If our organization controls two office365 tenants, at some point we may wish to enable forwarding of email from an address hosted in one of our tenants to an address hosted in another. When we enable the forward in O365 Exchange Admin, the end user may complain that every time they try to send a message to see if it is forwarded, they receive the following bounce back message:
Remote Server returned '550 5.7.520 Access denied, Your organization does not allow external forwarding. Please contact your administrator for further assistance. AS(7555)'
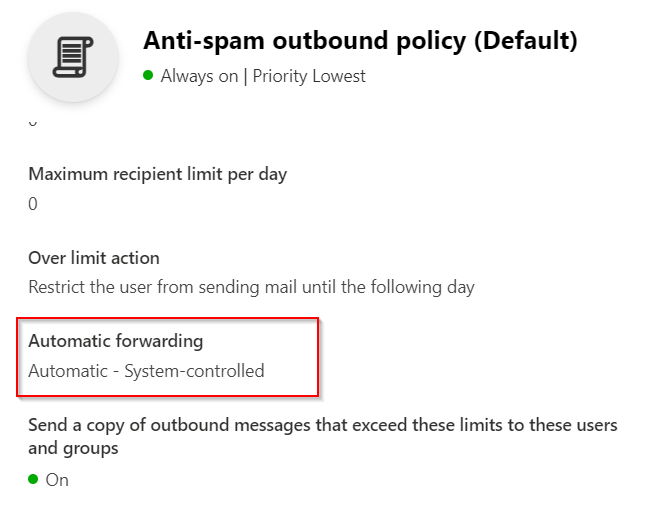
By default, Microsoft 365 Defender sets up an Anti-Spam outbound policy. And the policy default sets Automatic Forwarding to “Automatic: System Controlled.” Since we do not want to modify this default policy, instead we can create a policy (with a higher priority) that defines certain users or groups to allow forwarding.
Go to www.office.com and log into the tenant which hosts the email address that we want to forward mail from. (do not log into the destination email address tenant)
Open the Admin Center
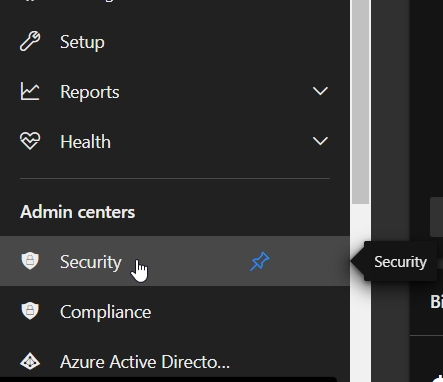
Next, click Show All (admin centers) and then click Security.
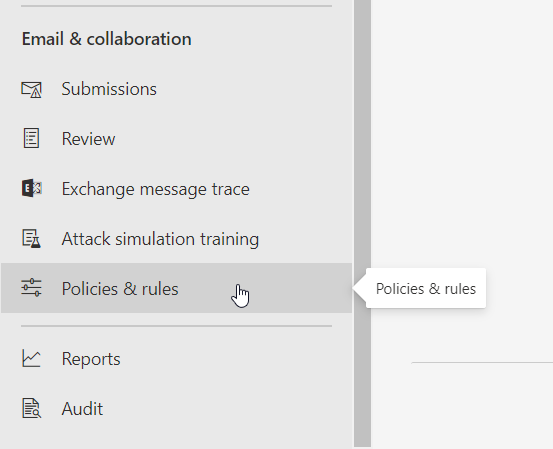
5. Next, in the Security / Microsoft 365 Defender Admin Center, under Email & Collaboration, click on Policies & rules.
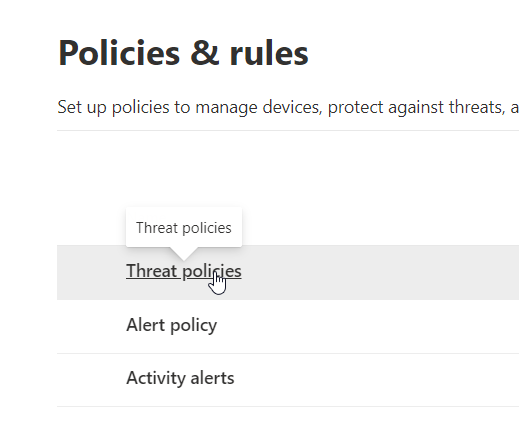
6. Here, click on Threat Policies
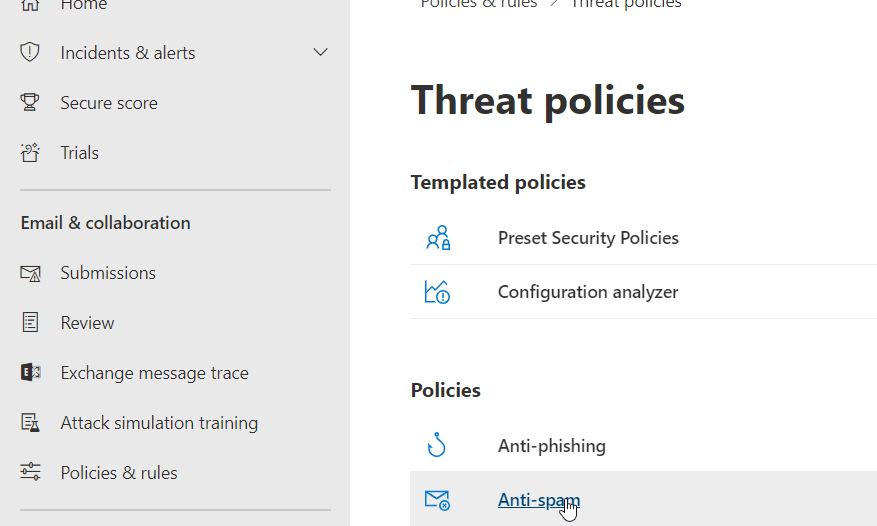
7. Under Threat policies, click Anti-Spam.
8. Under the Default Anti-Spam outbound policy (Default) we will probably find Automatic Forwarding is set to Automatic – System-Controlled
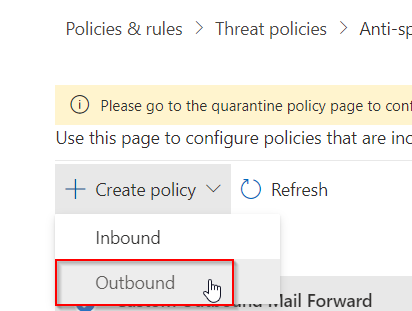
9. Close the Default Policy and then at the top of the screen click the + Create Policy drop-down and choose Outbound
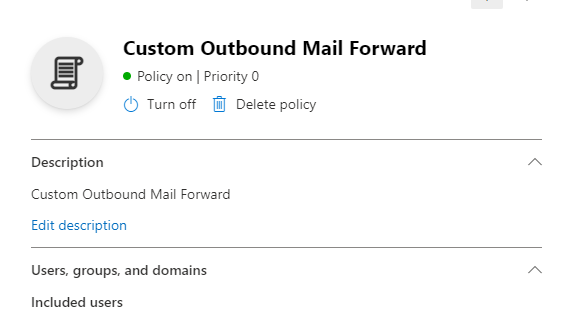
10. In the new Outbound policy, edit the description to something like “Custom Outbound Mail Forward“, and add the Users or Groups to the policy (whom you want to give the ability to forward.)
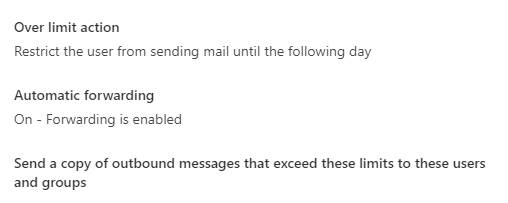
11. At the bottom of the new custom policy change Automatic Forwarding to: On – Forwarding is enabled
12. Save and close the new policy and that should do it. Try sending some test messages to see if the forward works correctly. We may need to change the new policy’s Priority to 0 if something still isn’t working. Also, don’t forget to double check the Automatic Forwarding on the mailbox itself.
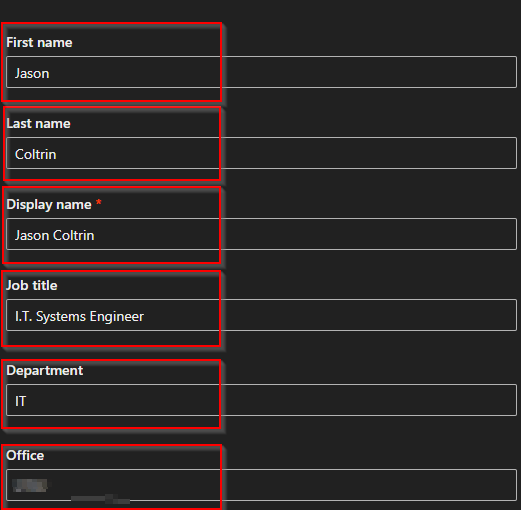
If you have employees who change phone extensions, names, departments, address, or titles a lot, HR or management may want to have this contact information data updated in Office365. Oftentimes these little changes can add up and we want to make a lot of changes in bulk with a single command. Instead of updating manually, we can make the changes to an Excel csv file and upload the changes all at once.
Ok in order to import/update the contact information for employees in the Office 365 tenant using a csv file and PowerShell, do the following:
Edit the attached CSV file with information that needs to be imported into O365. **Note: the UserPrincipleName and DisplayName columns are required.** FYI, screenshot below is how I exported the required data from O365 and copied the required columns into the attached file.
When you manage a large amount of Exchange mailboxes, inevitably someone will leave the organization, and you have to setup autoreplies with a message stating the user is no longer available by email. Common sense dictates we will setup a noreply@ mailbox and add the terminated users as alias’ to that mailbox, but not so fast. After a few days of testing and working with support, we’ve found that setting up a shared mailbox with autoreplies enabled with the terminated user’s unique email address/alias, provides the most consistent results.
We’re not going to go through the myriad of possible scenarios about what your org does with a mailbox after a user leaves. Instead, we’ll assume the mailbox is now deleted, and forwarding of mail bound for that mailbox is no longer necessary. To be on the safe side, ensure you back up the mailbox in some way before deleting the mail.
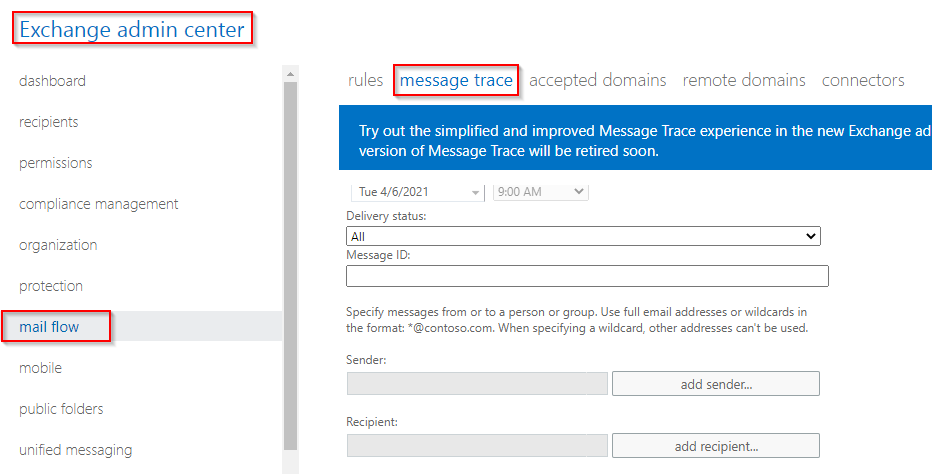
When testing auto replies, you may want to use the Exchange Message Tracker to see the messages come in and go out. To get there, go to O365 Admin > Exchange > Mail Flow > Message Trace.
A good thing to note here is that while performing a message trace, when sending test messages to the newly created shared mailbox with Automatic Replies enabled from within the same tenant or domain, auto reply messages may Drop with the following error:
This Drop message is actually an intended action, and is not an error, as it is probably used to prevent a loop of autoreplies within the same tenant.
Getting back to our original issue, to generate autoreplies, we first tried to setup a “noreply@” shared mailbox and add terminated user’s email addresses as aliases to the noreply box, but we got inconsistent results. Instead, we did the following.
How to Setup Automatic Replies for a Terminated User Mailbox
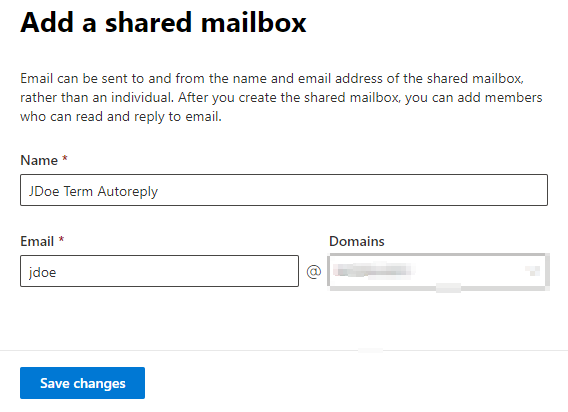
Create a shared mailbox with the terminated user’s email address. To do this go to 365 Admin Center > Groups > Shared mailboxes > Add a shared mailbox > Give the shared mailbox a name like “JDoe Term AutoReply” > Give the shared mailbox the (previously/actually used) email address of the terminated user. This does not use a mailbox license thereby freeing up a license. Alternatively, you can try simply converting the terminated user’s mailbox to a shared mailbox, but we had an inconsistent result doing this.
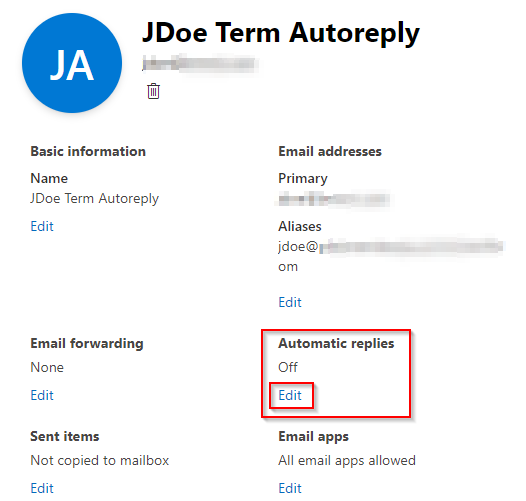
Next, simply click on the details of the shared mailbox, and under Automatic replies, click the Edit link:
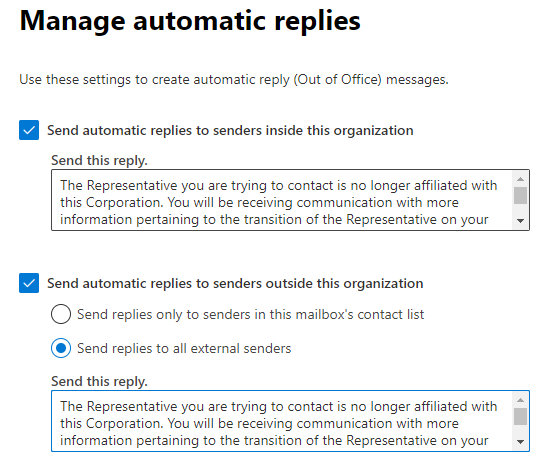
Next place Checkmarks in both “Send automatic replies to senders inside this organization” and “Send automatic replies to senders outside this organization”
Add a reply blurb which can be something similar to the following:
The Representative you are trying to contact is no longer affiliated with this Corporation. You will be receiving communication with more information pertaining to the transition of the Representative on your account. If you have an urgent matter and would like to speak with someone, please call our Service Center at 800-555-5555 between the hours of 6am-5pm (PST).
Click “Save” at the bottom and you should be all set.
If you want to test, you can try sending an email from an account outside your organization. *Note – when we sent a test message from gmail, the autoreply ended up going into the gmail account’s spam folder.
If further errors are encountered, you may need to look at your spam/external forwarding policies in your mail filtering site at https://protection.office.com/antispam or reach out to MS Support.
If you have recently enabled MFA multi factor authentication or 2FA on your Office 365 tenant, your Microsoft Outlook for Office 365 MSO 16.0.11929 (desktop version) users may be prompted over and over for their password, even though you are sure you have the correct password and even the apppassword / app password hash. I’m sure you’ve tried to re-configure Outlook, look at Azure settings, reinstall Outlook, check your autodiscover records, make sure you have the correct Office Suite version and perhaps have even attempted to change the windows 10 registry with the following settings:
So I thought it would be helpful to have a step-by-step how to enable modern authentication in Exchange Online for Office 365 based on the instructions provided in the link above.
With MFA enabled, connecting to Exchange Online with powershell is not as simple as it used to be, but still not all that bad. I’ve found the easiest way to connect to Exchange Online with Powershell is to do the following.
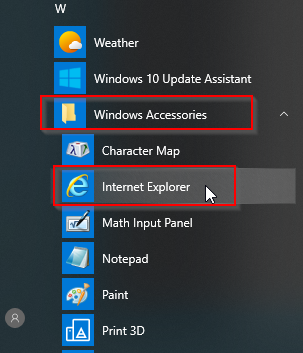
Note: A forewarning here, with certain browsers, when clicking on the Exchange Hybrid “Configure” button, and then installing the Hybrid configuration, the Office 365 login screen may may flash on the screen as a white box, and then disappears before you can authenticate and use your 2FA txt code. I’ve seen this when using Microsoft Edge, Chrome, and even the new version of Microsoft Edge based on Chromium. The only browser I’ve gotten this to consistently work with is the Internet Explorer browser built into Windows 10. The Internet Explorer browser is installed on Windows 10 by default, it’s hidden in the start menu under Accessories:
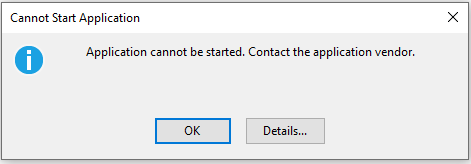
If you do attempt to run the Exchange Powershell Module using chrome you may encounter the error:
“Application cannot be started. Contact the application vendor.”
When clicking the Details… button, you may find information similar to the following:
PLATFORM VERSION INFO
	Windows 			: 10.0.18363.0 (Win32NT)
	Common Language Runtime 	: 4.0.30319.42000
	System.Deployment.dll 		: 4.8.3752.0 built by: NET48REL1
	clr.dll 			: 4.8.4121.0 built by: NET48REL1LAST_C
	dfdll.dll 			: 4.8.3752.0 built by: NET48REL1
	dfshim.dll 			: 10.0.18362.1 (WinBuild.160101.0800)

SOURCES
	Deployment url			: file:///C:/Users/Jason/Downloads/Microsoft.Online.CSE.PSModule.Client%20(3).application

IDENTITIES
	Deployment Identity		: Microsoft.Online.CSE.PSModule.Client.application, Version=16.0.3527.0, Culture=neutral, PublicKeyToken=45baf49ae30bdb15, processorArchitecture=msil

APPLICATION SUMMARY
	* Installable application.
	* Trust url parameter is set.
ERROR SUMMARY
	Below is a summary of the errors, details of these errors are listed later in the log.
	* Activation of C:\Users\Jason\Downloads\Microsoft.Online.CSE.PSModule.Client (3).application resulted in exception. Following failure messages were detected:
		+ Deployment and application do not have matching security zones.

COMPONENT STORE TRANSACTION FAILURE SUMMARY
	No transaction error was detected.

WARNINGS
	There were no warnings during this operation.

OPERATION PROGRESS STATUS
	* [4/3/2020 3:32:57 PM] : Activation of C:\Users\Jason\Downloads\Microsoft.Online.CSE.PSModule.Client (3).application has started.
	* [4/3/2020 3:32:57 PM] : Processing of deployment manifest has successfully completed.
	* [4/3/2020 3:32:57 PM] : Installation of the application has started.

ERROR DETAILS
	Following errors were detected during this operation.
	* [4/3/2020 3:32:57 PM] System.Deployment.Application.InvalidDeploymentException (Zone)
		- Deployment and application do not have matching security zones.
		- Source: System.Deployment
		- Stack trace:
			at System.Deployment.Application.DownloadManager.DownloadApplicationManifest(AssemblyManifest deploymentManifest, String targetDir, Uri deploymentUri, IDownloadNotification notification, DownloadOptions options, Uri& appSourceUri, String& appManifestPath)
			at System.Deployment.Application.ApplicationActivator.DownloadApplication(SubscriptionState subState, ActivationDescription actDesc, Int64 transactionId, TempDirectory& downloadTemp)
			at System.Deployment.Application.ApplicationActivator.InstallApplication(SubscriptionState& subState, ActivationDescription actDesc)
			at System.Deployment.Application.ApplicationActivator.PerformDeploymentActivation(Uri activationUri, Boolean isShortcut, String textualSubId, String deploymentProviderUrlFromExtension, BrowserSettings browserSettings, String& errorPageUrl, Uri& deploymentUri)
			at System.Deployment.Application.ApplicationActivator.PerformDeploymentActivationWithRetry(Uri activationUri, Boolean isShortcut, String textualSubId, String deploymentProviderUrlFromExtension, BrowserSettings browserSettings, String& errorPageUrl)
--- End of stack trace from previous location where exception was thrown ---
			at System.Runtime.ExceptionServices.ExceptionDispatchInfo.Throw()
			at System.Deployment.Application.ApplicationActivator.PerformDeploymentActivationWithRetry(Uri activationUri, Boolean isShortcut, String textualSubId, String deploymentProviderUrlFromExtension, BrowserSettings browserSettings, String& errorPageUrl)
			at System.Deployment.Application.ApplicationActivator.ActivateDeploymentWorker(Object state)

COMPONENT STORE TRANSACTION DETAILS
	No transaction information is available.
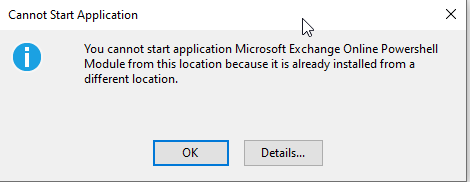
At this point, it may be necessary to uninstall the existing module and then re-install and run using Internet Explorer. You may even receive the following error:
"You cannot start application Microsoft Exchange Online Powershell Module from this location because it is already installed from a different location."
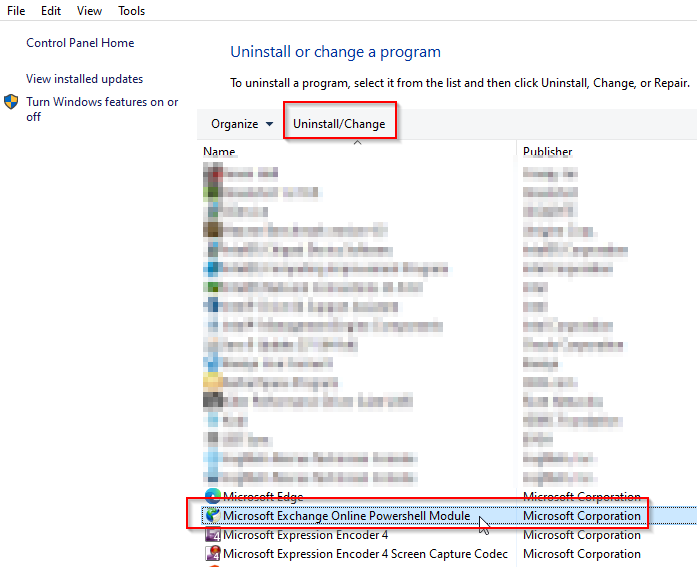
To uninstall the module, click the Start Button > type “appwiz.cpl” and press Enter.
Inside of the Programs and Features screen find the application and click Uninstall.
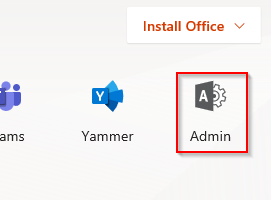
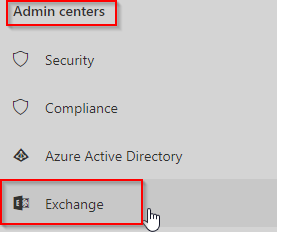
After uninstall, log into your tenant (with an administrator account) at https://www.office.com using Internet Explorer 11, and click the Admin link:
Next, Expand the Menu on the left menu by clicking Show All… and then click on Exchange:
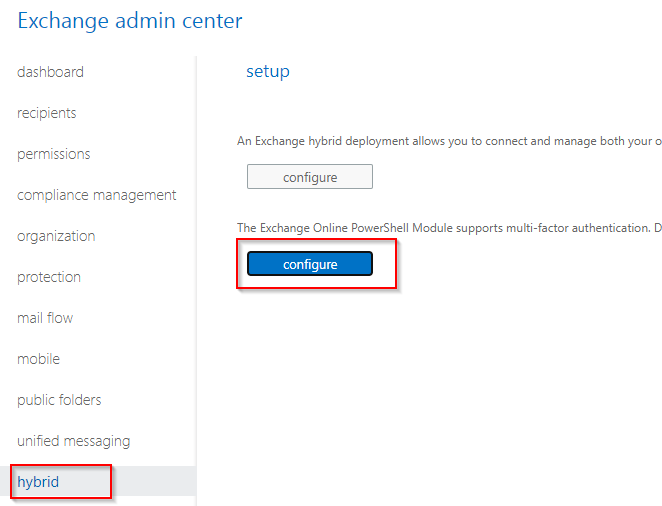
Next we want to click on the Hybrid link to get to our Powershell Configure button:
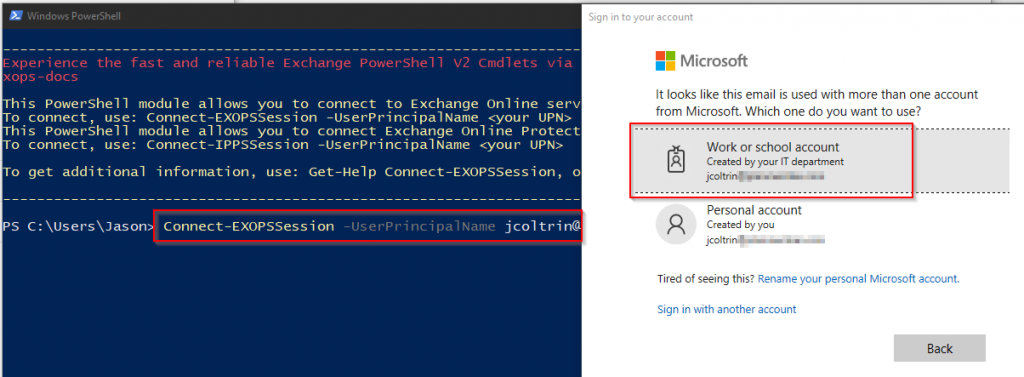
Go ahead and install the component if it asks, and when it completes, you’ll be greeted with a Windows Powershell screen with the following message:
Experience the fast and reliable Exchange PowerShell V2 Cmdlets via new PowerShellGallery module. Go to https://aka.ms/exops-docs

This PowerShell module allows you to connect to Exchange Online service.
To connect, use: Connect-EXOPSSession -UserPrincipalName <your UPN>
This PowerShell module allows you to connect Exchange Online Protection and Security & Compliance Center services also.
To connect, use: Connect-IPPSSession -UserPrincipalName <your UPN>

To get additional information, use: Get-Help Connect-EXOPSSession, or Get-Help Connect-IPPSSession
We now want to initiate our session using the instructions provided. At the prompt, type in the command:
You’ll now be prompted to sign into your tenant (Work or School). You’ll see some status bars go by and then be prompted with a warning about unapproved verbs (for example banish?)
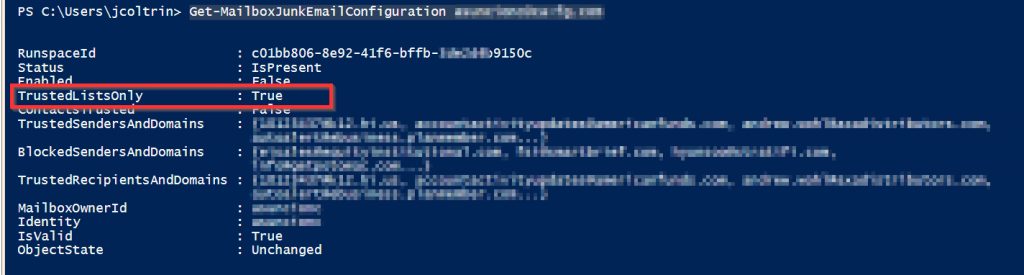
So now we want to (only look before making changes) get our organization structure, and more precisely, find the status of our OAuth2ClientProfileEnabled setting by issuing the command:
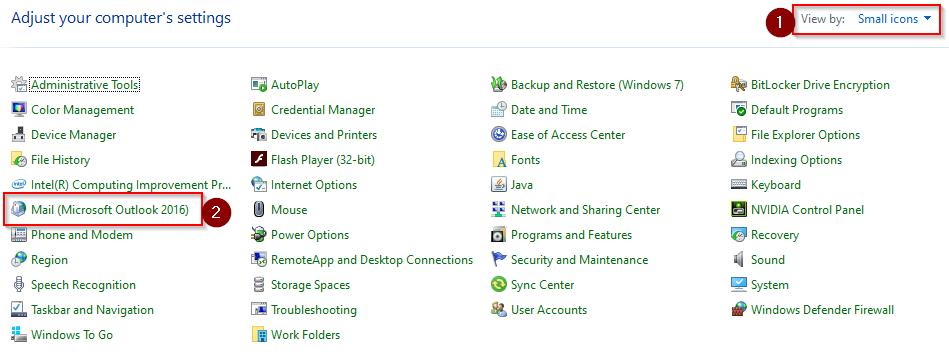
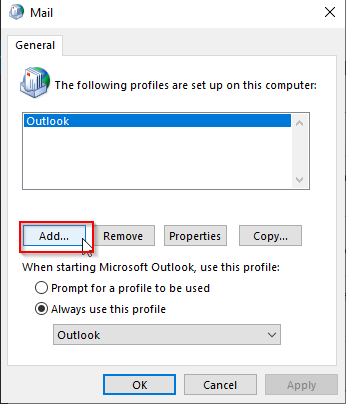
That’s about it! Give the setting about an hour to propagate and then try testing Outlook on the desktop again. You may get a few clients where their profile needs to be recreated. You can do this by going into the control panel > (1) choose Small Icons > (2) Mail Microsoft Outlook 2016.
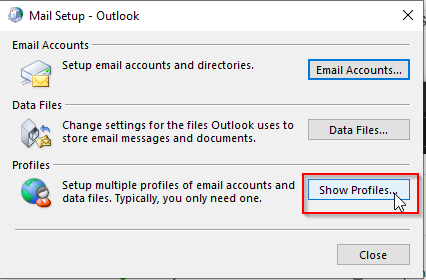
Then click Show Profiles
Click Add…
Now when setting up the new mail account, you should be prompted with the modern authentication and you’ll be prompted for your txt code or Microsoft Authentication Application.
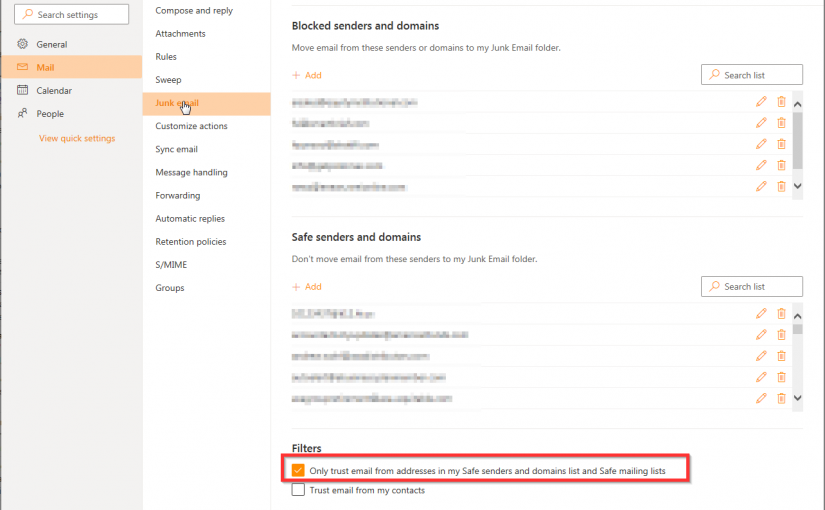
A user complained that valid good email was being sent to the Junk email folder on outlook on the web. To get to the setting, click on the Gear Icon > View all outlook settings > Junk Email. Attempts to uncheck “Only trust email from addresses in my safe senders and domains list and safe mailing lists.” were unsuccessful and we cannot save the setting.
Recently a client complained that an Office 365 account had sent out spam messages to a number of clients. Later, the suspect account which had been sending spam could no longer send or receive email. However upon first glance at the mailbox, sent messages were sitting in the sent items folder, and messages sent to the account in question were not receiving bounce-back failures, but the messages sent to the affected account were not in the inbox. After we changed the password to the account, and enabled 2FA on the account we could still not send and receive mail. Below are the steps used to resolve this particular issue. In short, a malicious inbox rule had been created and outbound messages had been blocked by Microsoft.
Log into the tenant’s Admin console with an Administrative account, and change the password of the affected account.
Log into the affected account as the user using the new password.
Click on the Gear icon and then under Your app settings, click Mail.
4. One in the Mail app Settings, go to Mail > Automatic Processing > Inbox and Sweep rules.
Here we can see a malicious rule had been created to mark all inbound mail as Read and move the message to the “RSS Subscriptions” folder:
5. Uncheck and turn off any malicious or invalid rules.
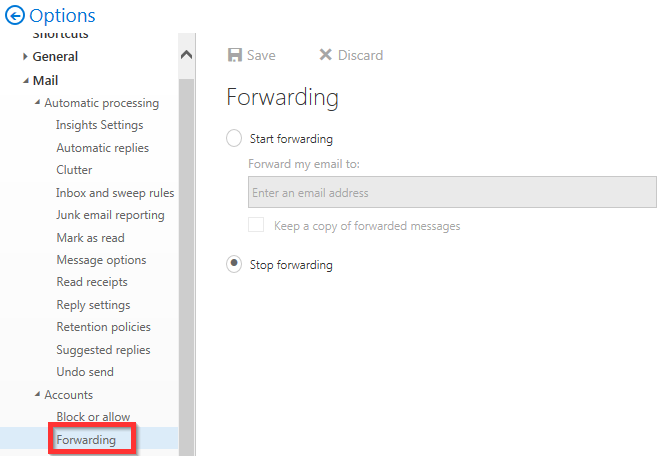
Also check for any new forwarding rules in Mail > Accounts > Forwarding:
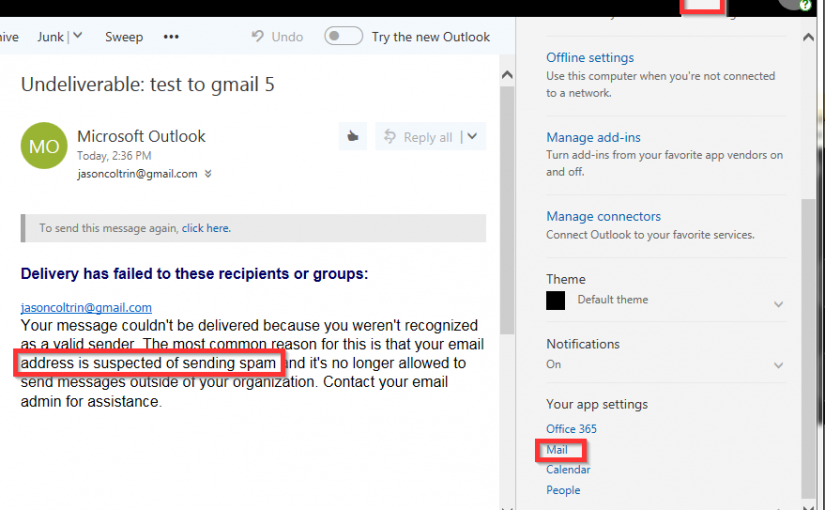
6. When we look in our “RSS Subscriptions” folder we find some messages from Microsoft indicating the account has been blocked from sending mail because the account was flagged as sending spam:
Your message couldn't be delivered because you weren't recognized as a valid sender. The most common reason for this is that your email address is suspected of sending spam and it's no longer allowed to send messages outside of your organization. Contact your email admin for assistance.

Remote Server returned '550 5.1.8 Access denied, bad outbound sender. For more information please go to http://go.microsoft.com/fwlink/?LinkId=875724. S(9333) [DM5PR10MB1914.namprd10.prod.outlook.com]'
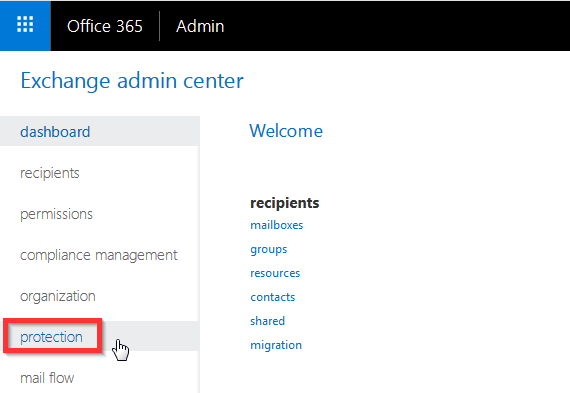
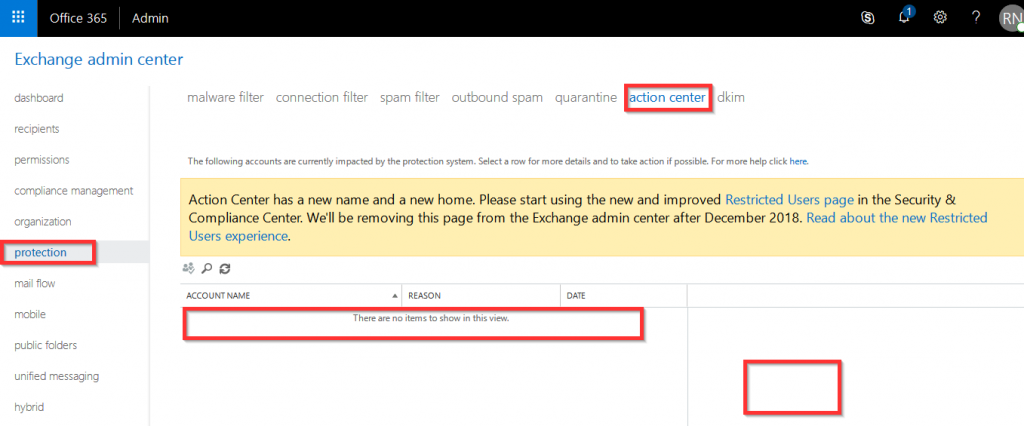
7. To resolve this issue, we’ll need to go into the Action Center. Log into the Admin console > Admin Centers > Exchange > Protection > Action Center
8. In the Action center, we’ll find an issue flagged regarding our hacked user account. Take action on the issue and after a while due to permission propagation, it may take up to 2 hours for the account to be re-enabled for sending mail again.
9. It might be a good idea to contact Microsoft Support if you continue to experience problems with a user account sending spam. Changing the password should prevent malicious access. Most like the account had been phished or the computer the user has was compromised by a virus/malware or spyware. It’s recommended that the account have two-factor authentication or multi-factor authentication enabled to prevent the account from being hacked again.
tag: outlook cannot send or receive email but sent mail is in sent items folder
After having created a Resource Room in the Office365 Admin console (with an Enterprise E1 license,) you may find that meetings which are created in Outlook and which are sent, are not automatically processing and sending verification confirmations back to the person that created the event. Nor will new events populate the event in the new room’s Outlook calendar. In this case, there are a few things we can check to ensure the room behaves as intended.
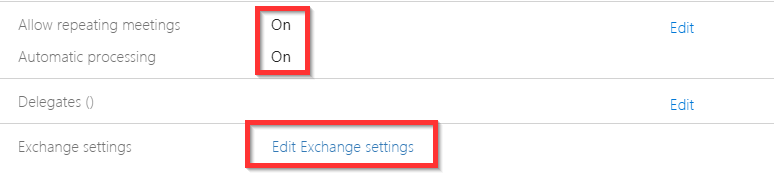
First, after creating the room, ensure that you, as an admin, are set as an owner of the room. Under O365 > Admin Center > Rooms and Resources > place a checkmark next to the room in question. Ensure that Allow repeating meetings and Automatic Processing is On. Then, click on Edit Exchange Settings:
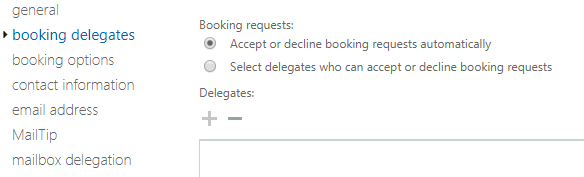
2. In this example, we don’t use booking delegates. In the Exchange Settings for the new resource room, make sure Booking requests are accepted automatically.
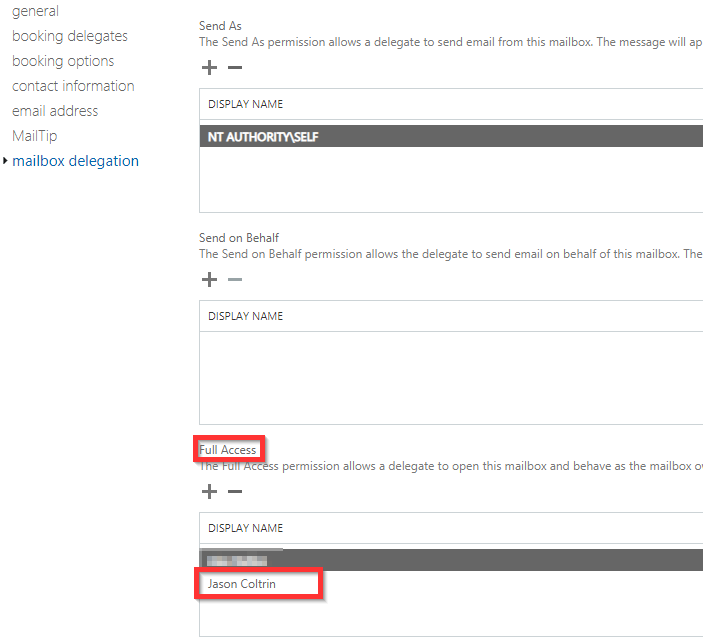
3. Edit the booking options, contact information, email address, and mailtip settings to your preferences and then click on Mailbox Delegation. Here, add yourself under Full Access so that we can go on to our next step.
4. Next, log into your own OWA admin Outlook online inbox. In Outlook, click your profile photo in the upper right corner and click “Open another mailbox.” Type the address of the room and open the webmail for the room.
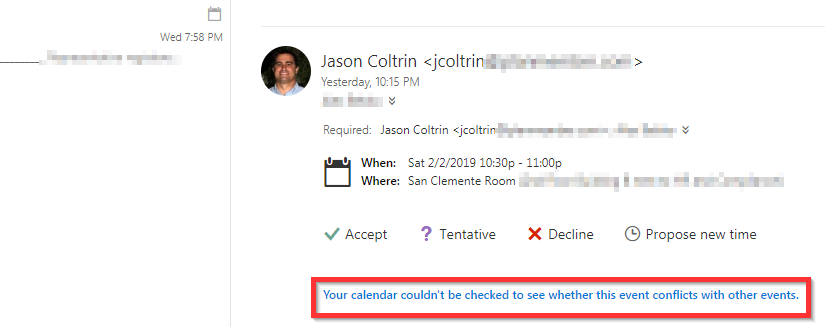
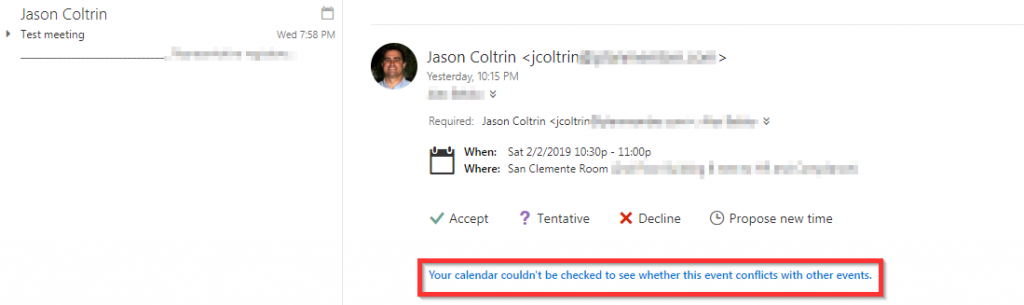
5. Here you may see some emails of previous attempts to book events like the following with the error “Your calendar couldn’t be checked to see whether this event conflicts with other events.“:
6. This error lets us know that automatic processing is not working even though we have it set to “On” in our first step. Had the processing worked correctly, we wouldn’t even see this event email in the mailbox of the room in question.
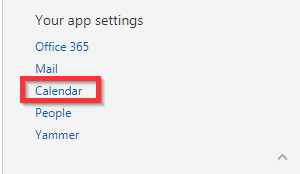
7. In the upper right corner, click the Gear icon, then under Your app settings, click Calendar.
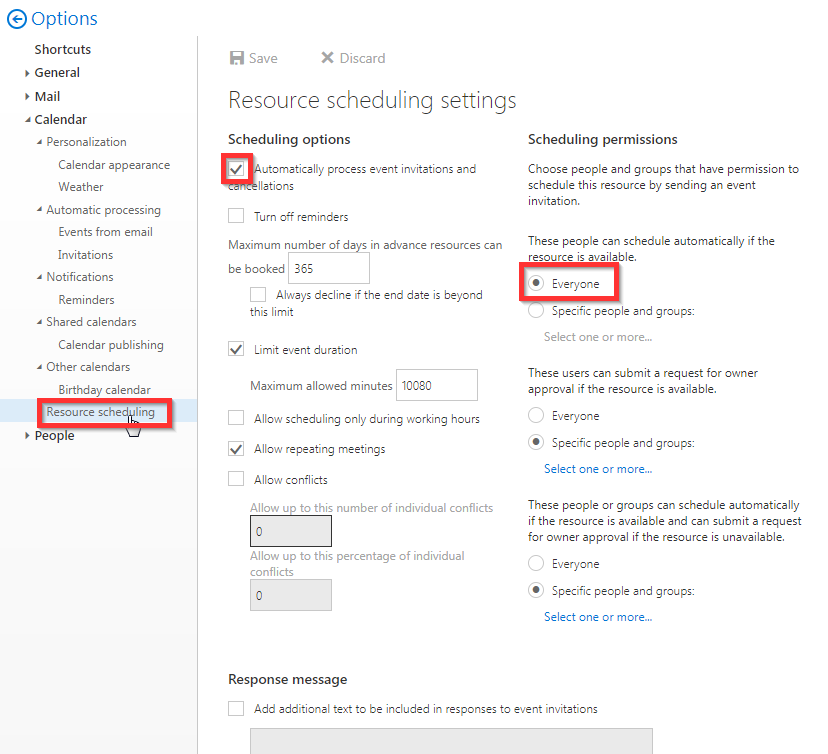
8. In the calendar resource scheduling settings, ensure that under the scheduling options, “Automatically process event invitations and cancellations” is checked, and then click Save.
9. In theory, these settings should be enough to get the calendar to auto process and verify, however, your results may vary. Test by creating a meeting event in outlook with the new room. When you send the meeting, you should receive a verification email in your inbox in less than a minute. If you don’t receive the verification, check the inbox of the calendar again. You’ll probably find more emails with the “Your calendar couldn’t be checked…” errors.
10. Time to open PowerShell and connect to your O365 Exchange. If you’ve enabled MFA (two-factor authentication) use the guide on how to connect to Exchange with Hybrid/Modern Authentication here. If you don’t use Modern 2FA authentication, use the following commands:
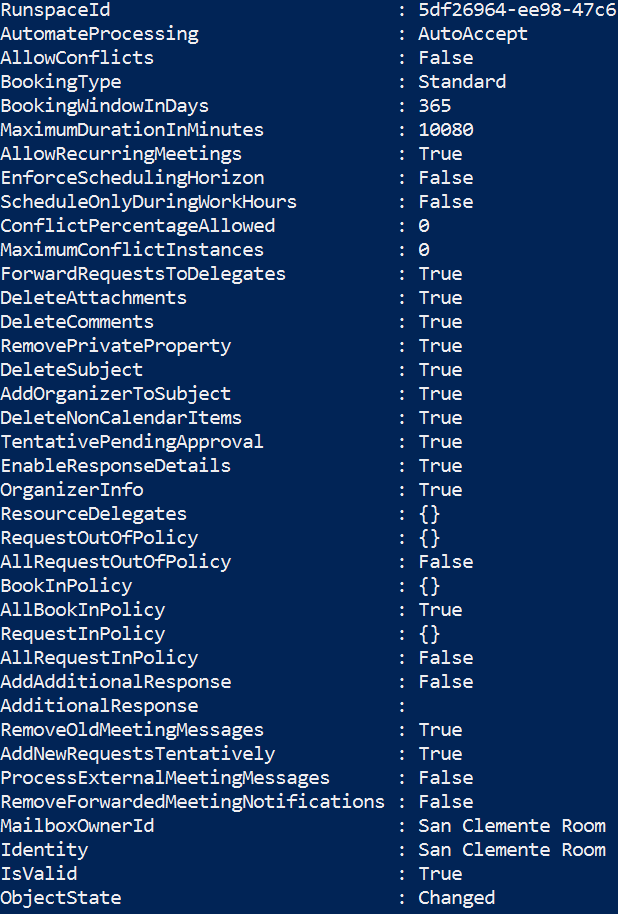
12. It’s helpful to first get a list of all calendar processing objects of a room that already works correctly to refer to when editing your new room’s permissions. If you don’t already have a room that you can reference, below is a list of my room that is not behaving normally:
13. Notice that ProcessExternalMeetingMessages is set to False. Let’s change this to True with the following command:
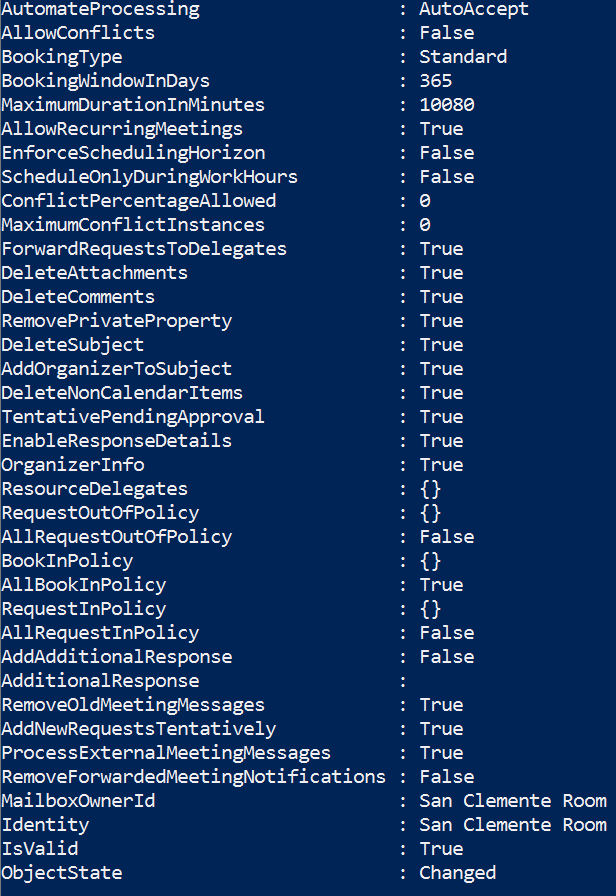
14. After making this and a few other changes displayed in the following screenshot, go ahead and try creating another test meeting and see if the autoprocessing behaves as it should. If you’re still having trouble, try referring to the screenshot below as an example, and use the “Set-CalendarProcessing” command to edit the values.
15. Once you successfully receive verifications and the calendar populates with events as it should, you may want to set the calendar to display the owner of the event and details of the event (rather than the event is listed in the calendar as only “Busy”.) To do so, follow the instructions I wrote in my article here.
At some point, a user’s mailbox will reach the default quota for Enterprise E1 default of 50 GB, and they will have to either move mail into an archive or delete mail to continue to receive email. The user may receive the warning:
Your mailbox is near the maximum storage limit. Archive or delete items to create additional free space.
Our options at this point is to do one of three things: Upgrade the user’s license from E1 to E3 to double the mailbox size, permanently delete mail out of the mailbox, or archive the mail. Microsoft provides 50 additional GB of archive space for an E1 license (this number is subject to change.)
In many instances, the user may not want to delete any mail and would prefer to archive the mail. In my opinion, the ideal way to handle archiving is to create an online archive, rather than create .pst files on the local machine which could end up getting lost or deleted. Also managing local .pst archive files can be a pain. And lastly, if the archive is only available as a .pst file in the user’s PC, the archived mail will not be available from webmail or a different device.
If we want to create an online archive for the user on Office 365, there are a few simple steps to take in the Office 365 Admin console.
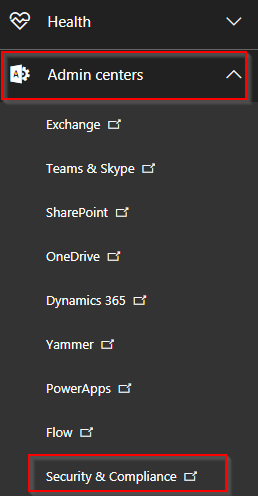
Log into the Office365 Admin console, then click on Admin centers > Security and Compliance:
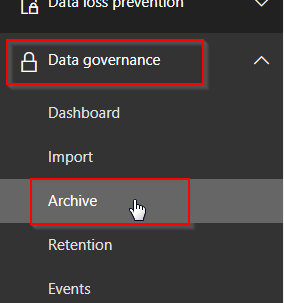
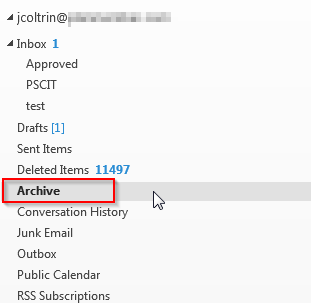
Next, on the navigation bar, expand Data Governance, and click Archive
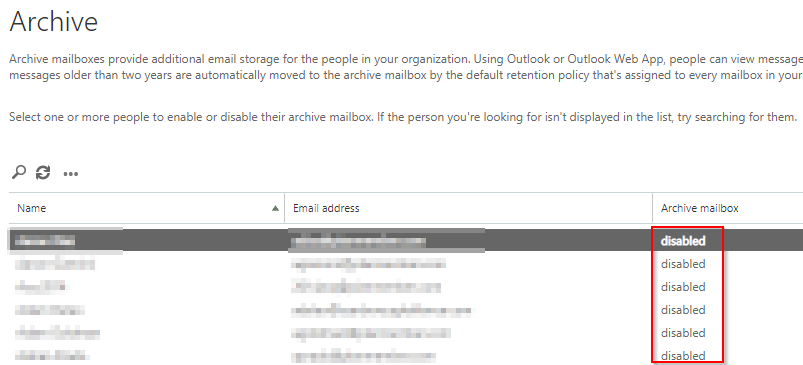
Now on the right-hand pane, we will see all of our mailboxes and find out if the Archive Mailbox for Office 365 is enabled or disabled.
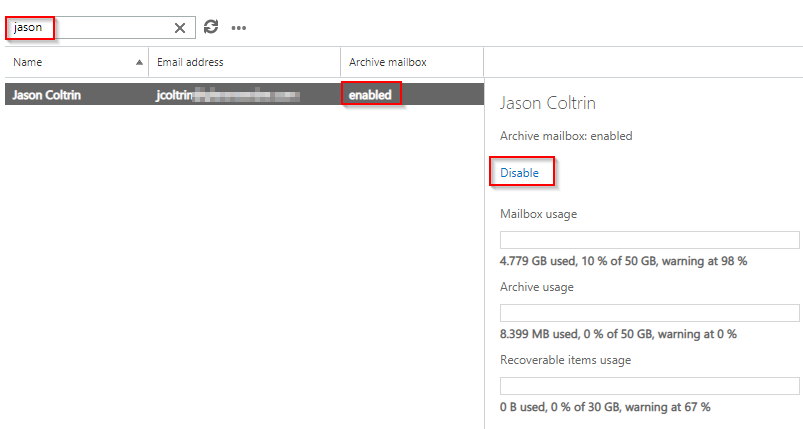
To enable the archive on a disabled user’s mailbox, first select the user. If we have a lot of users, do a search for the user’s name and then highlight the correct mailbox we want to change.
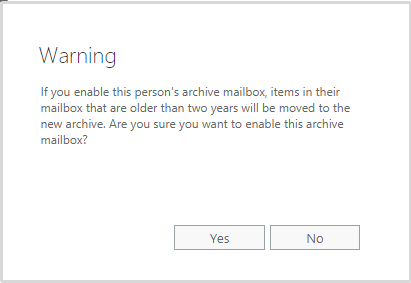
We can see in the screenshot above, my account already has Archive mailbox: enabled. If the account’s archive had been disabled, we would simply click the Enable link. When we click enable, we will get the following Warning:
If you enable this person's archive mailbox, items in their mailbox that are older than two years will be moved to the new archive. Are you sure you want to enable this archive mailbox? Yes No
9. Click Yes.
10. What happens next is, as the warning states, mail that is over 2 years old will begin to be archived. We will also get some new features in both Outlook online, as well as in Outlook 2016/Outlook 2013. We can wait for the auto-archiving to take place, but we can also take some immediate action to archive old mail online.
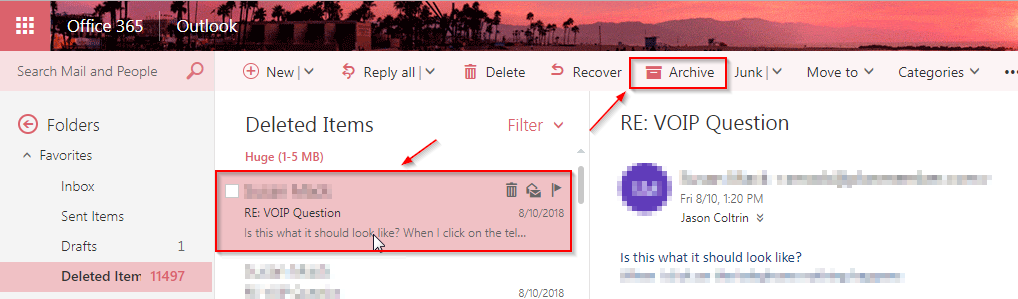
11. Pretty much immediately in Outlook online, we will get new Archive buttons, and an archive folder here:
We won’t see the archive buttons until we click on an individual message. If we do click on a message and select it, we will see the Archive button available.
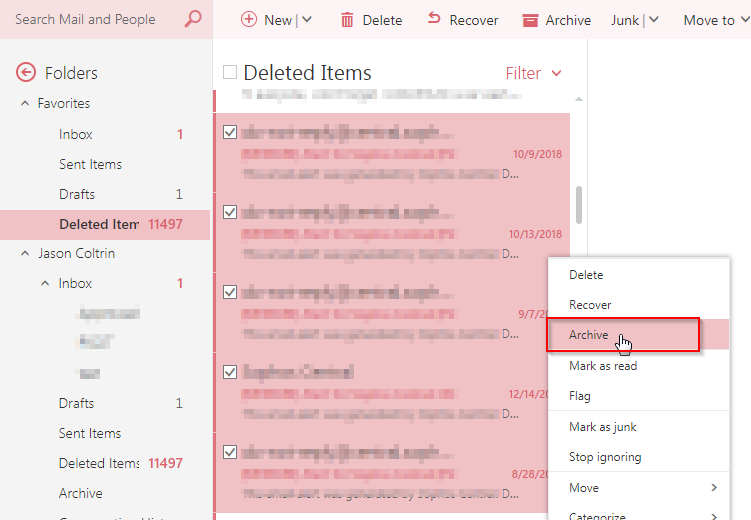
12. We can also select multiple emails and then right-click on the highlighted messages. A wizard will appear on the screen. Click the Archive button to move these emails to the archive folder.
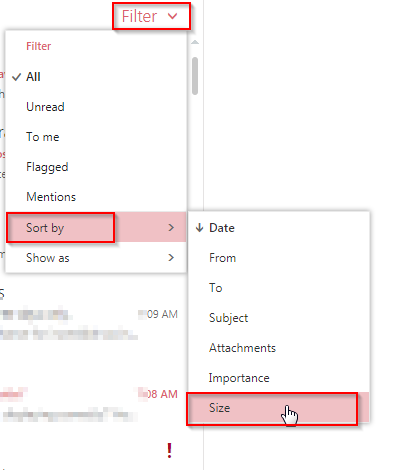
13. If reducing the size of the mailbox immediately is our goal, we can start by archiving our largest emails first. At the top of the mail folder, whether it be the inbox, Sent Items, or Deleted Items folder, we’d click the Filter button > Sort by > Size.
14. Select the “Enormous” items first by clicking on the top email, hold down the Shift button, then select the bottom email and it will highlight all of the messages in between. Next, right-click and choose Archive.
15. In the desktop version of Outlook 2013/2016, only after a few hours will we have our new Archive folder available. This may take up to 24 hours depending on the speed of replication of settings from Office 365 down to the client. Once the folder is available, however, I find the process of moving mail out of the inbox, sent items or cut/paste of subfolders into the archive much easier.
I don’t have mail over 2 years old in my mailbox, so I’m not sure if it will automatically create subfolders dependent on where they originally lived so let me know in the comments if you notice automatic folder creation.
In order for someone to find an old message, they will only need to search their mailbox in Outlook online or Search Archive in Outlook 2013/2016.
How to repair and fix Skype for Business 2016 by clearing the cache, and get back the emoticons which have been replaced by words in parenthesis.
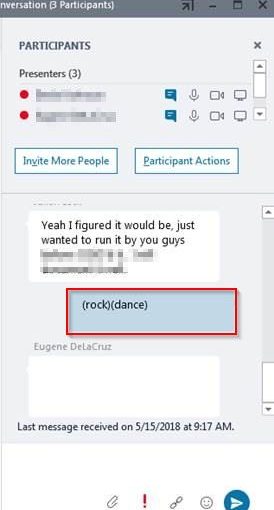
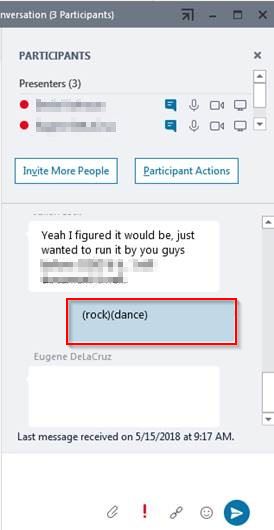
For example, an associate sent me the following screenshot:
We can see that the emoticons have been replaced by (rock)(dance).
To fix this problem without re-installing Microsoft Office or Skype, clear the Skype Cache by doing the following (which I found in an MS Support forum here.)
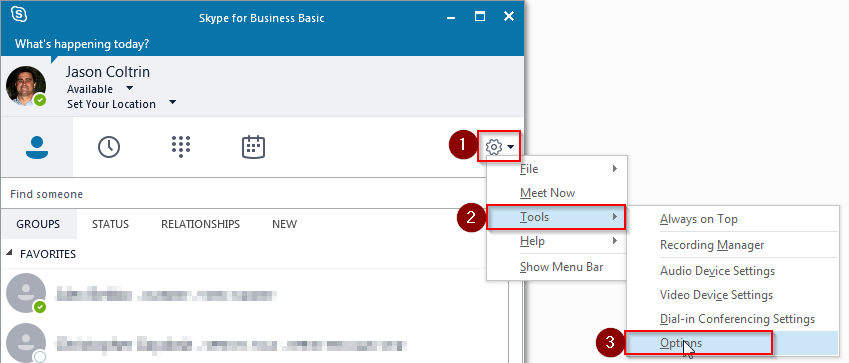
1. In the Skype main windows, click the gear in the top right-hand corner.
2. Choose File – Sign Out to log out of Skype for Business.
3. On the Sign In window, choose the link to Delete my sign-in info.
4. In the pop-up window to forget sign in info, click Yes.
5. Click the gear, choose File> Exit to exit and close Skype. Close all other Office Applications.
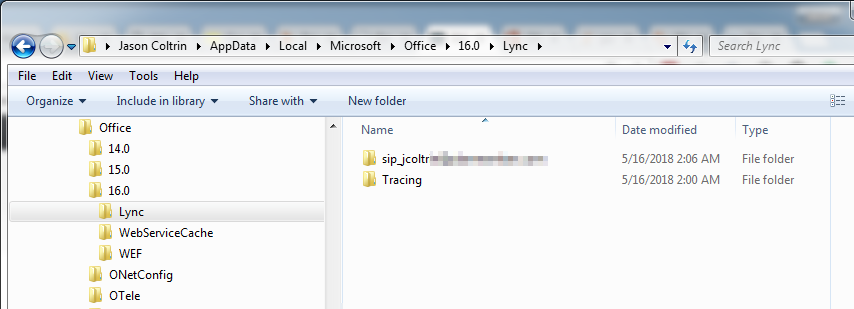
6. Go to the location: C:\Users\<username>\AppData\Local\Microsoft\Office\16.0\Lync – you can get here quickly by going to Start > Run > %appdata$% > Enter.
7. Locate the sip_YourProfileName folder and delete it if it exists. In some cases, it will not. Open the Tracing folder and delete all files inside of it. Do not delete the Tracing folder itself. If you receive a message that the action can’t be completed because a file is Open or that you need Administrator permission to delete a file, click the Skip button. Close Windows File Explorer
8. Open a command prompt (in Windows, click the Start button, type cmd and select the command prompt from the menu. Type ipconfig /flushdns and press the enter key on your keyboard to clear the DNS cache.
9. Sign back into Skype/Lync.
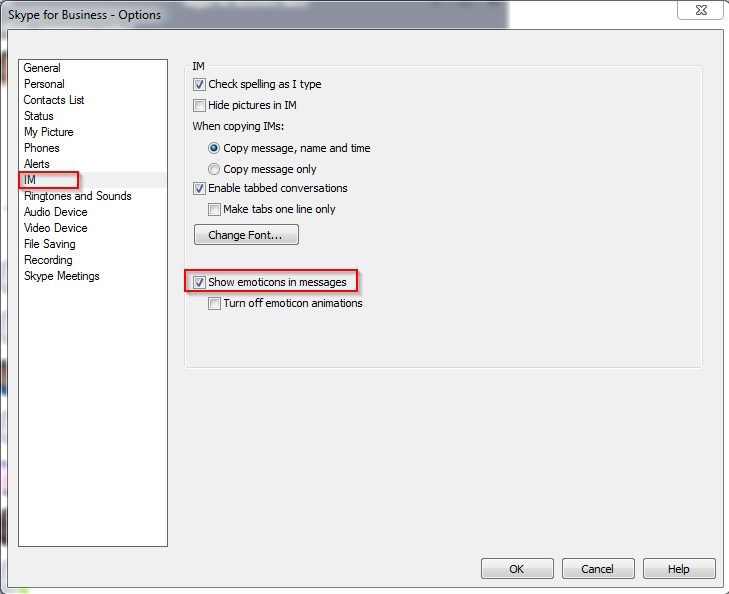
10. Once Skype is open, make sure you go back into Gear > Tools > Options > IM > and place a checkmark to show emoticons again.
11. Test to see if the emoticons have returned!
If all else fails, you might want to completely uninstall Office and/or Skype for Business, delete the Appdata\Local\Microsoft\Office\16.0\Lync folder completely, and then re-install again. But hopefully, this procedure will save you some time.
Lastly, a user comment below has had success with several people (thanks Chris!)
Set DisableRicherEditCanSetReadOnly to 1 in regedit path: Computer\HKEY_CURRENT_USER\Software\Microsoft\Office\16.0\Lync\
Always, back up the registry key before you change anything in the registry.
How to get a list of users who have enabled Out of Office in Outlook with Office365 PowerShell
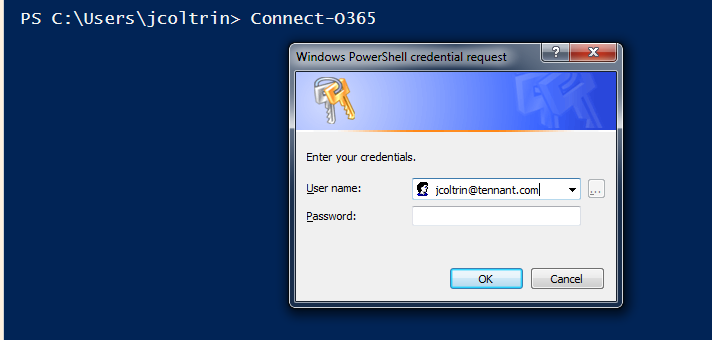
For administrators of Office 365, you may need to occasionally get a list of users who have set up or enabled their Out of Office in Outlook. In my case, we needed to see which parking spots were available on campus in a pinch, and who was not coming in the next day. To do this with PowerShell we’ll need to first connect to our Office 365 Exchange Tennant.
In PowerShell ISE, enter the following code into the code view, save the function as Connect-O365.ps1, and then hit the green Play button.
Next, execute the new function with the following command:
Connect-O365
Replace the username and password with your Office365 admin credentials (not your on-premise domain credentials.) This will log you into your Exchange Admin with PowerShell where we can run our Out of Office commands.
With authentication out of the way, now all we need to do is run the following command to get a list of mailbox identities who have AutoReply configured (and not disabled), and sort by Identity, Start Time, End Time, and Auto Reply State: