Office365 Outlook Room Calendar not showing details – displays busy only – fix when Set-MailboxFolderPermission does not resolve

Solved: Office365 O365 Resources Rooms and & Equipment cannot view details or subject in shared calendar, can only see “Busy” and Set-MailboxFolderPermission did not fix or resolve.

So a room calendar would not display who reserved the room, and users requested that the calendars for room reservations display who reserved the room and the details. By default the event only displays “Busy”. Most posts I found online for this issue have the same resolution: use Set-MailboxFolderPermission to display details, comments, subject, and organizer. I did this and tried this using the identity in quotes as well as the full email address of the room, however the Set-MailboxFolderPermission setting did not work and the calendar would still only show “Busy”.

I was able to resolve the problem by looking at the rights of the users.

I found that the Calendar Access Rights for the User: “Default” only had {AvailabilityOnly}

To check permissions and fix this issue, first open PowerShell and connect to your O365 Exchange. If you’ve enabled MFA on your Office365 account (two-factor authentication,) use the guide on how to connect to Exchange with Hybrid/Modern Authentication here. If you don’t use Modern 2FA authentication, use the following commands: 

$LiveCred = Get-Credential
$Session = New-PSSession -ConfigurationName Microsoft.Exchange-ConnectionUri https://ps.outlook.com/powershell/ -Credential $LiveCred -Authentication Basic -AllowRedirection
Import-PSSession $Session

Once connected, first check that the default user has the correct AccessRights and permissions to work with the calendar. As you can see below here, the Default user has {AvailabilityOnly} permissions when issuing the following command:

Get-MailboxFolderPermission [email protected]:\Calendar
PS C:\admin> Get-MailboxFolderPermission [email protected]:\Calendar

FolderName           User                 AccessRights
----------           ----                 ------------
Calendar             Default              {AvailabilityOnly}
Calendar             Anonymous            {None}

I changed the AccessRights from {AvailabilityOnly} to {PublishingAuthor} with the following command:

Set-MailboxFolderPermission -Identity "[email protected]:\Calendar" -User default -AccessRights PublishingAuthor

And then ensured the identity has the correct CalendarProcessing switches with this command:

Set-CalendarProcessing -Identity "[email protected]" -AddOrganizerToSubject $true -DeleteComments $false -DeleteSubject $false

Now the event’s details and subject can be viewed by everyone. This change takes place pretty quickly, within a minute – the “Busy” events should change to display the details when you close/open Outlook and/or switch between the calendars in Outlook online. Hope this saves someone else a call to MS Support.

In the event the new room’s Calendar is not auto processing or accepting meeting requests, check out my article here:

Solved – Office 365 Room Calendar Not Auto Processing or Accepting Meeting Requests

Please leave a comment, thanks.

SmarterMail Enterprise 15.5 – Export / Import iCalendar/Outlook calendar into SmartMail

How to import iCalendar events into SmartMail / SmarterMail Enterprise IMAP calendar

So one of my clients have a team that have been using iCalendar to share calendars, but have decided to migrate to SmarterMail Enterprise 15.5 IMAP/Exchange for their team calendar sharing. While there is no direct way to import iCalendar events into SmartMail directly, there is a two-step approach that works pretty well.

In this case, the clients only want to migrate historical data and not current/future events. It sounds harder than it is, but the migrations shouldn’t take long and with minimal effort. If you don’t have spare gmail accounts to use then you may want to create new gmail accounts just for this purpose, or delete all calendar events in an existing google calendar between migrations.

One thing that I did notice is that reoccurring appointments will be transferred over and this may in turn create duplicates if you already have appointments in SmartMail that are reoccurring. It may be wise to remove reoccurring appointments from the source calendar prior to doing the first export.

As always it’s best to first backup your data prior to doing anything, then run a few tests to make sure that all calendar events, items, and attachments transfer successfully during the migration.

But in our test case, the Outlook (icalendar) – to – GMAIL – to – SmartMail works perfectly fine.

First go to Outlook > File menu > Open & Export > Import/Export > Select your iCalendar (and any other calendars you’d like to export):

Export to .CSV > Calendar (here you can select date range of events to be exported) > save to something like c:\Users\jcoltrin\Desktop\jasoncalendar.csv

Then

Login to any Google account/Gmail > Calendar > Gear Icon > Settings > Calendars > Import calendar > choose jasoncalendar.csv (import successful.)

Calendar items display in my google calendar:

Then now that the calendar items are in my google calendar, I went into smartmail account  > settings > Advanced Settings > Mailbox Migration > Account type: GMAIL > next > Check “Calendar” > do the Google authentication (which works well and uses Google’s authentication). >  Import

Now the same calendar items are in my Smartmail Calendar.

Clonezilla – identify original disk size of clone .img image by looking at flat files

How to find the original HDD hard drive disk size in a Clonezilla img image file

So if you’re a fan of Clonezilla like I am, you may have a library of .img images in a file share somewhere. I find that when taking an image of a system, it’s best to name the image/file with something descriptive such as (Win7-64-Optiplex7040-500GB-Date-img). But what happens if you want to restore data from an image onto a new hard drive, but you can’t remember, or didn’t write down the size of the disk that it originally was imaged from? As you may already know, Clonezilla doesn’t like to be restored onto disks smaller than the original disk on which it originated. There are some advanced options when saving a Disk-to-image in clonezilla, or Image-to-Disk, however I haven’t found a reliable way to restore an image to a smaller disk drive.

In the event you have an old image, but you’re not sure what size disk it came from originally, and you didn’t name your file with the original disk size, there is a way how to find the original disk size using the flat files that clonezilla creates when taking the image.  To do this, go into the img folder, look for a file named sda-pt.parted.compact and open it with a text editor such as NotePad++.

This file will contain everything you need to know to determine the original size of a HDD that existed in the computer before you took the copy of the clone. For example, here is the contents of the file highlighted above:

Model: ATA WDC WD2500AAJS-7 (scsi)
Disk /dev/sda: 250GB
Sector size (logical/physical): 512B/512B
Partition Table: msdos
Disk Flags: 

Number  Start   End    Size   Type     File system  Flags
 1      1049kB  106MB  105MB  primary  ntfs         boot
 2      106MB   250GB  250GB  primary  ntfs

As you can see we get a Model number, Manufacturer, disk size, partition sizes and file-system type.

I haven’t had trouble restoring Clonezilla images to different manufacturers of hard drives as long as the new drive is larger than the original drive. Also, I find that it’s invaluable to have at least a gigabit connection between the machine you’re trying to clone and the file share where you’re saving the img file.

Test USB 3.0 and USB 2.0 thumb flash drive on Windows 10 read write speeds

How to test USB thumb drives for USB 3.0, USB 2.0, and test Read and Write Speeds on Windows 10

Determine if USB Port is 2.0 or 3.0 in Windows 10:

Below are some directions and screenshots of how you can tell if a USB drive is connected to Windows 10 with USB 3.0 or USB 2.0., first insert the drive into a USB port on your Windows 10 computer.

Click on the Start Button > then click on the Settings gear icon > in the “Find a Setting” box > type “Connected Devices” > then click on the “Connected Device Settings” icon. The USB 3.0 will show “Connected to USB 3.0”, the USB 2.0 drives will not display these words:

Testing Read and Write speeds of USB 2.0 and USB 3.0 with SpeedOut utility and  Windows 10.

I picked up a couple thumb drives this weekend that were on sale at Frys. I like to have both USB 2.0 and USB 3.0 drives on hand in case a computer doesn’t recognize USB 3.0 as a boot drive. I wanted to determine the Read and Write speeds of my USB drives to test if they actually display a difference according to their listed specs (spoiler alert: numbers can be deceiving.) My PC workstation has an Intel SSD drive and USB 3.0 ports.  I downloaded and ran the SpeedOut v0.5 utility against 4 different USB thumb drives:

  1. Patriot Memory Flash PSF32GBLZ3USB 32GB USB3.0 BLITZ with a yellow plastic case.
  2. Hyundai USB 2.0 Bravo 16GB with a metal case.
  3. Kingston USB 2.0 DTS E9 Data Traveller 16GB with a metal case.
  4. SanDisk Ultra USB 3.0 32GB SDCZ48-032G with a plastic case.

All four drives were formatted FAT32 (and I tested the Patriot drive as NTFS.) The way you know if a device is connected to 3.0 USB in windows 10: Start > Settings > Search “Find a setting” : type in “devices” > Show all results > Connected Device Settings > Other devices > Find your USB drive and it should say “Connected to USB 3.0”. More details on where to find this setting at the bottom of the article.

Anyway, I ran SpeedOut utility against the Patriot USB 3.0 drive first, and the results were: 23.7 MB/s READ and 27.8 MB/s.

I ran the same SpeedOut test against on the same USB port using a HYUNDAI USB 2.0 BRAVO 16GB drive (wasn’t recognized as USB3.0 by Windows 10) and it’s results were: 21.9 READ and 10.5 WRITE.

Then I ran the same SpeedOut test again using a Kingston DTS E9 Data Traveler and it’s results were 17.158 READ and 9.8 MB/s WRITE.

Lastly I ran the same SpeedOut test again using a SanDisk Ultra USB 3.0 32GB drive and the results were: 128.04 MB/s READ and 52.47 MB/s WRITE.

I gave the Patriot USB 3.0 drive another chance the results of a 2nd read write test against the drive were pretty good:

This test gave me hope that the drive would have decent write speeds but upon testing the copy of an ubuntu-16.10-server-amd64.iso (684.032 MB) file from my SSD drive to the Patriot USB 3.0 Drive, the results show surprisingly slow speeds after an initial burst of speed:

I thought perhaps this may have to do with the drive formatted as Fat32, so I formatted the drive as NTFS and tried again. Here is the SpeedOut result first:

Now the same Ubuntu.iso copy and it’s results:

Same results. The write speed would alternate between 6.24 MB/s and 12 MB/s which is in all reality pretty abysmal for a USB 3.0 drive! The total copy time for the 684MB file was 55.12 seconds…

The total copy time for the HYUNDAI USB drive for the same ubuntu .iso was 1:10.02 seconds.

The USB Patriot USB 3.0 drive did not fare much better than the Hyundai USB 2.0 drive, but I did notice that there is an initial speed burst when copying data to the Patriot drive. To test this I copied a 100MB file to the Patriot drive and while the first copy of the 94MB file did quickly finish at around 60 MB/s, however subsequent tests were very low again in the 6-12MB/sec range. The Patriot drive is no other way to describe than flaky; fast sometimes for a little while, but ultimately pretty slow – just a little better than the USB 2.0 drives.

Lastly I tested the copy speed of the same Ubuntu .iso file to the SanDisk Ultra 3.0 32 GB drive formatted Fat32 and the amount of time to copy was  14.59 seconds!

Just because something says USB 3.0 and is on sale, doesn’t mean you’re going to get true USB 3.0 speeds reliably…

New Active Directory User and Office365 New User Powershell Procedure

As a systems administrator, quite often you’ll need to create new user accounts in Active Directory and MSOnline Office 365. It’s good to streamline your new user creation procedure as much as possible to make the process faster and more accurate. Thanks to PowerShell, we can turn a whole bunch of point and clicks into just a few PowerShell commands. In this example procedure we will first create an Active Directory AD user account with powershell and a .csv file and then add that user into multiple groups with a different powershell script and a .txt file that has a list of the groups. We will also use another powershell script to get the canonical name of the groups so that our script can find the LDAP location of the group in Active Directory. Secondly, because we do not run our own exchange server we will use powershell to connect to Office365, and create a new user there, license the user, and then add the user to some distribution groups. Prerequisites are powershell, and import AD components and MSOnline components.

  1. Go to https://gallery.technet.microsoft.com/scriptcenter/PowerShell-Create-Active-7e6a3978 and download the create_ad_users.zip and extract to c:\newusers\
  2. Edit create_ad_users.ps1 lines 92 and 98 to accommodate longer last names. In the original script it only allows for first initial and then a truncated last name of 4 characters. In my case, we have some users with long last names, so I set those values to 20:
  3. If($replace.length -lt 20)
    {
      $lastname = $replace
    }
    Else
    {
      $lastname = $replace.substring(0,20)
    }
    
  4. Copy info from your HR department about the new user into the .csv file c:\newusers\import_create_ad_users.csv
  5. Run PS C:\newusers> .\create_ad_users.ps1
  6. Next check the new username in ADUC for such things as account name, address, phone number etc. to ensure the entries are accurate.
  7. With our new user account created, most likely we will want to make that user a member of several security groups. To do that with PowerShell, we need to make sure that we have the correct LDAP names for our groups and place them into a file named groups.txt. In order to do so, we need to run another powershell script named find-dn.ps1 . The code is as follows:
    # Function Find Distinguished Name
    function find-dn { param([string]$adfindtype, [string]$cName)
        # Create A New ADSI Call
        $root = [ADSI]''
        # Create a New DirectorySearcher Object
        $searcher = new-object System.DirectoryServices.DirectorySearcher($root)
        # Set the filter to search for a specific CNAME
        $searcher.filter = "(&(objectClass=$adfindtype) (CN=$cName))"
        # Set results in $adfind variable
        $adfind = $searcher.findall()
        
        # If Search has Multiple Answers 
        if ($adfind.count -gt 1) {
            $count = 0 
            foreach($i in $adfind)
            {
                # Write Answers On Screen
                write-host $count ": " $i.path
                $count += 1
            }
            # Prompt User For Selection
            $selection = Read-Host "Please select item: "
            # Return the Selection
            return $adfind[$selection].path
        }
        # Return The Answer
        return $adfind[0].path
    }

    This code should be inserted into a new PowerShell ISE tab and then saved as find-dn.ps1 . Running the code will produce a new PowerShell function (but will not write any output to the screen.) Find the group names in ADUC that you want the CN name for, and then use the following command(s) to return the CN name:

    find-dn "group" "FinanceGroup"

    The script will return something similar to the following:

    LDAP://CN=FinanceGroup,CN=Users,DC=intranet,DC=contoso,DC=com

    Remove the part “LDAP://” and copy the remaining string into the c:\newusers\groups.txt file, which after finding the rest of your group CN names, should look something similar to the following:

    CN=FinanceGroup,CN=Users,DC=intranet,DC=contoso,DC=com
    CN=HRGroup,CN=Users,DC=intranet,DC=contoso,DC=com
    CN=OperationsGroup,CN=Users,DC=intranet,DC=contoso,DC=com
    CN=ITGroup,CN=Users,DC=intranet,DC=contoso,DC=com
    CN=AccountingGroup,CN=Users,DC=intranet,DC=contoso,DC=com
    CN=ComplianceGroup,CN=Users,DC=intranet,DC=contoso,DC=com
    CN=MarketingGroup,CN=Users,DC=intranet,DC=contoso,DC=com
  8. Now that we have our CN security group names, we can add the user(s) into the groups with the following script. For this step we can utilize the script found here: https://community.spiceworks.com/topic/459481-adding-users-to-multiple-security-groups-in-ad – which was contributed by Martin9700 . Copy the following script into a new PowerShell ISE tab and name the file Add-MultipleGroups.ps1 :
    #requires -Version 3.0
    Param (
        [Parameter(Mandatory,ValueFromPipeline)]
        [String[]]$Groups,
        [Parameter(Mandatory)]
        [String[]]$Users,
        [switch]$Passthru
    )
    
    Begin {
        Try { Import-Module ActiveDirectory -ErrorAction Stop }
        Catch { Write-Error "Unable to load Active Directory module, is RSAT installed?"; Exit }
        $Result = @()
    }
    
    Process {
        ForEach ($Group in $Groups)
        {   Try {
                Add-ADGroupMember $Group -Members $Users -ErrorAction Stop
                $Result += [PSCustomObject]@{
                    Group = $Group
                    AddMembers = $Users -join ", "
                }
            }
            Catch {
                Write-Error "Error adding members to $Group because $($Error[0])"
                $Result += [PSCustomObject]@{
                    Group = $Group
                    AddMembers = $Error[0]
                }
            }
        }
    }
    
    End {
        If ($Passthru)
        {   $Result
        }
    }
  9. Run the following command to add user to the appropriate security groups:
PS C:\newusers> .\Add-MultipleGroups.ps1 -Groups "CN=ITGroup,CN=Users,DC=intranet,DC=contoso,DC=com","CN=OperationsGroup,CN=Users,DC=intranet,DC=contoso,DC=com" -users user1, user2

With the above script you can use the file to run a number of different options as well such as:

You can just put the group names in -Groups:

.\Add-MultipleGroups.ps1 -Groups "testgroup1","testgroup2" -users user1,user2,user3,user4

You can use a text file (either in Groups or via pipeline):

.\Add-MultipleGroups.ps1 -Groups (Get-content c:\groups.txt) -users user1,user2,user3,user4

Get-content c:\groups.txt | .\Add-MultipleGroups.ps1 -Groups -users user1,user2,user3,user4

You can also use Get-Content for users, but you can pipe it:

Get-content c:\groups.txt | .\Add-MultipleGroups.ps1 -Groups -users (Get-content c:\users.txt)

You can confirm in ADUC that the users are now members of the security groups in our groups.txt file.

Add users to Office 365 and Distribution Groups with PowerShell

Great! Now that we have our user accounts created on the AD side of things, we will move on to adding our user(s) into Office365:

With PowerShell up and running will will issue the following commands:

From https://www.petri.com/use-powershell-create-assign-licenses-office-365-users

Import-Module MSOnline

Connect-MsolService

Now we will create the user with the following command:

New-MsolUser -UserPrincipalName [email protected] -DisplayName ‘User 1’ -FirstName User -LastName 1

This command will return something like the following (sorry about the formatting:)

PS C:\Users\jcoltrin> New-MsolUser -UserPrincipalName [email protected] -DisplayName ‘User 1’ -FirstName User -LastName 1


Password                                   UserPrincipalName                          DisplayName                                isLicensed

--------                                   -----------------                          -----------                                ----------

Suso4007                                   [email protected]                       User 1                                False

Now we need to add a license to the user account. We need to do two things before we can assign the licenses. First is we need to to determine the different sku’s we have available to license, and second, we need to set the usage location. To accomplish the first part, we can issue the command:

Get-MsolAccountSku

Second, by using the instructions here: https://social.technet.microsoft.com/Forums/ie/en-US/bfde2a73-579c-409b-a7cd-77110048c7b7/license-enabling-script?forum=onlineservicesadministrationcenter

We can set the MS Online user’s principal location:

Set-MsolUser -UserPrincipalName [email protected] -UsageLocation US


Set-MsolUserLicense -UserPrincipalName [email protected] -AddLicenses Contoso:STANDARDPACK

Now that the user is licensed, we will add the account to a few Exchange Distribution Groups. We will need to import a new PSSession from outlook.com before we can run the Exchange commands. Import the session by first creating a function called “Connect-O365” by running the following (just like we created the function find-dn above):

function Connect-O365{
 $o365cred = Get-Credential [email protected]
 $session365 = New-PSSession -ConfigurationName Microsoft.Exchange -ConnectionUri "https://ps.outlook.com/powershell/" -Credential $o365cred -Authentication Basic -AllowRedirection 
 Import-Module (Import-PSSession $session365 -AllowClobber) -Global
}

Save and name this function: Connect-O365.ps1 and run it. We now have a function that we can run:

.\Connect-O365.ps1
Connect-O365

(enter creds)

Now we can add the distribution group members with the group identity and member name in quotes:

Add-DistributionGroupMember -Identity "Finance" -Member "[email protected]"

Add-DistributionGroupMember -Identity "AllEmployees" -Member "[email protected]"

A number of these scripts and commands can be combined into .ps1 files to optimize the workflow even further. With the information here you should have a good place to start. Let me know in the comments how you added your own features to the procedure.

Dell Latitude 3570 SSD HDD upgrade procedure reinstall reset recover Windows 10 on blank disk from DVD

So you received a Dell Latitude e3570 for business and the laptop already has a downgrade Windows 7 Pro Operating System installed on the existing 500GB 7200RPM hard drive. You want to make the machine faster and upgrade to Windows 10, so you decide to install a 120GB SSD HDD (or a Samsung M.2) and then install Windows 10 Pro from scratch. You already have the Dell Windows 10 Pro DVD. The problem is that you don’t have a hard disk image, clone image, cloning software, or machine to clone from the old HDD to the new SSD, nor do you even want to use an existing Operating System image. You don’t want to go through the steps of an upgrade from Windows 7 Pro to Windows 10 Pro and then perform a clone as well. Well, that’s what happened to me and I usually prefer to perform a clean installation from a certified Dell Windows 10 Pro 64-Bit DVD for use with a licensed Dell computer like the one in the picture below. After banging my head over what amounts to a relatively simple solution, and doing some research, I thought I’d spare someone else the pain of what I went through by documenting the solution here.

So, you gleefully pop open the back of the laptop by loosening the cover screws, replace the SATA HDD with your new SSD HDD, and close up the cover again. With an external USB DVD drive, power on the laptop, hit F12, select the Dell DVD as your boot device, and hit a brick wall with the following sequence:

Language > Country > Choose option: Troubleshoot > Reset this PC > Reset this PC: Remove everything :

Error: Reset this PC – Unable to reset your PC. A required drive partition is missing. (cancel)

In this event, what the setup is doing is that it’s assuming you already have Windows 10 installed on the hard drive, and that perhaps it’s corrupted, and you are choosing to have the installer find the default recovery partition that’s already on the hard drive (which it isn’t because it’s a brand new-wiped-clean-by-the-factory SSD). Also, you’d already probably know that if you DID already have the recovery partition on the hard drive that you’d choose the “Repair my computer” option in the boot menu by hitting F12 when starting…

So the problem is actually not difficult to resolve because, in summary, the solution is you merely need to choose the following sequence instead and perform a “Recover from a drive“, not “Reset this PC”. *Note: if you do this, your BIOS may still hold non-recommended Boot and Drive configurations for Windows 10, so be sure to follow the instructions after the screenshots that your BIOS and new SSD HDD is set up for correct secure-boot operations.

Language > Country > Choose option: Troubleshoot > Recover from a drive > Fully clean the drive

At this point, if you have replaced an M2 hard drive, you may have received the following error:  “Unable to reset your pc. The system drive cannot be found.” If this is the case, skip to the bottom of this post to find new information.

Like I said, it’s a good idea to check some BIOS settings and secure your new SSD HDD boot device prior to running the system Recover > Fully clean the drive operation.

  1. First hit F12 and select OTHER OPTIONS: BIOS Setup
  2. Next under General > Boot Sequence, set the Boot List Option to UEFI
  3. Next, under General heading, select Advanced Boot Options and uncheck “Enable Legacy Option ROMs”
  4. Next, under System Configuration, make sure SATA Operation is set to AHCI:
  5. Next, go to the heading Secure Boot and set Secure Boot Enable to Enabled:
  6. Now save all the changes to the BIOS and restart/Save, and hit F12 again, where at the next menu you will use the UEFI BOOT: to your external USB/DVD drive:
  7. Now go ahead and go back to the Troubleshoot > Recover from a drive > Fully clean the drive. *Note: this action will completely destroy anything that is already on the hard drive so before you do this action, be sure you have a backup of what was previously on the drive; if anything.
  8. Once the procedure runs and the machine reboots, you should see the “Recovering this PC” and a percentage status.
  9. The machine will complete the procedure and you may receive the following warning: A configuration change was requested to enable, activate, clear, enable, and activate the TPM – This action will clear and turn on the computer’s TPM (Trusted Platform Module) – WARNING: This request will remove any keys stored in the TPM: Press F12 to enable, activate, clear, enable, and activate the TPM or Press Esc to reject this change request and continue. Unless you have stored keys and want to retain them, go ahead and hit F12. 
  10. The machine will restart a couple more times and finally, you should be prompted with the traditional setup:
  11. Complete the setup, remove the DVD from the computer, restart and enjoy your newly installed Windows 10 Pro on your Latitude 3570 with an SSD hard drive. In my opinion, this is a very worthwhile upgrade and the speed difference between Windows 7 Pro on a spinning HDD as compared to Windows 10 on an SSD is like night and day.

__________________

So if your error encountered during a “Recover from Drive” was:  “Unable to reset your pc. The system drive cannot be found.” then you’ll want to take note. The Purple DVD you are trying to recover from may not include the required M2 Hard drive drivers in order for the installer to find your new hard drive. “Extra Fudge” found some success by downloading the drivers manually (which did not solve the problem for me – more below…) from Intel (if you’re installing an Intel M2 HDD, that is) and that information can be found here:

Dell Recovery disc not working. “Unable to reset your pc. The system drive cannot be found”

The link to the updated drivers in this post can be found here:

https://downloadcenter.intel.com/download/27147/Intel-Rapid-Storage-Technology-Intel-RST-?v=t

Like I said earlier, this fix and was not successful (perhaps because I was installing a Samsung NVMe SSD 960 EVO M.2 drive.)

Finally what solved my problem was to use the new Dell Operating System Imaging Tool, which assumably has the correct M.2 drivers baked into the image.

You’ll need an 8GB or larger drive USB thumb drive to complete this task. Go to Dell support https://support.dell.com, enter in the Service Tag, Select find Drivers Myself, > Select OS Windows 10, and then download the Operating System Image tool.

Next, run the tool and the rest is pretty self-explanatory.

Proxmox upgrade project from ESXi to Proxmox – nice speed increase

So I did a little upgrade project this weekend – went from a Dual-Core CPU workstation-class VMWare ESXi system running a pfSense VM with 512MB RAM & a SATA HDD plus 10/100Mb LAN, and moved to a Core i5 CPU workstation-class Proxmox hypervisor running the same version of pfSense with 2GB of RAM, SSD and gigabit NICs. The Core2Duo system had a 10/100Mb LAN card so the download speed was limited to 100Mb because of the hardware, not software, but I do believe the ping times can be attributed to the new hardware. Proxmox can be tricky to setup the NICs so I left notes on what I experienced below.

Proxmox Install notes:

3 NICs (one on board, and 2xintel NIC)

Initially I got my proxmox installed and running on my current network on a new workstation-class PC with just the on-board NIC connected. It picked up 10.0.10.175 from my dhcp server

On Proxmox I went to setup pfSense but prior to doing so I needed to bridge my NICs

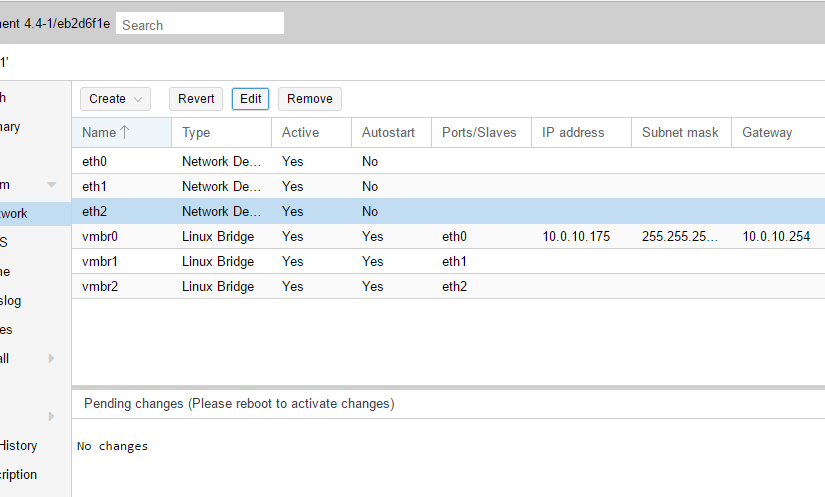
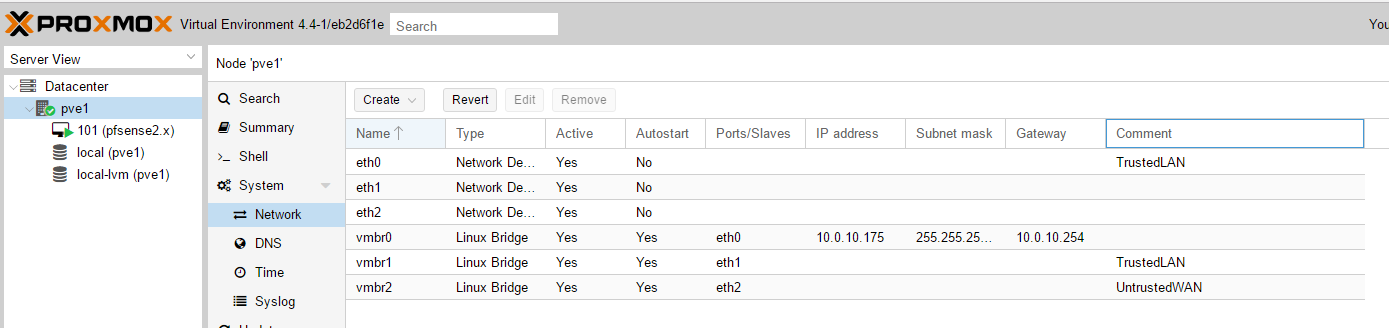
Here is my NIC setup after setting up the Linux bridge NICs:

When I initially setup the vm, I created pfsense pretty standard, then before starting the VM, I added System > Network > Create > Linux Bridge, and I chose the two other Intel NIC’s (did this twice, once for each NIC.

When I started the pfSense vm I got the error:

Task viewer: VM 101 - Start

OutputStatus

Stop

bridge 'vmbr1' does not exist
kvm: -netdev type=tap,id=net1,ifname=tap101i1,script=/var/lib/qemu-server/pve-bridge,downscript=/var/lib/qemu-server/pve-bridgedown: network script /var/lib/qemu-server/pve-bridge failed with status 512
TASK ERROR: start failed: command '/usr/bin/kvm -id 101 -chardev 'socket,id=qmp,path=/var/run/qemu-server/101.qmp,server,nowait' -mon 'chardev=qmp,mode=control' -pidfile /var/run/qemu-server/101.pid -daemonize -smbios 'type=1,uuid=75940385-d64a-4fc8-b286-ade75fc08d52' -name pfsense2.x -smp '4,sockets=1,cores=4,maxcpus=4' -nodefaults -boot 'menu=on,strict=on,reboot-timeout=1000,splash=/usr/share/qemu-server/bootsplash.jpg' -vga cirrus -vnc unix:/var/run/qemu-server/101.vnc,x509,password -cpu kvm64,+lahf_lm,+sep,+kvm_pv_unhalt,+kvm_pv_eoi,enforce -m 2048 -k en-us -device 'pci-bridge,id=pci.1,chassis_nr=1,bus=pci.0,addr=0x1e' -device 'pci-bridge,id=pci.2,chassis_nr=2,bus=pci.0,addr=0x1f' -device 'piix3-usb-uhci,id=uhci,bus=pci.0,addr=0x1.0x2' -device 'usb-tablet,id=tablet,bus=uhci.0,port=1' -device 'virtio-balloon-pci,id=balloon0,bus=pci.0,addr=0x3' -iscsi 'initiator-name=iqn.1993-08.org.debian:01:6148cfb1fd55' -drive 'file=/dev/pve/vm-101-disk-1,if=none,id=drive-ide0,format=raw,cache=none,aio=native,detect-zeroes=on' -device 'ide-hd,bus=ide.0,unit=0,drive=drive-ide0,id=ide0,bootindex=100' -drive 'file=/var/lib/vz/template/iso/pfSense-CE-2.3.3-RELEASE-amd64.iso,if=none,id=drive-ide2,media=cdrom,aio=threads' -device 'ide-cd,bus=ide.1,unit=0,drive=drive-ide2,id=ide2,bootindex=200' -netdev 'type=tap,id=net0,ifname=tap101i0,script=/var/lib/qemu-server/pve-bridge,downscript=/var/lib/qemu-server/pve-bridgedown' -device 'e1000,mac=C2:8E:F1:2E:83:E5,netdev=net0,bus=pci.0,addr=0x12,id=net0,bootindex=300' -netdev 'type=tap,id=net1,ifname=tap101i1,script=/var/lib/qemu-server/pve-bridge,downscript=/var/lib/qemu-server/pve-bridgedown' -device 'e1000,mac=CE:AE:FA:44:EF:13,netdev=net1,bus=pci.0,addr=0x13,id=net1,bootindex=301' -netdev 'type=tap,id=net2,ifname=tap101i2,script=/var/lib/qemu-server/pve-bridge,downscript=/var/lib/qemu-server/pve-bridgedown' -device 'e1000,mac=D2:09:7A:FC:6D:95,netdev=net2,bus=pci.0,addr=0x14,id=net2,bootindex=302'' failed: exit code 1

So to fix this I first destroyed my initial vm 100 in the proxmox console with

qm destroy 100

Next with the info I found here: https://forum.proxmox.com/threads/cant-start-vms.13824/

It seems the Proxmox underlying debian OS didn’t know about my other NICs:

I ssh’d into the new server with putty and edited the interfaces file:

Nano /etc/network/interfaces

and changed this config:

auto vmbr0

iface vmbr0 inet static

        address  10.0.10.175

        netmask  255.255.255.0

        gateway  10.0.10.254

        bridge_ports eth0

        bridge_stp off

        bridge_fd 0

To this:

auto vmbr0

iface vmbr0 inet static

        address  10.0.10.175

        netmask  255.255.255.0

        gateway  10.0.10.254

        bridge_ports eth0

        bridge_stp off

        bridge_fd 0


auto vmbr1

iface vmbr1 inet dhcp


auto vmbr2

iface vmbr2 inet dhcp

Then I had proxmox reboot by issuing the command:

reboot

And my interfaces file ended up looking like this:

auto lo

iface lo inet loopback


iface eth0 inet manual

#TrustedLAN


iface eth1 inet manual


iface eth2 inet manual


auto vmbr0

iface vmbr0 inet static

        address  10.0.10.175

        netmask  255.255.255.0

        gateway  10.0.10.254

        bridge_ports eth0

        bridge_stp off

        bridge_fd 0


auto vmbr1

iface vmbr1 inet manual

        bridge_ports eth1

        bridge_stp off

        bridge_fd 0

#TrustedLAN


auto vmbr2

iface vmbr2 inet manual

        bridge_ports eth2

        bridge_stp off

        bridge_fd 0

#UntrustedWAN


I could now start the pfsense vm and the pfsense install now recognized my network cards <smiles>

In the pfsense setup I choose 1) and I am offered the following options:

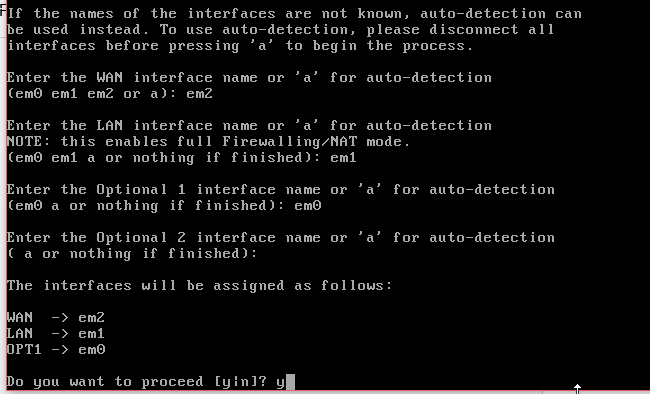
With a little bit of guessing and using my laptop to find the LAN, I was able to get up and connected into my pfSense web console. From there, reset the power to my cable modem, and got a new Cox IP address.

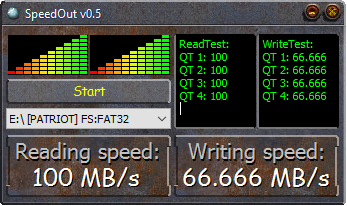
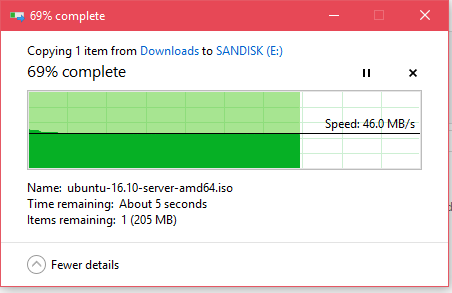
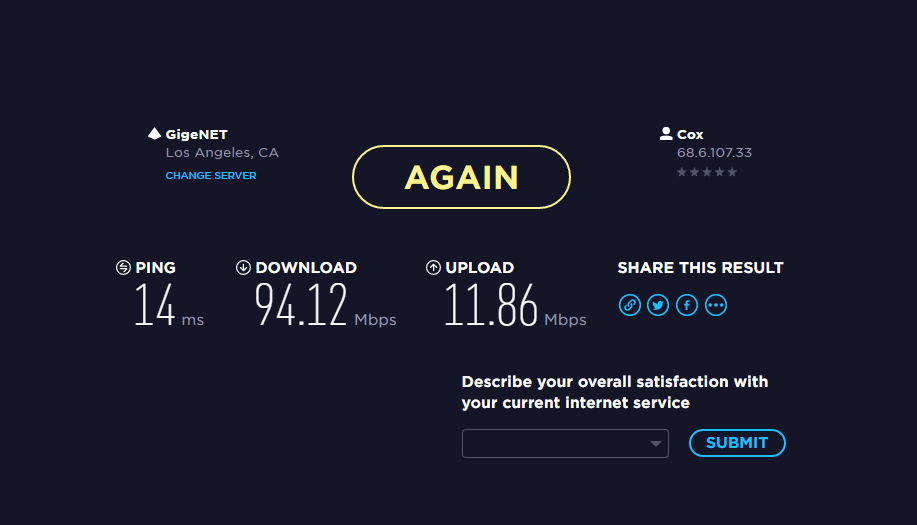
The change in speeds was actually pretty remarkable.

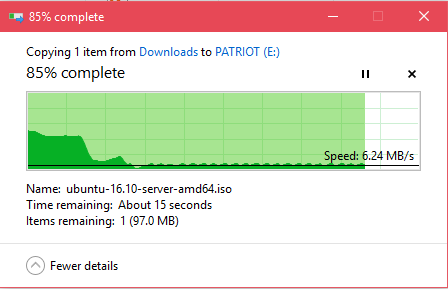
Here are the speedtest.net results with the old Dual Core (Core2Duo) with an ESXi VM on a SATA HDD 512MB of RAM and 10/100 LAN:

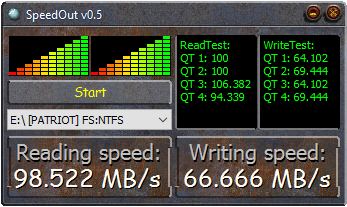
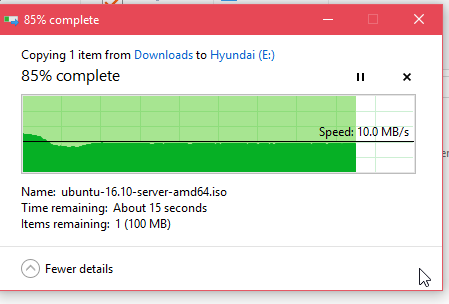
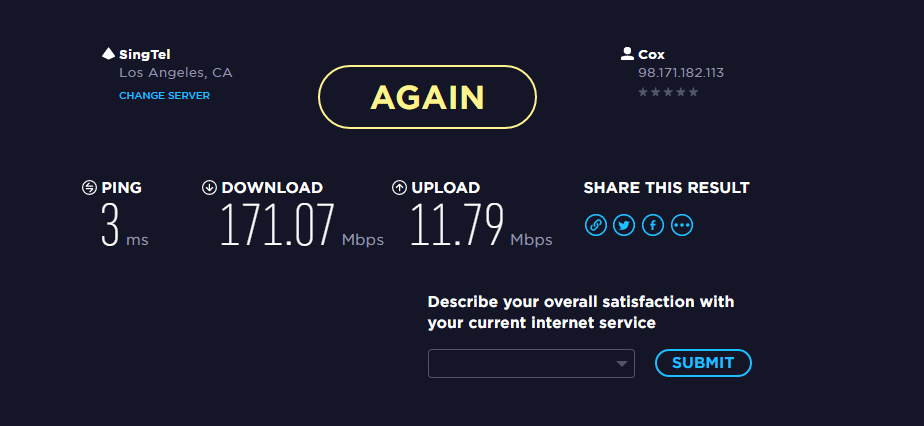
And here are my speedtest.net results with a core i5 4-core Proxmox VM on an SSD, 2GB of RAM, and Gigabit NICs:

Below is an image of the old server on the left and a new server on the right.

VMWare is still running on the old server and I may keep it around, but also considering moving my domain controller & ISC DHCP server off of it and re-building it as another Proxmox VME as a cluster, but I’ve read that it’s best to have 3 servers for a Proxmox cluster.

All in all I’m pretty happy with the results of upgrading my home pfSense firewall from ESXi to Proxmox, and I hope this post helps someone with their Proxmox setup.

Solved – Unable to remove OneDrive for Business from Windows 7

Solved – Unable to remove OneDrive for Business from Windows 7 – two versions of OneDrive on the same Windows 7 / Windows 10 PC. Remove / uninstall old version of OneDrive for Business. 

This may not be the most elegant/logical way of stopping the old/bad OneDrive from running, so let me know in the comments if you found the correct “Microsoft way” of fixing this issue. Others have spent hours trying to resolve this issue and hopefully you’ll get some kind of resolution with this information.

In some instances OneDrive for Business will ask you to upgrade. When you Update or upgrade OneDrive for Business it could keep the old version of OneDrive for Business on your computer, making it so that you have two versions of OneDrive for Business (even the icons look slightly different.) This may come pre-packaged with a Click to Run (clicktorun) install of Office or pre-installed on your system. You probably want to remove the older version of OneDrive for Business, but even after trying to uninstall OneDrive for Business old version from Programs and Features in the Control panel, even after restarting, the program comes back and you can’t delete it!

You probably still want to use OneDrive for Business, but you should only use the updated version that works correctly with Office365 and SharePoint Online.

Anyway, once your updated/upgraded OneDrive for Business is updated and installed, make sure you have all your important files inside the new OneDrive for Business and that the files are synced with SharePoint or where ever they should be. Make sure you have backups of the important files somewhere else like an external drive as well just to be safe. Once we disable the old OneDrive for Business / Groove.exe, make sure those old files are already synced with the new OneDrive for Business service. Once you have your files all synced and what-not with the new OneDrive for Business, we can disable/remove the old/bad version of OneDrive.

The older version of OneDrive for Business actually runs as Groove.exe. While the Task Manager is open (tick the check-mark or hit the button that says ‘Show Processes from All Users), track down Groove.exe by right-clicking on the bad OneDrive in the systray and then in the OneDrive menu, choose Exit (down by the clock – there may be two cloud icons down there, be sure to exit the correct one.) Then launch the old/bad OneDrive again from the Start > Program Files > OneDrive for Business. Do this several times and you will see Groove.exe pop in and out of existence inside the Task Manager. While it’s up and running, right click on the groove.exe in the task manager and choose “Open File Location”. The file will probably live somewhere similar to the following location:

C:\Program Files\Microsoft Office 15\root\office15\Groove.exe

Be sure to End Task or Exit out of the bad OneDrive for Business or Groove.exe, then rename the Groove.exe file to Groove.exe.old .

Now that this has been done, you may want to remove the old/bad OneDrive for Business link in your Explorer Favorites list. Do this with a left-click on the top-most Favorites link and in the right-hand pane, right-click on the old/bad OneDrive for Business shortcut and click Remove. Additionally you may want to remove the old/bad program shortcut in your Start Menu.

CockroachDB – how to build a 4 node SQL cluster on ubuntu and HyperV

CockroachDB Overview

Description: cockroach is an open source, survivable, strongly consistent, scale-out SQL database. If you wonder where google engineers go when they leave google, they go out on their own and build unbelievably great scalable and distributed open source software. Essentially if you want to run your own fault-tolerant SQL database across multiple datacenters and cloud services, using your own servers, allowing you complete control of your database, without paying hefty licensing fees, then run cockroach. The info in this post is not a review of cockroach, but rather a demonstration of a lab setup and POC.

To get started in our lab, first we want to build around 3 or 4 test clone servers or “nodes”. I use ubuntu on top of HyperV, but you can use any flavor of linux or MacOS you want. It can also run on Windows Docker.

If you’re like me and use Hyper-V on Win10, make 4 x Ubuntu 16.04 “clones” – first build a ‘goldmaster’ image, and clone it 4 times – guide here: https://4sysops.com/archives/clone-a-ubuntu-server-in-hyper-v-2012-r2/ – or use something like virtualboxes.org.

Create 4 virtual machines, each having it’s own IP address:
Node1: inet addr:10.0.10.169
Node2: inet addr:10.0.10.170
Node3: inet addr:10.0.10.171
Node4: inet addr:10.0.10.172

Make sure each node is up to date and has ntp installed and synchronized with the commands:

sudo apt-get install ntp

Use the command

timedatectl

To ensure that…

NTP synchronized: yes

At this point before you install/run cockroach, it’s wise to export each node VM with HyperV as a backup.

On Nodes 1,2,3,4 download the latest binary here https://www.cockroachlabs.com/docs/install- cockroachdb.html with the command:

sudo wget https://binaries.cockroachdb.com/cockroach-latest.linux-amd64.tgz

Extract the binary with the command:

tar -xvf cockroach-latest.linux-amd64.tgz

Move the binary to a location in your PATH or add the directory location to your path. You can learn about your path with the command:

sudo vi /etc/environment

And then move your extracted cockroach to /usr/sbin with the command:

sudo mv cockroach-latest.linux-amd64/cockroach /usr/sbin/

Do a sanity check with the command:

cockroach version

Start cockroach in insecure mode in the background on Node1 (master server) with the command:

sudo cockroach start --background --insecure --host=10.0.10.169

Result should be something like below:

CockroachDB node starting at 2017-03-15 23:16:23.118419329 -0700 PDT
 build: CCL beta-20170309 @ 2017/03/09 16:31:10 (go1.8)
 admin: http://10.0.10.169:8080
 sql: postgresql://[email protected]:26257?sslmode=disable
 logs: cockroach-data/logs
 store[0]: path=cockroach-data
 status: restarted pre-existing node
 clusterID: 08b6bfe6-4886-466b-a9c6-bc58a3809113
 nodeID: 1

Go ahead and browse to the admin page http://10.0.10.169:8080

On your other nodes:

sudo cockroach start --background --insecure --host=10.0.10.170 --join=10.0.10.169:26257

*where –host=current node ip address you’re having to join with the master server 10.0.10.169

Your results should look something like the following:

CockroachDB node starting at 2017-03-15 23:23:43.783097234 -0700 PDT
 build: CCL beta-20170309 @ 2017/03/09 16:31:10 (go1.8)
 admin: http://10.0.10.170:8080
 sql: postgresql://[email protected]:26257?sslmode=disable
 logs: cockroach-data/logs
 store[0]: path=cockroach-data
 status: initialized new node, joined pre-existing cluster
 clusterID: 08b6bfe6-4886-466b-a9c6-bc58a3809113
 nodeID: 2

Your web interface should provide you with performance graphs:

Identify the new nodes in the View Nodes List link:

Go on and add the remaining Nodes to the cluster.

???

Profit! – just kidding

Now you can go on to learn about cockroach SQL and create some databases and tables and test how pulling the plug on one of your nodes doesn’t bring down the DB, and how all the data is replicated to all 4 nodes. It’s recommended you don’t run this lab on a single workstation-class system, but something that meets the cockroach DB minimum system requirements. This product is still in beta and features are subject to change. Regardless, cockroachdb is an incredible addition to the open-source community and I’m sure will be very useful to a lot of systems admins and application developers.


Dell Latitude 3450 cannot install windows 7 with samsung se-208 DVD driver missing

So I recently had problems installing Windows 7 SP1 with an original certified Dell installation DVD using a Samsung thin profile SE-208 external USB DVD/CD.

Upon booting to the Windows 7 installation, after telling the Windows 7 installer to go ahead, it said that the DVD/CD ROM drivers were missing.

I also could not install with a bootable Windows 7 USB key that I created by first ripping the Dell DVD to an ISO with IMG Burn, and then creating a bootable USB drive with rufus-2.12.exe. The same error – no drivers detected.

After finding this post here, it came to me that I had only tried the external DVD drive on the USB port that is on the right-hand side of the laptop (USB 3.0).

I instead connected the external USB DVD drive into the Left-hand side of the laptop USB port (USB 2.0) and booted the DVD into the installation and proceeded normally.

So if this happens to you, connect your bootable device to only a USB 2.0 port, when trying to install Windows 7 on a newer PC or laptop that has both USB 2.0 and USB 3.0 ports!