
When you manage a large amount of Exchange mailboxes, inevitably someone will leave the organization, and you have to setup autoreplies with a message stating the user is no longer available by email. Common sense dictates we will setup a noreply@ mailbox and add the terminated users as alias’ to that mailbox, but not so fast. After a few days of testing and working with support, we’ve found that setting up a shared mailbox with autoreplies enabled with the terminated user’s unique email address/alias, provides the most consistent results.
We’re not going to go through the myriad of possible scenarios about what your org does with a mailbox after a user leaves. Instead, we’ll assume the mailbox is now deleted, and forwarding of mail bound for that mailbox is no longer necessary. To be on the safe side, ensure you back up the mailbox in some way before deleting the mail.
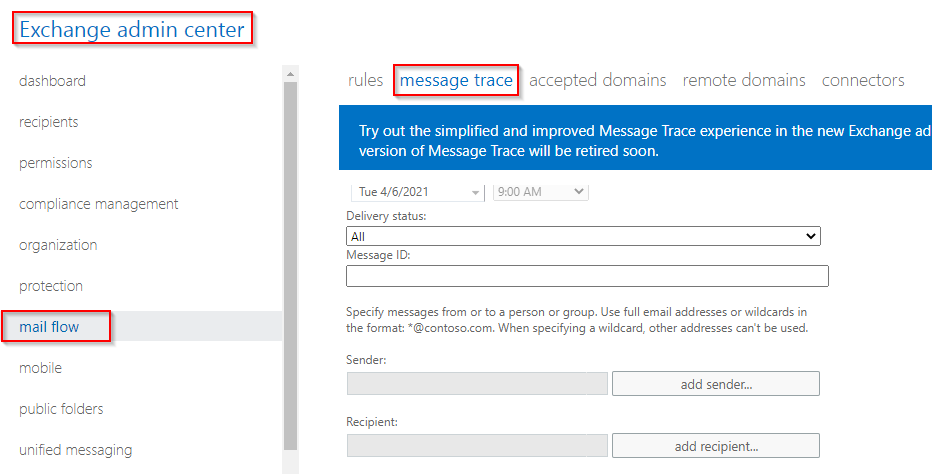
When testing auto replies, you may want to use the Exchange Message Tracker to see the messages come in and go out. To get there, go to O365 Admin > Exchange > Mail Flow > Message Trace.
A good thing to note here is that while performing a message trace, when sending test messages to the newly created shared mailbox with Automatic Replies enabled from within the same tenant or domain, auto reply messages may Drop with the following error:
| Date/Time | Drop | Reason: [{LED=250 2.1.5 RESOLVER.OOF.ExtToInt; handled external OOF addressed to internal recipient};{MSG=};{FQDN=};{IP=};{LRT=}] |
This Drop message is actually an intended action, and is not an error, as it is probably used to prevent a loop of autoreplies within the same tenant.
Getting back to our original issue, to generate autoreplies, we first tried to setup a “noreply@” shared mailbox and add terminated user’s email addresses as aliases to the noreply box, but we got inconsistent results. Instead, we did the following.
How to Setup Automatic Replies for a Terminated User Mailbox
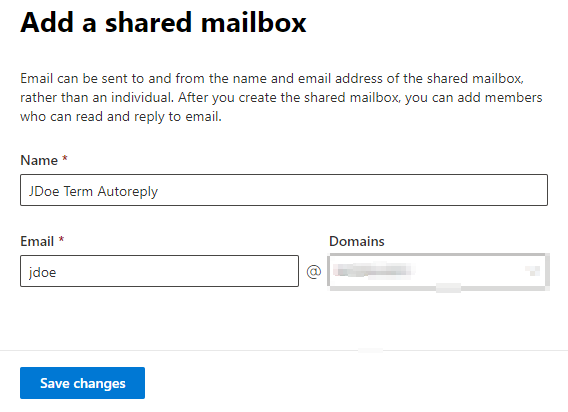
- Create a shared mailbox with the terminated user’s email address. To do this go to 365 Admin Center > Groups > Shared mailboxes > Add a shared mailbox > Give the shared mailbox a name like “JDoe Term AutoReply” > Give the shared mailbox the (previously/actually used) email address of the terminated user. This does not use a mailbox license thereby freeing up a license. Alternatively, you can try simply converting the terminated user’s mailbox to a shared mailbox, but we had an inconsistent result doing this.
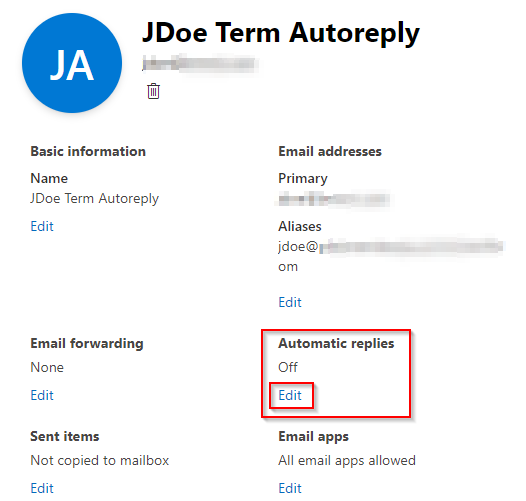
- Next, simply click on the details of the shared mailbox, and under Automatic replies, click the Edit link:
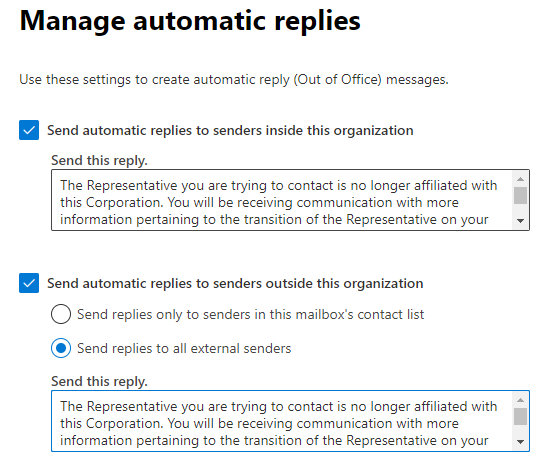
Next place Checkmarks in both “Send automatic replies to senders inside this organization” and “Send automatic replies to senders outside this organization”
Add a reply blurb which can be something similar to the following:
The Representative you are trying to contact is no longer affiliated with this Corporation. You will be receiving communication with more information pertaining to the transition of the Representative on your account. If you have an urgent matter and would like to speak with someone, please call our Service Center at 800-555-5555 between the hours of 6am-5pm (PST).
Click “Save” at the bottom and you should be all set.
If you want to test, you can try sending an email from an account outside your organization. *Note – when we sent a test message from gmail, the autoreply ended up going into the gmail account’s spam folder.
If further errors are encountered, you may need to look at your spam/external forwarding policies in your mail filtering site at https://protection.office.com/antispam or reach out to MS Support.