Clients on your network may wish to work from home. While there are alternatives like GoToMyPC or LogMeIn, this is a free alternative. You will need spare public IP addresses that you can configure your domain’s DNS and your SonicWall to allow RDP traffic to clients on your LAN.
1. Ensure the client has RDP enabled. On the Windows PC, go to System Settings and then the Remote tab and make sure “any RDP client” is allowed access. Some of your clients may be using Macs and do not use Windows RDP clients. Also, it’s best to narrow down access to only particular user accounts (the user and administrator). Once RDP is enabled be sure to test connecting from a different client within your Local Area Network. If you can’t RDP into the client from within your LAN, you sure won’t be able to get to the machine remotely!
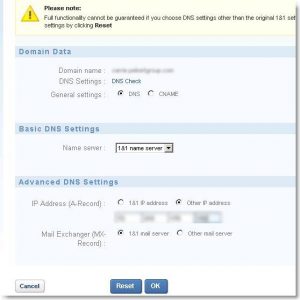
2. Go to your Domain Registrar and setup a sub domain for your user. In this example, I’m using my.1and1.com. Once logged in, click on “Domains”, then click on “New” and then “Subdomain”. Give the subdomain a friendly name. In this case I am using Julie.domainname.com. Once the subdomain has been added, place a checkmark next to the new subdomain, and then click on the DNS button dropdown and click Edit. Under Advanced DNS Settings -> IP Address (A-Record) : Change the radio button to “Other IP Addresses”. Enter in the Public IP address you want specified for the client. Make sure you record the IP address, because we will be using it again soon on the SonicWALL. As far as DNS replication is concerned, I’ve found that it takes place pretty quickly, if not 5 to 10 minutes for the new address to be resolved.
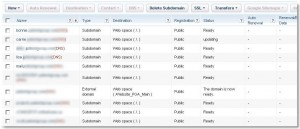
3. You should now see the entry along with the rest of your domain’s records. That should take care of the external DNS side of things.
4. Now log into your SonicWALL and browse to Network -> Address Objects. Here we will create two new address objects. “Username_Computer Private”, and “Username_Computer Public”. Click on the Add… button.
— For Username_Computer Private use:
Name: Username_Computer Private
Zone Assignment: LAN
Type: Host
IP Address: (Internal IP Address 192.168…..)
— Click the Add… button again for Username_Computer Public:
Name: Username_Computer Private
Zone Assignment: WAN
Type: Host
IP Address: (External IP address you created in your Domain’s registrar)
5. Now that the Address Objects have been created, we can move on to Services. On the sonicwall, browse to Network -> Services.
Click on Add Group. In the Name field, type in “Username Computer Services”. Then find Terminal Services in the list on the left side of the screen, and add it to the right-hand pane and click OK. That’s it for this part.
6. Now we are going to add NAT policies for our Network. Browse to Network -> NAT Policies.
First we are going to want to add a Loopback policy which should look like the following:
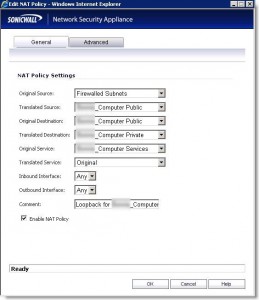
Be sure to add a comment “Loopback for Username_Computer”
Next, we’ll add Private to Public Translation which will look like the following. Make sure your Outbound interface is your WAN interface, typically X1:
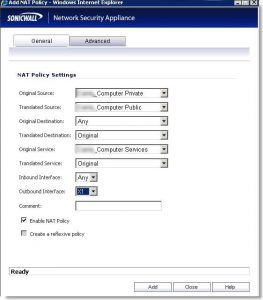
Next we’re going to do Public to Private Translation:
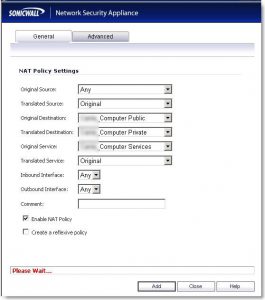
7. Lastly, we’re going to configure the firewall to allow traffic. Go to Firewall – Access Rules -> WAN to LAN which should have the following settings:
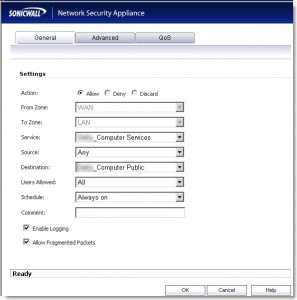
Action: Allow
From Zone: WAN
To Zone: LAN
Services: Username_Computer Services
Source: ANY
Destination: Username_Computer Public
Users allowed: All
Schedule: Always On
That should do it! You can now test by trying to RDP from any computer using the friendly subdomain name you setup with your domain’s registrar. If you are prompted for a username and password, your subdomain name and firewall are configured correctly.
Perhaps you may want to email your users the following instructions to assist them in connecting to their PC at work:
