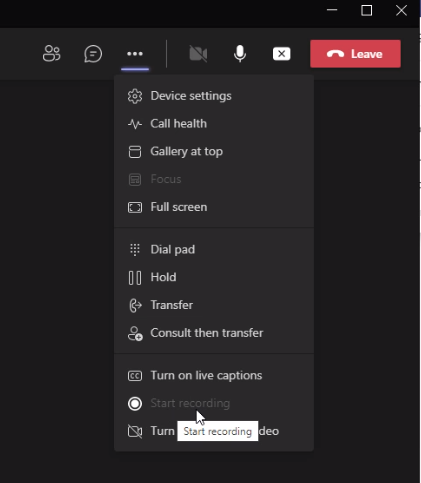
If your users report that the “Start Recording” button in Microsoft Teams is disabled and/or “greyed” out and/or “grayed out,” then perhaps recently the storage path for Teams to One Drive had changed, or there was a policy change or a tenant change occurred which caused the problem. Regardless, the following resolved the issue and fixed the grayed out problem for us. Special thanks to Ryu_Yosei for providing a solution here; below is the step-by-step.
For starters, this resolution’s time-to-fix is about 20 minutes. You’ll first want to start by opening a Microsoft Exchange Online Powershell Module as an Administrator, into the Tenant that is having the issue. If you’re unfamiliar with how to do this, follow the instructions in the first part of the procedure/guide here. One caveat, is that in order to import the required MicrosoftTeams module, we want to ensure that we start the Exchange Powershell session as an Administrator.
How to Run the Microsoft Exchange Online Powershell Module as Administrator
After installing the Hybrid Exchange Shell, we will probably have a desktop shortcut. Right-clicking on the shortcut doesn’t give us the usual “Run as an Administrator” option. Instead, we’ll want to first start a command ‘cmd’ prompt, run that as an administrator first, and then launch the Exchange Shell from within the command prompt.
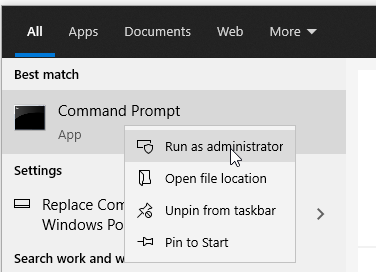
Click the Start Button and type cmd
Right click on the Command Prompt app and choose Run as an Administrator
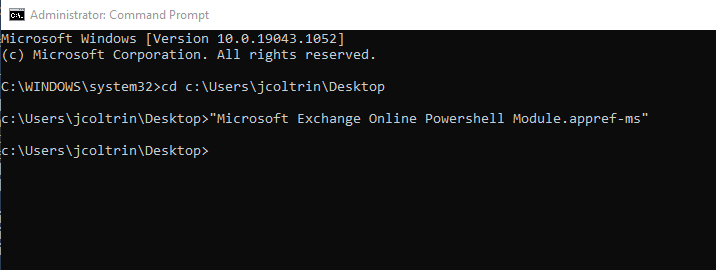
4. Next, inside the Administrator command prompt, issue the commands
cd c:\Users\Username\Desktop
5. Next start the Exchange module by running the command:
You may be prompted to log into O365, and perform multi-factor authentication if necessary. Next, if we do not already have the Teams module installed, issue the commands:
We’ll see some information asking to allow to trust the repo, so type y for yes.
PS C:\Users\jcoltrin> Install-Module MicrosoftTeams

Untrusted repository
You are installing the modules from an untrusted repository. If you trust this repository, change its
InstallationPolicy value by running the Set-PSRepository cmdlet. Are you sure you want to install the modules from
'PSGallery'?
[Y] Yes  [A] Yes to All  [N] No  [L] No to All  [S] Suspend  [?] Help (default is "N"): y
Next we’ll want to connect to Microsoft Teams in our tenant with the command:
Connect-MicrosoftTeams
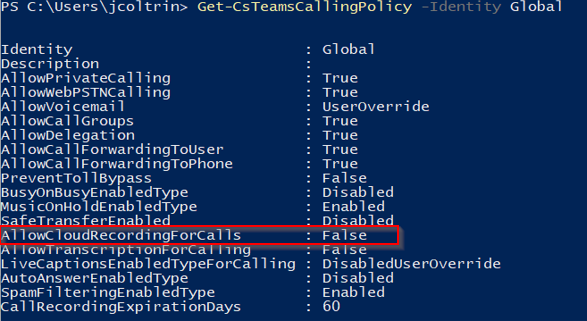
We’ll have the system return some information including our Account, Environment, Tenant, and TenantId. We can now check the status of our CsTeamsCallingPolicy with the command:
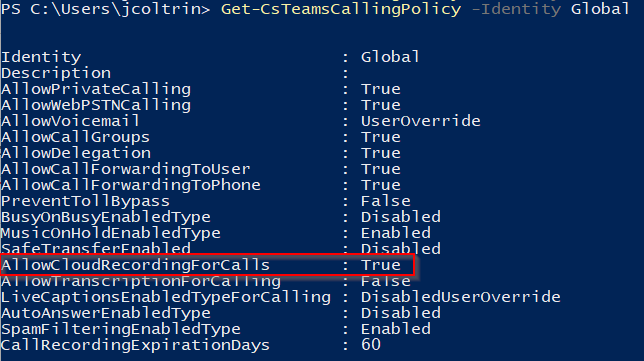
Get-CsTeamsCallingPolicy -Identity Global
In our case if we look at the entry for AllowCloudRecordingForCalls, we can see it is set to False:
Teams AllowCloudRecordingForCalls set to False
To change this to True, use the following command:
Set-CsTeamsCallingPolicy -Identity Global -AllowCloudRecordingForCalls $true
We can check to see if the command worked by issuing the previous command again:
Get-CsTeamsCallingPolicy -Identity Global
We can now see that AllowCloudRecordingForCalls is now set to True:
AllowCloudRecordingForCalls set to True
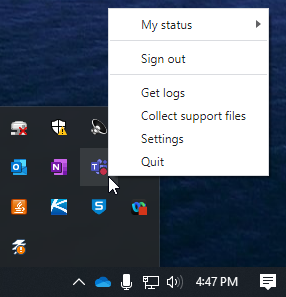
The setting should take place pretty much immediately across the tenant, however, users will still see the Start Recording button is disabled or grayed out until they completely Quit Teams and then restart the App again. To quit teams, in the bottom-right corner of the Windows primary desktop, down by the clock, expand the SysTray, right-click on the Teams icon and choose Quit.
How to Quit Microsoft Teams
Restart and/or Sign into Microsoft Teams again, start a test Call/Meeting with an associate, and check to see that Start Recording is now available and enabled.
Hopefully this guide helps restore your ability to record Teams calls. If something else worked for you, please leave a note in the comments below.
If you have recently enabled MFA multi factor authentication or 2FA on your Office 365 tenant, your Microsoft Outlook for Office 365 MSO 16.0.11929 (desktop version) users may be prompted over and over for their password, even though you are sure you have the correct password and even the apppassword / app password hash. I’m sure you’ve tried to re-configure Outlook, look at Azure settings, reinstall Outlook, check your autodiscover records, make sure you have the correct Office Suite version and perhaps have even attempted to change the windows 10 registry with the following settings:
So I thought it would be helpful to have a step-by-step how to enable modern authentication in Exchange Online for Office 365 based on the instructions provided in the link above.
With MFA enabled, connecting to Exchange Online with powershell is not as simple as it used to be, but still not all that bad. I’ve found the easiest way to connect to Exchange Online with Powershell is to do the following.
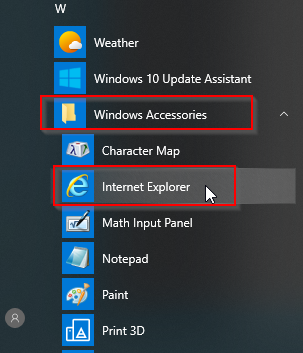
Note: A forewarning here, with certain browsers, when clicking on the Exchange Hybrid “Configure” button, and then installing the Hybrid configuration, the Office 365 login screen may may flash on the screen as a white box, and then disappears before you can authenticate and use your 2FA txt code. I’ve seen this when using Microsoft Edge, Chrome, and even the new version of Microsoft Edge based on Chromium. The only browser I’ve gotten this to consistently work with is the Internet Explorer browser built into Windows 10. The Internet Explorer browser is installed on Windows 10 by default, it’s hidden in the start menu under Accessories:
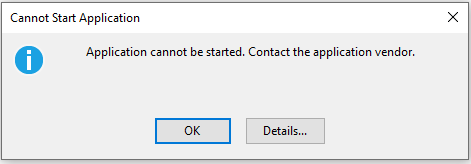
If you do attempt to run the Exchange Powershell Module using chrome you may encounter the error:
“Application cannot be started. Contact the application vendor.”
When clicking the Details… button, you may find information similar to the following:
PLATFORM VERSION INFO
	Windows 			: 10.0.18363.0 (Win32NT)
	Common Language Runtime 	: 4.0.30319.42000
	System.Deployment.dll 		: 4.8.3752.0 built by: NET48REL1
	clr.dll 			: 4.8.4121.0 built by: NET48REL1LAST_C
	dfdll.dll 			: 4.8.3752.0 built by: NET48REL1
	dfshim.dll 			: 10.0.18362.1 (WinBuild.160101.0800)

SOURCES
	Deployment url			: file:///C:/Users/Jason/Downloads/Microsoft.Online.CSE.PSModule.Client%20(3).application

IDENTITIES
	Deployment Identity		: Microsoft.Online.CSE.PSModule.Client.application, Version=16.0.3527.0, Culture=neutral, PublicKeyToken=45baf49ae30bdb15, processorArchitecture=msil

APPLICATION SUMMARY
	* Installable application.
	* Trust url parameter is set.
ERROR SUMMARY
	Below is a summary of the errors, details of these errors are listed later in the log.
	* Activation of C:\Users\Jason\Downloads\Microsoft.Online.CSE.PSModule.Client (3).application resulted in exception. Following failure messages were detected:
		+ Deployment and application do not have matching security zones.

COMPONENT STORE TRANSACTION FAILURE SUMMARY
	No transaction error was detected.

WARNINGS
	There were no warnings during this operation.

OPERATION PROGRESS STATUS
	* [4/3/2020 3:32:57 PM] : Activation of C:\Users\Jason\Downloads\Microsoft.Online.CSE.PSModule.Client (3).application has started.
	* [4/3/2020 3:32:57 PM] : Processing of deployment manifest has successfully completed.
	* [4/3/2020 3:32:57 PM] : Installation of the application has started.

ERROR DETAILS
	Following errors were detected during this operation.
	* [4/3/2020 3:32:57 PM] System.Deployment.Application.InvalidDeploymentException (Zone)
		- Deployment and application do not have matching security zones.
		- Source: System.Deployment
		- Stack trace:
			at System.Deployment.Application.DownloadManager.DownloadApplicationManifest(AssemblyManifest deploymentManifest, String targetDir, Uri deploymentUri, IDownloadNotification notification, DownloadOptions options, Uri& appSourceUri, String& appManifestPath)
			at System.Deployment.Application.ApplicationActivator.DownloadApplication(SubscriptionState subState, ActivationDescription actDesc, Int64 transactionId, TempDirectory& downloadTemp)
			at System.Deployment.Application.ApplicationActivator.InstallApplication(SubscriptionState& subState, ActivationDescription actDesc)
			at System.Deployment.Application.ApplicationActivator.PerformDeploymentActivation(Uri activationUri, Boolean isShortcut, String textualSubId, String deploymentProviderUrlFromExtension, BrowserSettings browserSettings, String& errorPageUrl, Uri& deploymentUri)
			at System.Deployment.Application.ApplicationActivator.PerformDeploymentActivationWithRetry(Uri activationUri, Boolean isShortcut, String textualSubId, String deploymentProviderUrlFromExtension, BrowserSettings browserSettings, String& errorPageUrl)
--- End of stack trace from previous location where exception was thrown ---
			at System.Runtime.ExceptionServices.ExceptionDispatchInfo.Throw()
			at System.Deployment.Application.ApplicationActivator.PerformDeploymentActivationWithRetry(Uri activationUri, Boolean isShortcut, String textualSubId, String deploymentProviderUrlFromExtension, BrowserSettings browserSettings, String& errorPageUrl)
			at System.Deployment.Application.ApplicationActivator.ActivateDeploymentWorker(Object state)

COMPONENT STORE TRANSACTION DETAILS
	No transaction information is available.
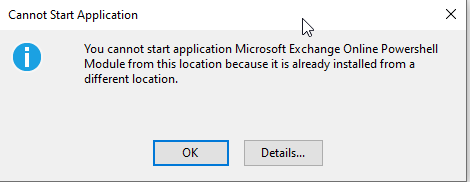
At this point, it may be necessary to uninstall the existing module and then re-install and run using Internet Explorer. You may even receive the following error:
"You cannot start application Microsoft Exchange Online Powershell Module from this location because it is already installed from a different location."
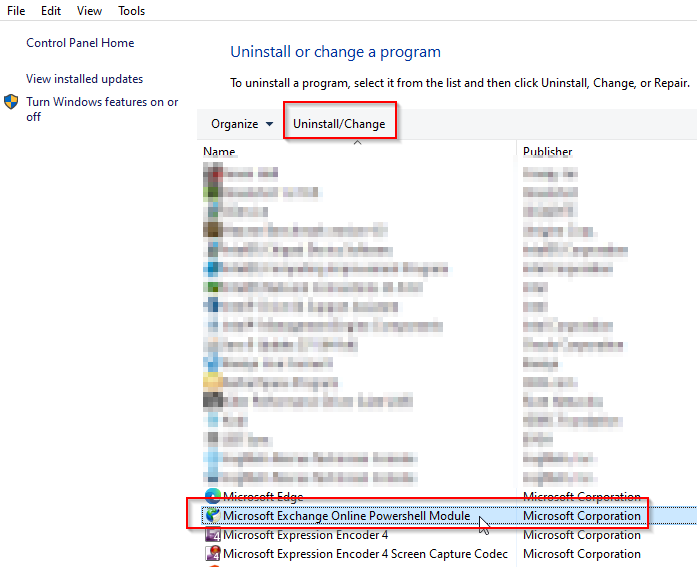
To uninstall the module, click the Start Button > type “appwiz.cpl” and press Enter.
Inside of the Programs and Features screen find the application and click Uninstall.
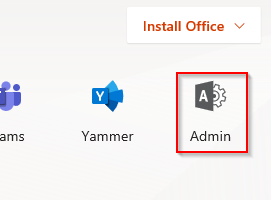
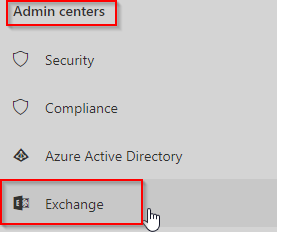
After uninstall, log into your tenant (with an administrator account) at https://www.office.com using Internet Explorer 11, and click the Admin link:
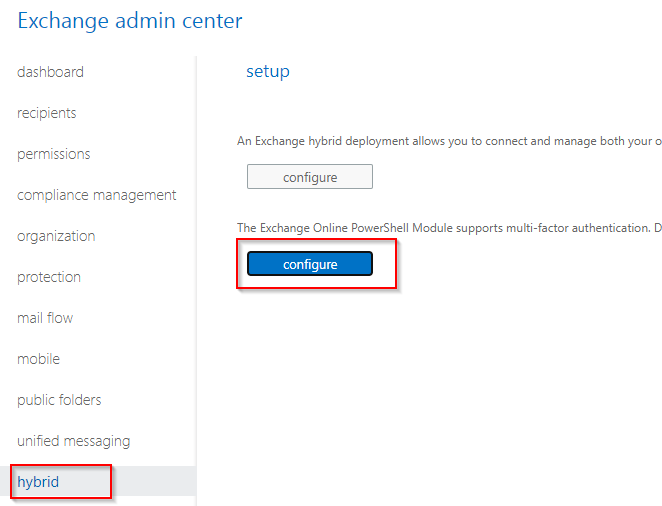
Next, Expand the Menu on the left menu by clicking Show All… and then click on Exchange:
Next we want to click on the Hybrid link to get to our Powershell Configure button:
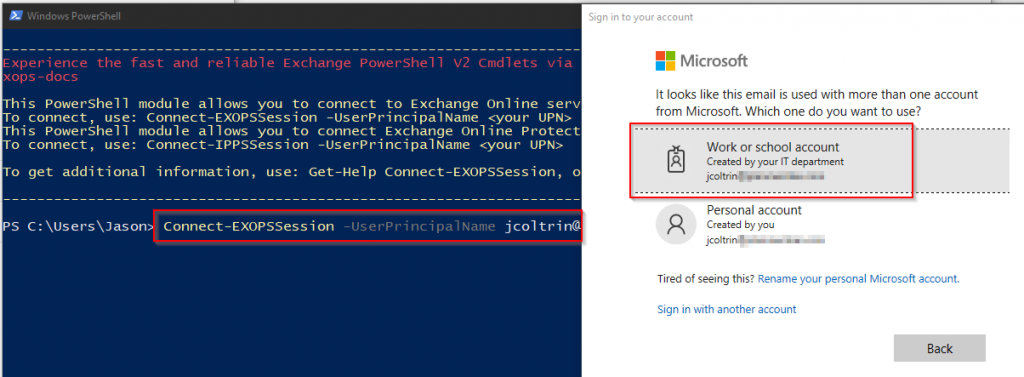
Go ahead and install the component if it asks, and when it completes, you’ll be greeted with a Windows Powershell screen with the following message:
Experience the fast and reliable Exchange PowerShell V2 Cmdlets via new PowerShellGallery module. Go to https://aka.ms/exops-docs

This PowerShell module allows you to connect to Exchange Online service.
To connect, use: Connect-EXOPSSession -UserPrincipalName <your UPN>
This PowerShell module allows you to connect Exchange Online Protection and Security & Compliance Center services also.
To connect, use: Connect-IPPSSession -UserPrincipalName <your UPN>

To get additional information, use: Get-Help Connect-EXOPSSession, or Get-Help Connect-IPPSSession
We now want to initiate our session using the instructions provided. At the prompt, type in the command:
You’ll now be prompted to sign into your tenant (Work or School). You’ll see some status bars go by and then be prompted with a warning about unapproved verbs (for example banish?)
So now we want to (only look before making changes) get our organization structure, and more precisely, find the status of our OAuth2ClientProfileEnabled setting by issuing the command:
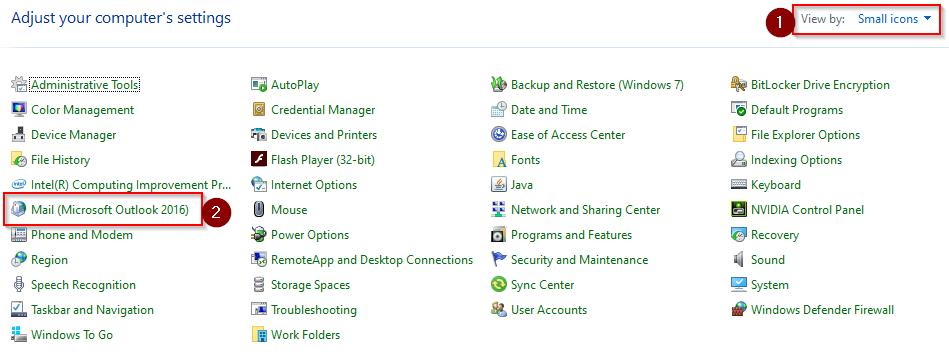
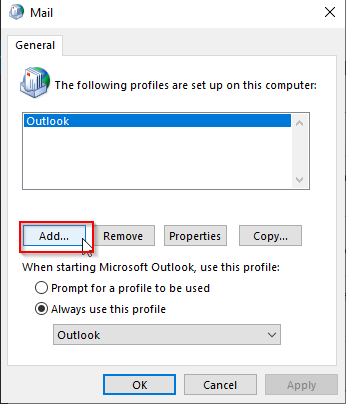
That’s about it! Give the setting about an hour to propagate and then try testing Outlook on the desktop again. You may get a few clients where their profile needs to be recreated. You can do this by going into the control panel > (1) choose Small Icons > (2) Mail Microsoft Outlook 2016.
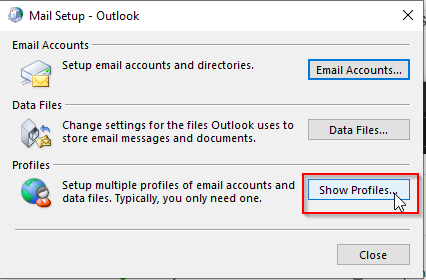
Then click Show Profiles
Click Add…
Now when setting up the new mail account, you should be prompted with the modern authentication and you’ll be prompted for your txt code or Microsoft Authentication Application.
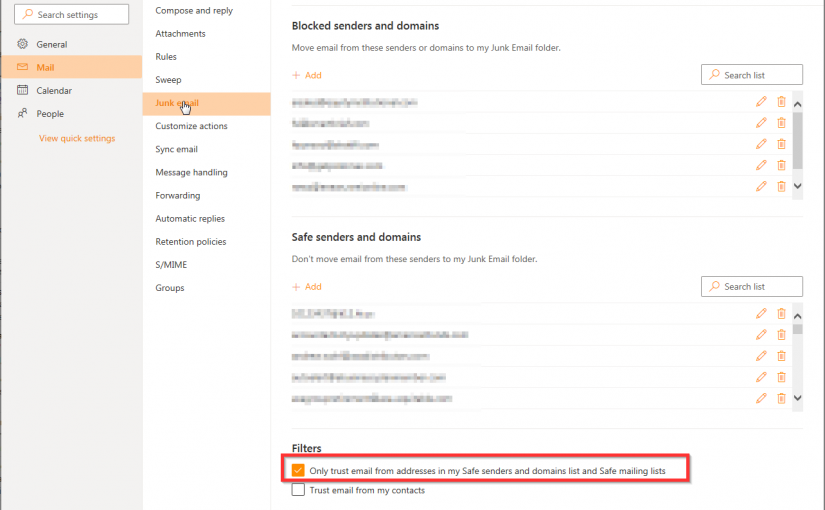
A user complained that valid good email was being sent to the Junk email folder on outlook on the web. To get to the setting, click on the Gear Icon > View all outlook settings > Junk Email. Attempts to uncheck “Only trust email from addresses in my safe senders and domains list and safe mailing lists.” were unsuccessful and we cannot save the setting.
After having created a Resource Room in the Office365 Admin console (with an Enterprise E1 license,) you may find that meetings which are created in Outlook and which are sent, are not automatically processing and sending verification confirmations back to the person that created the event. Nor will new events populate the event in the new room’s Outlook calendar. In this case, there are a few things we can check to ensure the room behaves as intended.
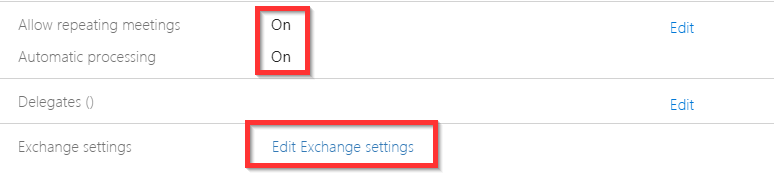
First, after creating the room, ensure that you, as an admin, are set as an owner of the room. Under O365 > Admin Center > Rooms and Resources > place a checkmark next to the room in question. Ensure that Allow repeating meetings and Automatic Processing is On. Then, click on Edit Exchange Settings:
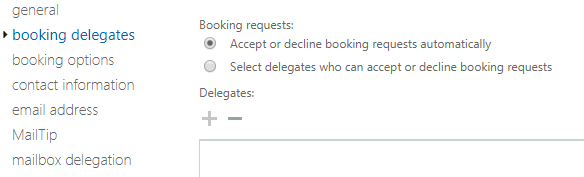
2. In this example, we don’t use booking delegates. In the Exchange Settings for the new resource room, make sure Booking requests are accepted automatically.
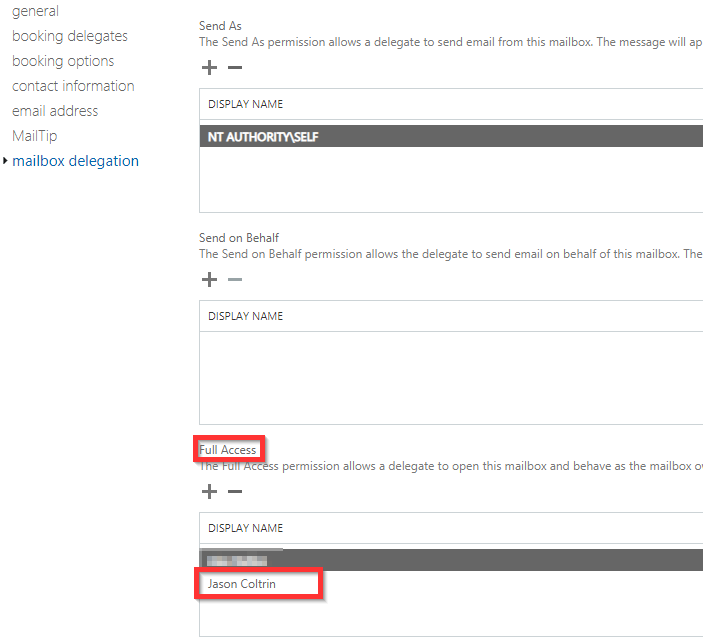
3. Edit the booking options, contact information, email address, and mailtip settings to your preferences and then click on Mailbox Delegation. Here, add yourself under Full Access so that we can go on to our next step.
4. Next, log into your own OWA admin Outlook online inbox. In Outlook, click your profile photo in the upper right corner and click “Open another mailbox.” Type the address of the room and open the webmail for the room.
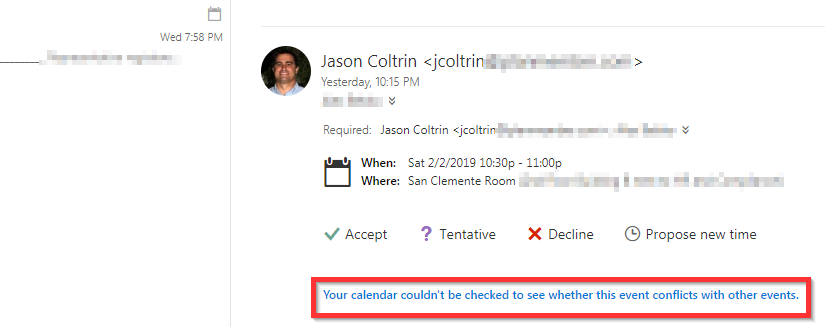
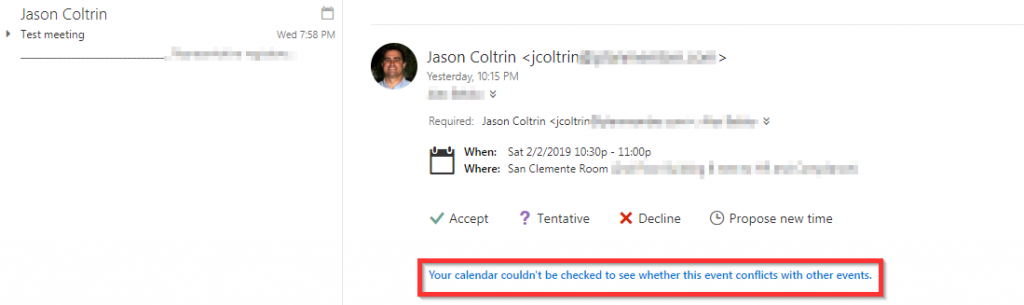
5. Here you may see some emails of previous attempts to book events like the following with the error “Your calendar couldn’t be checked to see whether this event conflicts with other events.“:
6. This error lets us know that automatic processing is not working even though we have it set to “On” in our first step. Had the processing worked correctly, we wouldn’t even see this event email in the mailbox of the room in question.
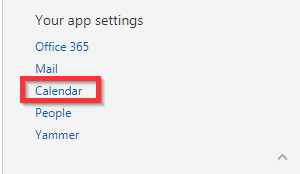
7. In the upper right corner, click the Gear icon, then under Your app settings, click Calendar.
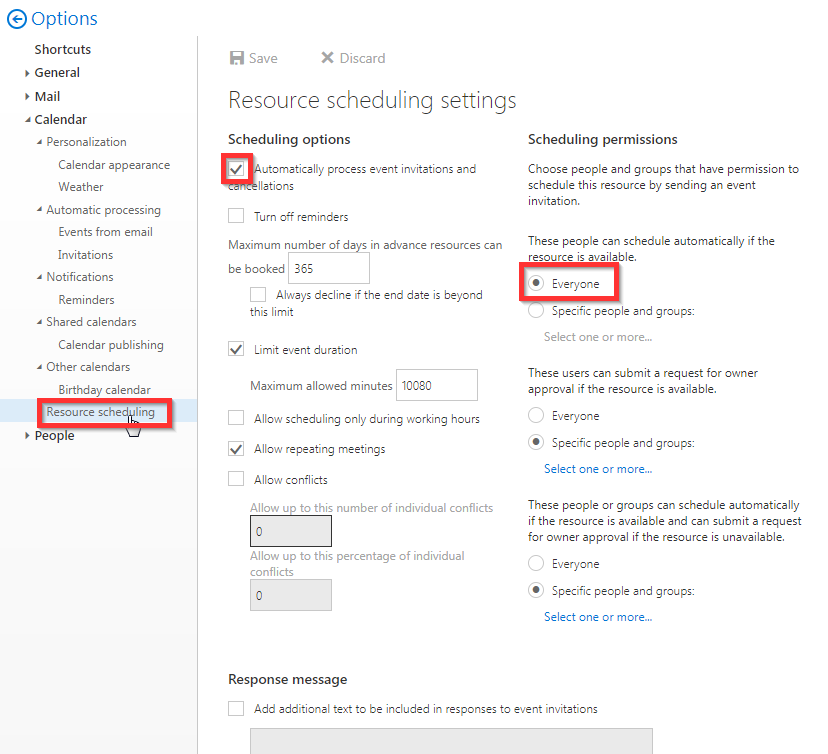
8. In the calendar resource scheduling settings, ensure that under the scheduling options, “Automatically process event invitations and cancellations” is checked, and then click Save.
9. In theory, these settings should be enough to get the calendar to auto process and verify, however, your results may vary. Test by creating a meeting event in outlook with the new room. When you send the meeting, you should receive a verification email in your inbox in less than a minute. If you don’t receive the verification, check the inbox of the calendar again. You’ll probably find more emails with the “Your calendar couldn’t be checked…” errors.
10. Time to open PowerShell and connect to your O365 Exchange. If you’ve enabled MFA (two-factor authentication) use the guide on how to connect to Exchange with Hybrid/Modern Authentication here. If you don’t use Modern 2FA authentication, use the following commands:
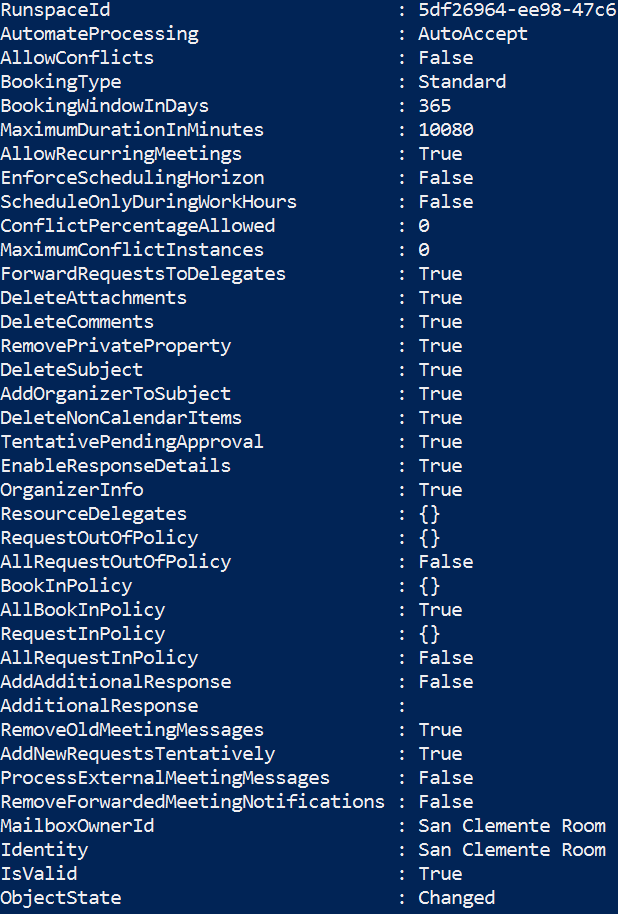
12. It’s helpful to first get a list of all calendar processing objects of a room that already works correctly to refer to when editing your new room’s permissions. If you don’t already have a room that you can reference, below is a list of my room that is not behaving normally:
13. Notice that ProcessExternalMeetingMessages is set to False. Let’s change this to True with the following command:
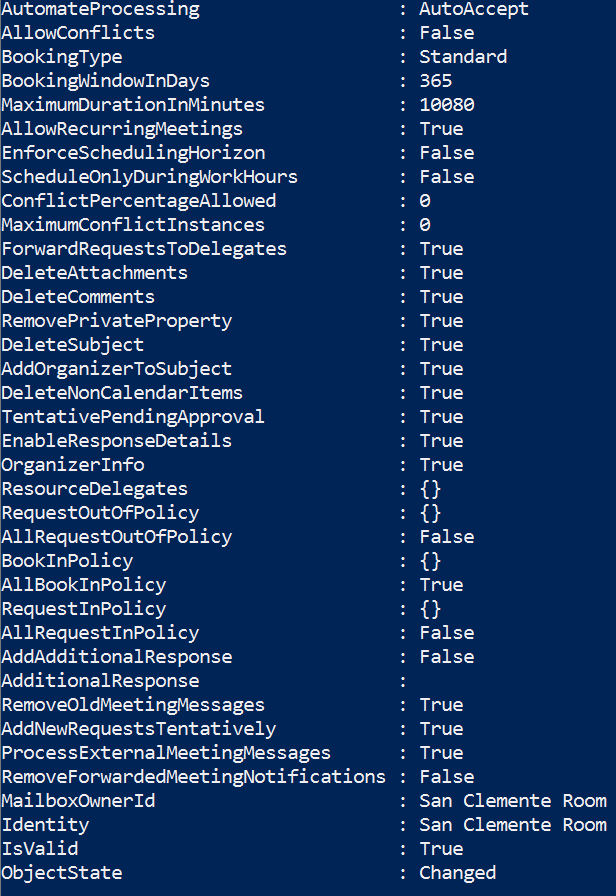
14. After making this and a few other changes displayed in the following screenshot, go ahead and try creating another test meeting and see if the autoprocessing behaves as it should. If you’re still having trouble, try referring to the screenshot below as an example, and use the “Set-CalendarProcessing” command to edit the values.
15. Once you successfully receive verifications and the calendar populates with events as it should, you may want to set the calendar to display the owner of the event and details of the event (rather than the event is listed in the calendar as only “Busy”.) To do so, follow the instructions I wrote in my article here.
Occasionally we’ll be required to set a user account on Office365 to never expire. It’s not advisable to perform this action, as a compromised account who’s passwords never expires can be a liability. However, in some cases a utility account such as a scanner/copier or kiosk account may require a password that does not change. The following tutorial will show you how to set an Office365 password to never expire using PowerShell.
First, we’ll want to ensure that the account password is not already set to expire and we want to confirm it’s status. Using PowerShell we can get information about an Office365 user account password expiration status.
1. Connect to Microsoft Online Services with PowerShell by running the following commands:
Import-Module MSOnline
Connect-MsolService
2. Next, replace <UserID> with the user account (email address) of the user’s properties we want to get with the following command:
3. Because we get the message returned that the property PasswordNeverExpires = False, we want set it to $True and set the account password to never expire with the following command:
Because our PasswordNeverExpires property is now set to True, our task is complete. Disconnect from Office365 and close powershell by entering the command: exit.
Use PowerShell to get the Windows Experience Index in Windows 10
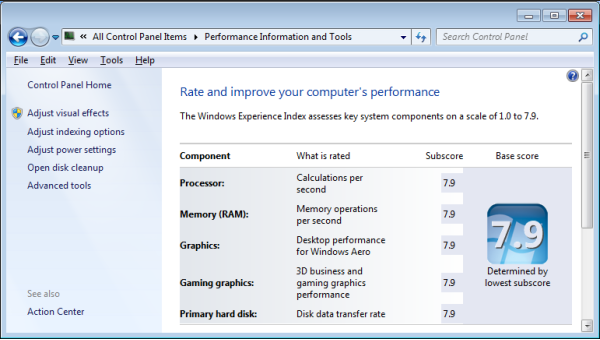
Windows 7 has the Windows Experience Index which is used often by hardware techs to get a good idea about the kind of hardware installed in a PC. It also allows you to quickly find where improvements can be made to get the machine to run faster. The following screenshot is an example of the Windows 7 Windows Experience Index:
You can get an idea about how fast the components of your Windows 10 computer are by running the Windows System Assessment Tool, but the readout is a little hard to understand. Skip this part (winsat formal) to get the Windows Experience Index in Windows 10 or Windows 7 with PowerShell below.
First open an elevated command prompt and run the command:
winsat formal
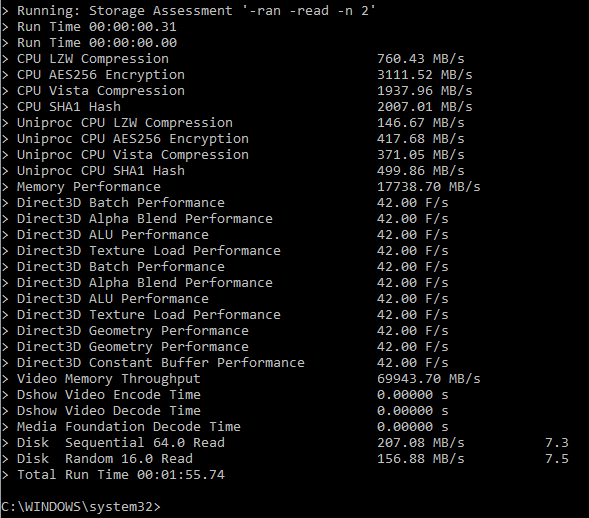
Below is a screenshot of the command running and it’s output. Running this tool will slow down your PC for a few minutes as it runs the tests:
Results:
The Windows Experience Index WMI modules are still available in Windows 10, however, the scores are not readily apparent in the Windows 10 system settings.
To get your Windows 10 Windows Experience Index subscores with PowerShell, first open up the Windows PowerShell ISE. Next, go to the following link: https://pastebin.com/i5M81xsV, -credit goes to reddit user:
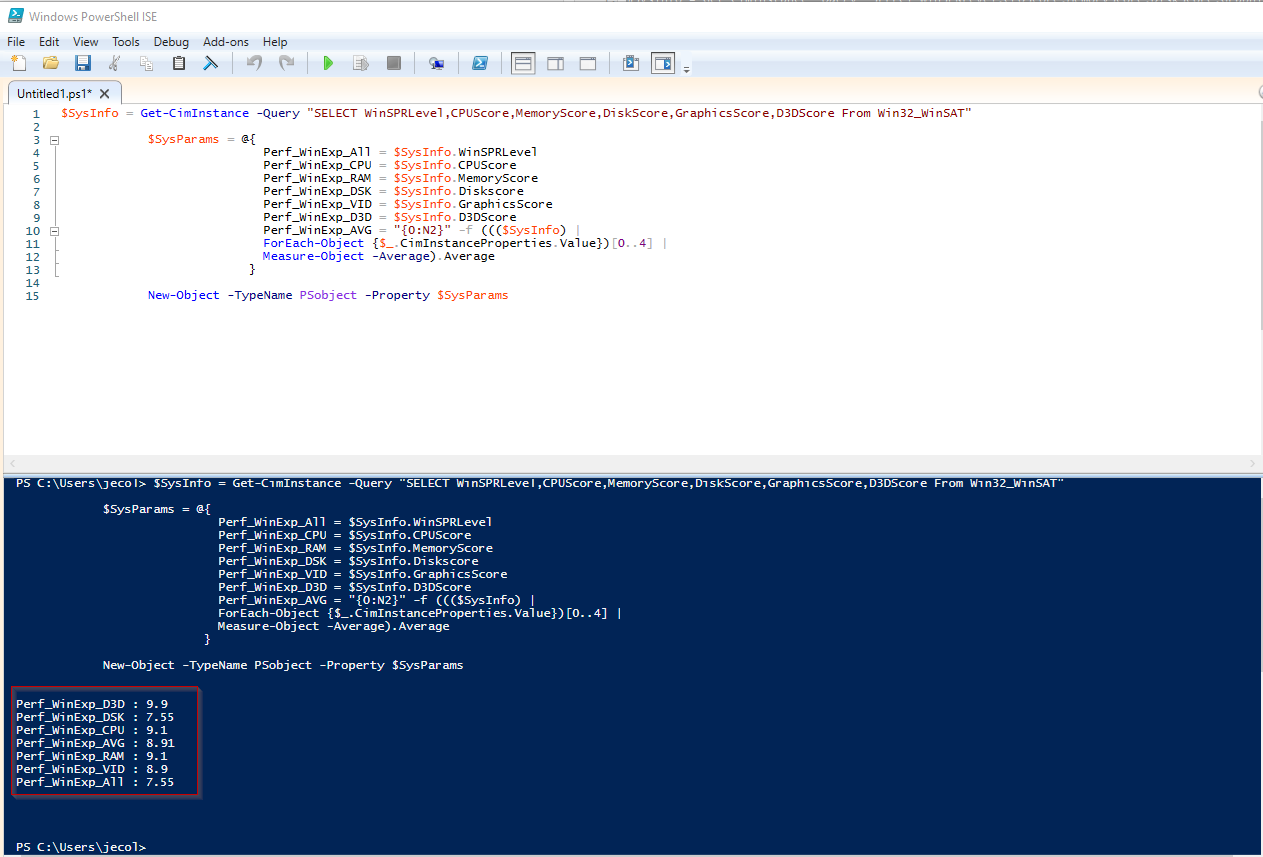
Copy the code into the Windows 10 PowerShell ISE and then run the script, or create a .ps1 file, and you can get the Windows Experience Index with PowerShell in either Windows 10 or Windows 7:
So you can see that in my results, my WEI score would be 7.5 – where the lowest subscore determines my overall result. Looking at the scores, I can improve my score and upgrade my computer by increasing the DSK (disk) performance. To do this I would probably have to upgrade my motherboard to one that supports an NVME hard drive.
My friend’s laptop’s lowest score is VID (video) which means his laptop GPU is keeping the score low. There are a few options for upgrading a laptop GPU, such as an external GPU, but this isn’t surprising as most laptops GPUs can’t compete with a full-sized computer and GPU.
How to get a list of users who have enabled Out of Office in Outlook with Office365 PowerShell
For administrators of Office 365, you may need to occasionally get a list of users who have set up or enabled their Out of Office in Outlook. In my case, we needed to see which parking spots were available on campus in a pinch, and who was not coming in the next day. To do this with PowerShell we’ll need to first connect to our Office 365 Exchange Tennant.
In PowerShell ISE, enter the following code into the code view, save the function as Connect-O365.ps1, and then hit the green Play button.
Next, execute the new function with the following command:
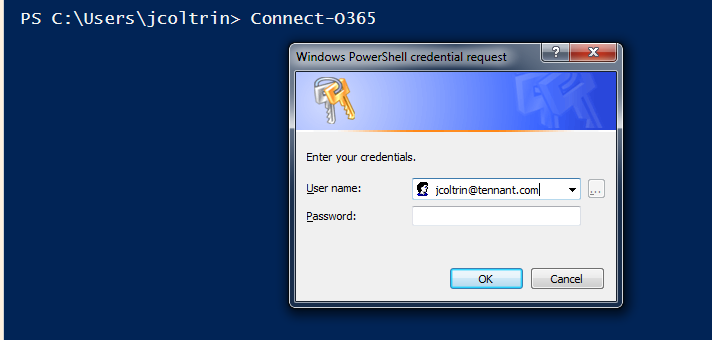
Connect-O365
Replace the username and password with your Office365 admin credentials (not your on-premise domain credentials.) This will log you into your Exchange Admin with PowerShell where we can run our Out of Office commands.
With authentication out of the way, now all we need to do is run the following command to get a list of mailbox identities who have AutoReply configured (and not disabled), and sort by Identity, Start Time, End Time, and Auto Reply State:
Solved: Office365 O365 Resources Rooms and & Equipment cannot view details or subject in shared calendar, can only see “Busy” and Set-MailboxFolderPermission did not fix or resolve.
So a room calendar would not display who reserved the room, and users requested that the calendars for room reservations display who reserved the room and the details. By default the event only displays “Busy”. Most posts I found online for this issue have the same resolution: use Set-MailboxFolderPermission to display details, comments, subject, and organizer. I did this and tried this using the identity in quotes as well as the full email address of the room, however the Set-MailboxFolderPermission setting did not work and the calendar would still only show “Busy”.
I was able to resolve the problem by looking at the rights of the users.
I found that the Calendar Access Rights for the User: “Default” only had {AvailabilityOnly}
To check permissions and fix this issue, first open PowerShell and connect to your O365 Exchange. If you’ve enabled MFA on your Office365 account (two-factor authentication,) use the guide on how to connect to Exchange with Hybrid/Modern Authentication here. If you don’t use Modern 2FA authentication, use the following commands:
Once connected, first check that the default user has the correct AccessRights and permissions to work with the calendar. As you can see below here, the Default user has {AvailabilityOnly} permissions when issuing the following command:
Now the event’s details and subject can be viewed by everyone. This change takes place pretty quickly, within a minute – the “Busy” events should change to display the details when you close/open Outlook and/or switch between the calendars in Outlook online. Hope this saves someone else a call to MS Support.
In the event the new room’s Calendar is not auto processing or accepting meeting requests, check out my article here:
As a systems administrator, quite often you’ll need to create new user accounts in Active Directory and MSOnline Office 365. It’s good to streamline your new user creation procedure as much as possible to make the process faster and more accurate. Thanks to PowerShell, we can turn a whole bunch of point and clicks into just a few PowerShell commands. In this example procedure we will first create an Active Directory AD user account with powershell and a .csv file and then add that user into multiple groups with a different powershell script and a .txt file that has a list of the groups. We will also use another powershell script to get the canonical name of the groups so that our script can find the LDAP location of the group in Active Directory. Secondly, because we do not run our own exchange server we will use powershell to connect to Office365, and create a new user there, license the user, and then add the user to some distribution groups. Prerequisites are powershell, and import AD components and MSOnline components.
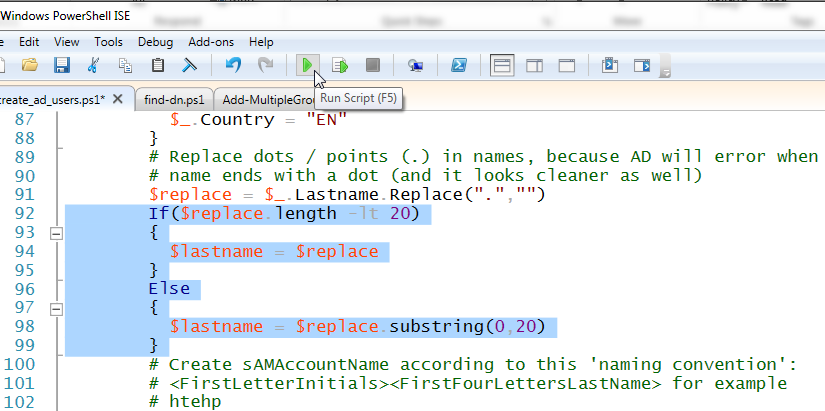
Edit create_ad_users.ps1 lines 92 and 98 to accommodate longer last names. In the original script it only allows for first initial and then a truncated last name of 4 characters. In my case, we have some users with long last names, so I set those values to 20:
Copy info from your HR department about the new user into the .csv file c:\newusers\import_create_ad_users.csv
Run PS C:\newusers> .\create_ad_users.ps1
Next check the new username in ADUC for such things as account name, address, phone number etc. to ensure the entries are accurate.
With our new user account created, most likely we will want to make that user a member of several security groups. To do that with PowerShell, we need to make sure that we have the correct LDAP names for our groups and place them into a file named groups.txt. In order to do so, we need to run another powershell script named find-dn.ps1 . The code is as follows:
# Function Find Distinguished Name
function find-dn { param([string]$adfindtype, [string]$cName)
    # Create A New ADSI Call
    $root = [ADSI]''
    # Create a New DirectorySearcher Object
    $searcher = new-object System.DirectoryServices.DirectorySearcher($root)
    # Set the filter to search for a specific CNAME
    $searcher.filter = "(&(objectClass=$adfindtype) (CN=$cName))"
    # Set results in $adfind variable
    $adfind = $searcher.findall()

    # If Search has Multiple Answers
    if ($adfind.count -gt 1) {
        $count = 0
        foreach($i in $adfind)
        {
            # Write Answers On Screen
            write-host $count ": " $i.path
            $count += 1
        }
        # Prompt User For Selection
        $selection = Read-Host "Please select item: "
        # Return the Selection
        return $adfind[$selection].path
    }
    # Return The Answer
    return $adfind[0].path
}
This code should be inserted into a new PowerShell ISE tab and then saved as find-dn.ps1 . Running the code will produce a new PowerShell function (but will not write any output to the screen.) Find the group names in ADUC that you want the CN name for, and then use the following command(s) to return the CN name:
find-dn "group" "FinanceGroup"
The script will return something similar to the following:
Remove the part “LDAP://” and copy the remaining string into the c:\newusers\groups.txt file, which after finding the rest of your group CN names, should look something similar to the following:
Now that we have our CN security group names, we can add the user(s) into the groups with the following script. For this step we can utilize the script found here: https://community.spiceworks.com/topic/459481-adding-users-to-multiple-security-groups-in-ad – which was contributed by Martin9700 . Copy the following script into a new PowerShell ISE tab and name the file Add-MultipleGroups.ps1 :
#requires -Version 3.0
Param (
    [Parameter(Mandatory,ValueFromPipeline)]
    [String[]]$Groups,
    [Parameter(Mandatory)]
    [String[]]$Users,
    [switch]$Passthru
)

Begin {
    Try { Import-Module ActiveDirectory -ErrorAction Stop }
    Catch { Write-Error "Unable to load Active Directory module, is RSAT installed?"; Exit }
    $Result = @()
}

Process {
    ForEach ($Group in $Groups)
    {   Try {
            Add-ADGroupMember $Group -Members $Users -ErrorAction Stop
            $Result += [PSCustomObject]@{
                Group = $Group
                AddMembers = $Users -join ", "
            }
        }
        Catch {
            Write-Error "Error adding members to $Group because $($Error[0])"
            $Result += [PSCustomObject]@{
                Group = $Group
                AddMembers = $Error[0]
            }
        }
    }
}

End {
    If ($Passthru)
    {   $Result
    }
}
Run the following command to add user to the appropriate security groups:
With the above script you can use the file to run a number of different options as well such as:
You can just put the group names in -Groups:

.\Add-MultipleGroups.ps1 -Groups "testgroup1","testgroup2" -users user1,user2,user3,user4

You can use a text file (either in Groups or via pipeline):

.\Add-MultipleGroups.ps1 -Groups (Get-content c:\groups.txt) -users user1,user2,user3,user4

Get-content c:\groups.txt | .\Add-MultipleGroups.ps1 -Groups -users user1,user2,user3,user4

You can also use Get-Content for users, but you can pipe it:

Get-content c:\groups.txt | .\Add-MultipleGroups.ps1 -Groups -users (Get-content c:\users.txt)
You can confirm in ADUC that the users are now members of the security groups in our groups.txt file.
Add users to Office 365 and Distribution Groups with PowerShell
Great! Now that we have our user accounts created on the AD side of things, we will move on to adding our user(s) into Office365:
With PowerShell up and running will will issue the following commands:
Now we need to add a license to the user account. We need to do two things before we can assign the licenses. First is we need to to determine the different sku’s we have available to license, and second, we need to set the usage location. To accomplish the first part, we can issue the command:
Now that the user is licensed, we will add the account to a few Exchange Distribution Groups. We will need to import a new PSSession from outlook.com before we can run the Exchange commands. Import the session by first creating a function called “Connect-O365” by running the following (just like we created the function find-dn above):
A number of these scripts and commands can be combined into .ps1 files to optimize the workflow even further. With the information here you should have a good place to start. Let me know in the comments how you added your own features to the procedure.
My latest article on 4sysops.com describes how to connect to the Google Cloud Platform and Google Cloud Instances with PowerShell. A systems developer kit SDK was released for PowerShell that creates new gcloud commands and it’s awesome!