To enable Bitlocker on your Windows computer, you first need to be running the Windows 10 Pro operating system. Windows 7, Windows 8, and ‘Windows 10 Home’ versions do not support Bitlocker.
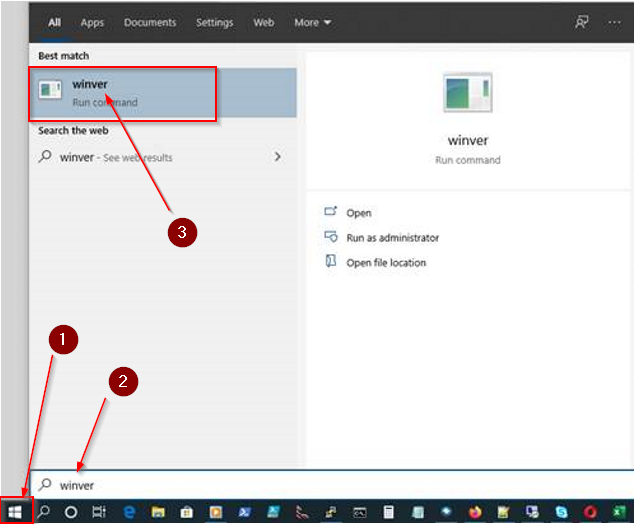
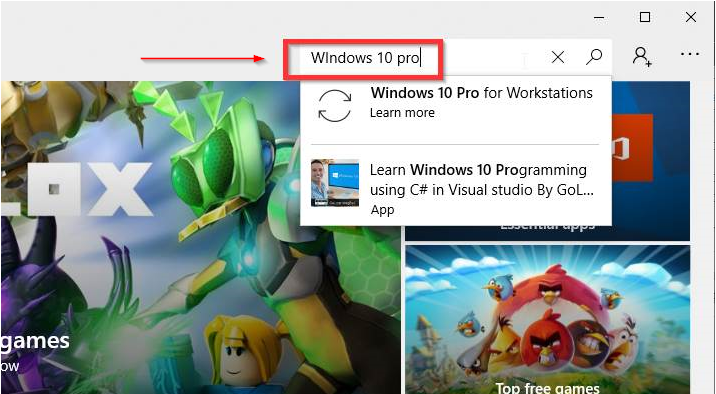
It’s a good idea to first know your current operating system version. To do so, click on the Start Button and type “WinVer” and then press Enter:
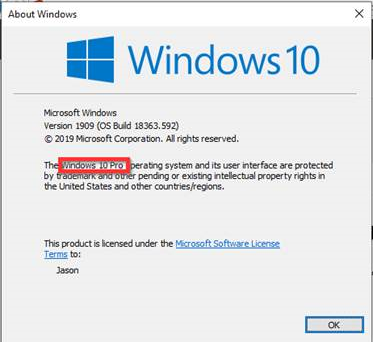
Check the version of operating system. You need to have Windows 10 Pro. As of the time of writing this article, the most version of Windows 10 is Version 1909 (OS Build 18363.592).
If you have Windows 7, follow the upgrade instructions below. If you have Windows 10 Home, then you need to purchase the upgrade to Windows 10 Pro, and follow instructions here.
You need to upgrade from Windows 7 Home to Windows 10 Home before you can upgrade to Windows 10 Pro.
When running the Media Creation Tool, run the Upgrade option. It will take a while and several reboots to upgrade from Windows 7 or 8 to Windows 10. If you started with Windows 7 Home or Windows 8 Home, the tool will most likely upgrade your PC to Windows 10 Home.
After you’ve finished the ‘Windows 7 Home’ to ‘Windows 10 Home’ upgrade, you now need to upgrade from Windows 10 Home to Windows 10 Pro in order to get the Bitlocker feature.
Upgrade from Windows 10 Home to Windows 10 Pro
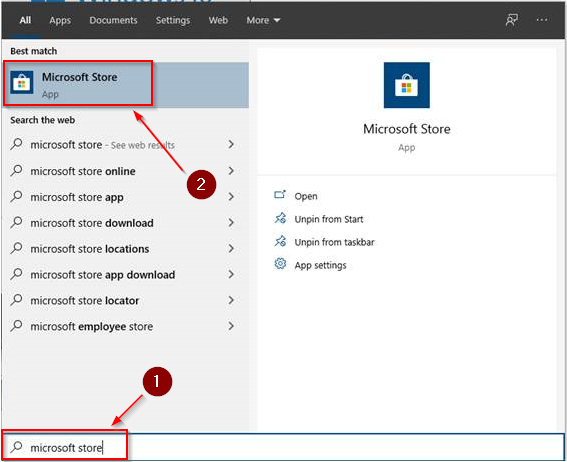
To upgrade from Windows 10 Home to Windows 10 Pro, click on the start button and type ‘Microsoft Store‘ and press Enter.
In the store, search for Windows 10 Pro in the upper-right corner of the store:
Purchase the upgrade ($99) and then run the upgrade. The process will take a while and several reboots.
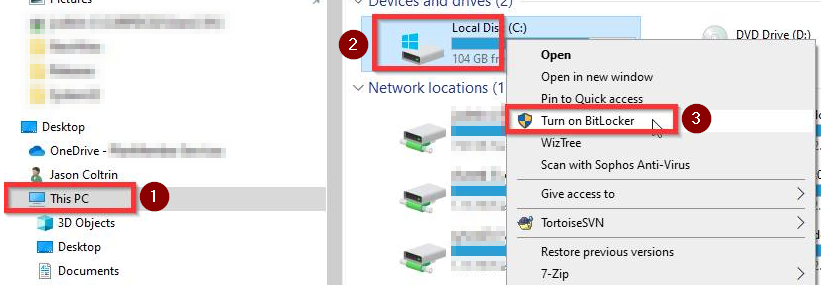
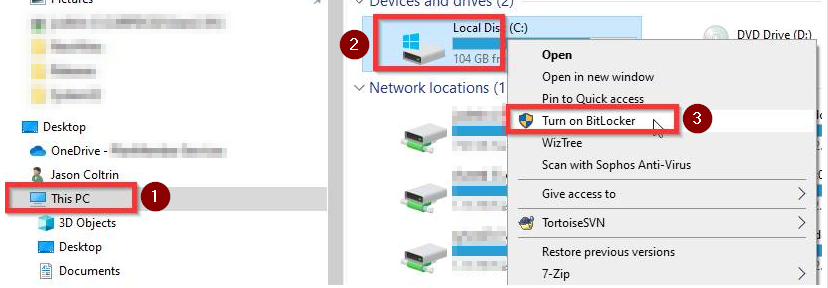
Once you are on Windows 10 Pro, open the File Explorer, click This PC, then Righ- click on the C: drive and choose Turn on Bitlocker or Manage Bitlocker.
Enable Bitlocker for the C: drive – Save the Bitlocker encryption/decryption key to a removable USB drive, save to the cloud, and print for a hard copy. This password to unlock the drive and the Recovery/Decryption key are very important, do not lose them.
Follow the default prompts (ok to skip system check) and the drive will begin encryption. You should see a status bar and progress indicator showing the percentage of encryption. When it reaches 100%, the encryption process has finished.
Reboot the system to complete the encryption of the drive.
After the reboot, log in to the desktop again, and use the Windows Control Panel to check the status. Please follow instructions here:
When trying to setup and authenticate to an AWS Instance running OpenVPN, a user could not complete a new connection to OpenVPN after entering the initial un/pwd. They receive the error: Permission denied. This is after successfully setting up the OpenVPN client on Windows 10 and scanning an Authenticator code using Google Authenticator App on a Samsung S8 Active Android mobile phone running Android 8.0.0 ‘lollipop’. Ultimately the reason the user could not authenticate was their mobile phone’s time was off by about 3 minutes. Continue below to find additional information on how to troubleshoot this and other authentication issues with OpenVPN.
When troubleshooting OpenVPN login errors it’s a good idea to first try some of the following:
Unlock a Disabled or Locked account on OpenVPN Admin console
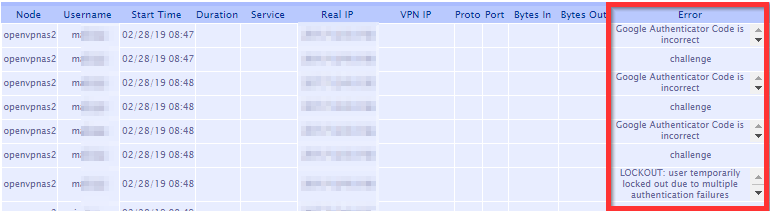
To check for the events related to a user lockout, first log into the Admin web console > Status > Log Reports. Here you will find the errors related to bad authentication and eventually an account lockout.
The errors you may find could be the following:
Google Authenticator Code is incorrect.
LOCKOUT: user temporarily locked out due to multiple authentication failures.
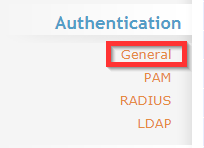
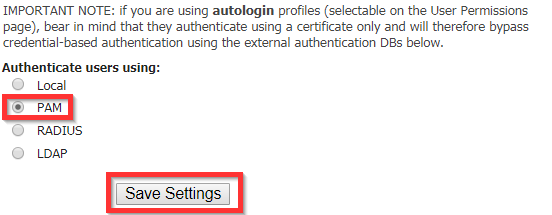
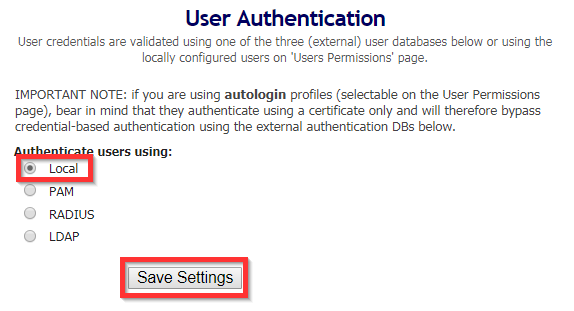
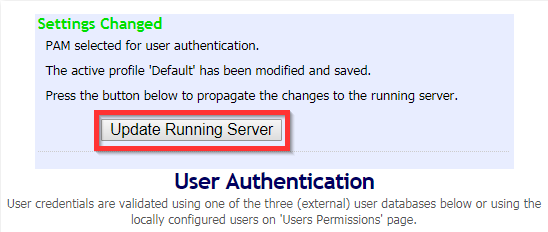
To unlock a user account (if using local authentication), Login to the Admin Web Console, Go to “General” under Authentication and change Authentication to “PAM”, Save Settings > Update Running Server > “Local” > Save Settings> Update Running Server.
This procedure should unlock disabled or locked user accounts on OpenVPN.
Reset A User Account on OpenVPN
To reset a user’s OpenVPN account:
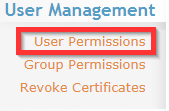
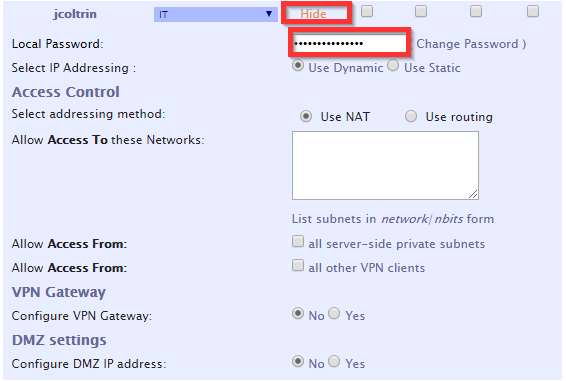
Log in to the admin web console, click on User Permissions.
Find the username, place a checkmark in the Delete column, then Apply > Save. Next, re-create the account. Scroll to the bottom of the list, type the new user name: Eg. jcoltrin Save > update server
Go back find the username again in the list and hit Show:
Enter in the Local Password: (S3cr3tP@ssw0rd!) Save > Update
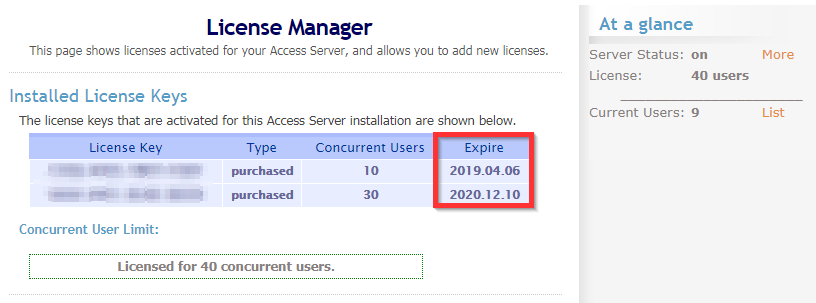
Check OpenVPN for Valid Concurrent License
In the admin web console, under the Configuration menu, click License. Check to ensure that your concurrent users have not reached or exceeded the limits of your licenses (under At a glance,) or that your licenses have not expired.
Use SSH to check the logs of the OpenVPN server and get the specific errors for an individual’s login problems.
After logging into the server using Putty/SSH, you can change directory to the scripts directory:
cd
/usr/local/openvpn_as/scripts/
and then issue the command ./authcli –user <username> –pass S3cr3tP@ssw0rd
./authcli --user jcoltrin --pass S3cr3tP@ssw0rd
This will produce something similar to the following information:
Result:
API METHOD: authenticate
AUTH_RETURN
  status : COM_FAULT
  reason : An error occurred while connecting: 13: Permission denied. (twisted.internet.error.ConnectError)
  user : jcoltrin
Addtionally you can find more messages related to authentication failures in /var/log. You’ll find these messages in the latest log files:
openvpnas.log
openvpnas.log.1
Use your favorite editor (vi) to search through the logs
vi openvpnas.log
use the command / and then the username to search for that term and hit “n” to go to the next instance of your term, for example:
/jcoltrin > n > n
and then :q to quit.
Here are some typical error messages for my authentication errors:
2019-02-26
14:20:08-0800 [-] WEB OUT: '2019-02-26 14:20:08-0800
[UDSProxyQueryProtocol,client] Web login failed
(twisted.cred.error.UnauthorizedLogin)'
2019-02-26 14:21:30-0800 [-] WEB OUT: "2019-02-26 14:21:30-0800 [UDSProxyQueryProtocol,client] Web login authentication failed: {'status': 1, 'client_reason': 'LOCKOUT: user temporarily locked out due to multiple authentication failures', 'reason': 'LOCKOUT: user temporarily locked out due to multiple authentication failures', 'user': 'jcoltrin'}"
Make sure the phone with Google Authenticator has the correct time and set the phone to sync it’s clock with the network/carrier
As mentioned at the beginning of this article, what the original login issue came down to was the Android phone, on which the Google Authenticator was running, had it’s time off by about 3 minutes. To set and change the correct time on an Android Galaxy S8 Active, first, go to Settings > General Management > Date and Time > Set/Turn on Automatic Date and Time.
I’m not sure why the value for this phone had it’s time set to not have automatic sync with the network/carrier. This may have been due to a recent android update because I found this setting off on a couple phones in the office. Ensure the time on your server is accurate as well by issuing the bash/ssh command:
date
Your result should look like the following:
openvpnas@openvpnas2:/var/log$ date
Thu Feb 28 14:46:57 PST 2019
I ran into trouble when trying to clone a new Optiplex 7050. My normal procedure for cloning with clonezilla required a little tweaking to accommodate Windows 10, UEFI, NVME M.2, Secure Boot, and RAID On. Follow the procedure below to clone your systems on these newer hard drives and BIOS versions.
As a side thought, I enjoy using Clonezilla and have used it for many years. I love the convenience of it and not having to manage Windows images with something like SCCM. While SCCM has a place in some organizations, I believe it’s perfectly fine to use Clonezilla to create OS images of different models of computers. I have approx 15 different OS images; everything from Lenovo laptops to Dell Optiplex 380’s to Optiplex 7050’s.
Requirements:
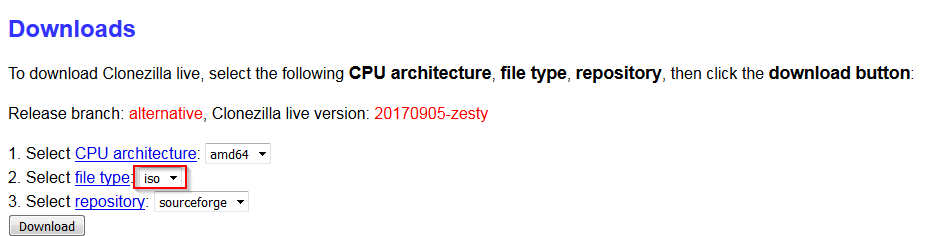
1 x USB 2.0 or 3.0 USB thumb drive min 2GB capacity for the clonezilla bootable USB drive made bootable to 20170905-zesty version of clonezilla
1 x USB 3.0 USB External HDD with a minimum HDD size that is larger than the TOTAL size of your M.2 NVME HDD. (I use a 4 TB Western Digital My Passport) – In my previous experience with Clonezilla, it has created images only writing images of the Used Space on the Source HDD, in this case with UEFI / NVME HDD’s, the image created on disk is the total size of the NVME drive.
2 x Dell Optiplex 7050 (Source and Target) computers
1 x Separate PC or laptop you can use to create a bootable USB Clonezilla Thumb Drive
1. Configure your Source Windows 10 Dell Optiplex 7050 machine as necessary. Install all applications, create user accounts, and uninstall bloatware. Make sure you create an administrator user account and password. In final preparation for cloning, either run Sysprep (found in C:\Windows\System32\Sysprep), or alternatively ensure you shut down Windows 10 completely by creating a Shutdown /s /t 0 shortcut and executing it.
2. On a separate PC, download Rufus which we’ll use to create a bootable USB thumb drive.
5. Attach your USB thumb drive into your separate computer, run Rufus, tell Rufus to use the drive you just attached under Device, point Rufus ” to the .iso file you just downloaded.
6. Hit Start and the bootable USB thumb drive with Clonezilla will be created.
7. On the Source computer, insert the USB thumb drive into one of the front panel’s top (black) USB ports, and insert the USB External HDD separately into the Blue USB 3.0 port. Attach the keyboard, mouse, power, and monitor.
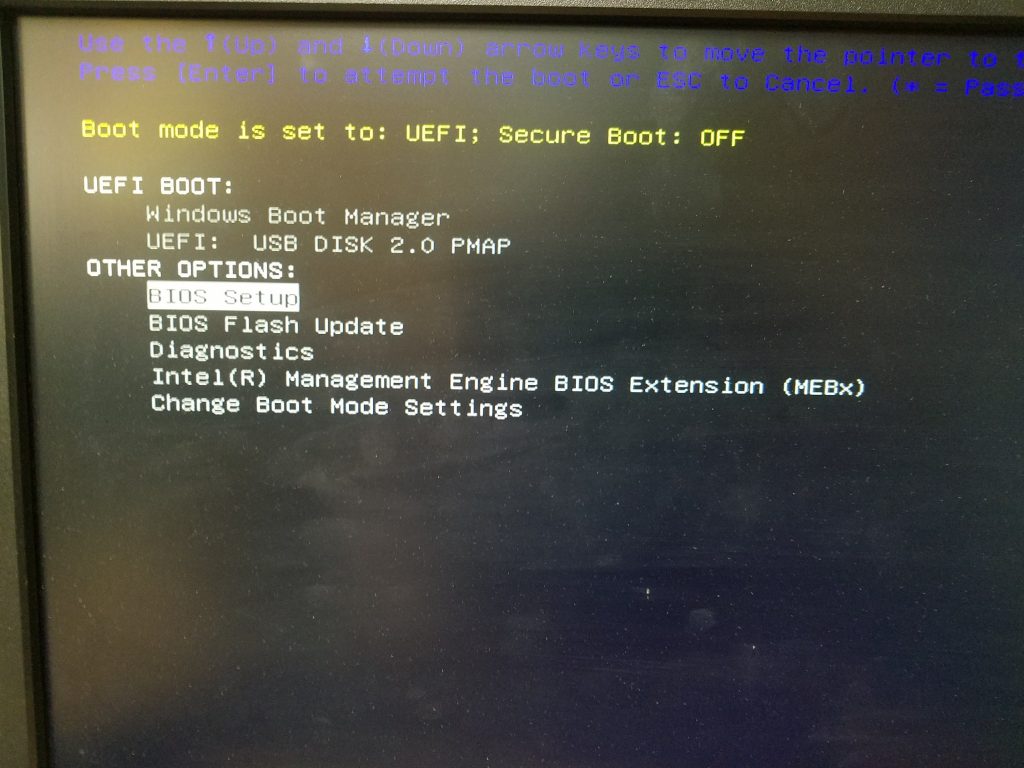
8. Power on the Source computer and start mashing the F12 key on the keyboard to get to the one-time boot menu.
9. Before we begin, we need to make sure clonezilla can find our NVME HDD. By default UEFI and Secure Boot will be enabled. We need to disable these as well as Boot Path Security so that we can continue.
10. Select Setup from the Boot Menu:
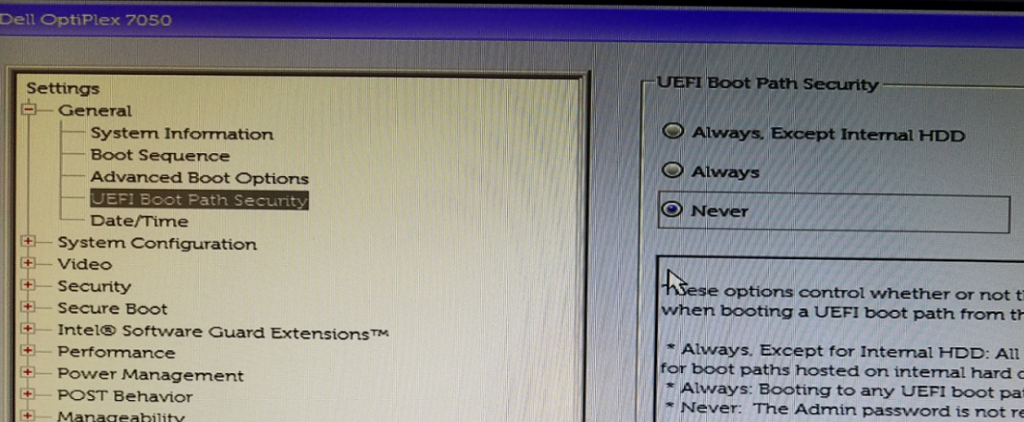
11. In the BIOS, under the General Heading, select UEFI Boot Path Security and change it from Always to Never.
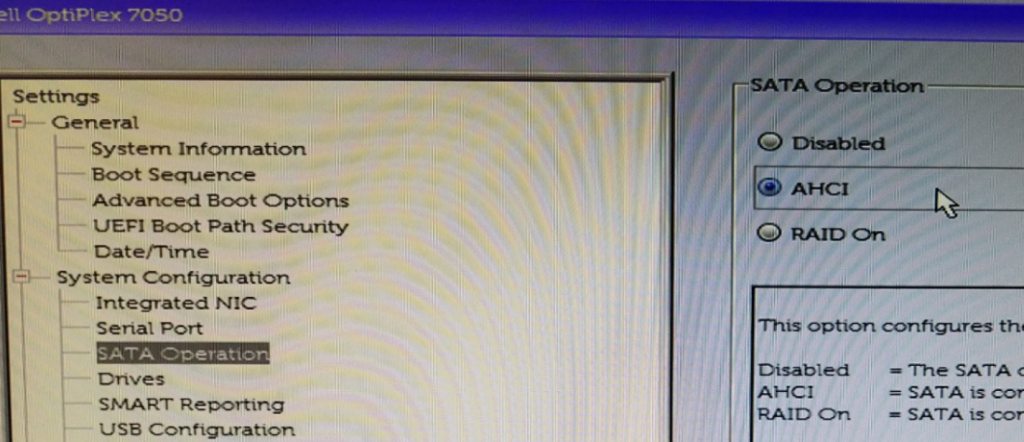
12. Next change System Configuration > SATA Operation from RAID On to AHCI
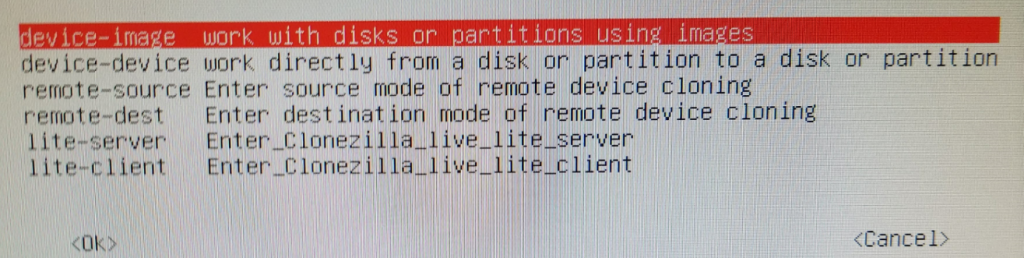
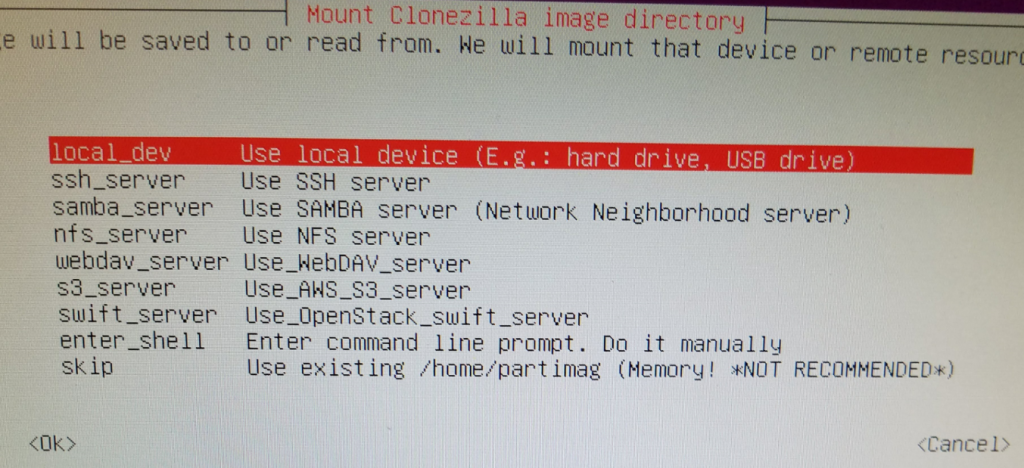
Under Mount Clonezilla image directory, choose Local_dev (Ok)
Press Enter to continue.
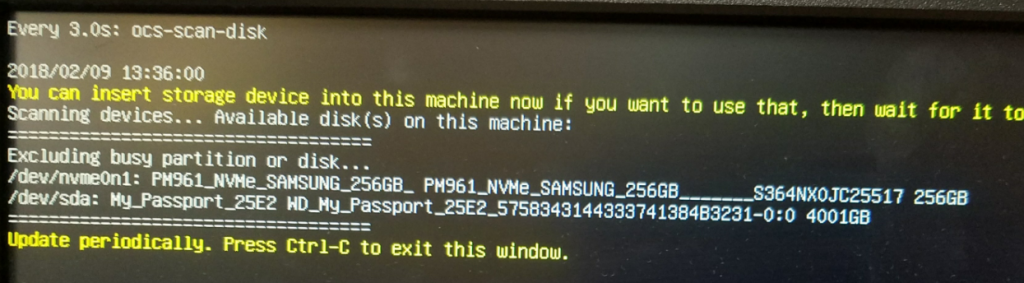
Review the clonezilla Scan disk preview to ensure it’s found both your Source and Target hard drives:
Press Ctrl-C to continue.
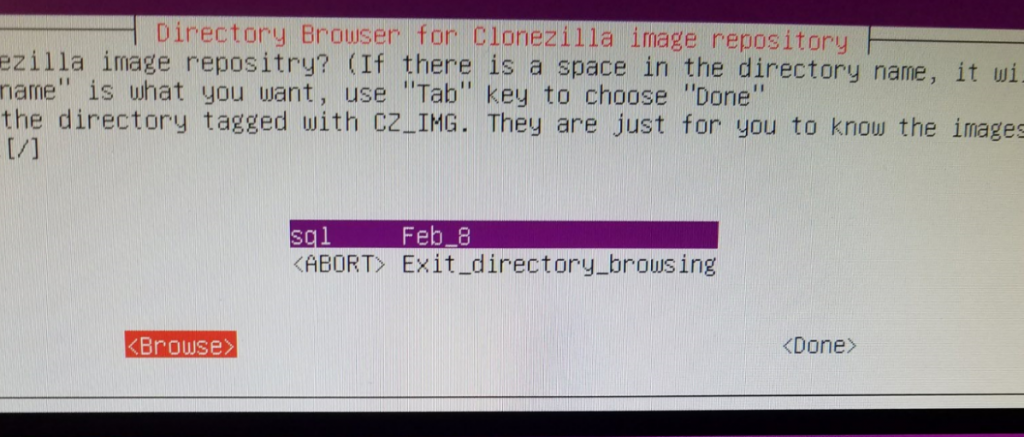
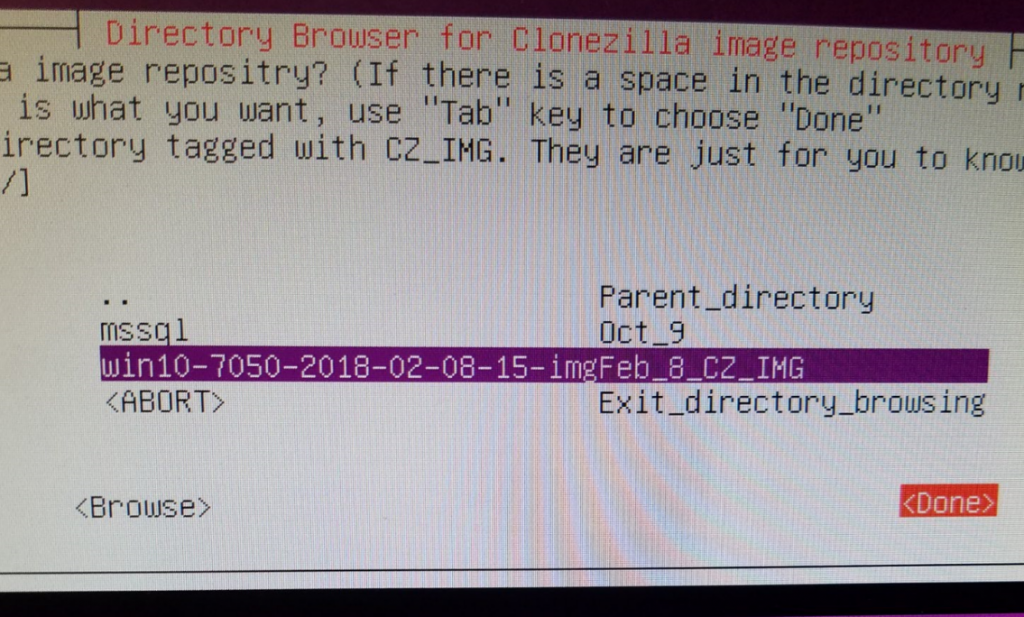
Arrow down and select your large external USB hard drive (sda1) to set the location of /home/partimg . This is where the clone image will be stored.
In the Directory Browser, hit “Browse” and go to your Parent Directory (top-most level) and select Done. This is where your image will be saved. You can see in my screenshot I’ve already saved an image here.
You will get a Summary location of Source (dev/sda1) and Target (/home/partimag). Press Enter to continue.
Choose Beginner mode
Choose Save Disk (Save_local_disk_as_an_image) – in my previous experience with Clonezilla, using normal spinning HDD’s and even SSD’s, I’ve used Samba to save my images to a separate server over the network using gigabit ethernet perfectly fine. However, in the case of these new computers and hard drives, I would get a permissions error when selecting SAMBA/SMB 2.1. The imaging would begin to take place and a couple smaller partitions would copy, but as soon as the primary large partition started it’s copy, I would get the permission error and the clone would halt. This is why we are using a local external USB hard drive.
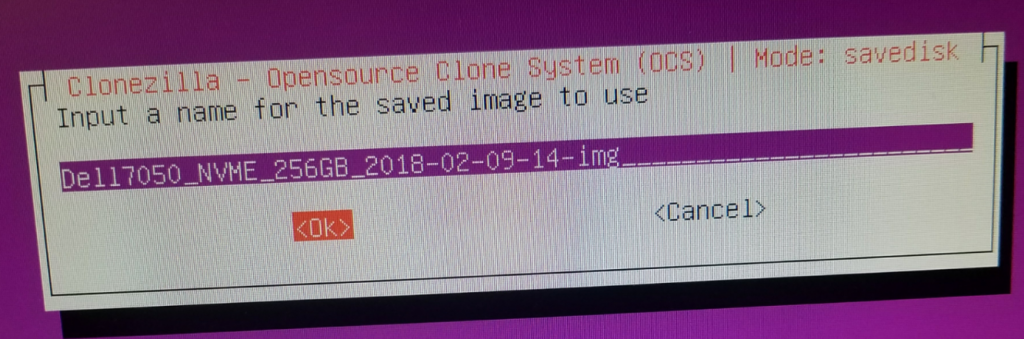
Give a descriptive name for the image (Dell7050_NVME_256GB_DATE-IMG) hit OK.
Select the local disk as source (should only be one here)
Select -sfsck (Skip Checking)
Select Yes, check the saved image
Select -senc Not to encrypt the image (or encrypt if desired)
Select Action to perform when everything is finished: -p power off.
Press Enter to continue, (Yes/Yes) – the image process will run and the image of the Source PC will be written to the External USB HDD. The machine should shut down when complete.
Image Target Computer
Now that we have our image saved on our external HDD, we can image our Target PC. On the powered-off PC, Connect the USB thumbdrive, External HDD, keyboard, mouse, and monitor, and again Boot into the BIOS.
On the new target computer, we want to again change the BIOS settings to mirror those we made in steps 11., 12., and 13.
After saving the BIOS, restart and hit F12 again, select the USB thumb drive, and boot Clonezilla.
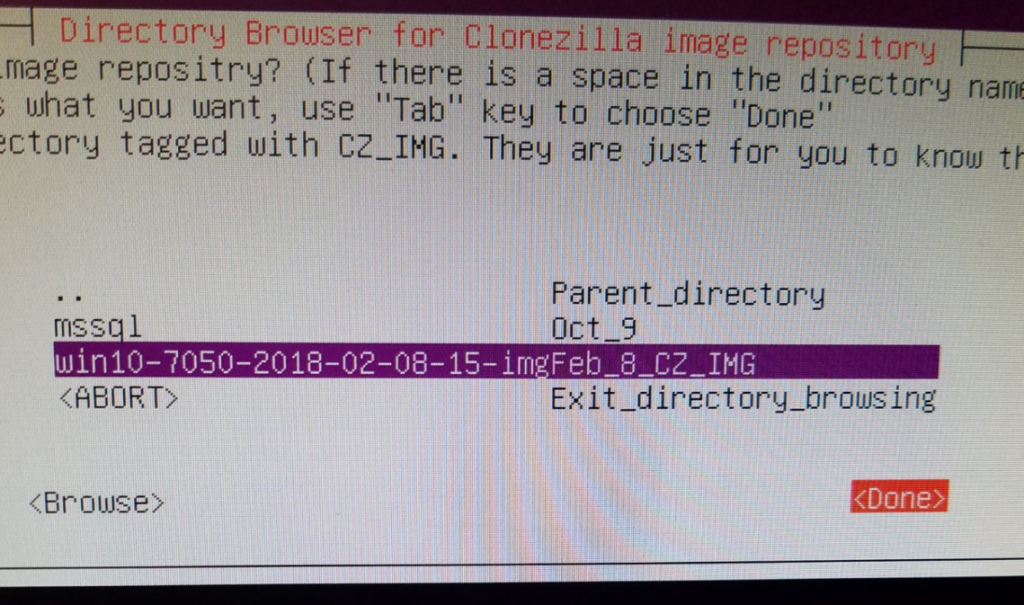
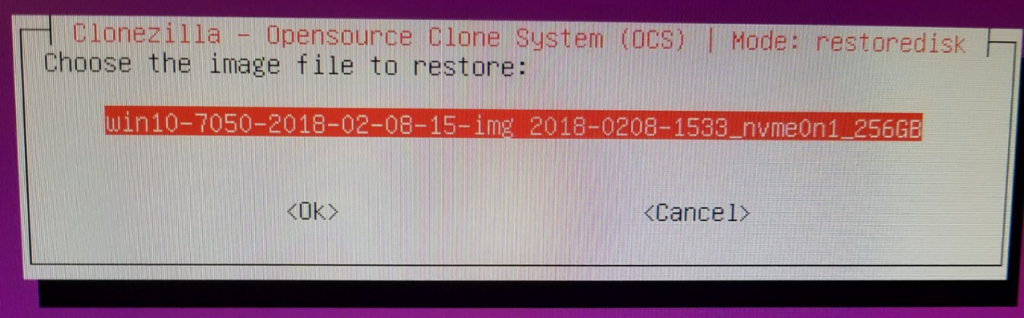
Start Clonezilla > Device Image > Local_dev > select image repository (sda1) > in Directory Browser, browse to the image we created, highlight it and select Done:
Choose Beginner Mode > Restore Disk:
Choose the image to restore:
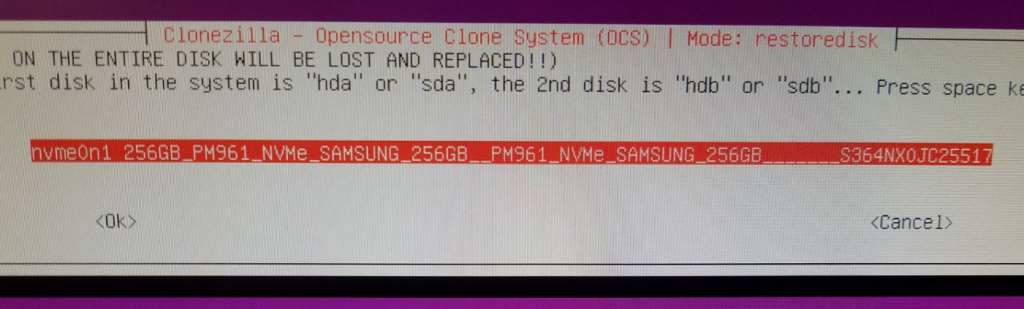
Select the target disk to restore onto (Should only be one listed here):
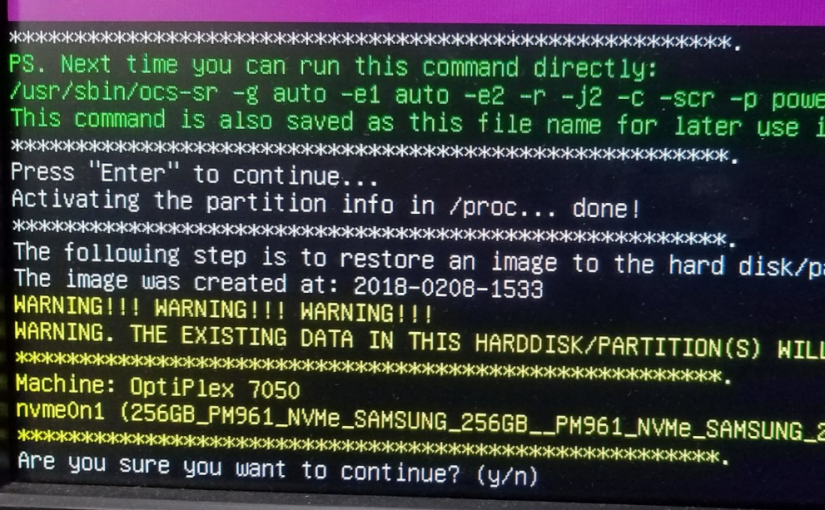
Select “Skip checking the image before restoring” > poweroff > Enter >
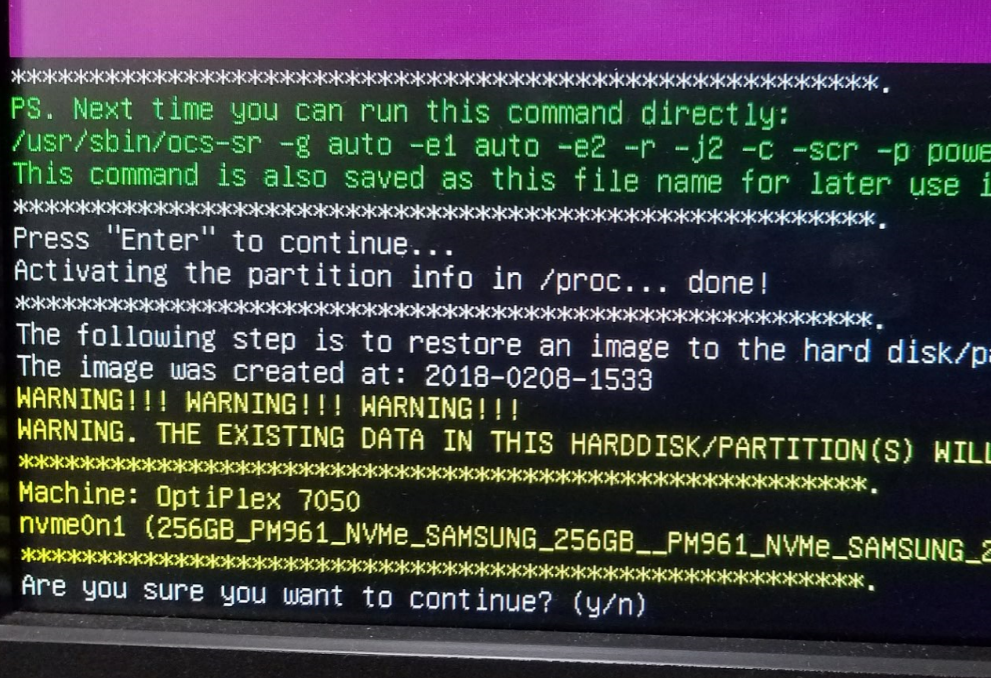
Heed the warning here. If important data is on the target disk, do not proceed. All data will be overwritten:
Hit y (enter) > y (enter) >
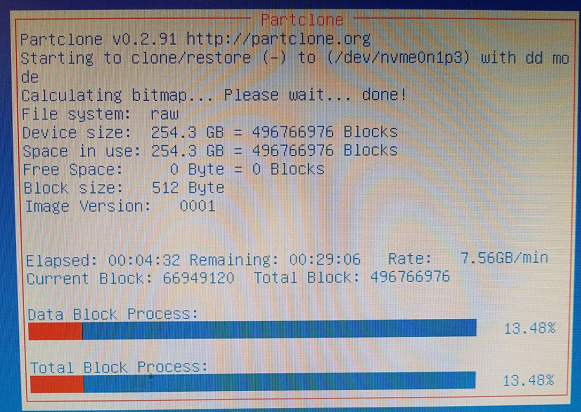
Partclone will run, clone the image to your disk, then shut down:
With the system powered down, remove your external HDD and boot thumb drive.
Power on the newly-imaged PC, hit the F12 button to go into the BIOS again. Reverse the changes made in steps 11, 12, and 13. Save the BIOS settings, and boot normally into windows. Congrats, you’re done! Hope this helps someone clone their newer systems with Clonezilla.
Use a Base Framework for your security project. There are a lot of standards available and the NIST government standards are a good solid foundation:
NIST 800-53
NIST Cybersecurity Framework
NIST CSF Tool
CIS Critical Security Controls
NIST-CSF tool – this is a nice visual tool – graphical interface for the stages of building a security program
Document everything
A core documentation repository is critical when setting up a security project – others will follow you and will need to look up the information you have recorded. It’s best to have a security incident response ticketing system and documentation before you need it. Have these tools up and ready.
For policy, procedure, how-tos, etc:
MediaWiki(free)
Atlassian Confluence ($10 for 10 users) – glyfee plugin for confluence
OneNote/SharePoint – not every company is entirely open source
NetDB – Uses ARP tables and MAC databases on your network gear. (use a service account and NetDB will use ssh/telnet to find every device connected, will give a nice http interface. You can setup a cron job that will scan NetDB database every hour. You can pipe new device connections to an email address. Knowing if something comes onto your network is critical.
Map your network – create a Visio document and have a good network map.
Visibility
Facebook-developed osquery and this tool can give you all you need.
Agents for MacOS, Windows, Linux
Deploy across your enterprise w/ Chef, Puppet, or SCCM
Do fun things like search for IoC’s (FBI file hashes, processes) – pipe the data into ElasticStack for visibility & search-ability
SpiderFoot: http://www.spiderfoot.net/info/ – automated reconnaisance that provides a rich set of data to pinpoint areas of focus.
User Data Discovery
OpenDLP – (github) or (download an .ova) – will scan file shares and using a normal user account you can scan for available shares and data. Run over the weekend and see what you can find. Find the data owners and determine where the data should reside.
Hardening Your Network
CIS Benchmarks – Center for Internet Security Benchmarks: 100+ configuration guidelines for various technology groups to safeguard systems against today’s evolving cyber threats.
Out of the box, windows 10 is 22% for the CIS benchmark.
It’s difficult to secure your network if everything is a snowflake. While not exciting, configuration management is important. Deploy configs across your org using tools like GPO, Chef, or Puppet.
Change management is also important – use git repo for trackign changes to your config scripts.
Safety vs. Risk
Scanning for Vulnerabilities:
OpenVAS (greenbone) is a fork of Nessus which is still maintained, is the default vulnerability scanner in AlienVault. It does a great job in comparison with commercial products. Be careful, do some safe scans first and it’s not recommended to scan critical life-support equipment for example in a hospital.
Scan web apps:
Arachni Framework – for finding bugs in your developer’s code
OWASP ZAP (Zed Attack Proxy)
Nikto2 (Server config scanner)
Portswigger Burp Suite (not free – $350)
Harden your web servers:
Fail2ban – python-based IPS that runs off of Apache Logs
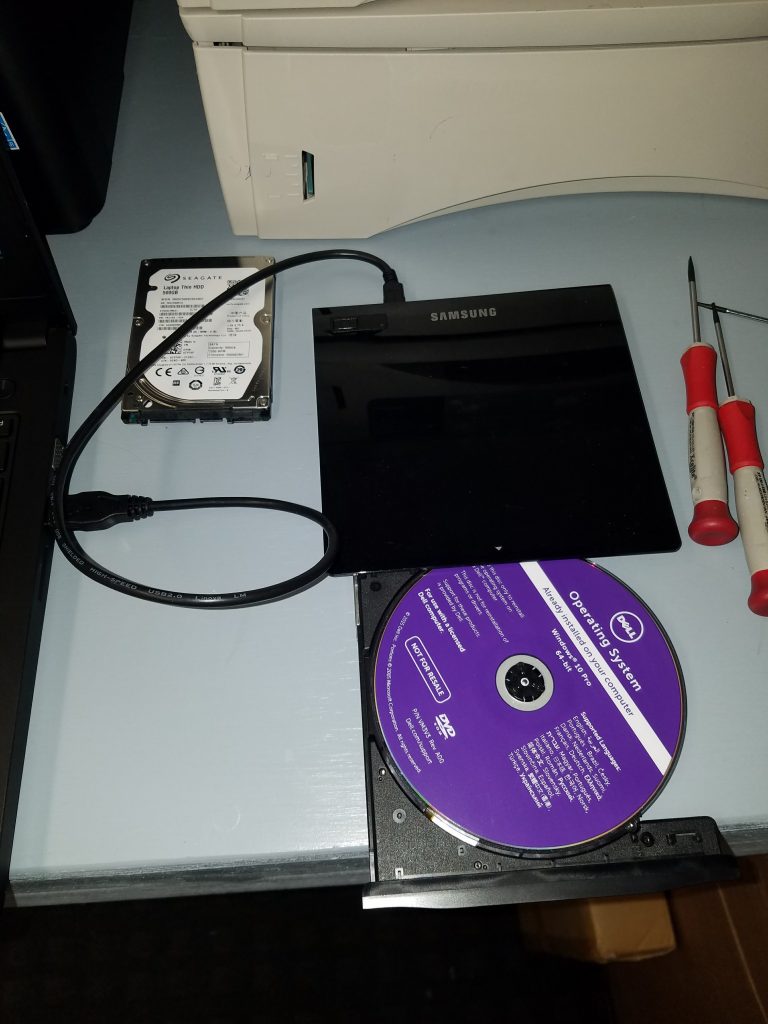
So you received a Dell Latitude e3570 for business and the laptop already has a downgrade Windows 7 Pro Operating System installed on the existing 500GB 7200RPM hard drive. You want to make the machine faster and upgrade to Windows 10, so you decide to install a 120GB SSD HDD (or a Samsung M.2) and then install Windows 10 Pro from scratch. You already have the Dell Windows 10 Pro DVD. The problem is that you don’t have a hard disk image, clone image, cloning software, or machine to clone from the old HDD to the new SSD, nor do you even want to use an existing Operating System image. You don’t want to go through the steps of an upgrade from Windows 7 Pro to Windows 10 Pro and then perform a clone as well. Well, that’s what happened to me and I usually prefer to perform a clean installation from a certified Dell Windows 10 Pro 64-Bit DVD for use with a licensed Dell computer like the one in the picture below. After banging my head over what amounts to a relatively simple solution, and doing some research, I thought I’d spare someone else the pain of what I went through by documenting the solution here.
So, you gleefully pop open the back of the laptop by loosening the cover screws, replace the SATA HDD with your new SSD HDD, and close up the cover again. With an external USB DVD drive, power on the laptop, hit F12, select the Dell DVD as your boot device, and hit a brick wall with the following sequence:
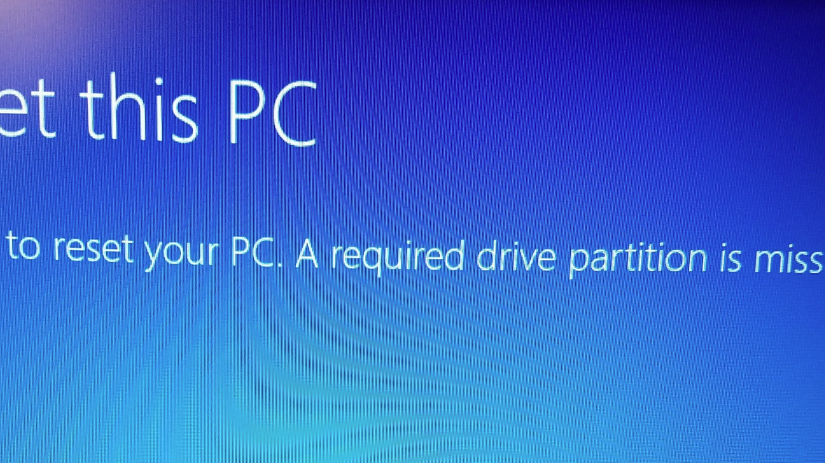
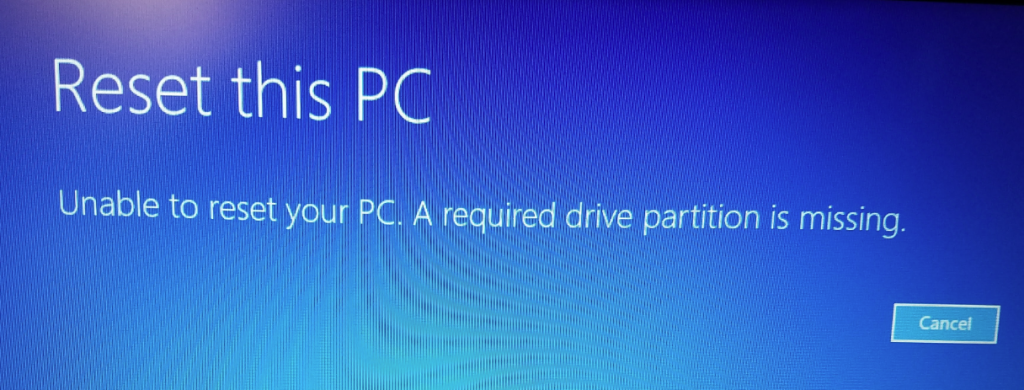
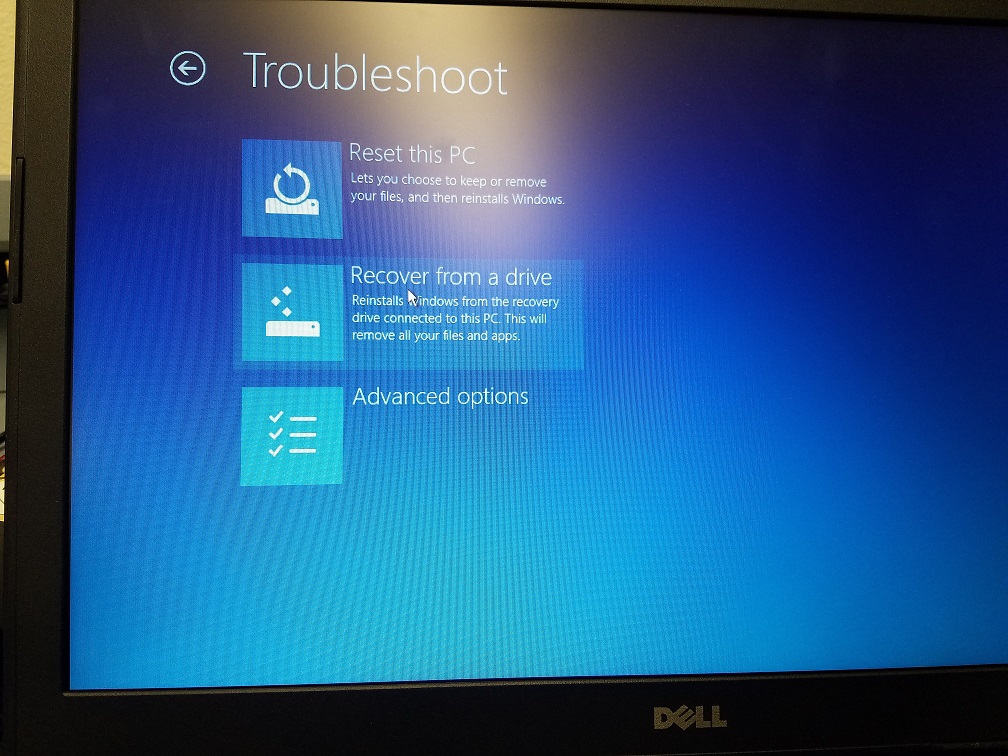
Language > Country > Choose option: Troubleshoot > Reset this PC > Reset this PC: Remove everything :
Error: Reset this PC – Unable to reset your PC. A required drive partition is missing. (cancel)
In this event, what the setup is doing is that it’s assuming you already have Windows 10 installed on the hard drive, and that perhaps it’s corrupted, and you are choosing to have the installer find the default recovery partition that’s already on the hard drive (which it isn’t because it’s a brand new-wiped-clean-by-the-factory SSD). Also, you’d already probably know that if you DID already have the recovery partition on the hard drive that you’d choose the “Repair my computer” option in the boot menu by hitting F12 when starting…
So the problem is actually not difficult to resolve because, in summary, the solution is you merely need to choose the following sequence instead and perform a “Recover from a drive“, not“Reset this PC”. *Note: if you do this, your BIOS may still hold non-recommended Boot and Drive configurations for Windows 10, so be sure to follow the instructions after the screenshots that your BIOS and new SSD HDD is set up for correct secure-boot operations.
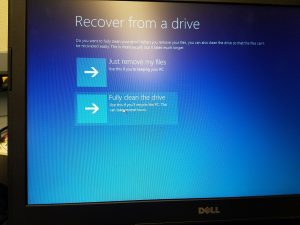
Language > Country > Choose option: Troubleshoot > Recover from a drive > Fully clean the drive
At this point, if you have replaced an M2 hard drive, you may have received the following error: “Unable to reset your pc. The system drive cannot be found.” If this is the case, skip to the bottom of this post to find new information.
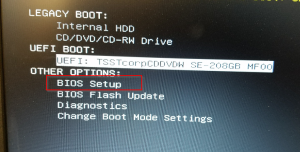
Like I said, it’s a good idea to check some BIOS settings and secure your new SSD HDD boot device prior to running the system Recover > Fully clean the drive operation.
First hit F12 and select OTHER OPTIONS: BIOS Setup
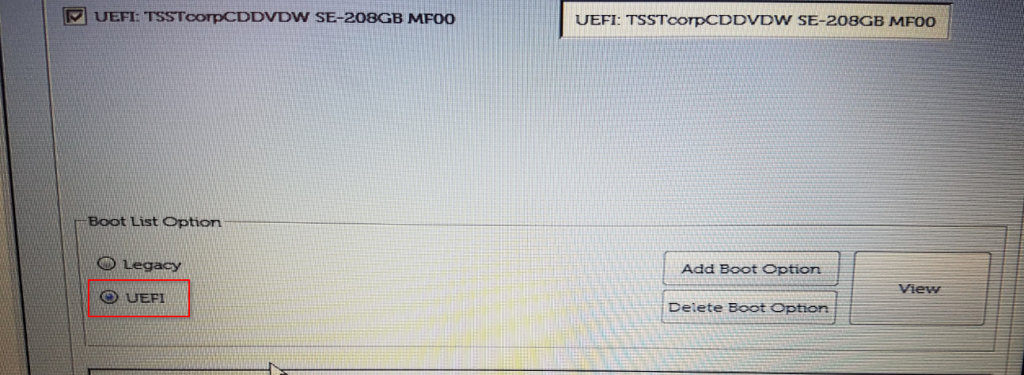
Next under General > Boot Sequence, set the Boot List Option to UEFI
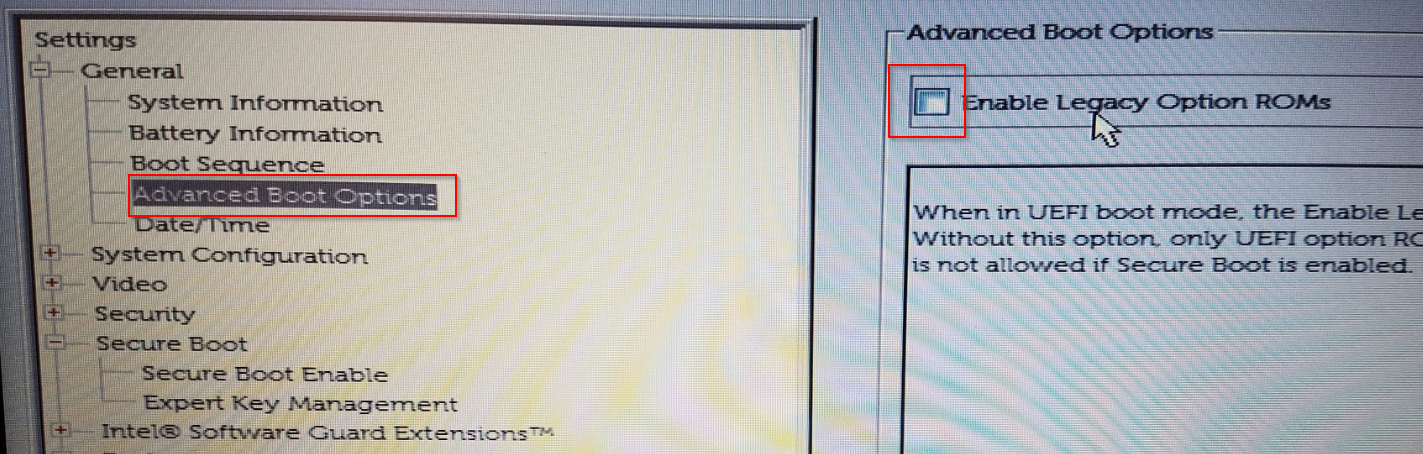
Next, under General heading, select Advanced Boot Options and uncheck “Enable Legacy Option ROMs”
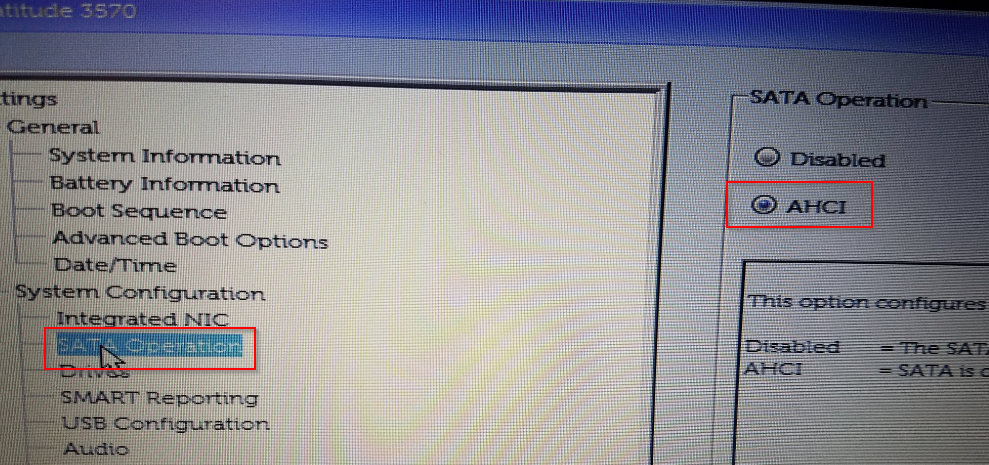
Next, under System Configuration, make sure SATA Operation is set to AHCI:
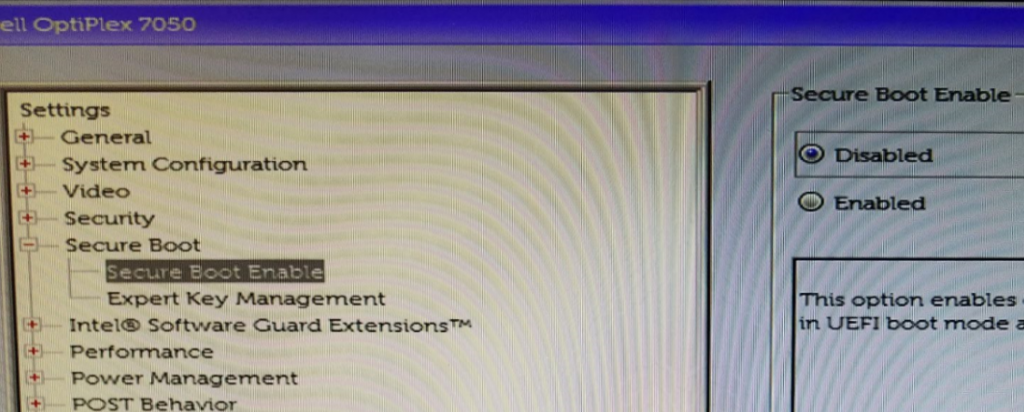
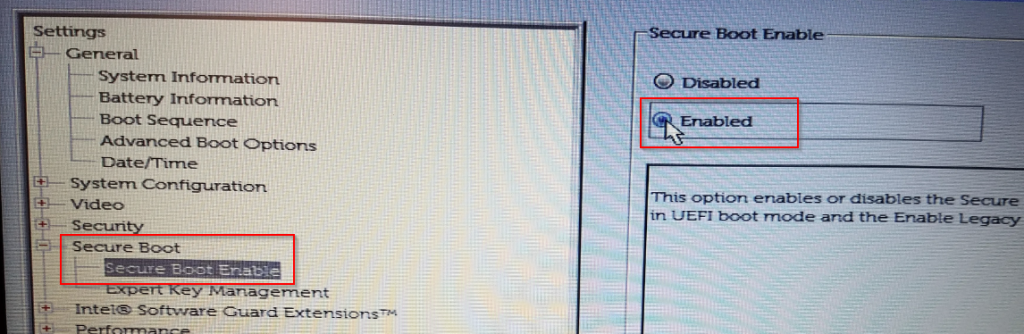
Next, go to the heading Secure Boot and set Secure Boot Enable to Enabled:
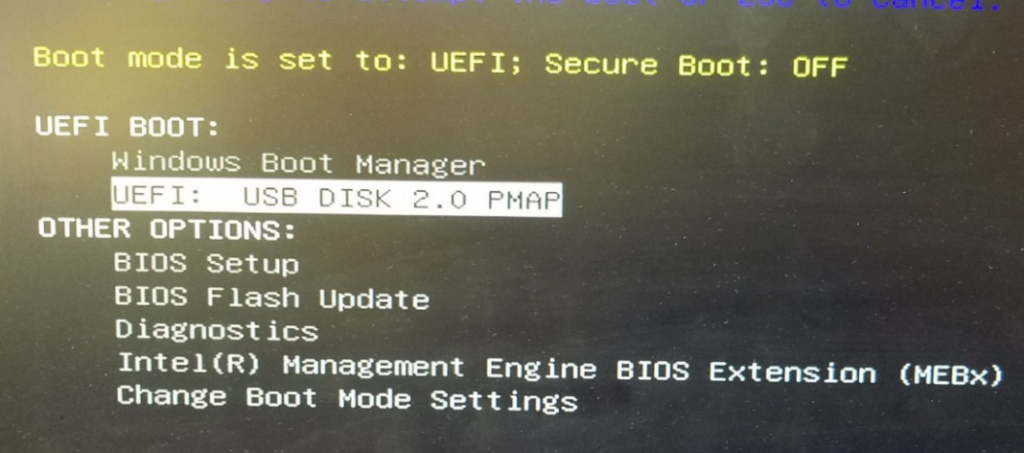
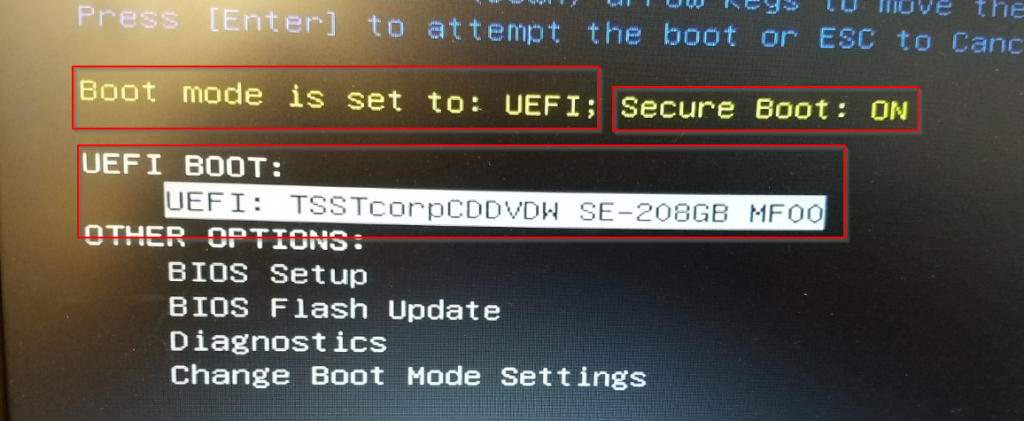
Now save all the changes to the BIOS and restart/Save, and hit F12 again, where at the next menu you will use the UEFI BOOT: to your external USB/DVD drive:
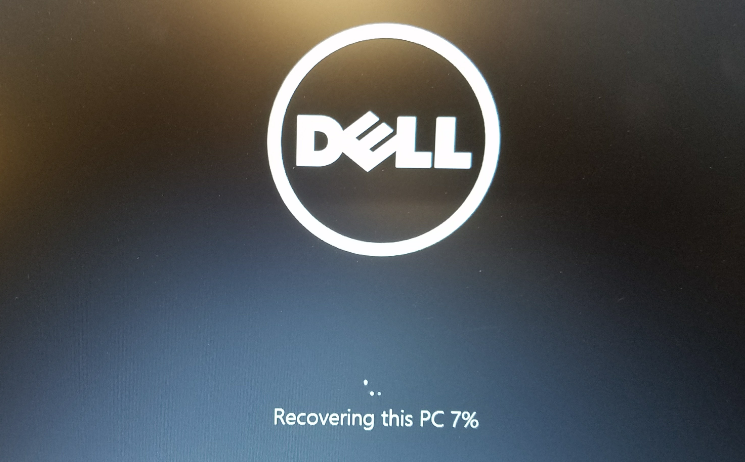
Now go ahead and go back to the Troubleshoot > Recover from a drive > Fully clean the drive. *Note: this action will completely destroy anything that is already on the hard drive so before you do this action, be sure you have a backup of what was previously on the drive; if anything.
Once the procedure runs and the machine reboots, you should see the “Recovering this PC” and a percentage status.
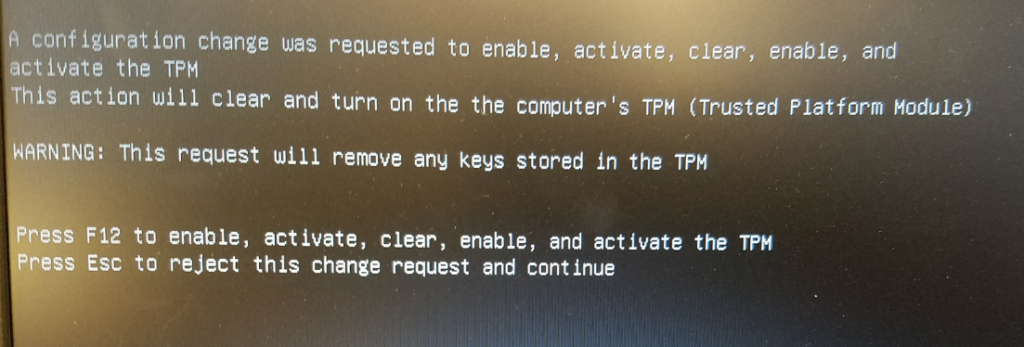
The machine will complete the procedure and you may receive the following warning: A configuration change was requested to enable, activate, clear, enable, and activate the TPM – This action will clear and turn on the computer’s TPM (Trusted Platform Module) – WARNING: This request will remove any keys stored in the TPM: Press F12 to enable, activate, clear, enable, and activate the TPM or Press Esc to reject this change request and continue. Unless you have stored keys and want to retain them, go ahead and hit F12.
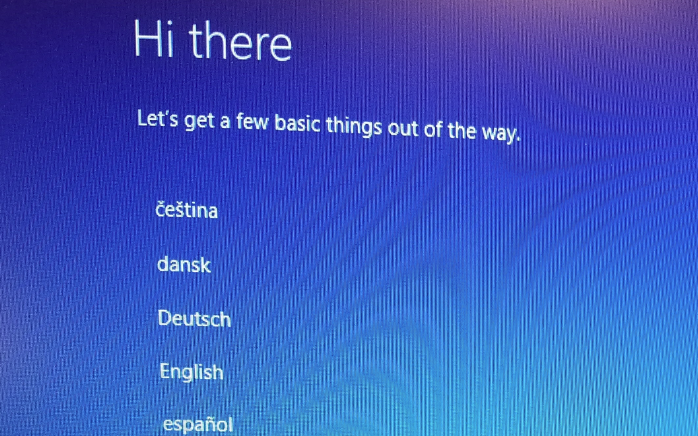
The machine will restart a couple more times and finally, you should be prompted with the traditional setup:
Complete the setup, remove the DVD from the computer, restart and enjoy your newly installed Windows 10 Pro on your Latitude 3570 with an SSD hard drive. In my opinion, this is a very worthwhile upgrade and the speed difference between Windows 7 Pro on a spinning HDD as compared to Windows 10 on an SSD is like night and day.
__________________
So if your error encountered during a “Recover from Drive” was: “Unable to reset your pc. The system drive cannot be found.” then you’ll want to take note. The Purple DVD you are trying to recover from may not include the required M2 Hard drive drivers in order for the installer to find your new hard drive. “Extra Fudge” found some success by downloading the drivers manually (which did not solve the problem for me – more below…) from Intel (if you’re installing an Intel M2 HDD, that is) and that information can be found here:
Like I said earlier, this fix and was not successful (perhaps because I was installing a Samsung NVMe SSD 960 EVO M.2 drive.)
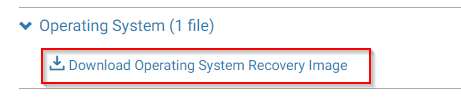
Finally what solved my problem was to use the new Dell Operating System Imaging Tool, which assumably has the correct M.2 drivers baked into the image.
You’ll need an 8GB or larger drive USB thumb drive to complete this task. Go to Dell support https://support.dell.com, enter in the Service Tag, Select find Drivers Myself, > Select OS Windows 10, and then download the Operating System Image tool.
Next, run the tool and the rest is pretty self-explanatory.
If your email servers support, or are required to enforce transport layer security (TLS), then you can use Symantec TLS Business Partners to configure policies to enforce encryption between your mail servers and the broader public, as well as Symantec’s Email Security Services infrastructure. You can also configure policies to enforce TLS encryption between your domains and the domains of third-party business partner organizations. This article will provide a procedure that demonstrates how to generate a report with Symantec PBE Advanced Domains that displays mail which failed a TLS policy. We then go on to process that report and relax the enforcement of Certificate Validation with the following steps:
Scrub the Symantec Report for just email addresses of the intercepted mail.
Remove the first part of the email addresses, leaving only a list of the domain names.
Compare the domains from Step 2 to already-existing TLS Business Partners and leave only those domains that are unique.
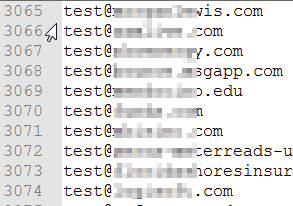
Create a new text .txt file with the unique domains, add ‘test@’ to the beginning of each domain to create an email address that can be tested at checktls.com.
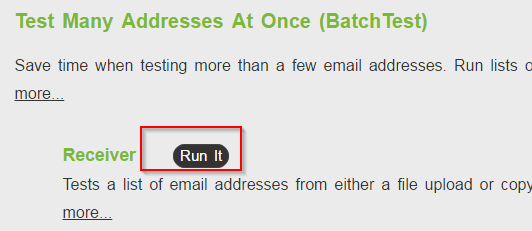
Batch test the domains for certain TLS conditions.
Scrub and sort the checktls.com report for only those domains that meet conditions in Step 5.
Upload the list of unique, tested, and scrubbed domains into the Symantec Cloud TLS Business Partners.
Use Symantec to again test the domain for Certificate Validation, enable the domain, and enforce the encryption of traffic to that domain.
Often times, TLS encryption requirements will force end-users and recipients of TLS encrypted email to log into a secure mail portal to authenticate and retrieve messages. Depending on your organization’s policies, you may want to ‘relax’ the level of enforcement of TLS requirements so that users can receive mail in ‘plain text’ as a normal message in the user’s mailbox. These different levels of encryption are scored by traits including the availability of TLS encryption, TLS negotiation, the SSL/TLS Certificate trustworthiness, and other factors.
To a large degree, TLS email encryption has not quite become the standard for many mail servers out there. Many large mail providers such as earthlink.net do not support TLS encrypted email. Some mail servers will allow TLS encyrption (TLSAvailable=100), negotiate a TLS transaction (NegotiatedTLS=100), but not have a valid certificate (CertOK >= 33). Often times, the CertOK value will not reach 100 simply because the certificate on the receiving server is a self-signed certificate.
You can check the support of an email address or domain by visiting checktls.com, enter an email address into the address test, and hit the ‘Try It’ button. For example, when we test [email protected], our results are as follows:
TLS Receiver Test
In this case, if Symantec /MessageLabs were to try to send a message to the recipient, the message would not be delivered to the recipient mailbox, but quarantined in a secure mail portal. The recipient would then be required to create a secure portal account, log in, and retrieve the message.
If our results above were to demonstrate the passing of all checks with the exception of the CertOK column, then we may want to relax the enforcement of certificate validation in Symantec. But in order to find all of the domains that meet these conditions, (excluding those domains we already have validated and trust), we need to generate reports, scrub the data, and test for the conditions we accept. Once we find the unique domains, we’ll add them into our list of TLS Business Partners.
While the following procedure does not have long-winded explanations and exact step-by-step instructions, the information and screenshots should be enough to get you through the process, hopefully saving you the hours of research and note-taking that I endured. This article does not go over the initial setup of your domain’s email encryption with Symantec. The prerequisites for this guide are that you already have TLS email encyption setup with Symantec Cloud / MessageLabs.com. Also be sure to have Excel 2013 or newer and NotePad++ installed on your computer. Lastly, you may be required to purchase an account with checktls.com to run batch tests.
Lets get started!
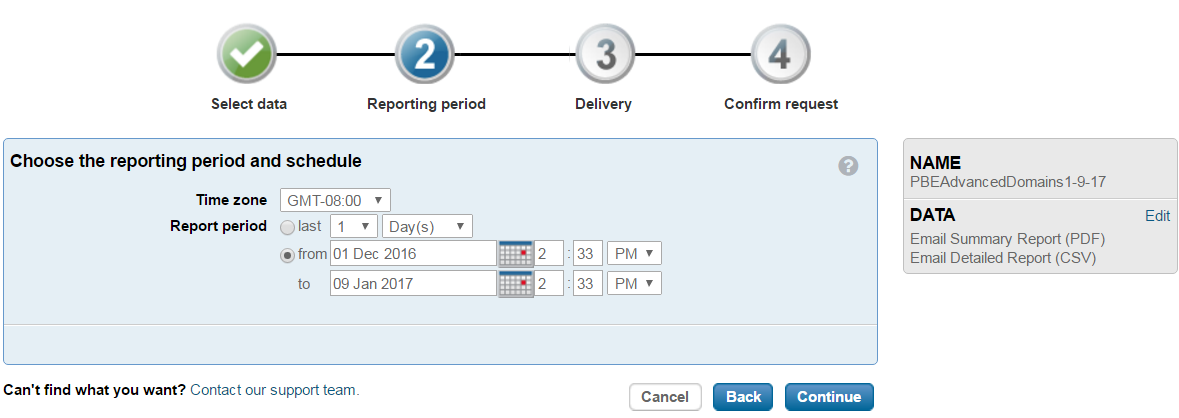
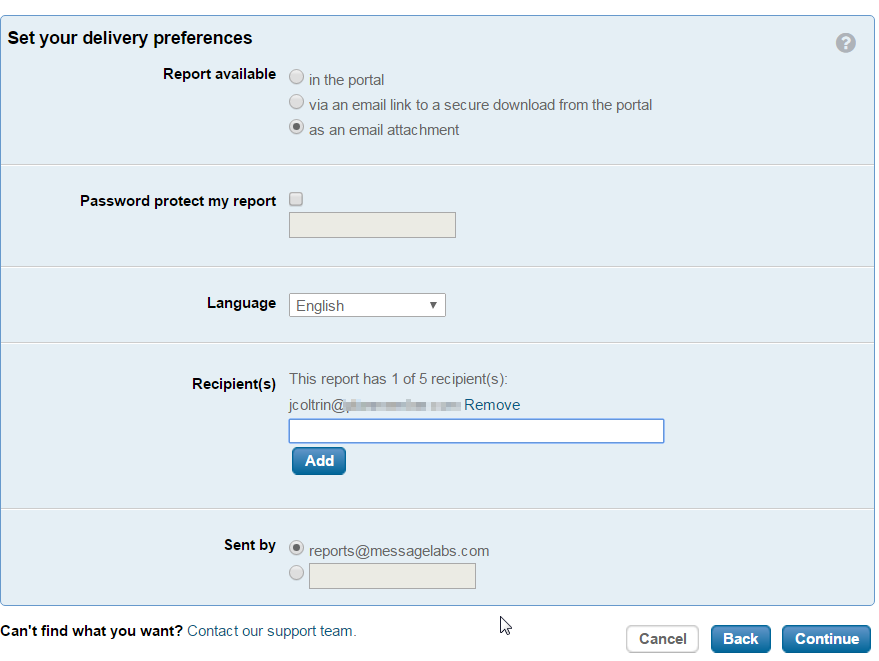
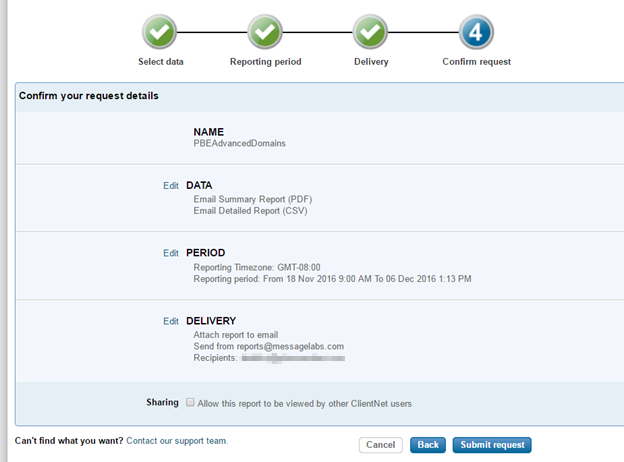
We’ll first run a report in the Symantec Cloud / clients.messagelabs.com to find emails intercepted by the service. Starting in the Dashboard, go to Reports > Report Request > Request a new Report > Request name: PBEAdvancedDomains-Date > continue > email summary report (PDF) >
The data we will include in the report are:
Email Summary Report (PDF) advanced settings
Emails intercepted by the service
Data Protection volume
Data Protection volume by domain
Top 20 Data Protection recipients
Email Detailed Report (CSV) advanced settings
Data Protection
Message Labs Report 1
MessageLabs Report 2
MessageLabs Report 3
MessageLabs Report 4
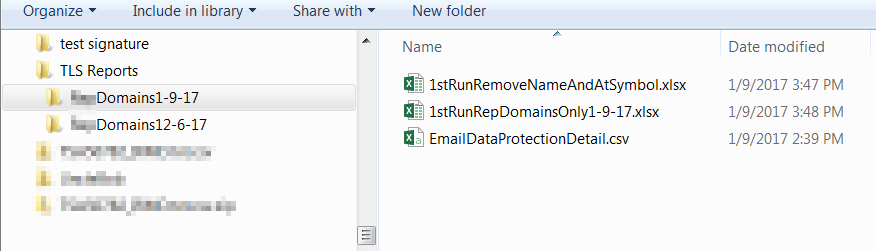
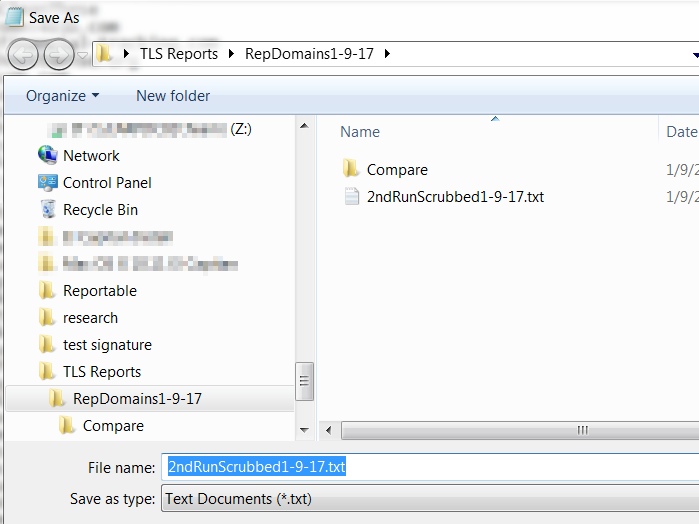
Download the Report.zip
Extract to Desktop\TLSReports\RepDomainsDate
Open the EmailDataProtectionDetail.csv
Copy the column “Email To” to a new spreadsheet named 1stRunRemoveNameAndAtSymbol.xlsx
In 1stRunRemoveNameAndAtSymbol.xlsx, delete the 1st row “Email To”
Excel wants you to type out the formula (instead of copy/paste) in the first cell B1, then apply formula down the column.
Apply formula to an entire column or row without dragging by Fill feature
In Excel, Select the entire Column B, and then click Home > Fill > Down.
Apply formula fill down
Copy and Paste (Paste – Special->ValuesOnly) the resulting Domains (only) to a new sheet and name
1stRunDomainsOnlyDate.xlsx
Now you should have 3 files:
1st Run Files
In Symantec Message Labs go to Services > Encryption > existing TLS Business Partners
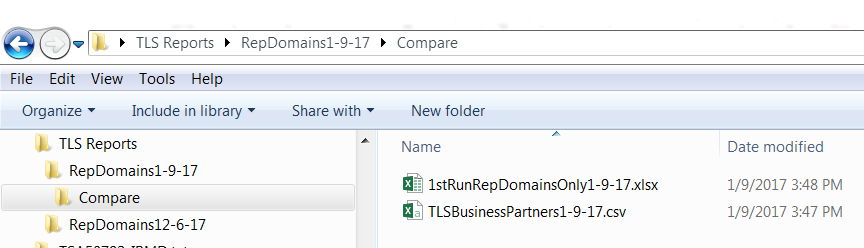
Download All -> get TLSBusinessPartners.csv > rename to TLSBusinessPartnersDate.csv copy to same folder, so you should have 4 files. In the 1stRunRepDomainsOnlyDate.xlsx you may want to remove all the empty cells with #VALUE! From the bottom of the file.
Create a new folder named Compare, and copy 1stRunRepDomainsOnlyDate.xlsx and TLSBusinessPartnersDate.csv into the folder:
Compare domains files
Remove all domains in TLSBusinessPartners file that are current Partners (as well as those existing in previously completed procedure runs.) – To do so,
Open 1stRunRepDomainsOnlyDate.xlsx. Create a new Sheet 2.
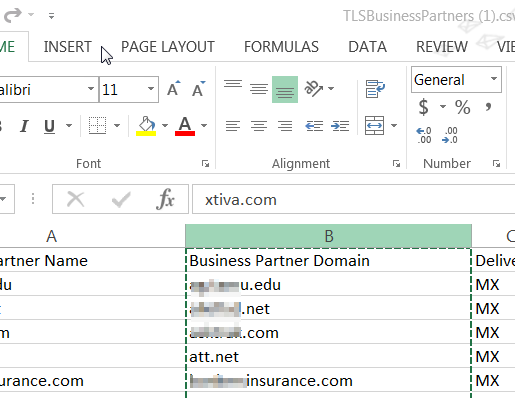
Open TLSBusinessPartners.. file and copy the column with only the domain names Column labeled “Business Partner Domain” into Sheet 2
Run compare and remove all domains that exist in TLS.BP.Date from 1stRunRDODate.
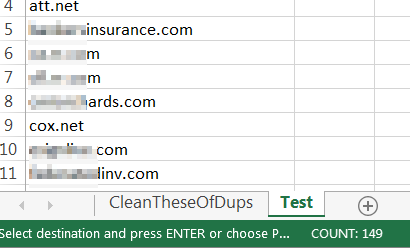
Scrub the domains of duplicates. Copy all the Business Partner Domains AND be sure to include all of the domains listed in TLS Enforcement page into Test sheet (selecting with the mouse, copy from website, and paste into excel works, just remove the hyperlinks).
Populate test worksheet with existing domains
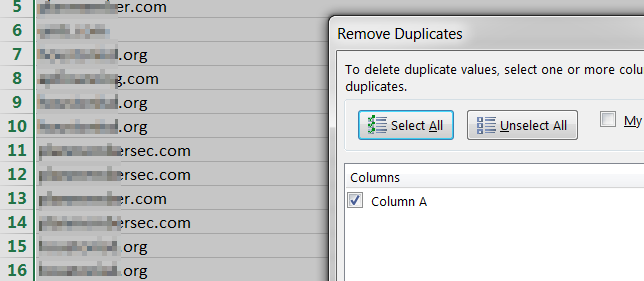
Next, select Sheet 1 then go to the Data tab and click Remove Duplicates:
Remove duplicate domains
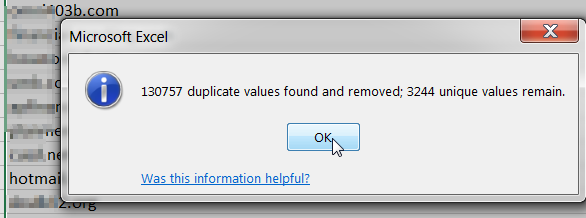
Click OK
Duplicate domains removed
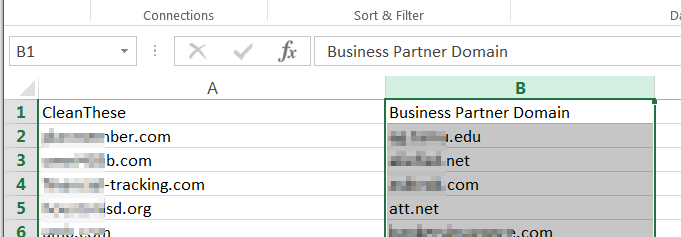
Add a new row to A1 top level and add header named: “CleanThese” for Column A and “Business Partner Domains” for Column B
Copy existing Business Partner unique domains in Test sheet to B1
Should now look something like this:
Clean domains of existing domains
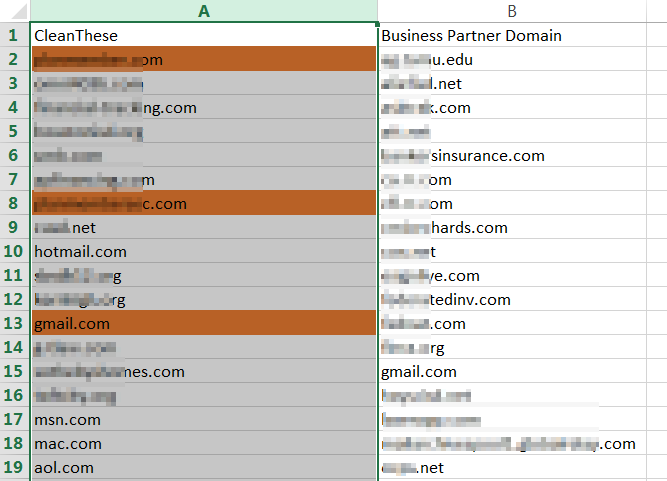
Now Filter for Unique values:
Click on the Column Header to highlight Column A. Select the Conditional Formatting button on the Home tab.
Select the New Rule option from the Conditional Formatting button drop-down list. Select “Use a formula to determine which cells to format" as a rule in the New Formatting Rule window.
Proceed by entering the following formula in the “Format values where this formula is true" box: =countif($B:$B, $A1)
Click on the Format button and specify the format you want to set. It is possible to set a different cell color for duplicate values by clicking the Fill tab and selecting a background color. (Orange)
After having specified the format you want click OK.
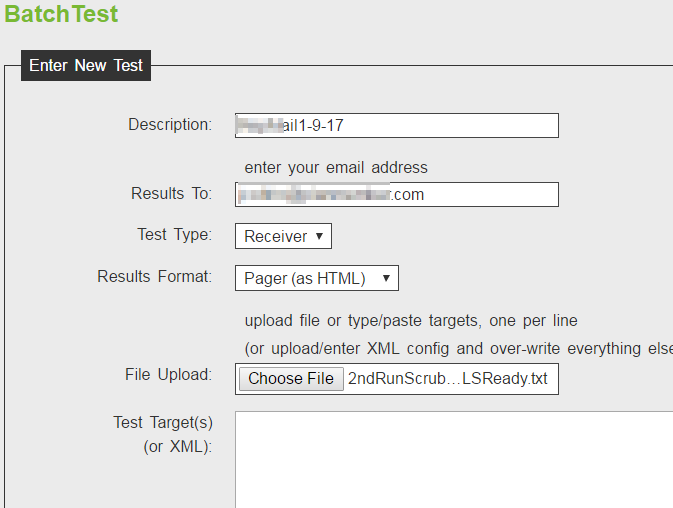
CheckTLS batch test: Once you’ve uploaded the file, hit R(u)n Test Now to initiate the testing. One domain takes 5 minutes, so 4000 domains can take 4 hours or so. An estimate from checktls.com will be given.
CheckTLS batch test 3
Once the report arrives via email, copy the data in email to a new file named TLSCheckReportResults1-9-17.xlsx
Next, find CertOK is a value of 33 or 0, but the TLSAvailable=100 and NegotiatedTLS=100
To do this, do Ctrl+A then Sort & Filter > Custom Sort > Sort by CertOK > Sort on Values > Order Custom List: 33, 0 > OK > OK
(Column H is Cert OK) so Select only those that are anything other than 100, copy the rows to a new spreadsheet named
TLSCheckReportResultsCertOK33-Date.xlsx
Sort the TLSCheckReportResultsCertOK33 file by TLSAvailable=100 and NegotiatedTLS=100
To do this, first remove all columns except EMailAddress, TLSAvailable, CertOK, and NegotiatedTLS=100
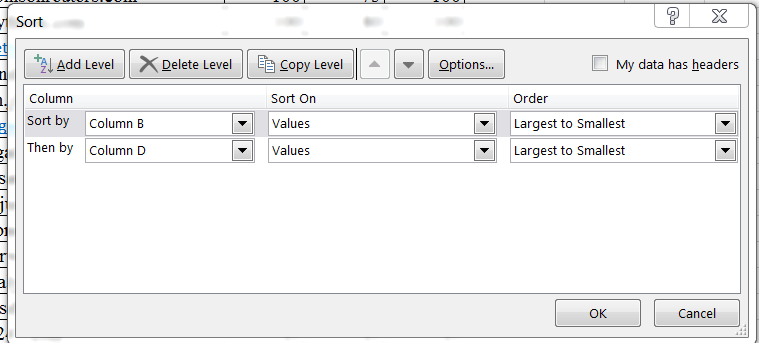
Do another custom sort; select columns labeled TLSAvailable, Cert OK, and NegotiatedTLS, and Sort by Column B (TLS) then by Column D (SenderOK/Sec) Largest to Smallest:
Excel custom sort columns on values largest to smallest
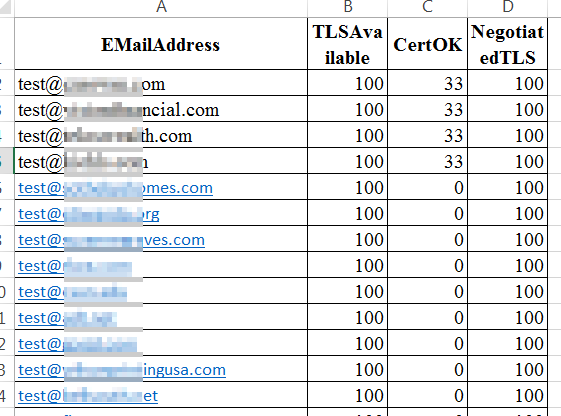
Select only those rows that have at least TLSAvailable = 100 … CertOK(%) … NegotiatedTLS = 100; where CertOK % is less than 100:
Excel custom sort results
Copy these values to a new .xlsx file and folder named:
TLSCheckSortTLSAvailable100Negotiated100-Date
Copy custom sort results above into a new .xlsx file and rename the filename the same as the folder name.
Remove everything except the domain name (remove ‘test@’) from this file. Follow instructions above – delete columns B, C, D, then formula =RIGHT(A1,LEN(A1)-FIND(“@”,A1)) – then fill down (select column first)
Copy resulting domains to a new .txt file named:
TLSCheckSortTLS-DomainOnly-Final-Date.txt
Now we need to add the tested domains to the Business Partner for the week. Eg. RepDomains-Date in Symantec.
Log into Symantec Cloud,
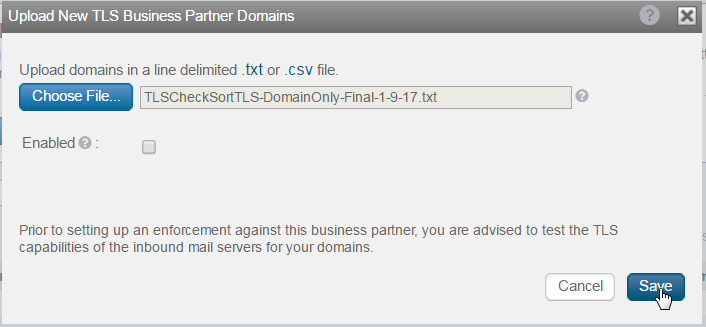
Services > Encryption > TLS Business Partners > Add new BP > RepDomains-Date > Upload New Business Partner Domains > Uncheck “Enabled” > choose file > select TLSCheckSortTLS-DomainOnly-Final-Date.txt > Save
Upload New TLS Business Partner Domains
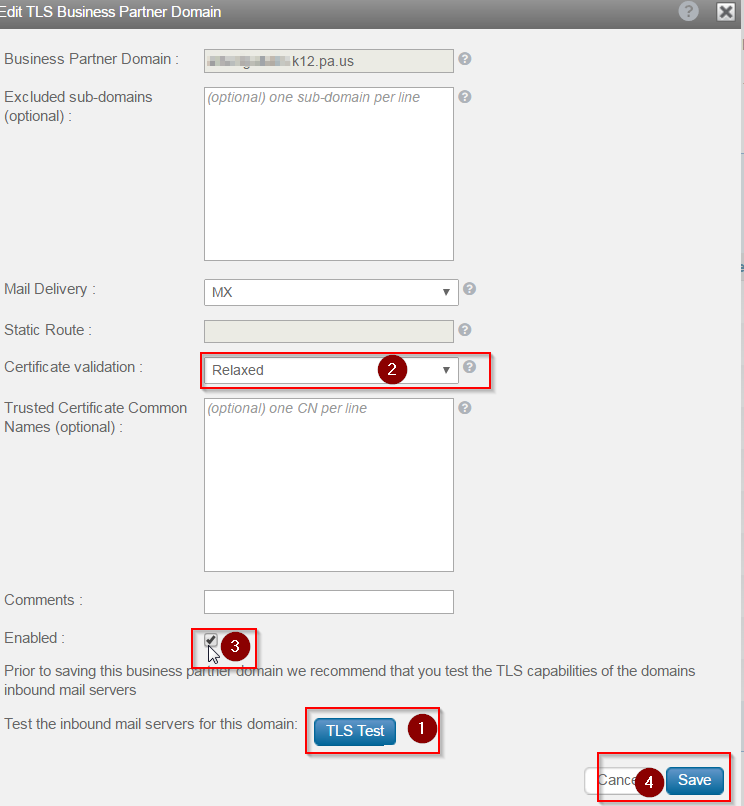
Now that all of the new unique domains have been imported, we need to test them within Symantec and change Certificate Validation from Strong to Relaxed if required.
Click on the domain name, hit the TLS Test button, and if the TLS connectivity fails, hit Close, change the Certificate Validation to “Relaxed” and then Save.
Relaxed certificate validation
Go through each of the newly uploaded domains, and when finished, make sure to ENABLE TLS Encryption enforcement in the TLS Enforcements tab.
Take those in the list that test correctly and are enforced and add to Data Protection Exceptions. Services > Data Protection > PBE Advanced TLS the Portal Trigger Template > (scroll down) Recipient Exclude Domain List > Edit List > Add List Items > Add
It’s a good idea to repeat this procedure every so often so that you catch mail that is being delivered to the secure portal unnecessarily. Hopefully, this procedure will help someone save some time if they have the same task, or at the least help someone sort and scrub email addresses and domains.