OpenVPN Cannot Authenticate -Google Authenticator Code Incorrect – Android Windows 10

When trying to setup and authenticate to an AWS Instance running OpenVPN, a user could not complete a new connection to OpenVPN after entering the initial un/pwd. They receive the error: Permission denied. This is after successfully setting up the OpenVPN client on Windows 10 and scanning an Authenticator code using Google Authenticator App on a Samsung S8 Active Android mobile phone running Android 8.0.0 ‘lollipop’. Ultimately the reason the user could not authenticate was their mobile phone’s time was off by about 3 minutes. Continue below to find additional information on how to troubleshoot this and other authentication issues with OpenVPN.

When troubleshooting OpenVPN login errors it’s a good idea to first try some of the following:

Unlock a Disabled or Locked account on OpenVPN Admin console

To check for the events related to a user lockout, first log into the Admin web console > Status > Log Reports. Here you will find the errors related to bad authentication and eventually an account lockout.

The errors you may find could be the following:

Google Authenticator Code is incorrect.
LOCKOUT: user temporarily locked out due to multiple authentication failures.

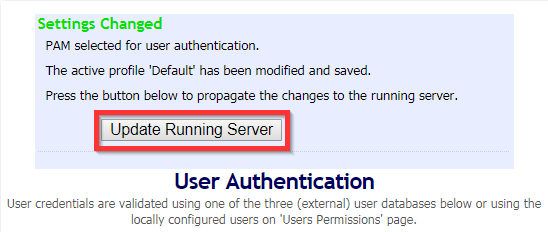
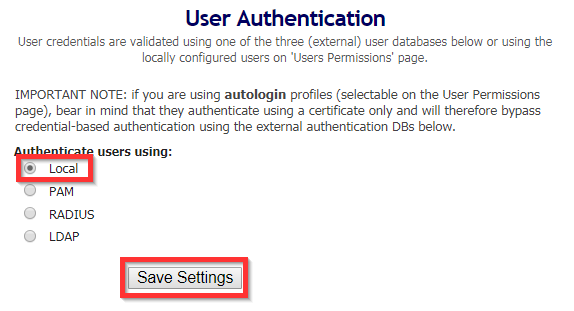
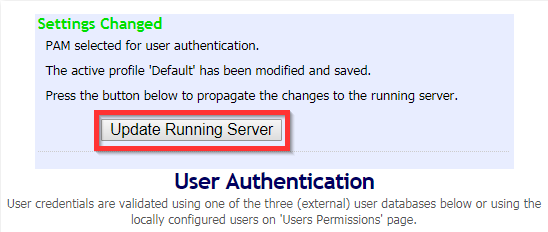
To unlock a user account (if using local authentication), Login to the Admin Web Console, Go to “General” under Authentication and change Authentication to “PAM”, Save Settings > Update Running Server > “Local” > Save Settings> Update Running Server.
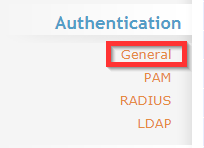
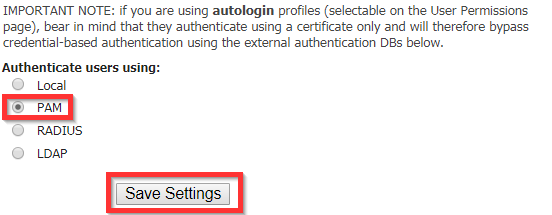
This procedure should unlock disabled or locked user accounts on OpenVPN.

Reset A User Account on OpenVPN

To reset a user’s OpenVPN account:

Log in to the admin web console, click on User Permissions.
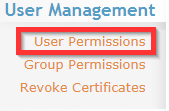
Find the username, place a checkmark in the Delete column, then Apply > Save. Next, re-create the account.
Scroll to the bottom of the list, type the new user name:
Eg. jcoltrin
Save > update server

Go back find the username again in the list and hit Show:
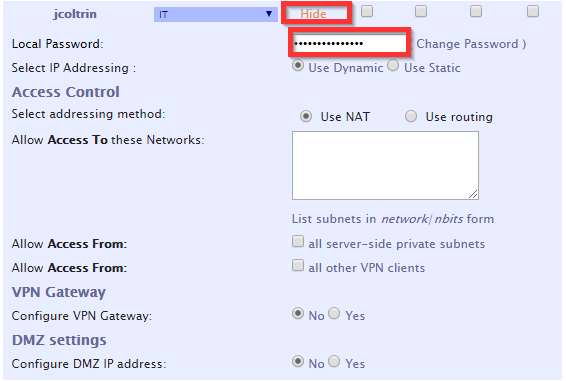
Enter in the Local Password: (S3cr3tP@ssw0rd!)
Save > Update

Check OpenVPN for Valid Concurrent License

In the admin web console, under the Configuration menu, click License. Check to ensure that your concurrent users have not reached or exceeded the limits of your licenses (under At a glance,) or that your licenses have not expired.
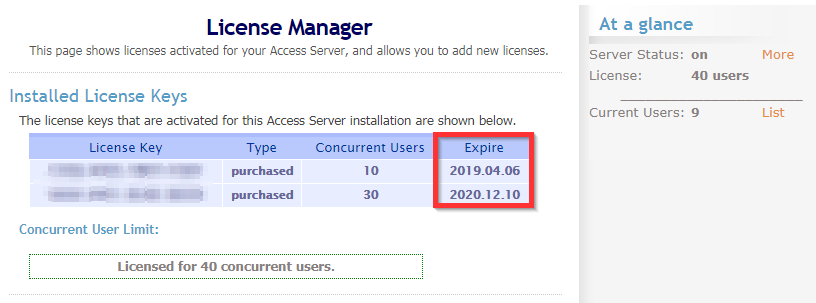
Use SSH to check the logs of the OpenVPN server and get the specific errors for an individual’s login problems.

After logging into the server using Putty/SSH, you can change directory to the scripts directory:

cd
/usr/local/openvpn_as/scripts/

and then issue the command ./authcli –user <username> –pass S3cr3tP@ssw0rd

./authcli --user jcoltrin --pass S3cr3tP@ssw0rd

This will produce something similar to the following information:

Result:
API METHOD: authenticate
AUTH_RETURN
  status : COM_FAULT
  reason : An error occurred while connecting: 13: Permission denied. (twisted.internet.error.ConnectError)
  user : jcoltrin

Addtionally you can find more messages related to authentication failures in /var/log. You’ll find these messages in the latest log files:

openvpnas.log

openvpnas.log.1

Use your favorite editor (vi) to search through the logs

vi openvpnas.log

use the command / and then the username to search for that term and hit “n” to go to the next instance of your term, for example:

/jcoltrin > n > n

and then :q to quit.

Here are some typical error messages for my authentication errors:

2019-02-26 14:03:26-0800 [-] WEB OUT: "2019-02-26 14:03:26-0800 [UDSProxyQueryProtocol,client] Web login authentication failed: {'status': 1, 'reason': 'local auth failed: password verification failed: auth/authlocal:42,web/http:1609,web/http:750,web/server:126,web/server:133,xml/authrpc:110,xml/authrpc:164,internet/defer:102,xml/authsess:50,sagent/saccess:86,xml/authrpc:244,xml/authsess:50,xml/authsess:103,auth/authdelegate:308,util/delegate:26,auth/authdelegate:237,util/defer:224,util/defer:246,internet/defer:190,internet/defer:181,internet/defer:323,util/defer:246,internet/defer:190,internet/defer:181,internet/defer:323,util/defer:245,internet/defer:102,auth/authdelegate:61,auth/authdelegate:240,util/delegate:26,auth/authlocal:42,util/error:61,util/error:44', 'user': 'jcoltrin'}"
2019-02-26 14:19:40-0800 [-] WEB OUT: "2019-02-26 14:19:40-0800 [UDSProxyQueryProtocol,client] Web login authentication failed: {'status': 1, 'no_lockout': True, 'reason': 'challenge', 'user': 'jcoltrin', 'proplist': {'pvt_google_auth_secret_locked': 'true', 'prop_cli.script.win.user.connect': '[redacted]', 'pvt_google_auth_secret': '[redacted]', 'prop_autogenerate': 'true', 'prop_deny': 'false', 'prop_cli.script.win.user.disconnect': '[redacted]', 'prop_superuser': 'false', 'pvt_password_digest': '[redacted]', 'prop_cli.script.linux.user.connect': '[redacted]', 'prop_autologin': 'false', 'conn_group': 'Default', 'type': 'user_connect'}, 'client_reason': 'CRV1:R,E:[redacted]==:Enter Google Authenticator Code'}"
2019-02-26
14:20:08-0800 [-] WEB OUT: '2019-02-26 14:20:08-0800
[UDSProxyQueryProtocol,client] Web login failed
(twisted.cred.error.UnauthorizedLogin)'
2019-02-26 14:21:30-0800 [-] WEB OUT: "2019-02-26 14:21:30-0800 [UDSProxyQueryProtocol,client] Web login authentication failed: {'status': 1, 'client_reason': 'LOCKOUT: user temporarily locked out due to multiple authentication failures', 'reason': 'LOCKOUT: user temporarily locked out due to multiple authentication failures', 'user': 'jcoltrin'}"

Make sure the phone with Google Authenticator has the correct time and set the phone to sync it’s clock with the network/carrier

As mentioned at the beginning of this article, what the original login issue came down to was the Android phone, on which the Google Authenticator was running, had it’s time off by about 3 minutes. To set and change the correct time on an Android Galaxy S8 Active, first, go to Settings > General Management > Date and Time > Set/Turn on Automatic Date and Time.

I’m not sure why the value for this phone had it’s time set to not have automatic sync with the network/carrier. This may have been due to a recent android update because I found this setting off on a couple phones in the office. Ensure the time on your server is accurate as well by issuing the bash/ssh command:

date 

Your result should look like the following:

openvpnas@openvpnas2:/var/log$ date
Thu Feb 28 14:46:57 PST 2019

If you find the time on your server is not accurate, check out my article on how to set the time on Ubuntu and Synchronize NTP here.

Setup Guacamole Remote Desktop Gateway on Ubuntu with one script

How to replace RDP, SSH and TeamViewer with free open source web-based client-less remote desktop gateway.

I recently learned about Guacamole and found that the setup is quite easy. I had been looking for a way to access all of my virtual and physical machine desktops remotely but didn’t want to rely upon, or trust TeamViewer eternally. Guacamole is open source software that provides you a way to run a tomcat/apache/mysql server suite that sets up and connects remote desktop connections via a web browser very similar to Teamviewer. It allows you to connect to any number of different desktops with just an html5 web browser, and a single open port on your firewall. You can use Google Authenticator 2FA to log into a console that has access to all your desktops, without having to install or configure remote clients such as putty, RDP and VPN. Although, if you’re attempting to use VNC, there will be some initial configuration of the VNC server on the client side – I found that UltraVNC server works best with Guacamole, more on that later.

The installation documentation on the official site is comprehensive but I was able to set up the system fast thanks to Chase Wright’s post here. To be clear, this is not “my script”, but I’ve written this article as a tutorial/guide.

First, you’ll want a standard Ubuntu server or virtual machine installed and running. I installed guacamole on Ubuntu Server 16.10 LTS.

Second, open an ssh connection to your server and run the following commands:

sudo su -
wget https://raw.githubusercontent.com/MysticRyuujin/guac-install/master/guac-install.sh
chmod +x guac-install.sh
./guac-install.sh

The installation will take a little while to download and install, and should only prompt you to provide a mysql database password.

For me, that was pretty much it for the initial setup. Next, I went to a different computer and connected to the guacamole gateway at the following default website:

http://serverIPaddress:8080/guacamole (replace serverIPaddress with your ubuntu server’s IP)

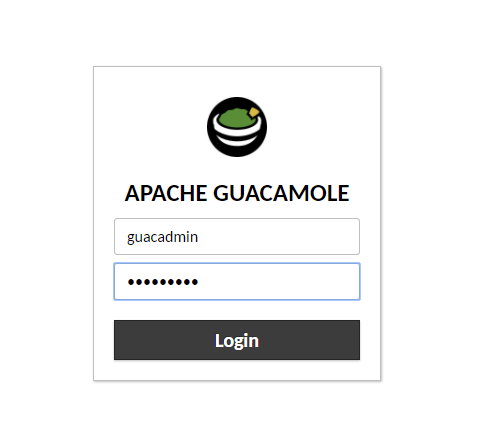
Login with the default guacamole username/password: guacadmin/guacadmin

The initial interface is a little sparse, but to create an RDP connection do the following:

  1. Create a new user first before you create a connection because, by default, it will launch a desktop session the next time you log in. If there’s a problem with the connection you may get stuck. This happened to me and I was stuck on the error:
    “Connection Error: An internal error with Guacamole server, and the connection has been terminated”

    It took a little digging but essentially the server console is up and running, but it is hidden by the black screen/pop-up and you can get back into the settings by going to the url: http://serverIPaddress:8080/guacamole/#/settings/sessions

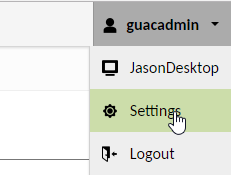
  2. Create the user first by going to the menu in the upper right-hand corner and choose Settings:
  3.  
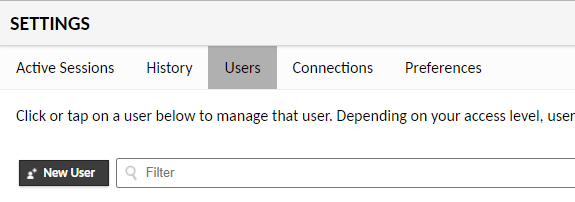
  4. Next, click the Users tab and then New User:
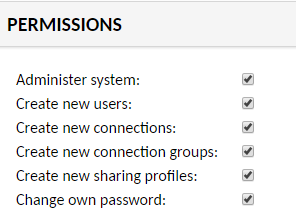
  5. Next, provide a username, password (x2), and give this new user all permissions and hit save at the bottom:
  6. With this new user created, you will now want to log in as this new user and change the guacadmin account password.
  7. Now we can create our first connection. Before you create your first RDP connection, be sure to test RDP account credentials from a different computer to ensure you can connect successfully.
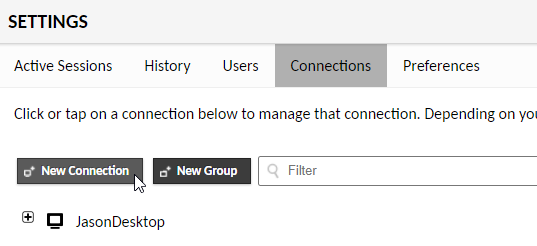
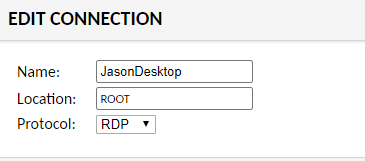
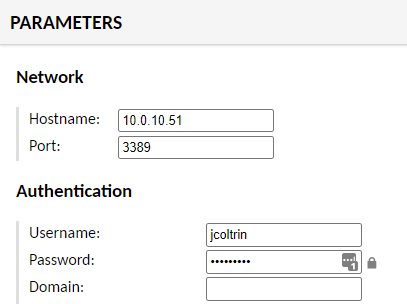
  8. Click on the Connections tab and then New Connection. The only things I had to set up to get to my workstation RDP connection working were the following:            
  9.  
  10. Hit Save at the bottom. There are many additional settings available but this should get you up and connected.
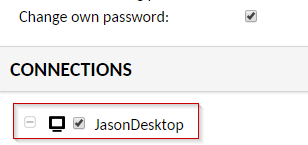
  11. Now we want to assign this connection to a user. Do that by going into the Users tab again, find the user you want to assign and the connection:
  12. Now go to a different computer from the one you want to connect to, go to http://serverIPaddress:8080/guacamole site, login as the user with the connection assigned to it and you should be greeted with the RDP console of the remote computer.
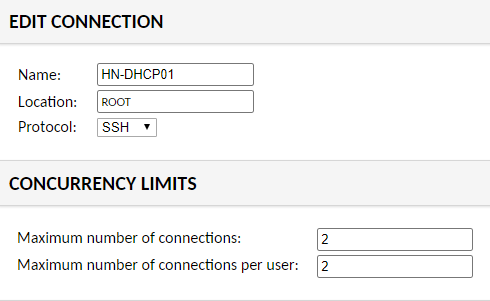
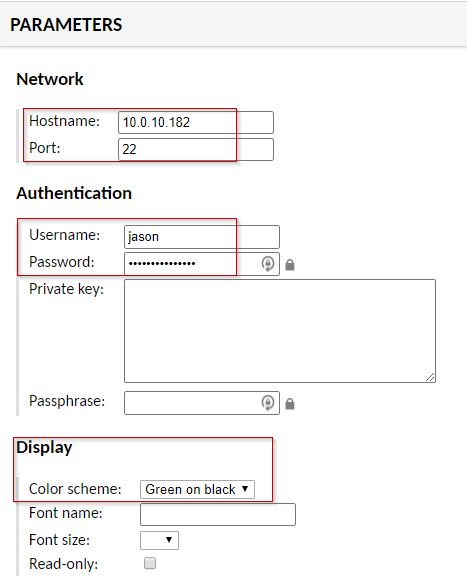
  13. To setup an ssh connection it’s even easier. Again, first create a new user with the same name as the ssh server you want to connect into (I named my user HN-DHCP01). Then create a new connection and name it the same as your server. Below are the guacamole ssh connection settings I used to connect to my DHCP01 server:
  14. Under the Authentication setting, provide a valid ssh user’s credentials on the server you’ll be connecting into.
  15. Hit save at the bottom. Go back into the User tab, then select the new user (HN-DHCP01 user) and assign the connection to the user at the bottom and hit save.
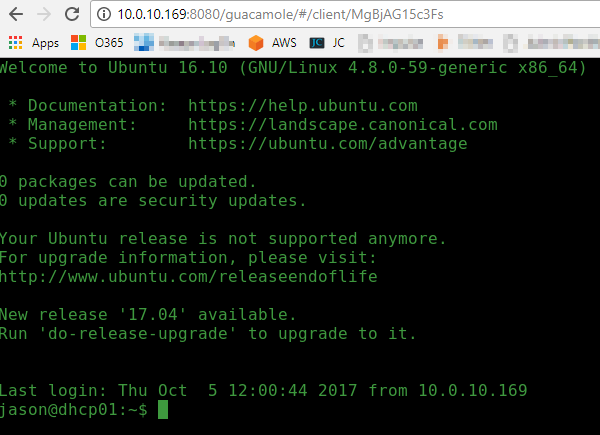
  16. Log out of guacamole, then log in as the new user (HN-DHCP01) this will instantly log you into an ssh session that you can see in the screenshot below runs right in the browser!
  17. Guacamole also supports Two-Factor Authentication as well as a multitude of additional setups and configurations. It’s wise to setup 2FA prior to opening any firewall ports into your local network from the internet, as well as make sure that you follow all security precautions and test everything thoroughly.
  18. When configuring VNC for use as a remote support with Guacamole, I’ve found UltraVNC Server works best for Windows Clients. It’s a little tricky to setup on the client side and get it to run consistently across all flavors of Windows 7, and Windows 10 feature releases. 
  19. Enjoy your guacamole and let me know in the comments if I’ve missed anything.

Installing Kali Linux on ProxMox – Building a Penetration Test Lab – Part 2

In the process of building a Penetration Test Lab, I wanted to get started with the installation of Kali Linux virtual machine running on ProxMox. To get started, first download the latest version of Kali Linux (ISO) here. Grab the version

Kali 64 bit ISO | Torrent 2.6G 2017.1

Build your new VM (Proxmox > Create VM) using the ISO you’ve downloaded.

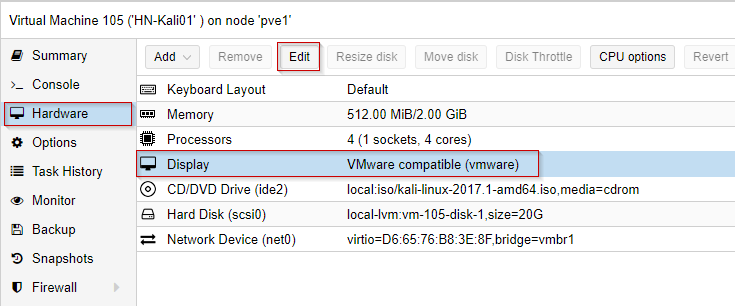
According to other user’s accounts of Kali not working after installation, it’s recommended to change the display type to VMWare compatible: After building the VM, change Hardware > Display > Edit > Choose VMWare compatible:

Kali installs onto a virtual hard drive on ProxMox (we will not be running a “live” version of Kali.) Start the new VM and scroll down the menu and choose Install  – (not GUI install.)

During installation, when grub asks where to have grub installed, choose “select your own location.”
Manually enter the path: /dev/sda
Otherwise, if you choose the ‘default’ or the path already listed, after completing the installation and a restart, you’ll get a message “Booting from Hard Disk” and the boot sequence will not complete, the VM will essentially hang.

Kali has completed its setup, I’ve booted the Kali VM, I’ve logged in, and I’m on the desktop.

Run apt-get update and apt-get upgrade to update the packages on your system.

Before we go on to complete the setup of the rest of our lab with known-vulnerable hosts, let’s run some cursory nmap scans.

Let’s run a ping scan on our own network with the command:

nmap -v -sn 10.0.10.0/24

This says: nmap, print verbose output (-v), do a Ping Scan (-sn) – (disable the default port scan for each address), and use the network 10.0.10.0 with a CIDR of /24.

This scan will attempt to ping all 254 addresses. The highlights of the scan are below:

root@HN-kali01:~# nmap -v -sn 10.0.10.0/24

Starting Nmap 7.40 ( https://nmap.org ) at 2017-08-04 15:13 PDT
Initiating ARP Ping Scan at 15:13
Scanning 255 hosts [1 port/host]
Completed ARP Ping Scan at 15:13, 1.95s elapsed (255 total hosts)
Initiating Parallel DNS resolution of 255 hosts. at 15:13
Completed Parallel DNS resolution of 255 hosts. at 15:13, 5.53s elapsed
Nmap scan report for 10.0.10.0 [host down]
Nmap scan report for pfSense2x.jasoncoltrin.local (10.0.10.1)
Host is up (0.00048s latency).
MAC Address: 62:65:B1:30:52:A7 (Unknown)
Nmap scan report for 10.0.10.2 [host down]
Nmap scan report for 10.0.10.3 [host down]

...
...
Nmap scan report for 10.0.10.51
Host is up (0.00049s latency).
MAC Address: 18:03:73:34:34:36 (Dell)
Nmap scan report for 10.0.10.52 [host down]
Nmap scan report for 10.0.10.53 [host down]

So here we see that the scan detected my pfSense virtual machine firewall on IP 10.0.10.1, and gave me the MAC Address.

Let’s take a closer look at my the Dell workstation found on 10.0.10.51. To do so, let’s run a port scan:

nmap -p 1-65535 -sV -sS -T4 10.0.10.51

This scan does the following:

Run a full port scan on ports 1-65535, detect service versions, run a Stealth Syn scan, use T4 timing and the target of the scan is IP 10.0.10.51.

Below are the results:

root@HN-kali01:~# nmap -p 1-65535 -sV -sS -T4 10.0.10.51

Starting Nmap 7.40 ( https://nmap.org ) at 2017-08-04 15:17 PDT
Nmap scan report for 10.0.10.51
Host is up (0.00047s latency).
Not shown: 65528 filtered ports
PORT      STATE SERVICE      VERSION
135/tcp   open  msrpc        Microsoft Windows RPC
139/tcp   open  netbios-ssn  Microsoft Windows netbios-ssn
445/tcp   open  microsoft-ds Microsoft Windows 7 - 10 microsoft-ds (workgroup: WORKGROUP)
2179/tcp  open  vmrdp?
27036/tcp open  ssl/steam    Valve Steam In-Home Streaming service (TLSv1.2 PSK)
49666/tcp open  msrpc        Microsoft Windows RPC
49667/tcp open  msrpc        Microsoft Windows RPC
MAC Address: 18:03:73:34:34:36 (Dell)
Service Info: Host: JCDESKTOP; OS: Windows; CPE: cpe:/o:microsoft:windows

Service detection performed. Please report any incorrect results at https://nmap.org/submit/ .
Nmap done: 1 IP address (1 host up) scanned in 141.84 seconds

Because I don’t always like to use my new Kali VM via the ProxMox console, I want to run my Kali desktop over VNC & SSH. Here is a good resource for learning how to connect to your Kali Linux system with VNC over a secure SSH connection:

In the next post, we’ll look some more at NMAP, as well as some other pen-test tools.

Security – Blue Team – Building a security project on a budget

How to Create and Build a Security Profile for Your Network on a Budget – Part 1

Start with Building a Foundation (or use an existing good one).

Credit to Kyle Bubp & irongeek.com: http://www.irongeek.com/i.php?page=videos/bsidescleveland2017/bsides-cleveland-102-blue-teamin-on-a-budget-of-zero-kyle-bubp

Use a Base Framework for your security project. There are a lot of standards available and the NIST government standards are a good solid foundation:

  • NIST 800-53
  • NIST Cybersecurity Framework
  • NIST CSF Tool
  • CIS Critical Security Controls
  • NIST-CSF tool – this is a nice visual tool – graphical interface for the stages of building a security program

Document everything

A core documentation repository is critical when setting up a security project – others will follow you and will need to look up the information you have recorded. It’s best to have a security incident response ticketing system and documentation before you need it. Have these tools up and ready.

For policy, procedure, how-tos, etc:

  • MediaWiki(free)
  • Atlassian Confluence ($10 for 10 users) – glyfee plugin for confluence
  • OneNote/SharePoint – not every company is entirely open source

Incident Response Ticketing/Documentation systems:

Map out your entire network

  • NetDB – Uses ARP tables and MAC databases on your network gear. (use a service account and NetDB will use ssh/telnet to find every device connected, will give a nice http interface. You can setup a cron job that will scan NetDB database every hour. You can pipe new device connections to an email address. Knowing if something comes onto your network is critical.

.ova is available at https://www.kylebubp.com/files/netdb.ova

Supports the following: Cisco, Palo Alto, JunoOS, Aruba, Dell Powerconnect

  • nmap scans + ndiff/yandiff – not just for red teams; export results, diff for changes. Alert if something changed.
  • NetDisco

https://sourceforge.net/projects/netdisco – uses SNMP to inventory your network devices.

  • Map your network – create a Visio document and have a good network map.

Visibility

Facebook-developed osquery and this tool can give you all you need.

Agents for MacOS, Windows, Linux

Deploy across your enterprise w/ Chef, Puppet, or SCCM

Do fun things like search for IoC’s (FBI file hashes, processes) – pipe the data into ElasticStack for visibility & search-ability

User Data Discovery

OpenDLP – (github) or (download an .ova) – will scan file shares and using a normal user account you can scan for available shares and data. Run over the weekend and see what you can find. Find the data owners and determine where the data should reside.

Hardening Your Network

CIS Benchmarks – Center for Internet Security Benchmarks: 100+ configuration guidelines for various technology groups to safeguard systems against today’s evolving cyber threats.

Out of the box, windows 10 is 22% for the CIS benchmark.

It’s difficult to secure your network if everything is a snowflake. While not exciting, configuration management is important. Deploy configs across your org using tools like GPO, Chef, or Puppet.

Change management is also important – use git repo for trackign changes to your config scripts.

Safety vs. Risk

Scanning for Vulnerabilities:

OpenVAS (greenbone) is a fork of Nessus which is still maintained, is the default vulnerability scanner in AlienVault. It does a great job in comparison with commercial products. Be careful, do some safe scans first and it’s not recommended to scan critical life-support equipment for example in a hospital.

Scan web apps:

Arachni Framework – for finding bugs in your developer’s code

OWASP ZAP (Zed Attack Proxy)

Nikto2 (Server config scanner)

Portswigger Burp Suite (not free – $350)

Harden your web servers:

Fail2ban – python-based IPS that runs off of Apache Logs

ModSecurity – Open source WAF for Apache & IIS

Fix ubuntu when the OS will not boot – kernel panic – kernel panic not syncing vfs unable to mount root fs on unknown-block 0 0 – error /boot full remove old kernels from command line

To begin, it will probably take at least 30 minutes resolve this issue…

This fix solved my problem with the “vfs unable to mount root fs” error, but of course your results may vary. As always, first backup your system or do an export of the vm so you have a copy of the system as it existed before you started screwing around with it 😉

After running apt-get update / apt-get upgrade and then a reboot, you may receive the following error: kernel panic not syncing vfs unable to mount root fs on unknown-block 0 0 on ubuntu 16.04.

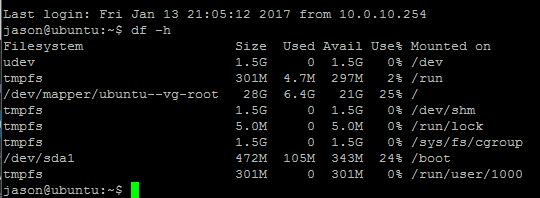
In many cases this  will be due to the /boot drive becoming 100% full because many updates have been made to the kernel. By default, ubuntu will retain the old kernels and add them to the list of available kernels you can boot into in the Grub2 boot loader menu. You can confirm that your drive is full by issueing the command:

df -h

The result will likely show the following:

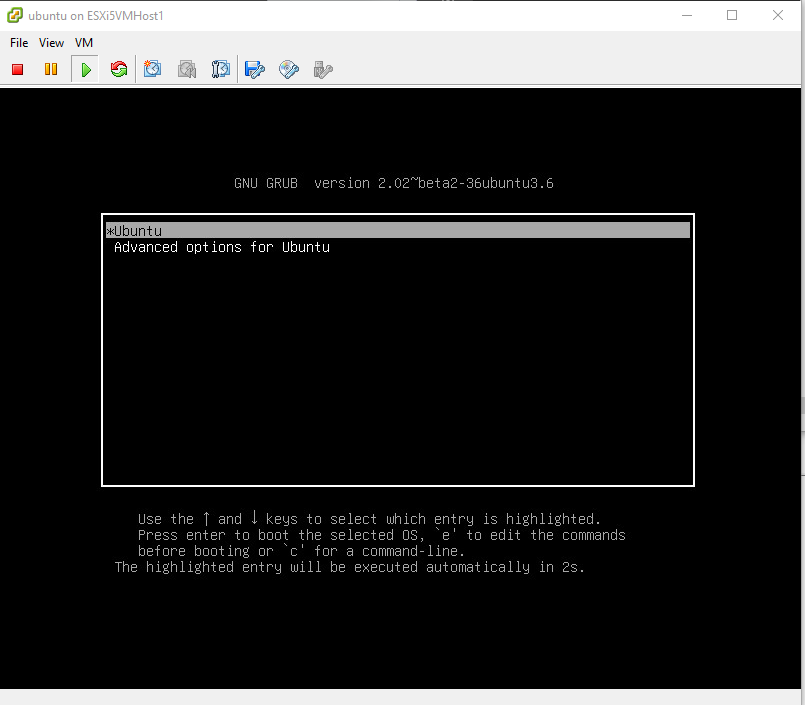
In order to resolve this issue and boot successfully, while you’re looking at the error during boot, (you should already be at the console), and restart the vm or computer into the Grub2 menu then choose “Advanced options for ubuntu” view where you can see a list of old kernels you can boot into. Some report you can do this booting with the Shift key held down, or in the event it’s a virtual machine, you should be able to arrow-down in the Grub start screen and choose Advanced options for ubuntu on startup:

Grub2 boot menu.

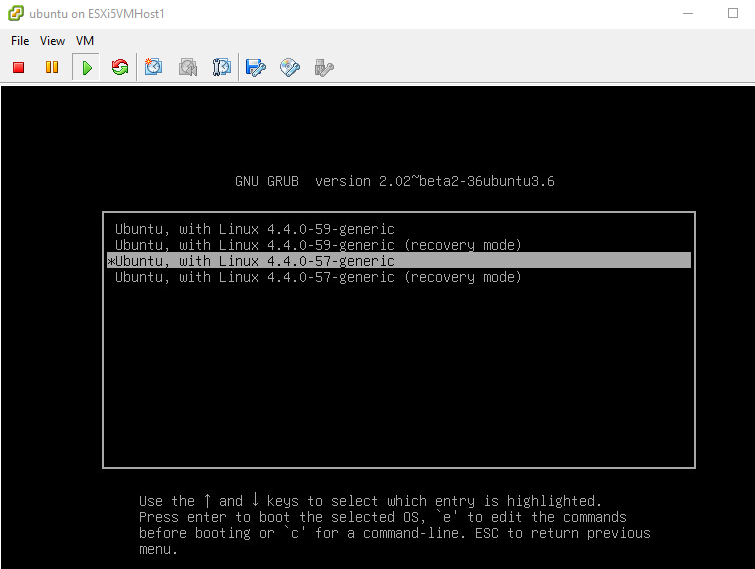
Once you go into the advanced boot menu you will likely see several kernels listed. Choose the next-oldest kernel from the top/highest version of kernels. In my case I booted into the version labeled Ubuntu, with Linux 4.4.0-57-generic (my boot menu screenshot below is clean, but you’ll likely see several kernels listed).

Cross your fingers and hope you get to your login prompt. From here I jumped on putty and connected from that client, as I prefer it over the console.

Next, login and follow the directions that I found here:

http://askubuntu.com/questions/2793/how-do-i-remove-old-kernel-versions-to-clean-up-the-boot-menu

To save you the search, here are the instructions I used to first list and then remove the old kernels:

Open terminal and check your current kernel:

uname -a

DO NOT REMOVE THIS KERNEL! Make a note of the version in notepad or something.

Next, type the command below to view/list all installed kernels on your system.

dpkg --list | grep linux-image

Find all the kernels that are lower than your current kernel version. When you know which kernel to remove, continue below to remove it. Run the commands below to remove the kernel you selected.

sudo apt-get purge linux-image-x.x.x.x-generic

Or:

sudo apt-get purge linux-image-extra-x.x.x-xx-generic

Finally, run the commands below to update grub2

sudo update-grub2

Reboot your system.

sudo reboot

As you can see from my terminal history, I had to remove a few:

589  uname -a
 590  dpkg --list | grep linux-image
 591  sudo apt-get purge linux-image-4.4.0-21-generic
 592  sudo apt-get purge linux-image-4.4.0-22-generic
 593  sudo apt-get purge linux-image-4.4.0-24-generic
 594  df -h
 595  sudo apt-get purge linux-image-4.4.0-24-generic
 596  sudo apt-get purge linux-image-4.4.0-28-generic
 597  sudo apt-get purge linux-image-4.4.0-31-generic
 598  sudo apt-get purge linux-image-4.4.0-34-generic
 599  sudo apt-get purge linux-image-4.4.0-36-generic
 600  sudo apt-get purge linux-image-4.4.0-38-generic
 601  df -h
 602  sudo apt-get purge linux-image-4.4.0-42-generic
 603  sudo apt-get purge linux-image-4.4.0-45-generic
 604  sudo apt-get purge linux-image-4.4.0-47-generic
 605  sudo apt-get purge linux-image-4.4.0-51-generic
 606  sudo apt-get purge linux-image-4.4.0-53-generic
 607  sudo update-grub2
 608  dpkg --list | grep linux-image
 609  df -h
 610  sudo apt-get purge linux-image-extra-4.4.0-21-generic
 611  sudo apt-get purge linux-image-extra-4.4.0-22-generic
 612  sudo apt-get purge linux-image-extra-4.4.0-24-generic
 613  sudo apt-get purge linux-image-extra-4.4.0-28-generic
 614  sudo apt-get purge linux-image-extra-4.4.0-31-generic
 615  sudo update-grub2
 616  df -h
 617  sudo reboot
 618  dpkg --list | grep linux-image
 619  uname -a
 620  sudo reboot

After the reboot, you can see my /boot partition returned to a manageable size:

I hope this post helps someone save some time and help them fix their ubuntu boot problems. Please leave a comment if this helped resolve your issue or if there is a smarter/faster way to fix this problem.

How to setup an Amazon AWS VPC, What is a VPC, and Subnets, Part 1 of 3

Amazon Web Services (AWS) provides the capacity to create a Virtual Private Cloud (VPC), which is a virtual network dedicated to your AWS account. In the first part of this three-part series, I will show you how to create a VPC with the corresponding subnets.

Read the rest of the articles Here

AWS VPC – Overview, setup, subnets

Modern PHP development environment – Setup of Ansible, pycharm, sourcetree and workflow with bitbucket

When getting started with development with a cloud repository such as git, it may be a little daunting to decide how to get started. With some help from an associate, I put together a short simple guide to setup a development environment on OS X. I hope this information provides someone with a good start to development with bitbucket, version control, and PHP Development in conjunction with a cloud repository.

Bitbucket is similar to git, but allows free repos. We prefer to use bitbucket for a repository of code so that we can manage changes to our ubuntu servers and files. Bitbucket is the “Book of Truth” and will be the keeper of all files and things that are good. Ansible runs on a dedicated management ubuntu server and pushes out changes (playbooks) to either a single, a few, or all of our linux servers. Either way, with pull/push of data from our code repository, we can control what is deployed on our systems, an use our repo as our backup. If a server dies, we can setup a new system, and pull in the good data.

Setup

First, you need a bitbucket account and sign-on. Once signed on to https://bitbucket.org/brooksinstitute/ You should be able to create your first repo. You might want to create your own private repo for notes, configs etc. As mentioned earlier, bitbucket is where we keep our known-good source code, and changes to this should only be done from your own computer’s copy of the repo, and only changed with commits – more on this later.

sourcetree

Next on your local machine, download sourcetree https://www.sourcetreeapp.com/

Once downloaded and installed, tell sourcetree where your repos live at bitbucket (simple username/password login).

Next, SourceTree will ask you which remote repository you want to clone to your local machine. You want to clone the remote repos on bitbucket so that you can make changes to your local versions before you commit them back to bitbucket. If you work with a group of developers you will probably want someone to review your files before you commit. You should also “checkout” local copies within pycharm, if someone else will also be working on your local files.

pycharm

Now it’s time to install and configure pycharm Community Edition https://www.jetbrains.com/pycharm/ . Pycharm is a Development Environment (IDE) that provides code completion, nice pretty colors and integrates with VCS/Git to do versioning control of your local (cloned) repo. In Pycharm, you want to go to the File → Open menu, browse your local machine, and choose the root folder of the cloned repo of your choice. This will get you to the point where you can begin to edit files.

ansible

Ansible http://www.ansible.com/ is a management utility that helps you easily manage systems and deploy apps. Here is some introductory documentation http://docs.ansible.com/ansible/intro_getting_started.html. Ansible usually runs on a dedicated Admin server, and this is the server that issues commands or “playbooks”. Although your Admin server contains the ansible playbook files, we only want to make changes to the files linked to the bitbucket repo before we pull them into the Admin server and then execute the commands.


Vagrant

Vagrant https://www.vagrantup.com/ provides easy to configure, reproducible, and portable work environments built on top of industry-standard technology and controlled by a single consistent workflow to help maximize productivity. First download, install, and run VirtualBox https://www.virtualbox.org/wiki/Downloads , then open a terminal, and startup a vagrant “box” with the following:

   $ vagrant init hashicorp/precise32
   $ vagrant up

Vagrant will download and install the ‘precise32’ “box”. And now, in virtualbox you will see the new virtual machine. Then next from the command line you can issue the command ‘vagrant ssh’ which will open a shell to your new precise32 vm. You can use this vm to test your configurations and playbooks against before you roll them out to your production servers.

Workflow

When you’ve changed something in your local (cloned) repo, and you want to have that become the “truth” on bitbucket, do the following:

  1. Open the file from your local repo in pycharm (double-click on the file icon in the menu tree)
  2. Edit the file
  3. When done editing, right-click on the file → Git → Commit file
  4. Now you want to push this edited file up to bitbucket. Review the code, make comments and then push.


Ubuntu Linux Server setup guide – Setup ssh, keygen, brew, and ssh-copy-id on Mac OS X


iTerm on OS X
ssh config file in iTerm on OS X

What follows is a ubuntu/linux server setup guide that can be used to configure, 1. A new linux server and 2. setup an OS X workstation to easily connect to your linux servers with preshared keys.

  • Build the server on Hyperv, then setup your initial account during the Ubuntu LTS 14.04.2 setup.
  • Log in as the initial user and add accounts as necessary:
    • “sudo su -“ – this does a sudo and copies root path and all environmental variables
    • useradd -m -s /bin/bash jcoltrin
    • passwd jcoltrin
    • vi /etc/sudoers
      • (end of file) add line: jcoltrin ALL=NOPASSWD: ALL
    • su jcoltrin – make sure you can su.
    • sudo su – this sequence has allowed you to sudo without having to type in your password.
    • Just a note: modifying /etc/group – putting users in here is the wrong way of adding sudoers – no granular control – users here will be required to enter their password when doing sudo.
  • ctrl+l clears screen
  • Add static IP address and dns-nameservers to /etc/network/interfaces
    • Get the name of your network interface with command:
    • ifconfig -a

      In my case, the network interface name is ens33. So to make my ens33 interface a static interface, I configure the /etc/network/interface with the text editor vi. The first interface is lo, which is the loopback interface. The line ‘auto ens33’ is necessary because it is used to start the interface when the system boots.

    • 
      source /etc/network/interfaces.d/*
      
      # The loopback network interface
      auto lo
      iface lo inet loopback
      
      # The primary network interface
      auto ens33
      iface ens33 inet static
              address 10.0.10.151
              netmask 255.255.255.0
              gateway 10.0.10.254
              dns-nameservers 8.8.8.8 8.8.4.4


  • apt-get:
    • apt-get update – checks online for updates
    • apt-get upgrade – installs updates and security patches
    • apt-get dist-upgrade – note: make sure /boot dir is not more than 80% full. If it’s full it may have old kernel upgrades so google ubuntu clean old kernels.
    • reboot
Setup ssh, keygen, brew, and ssh-copy-id on Mac OS X

Now we need to establish a secure and easy connection from our mac to the new server. On our Mac issue the commands:

  • Install iTerm on your Mac. Configure to your liking, but it’s a good idea to set, in the Terminal settings, the scroll-back limit to either 99,999 or unlimited. Now in our new iTerminal, issue the command: ssh-keygen – this generates both public and private keys in our .ssh directory in our home directory.
    • Install HomeBrew on your Mac in order to get unix tools installed on your mac:
      • Make sure your account on your Mac is an administrator by going into System Preferences → Users and Groups → (unlock) → Select Account → checkmark Allow user to administer this computer.
      • First install XCode, then open a terminal again and paste in the command for installing homebrew from http://brew.sh
      • Install homebrew as it prompts, and run brew doctor so that we know we’re ready to install homebrew
      • brew install nmap ssh-copy-id wget htop ccze – this installs the linux tools we want on our mac
  • ssh-copy-id jcoltrin@serverIPaddress (password) – this copies our public key into the server we connected to. Now we can log into the servers from our mac terminal without having to type in the password.
    • Also on the mac we want to make it easy to ssh into, for example, server.domain.com.
    • vi .ssh/config
    • Line 1: host server
    • Line 2: hostname server.domain.com
    • Line 3: User jcoltrin
    • Line 4: KeepAlive yes
    • ctrl+wq!
    • The result should look like the following:

jcmbp:.ssh jcoltrin$ cat config

Host	    server
    Hostname server.domain.com
    User jcoltrin
    KeepAlive yes
    ServerAliveInterval 15

Host    myAmazonAWS1
    Hostname jasoncoltrin.com
    user ubuntu
    IdentityFile ~/.ssh/jasoncoltrin_keypair1.pem
    KeepAlive yes  
    ServerAliveInterval 15
  • ssh server – now we are able to issue this command and get in immediately without having to enter a password and also we can run sudo commands without having to enter our password again. As you can see in the config file above, we can also copy our .pem files into our .ssh directory and have config point to them so that we can easily ssh into our amazon AWS servers as well.
  • If we will be running websites, we now want to install virtualmin. Go to http://www.virtualmin.com/download.html#gpl and follow instructions here for downloading install.sh
Adding a new remote Administrative User’s ssh keys to a Linux Server

useradd -m -s /bin/bash newadmin1
mkdir ~newadmin1/.ssh
echo ssh-dss ****key data***..xxblahblahACBAM……kpucyrGw== [email protected] » ~newadmin1/.ssh/authorized_keys
chown -R newadmin1:newadmin1 ~newadmin1/.ssh
chmod 700 ~newadmin1/.ssh
chmod 600 ~newadmin1/.ssh/authorized_keys

vi /etc/sudoers

newadmin1 ALL=NOPASSWD: ALL

While this guide is not meant to be a comprehensive step-by-step guide, it should provide you with enough to setup an OS X workstation with pre-shared keys, and copy those keys to your new server. Working with iTerm and pre-shared keys, I think, is vastly superior to Putty on Windows. I hope this guide helps a few admins become more efficient and versatile working on OS X and linux.