YYYY-MM-DD is the standardized international date formatting scheme as codified in ISO 8601. The standard aims to provide a well-defined unambiguous method of representing calendar dates and times in worldwide communications.
The standard has the additional benefit of organizing file and folders in a data-system in an intuitive ascending or descending order. Additionally not only is this good for Excel sorting, it’s also excellent for file naming as it sorts properly (based on date) even if the sort is done alphabetically and not numerically.
Also, the ISO 8601 is a format recognized internationally, and will prevent costly mistakes (the refund expires on 2/22/21,) and inconveniences (my plane arrives in Japan at 5:30P on 12-23-22.)
Question: Yes this is all fine and good but I can’t remember all this, how do I get used to the correct date format?
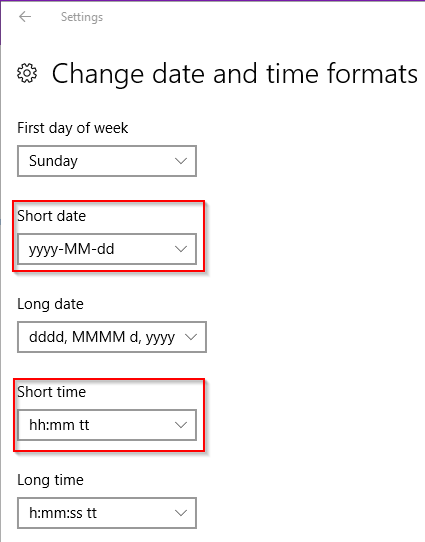
Answer: Change the Short Date format under Windows Settings > Region Settings or Date and Time Format.
Click on the Windows Start button and type Region
Click on Region Settings or Change the Date and Time Format
In the Date and Time Format settings, change the Short Date format to yyyy-MM-dd
Windows Region Time Date Format Settings YYYY-MM-DD
4. Additionally we can change the Short Time format to hh:mm tt (which adheres to the ISO 8601 format)
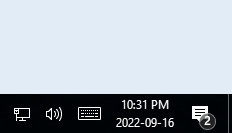
5. Now we can see in the bottom-right corner of our screen, our date and time formats are displayed:
Systray Time Date Format
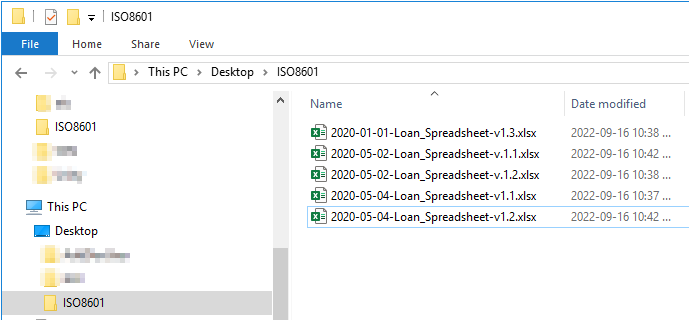
ISO 8601 Filename conventions
Naming files using the ISO 8601 scheme can have many variations, however the following makes most sense to me.
The timestamp is only a portion of the filename, it should not dictate how the other portions are formatted.
Typically dashes are used to separate fragments of a filename, while underscores delimit tokens within a fragment.
As such, the timestamp and the filename should be delimited by dashes, as they are different sections. Keep underscores within a section.
Then you get filenames which look like YYYY-MM-DD-file_name-v3.41. Which is clean and consistent (and easily copy / paste-able.)
Which of these filenames below is going to have you pulling your hair out, and which will leave you nice and happy when sorting by date in Windows File Explorer?
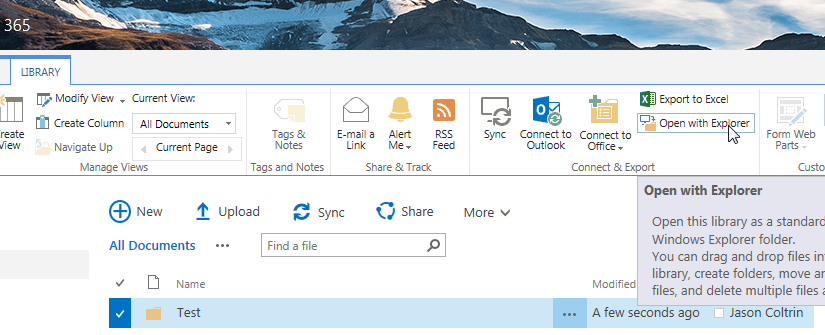
If your organization has been utilizing SharePoint’s “View in File Explorer” or “Open With Explorer” to map a drive to a SharePoint directory, you may have had problems opening SharePoint files in File Explorer, the connection between SharePoint and the File Explorer breaks, the Mapped Drive disconnects, or the connection is unreliable. Also, SharePoint can be a bit cumbersome when trying to work with files in the web-browser. The outdated SharePoint “View in File Explorer” feature was built with WebDav in the 90’s, and may use ActiveX controls, which is why it relies on Internet Explorer version 10 and/or 11 to run. You may recall we wrote about troubleshooting SharePoint’s “Open in File Explorer” here.
Microsoft’s preferred alternative to “View in File Explorer” is OneDriveSync, and Files On Demand (FOD.) When we think of “Sync”, we probably think of the classic Windows “Offline Files” configured in the Control Panel’s Sync Center. However, OneDriveSync is not the same as Offline Files.
OneDrive Sync utilizes the more modern technology, Files-on-Demand (FOD), which is configured in OneDrive Settings. Once configured, Files on Demand will only pull the index of all the files and folders in a SharePoint Library.
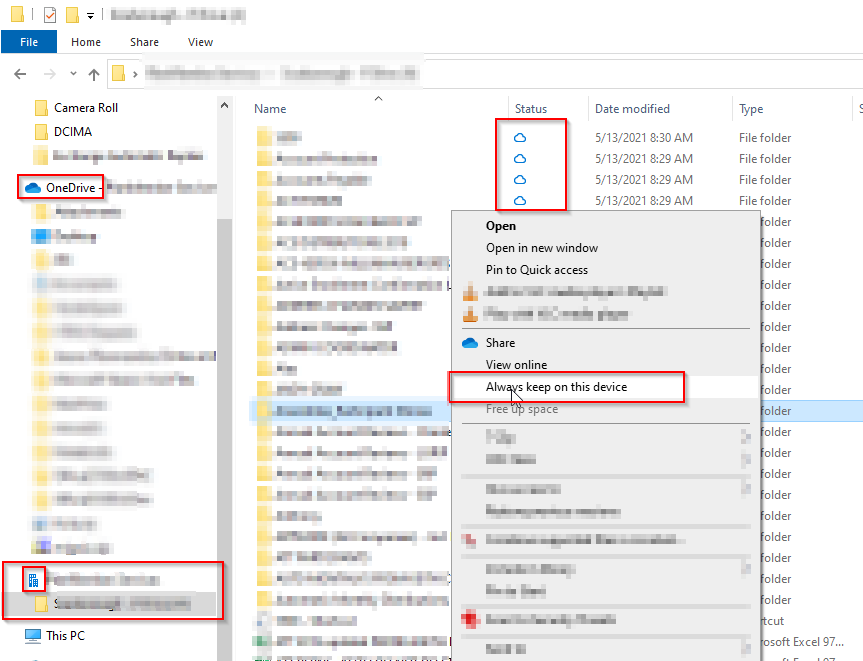
If desired, we can get the entire file/folder/data by right-clicking on the file or folder and choosing “Always keep on this device.” By default, if FOD is enabled, and we choose to Sync, we’ll only get an index of the SharePoint Library in the File Explorer (and we won’t sync the entire library and data contained there in.)
How to Enable Files On Demand and Sync a SharePoint Library
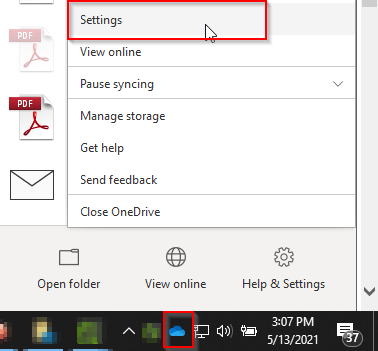
Before we Sync our SharePoint Library, make sure the OneDrive app is up to date and is running and logged in with the same credentials used to log into SharePoint online at www.office.com. Look for the blue or white cloud icon in the Systray (bottom right corner of your primary screen; near the clock,) then right-click, and click Settings.
OneDrive Settings
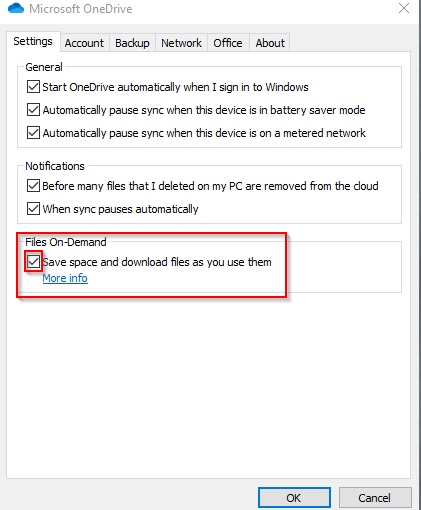
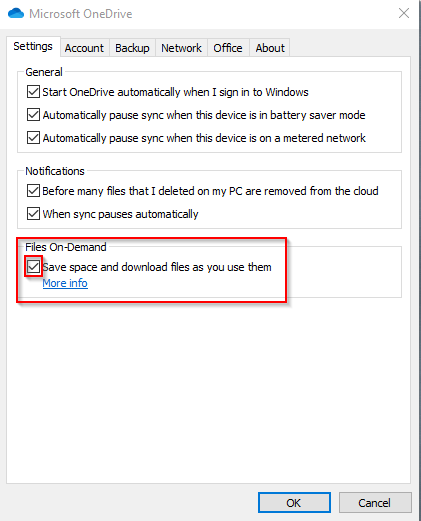
Next, in the Settings dialog box, near the bottom, place a check mark in the Files On-Demand / “Save space and download files as you use them” checkbox.
OneDrive Settings Files On-Demand
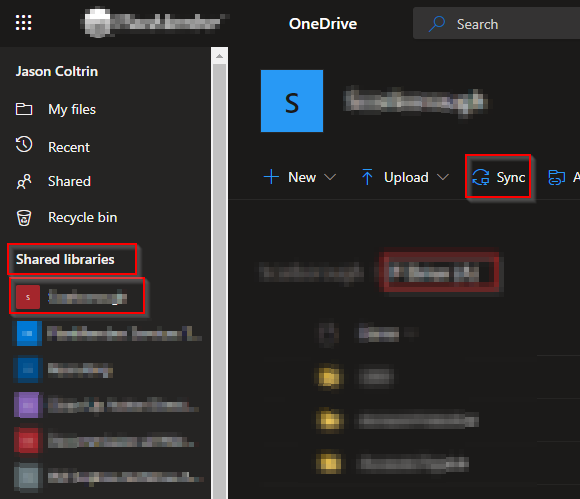
Next, open the Edge web browser and sign into www.office.com. Click on the SharePoint icon and then navigate to a Document Library that you would like to sync. Next, click the Sync button at the top of the Library:
OneDrive Sync
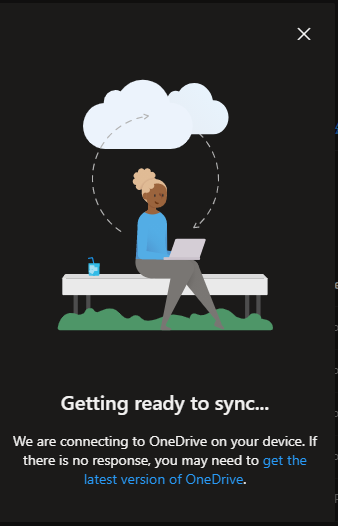
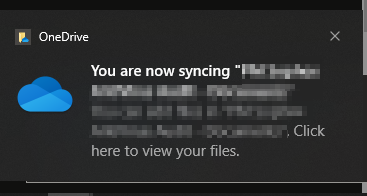
Normally we’ll see a couple pop-ups: Getting Ready to Sync, and You are Now Syncing:
Getting Ready to Sync dialog
OneDrive You are now syncing dialog
We’ll now have the SharePoint Library’s index built in our File Explorer with the files now having a status of either “Cloud Icon” or “Green Check Mark” next to each folder/file. As the Sync runs, we can check the Sync status by right-clicking on the OneDrive icon in the Systray.
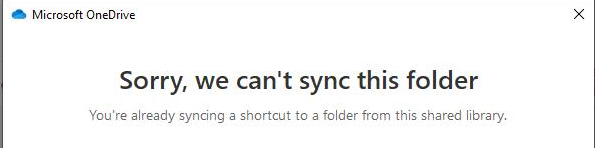
If you attempt to sync a library that already has a shortcut pointing to that library from within the user’s OneDrive folder, you may get an error:
Sorry, we can’t sync this folder – You’ve already syncing a shortcut to a folder from this shared library.
The icon will appear to have a link, so right-click on the folder that’s pointing to the Library you’re trying to Sync, and choose remove shortcut. Now we should be able to Sync the library.
If we want to have the file in SharePoint downloaded completely to our computer, right-click and choose “Always keep on this device.”
We probably do not want “Always keep on Device” for the entire Folder/Library, as it will eat up our entire hard drive.
Always keep on this device OneDrive Sync
If a file or folder is inadvertently kept on our device, we can right-click and instead choose “Free up space” on the file (greyed-out in the screenshot above.)
Take note in the screenshot above, the newly-synced Shared Library is not directly under OneDrive in the left navigation pane of the File Explorer, instead, it is listed separately below it and has a different “building” type icon.
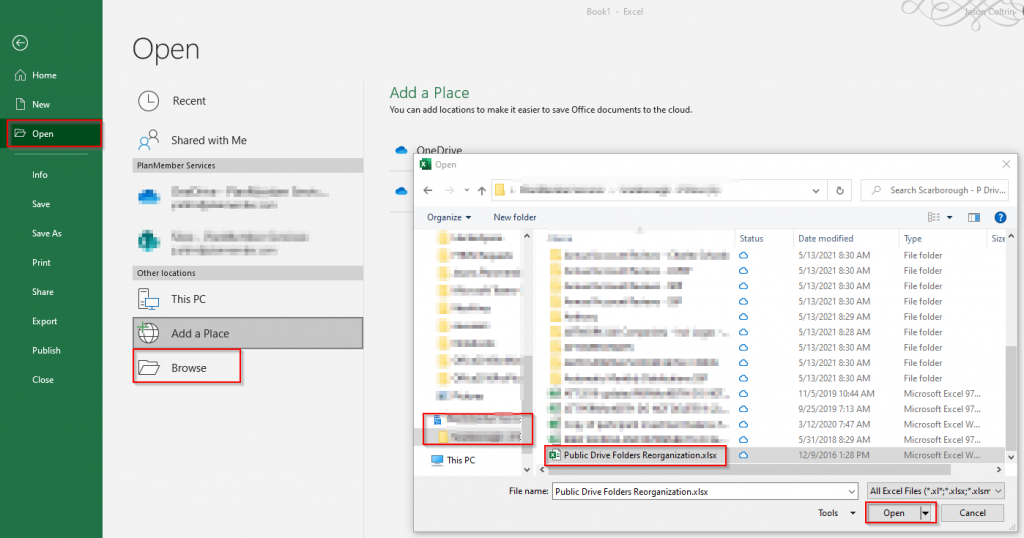
So now we can use Word and Excel apps to browse our local computer for files that are synced with SharePoint without having to use the old “Open/View in File Explorer” method.
For example, if we want to open a SharePoint file inside Excel, we click the File menu > Open > Browse > Organization / Library > File.xlsx > Open
Open SharePoint Library Files in Excel
Once we have made our changes and click Save, we’ll see a green checkmark under the Status column inside the File Explorer.
Excel File SharePoint Sync Status
We hope that if you’ve experienced difficulty opening SharePoint files in the Windows 10 File explorer, this procedure and OneDrive Sync will provide a more stable and fluid means of browsing SharePoint files in the File Explorer.
So recently Windows 10 has enabled a security feature that redirects certain websites like www.office.com to the Edge browser. If you need to get into a website using Internet Explorer, for now the workaround is to disable the Edge redirect setting inside the Edge browser settings.
If you use SharePoint online a lot you have probably found that Open in File Explorer is a convenient way to manage your SharePoint files and libraries in Windows 10. You’ve also probably found that in order to view the SharePoint files in the Windows 10 File Explorer, you first need to open Internet Explorer, then open the SharePoint library, find the link Return to Classic SharePoint in the bottom left corner of the SharePoint library page, and then click on the Open in File Explorer link inside Classic Mode. Details on how to troubleshoot opening SharePoint files in File Explorer can be found here. If you want an alternative way to browse SharePoint files in Windows 10 File Explorer using Edge, please go here.
If you want to know how to disable or remove the IE to Edge redirect, use the following instructions:
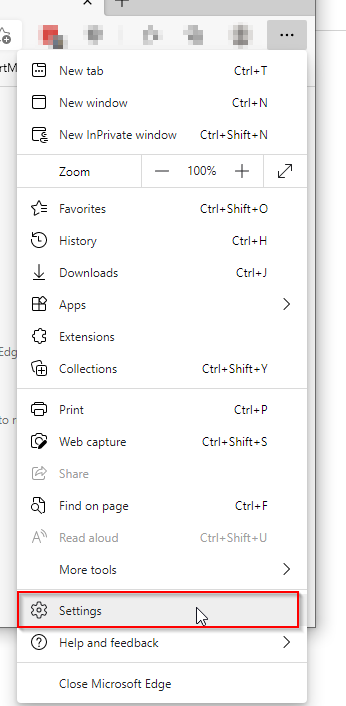
Start by opening the Edge browser.
In Edge, click on the … ellipsis menu in the upper-right corner, and then click Settings. Or in the address bar at the top of Edge, type edge://settings/defaultbrowser and press Enter.
Edge Browser Settings
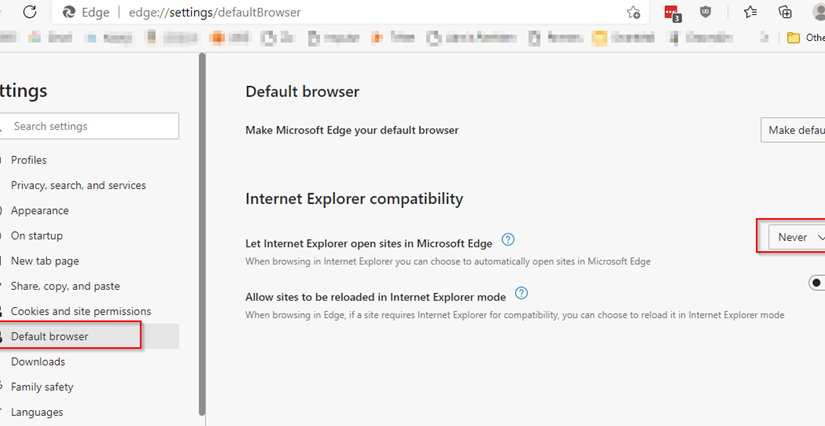
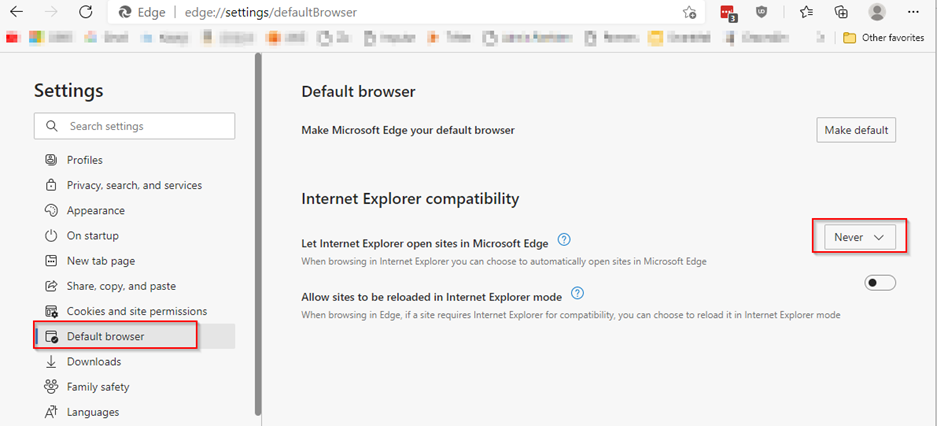
Next, inside the Edge Settings page, on the left side menu, click Default browser.
Change the setting “Let Internet Explorer open sites in Microsoft Edge” to Never.
Edge Default Browser Let Internet Explorer open sites in Microsoft Edge
That should do it!
Close the Settings Tab/Edge browser. Close and then open Internet Explorer browser. Go to www.office.com in IE and it should let you in.
To enable Bitlocker on your Windows computer, you first need to be running the Windows 10 Pro operating system. Windows 7, Windows 8, and ‘Windows 10 Home’ versions do not support Bitlocker.
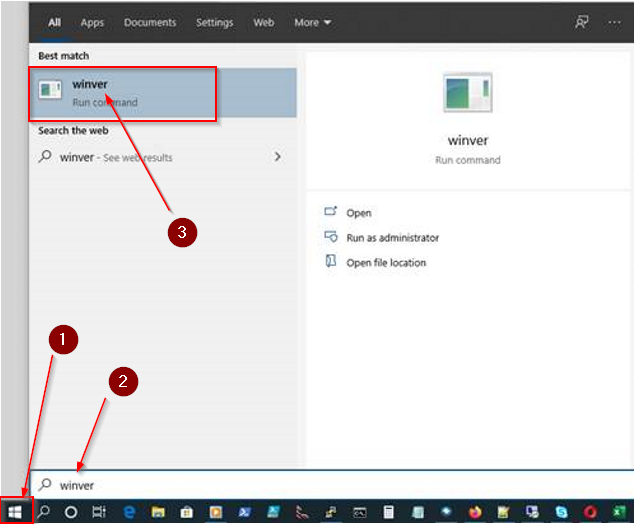
It’s a good idea to first know your current operating system version. To do so, click on the Start Button and type “WinVer” and then press Enter:
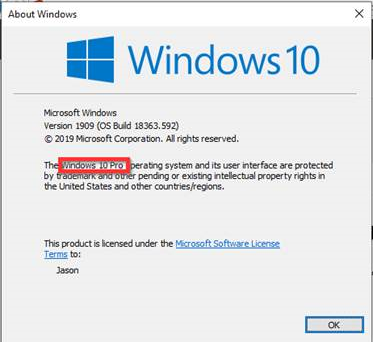
Check the version of operating system. You need to have Windows 10 Pro. As of the time of writing this article, the most version of Windows 10 is Version 1909 (OS Build 18363.592).
If you have Windows 7, follow the upgrade instructions below. If you have Windows 10 Home, then you need to purchase the upgrade to Windows 10 Pro, and follow instructions here.
You need to upgrade from Windows 7 Home to Windows 10 Home before you can upgrade to Windows 10 Pro.
When running the Media Creation Tool, run the Upgrade option. It will take a while and several reboots to upgrade from Windows 7 or 8 to Windows 10. If you started with Windows 7 Home or Windows 8 Home, the tool will most likely upgrade your PC to Windows 10 Home.
After you’ve finished the ‘Windows 7 Home’ to ‘Windows 10 Home’ upgrade, you now need to upgrade from Windows 10 Home to Windows 10 Pro in order to get the Bitlocker feature.
Upgrade from Windows 10 Home to Windows 10 Pro
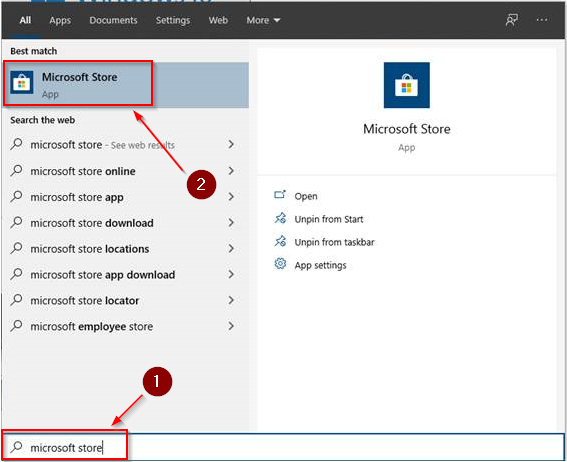
To upgrade from Windows 10 Home to Windows 10 Pro, click on the start button and type ‘Microsoft Store‘ and press Enter.
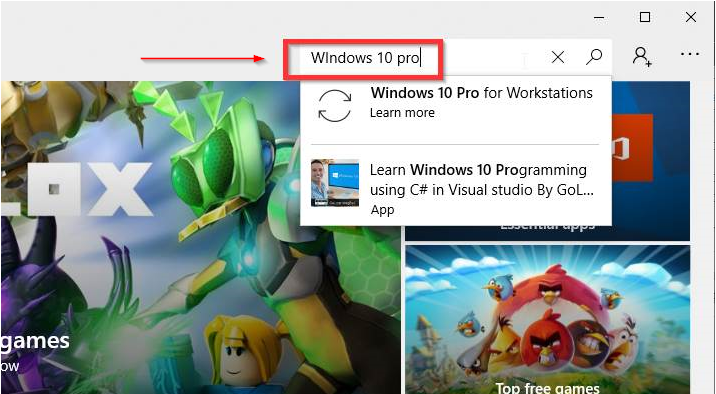
In the store, search for Windows 10 Pro in the upper-right corner of the store:
Purchase the upgrade ($99) and then run the upgrade. The process will take a while and several reboots.
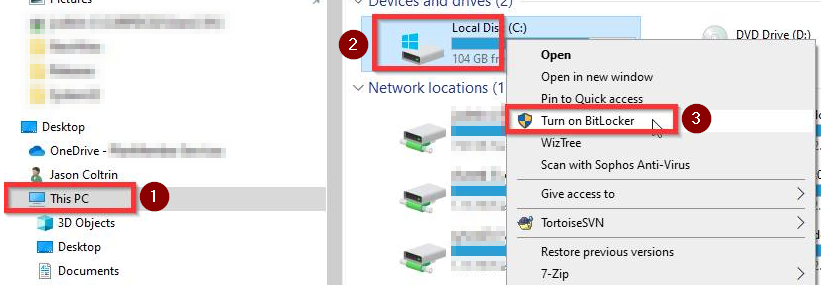
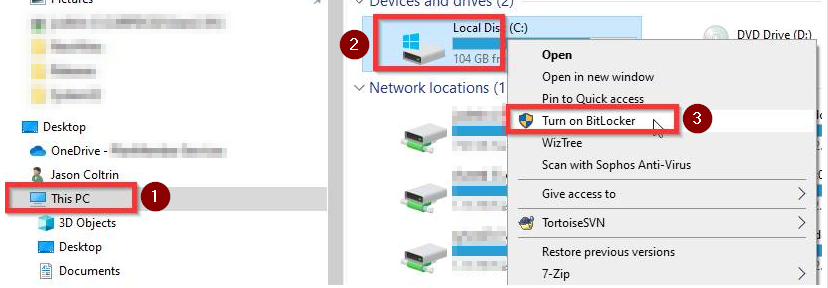
Once you are on Windows 10 Pro, open the File Explorer, click This PC, then Righ- click on the C: drive and choose Turn on Bitlocker or Manage Bitlocker.
Enable Bitlocker for the C: drive – Save the Bitlocker encryption/decryption key to a removable USB drive, save to the cloud, and print for a hard copy. This password to unlock the drive and the Recovery/Decryption key are very important, do not lose them.
Follow the default prompts (ok to skip system check) and the drive will begin encryption. You should see a status bar and progress indicator showing the percentage of encryption. When it reaches 100%, the encryption process has finished.
Reboot the system to complete the encryption of the drive.
After the reboot, log in to the desktop again, and use the Windows Control Panel to check the status. Please follow instructions here:
If you have recently enabled MFA multi factor authentication or 2FA on your Office 365 tenant, your Microsoft Outlook for Office 365 MSO 16.0.11929 (desktop version) users may be prompted over and over for their password, even though you are sure you have the correct password and even the apppassword / app password hash. I’m sure you’ve tried to re-configure Outlook, look at Azure settings, reinstall Outlook, check your autodiscover records, make sure you have the correct Office Suite version and perhaps have even attempted to change the windows 10 registry with the following settings:
So I thought it would be helpful to have a step-by-step how to enable modern authentication in Exchange Online for Office 365 based on the instructions provided in the link above.
With MFA enabled, connecting to Exchange Online with powershell is not as simple as it used to be, but still not all that bad. I’ve found the easiest way to connect to Exchange Online with Powershell is to do the following.
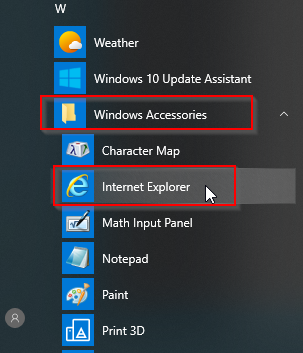
Note: A forewarning here, with certain browsers, when clicking on the Exchange Hybrid “Configure” button, and then installing the Hybrid configuration, the Office 365 login screen may may flash on the screen as a white box, and then disappears before you can authenticate and use your 2FA txt code. I’ve seen this when using Microsoft Edge, Chrome, and even the new version of Microsoft Edge based on Chromium. The only browser I’ve gotten this to consistently work with is the Internet Explorer browser built into Windows 10. The Internet Explorer browser is installed on Windows 10 by default, it’s hidden in the start menu under Accessories:
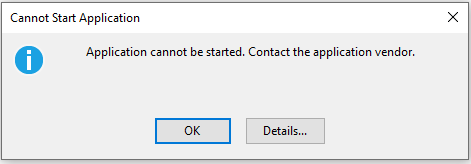
If you do attempt to run the Exchange Powershell Module using chrome you may encounter the error:
“Application cannot be started. Contact the application vendor.”
When clicking the Details… button, you may find information similar to the following:
PLATFORM VERSION INFO
	Windows 			: 10.0.18363.0 (Win32NT)
	Common Language Runtime 	: 4.0.30319.42000
	System.Deployment.dll 		: 4.8.3752.0 built by: NET48REL1
	clr.dll 			: 4.8.4121.0 built by: NET48REL1LAST_C
	dfdll.dll 			: 4.8.3752.0 built by: NET48REL1
	dfshim.dll 			: 10.0.18362.1 (WinBuild.160101.0800)

SOURCES
	Deployment url			: file:///C:/Users/Jason/Downloads/Microsoft.Online.CSE.PSModule.Client%20(3).application

IDENTITIES
	Deployment Identity		: Microsoft.Online.CSE.PSModule.Client.application, Version=16.0.3527.0, Culture=neutral, PublicKeyToken=45baf49ae30bdb15, processorArchitecture=msil

APPLICATION SUMMARY
	* Installable application.
	* Trust url parameter is set.
ERROR SUMMARY
	Below is a summary of the errors, details of these errors are listed later in the log.
	* Activation of C:\Users\Jason\Downloads\Microsoft.Online.CSE.PSModule.Client (3).application resulted in exception. Following failure messages were detected:
		+ Deployment and application do not have matching security zones.

COMPONENT STORE TRANSACTION FAILURE SUMMARY
	No transaction error was detected.

WARNINGS
	There were no warnings during this operation.

OPERATION PROGRESS STATUS
	* [4/3/2020 3:32:57 PM] : Activation of C:\Users\Jason\Downloads\Microsoft.Online.CSE.PSModule.Client (3).application has started.
	* [4/3/2020 3:32:57 PM] : Processing of deployment manifest has successfully completed.
	* [4/3/2020 3:32:57 PM] : Installation of the application has started.

ERROR DETAILS
	Following errors were detected during this operation.
	* [4/3/2020 3:32:57 PM] System.Deployment.Application.InvalidDeploymentException (Zone)
		- Deployment and application do not have matching security zones.
		- Source: System.Deployment
		- Stack trace:
			at System.Deployment.Application.DownloadManager.DownloadApplicationManifest(AssemblyManifest deploymentManifest, String targetDir, Uri deploymentUri, IDownloadNotification notification, DownloadOptions options, Uri& appSourceUri, String& appManifestPath)
			at System.Deployment.Application.ApplicationActivator.DownloadApplication(SubscriptionState subState, ActivationDescription actDesc, Int64 transactionId, TempDirectory& downloadTemp)
			at System.Deployment.Application.ApplicationActivator.InstallApplication(SubscriptionState& subState, ActivationDescription actDesc)
			at System.Deployment.Application.ApplicationActivator.PerformDeploymentActivation(Uri activationUri, Boolean isShortcut, String textualSubId, String deploymentProviderUrlFromExtension, BrowserSettings browserSettings, String& errorPageUrl, Uri& deploymentUri)
			at System.Deployment.Application.ApplicationActivator.PerformDeploymentActivationWithRetry(Uri activationUri, Boolean isShortcut, String textualSubId, String deploymentProviderUrlFromExtension, BrowserSettings browserSettings, String& errorPageUrl)
--- End of stack trace from previous location where exception was thrown ---
			at System.Runtime.ExceptionServices.ExceptionDispatchInfo.Throw()
			at System.Deployment.Application.ApplicationActivator.PerformDeploymentActivationWithRetry(Uri activationUri, Boolean isShortcut, String textualSubId, String deploymentProviderUrlFromExtension, BrowserSettings browserSettings, String& errorPageUrl)
			at System.Deployment.Application.ApplicationActivator.ActivateDeploymentWorker(Object state)

COMPONENT STORE TRANSACTION DETAILS
	No transaction information is available.
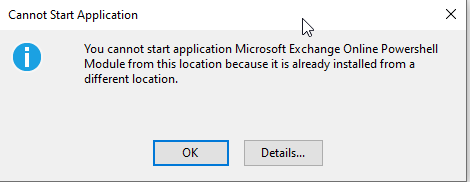
At this point, it may be necessary to uninstall the existing module and then re-install and run using Internet Explorer. You may even receive the following error:
"You cannot start application Microsoft Exchange Online Powershell Module from this location because it is already installed from a different location."
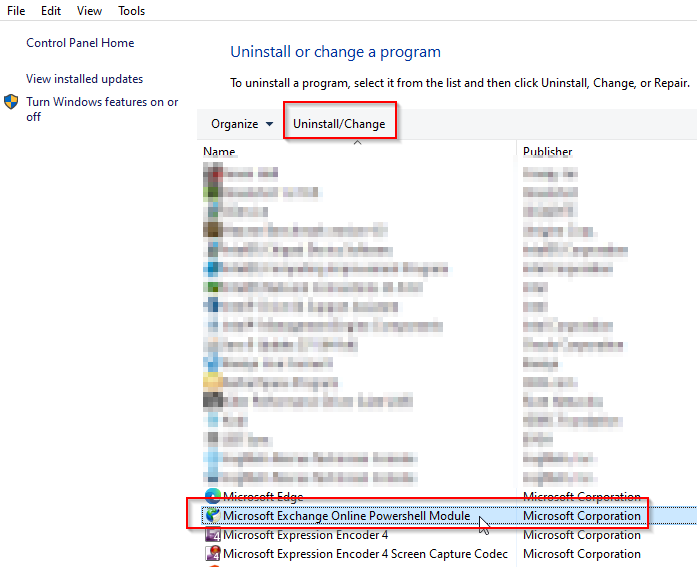
To uninstall the module, click the Start Button > type “appwiz.cpl” and press Enter.
Inside of the Programs and Features screen find the application and click Uninstall.
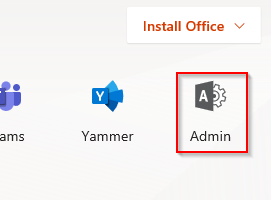
After uninstall, log into your tenant (with an administrator account) at https://www.office.com using Internet Explorer 11, and click the Admin link:
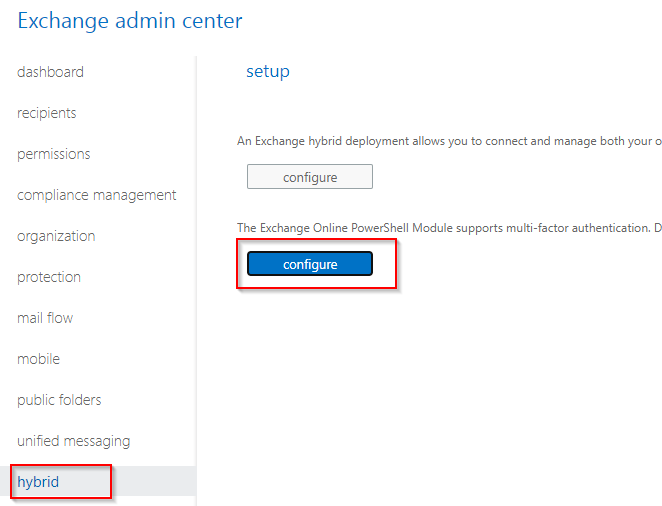
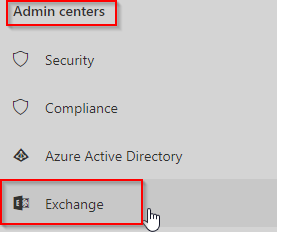
Next, Expand the Menu on the left menu by clicking Show All… and then click on Exchange:
Next we want to click on the Hybrid link to get to our Powershell Configure button:
Go ahead and install the component if it asks, and when it completes, you’ll be greeted with a Windows Powershell screen with the following message:
Experience the fast and reliable Exchange PowerShell V2 Cmdlets via new PowerShellGallery module. Go to https://aka.ms/exops-docs

This PowerShell module allows you to connect to Exchange Online service.
To connect, use: Connect-EXOPSSession -UserPrincipalName <your UPN>
This PowerShell module allows you to connect Exchange Online Protection and Security & Compliance Center services also.
To connect, use: Connect-IPPSSession -UserPrincipalName <your UPN>

To get additional information, use: Get-Help Connect-EXOPSSession, or Get-Help Connect-IPPSSession
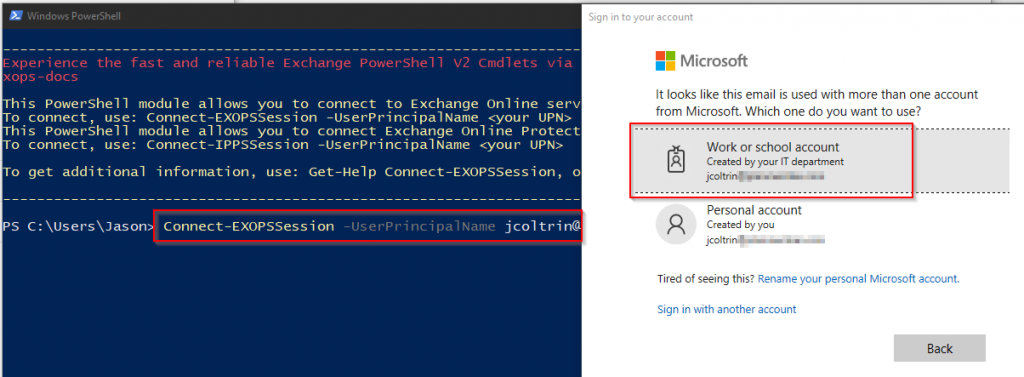
We now want to initiate our session using the instructions provided. At the prompt, type in the command:
You’ll now be prompted to sign into your tenant (Work or School). You’ll see some status bars go by and then be prompted with a warning about unapproved verbs (for example banish?)
So now we want to (only look before making changes) get our organization structure, and more precisely, find the status of our OAuth2ClientProfileEnabled setting by issuing the command:
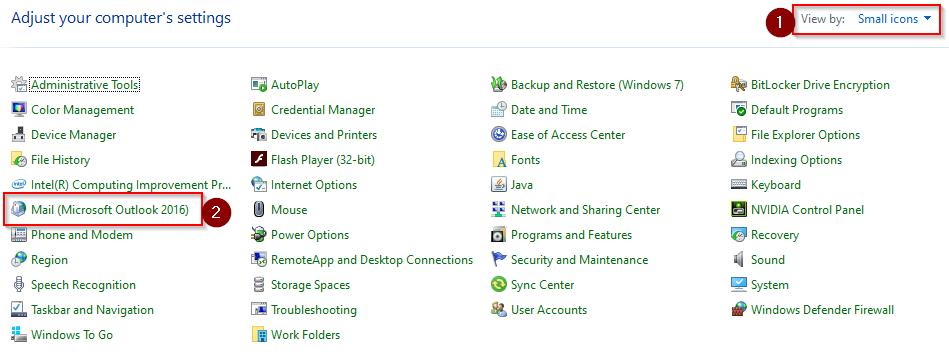
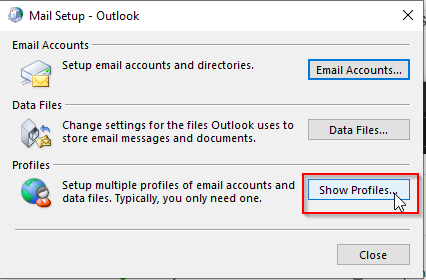
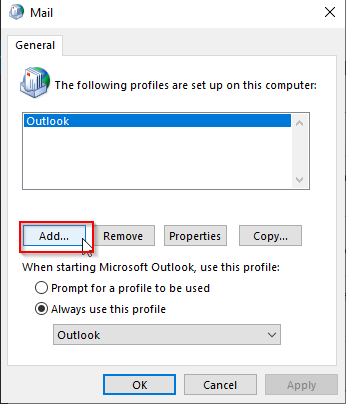
That’s about it! Give the setting about an hour to propagate and then try testing Outlook on the desktop again. You may get a few clients where their profile needs to be recreated. You can do this by going into the control panel > (1) choose Small Icons > (2) Mail Microsoft Outlook 2016.
Then click Show Profiles
Click Add…
Now when setting up the new mail account, you should be prompted with the modern authentication and you’ll be prompted for your txt code or Microsoft Authentication Application.
If you’re working remote with just a laptop, or
a laptop and a small 2nd monitor, the desktop gets pretty cramped
for a sysadmin. One way to mitigate the pain is to use your OS’s virtual
desktops functionality.
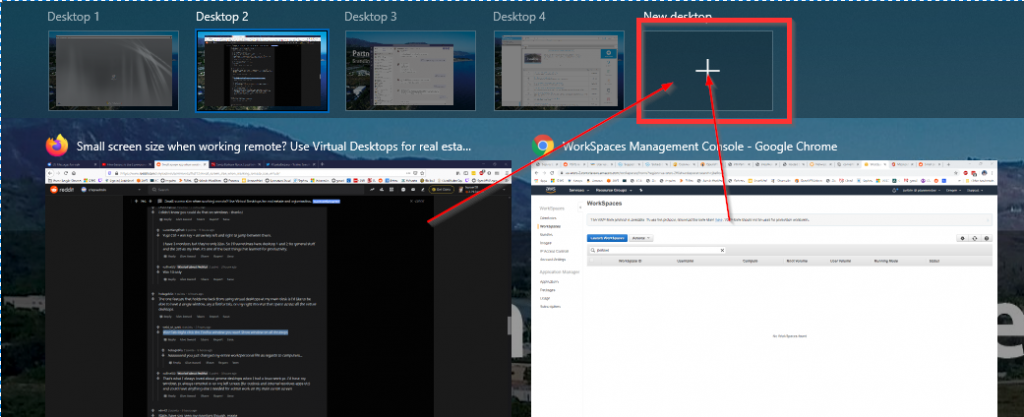
Here’s links to guides for Windows, Ubuntu, and MacOS on how to get started with them for your OS. Using Windows as the example, you just press Win-Tab and click the plus sign at the top for New Desktop.
Then drag existing windows on to it, and now they’re on a separate screen. To quickly move between virtual desktops, you can use the CTRL-WIN-left/right arrows.
Once you get in a habit of using them, it’s great for keeping multiple small applications visible on a whole desktop, or multiple full screen apps on their own window that you don’t have to constantly minimize/maximize. You can use Win-Tab (or the Task View button next to the Cortana button on your taskbar) to mass organize things or rearrange, and your Taskbar will reflect what items are open on that particular Desktop.
Alerts and notifications will still appear, even if you’re on a different virtual desktop, and interacting with the notification will teleport you to the relevant desktop.
One gripe with the Windows Virtual desktops is that there’s no easy way to move between desktops without taking your hand off the mouse. You can use the buttons on the side of your mouse (if your mouse has them) to switch desktops if you have the buttons on the side. If your mouse software doesn’t support the windows key combos check out X-Button Mouse Control. Set the buttons to generic and tell X-BMC to change it to the virtual desktop switches.
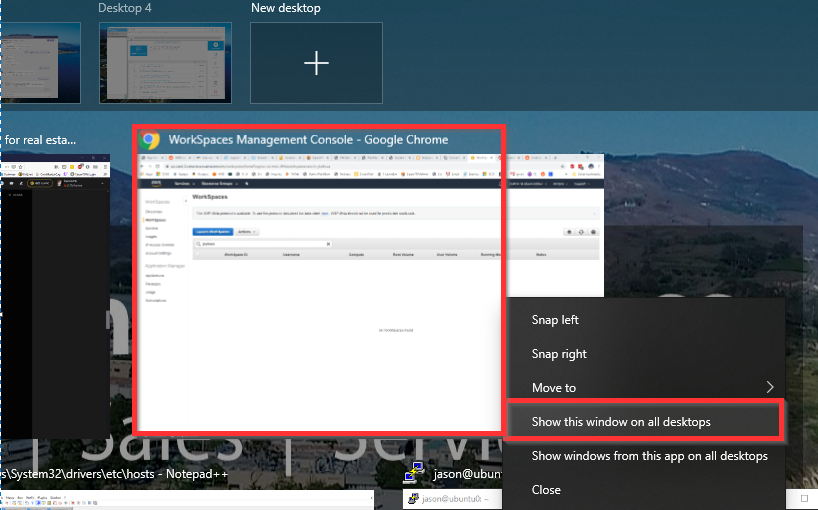
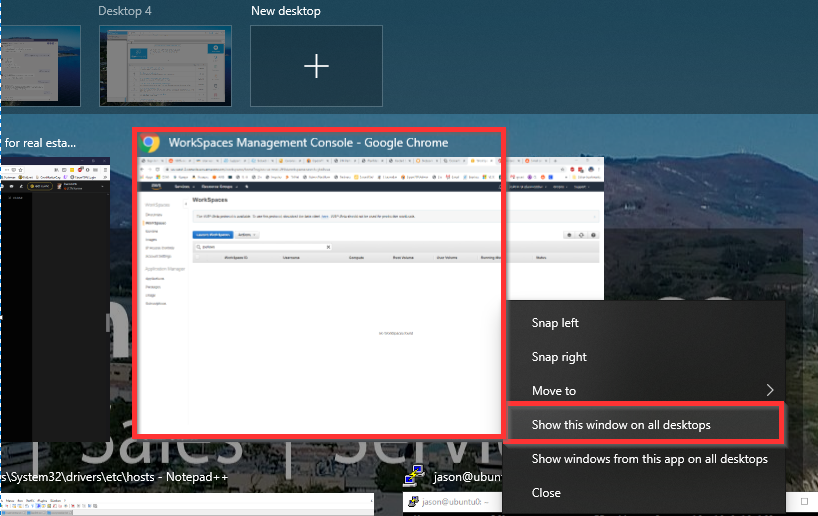
In order to display an application on all virtual desktops, do Win+Tab, then Right click the Chrome window you want Show window on all desktops.
One thing to note is if you have an AWS Workspace desktop open inside of a virtual desktop, it’s best to have the workspaces desktop in the far-left/primary desktop.
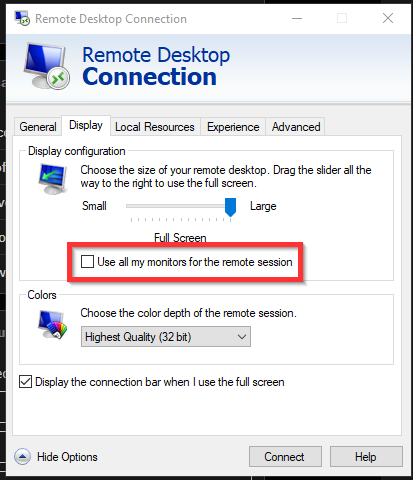
When working remotely in RDP, and you have multiple monitors, and you remote into a machine with multiple monitors, when you open the Remote Desktop client, click the Show Options button then under the display tab, ‘select use all my monitors’ for the remote session.
When
trying to install Microsoft Visio or Publisher with a Volume License MAK
license key alongside Office 365 Pro Plus, the Visio .iso installer may give
the error: “this version of O365 does not get along with the Installer, or you
cannot install 32bit with 64bit”. You may even have tried uninstalling the 32
bit version of Office, install the 64 bit version, only to receive the same
exact message. You may find installing 64 bit Visio Volume License with 64 bit
Office 2016 Pro Plus doesn’t work, nor does 32 bit with 32 bit, nor 64 bit with
32 bit. It can be frustrating.
The problem is that Microsoft has moved away from mixing the Volume License .iso installations (downloaded from the Volume Licensing website here: https://www.microsoft.com/Licensing/servicecenter/default.aspx ) – on the same computer with the “Click to Run” versions of Office you typically download from within Office 365 online. Instead, to get around the issue, you need to use the Office Deployment Tool. This will allow you build a build a package you’ll run from the command prompt to install for example, Visio or Publisher, on the same computer as Office 365 Pro Plus Click to Run. The configuration and setup is not all too difficult and we’ve documented the installation instructions below.
*NOTE: While I’ve found Visio .ISO/MAK can be happy with CTR, and although I have gotten it to work in a few instances, I wholeheartedly recommend to bite the bullet and use O365 Visio monthly licensing alongside the O365 Click-to-Run suite. It’s orders of magnitude easier to deploy Visio with O365 than to mix CTR with ISO’s/MAKs! It will save you worlds of frustration when someone moves to a new PC, or MAK licensing changes. Instead, go to Office365 licensing, purchase a Visio license, and assign it to a user. Any money saved by mixing MAK licensing with click to run, in my opinion is not worth the headache. That being said, a lot of the instructions below are relevant to a sysadmin’s job, and you should be familiar with how the deployment tools and office ‘configurator’ works, so read on.
The first thing we need to do is download the Office deployment tool from the following site:
Run the .exe you downloaded, accept the license terms, and extract the tool to a new folder you create named c:\admin\ODT
Click OK
Next, let’s switch gears and configure and run the online XML generator tool to build the XML file which we’ll need to configure the tool we just downloaded and extracted above.
At this website you can log into your office account (Recommended), or alternatively choose to continue without signing in:
In our example we’ll create the file by logging in first by clicking “Sign in.”
Once logged in, click on Customization > Device Configuration > +Create.
You’ll notice in the screenshot above we’ve already created a customization file which installs the 64 Bit version of Office Click to Run along with Visio 2016 Standard Volume license. We can download ImageFileNamethis configuration file again at a later date if we lose our .xml file.
In this example, we’ll create a customized file that pairs and combines installations of 32bit Office 365 Pro Plus with Visio Standard 2016 Volume License.
Click on the + Create button.
We first give the configuration a title, something like:
32-Office365CTR_and_Visio2016-32-VL_Key
Our configuration will be setup something similar to the following:
Take note that Office365 has different versions, and you click the “Learn More” link to decide which version to install or accept the default “Latest”. You might want to install the version that all of your other deployed Office365 versions are using. If you choose “Latest” you’ll most likely get a newer version of Office365 installed than everyone else. As a reference, I’ve copied one of the version tables below:
Also take a look at the primary language, and any other Office Suite apps you don’t want installed. It’s worth it to click through each heading to see what’s inside.
Next, we need to provide our Visio Standard 2016 volume license key. Do this by first logging into the Microsoft Volume Licensing Center here: https://www.microsoft.com/Licensing/servicecenter/default.aspx , find your product, your version, expand the license keys, and copy the license key into the Office Customization Tool under the heading Licensing and Activation > Product Key > Multiple Activation Key:
Finish by clicking Done in the upper right-hand corner.
Next, place a check next to the configuration file we’ve just created and click Download:
Once you’ve downloaded the .xml file, copy it into the c:\admin\ODT folder.
Open the command prompt on the computer onto which we’ll be installing Office 365 and Visio.
Change directory to c:\admin\ODT with the command:
cd c:\admin\ODT
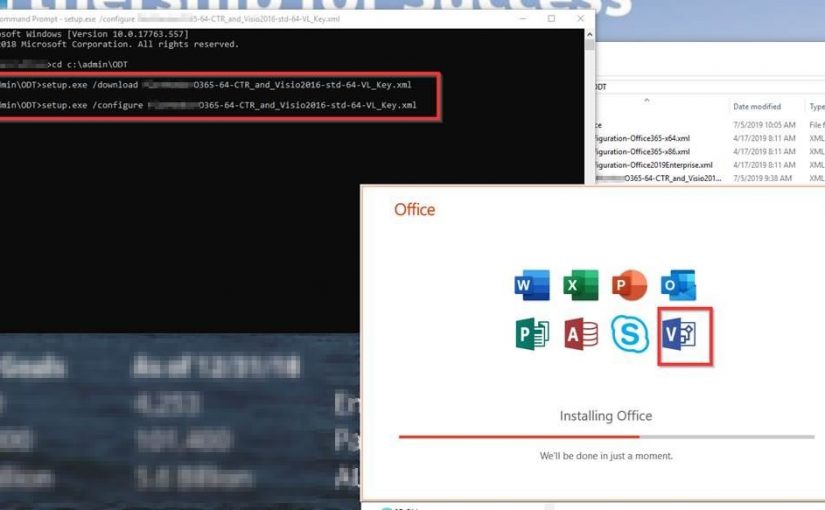
Run the setup.exe tool from the command Prompt first with the /download switch, followed by the name of your .xml configuration file (use tab to auto-complete the long file name.) For example the filename would look like:
setup.exe /download configurationFileName.xml
The download will be “silent” – it will take about 10 minutes to download the installer to the c:\admin\ODT\Office folder.
Once the download completes, the cmd prompt will be waiting for input again. Next run the setup.exe, except this time, with the /configure switch (again, reference your .xml file.) The /configure switch will process and install your applications as demonstrated in the following screenshot. For example the command would look like the following:
setup.exe /configure ConfigurationFileName.xml
When it finishes both the click to run Office365 will be installed as well as the Visio Volume License MAK version.
We’re done! Now if we need to do another install on a different computer of our Office365+Visio, we can copy the deployment tool and the .xml file to the computer and run the command prompt installer again.
When trying to setup and authenticate to an AWS Instance running OpenVPN, a user could not complete a new connection to OpenVPN after entering the initial un/pwd. They receive the error: Permission denied. This is after successfully setting up the OpenVPN client on Windows 10 and scanning an Authenticator code using Google Authenticator App on a Samsung S8 Active Android mobile phone running Android 8.0.0 ‘lollipop’. Ultimately the reason the user could not authenticate was their mobile phone’s time was off by about 3 minutes. Continue below to find additional information on how to troubleshoot this and other authentication issues with OpenVPN.
When troubleshooting OpenVPN login errors it’s a good idea to first try some of the following:
Unlock a Disabled or Locked account on OpenVPN Admin console
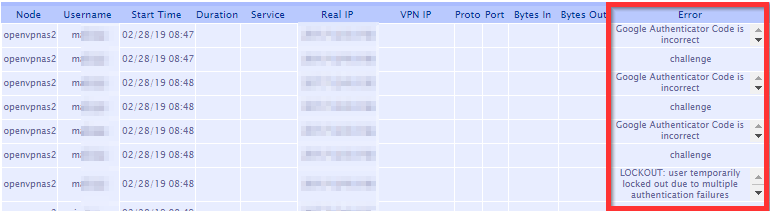
To check for the events related to a user lockout, first log into the Admin web console > Status > Log Reports. Here you will find the errors related to bad authentication and eventually an account lockout.
The errors you may find could be the following:
Google Authenticator Code is incorrect.
LOCKOUT: user temporarily locked out due to multiple authentication failures.
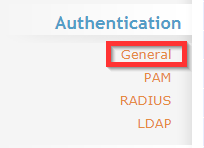
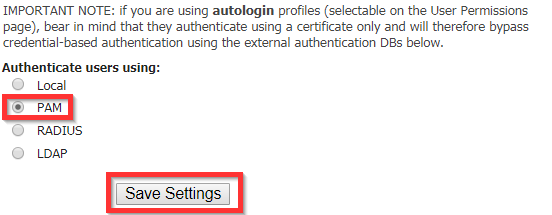
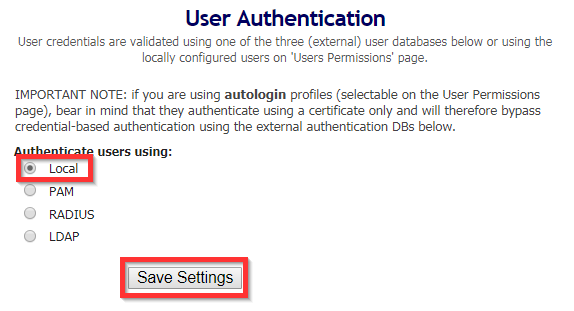
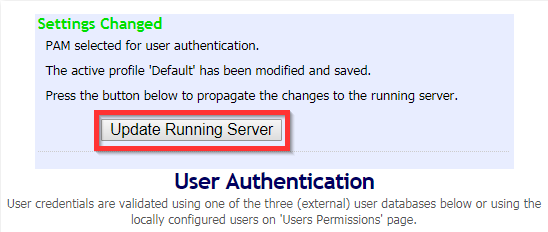
To unlock a user account (if using local authentication), Login to the Admin Web Console, Go to “General” under Authentication and change Authentication to “PAM”, Save Settings > Update Running Server > “Local” > Save Settings> Update Running Server.
This procedure should unlock disabled or locked user accounts on OpenVPN.
Reset A User Account on OpenVPN
To reset a user’s OpenVPN account:
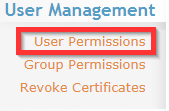
Log in to the admin web console, click on User Permissions.
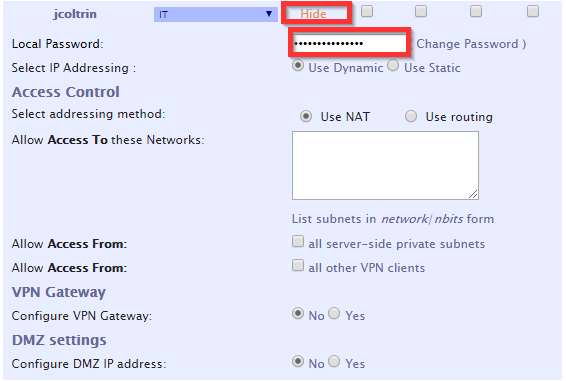
Find the username, place a checkmark in the Delete column, then Apply > Save. Next, re-create the account. Scroll to the bottom of the list, type the new user name: Eg. jcoltrin Save > update server
Go back find the username again in the list and hit Show:
Enter in the Local Password: (S3cr3tP@ssw0rd!) Save > Update
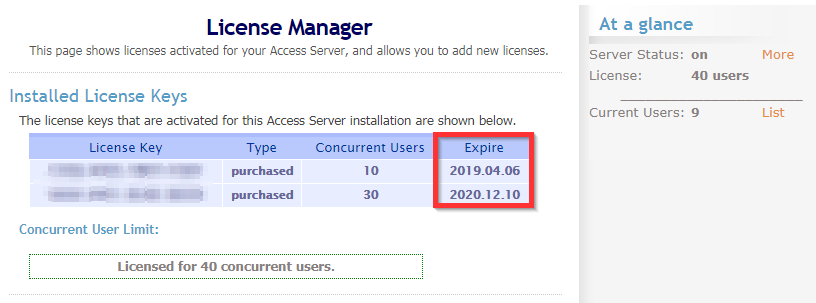
Check OpenVPN for Valid Concurrent License
In the admin web console, under the Configuration menu, click License. Check to ensure that your concurrent users have not reached or exceeded the limits of your licenses (under At a glance,) or that your licenses have not expired.
Use SSH to check the logs of the OpenVPN server and get the specific errors for an individual’s login problems.
After logging into the server using Putty/SSH, you can change directory to the scripts directory:
cd
/usr/local/openvpn_as/scripts/
and then issue the command ./authcli –user <username> –pass S3cr3tP@ssw0rd
./authcli --user jcoltrin --pass S3cr3tP@ssw0rd
This will produce something similar to the following information:
Result:
API METHOD: authenticate
AUTH_RETURN
  status : COM_FAULT
  reason : An error occurred while connecting: 13: Permission denied. (twisted.internet.error.ConnectError)
  user : jcoltrin
Addtionally you can find more messages related to authentication failures in /var/log. You’ll find these messages in the latest log files:
openvpnas.log
openvpnas.log.1
Use your favorite editor (vi) to search through the logs
vi openvpnas.log
use the command / and then the username to search for that term and hit “n” to go to the next instance of your term, for example:
/jcoltrin > n > n
and then :q to quit.
Here are some typical error messages for my authentication errors:
2019-02-26
14:20:08-0800 [-] WEB OUT: '2019-02-26 14:20:08-0800
[UDSProxyQueryProtocol,client] Web login failed
(twisted.cred.error.UnauthorizedLogin)'
2019-02-26 14:21:30-0800 [-] WEB OUT: "2019-02-26 14:21:30-0800 [UDSProxyQueryProtocol,client] Web login authentication failed: {'status': 1, 'client_reason': 'LOCKOUT: user temporarily locked out due to multiple authentication failures', 'reason': 'LOCKOUT: user temporarily locked out due to multiple authentication failures', 'user': 'jcoltrin'}"
Make sure the phone with Google Authenticator has the correct time and set the phone to sync it’s clock with the network/carrier
As mentioned at the beginning of this article, what the original login issue came down to was the Android phone, on which the Google Authenticator was running, had it’s time off by about 3 minutes. To set and change the correct time on an Android Galaxy S8 Active, first, go to Settings > General Management > Date and Time > Set/Turn on Automatic Date and Time.
I’m not sure why the value for this phone had it’s time set to not have automatic sync with the network/carrier. This may have been due to a recent android update because I found this setting off on a couple phones in the office. Ensure the time on your server is accurate as well by issuing the bash/ssh command:
date
Your result should look like the following:
openvpnas@openvpnas2:/var/log$ date
Thu Feb 28 14:46:57 PST 2019
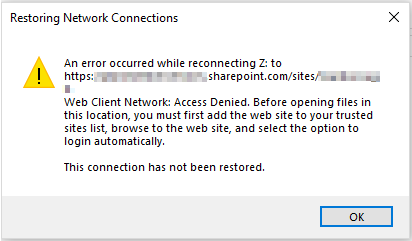
On Office365 SharePoint, when trying to open a file in the Windows File Explorer, you might get something similar to the following error:
An error occurred while reconnecting Z: to (sharepoint location) - Web Client Network: Access Denied. Before opening files in this location you must first add the web site to your trusted sites list, browse to the web site, and select the option to login automatically. The connection has not been restored.
….or clicking the Open With Explorer button does nothing, or the button is greyed out.
If the button is greyed out using Windows 10 Edge, you might find things work better using the Internet Explorer web browser. Edge does not support Active X controls. So instead, Click on the the Start button, type in Internet Explorer, find and open Internet Explorer (11), and try again.
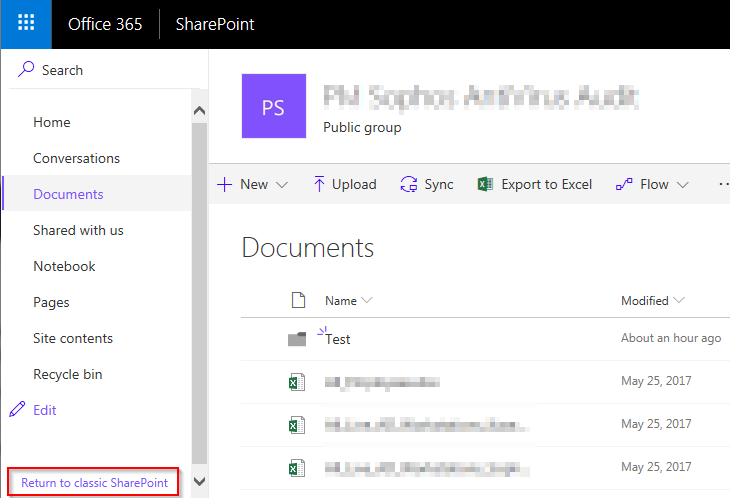
In the bottom left corner of the browser click the “Return to classic SharePoint”
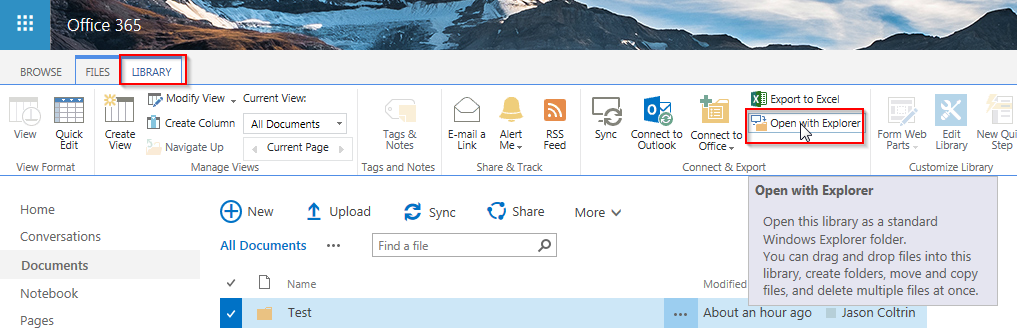
Place a check mark next to a folder, click on the “Library” tab at the top of the screen, and then click “Open in Explorer”
To resolve, make sure you have the following:
Windows 10 is up to date (v1803) as of this article
The Webclient service is Started and set to Automatic (Start > services.msc )
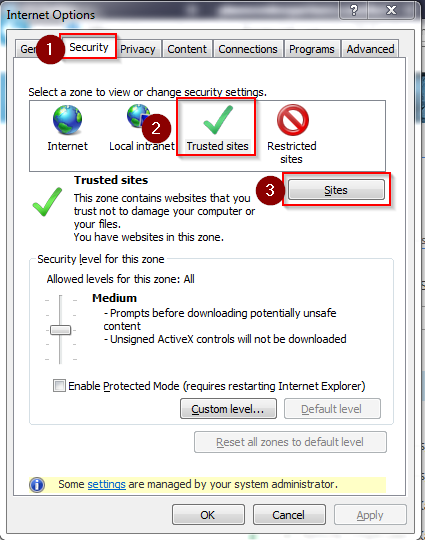
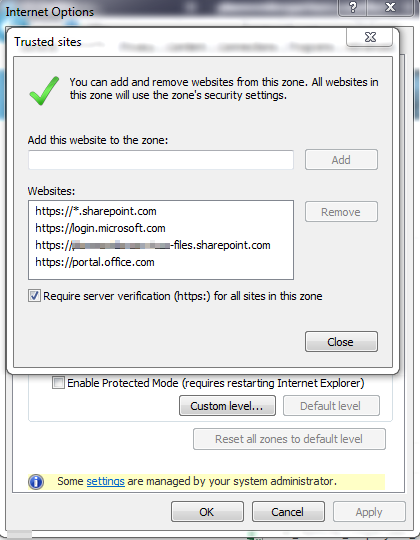
Make sure the following sites are added to your Trusted Sites in Internet Explorer settings:
https://yourdomain-files.sharepoint.com
https://*.sharepoint.com
https://login.microsoft.com
https://portal.office.com
https://yourdomain-myfiles.sharepoint.com
Next, restart your IE web browser, open IE, log into Office 365, and try again.
It may be beneficial to reset IE to its default settings:
IE > Gear Menu > Internet Options > Advanced Tab > Reset (delete personal settings) – use caution, try the following first, then if still having issues, try resetting your browser.
How to find your Active Directory Network Time Server
If someone complains that the time on a Windows 7 /Windows 10 PC is off, we can first sync the Domain Controller to an External Time Source, then sync their PC to the DC. How do you sync the computer to the same time as the cell phone/NIST/External Time Source, and make sure that all computers on your network have the same time as the domain controller?
First, determine from a client computer which computer is the authority for your time server. This is usually your Primary Domain Controller. To do so, on the client PC, open a command prompt and run the command:
net time
This should return something similar to the following:
This shows “Current time at \\NETTIMESERVER.domain.com” which is your net time authority.
How to check your domain controller time against a global time provider:
On the server that net time identified (NETTIMESERVER / primary domain controller,) right-click on your PowerShell icon and choose Run as Administrator.
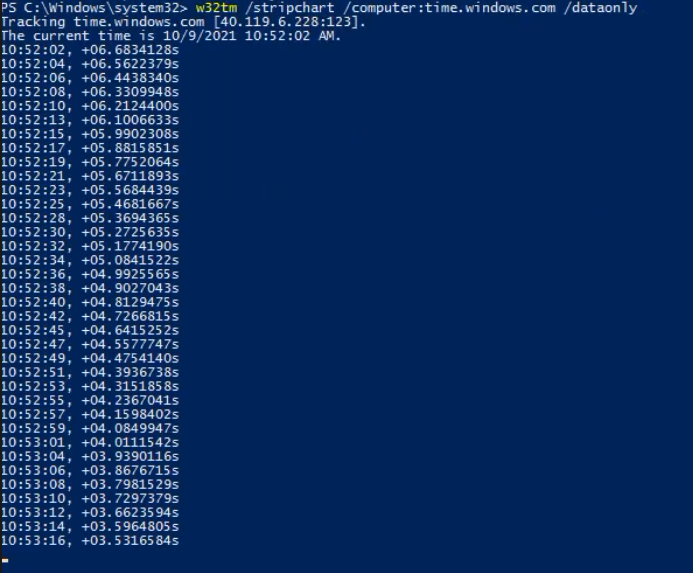
Run the following command to only check how much time your server is off from the global time authority. This command doesn’t do the sync, it just displays how much time your server is off. The result will display plus or minus hours/minutes/seconds/fractions of seconds.
The terminal should return “The command completed successfully.”
Next type:
w32tm /config /update
Again you should receive a message “The command completed successfully.”
Now to immediately synchronize the time use the following command:
w32tm /resync
We can now check again how much the time is off from the global provider by issuing the stripchart/dataonly command and check the results. You can see here that our time is now off by less than a second:
Sometimes it will take a while for the server’s time to completely sync, and we’ll see a slow progression until the time is accurate (screenshot at bottom of page:)
Sync Windows 7 or Windows 10 with Domain Controller
PC’s on the network that authenticate against our domain controller should automatically pick up the new time from the time server after a reboot. However, we can manually sync the time on the client with the net time domain controller. To do so, open powershell or the command prompt as administrator, and issue the command:
net time \\NETTIMESERVER.DOMAIN.com /set /y
This command should return the message “The command completed successfully.”
Our time on our PC is now synced with the domain controller, and the domain controller is now synced with time.windows.com.