To enable Bitlocker on your Windows computer, you first need to be running the Windows 10 Pro operating system. Windows 7, Windows 8, and ‘Windows 10 Home’ versions do not support Bitlocker.
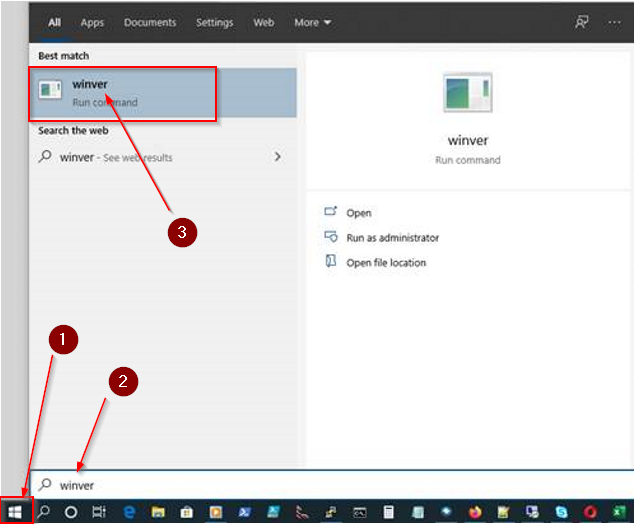
It’s a good idea to first know your current operating system version. To do so, click on the Start Button and type “WinVer” and then press Enter:
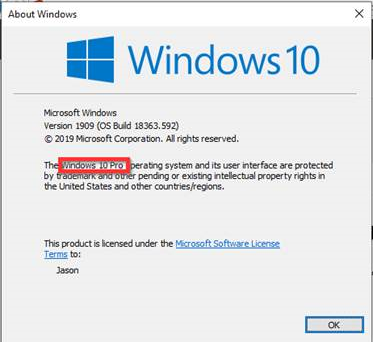
Check the version of operating system. You need to have Windows 10 Pro. As of the time of writing this article, the most version of Windows 10 is Version 1909 (OS Build 18363.592).
If you have Windows 7, follow the upgrade instructions below. If you have Windows 10 Home, then you need to purchase the upgrade to Windows 10 Pro, and follow instructions here.
You need to upgrade from Windows 7 Home to Windows 10 Home before you can upgrade to Windows 10 Pro.
When running the Media Creation Tool, run the Upgrade option. It will take a while and several reboots to upgrade from Windows 7 or 8 to Windows 10. If you started with Windows 7 Home or Windows 8 Home, the tool will most likely upgrade your PC to Windows 10 Home.
After you’ve finished the ‘Windows 7 Home’ to ‘Windows 10 Home’ upgrade, you now need to upgrade from Windows 10 Home to Windows 10 Pro in order to get the Bitlocker feature.
Upgrade from Windows 10 Home to Windows 10 Pro
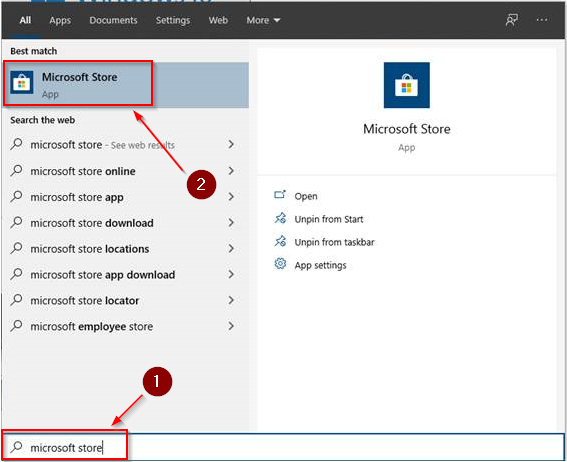
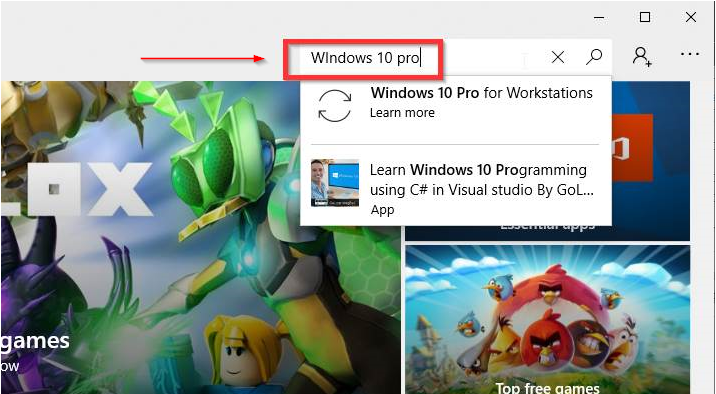
To upgrade from Windows 10 Home to Windows 10 Pro, click on the start button and type ‘Microsoft Store‘ and press Enter.
In the store, search for Windows 10 Pro in the upper-right corner of the store:
Purchase the upgrade ($99) and then run the upgrade. The process will take a while and several reboots.
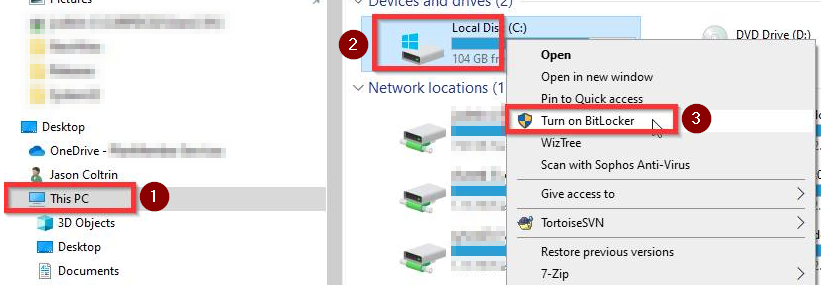
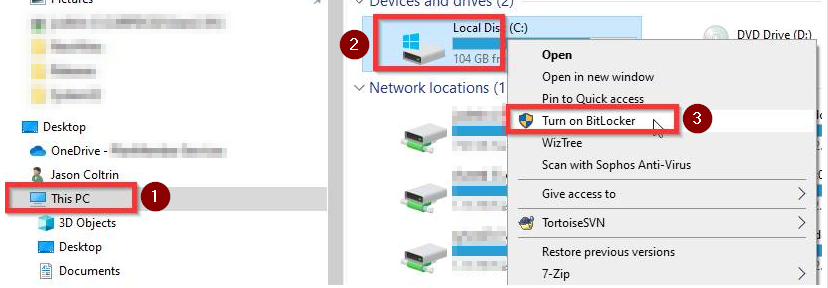
Once you are on Windows 10 Pro, open the File Explorer, click This PC, then Righ- click on the C: drive and choose Turn on Bitlocker or Manage Bitlocker.
Enable Bitlocker for the C: drive – Save the Bitlocker encryption/decryption key to a removable USB drive, save to the cloud, and print for a hard copy. This password to unlock the drive and the Recovery/Decryption key are very important, do not lose them.
Follow the default prompts (ok to skip system check) and the drive will begin encryption. You should see a status bar and progress indicator showing the percentage of encryption. When it reaches 100%, the encryption process has finished.
Reboot the system to complete the encryption of the drive.
After the reboot, log in to the desktop again, and use the Windows Control Panel to check the status. Please follow instructions here:
When
trying to install Microsoft Visio or Publisher with a Volume License MAK
license key alongside Office 365 Pro Plus, the Visio .iso installer may give
the error: “this version of O365 does not get along with the Installer, or you
cannot install 32bit with 64bit”. You may even have tried uninstalling the 32
bit version of Office, install the 64 bit version, only to receive the same
exact message. You may find installing 64 bit Visio Volume License with 64 bit
Office 2016 Pro Plus doesn’t work, nor does 32 bit with 32 bit, nor 64 bit with
32 bit. It can be frustrating.
The problem is that Microsoft has moved away from mixing the Volume License .iso installations (downloaded from the Volume Licensing website here: https://www.microsoft.com/Licensing/servicecenter/default.aspx ) – on the same computer with the “Click to Run” versions of Office you typically download from within Office 365 online. Instead, to get around the issue, you need to use the Office Deployment Tool. This will allow you build a build a package you’ll run from the command prompt to install for example, Visio or Publisher, on the same computer as Office 365 Pro Plus Click to Run. The configuration and setup is not all too difficult and we’ve documented the installation instructions below.
*NOTE: While I’ve found Visio .ISO/MAK can be happy with CTR, and although I have gotten it to work in a few instances, I wholeheartedly recommend to bite the bullet and use O365 Visio monthly licensing alongside the O365 Click-to-Run suite. It’s orders of magnitude easier to deploy Visio with O365 than to mix CTR with ISO’s/MAKs! It will save you worlds of frustration when someone moves to a new PC, or MAK licensing changes. Instead, go to Office365 licensing, purchase a Visio license, and assign it to a user. Any money saved by mixing MAK licensing with click to run, in my opinion is not worth the headache. That being said, a lot of the instructions below are relevant to a sysadmin’s job, and you should be familiar with how the deployment tools and office ‘configurator’ works, so read on.
The first thing we need to do is download the Office deployment tool from the following site:
Run the .exe you downloaded, accept the license terms, and extract the tool to a new folder you create named c:\admin\ODT
Click OK
Next, let’s switch gears and configure and run the online XML generator tool to build the XML file which we’ll need to configure the tool we just downloaded and extracted above.
At this website you can log into your office account (Recommended), or alternatively choose to continue without signing in:
In our example we’ll create the file by logging in first by clicking “Sign in.”
Once logged in, click on Customization > Device Configuration > +Create.
You’ll notice in the screenshot above we’ve already created a customization file which installs the 64 Bit version of Office Click to Run along with Visio 2016 Standard Volume license. We can download ImageFileNamethis configuration file again at a later date if we lose our .xml file.
In this example, we’ll create a customized file that pairs and combines installations of 32bit Office 365 Pro Plus with Visio Standard 2016 Volume License.
Click on the + Create button.
We first give the configuration a title, something like:
32-Office365CTR_and_Visio2016-32-VL_Key
Our configuration will be setup something similar to the following:
Take note that Office365 has different versions, and you click the “Learn More” link to decide which version to install or accept the default “Latest”. You might want to install the version that all of your other deployed Office365 versions are using. If you choose “Latest” you’ll most likely get a newer version of Office365 installed than everyone else. As a reference, I’ve copied one of the version tables below:
Also take a look at the primary language, and any other Office Suite apps you don’t want installed. It’s worth it to click through each heading to see what’s inside.
Next, we need to provide our Visio Standard 2016 volume license key. Do this by first logging into the Microsoft Volume Licensing Center here: https://www.microsoft.com/Licensing/servicecenter/default.aspx , find your product, your version, expand the license keys, and copy the license key into the Office Customization Tool under the heading Licensing and Activation > Product Key > Multiple Activation Key:
Finish by clicking Done in the upper right-hand corner.
Next, place a check next to the configuration file we’ve just created and click Download:
Once you’ve downloaded the .xml file, copy it into the c:\admin\ODT folder.
Open the command prompt on the computer onto which we’ll be installing Office 365 and Visio.
Change directory to c:\admin\ODT with the command:
cd c:\admin\ODT
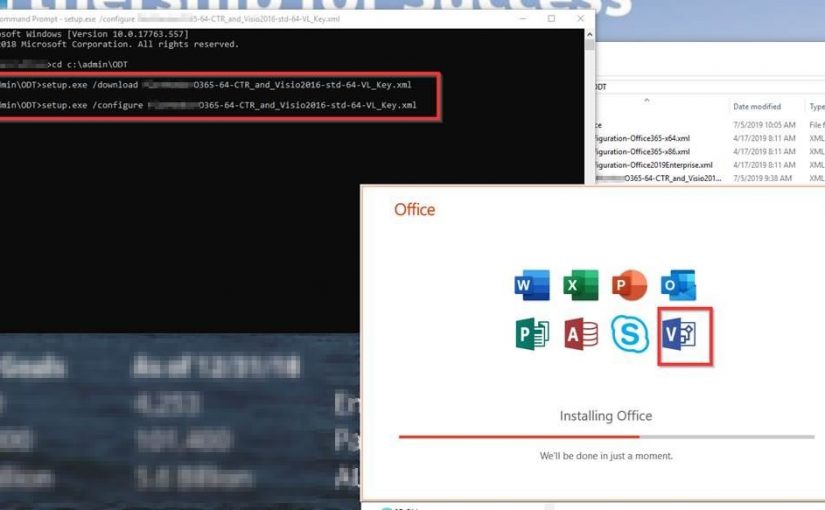
Run the setup.exe tool from the command Prompt first with the /download switch, followed by the name of your .xml configuration file (use tab to auto-complete the long file name.) For example the filename would look like:
setup.exe /download configurationFileName.xml
The download will be “silent” – it will take about 10 minutes to download the installer to the c:\admin\ODT\Office folder.
Once the download completes, the cmd prompt will be waiting for input again. Next run the setup.exe, except this time, with the /configure switch (again, reference your .xml file.) The /configure switch will process and install your applications as demonstrated in the following screenshot. For example the command would look like the following:
setup.exe /configure ConfigurationFileName.xml
When it finishes both the click to run Office365 will be installed as well as the Visio Volume License MAK version.
We’re done! Now if we need to do another install on a different computer of our Office365+Visio, we can copy the deployment tool and the .xml file to the computer and run the command prompt installer again.
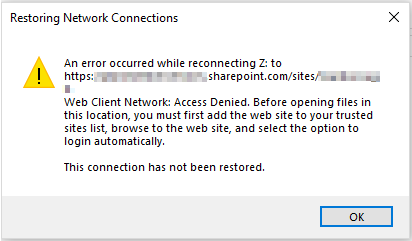
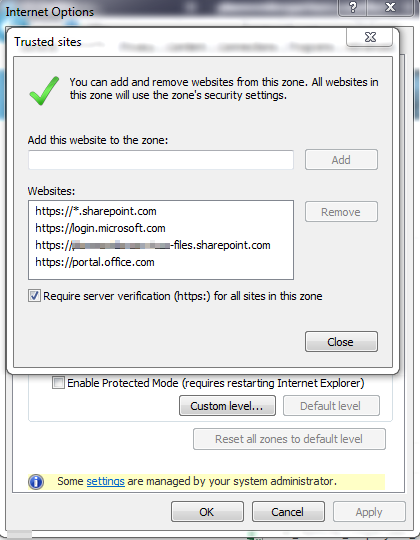
On Office365 SharePoint, when trying to open a file in the Windows File Explorer, you might get something similar to the following error:
An error occurred while reconnecting Z: to (sharepoint location) - Web Client Network: Access Denied. Before opening files in this location you must first add the web site to your trusted sites list, browse to the web site, and select the option to login automatically. The connection has not been restored.
….or clicking the Open With Explorer button does nothing, or the button is greyed out.
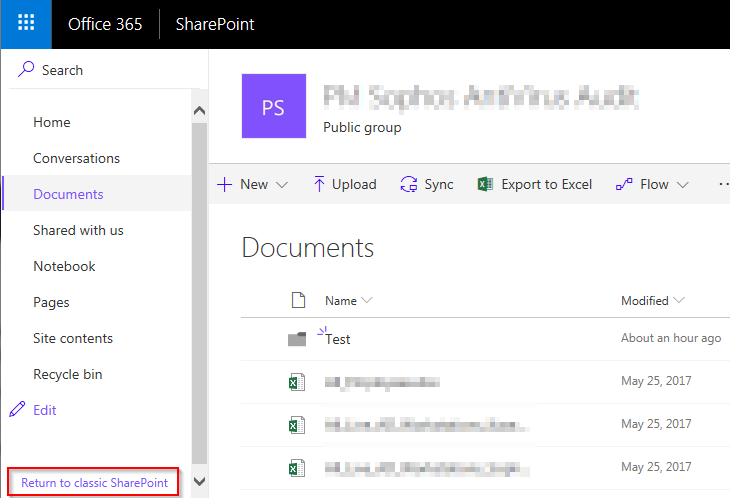
If the button is greyed out using Windows 10 Edge, you might find things work better using the Internet Explorer web browser. Edge does not support Active X controls. So instead, Click on the the Start button, type in Internet Explorer, find and open Internet Explorer (11), and try again.
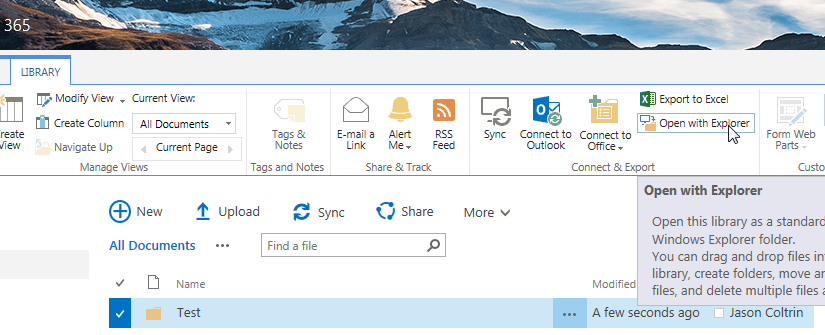
In the bottom left corner of the browser click the “Return to classic SharePoint”
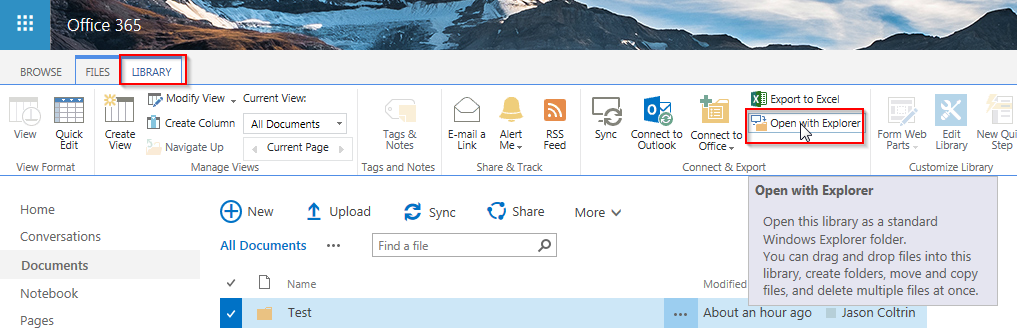
Place a check mark next to a folder, click on the “Library” tab at the top of the screen, and then click “Open in Explorer”
To resolve, make sure you have the following:
Windows 10 is up to date (v1803) as of this article
The Webclient service is Started and set to Automatic (Start > services.msc )
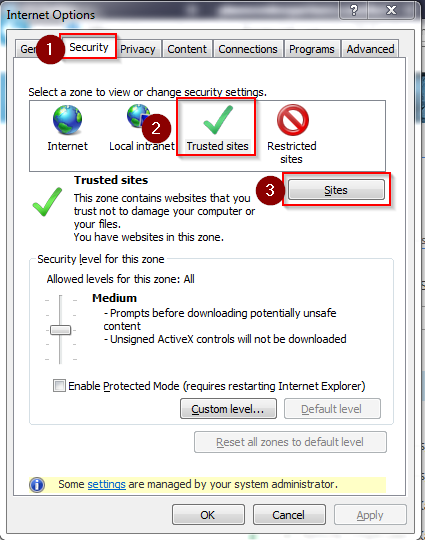
Make sure the following sites are added to your Trusted Sites in Internet Explorer settings:
https://yourdomain-files.sharepoint.com
https://*.sharepoint.com
https://login.microsoft.com
https://portal.office.com
https://yourdomain-myfiles.sharepoint.com
Next, restart your IE web browser, open IE, log into Office 365, and try again.
It may be beneficial to reset IE to its default settings:
IE > Gear Menu > Internet Options > Advanced Tab > Reset (delete personal settings) – use caution, try the following first, then if still having issues, try resetting your browser.
How to find your Active Directory Network Time Server
If someone complains that the time on a Windows 7 /Windows 10 PC is off, we can first sync the Domain Controller to an External Time Source, then sync their PC to the DC. How do you sync the computer to the same time as the cell phone/NIST/External Time Source, and make sure that all computers on your network have the same time as the domain controller?
First, determine from a client computer which computer is the authority for your time server. This is usually your Primary Domain Controller. To do so, on the client PC, open a command prompt and run the command:
net time
This should return something similar to the following:
This shows “Current time at \\NETTIMESERVER.domain.com” which is your net time authority.
How to check your domain controller time against a global time provider:
On the server that net time identified (NETTIMESERVER / primary domain controller,) right-click on your PowerShell icon and choose Run as Administrator.
Run the following command to only check how much time your server is off from the global time authority. This command doesn’t do the sync, it just displays how much time your server is off. The result will display plus or minus hours/minutes/seconds/fractions of seconds.
The terminal should return “The command completed successfully.”
Next type:
w32tm /config /update
Again you should receive a message “The command completed successfully.”
Now to immediately synchronize the time use the following command:
w32tm /resync
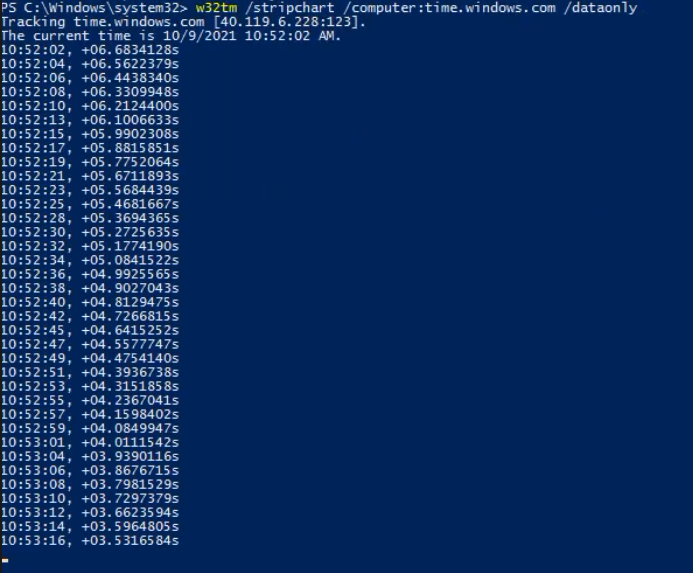
We can now check again how much the time is off from the global provider by issuing the stripchart/dataonly command and check the results. You can see here that our time is now off by less than a second:
Sometimes it will take a while for the server’s time to completely sync, and we’ll see a slow progression until the time is accurate (screenshot at bottom of page:)
Sync Windows 7 or Windows 10 with Domain Controller
PC’s on the network that authenticate against our domain controller should automatically pick up the new time from the time server after a reboot. However, we can manually sync the time on the client with the net time domain controller. To do so, open powershell or the command prompt as administrator, and issue the command:
net time \\NETTIMESERVER.DOMAIN.com /set /y
This command should return the message “The command completed successfully.”
Our time on our PC is now synced with the domain controller, and the domain controller is now synced with time.windows.com.
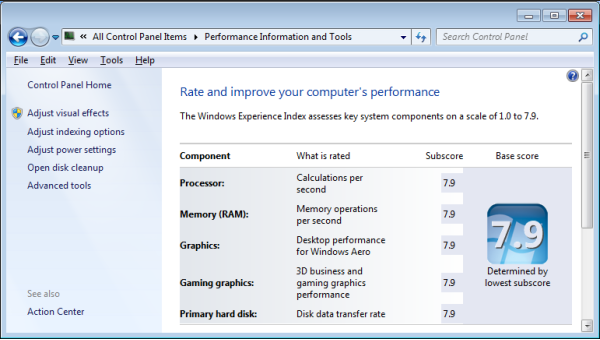
Use PowerShell to get the Windows Experience Index in Windows 10
Windows 7 has the Windows Experience Index which is used often by hardware techs to get a good idea about the kind of hardware installed in a PC. It also allows you to quickly find where improvements can be made to get the machine to run faster. The following screenshot is an example of the Windows 7 Windows Experience Index:
You can get an idea about how fast the components of your Windows 10 computer are by running the Windows System Assessment Tool, but the readout is a little hard to understand. Skip this part (winsat formal) to get the Windows Experience Index in Windows 10 or Windows 7 with PowerShell below.
First open an elevated command prompt and run the command:
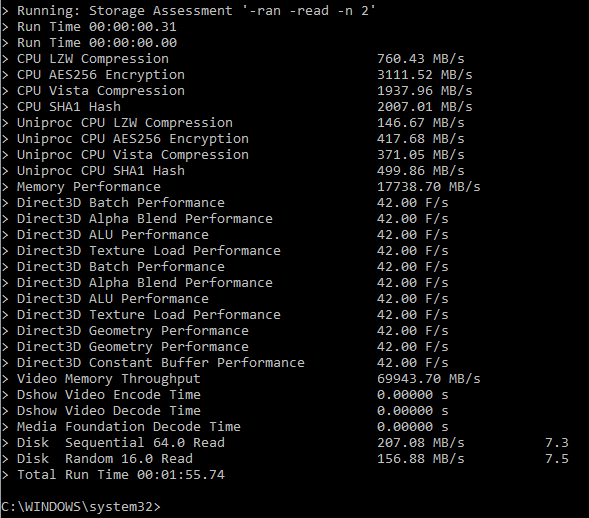
winsat formal
Below is a screenshot of the command running and it’s output. Running this tool will slow down your PC for a few minutes as it runs the tests:
Results:
The Windows Experience Index WMI modules are still available in Windows 10, however, the scores are not readily apparent in the Windows 10 system settings.
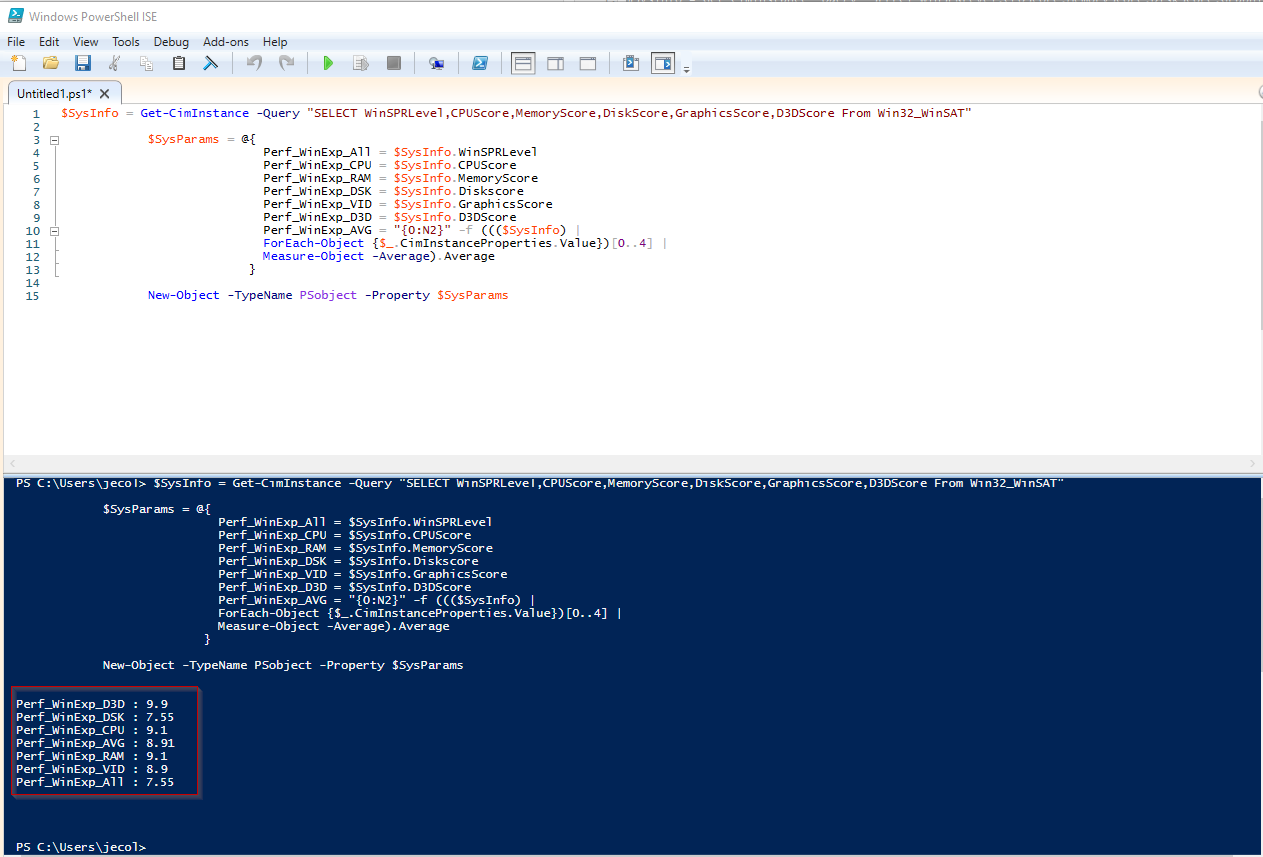
To get your Windows 10 Windows Experience Index subscores with PowerShell, first open up the Windows PowerShell ISE. Next, go to the following link: https://pastebin.com/i5M81xsV, -credit goes to reddit user:
Copy the code into the Windows 10 PowerShell ISE and then run the script, or create a .ps1 file, and you can get the Windows Experience Index with PowerShell in either Windows 10 or Windows 7:
So you can see that in my results, my WEI score would be 7.5 – where the lowest subscore determines my overall result. Looking at the scores, I can improve my score and upgrade my computer by increasing the DSK (disk) performance. To do this I would probably have to upgrade my motherboard to one that supports an NVME hard drive.
My friend’s laptop’s lowest score is VID (video) which means his laptop GPU is keeping the score low. There are a few options for upgrading a laptop GPU, such as an external GPU, but this isn’t surprising as most laptops GPUs can’t compete with a full-sized computer and GPU.
Efficient provisioning and de-provisioning with standardized images allowing quick revoking of access
Centralized image management, proactive detection, rapid quarantine of suspicious behavior
Downsides to VDI:
Complex infrastructure that is difficult for IT to plan, configure, manage, and maintain.
Unfavorable economics that tip ROI equation in the wrong direction with un-utilized capacity, heavy upfront costs and cumbersome ops.
Unpredictable global access based on proximity of users due to low network bandwidth and unacceptable latency
Time-consuming implementations that involve multiple IT disciplines and months of planning, testing, and staging of infrastructure.
Difficult root cause analysis among multiple IT teams.
Amazon Workspaces Desktop as a Service a Viable alternative to VDI (Hosted Desktop Service)
Employee Benefits:
Employees not tethered to traditional desktops or laptops.
No cumbersome VPN connections
Increased collaboration and communication with simplified virtual workspaces
Business Benefits:
Rapid scale up or down; new employees, mergers and acquisitions, global growth
Integrate, consolidate, and deliver services and apps
Reduce capital expenditures, operational costs and streamline IT maintenance and infrastructure management
IT Benefits
Ability to meet security policy requirements and compliance standards by using protocols to compress, encrypt, and encode data so only images are transmitted and data no longer resides on local devices.
Enables creation of developer-style environments, granting developers quick an secure access to end-user environments for seamless dev testing, without impeding user productivity.
Allows devs to move fast and fail fast with access to desktop resources when they need them.
Keeps business data secure, centrally managed, and accessible to users.
Places productive workspace in the hands of end-users near instantaneously, while supporting secure access from multiple device types.
Manages apps centrally with the ability to securely package, deploy, and maintain a productive user environment.
Deliver a productive environment for users without the task of configuring a desktop asset.
Proof of Concept
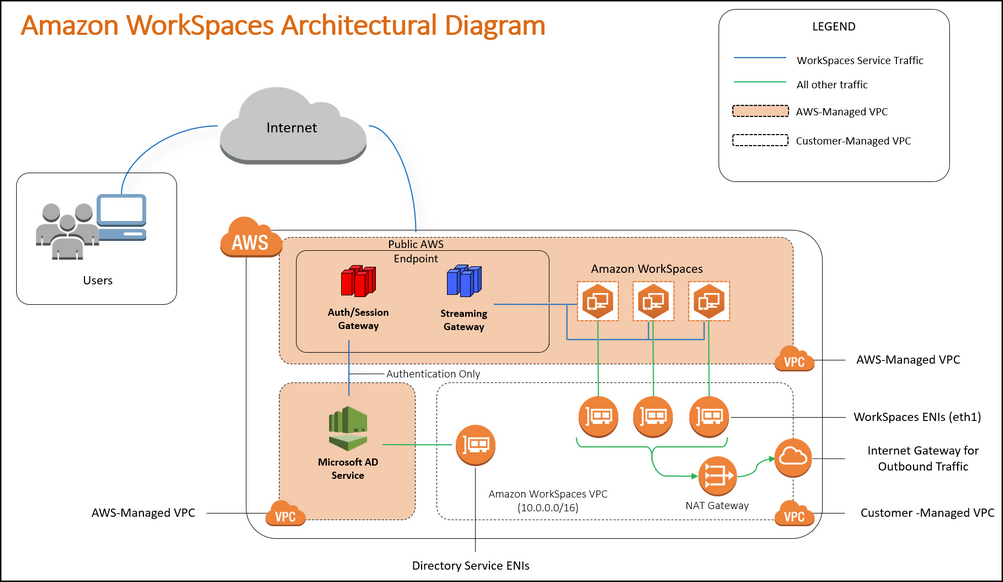
*Note, our org already has a VPN connection between Amazon AWS and our On-Prem domain and domain controllers. This allows me to find our domain with Amazon’s connector. Review the Architectural Diagram below to ensure you’re comfortable with how Workspaces can fit into your AWS presence and VPC’s.
Log into AWS, > Workspaces > Get started
Create AD connector (use Administrator account to connect) – also add WorkDocs Sync feature
Create New Workspace > Choose Directory (local.domain.com) > search for user > jcoltrin (username: domain\jcoltrin) > add selected > Next > Select: Standard with Windows 7 (later I will add MS volume license for Office and other applications and then create an image.)
I choose Performance: 2 vCPU, 7.5 GiB Memory – Hourly
I sent myself the connection email which looks like the following:
————————-
Dear Jason,

A new Amazon WorkSpace has been provided for you. Follow the steps below to quickly get up and running with your WorkSpace:

1. Download and install a WorkSpaces Client for your favorite devices:
2. Launch the client and enter the following registration code: XXxxXX+xxXXxx

3. Login with your Network/Domain password. Your username is jcoltrin

If you have any issues connecting to your WorkSpace, please contact your administrator.

Sincerely,

Amazon WorkSpaces
————————–
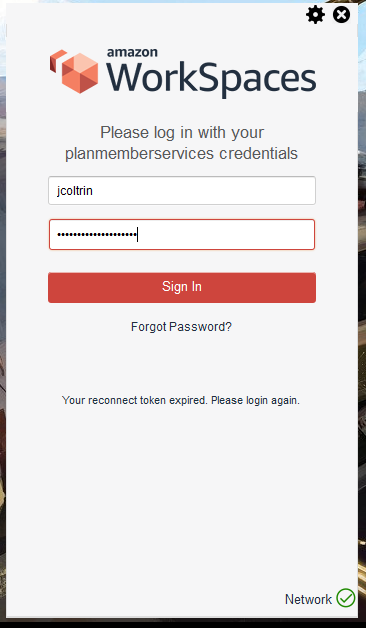
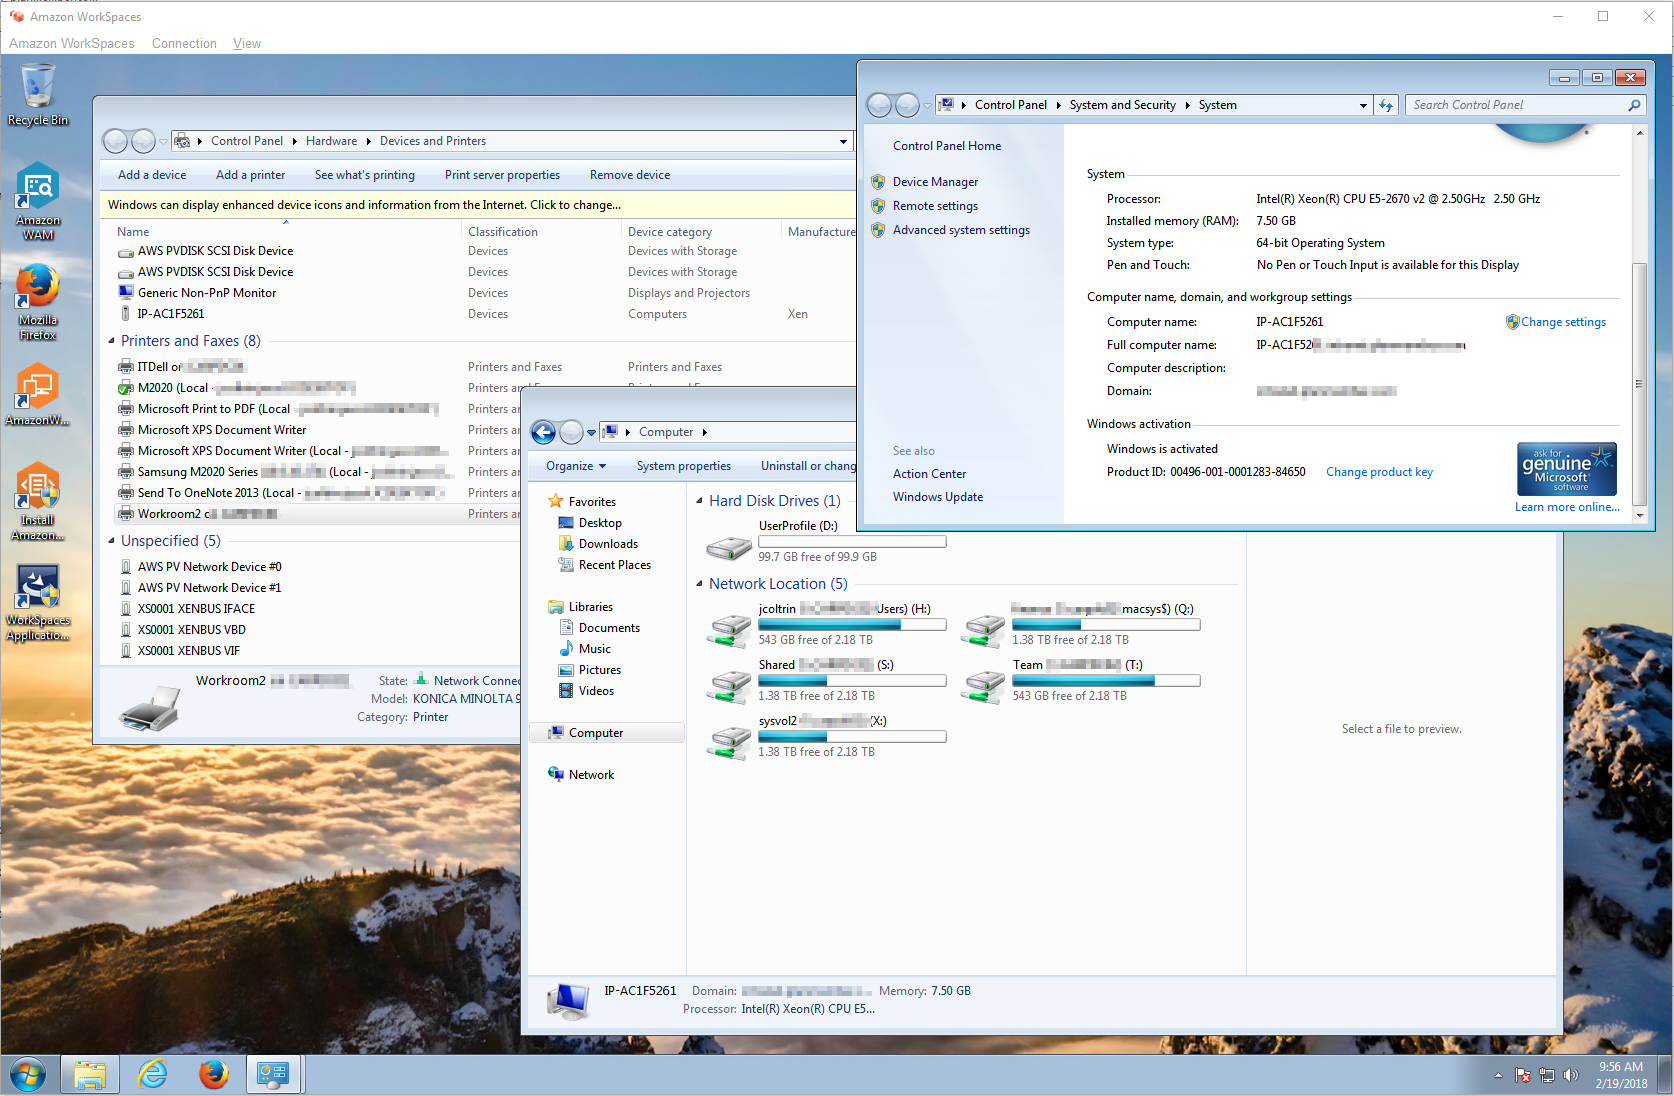
After verifying the registration code, log into the new virtual workspace with your domain credentials:
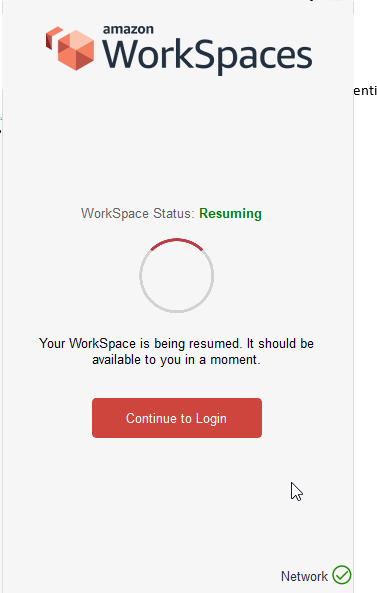
After logging in you may receive the following notice if resuming the workspace:
After logging in I received the following desktop:
Notice the following in the desktop image:
Network Drives mapped
Local and Remote Printers are created
Corporate desktop background
The computer is now a member of the domain with the computer name IP-AC1F5261
Icons available for AWS applications and Directory Sync (share files with my local workstation)
Finalizing for Production and Production Notes:
Finalize image with all necessary applications and test. Build your gold Images
Enlist a user to test running the workspace in production and adjust applications/workspace as necessary
Deploy to a set of users.
Rent before buy, buy before build.
Aligned with cloud technology
Builds on existing AWS infrastructure
Straightforward architecture
Give it to users and see how they like it
Multi-Region vs Single Region – within each region are availability zones. One workspace is not available in all regions. When building VPC, figure out which subnets support workspaces.
Subnets are fixed, build to allow for growth.
Workspaces are attached to AD connectors. You cannot move an old Workspace between AD Connectors. If availability zone becomes unavailable, then workspaces are unavailable. Use multiple availability zones to allow for this.
Only allow windows devices with certificates to connect. Etc. You’re going to have several AD connectors. Have a production AD connector and a testing AD Connector. Setup pure sandbox somewhere else for testing.
Each AD connector drops the computer into single OU, options are separate AD connector per department. Eg. Only accounting can connect from a certain dept. Or you cannot auth from outside, only on-prem. Create AD connector for consultants which drop them into separate subnet, monitoring.
Workspaces IP addresses stay there forever. IP addresses persist on rebuild etc. Cannot assign IP’s.
One VPC for workspaces.
Better segregation between work and personal side of things. BYOD is nice – pane of glass. Devs have good separation.
This gets Windows on Mac better than bootcamp
Reduced operational overhead, light-weight devices, drop them in mail ready to go. Send the registration code. People are lining up to get onboard. Tougher to please users are ecstatic about workspaces. Once implemented, IT itself will not go back to before.
Run pilots.
Replace end-of-life desktops
Great for Mergers and acquisitions
Users could connect with Zero client at the office and Home computer at home
Allow deployment of Zero clients in all facilities and retrofits
Hoteling/shared workspace areas. Smaller sites only need internet connectivity, not a WAN-enabled site.
Scalable and global
No upfront CapEx
Capacity-on-demand
Rate of innovation – customers drive features at Amazon
Instrumentation and controls – complexity and cost of on-prem is daunting
Cost savings – financial benefits – get out of the business of providing physical PC’s, building and configuring VDI service is complicated and costly, focus on service not infrastructure.
Workspaces API & CLI integration
Same image/applications leverage multiple Geos, ability to grow into other areas
Having desktop in cloud allows patch compliant capacities
Enabling support staff opportunities – support users all over world, help desk reps
Enable end users – automate the whole thing & allow user to migrate their data.
There are two main options for Workspaces, Monthly pricing and Hourly Pricing.
At 160 hours per month, a “Performance-grade” workspace under the Hourly Pricing model would cost $7.25 + $0.57/hour = $98.45.
The same “Performance-Grade” workspace under the “Monthly” pricing would cost $55.
$55 x 12 months = $660
A new Dell 7050 PC typically costs $800
So it would take approximately 1 1/2 years of monthly payments to reach the cost of a normal desktop PC.
Hardware Options
Value
Root Volume
User Volume
Monthly Pricing
Hourly Pricing
1 vCPU, 2 GiB Memory
80 GB
10 GB
$25
$7.25/month + $0.22/hour
1 vCPU, 2 GiB Memory
80 GB
50 GB
$28
$9.75/month + $0.22/hour
1 vCPU, 2 GiB Memory
80 GB
100 GB
$31
$13/month + $0.22/hour
1 vCPU, 2 GiB Memory
175 GB
100 GB
$36
$19/month + $0.22/hour
Standard
Root Volume
User Volume
Monthly Pricing
Hourly Pricing
2 vCPU, 4 GiB Memory
80 GB
10 GB
$33
$7.25/month + $0.30/hour
2 vCPU, 4 GiB Memory
80 GB
50 GB
$35
$9.75/month + $0.30/hour
2 vCPU, 4 GiB Memory
80 GB
100 GB
$38
$13/month + $0.30/hour
2 vCPU, 4 GiB Memory
175 GB
100 GB
$44
$19/month + $0.30/hour
Performance
Root Volume
User Volume
Monthly Pricing
Hourly Pricing
2 vCPU, 7.5 GiB Memory
80 GB
10 GB
$55
$7.25/month + $0.57/hour
2 vCPU, 7.5 GiB Memory
80 GB
50 GB
$57
$9.75/month + $0.57/hour
2 vCPU, 7.5 GiB Memory
80 GB
100 GB
$60
$13/month + $0.57/hour
2 vCPU, 7.5 GiB Memory
175 GB
100 GB
$66
$19/month + $0.57/hour
Power
Root Volume
User Volume
Monthly Pricing
Hourly Pricing
4 vCPU, 16 GiB Memory
80 GB
10 GB
$70
$7.25/month + $0.68/hour
4 vCPU, 16 GiB Memory
80 GB
50 GB
$72
$9.75/month + $0.68/hour
4 vCPU, 16 GiB Memory
80 GB
100 GB
$74
$13/month + $0.68/hour
4 vCPU, 16 GiB Memory
175 GB
100 GB
$78
$19/month + $0.68/hour
Graphics
Root Volume
User Volume
Monthly Pricing
Hourly Pricing
8 vCPU, 15 GiB Memory, 1 GPU, 4 GiB Video Memory
100 GB
100 GB
–
$22/month + $1.75/hour
Additional Storage
$0.10/GB
Conclusion
Overall, I really like Workspaces, it was simple to setup and run. I believe the remote workspace from AWS can work very well for the enterprise and provides a flexibility to expand, create different images for different users easily and keep data safe at AWS by only sending graphics/pixels over the wire. People can use their own BYOD devices such as Chromebooks etc. to perform their jobs.
The only drawback I’ve encountered is workspaces does not provide a pass-through video / camera devices for Skype video calls. If a user needs to use Skype or other video conferencing, they will have to start their call “outside” of Workspaces.
Let me know what you think about the product and this write-up.
Solved – Windows 7 – WiFi login: There are currently no logon servers available to process your logon request.
I had an associate drop a Dell Latitude 7370 laptop on my desk saying he cannot print. I found that the user is able to logon to local workstation desktop using cached credentials but cannot logon to the domain. He is only logging into the laptop with his cached credentials, is not authenticating with the domain, and therefore cannot print. Logging off of the user’s account, and then trying to login as myself I get the error:
“There are currently no logon servers available to process your logon request. “
I log in with his cached credentials again and right-click on the wifi adapter and choose Troubleshoot but can’t find any problems. I occasionally and intermittently get the “Windows needs your current credentials” Pop-up notification in the lower right near the clock/systray but clicking on that icon does not do anything. I even set the Wireless network adapter properties for TCP/IP 4 to use the DNS IP Address of the domain controller explicitly instead of getting the setting from DHCP, but still, the laptop is unable to login to the network with the new domain password I set for the user’s account.
There is definitely something wrong with the wireless adapter. I notice that when disconnecting/reconnecting to the wireless SSID, that the Intel WiFi drivers pop up stating that I’m connected and that there is a signal strength. Knowing that Intel drivers sometimes try to do too much and interfere with wireless connections I do the following and fix the issue.
Uninstalled Intel wifi driver package from Windows Control Panel > Programs and Features. (I uninstalled both the WiDi package as well as the Intel Wifi Drivers package). This removed the device from the Device Manager
In device manager, right-click on the Network Adapters and choose “Scan for Hardware Changes.” This, in turn, finds the WiFi network adapter but it does not have drivers yet.
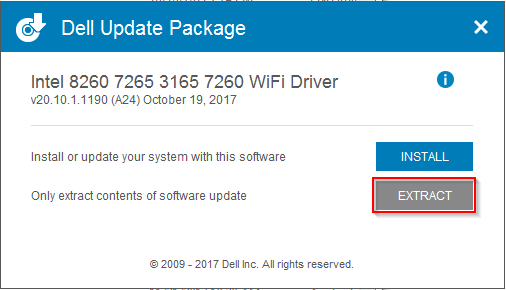
Go to https://support.dell.com and type in the Service Tag, find the drivers section and download the following driver: Intel-8260-7265-3165-7260-WiFi-Driver_YM1PH_WIN_20.10.1.1190_A24.exe
Run the .exe and when it asks if I want to install the driver or extract, I chose Extract only. I make a new folder under the root of my C: drive and finish the extraction.
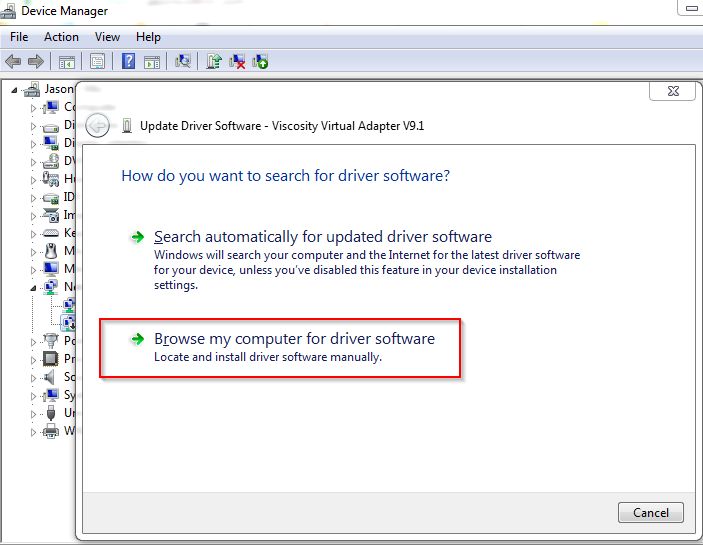
Back in the Device Manager, Right-click on the WiFi adapter and choose to “Browse my computer for driver software”.
Point to the location of the extracted drivers, finish the installation and log off. The laptop can now find the logon server/domain controller and the user is back in business.
For some reason the full suite driver for this model of laptop interferes with DNS and the laptop cannot find the logon server and login to the domain. By extracting the drivers only and telling the device manager to use only the .inf files for the device, we can circumvent the driver suite and get our adapter talking to the domain controller for authentication.
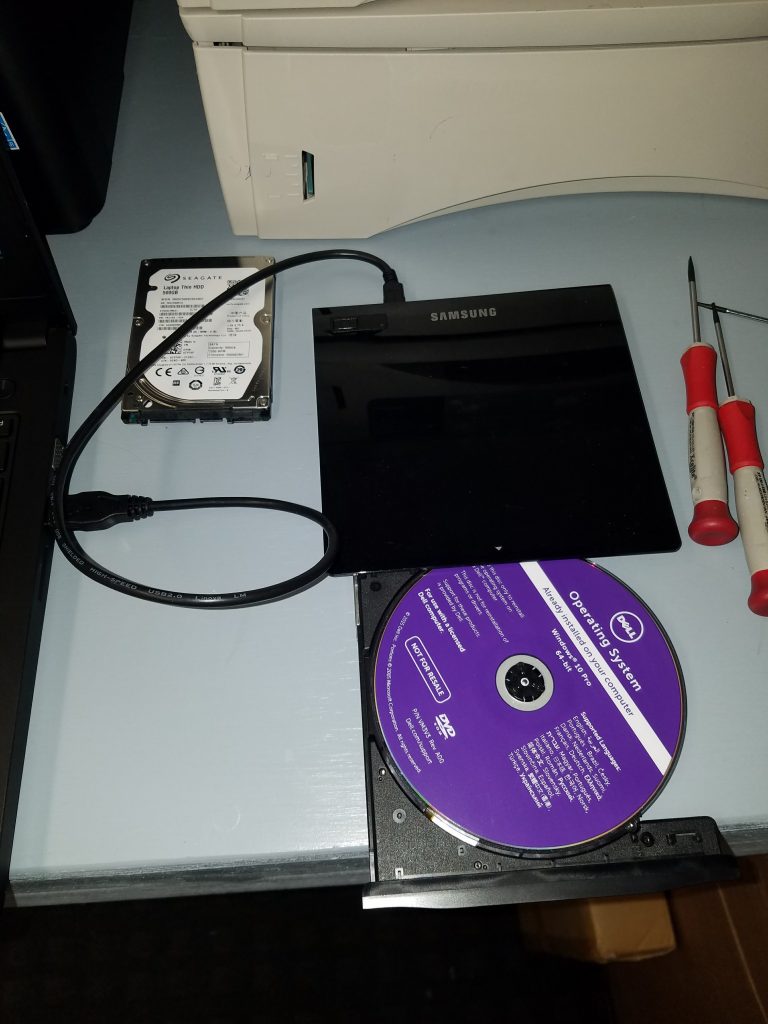
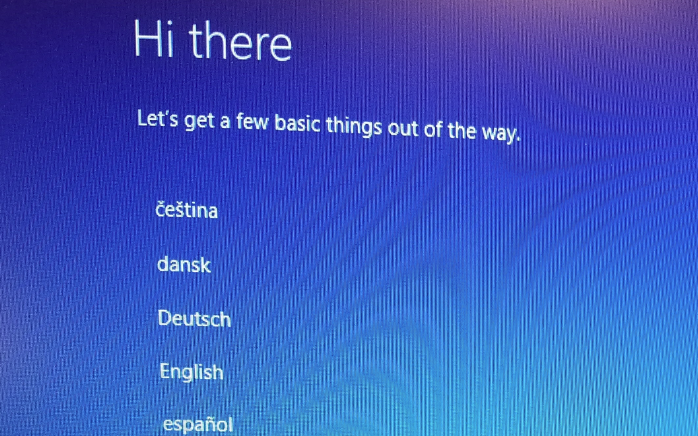
So you received a Dell Latitude e3570 for business and the laptop already has a downgrade Windows 7 Pro Operating System installed on the existing 500GB 7200RPM hard drive. You want to make the machine faster and upgrade to Windows 10, so you decide to install a 120GB SSD HDD (or a Samsung M.2) and then install Windows 10 Pro from scratch. You already have the Dell Windows 10 Pro DVD. The problem is that you don’t have a hard disk image, clone image, cloning software, or machine to clone from the old HDD to the new SSD, nor do you even want to use an existing Operating System image. You don’t want to go through the steps of an upgrade from Windows 7 Pro to Windows 10 Pro and then perform a clone as well. Well, that’s what happened to me and I usually prefer to perform a clean installation from a certified Dell Windows 10 Pro 64-Bit DVD for use with a licensed Dell computer like the one in the picture below. After banging my head over what amounts to a relatively simple solution, and doing some research, I thought I’d spare someone else the pain of what I went through by documenting the solution here.
So, you gleefully pop open the back of the laptop by loosening the cover screws, replace the SATA HDD with your new SSD HDD, and close up the cover again. With an external USB DVD drive, power on the laptop, hit F12, select the Dell DVD as your boot device, and hit a brick wall with the following sequence:
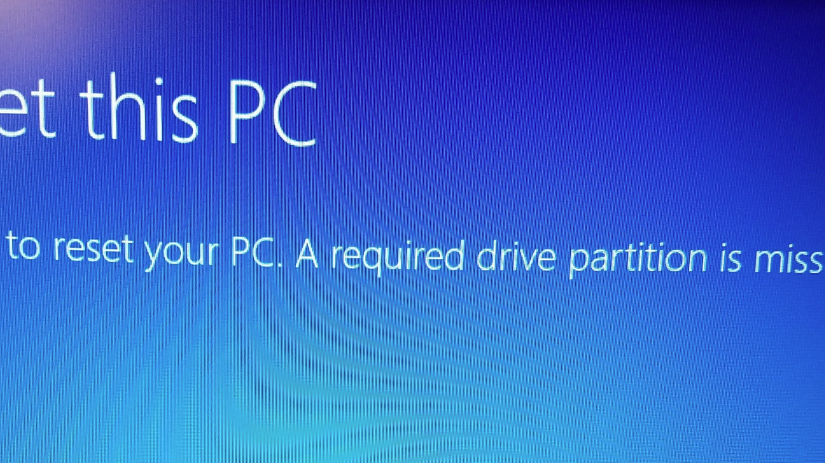
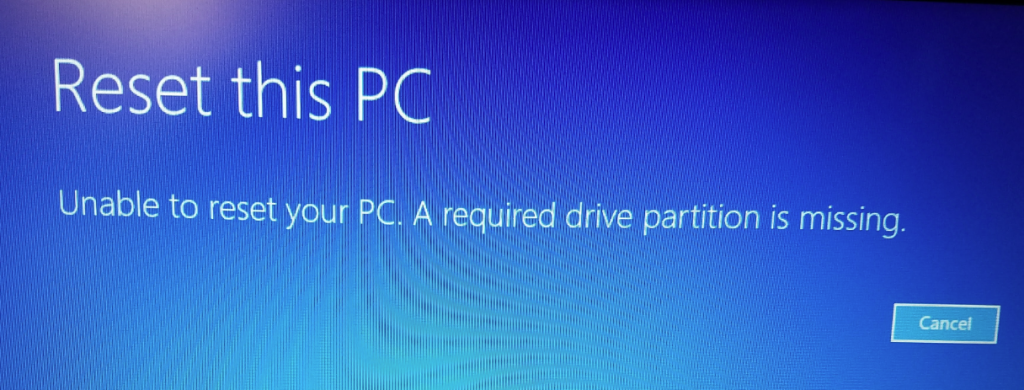
Language > Country > Choose option: Troubleshoot > Reset this PC > Reset this PC: Remove everything :
Error: Reset this PC – Unable to reset your PC. A required drive partition is missing. (cancel)
In this event, what the setup is doing is that it’s assuming you already have Windows 10 installed on the hard drive, and that perhaps it’s corrupted, and you are choosing to have the installer find the default recovery partition that’s already on the hard drive (which it isn’t because it’s a brand new-wiped-clean-by-the-factory SSD). Also, you’d already probably know that if you DID already have the recovery partition on the hard drive that you’d choose the “Repair my computer” option in the boot menu by hitting F12 when starting…
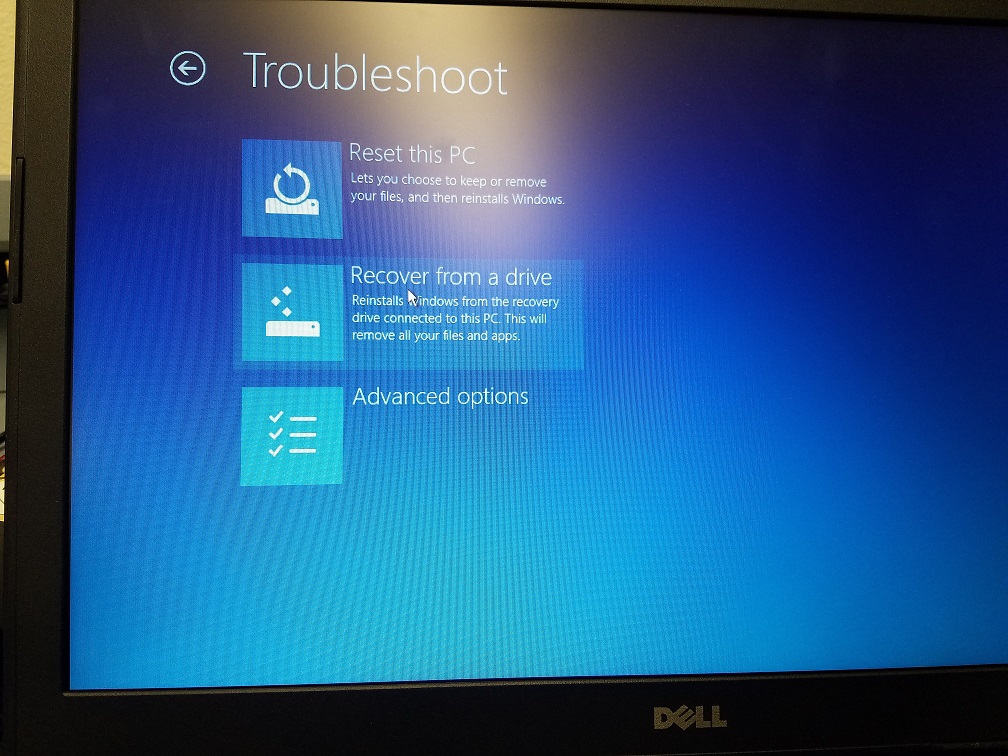
So the problem is actually not difficult to resolve because, in summary, the solution is you merely need to choose the following sequence instead and perform a “Recover from a drive“, not“Reset this PC”. *Note: if you do this, your BIOS may still hold non-recommended Boot and Drive configurations for Windows 10, so be sure to follow the instructions after the screenshots that your BIOS and new SSD HDD is set up for correct secure-boot operations.
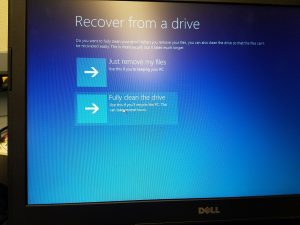
Language > Country > Choose option: Troubleshoot > Recover from a drive > Fully clean the drive
At this point, if you have replaced an M2 hard drive, you may have received the following error: “Unable to reset your pc. The system drive cannot be found.” If this is the case, skip to the bottom of this post to find new information.
Like I said, it’s a good idea to check some BIOS settings and secure your new SSD HDD boot device prior to running the system Recover > Fully clean the drive operation.
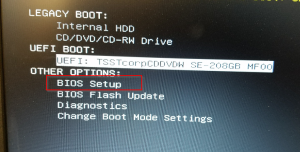
First hit F12 and select OTHER OPTIONS: BIOS Setup
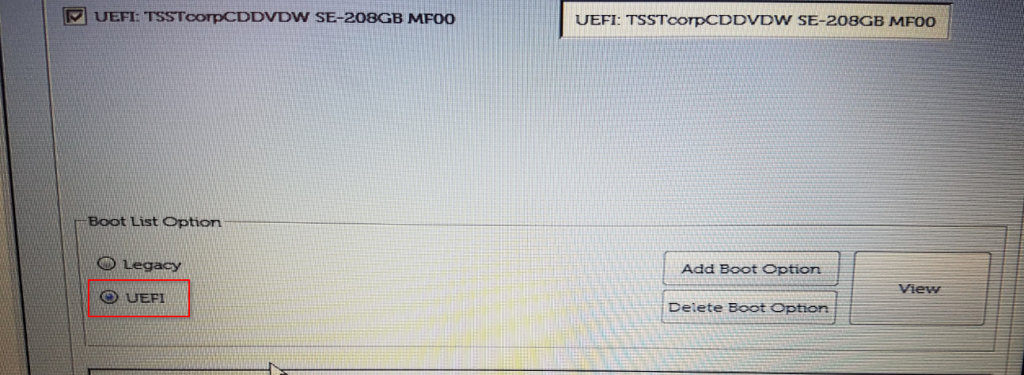
Next under General > Boot Sequence, set the Boot List Option to UEFI
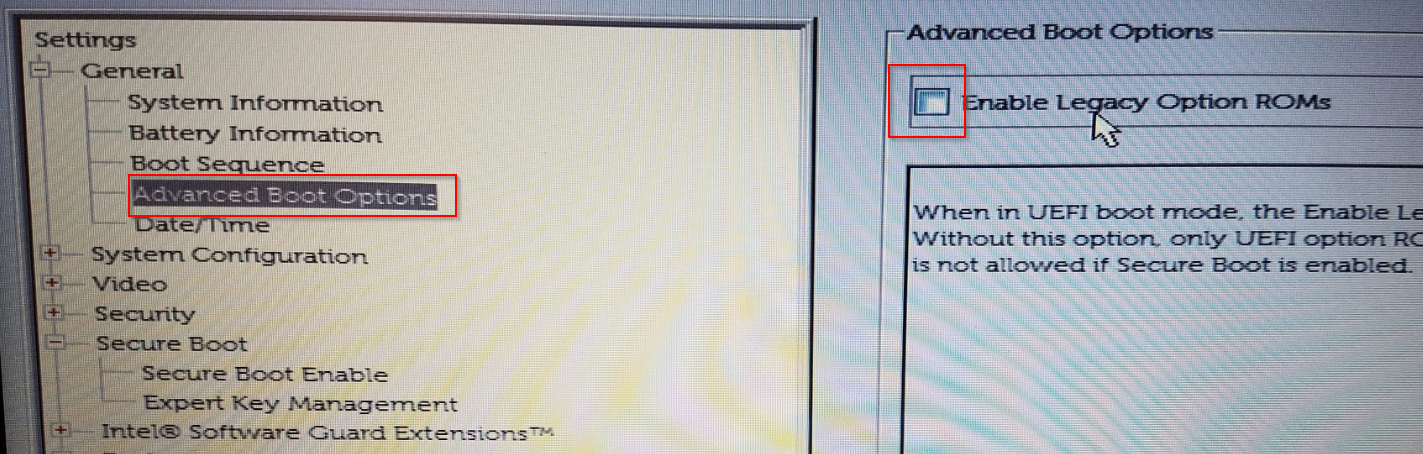
Next, under General heading, select Advanced Boot Options and uncheck “Enable Legacy Option ROMs”
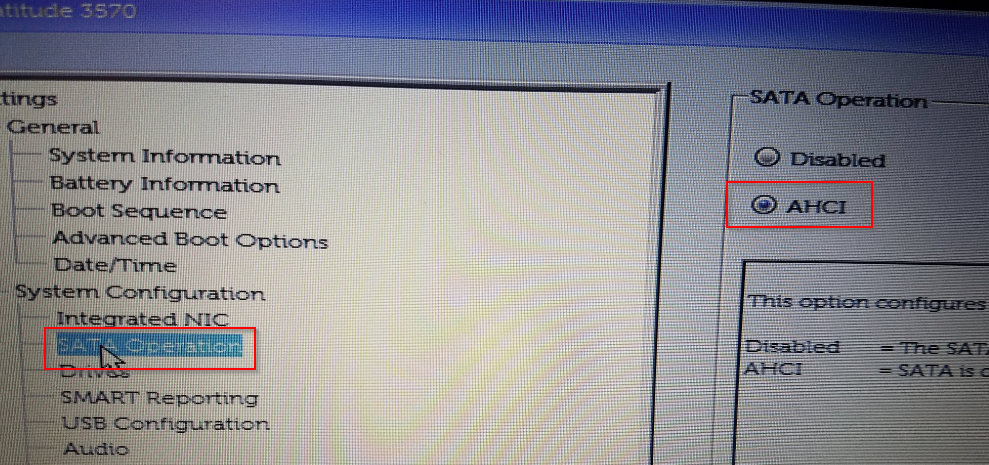
Next, under System Configuration, make sure SATA Operation is set to AHCI:
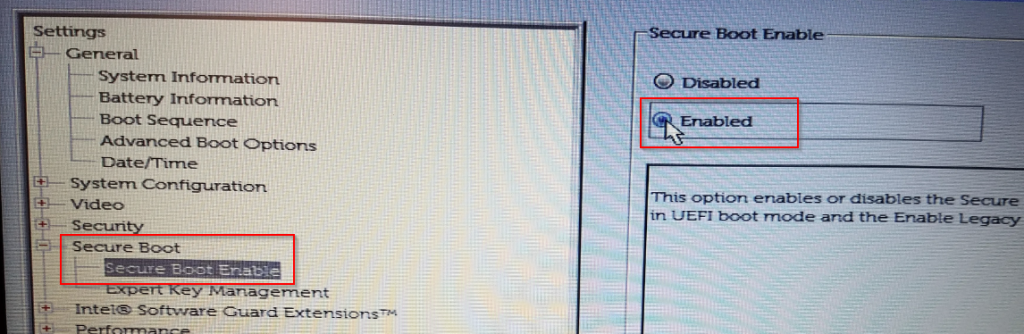
Next, go to the heading Secure Boot and set Secure Boot Enable to Enabled:
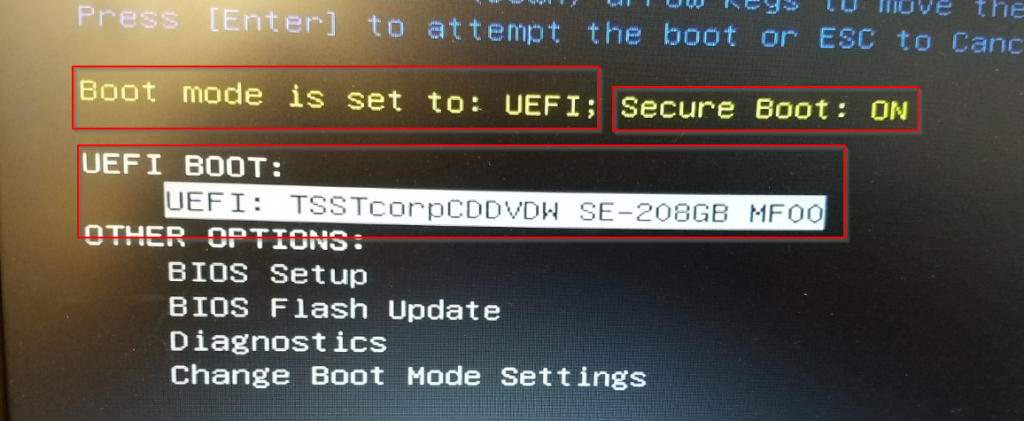
Now save all the changes to the BIOS and restart/Save, and hit F12 again, where at the next menu you will use the UEFI BOOT: to your external USB/DVD drive:
Now go ahead and go back to the Troubleshoot > Recover from a drive > Fully clean the drive. *Note: this action will completely destroy anything that is already on the hard drive so before you do this action, be sure you have a backup of what was previously on the drive; if anything.
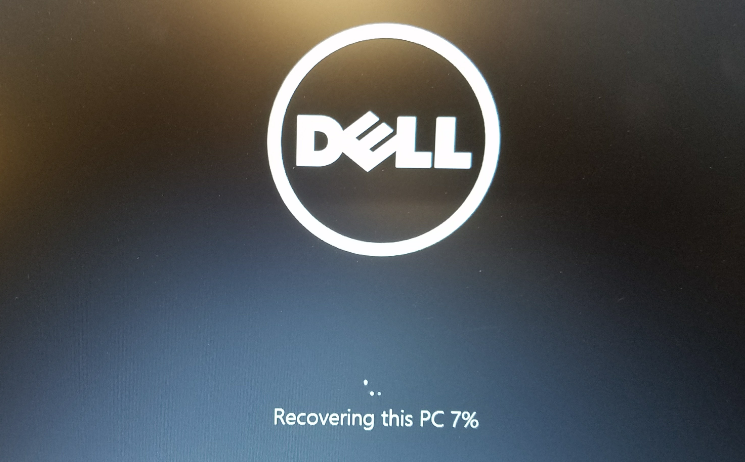
Once the procedure runs and the machine reboots, you should see the “Recovering this PC” and a percentage status.
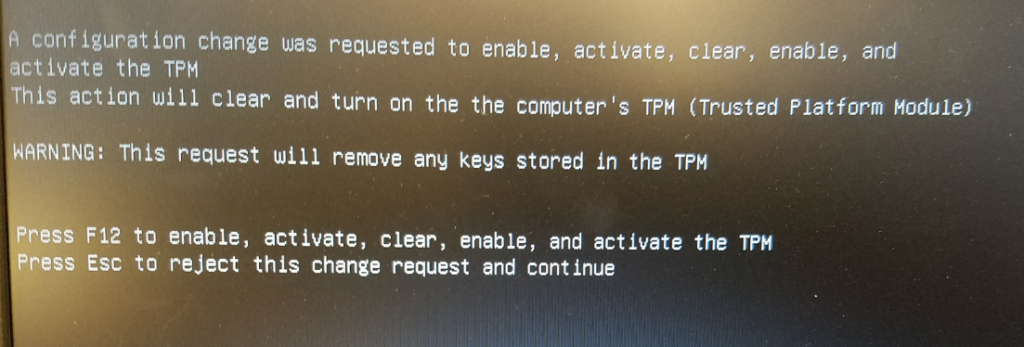
The machine will complete the procedure and you may receive the following warning: A configuration change was requested to enable, activate, clear, enable, and activate the TPM – This action will clear and turn on the computer’s TPM (Trusted Platform Module) – WARNING: This request will remove any keys stored in the TPM: Press F12 to enable, activate, clear, enable, and activate the TPM or Press Esc to reject this change request and continue. Unless you have stored keys and want to retain them, go ahead and hit F12.
The machine will restart a couple more times and finally, you should be prompted with the traditional setup:
Complete the setup, remove the DVD from the computer, restart and enjoy your newly installed Windows 10 Pro on your Latitude 3570 with an SSD hard drive. In my opinion, this is a very worthwhile upgrade and the speed difference between Windows 7 Pro on a spinning HDD as compared to Windows 10 on an SSD is like night and day.
__________________
So if your error encountered during a “Recover from Drive” was: “Unable to reset your pc. The system drive cannot be found.” then you’ll want to take note. The Purple DVD you are trying to recover from may not include the required M2 Hard drive drivers in order for the installer to find your new hard drive. “Extra Fudge” found some success by downloading the drivers manually (which did not solve the problem for me – more below…) from Intel (if you’re installing an Intel M2 HDD, that is) and that information can be found here:
Like I said earlier, this fix and was not successful (perhaps because I was installing a Samsung NVMe SSD 960 EVO M.2 drive.)
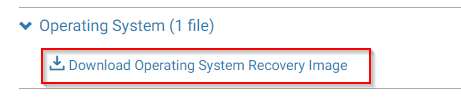
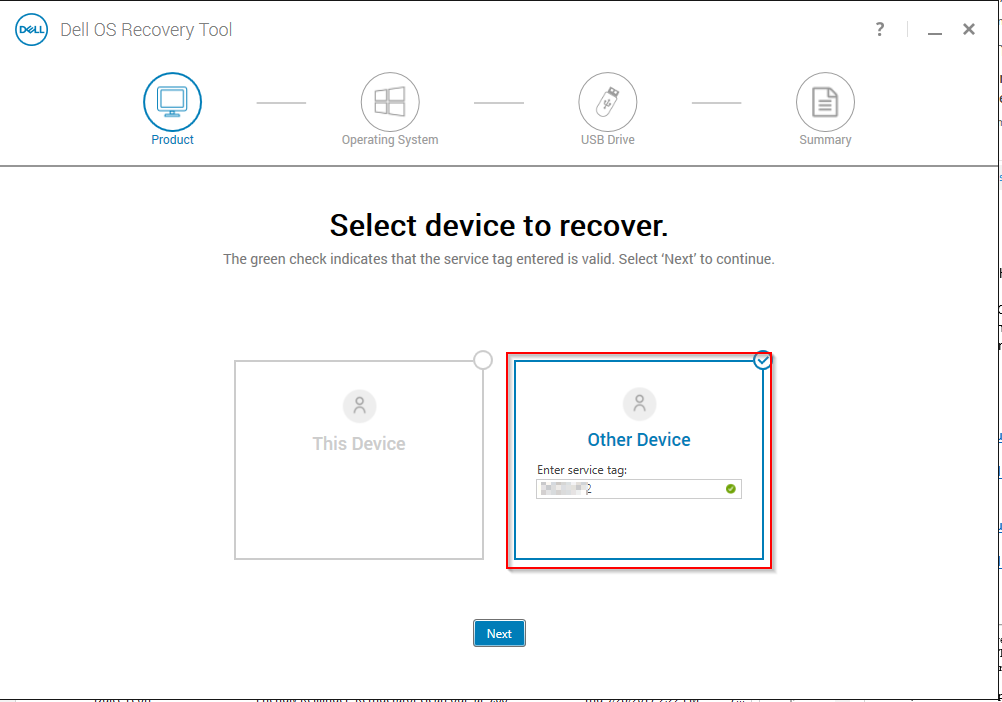
Finally what solved my problem was to use the new Dell Operating System Imaging Tool, which assumably has the correct M.2 drivers baked into the image.
You’ll need an 8GB or larger drive USB thumb drive to complete this task. Go to Dell support https://support.dell.com, enter in the Service Tag, Select find Drivers Myself, > Select OS Windows 10, and then download the Operating System Image tool.
Next, run the tool and the rest is pretty self-explanatory.
Solved – Unable to remove OneDrive for Business from Windows 7 – two versions of OneDrive on the same Windows 7 / Windows 10 PC. Remove / uninstall old version of OneDrive for Business.
This may not be the most elegant/logical way of stopping the old/bad OneDrive from running, so let me know in the comments if you found the correct “Microsoft way” of fixing this issue. Others have spent hours trying to resolve this issue and hopefully you’ll get some kind of resolution with this information.
In some instances OneDrive for Business will ask you to upgrade. When you Update or upgrade OneDrive for Business it could keep the old version of OneDrive for Business on your computer, making it so that you have two versions of OneDrive for Business (even the icons look slightly different.) This may come pre-packaged with a Click to Run (clicktorun) install of Office or pre-installed on your system. You probably want to remove the older version of OneDrive for Business, but even after trying to uninstall OneDrive for Business old version from Programs and Features in the Control panel, even after restarting, the program comes back and you can’t delete it!
You probably still want to use OneDrive for Business, but you should only use the updated version that works correctly with Office365 and SharePoint Online.
Anyway, once your updated/upgraded OneDrive for Business is updated and installed, make sure you have all your important files inside the new OneDrive for Business and that the files are synced with SharePoint or where ever they should be. Make sure you have backups of the important files somewhere else like an external drive as well just to be safe. Once we disable the old OneDrive for Business / Groove.exe, make sure those old files are already synced with the new OneDrive for Business service. Once you have your files all synced and what-not with the new OneDrive for Business, we can disable/remove the old/bad version of OneDrive.
The older version of OneDrive for Business actually runs as Groove.exe. While the Task Manager is open (tick the check-mark or hit the button that says ‘Show Processes from All Users), track down Groove.exe by right-clicking on the bad OneDrive in the systray and then in the OneDrive menu, choose Exit (down by the clock – there may be two cloud icons down there, be sure to exit the correct one.) Then launch the old/bad OneDrive again from the Start > Program Files > OneDrive for Business. Do this several times and you will see Groove.exe pop in and out of existence inside the Task Manager. While it’s up and running, right click on the groove.exe in the task manager and choose “Open File Location”. The file will probably live somewhere similar to the following location:
Be sure to End Task or Exit out of the bad OneDrive for Business or Groove.exe, then rename the Groove.exe file to Groove.exe.old .
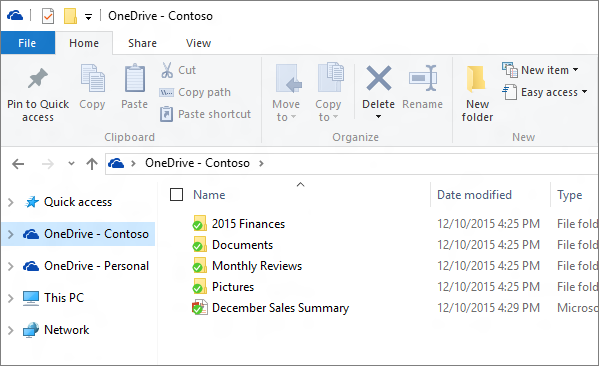
Now that this has been done, you may want to remove the old/bad OneDrive for Business link in your Explorer Favorites list. Do this with a left-click on the top-most Favorites link and in the right-hand pane, right-click on the old/bad OneDrive for Business shortcut and click Remove. Additionally you may want to remove the old/bad program shortcut in your Start Menu.
This how-to procedure for mapping network drives pertains to Windows 7 PC’s that are not joined to a domain, but are members of the same network Workgroup. This how-to map network drives is not the same as using the Windows “HomeGroup” feature – this tutorial is a little more advanced – but the method works for me consistently.
Make sure that both computers are on the same network and subnet. This should be already done in most cases as your computers should pick up IP addresses and network settings from a DHCP server/router/modem. Things might get weird if each PC trying to reach one-another are on different connections, i.e. one is on WiFi and one is on an Ethernet cable. Essentially both machines should have IP addresses that look similar, something like 192.168.0.5 and 192.168.0.6. You can find your IP address by right-clicking on the Network icon in the taskbar, down by the clock, or go into the Control Panel > Network and Internet > and choose: Network and Sharing Center > Change Adapter Settings > Right-click on Local Area Connection (the adapter which is connected to the network and internet) > Status > Details… button > IPv4 Address.
Each computer should be able to ping one another by IP address and by hostname. In a command prompt (Start button > All Programs > Accessories > Command Prompt) you can test this with the following command to ping by IP address:
ping 192.168.0.5
You should receive “Reply from 192.168.0.5…” and not “Request timed out.” Again, this should be done from each computer to the other.
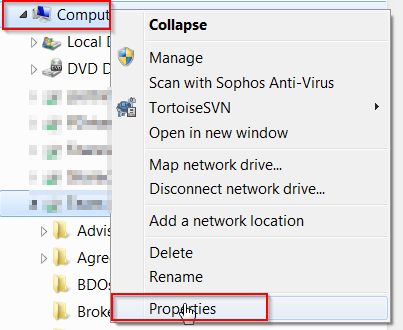
Next determine what the computer name is for each computer. Do this by Right-clicking on the Computer icon in Windows File Explorer and choose Properties.
Windows 7 Computer Properties
Look for “Computer name:” – use this computer name to do another ping test. From a command prompt, type in:
ping computername
where you replace ‘computername’ with the name of the other computer you want to ‘talk to’. Again, you should get ‘reply from…’, not ‘error/no host/time-out’. If you get replies when you ping the IP address but not the computer name, then you can still map the drive/share from your computer, but it won’t look pretty.
If you can ping by IP address but not computer name, for testing purposes, make sure the Windows Firewall is turned off (temporarily), and that both computers are members of the same Workgroup. In the same Computer Properties as above, where you found the Computer name: … you should see the “Change settings” link to the right of the Computer Name:. under the Computer Name tab, click on the “Change…” button > select Workgroup: and then enter the same workgroup name on both of the computers that will share files. Most people do Workgroup: WORKGROUP. Once you’re able to ping each computer from one another (at least by IP address), you should be ready to share out a folder and then map a drive letter to that share.
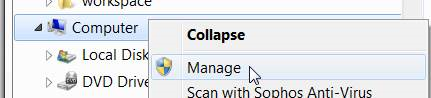
Next, make sure that the folder you want to access on, for example, Computer Name: PC1 is actually shared out by the PC1 computer. In PC1 Windows file Explorer, Right-click on Computer and choose Manage.
Computer management
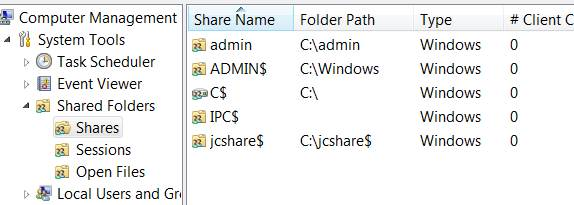
6. In the management tool, expand Shared Folders and then click on Shares:
Shared folders
7. If you don’t see the folder you want to share listed, click on More Actions > New Share > follow the wizard (don’t worry about the offline settings.) Typically if you’re in an environment where you trust everyone, you can set the share to be accessible (read/write/execute) by Everyone (Everyone is the name of an actual user group that resides in all Windows computers). Do this by selecting “Customize Permissions” then place check-marks in Allow: Full Control, Change, Read > OK:
Windows 7 share permissions
If you’re wondering what the $ is for in the shares I have on my machine, the $ is used to hide a file share. If the folder name has a $ at the end, it’s hidden from people browsing the computer’s IP address or UNC name (explained later), but since you know it’s there you can still get to it. For example, in my shares screenshot above, I could browse to the share by typing in \\jasonPC\jcshare$ . But had I only typed in \\jasonPC\ then it would not be displayed.
8. Now that the share is available, from PC2 you can browse to the share by the UNC computer name (Universal Naming Convention used by all windows computers – in Apple/Mac’s it’s actually weird and to browse to a share on a Mac you would use smb://jasonPC/share.)
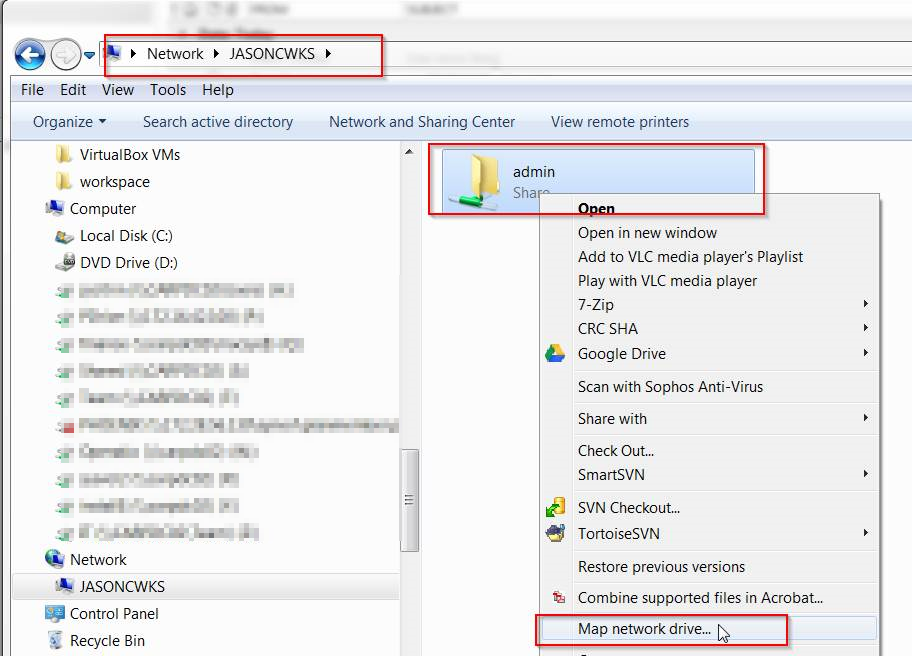
Open Windows File Explorer, in the address bar, type in the computer name that has the share you want to connect to preceded by two back-slashes (\\) and then followed by another backslash. So for example \\JASONCWKS\ and then hit the enter key. In the event if you could not ping the other computer by the UNC computer name, you can do the same action but replace the computer name with the IPv4 address, for example: \\192.168.05\ .
9. You will see a list of shares available on the computer. Next, right-click on the share and choose Map Network Drive.
Browse by UNC computer name
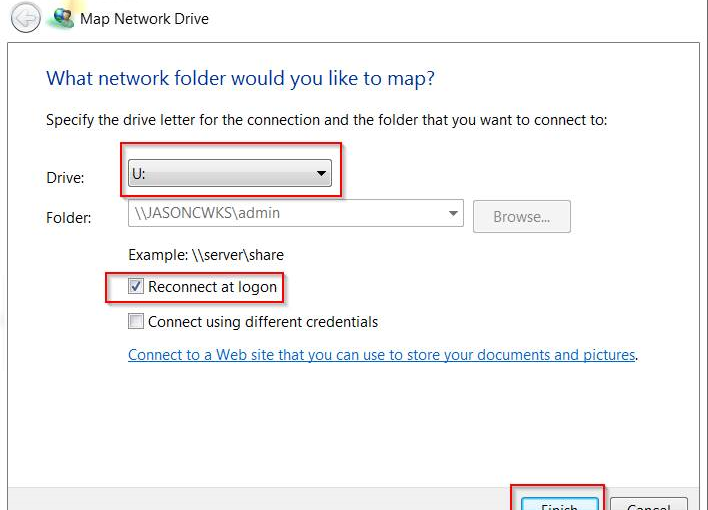
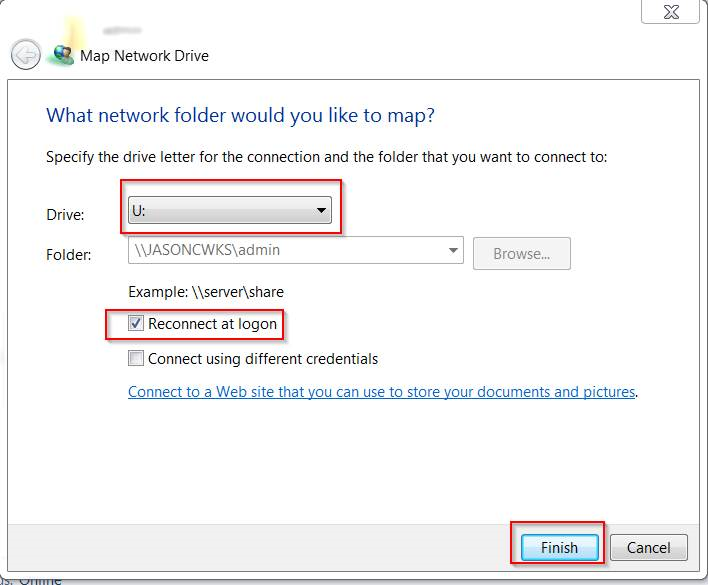
10. Now provide the drive letter you want, place a check-mark on Reconnect at Logon and then Finish
Map network drive
That’s about it! Your other computer should now have the drive mapped with full read/write permissions.