How to Set Clock Time and Date on Ubuntu Server when NTP Synchronized is set to No

In the event our Ubuntu server has an incorrect time, a clock that is offset may prevent users from logging in, or for example, synchronizing databases. If OpenVPN is in use with 2FA and google authenticator, their login is dependent on the time of the server being correct . We want to ensure our end users can log into the server or OpenVPN successfully. Let’s start by viewing the clock on our server, and then synchronize the clock with an internet-based time service.

First issue the command:

date

If we compare this time with an accurate clock, such as a cell phone, we may see this time is no accurate. The date display in the above screenshot shows the Day, Date, Hours, Minutes, Seconds, TimeZone and Year. 

Let’s check to see if our clock is set to be synchronized. Do this by issuing the command:

timedatectl status

Here we see that our “NTP synchronized: no” status indicates our Network Time Protocol synchronization is turned off. 

In order to get our clock synchronized and change it to NTP synchronized: yes, we need to do the following.

  1. Stop the ntp service
  2. Sync the time using ntpd with the -g and -q switches (allows the time to be set without restriction)
  3. Start the ntp service

We can do this by issuing the commands: 

Sudo service ntp stop
Sudo ntpd -gq

This will produce something like the following output:

In this output we can see that our time was offset and adjusted by -49.77 seconds.

Next let’s start the ntp service again with the command:

Sudo service ntp start

Lastly we can confirm that our time is set correctly and that NTP synchronized: is now set to yes with the command:

timedatectl

That should do it! Try issuing the command date again and compare it to an accurate clock. Check to see that your OpenVPN users can log in. If they continue to have issues, check out the article on Troubleshooting OpenVPN

Setup Guacamole Remote Desktop Gateway on Ubuntu with one script

How to replace RDP, SSH and TeamViewer with free open source web-based client-less remote desktop gateway.

I recently learned about Guacamole and found that the setup is quite easy. I had been looking for a way to access all of my virtual and physical machine desktops remotely but didn’t want to rely upon, or trust TeamViewer eternally. Guacamole is open source software that provides you a way to run a tomcat/apache/mysql server suite that sets up and connects remote desktop connections via a web browser very similar to Teamviewer. It allows you to connect to any number of different desktops with just an html5 web browser, and a single open port on your firewall. You can use Google Authenticator 2FA to log into a console that has access to all your desktops, without having to install or configure remote clients such as putty, RDP and VPN. Although, if you’re attempting to use VNC, there will be some initial configuration of the VNC server on the client side – I found that UltraVNC server works best with Guacamole, more on that later.

The installation documentation on the official site is comprehensive but I was able to set up the system fast thanks to Chase Wright’s post here. To be clear, this is not “my script”, but I’ve written this article as a tutorial/guide.

First, you’ll want a standard Ubuntu server or virtual machine installed and running. I installed guacamole on Ubuntu Server 16.10 LTS.

Second, open an ssh connection to your server and run the following commands:

sudo su -
wget https://raw.githubusercontent.com/MysticRyuujin/guac-install/master/guac-install.sh
chmod +x guac-install.sh
./guac-install.sh

The installation will take a little while to download and install, and should only prompt you to provide a mysql database password.

For me, that was pretty much it for the initial setup. Next, I went to a different computer and connected to the guacamole gateway at the following default website:

http://serverIPaddress:8080/guacamole (replace serverIPaddress with your ubuntu server’s IP)

Login with the default guacamole username/password: guacadmin/guacadmin

The initial interface is a little sparse, but to create an RDP connection do the following:

  1. Create a new user first before you create a connection because, by default, it will launch a desktop session the next time you log in. If there’s a problem with the connection you may get stuck. This happened to me and I was stuck on the error:
    “Connection Error: An internal error with Guacamole server, and the connection has been terminated”

    It took a little digging but essentially the server console is up and running, but it is hidden by the black screen/pop-up and you can get back into the settings by going to the url: http://serverIPaddress:8080/guacamole/#/settings/sessions

  2. Create the user first by going to the menu in the upper right-hand corner and choose Settings:
  3.  
  4. Next, click the Users tab and then New User:
  5. Next, provide a username, password (x2), and give this new user all permissions and hit save at the bottom:
  6. With this new user created, you will now want to log in as this new user and change the guacadmin account password.
  7. Now we can create our first connection. Before you create your first RDP connection, be sure to test RDP account credentials from a different computer to ensure you can connect successfully.
  8. Click on the Connections tab and then New Connection. The only things I had to set up to get to my workstation RDP connection working were the following:            
  9.  
  10. Hit Save at the bottom. There are many additional settings available but this should get you up and connected.
  11. Now we want to assign this connection to a user. Do that by going into the Users tab again, find the user you want to assign and the connection:
  12. Now go to a different computer from the one you want to connect to, go to http://serverIPaddress:8080/guacamole site, login as the user with the connection assigned to it and you should be greeted with the RDP console of the remote computer.
  13. To setup an ssh connection it’s even easier. Again, first create a new user with the same name as the ssh server you want to connect into (I named my user HN-DHCP01). Then create a new connection and name it the same as your server. Below are the guacamole ssh connection settings I used to connect to my DHCP01 server:
  14. Under the Authentication setting, provide a valid ssh user’s credentials on the server you’ll be connecting into.
  15. Hit save at the bottom. Go back into the User tab, then select the new user (HN-DHCP01 user) and assign the connection to the user at the bottom and hit save.
  16. Log out of guacamole, then log in as the new user (HN-DHCP01) this will instantly log you into an ssh session that you can see in the screenshot below runs right in the browser!
  17. Guacamole also supports Two-Factor Authentication as well as a multitude of additional setups and configurations. It’s wise to setup 2FA prior to opening any firewall ports into your local network from the internet, as well as make sure that you follow all security precautions and test everything thoroughly.
  18. When configuring VNC for use as a remote support with Guacamole, I’ve found UltraVNC Server works best for Windows Clients. It’s a little tricky to setup on the client side and get it to run consistently across all flavors of Windows 7, and Windows 10 feature releases. 
  19. Enjoy your guacamole and let me know in the comments if I’ve missed anything.

Linux Digital Forensics Web Resources

Below is a list of digital forensics resources for linux. I especially enjoyed reading LUIS ROCHA‘s intro guide to Linux Forensics (#19).

  1. VirusTotal – Free Online Virus, Malware and URL Scanner
  2. TSK Tool Overview – SleuthKitWiki
  3. The Sleuth Kit
  4. Taking advantage of Ext3 journaling file system in a forensic investigation
  5. SANS Digital Forensics and Incident Response Blog – Understanding EXT4 (Part 1)- Extents – SANS Institute
  6. SANS Digital Forensics and Incident Response Blog – Understanding EXT4 (Part 2)- Timestamps – SANS Institute
  7. SANS Digital Forensics and Incident Response Blog – Understanding EXT4 (Part 3)- Extent Trees – SANS Institute
  8. SANS Digital Forensics and Incident Response Blog – Understanding EXT4 (Part 4)- Demolition Derby – SANS Institute
  9. SANS Digital Forensics and Incident Response Blog – Understanding EXT4 (Part 5)- Large Extents – SANS Institute
  10. SANS Digital Forensics and Incident Response Blog – How To – Digital Forensics Copying A VMware VMDK – SANS Institute
  11. SANS Digital Forensics and Incident Response Blog – Blog – SANS Institute
  12. qemu-img(1)- QEMU disk image utility – Linux man page
  13. qemu-img for WIndows – Cloudbase Solutions
  14. National Software Reference Library (NSRL) – NIST
  15. ltrace – Wikipedia
  16. Logical Volume Manager (204.3)
  17. Linux-Unix and Computer Security Resources – Hal Pomeranz – Deer Run Associates
  18. The Law Enforcement and Forensic Examiner’s Introduction to Linux
  19. Intro to Linux Forensics – Count Upon Security
  20. https—www.kernel.org-doc-Documentation-filesystems-ext4.txt
  21. GitHub – log2timeline-plaso- Super timeline all the things
  22. Filesystem Hierarchy Standard
  23. Digital Forensics – SuperTimeline & Event Logs – Part I – Count Upon Security
  24. Digital Forensics – NTFS Metadata Timeline Creation – Count Upon Security
  25. Digital Forensics – Evidence Acquisition and EWF Mounting – Count Upon Security
  26. chkrootkit — locally checks for signs of a rootkit

Building a penetration test lab – Part 1

Notes on how to create a Penetration Testing Lab

I’ve always had an interest in penetration testing and have messed around with nmap and nessus, but now I’m going to dig in my heels and become proficient using the tools in the pen-test theater. The following post is more of an outline of what is found in a youtube video I found here at Derbycon 2016. This speaker was inspiring as well as a few others who’ve spoken because they said that Sysadmins make good penetration testers. They mentioned that someone who is good at building systems and networks in general do well at breaking them down and actively locating and fixing problems in other systems. I am not looking to become a script kiddy, or a black hat/dark side cracker for that matter, but I do hope to become proficient with the tools they use, as well as work with python to build my own tools.

Since I last upgraded my vm server to proxmox, I’ve been kicking around ideas on how to use the hardware to it’s fullest potential. I’ve already gotten started by by first creating a new network on my proxmox host, and started up my first server in my segrated ‘insecure’ network by spinning up an isc-dhcp-server. I’ll probably post info on my build as I go along so stay tuned.

-Start of Video notes-

Credit: David Boyd
Pentest lab requirements:

  • Core i5 CPU
  • 16gb RAM
  • 250-500GB HDD
  • 7zip

VM software:

  • virtualbox
  • VMWare
  • Hyper-V
  • (I’ll be using) ProxMox

Pentesting platforms:

  • Kali Linux
  • Samurai WTF (WebAppTesting)
  • SamuraiSTFU(Utility Hacking)
  • Deft Linux (Forensics)

Old stuff:

  • olpix (?)
  • IWax(?)
  • backtrack (now Kali)

Offensive Security has – pre-compiled linux distro

Note: generate your own SSH keys

Now need something to attack…
Vulnerable VM’s:

  • Metasploitable 2 (Metasploit) – intentionally vulnerable Ubuntu has remote logins, backdoors, default pwds, vulnerable web services
  • Morning Catch (Phishing)
  • OWASP BrokenWebApplications (WebApps)
    WebGoat (Web Applications)
  • vulnhub.com (challengeVMs)
  • Kioptrix (Beginners)
  • PwnOS

Guides to pen expoits:
https://community.rapid7.com/docs/DOC-1875

Introducing Morning Catch
http://blog.cobaltstrike.com/2014/08/06/introducing-morning-catch-a-phishing-paradise/ – real working phishing lab

Sans Mutillidae Whitepaper
https://www.sans.org/reading-room/whitepapers/testing/introduction-owasp-mutillidae-ii-web-pen-test-training-environment-34380

VM’s to build and test:

Do not expose vulnerable vm’s to internet!
Make them hosts only (or in proxmox create a new bridge)

More tools:

  • nmap
  • nessus
  • cain (still works)
  • responder
  • john the ripper/hashcat
  • metasploit (freeversion works great)
  • SET/GoPhish/SPF (social engineering)
  • Discover Scripts – great stuff – great reconnisance
  • PowershellEmpire
  • CrackMapExec (post exploit)

How to Build a test domain controller, and add users with various privileges:
http://thehackerplaybook.com/windows-domain.htm

Once the virtual machines have been setup and set to ‘host only’
ping each vm

Initial testing and exploit example:

On Kali:
nmap 192.168.110.2 (XP)
nmap -O 192.168.110.2 (checks for OS)
msfconsole
msf> search ms08-067
msf > use exploit/windows/smb/ms08_067_netapi
msf exploit(ms08_067_netapi) > show options
(shows mudule options)
msf exploit(ms08_067_netapi) > set RHOST 192.168.110.2
msf exploit(ms08_067_netapi) > exploit

kali:`# crackmapexec
(dumps hashes)

phishing server – load up goPhish – setup add users, make campaign

Additional training:
Metasploit unleashed
https://www.offensive-security.com/metasploit-unleashed

Hack This Site!
https://www.hackthissite.org/reading-room/whitepapers/testing/introduction-owasp-mutillidae-ii-web-pen-test-training-environment-34380
Youtube videos:
Derbycon, BSides, DefCon, ISSA

More information: Sans Cyber Aces, InfoSec Institute, Cybrary

It’s wise to find a mentor, as well as do some mentoring

Recommended reading (actual paper books):

  • The hacker playbook
  • Penetration Testing – a hands-on introduction to hacking – george wymann
  • Metasploit – The Penetration Tester’s Guide
  • Hacking – The art of exploitation Erickson
  • Professional Penetration Testing
  • The Art of Intrusion – kevin mitnick
  • The art of deception – kevin mitnick
  • Ghost in the wires – kevin mitnick
  • Black Hat Python – Jason Street

-End video notes-

CockroachDB – how to build a 4 node SQL cluster on ubuntu and HyperV

CockroachDB Overview

Description: cockroach is an open source, survivable, strongly consistent, scale-out SQL database. If you wonder where google engineers go when they leave google, they go out on their own and build unbelievably great scalable and distributed open source software. Essentially if you want to run your own fault-tolerant SQL database across multiple datacenters and cloud services, using your own servers, allowing you complete control of your database, without paying hefty licensing fees, then run cockroach. The info in this post is not a review of cockroach, but rather a demonstration of a lab setup and POC.

To get started in our lab, first we want to build around 3 or 4 test clone servers or “nodes”. I use ubuntu on top of HyperV, but you can use any flavor of linux or MacOS you want. It can also run on Windows Docker.

If you’re like me and use Hyper-V on Win10, make 4 x Ubuntu 16.04 “clones” – first build a ‘goldmaster’ image, and clone it 4 times – guide here: https://4sysops.com/archives/clone-a-ubuntu-server-in-hyper-v-2012-r2/ – or use something like virtualboxes.org.

Create 4 virtual machines, each having it’s own IP address:
Node1: inet addr:10.0.10.169
Node2: inet addr:10.0.10.170
Node3: inet addr:10.0.10.171
Node4: inet addr:10.0.10.172

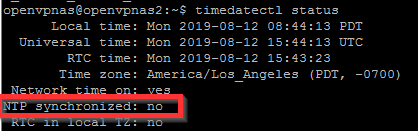
Make sure each node is up to date and has ntp installed and synchronized with the commands:

sudo apt-get install ntp

Use the command

timedatectl

To ensure that…

NTP synchronized: yes

At this point before you install/run cockroach, it’s wise to export each node VM with HyperV as a backup.

On Nodes 1,2,3,4 download the latest binary here https://www.cockroachlabs.com/docs/install- cockroachdb.html with the command:

sudo wget https://binaries.cockroachdb.com/cockroach-latest.linux-amd64.tgz

Extract the binary with the command:

tar -xvf cockroach-latest.linux-amd64.tgz

Move the binary to a location in your PATH or add the directory location to your path. You can learn about your path with the command:

sudo vi /etc/environment

And then move your extracted cockroach to /usr/sbin with the command:

sudo mv cockroach-latest.linux-amd64/cockroach /usr/sbin/

Do a sanity check with the command:

cockroach version

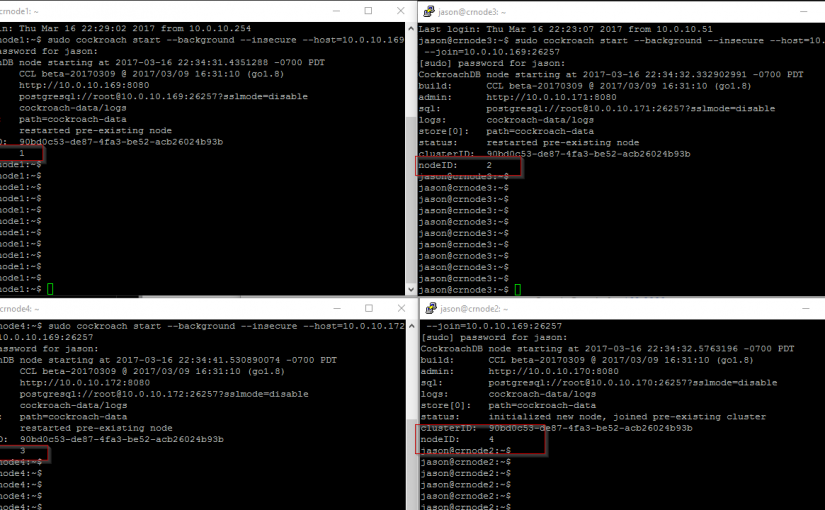
Start cockroach in insecure mode in the background on Node1 (master server) with the command:

sudo cockroach start --background --insecure --host=10.0.10.169

Result should be something like below:

CockroachDB node starting at 2017-03-15 23:16:23.118419329 -0700 PDT
 build: CCL beta-20170309 @ 2017/03/09 16:31:10 (go1.8)
 admin: http://10.0.10.169:8080
 sql: postgresql://[email protected]:26257?sslmode=disable
 logs: cockroach-data/logs
 store[0]: path=cockroach-data
 status: restarted pre-existing node
 clusterID: 08b6bfe6-4886-466b-a9c6-bc58a3809113
 nodeID: 1

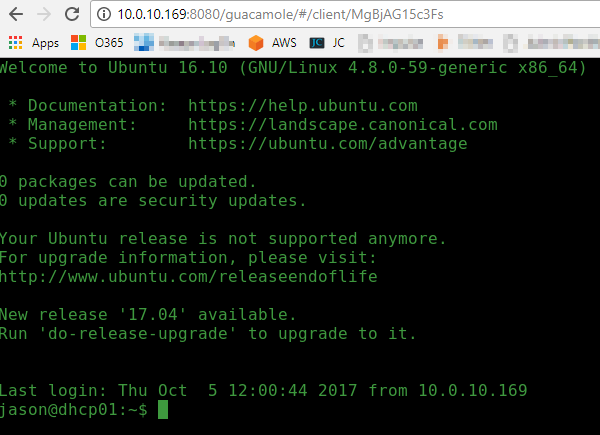
Go ahead and browse to the admin page http://10.0.10.169:8080

On your other nodes:

sudo cockroach start --background --insecure --host=10.0.10.170 --join=10.0.10.169:26257

*where –host=current node ip address you’re having to join with the master server 10.0.10.169

Your results should look something like the following:

CockroachDB node starting at 2017-03-15 23:23:43.783097234 -0700 PDT
 build: CCL beta-20170309 @ 2017/03/09 16:31:10 (go1.8)
 admin: http://10.0.10.170:8080
 sql: postgresql://[email protected]:26257?sslmode=disable
 logs: cockroach-data/logs
 store[0]: path=cockroach-data
 status: initialized new node, joined pre-existing cluster
 clusterID: 08b6bfe6-4886-466b-a9c6-bc58a3809113
 nodeID: 2

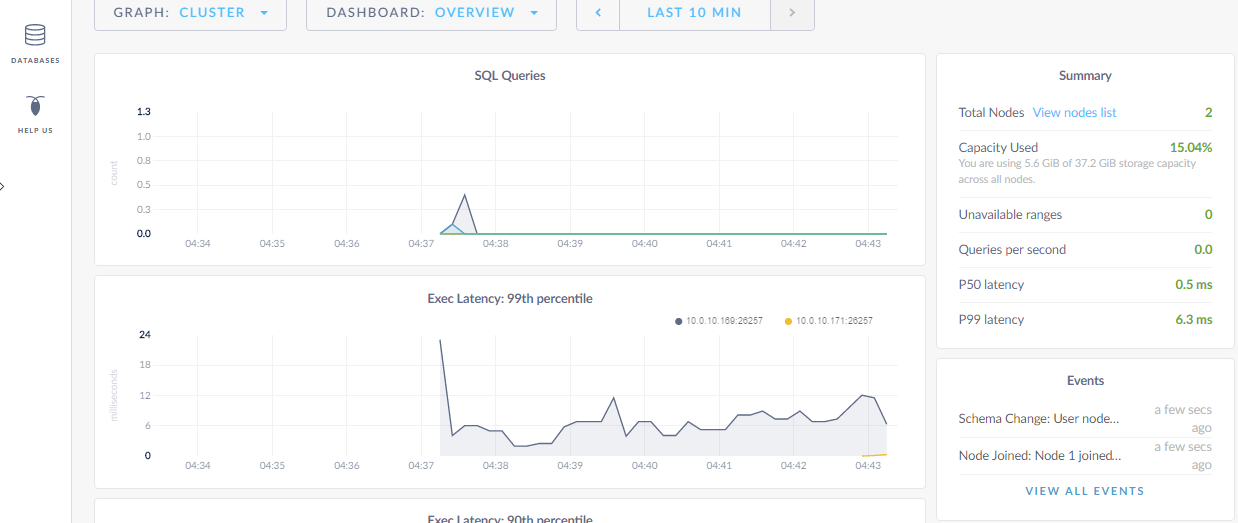
Your web interface should provide you with performance graphs:

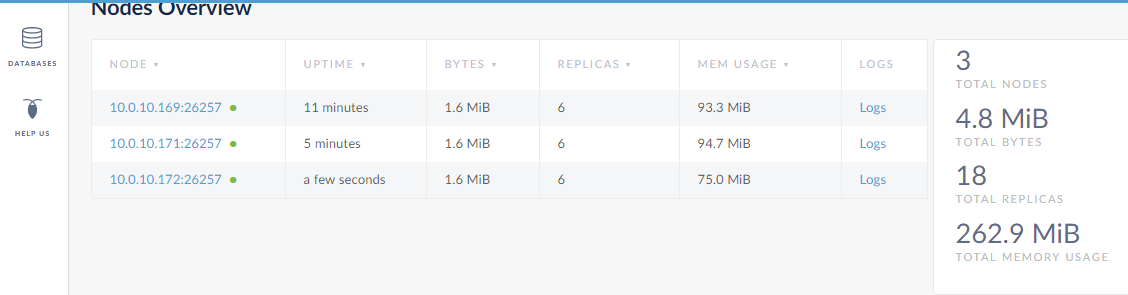
Identify the new nodes in the View Nodes List link:

Go on and add the remaining Nodes to the cluster.

???

Profit! – just kidding

Now you can go on to learn about cockroach SQL and create some databases and tables and test how pulling the plug on one of your nodes doesn’t bring down the DB, and how all the data is replicated to all 4 nodes. It’s recommended you don’t run this lab on a single workstation-class system, but something that meets the cockroach DB minimum system requirements. This product is still in beta and features are subject to change. Regardless, cockroachdb is an incredible addition to the open-source community and I’m sure will be very useful to a lot of systems admins and application developers.


Fix ubuntu when the OS will not boot – kernel panic – kernel panic not syncing vfs unable to mount root fs on unknown-block 0 0 – error /boot full remove old kernels from command line

To begin, it will probably take at least 30 minutes resolve this issue…

This fix solved my problem with the “vfs unable to mount root fs” error, but of course your results may vary. As always, first backup your system or do an export of the vm so you have a copy of the system as it existed before you started screwing around with it 😉

After running apt-get update / apt-get upgrade and then a reboot, you may receive the following error: kernel panic not syncing vfs unable to mount root fs on unknown-block 0 0 on ubuntu 16.04.

In many cases this  will be due to the /boot drive becoming 100% full because many updates have been made to the kernel. By default, ubuntu will retain the old kernels and add them to the list of available kernels you can boot into in the Grub2 boot loader menu. You can confirm that your drive is full by issueing the command:

df -h

The result will likely show the following:

In order to resolve this issue and boot successfully, while you’re looking at the error during boot, (you should already be at the console), and restart the vm or computer into the Grub2 menu then choose “Advanced options for ubuntu” view where you can see a list of old kernels you can boot into. Some report you can do this booting with the Shift key held down, or in the event it’s a virtual machine, you should be able to arrow-down in the Grub start screen and choose Advanced options for ubuntu on startup:

Grub2 boot menu.

Once you go into the advanced boot menu you will likely see several kernels listed. Choose the next-oldest kernel from the top/highest version of kernels. In my case I booted into the version labeled Ubuntu, with Linux 4.4.0-57-generic (my boot menu screenshot below is clean, but you’ll likely see several kernels listed).

Cross your fingers and hope you get to your login prompt. From here I jumped on putty and connected from that client, as I prefer it over the console.

Next, login and follow the directions that I found here:

http://askubuntu.com/questions/2793/how-do-i-remove-old-kernel-versions-to-clean-up-the-boot-menu

To save you the search, here are the instructions I used to first list and then remove the old kernels:

Open terminal and check your current kernel:

uname -a

DO NOT REMOVE THIS KERNEL! Make a note of the version in notepad or something.

Next, type the command below to view/list all installed kernels on your system.

dpkg --list | grep linux-image

Find all the kernels that are lower than your current kernel version. When you know which kernel to remove, continue below to remove it. Run the commands below to remove the kernel you selected.

sudo apt-get purge linux-image-x.x.x.x-generic

Or:

sudo apt-get purge linux-image-extra-x.x.x-xx-generic

Finally, run the commands below to update grub2

sudo update-grub2

Reboot your system.

sudo reboot

As you can see from my terminal history, I had to remove a few:

589  uname -a
 590  dpkg --list | grep linux-image
 591  sudo apt-get purge linux-image-4.4.0-21-generic
 592  sudo apt-get purge linux-image-4.4.0-22-generic
 593  sudo apt-get purge linux-image-4.4.0-24-generic
 594  df -h
 595  sudo apt-get purge linux-image-4.4.0-24-generic
 596  sudo apt-get purge linux-image-4.4.0-28-generic
 597  sudo apt-get purge linux-image-4.4.0-31-generic
 598  sudo apt-get purge linux-image-4.4.0-34-generic
 599  sudo apt-get purge linux-image-4.4.0-36-generic
 600  sudo apt-get purge linux-image-4.4.0-38-generic
 601  df -h
 602  sudo apt-get purge linux-image-4.4.0-42-generic
 603  sudo apt-get purge linux-image-4.4.0-45-generic
 604  sudo apt-get purge linux-image-4.4.0-47-generic
 605  sudo apt-get purge linux-image-4.4.0-51-generic
 606  sudo apt-get purge linux-image-4.4.0-53-generic
 607  sudo update-grub2
 608  dpkg --list | grep linux-image
 609  df -h
 610  sudo apt-get purge linux-image-extra-4.4.0-21-generic
 611  sudo apt-get purge linux-image-extra-4.4.0-22-generic
 612  sudo apt-get purge linux-image-extra-4.4.0-24-generic
 613  sudo apt-get purge linux-image-extra-4.4.0-28-generic
 614  sudo apt-get purge linux-image-extra-4.4.0-31-generic
 615  sudo update-grub2
 616  df -h
 617  sudo reboot
 618  dpkg --list | grep linux-image
 619  uname -a
 620  sudo reboot

After the reboot, you can see my /boot partition returned to a manageable size:

I hope this post helps someone save some time and help them fix their ubuntu boot problems. Please leave a comment if this helped resolve your issue or if there is a smarter/faster way to fix this problem.