If our organization controls two office365 tenants, at some point we may wish to enable forwarding of email from an address hosted in one of our tenants to an address hosted in another. When we enable the forward in O365 Exchange Admin, the end user may complain that every time they try to send a message to see if it is forwarded, they receive the following bounce back message:
Remote Server returned '550 5.7.520 Access denied, Your organization does not allow external forwarding. Please contact your administrator for further assistance. AS(7555)'
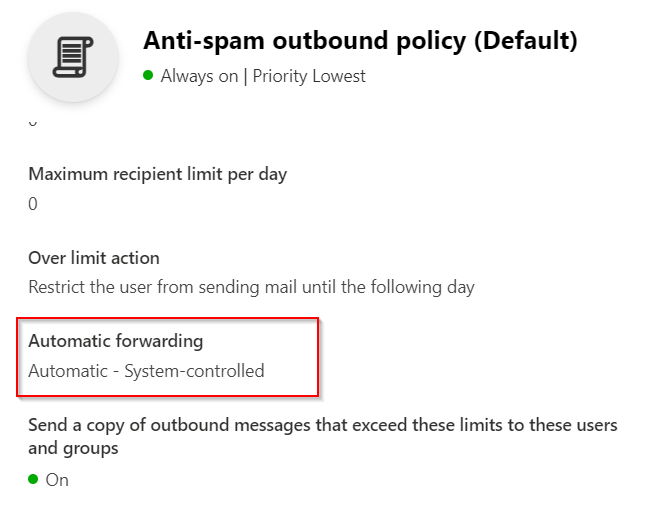
By default, Microsoft 365 Defender sets up an Anti-Spam outbound policy. And the policy default sets Automatic Forwarding to “Automatic: System Controlled.” Since we do not want to modify this default policy, instead we can create a policy (with a higher priority) that defines certain users or groups to allow forwarding.
Go to www.office.com and log into the tenant which hosts the email address that we want to forward mail from. (do not log into the destination email address tenant)
Open the Admin Center
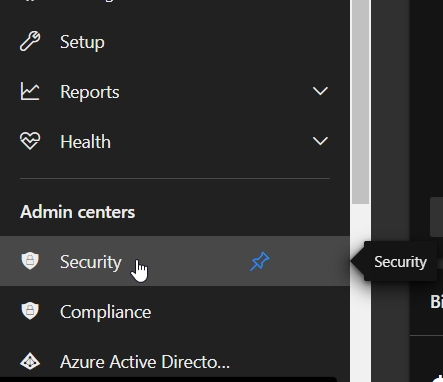
Next, click Show All (admin centers) and then click Security.
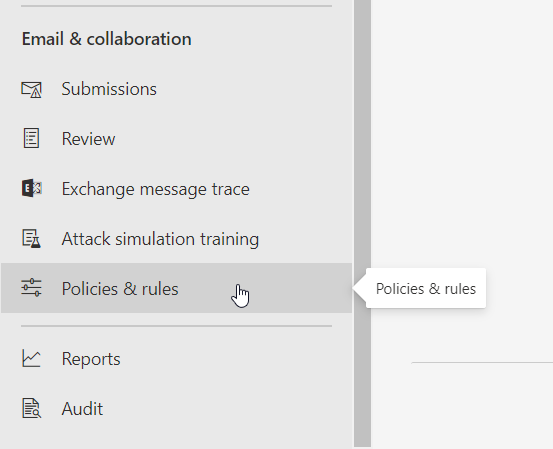
5. Next, in the Security / Microsoft 365 Defender Admin Center, under Email & Collaboration, click on Policies & rules.
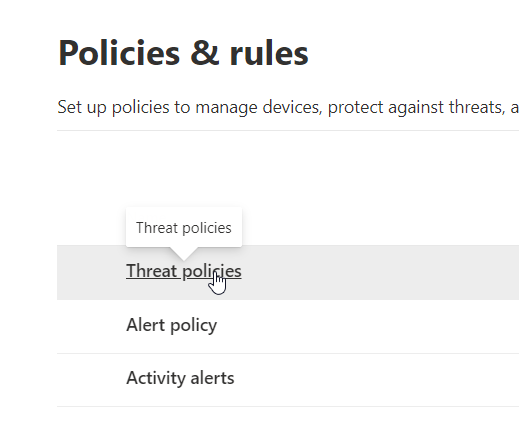
6. Here, click on Threat Policies
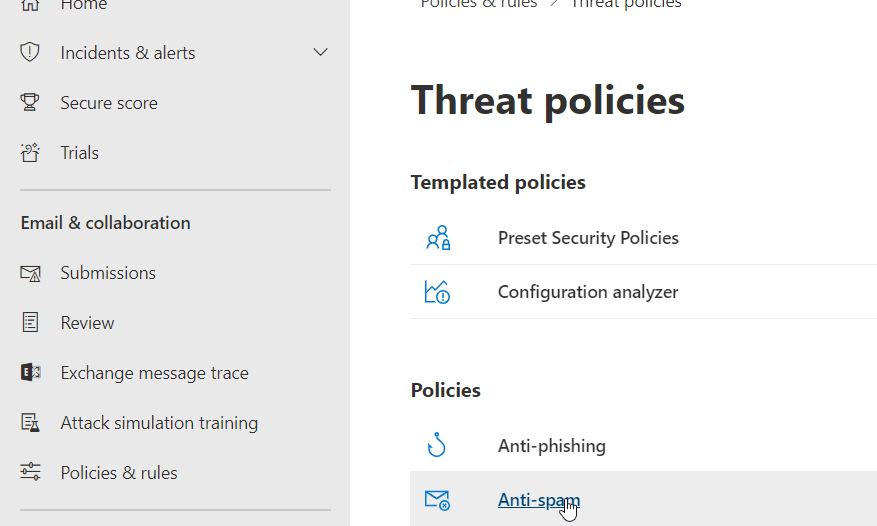
7. Under Threat policies, click Anti-Spam.
8. Under the Default Anti-Spam outbound policy (Default) we will probably find Automatic Forwarding is set to Automatic – System-Controlled
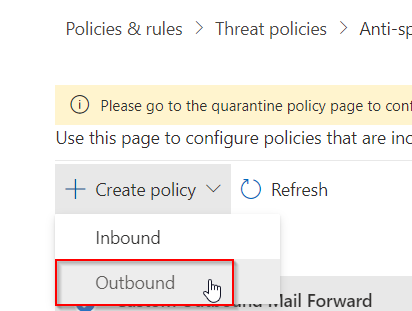
9. Close the Default Policy and then at the top of the screen click the + Create Policy drop-down and choose Outbound
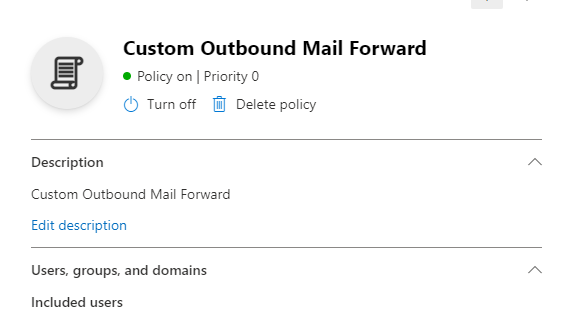
10. In the new Outbound policy, edit the description to something like “Custom Outbound Mail Forward“, and add the Users or Groups to the policy (whom you want to give the ability to forward.)
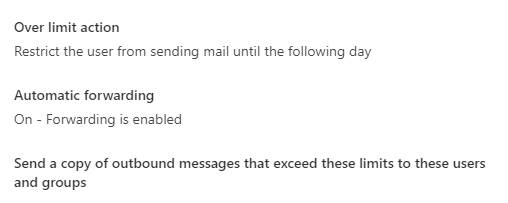
11. At the bottom of the new custom policy change Automatic Forwarding to: On – Forwarding is enabled
12. Save and close the new policy and that should do it. Try sending some test messages to see if the forward works correctly. We may need to change the new policy’s Priority to 0 if something still isn’t working. Also, don’t forget to double check the Automatic Forwarding on the mailbox itself.
So recently Windows 10 has enabled a security feature that redirects certain websites like www.office.com to the Edge browser. If you need to get into a website using Internet Explorer, for now the workaround is to disable the Edge redirect setting inside the Edge browser settings.
If you use SharePoint online a lot you have probably found that Open in File Explorer is a convenient way to manage your SharePoint files and libraries in Windows 10. You’ve also probably found that in order to view the SharePoint files in the Windows 10 File Explorer, you first need to open Internet Explorer, then open the SharePoint library, find the link Return to Classic SharePoint in the bottom left corner of the SharePoint library page, and then click on the Open in File Explorer link inside Classic Mode. Details on how to troubleshoot opening SharePoint files in File Explorer can be found here. If you want an alternative way to browse SharePoint files in Windows 10 File Explorer using Edge, please go here.
If you want to know how to disable or remove the IE to Edge redirect, use the following instructions:
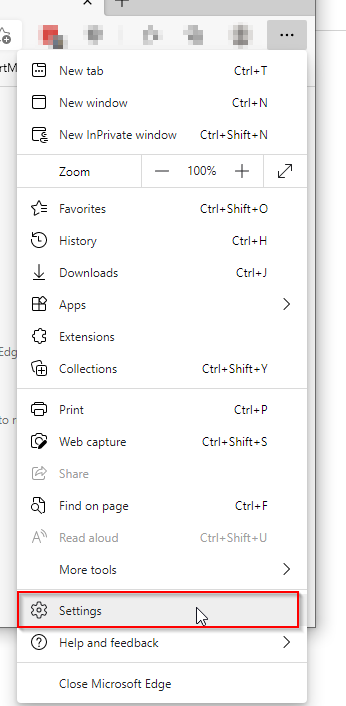
Start by opening the Edge browser.
In Edge, click on the … ellipsis menu in the upper-right corner, and then click Settings. Or in the address bar at the top of Edge, type edge://settings/defaultbrowser and press Enter.
Edge Browser Settings
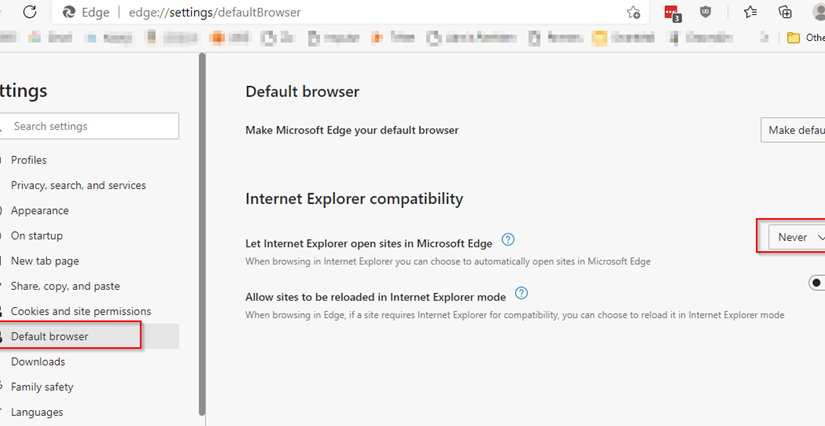
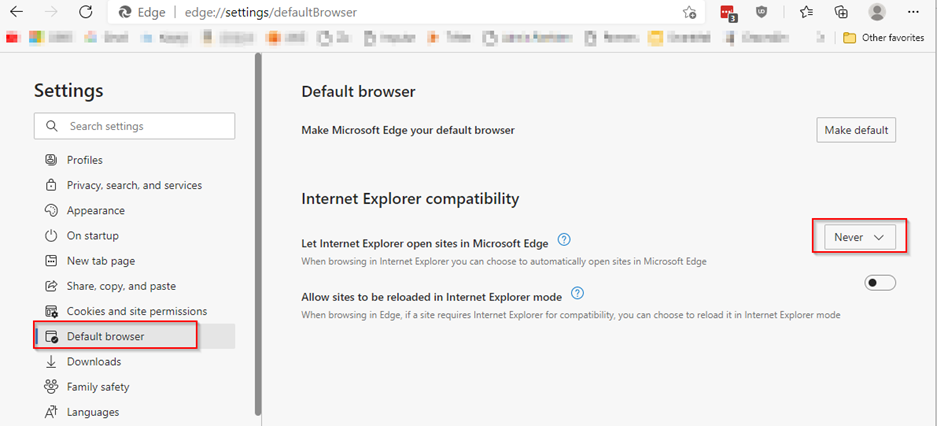
Next, inside the Edge Settings page, on the left side menu, click Default browser.
Change the setting “Let Internet Explorer open sites in Microsoft Edge” to Never.
Edge Default Browser Let Internet Explorer open sites in Microsoft Edge
That should do it!
Close the Settings Tab/Edge browser. Close and then open Internet Explorer browser. Go to www.office.com in IE and it should let you in.
Thanks for all your support. Some of you may have noticed a little downtime. I invested a little professional expertise in the site and you should now see better performance and more site reliability and uptime. Special thanks to Gregory Morozov at upwork.com who quickly identified and resolved the following issues:
Convert PHP to php-fpm – for many reasons, but one is control over max php processes (I’ll use: service php7.2-fpm restart – if I need to restart php.)
Relaxed Wordfence triggers so users don’t get denied access
Dropped memory usage from 700+MB to 400MB
Fixed invalid Repos, other updates and maintenance.
We’ll monitor the site usage into the beginning of next week to see if we need to add more memory to the instance.
Recently a client complained that an Office 365 account had sent out spam messages to a number of clients. Later, the suspect account which had been sending spam could no longer send or receive email. However upon first glance at the mailbox, sent messages were sitting in the sent items folder, and messages sent to the account in question were not receiving bounce-back failures, but the messages sent to the affected account were not in the inbox. After we changed the password to the account, and enabled 2FA on the account we could still not send and receive mail. Below are the steps used to resolve this particular issue. In short, a malicious inbox rule had been created and outbound messages had been blocked by Microsoft.
Log into the tenant’s Admin console with an Administrative account, and change the password of the affected account.
Log into the affected account as the user using the new password.
Click on the Gear icon and then under Your app settings, click Mail.
4. One in the Mail app Settings, go to Mail > Automatic Processing > Inbox and Sweep rules.
Here we can see a malicious rule had been created to mark all inbound mail as Read and move the message to the “RSS Subscriptions” folder:
5. Uncheck and turn off any malicious or invalid rules.
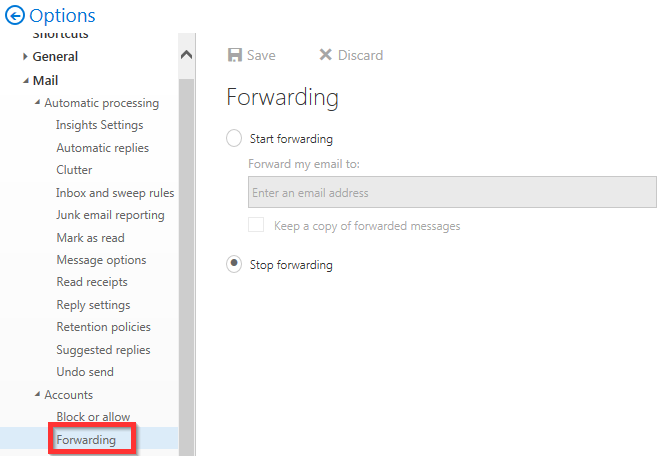
Also check for any new forwarding rules in Mail > Accounts > Forwarding:
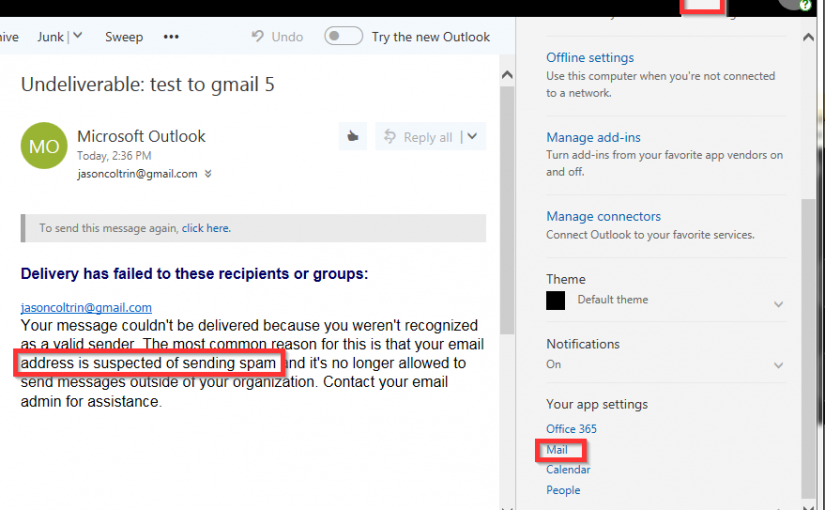
6. When we look in our “RSS Subscriptions” folder we find some messages from Microsoft indicating the account has been blocked from sending mail because the account was flagged as sending spam:
Your message couldn't be delivered because you weren't recognized as a valid sender. The most common reason for this is that your email address is suspected of sending spam and it's no longer allowed to send messages outside of your organization. Contact your email admin for assistance.

Remote Server returned '550 5.1.8 Access denied, bad outbound sender. For more information please go to http://go.microsoft.com/fwlink/?LinkId=875724. S(9333) [DM5PR10MB1914.namprd10.prod.outlook.com]'
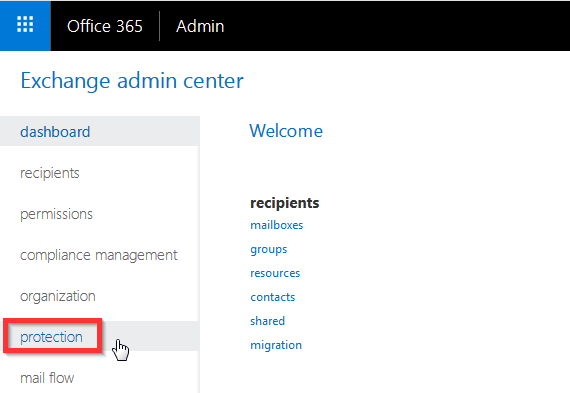
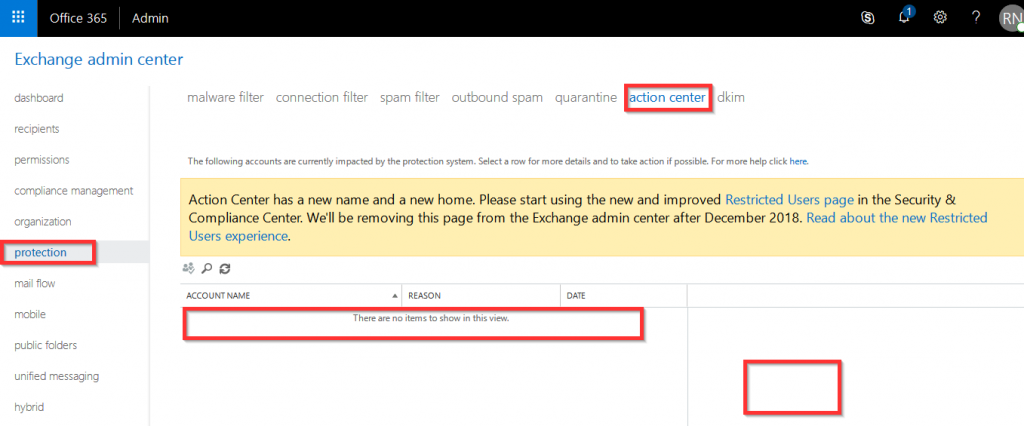
7. To resolve this issue, we’ll need to go into the Action Center. Log into the Admin console > Admin Centers > Exchange > Protection > Action Center
8. In the Action center, we’ll find an issue flagged regarding our hacked user account. Take action on the issue and after a while due to permission propagation, it may take up to 2 hours for the account to be re-enabled for sending mail again.
9. It might be a good idea to contact Microsoft Support if you continue to experience problems with a user account sending spam. Changing the password should prevent malicious access. Most like the account had been phished or the computer the user has was compromised by a virus/malware or spyware. It’s recommended that the account have two-factor authentication or multi-factor authentication enabled to prevent the account from being hacked again.
tag: outlook cannot send or receive email but sent mail is in sent items folder
When trying to setup and authenticate to an AWS Instance running OpenVPN, a user could not complete a new connection to OpenVPN after entering the initial un/pwd. They receive the error: Permission denied. This is after successfully setting up the OpenVPN client on Windows 10 and scanning an Authenticator code using Google Authenticator App on a Samsung S8 Active Android mobile phone running Android 8.0.0 ‘lollipop’. Ultimately the reason the user could not authenticate was their mobile phone’s time was off by about 3 minutes. Continue below to find additional information on how to troubleshoot this and other authentication issues with OpenVPN.
When troubleshooting OpenVPN login errors it’s a good idea to first try some of the following:
Unlock a Disabled or Locked account on OpenVPN Admin console
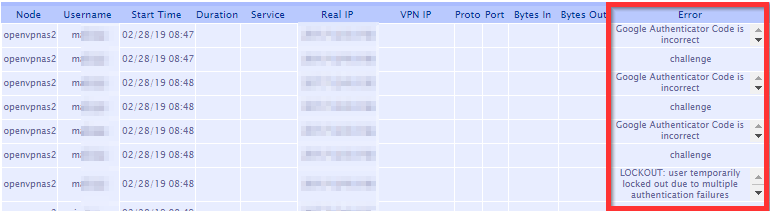
To check for the events related to a user lockout, first log into the Admin web console > Status > Log Reports. Here you will find the errors related to bad authentication and eventually an account lockout.
The errors you may find could be the following:
Google Authenticator Code is incorrect.
LOCKOUT: user temporarily locked out due to multiple authentication failures.
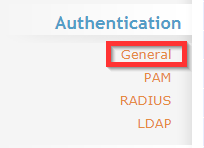
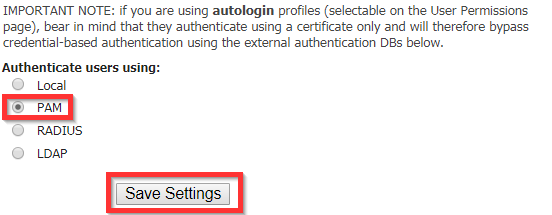
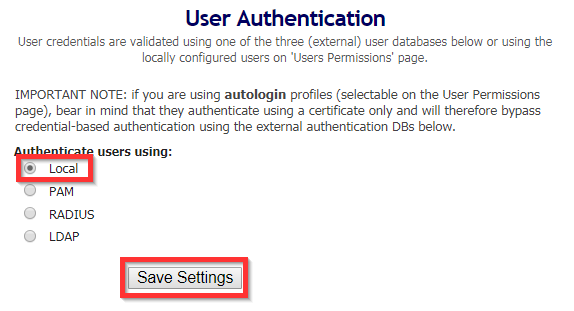
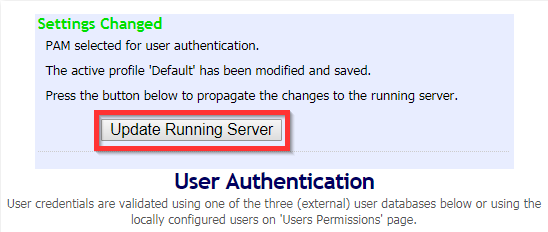
To unlock a user account (if using local authentication), Login to the Admin Web Console, Go to “General” under Authentication and change Authentication to “PAM”, Save Settings > Update Running Server > “Local” > Save Settings> Update Running Server.
This procedure should unlock disabled or locked user accounts on OpenVPN.
Reset A User Account on OpenVPN
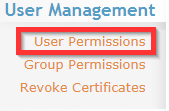
To reset a user’s OpenVPN account:
Log in to the admin web console, click on User Permissions.
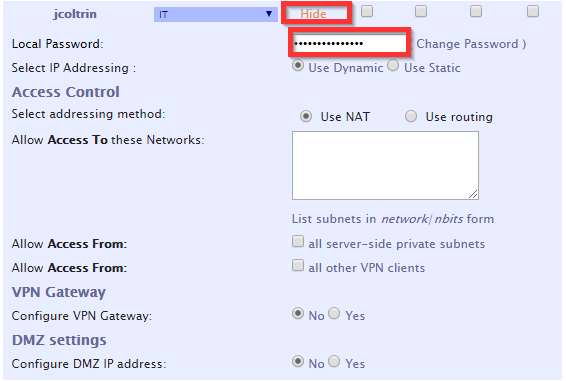
Find the username, place a checkmark in the Delete column, then Apply > Save. Next, re-create the account. Scroll to the bottom of the list, type the new user name: Eg. jcoltrin Save > update server
Go back find the username again in the list and hit Show:
Enter in the Local Password: (S3cr3tP@ssw0rd!) Save > Update
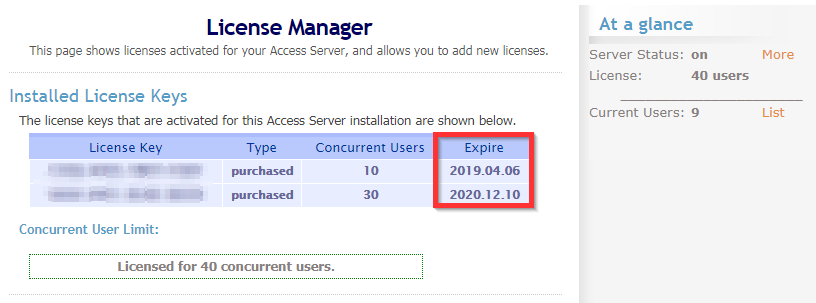
Check OpenVPN for Valid Concurrent License
In the admin web console, under the Configuration menu, click License. Check to ensure that your concurrent users have not reached or exceeded the limits of your licenses (under At a glance,) or that your licenses have not expired.
Use SSH to check the logs of the OpenVPN server and get the specific errors for an individual’s login problems.
After logging into the server using Putty/SSH, you can change directory to the scripts directory:
cd
/usr/local/openvpn_as/scripts/
and then issue the command ./authcli –user <username> –pass S3cr3tP@ssw0rd
./authcli --user jcoltrin --pass S3cr3tP@ssw0rd
This will produce something similar to the following information:
Result:
API METHOD: authenticate
AUTH_RETURN
  status : COM_FAULT
  reason : An error occurred while connecting: 13: Permission denied. (twisted.internet.error.ConnectError)
  user : jcoltrin
Addtionally you can find more messages related to authentication failures in /var/log. You’ll find these messages in the latest log files:
openvpnas.log
openvpnas.log.1
Use your favorite editor (vi) to search through the logs
vi openvpnas.log
use the command / and then the username to search for that term and hit “n” to go to the next instance of your term, for example:
/jcoltrin > n > n
and then :q to quit.
Here are some typical error messages for my authentication errors:
2019-02-26
14:20:08-0800 [-] WEB OUT: '2019-02-26 14:20:08-0800
[UDSProxyQueryProtocol,client] Web login failed
(twisted.cred.error.UnauthorizedLogin)'
2019-02-26 14:21:30-0800 [-] WEB OUT: "2019-02-26 14:21:30-0800 [UDSProxyQueryProtocol,client] Web login authentication failed: {'status': 1, 'client_reason': 'LOCKOUT: user temporarily locked out due to multiple authentication failures', 'reason': 'LOCKOUT: user temporarily locked out due to multiple authentication failures', 'user': 'jcoltrin'}"
Make sure the phone with Google Authenticator has the correct time and set the phone to sync it’s clock with the network/carrier
As mentioned at the beginning of this article, what the original login issue came down to was the Android phone, on which the Google Authenticator was running, had it’s time off by about 3 minutes. To set and change the correct time on an Android Galaxy S8 Active, first, go to Settings > General Management > Date and Time > Set/Turn on Automatic Date and Time.
I’m not sure why the value for this phone had it’s time set to not have automatic sync with the network/carrier. This may have been due to a recent android update because I found this setting off on a couple phones in the office. Ensure the time on your server is accurate as well by issuing the bash/ssh command:
date
Your result should look like the following:
openvpnas@openvpnas2:/var/log$ date
Thu Feb 28 14:46:57 PST 2019
Occasionally we’ll be required to set a user account on Office365 to never expire. It’s not advisable to perform this action, as a compromised account who’s passwords never expires can be a liability. However, in some cases a utility account such as a scanner/copier or kiosk account may require a password that does not change. The following tutorial will show you how to set an Office365 password to never expire using PowerShell.
First, we’ll want to ensure that the account password is not already set to expire and we want to confirm it’s status. Using PowerShell we can get information about an Office365 user account password expiration status.
1. Connect to Microsoft Online Services with PowerShell by running the following commands:
Import-Module MSOnline
Connect-MsolService
2. Next, replace <UserID> with the user account (email address) of the user’s properties we want to get with the following command:
3. Because we get the message returned that the property PasswordNeverExpires = False, we want set it to $True and set the account password to never expire with the following command:
Because our PasswordNeverExpires property is now set to True, our task is complete. Disconnect from Office365 and close powershell by entering the command: exit.
When attempting to move files in SharePoint Online Office365 from one folder to another you may find that you get errors or the moving process times out or fails with the error:
Error: We couldn't move the file because it's locked for editing or has been modified or deleted.
What has happened is some of the files in these folders have been marked as “checked out” or “locked”. This may have been done erroneously by a user or the status was corrupted when the files were originally uploaded into SharePoint.
Once the files are checked in, you can move them. As an alternative to moving the files, you may also be able to “Copy To…”, and then delete the original files. Again, you may not be able to delete the files you copied because the files you want to delete in SharePoint may also be locked or checked-out.
This is what worked for me:
Use your favorite web browser and log into your SharePoint site (e.g. https://companyname.sharepoint.com/sites/sitename.
Browse to the problem folders that contain files that you cannot move to another folder.
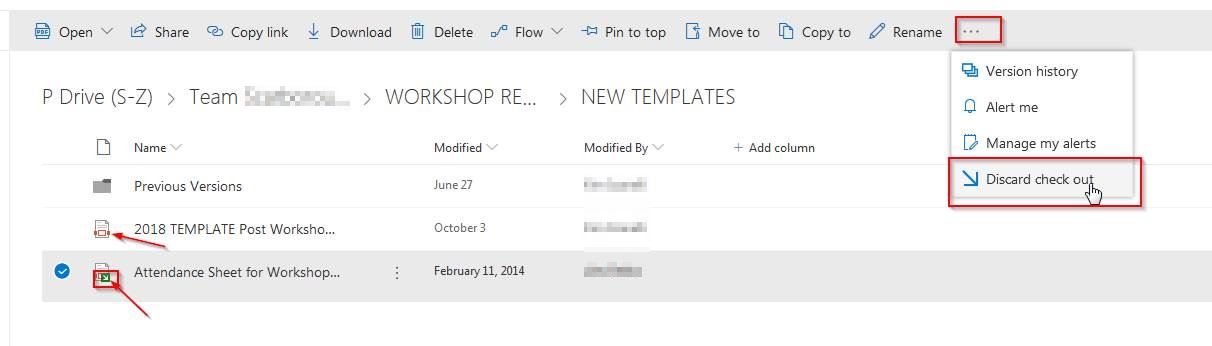
In the folders, you should find files that are “checked out”. The files will have a green arrow icon next to the file icon.
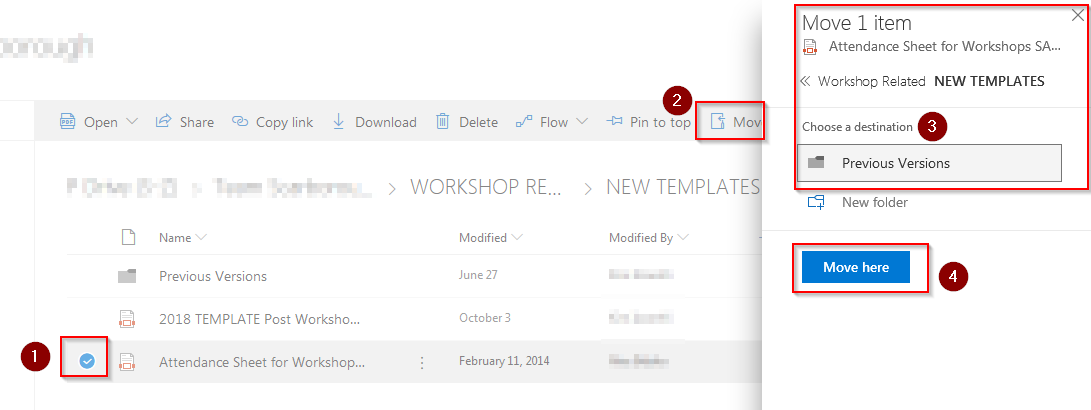
Place a checkmark next to the file that is checked out.
In the menu at the top-right choose “…”
In the “…” menu, click “Discard check out”
Now try moving the file with the following sequence:
If the problem files are Word/Excel files, you may need to Open the files in Word or Excel first, in order to check them back in.
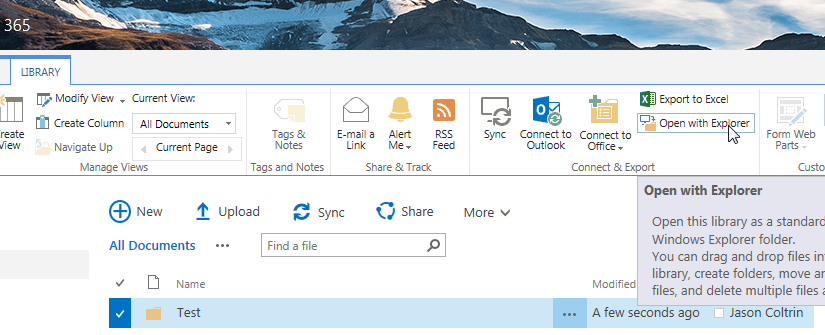
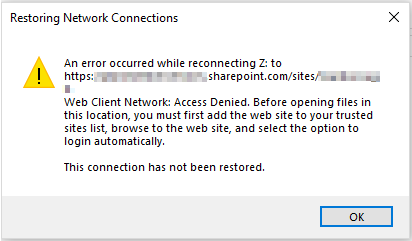
On Office365 SharePoint, when trying to open a file in the Windows File Explorer, you might get something similar to the following error:
An error occurred while reconnecting Z: to (sharepoint location) - Web Client Network: Access Denied. Before opening files in this location you must first add the web site to your trusted sites list, browse to the web site, and select the option to login automatically. The connection has not been restored.
….or clicking the Open With Explorer button does nothing, or the button is greyed out.
If the button is greyed out using Windows 10 Edge, you might find things work better using the Internet Explorer web browser. Edge does not support Active X controls. So instead, Click on the the Start button, type in Internet Explorer, find and open Internet Explorer (11), and try again.
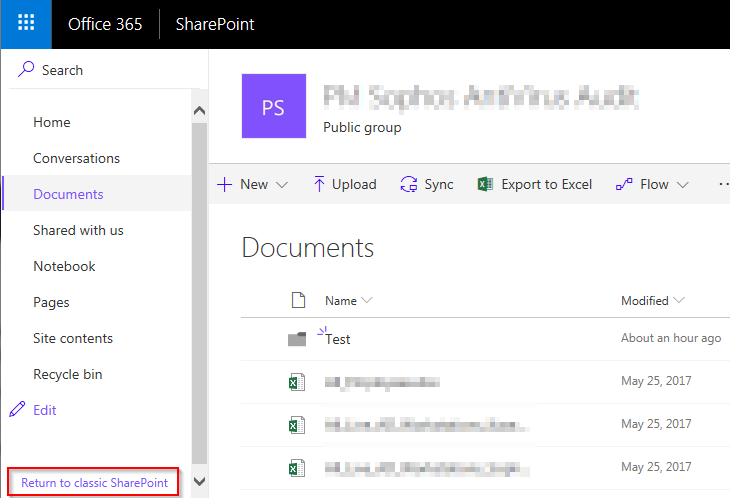
In the bottom left corner of the browser click the “Return to classic SharePoint”
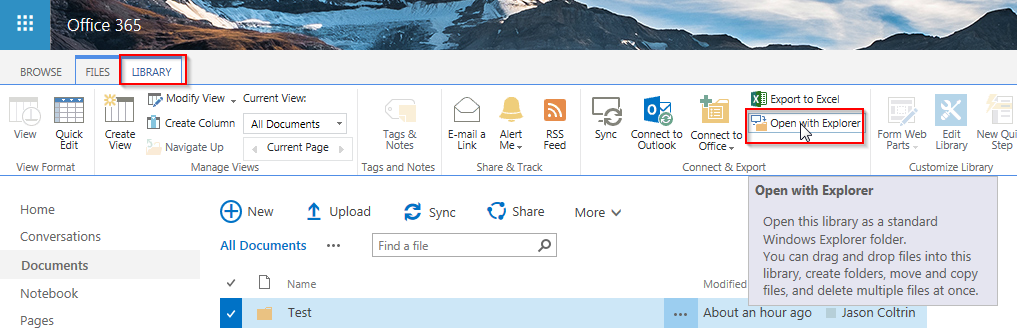
Place a check mark next to a folder, click on the “Library” tab at the top of the screen, and then click “Open in Explorer”
To resolve, make sure you have the following:
Windows 10 is up to date (v1803) as of this article
The Webclient service is Started and set to Automatic (Start > services.msc )
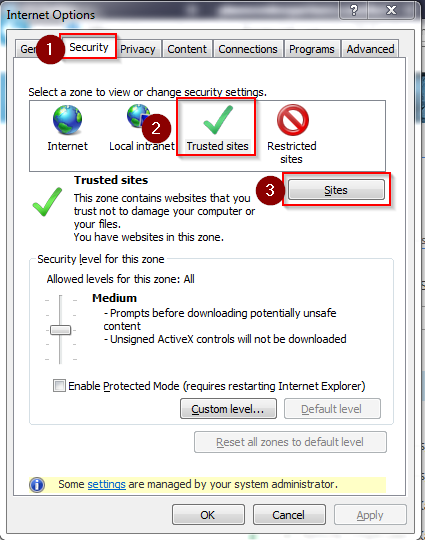
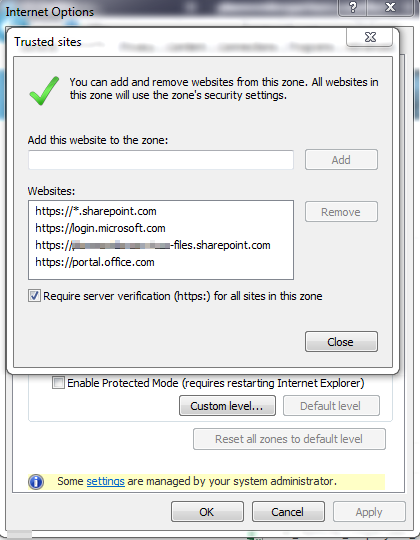
Make sure the following sites are added to your Trusted Sites in Internet Explorer settings:
https://yourdomain-files.sharepoint.com
https://*.sharepoint.com
https://login.microsoft.com
https://portal.office.com
https://yourdomain-myfiles.sharepoint.com
Next, restart your IE web browser, open IE, log into Office 365, and try again.
It may be beneficial to reset IE to its default settings:
IE > Gear Menu > Internet Options > Advanced Tab > Reset (delete personal settings) – use caution, try the following first, then if still having issues, try resetting your browser.
How to setup pfSense with free Secure and Private DNS
You’re probably aware by now that Cloudflare and APNIC has begun to provide secure and private DNS – DNS over HTTPS (DOH), to the general public. You can learn more and read about the initiative here. This article will give a brief summary of why this is important, and how to configure your pfSense router to use these new addresses and disseminate them to your network clients.
By default, your Internet Service Provider (ISP) will provide your router with it’s own list of DNS server IP addresses when you first connect your device to the internet. DNS is used to find websites, and essentially only translates IP addresses to domain names and vice-versa. However, these DNS IP addresses provided by your ISP may also be running on servers that nefariously log and record your internet browsing history. In some cases, these servers may go so far as to even inject advertisements into your web browser whether or not you’d like to see those ads.
By changing your router and/or computer to use 1.1.1.1 or 1.0.0.1 as it’s DNS resolver, you bypass your ISP’s DNS servers, and get a secure and private response from Cloudflare. Cloudflare has a configuration page guide for IOS, Android, MacOS, Windows, Linux, and a Router here. Follow the procedure below on how to setup a pfSense firewall/router to use DNS for it’s queries, as well as set your pfSense’s DHCP Server service to broadcast the new DNS IP addresses to your network clients.
Login to your pfSense firewall by pointing your web browser of choice to the login page (usually this is your Default Gateway IP Address).
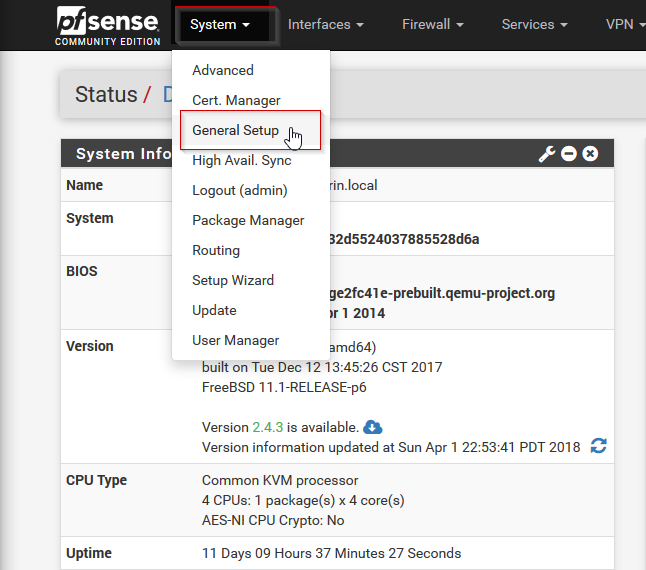
At the Status / Dashboard page, in the upper left-hand menu, click System > General Setup
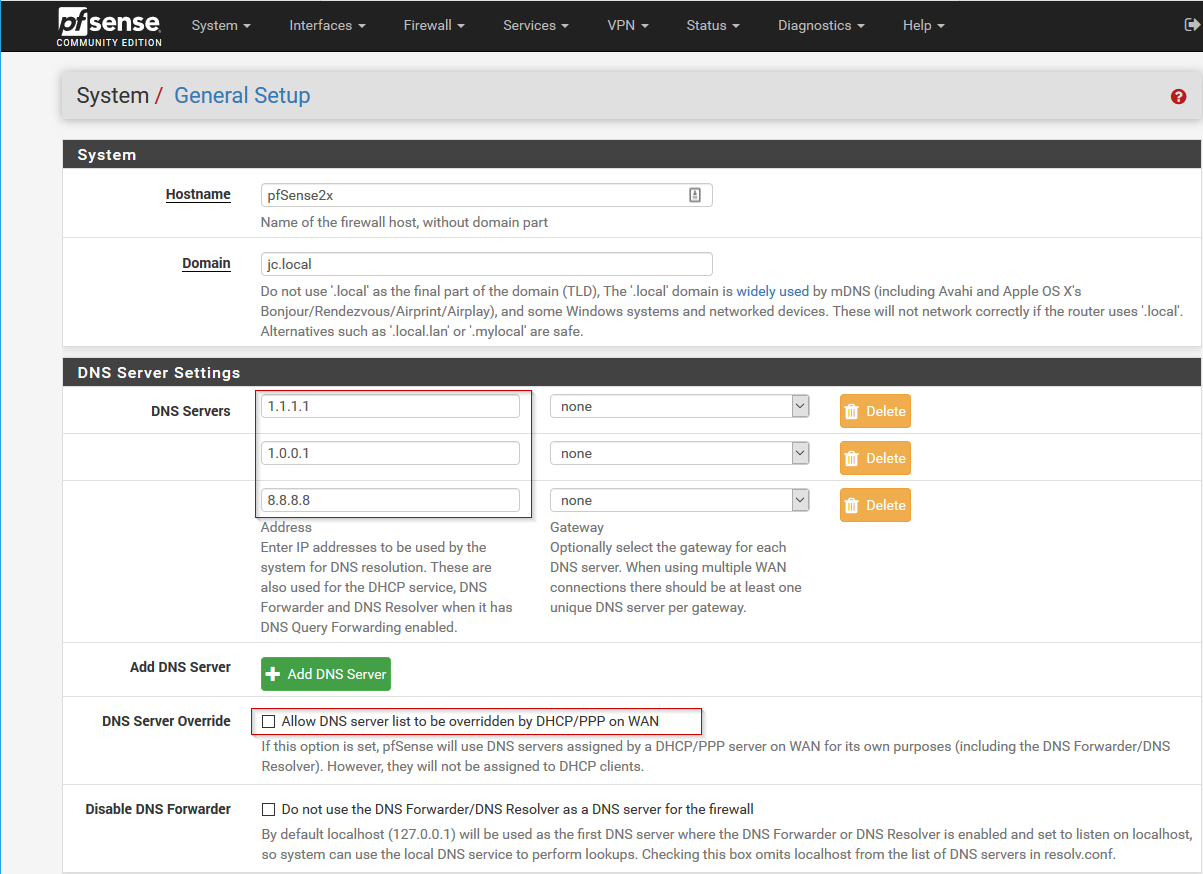
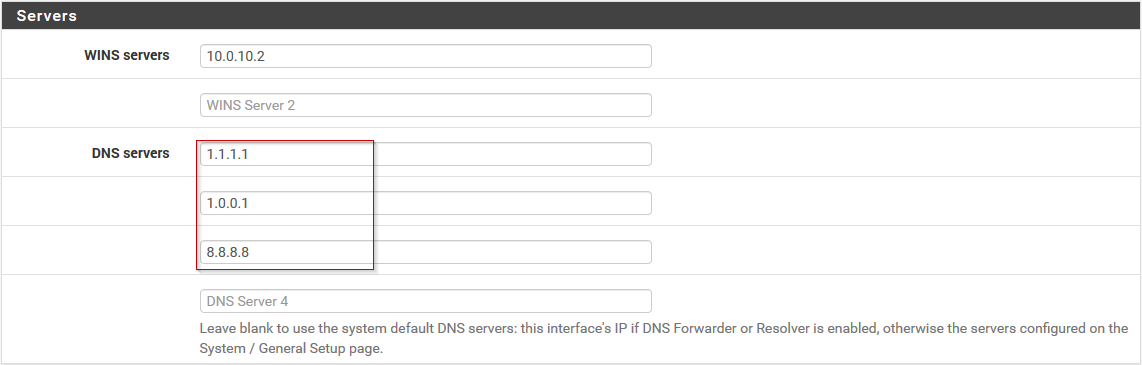
Next, under DNS Server Settings, change the DNS servers in the first two fields to 1.1.1.1 and 1.0.0.1 respectively. Optionally, you can add 8.8.8.8 as a third IP address to use Google DNS in the event that the CloudFlare servers are unavailable, or are taken down by the government. It’s also a good idea to uncheck “Allow DNS server list override”. Once these changes have been made, scroll to the bottom of the page and hit Save
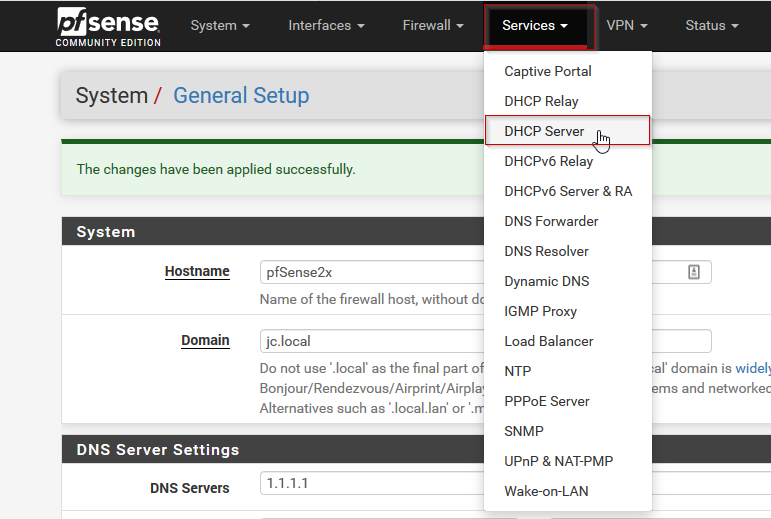
Next, if our pfSense is also being used as a DHCP server, we also want our clients to get these IP addresses for their DNS server settings. To do so, at the top of the pfSense settings menu, click Services > DHCP Server
In the DHCP Server settings, scroll down to Servers, and edit the DNS servers to contain the two new cloudflare DNS servers, (1.1.1.1 and 1.0.0.1), as well as Google’s 8.8.8.8, if desired. Next, scroll to the bottom of the page and hit Save.
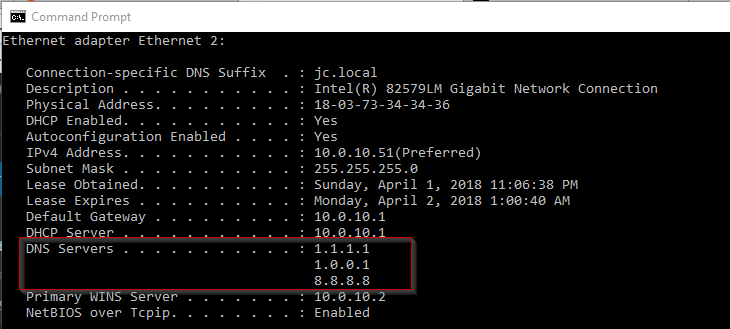
Now would be a good time to restart your client computers to pick up the new IP address settings. You can confirm your computers have received the new IP addresses by opening a command prompt and issue the command:
ipconfig /all | more
This will give you something like the following information:
As you can see our client has recieved the correct IP address from our pfSense DHCP server.
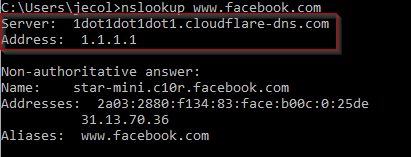
To confirm our computer is actually getting it’s DNS queries from CloudFlare (1.1.1.1), we can issue a new command in the command prompt:
nslookup www.facebook.com
And we can find in our results that the responding server is named 1dot1dot1dot1.cloudflare-dns.com, and it’s address is 1.1.1.1:
In order to test that your DNS queries are indeed secure, you can use the link posted by John in the comments; thanks, John!
Use a Base Framework for your security project. There are a lot of standards available and the NIST government standards are a good solid foundation:
NIST 800-53
NIST Cybersecurity Framework
NIST CSF Tool
CIS Critical Security Controls
NIST-CSF tool – this is a nice visual tool – graphical interface for the stages of building a security program
Document everything
A core documentation repository is critical when setting up a security project – others will follow you and will need to look up the information you have recorded. It’s best to have a security incident response ticketing system and documentation before you need it. Have these tools up and ready.
For policy, procedure, how-tos, etc:
MediaWiki(free)
Atlassian Confluence ($10 for 10 users) – glyfee plugin for confluence
OneNote/SharePoint – not every company is entirely open source
NetDB – Uses ARP tables and MAC databases on your network gear. (use a service account and NetDB will use ssh/telnet to find every device connected, will give a nice http interface. You can setup a cron job that will scan NetDB database every hour. You can pipe new device connections to an email address. Knowing if something comes onto your network is critical.
Map your network – create a Visio document and have a good network map.
Visibility
Facebook-developed osquery and this tool can give you all you need.
Agents for MacOS, Windows, Linux
Deploy across your enterprise w/ Chef, Puppet, or SCCM
Do fun things like search for IoC’s (FBI file hashes, processes) – pipe the data into ElasticStack for visibility & search-ability
SpiderFoot: http://www.spiderfoot.net/info/ – automated reconnaisance that provides a rich set of data to pinpoint areas of focus.
User Data Discovery
OpenDLP – (github) or (download an .ova) – will scan file shares and using a normal user account you can scan for available shares and data. Run over the weekend and see what you can find. Find the data owners and determine where the data should reside.
Hardening Your Network
CIS Benchmarks – Center for Internet Security Benchmarks: 100+ configuration guidelines for various technology groups to safeguard systems against today’s evolving cyber threats.
Out of the box, windows 10 is 22% for the CIS benchmark.
It’s difficult to secure your network if everything is a snowflake. While not exciting, configuration management is important. Deploy configs across your org using tools like GPO, Chef, or Puppet.
Change management is also important – use git repo for trackign changes to your config scripts.
Safety vs. Risk
Scanning for Vulnerabilities:
OpenVAS (greenbone) is a fork of Nessus which is still maintained, is the default vulnerability scanner in AlienVault. It does a great job in comparison with commercial products. Be careful, do some safe scans first and it’s not recommended to scan critical life-support equipment for example in a hospital.
Scan web apps:
Arachni Framework – for finding bugs in your developer’s code
OWASP ZAP (Zed Attack Proxy)
Nikto2 (Server config scanner)
Portswigger Burp Suite (not free – $350)
Harden your web servers:
Fail2ban – python-based IPS that runs off of Apache Logs