How to run Mac OS X El Capitan on Windows 7 or Windows 10 – How to build a Hackintosh VM Virtual Machine

Here is a guide to show how to build an OS X El Capitan virtual machine that runs on top of Windows 7 or Windows 10. Thanks to this video, (where only the first 3:30 minutes are relevant to this guide,) I wrote a step by step solution to building a hackintosh virtual machine that runs on top of Windows. Once you have OS X El Capitan running on Windows you can easily build a bootable OS X USB drive to further install the latest OS X operating system on a normal Mac. Building a hackintosh may be against the OS X terms of use so I don’t advise selling such a machine/solution and this guide is only for your testing and troubleshooting.

  1. Download VMware Player from official VMware website (30 day free trial):
    https://www.vmware.com/products/player
  2. Download OS X El Capitan: https://goo.gl/vXKKL6
  3. Download latest Unlocker app at http://www.insanelymac.com/forum/files/file/339-unlocker/
  4. Unpack Unlocker and copy to the same directory as your unpacked OS X El Cap.vmdk files.
  5. Run the unlocker file named “Win-Install”
  6. Create a new folder on the desktop and name El Cap Install Folder.
  7. Open VMWare Player -> New VM -> Typical -> Install OS Later -> Mac OS 10.11 -> Install to new El Cap Install folder you created. Store as single file -> Edit VM -> Set more ram and CPU -> Select HDD and remove -> Add new HDD -> SATA -> Use existing HDD -> Browse to El Cap.vmdk you downloaded and unpacked-> Keep existing format > Remove CD/DVD -> Show all USB devices -> finish ->
  8. Open the new Virtual Machine configuration file (OS X 10.11.vmx) inside your your “El Cap Install” folder, and open with notepad.

    vmx edit
    vmx edit
  9. At the end of the file add the line:
    smc.version = "0"
  10. Save
  11. Power on the OS X VM!

*Note, if you go on to build a USB bootable os x installation drive, after you insert your USB key drive into the computer, it may not show up on your OS X desktop. To fix this, click on the USB drive icon at the bottom right-hand corner of the vmware player frame.

attach-usb-drive-to-hackintosh-osx-in-vmware-player

How to format a large external usb hard drive for use between both an OS X Mac and a Windows 10 PC

All versions of Windows since Windows Vista should be able to access a GUID drive. Because OS X is able to partition a GUID partition, we want to partition our large external hard drives with this compatible partition table. So, any modern computer since 2006 should be compatible. GUID doesn’t suffer from the restriction of a maximum partition size of 2TB, so if we have a hard drive larger than 2TB, we won’t be required to build multiple partitions with MBR.

Here’s a good quote for other important features regarding GUID (GPT stands for GUID Partition Table).

“On an MBR disk, the partitioning and boot data is stored in one place. If this data is overwritten or corrupted, you’re in trouble. In contrast, GPT stores multiple copies of this data across the disk, so it’s much more robust and can recover if the data is corrupted. GPT also stores cyclic redundancy check (CRC) values to check that its data is intact — if the data is corrupted, GPT can notice the problem and attempt to recover the damaged data from another location on the disk. MBR had no way of knowing if its data was corrupted — you’d only see there was a problem when the boot process failed or your drive’s partitions vanished.”

exFAT was released in 2006 as well, but Microsoft added backwards-compatibility to previous Windows versions from before Vista. The main benefit to it is that it doesn’t have the file size restrictions of FAT32, so individual files with exFAT can be larger than 4GB each. It probably isn’t super important for smaller files, but it could be a necessity for people working on larger files like videos or disk images.

Below is a step-by-step procedure for formatting a large External USB drive which can be used by both a Mac and a PC. This setup will utilize the newest, most fault-tolerant partition tables, and allows for the largest volume and file size capabilities. In my case I am formatting an 8TB Seagate Backup Plus+ USB 3.0 external HDD hard drive.

First, plug a new USB drive into a Mac:

  1. The Mac will automatically prompt if you want to use the drive as a Time Machine backup Disk – click “Don’t Use”
  2. Open Disk Utility
  3. On the left side of Disk Utility, under External, you should see your drive listed.
  4. Select the “highest-level” of the drive, not the partitions located underneath. In my case, Seagate Backup+ Desk Media.PC Mac External drive format (1)
  5. At the top of Disk Utility, click the “Erase” button.PC Mac External drive format (2)
  6. Name your disk, such as “JC-External”.
  7. Under “Format” drop-down menu, select “ExFAT”
  8. Under “Scheme” drop-down menu, select “GUID Partition Map”PC Mac External drive format (3)
  9. Click “Erase”
  10. Once the drive has been erased, again, Time Machine will prompt to use as a backup disk – select “Don’t Use”PC Mac External drive format (4)
  11. Click “Done”
  12. Your drive should now be listed under Devices in the Finder.PC Mac External drive format (5)
  13. Control-click or right-click on the device in the Finder, and click “Get Info”.  You can see that indeed it created an 8TB ExFAT Volume, but the Sharing and Permissions cannot be modified. Permissions can only be set if the drive is formatted with  “OS X Extended”. Also, notice that the Created/Modified dates may not be accurate, however, files and folders contained in the drive will display accurate modified dates/times.PC Mac External drive format (6)
  14. One thing to note, is after initially formatting the drive on a Mac, and then attaching the external drive to a Windows 10 PC, the drive may not immediately display with a drive letter by default in the Windows File Explorer. Go into Windows 10 Disk Management and find the drive listed in the discovered drives, but you may find that a drive letter is not associated with the volume.
  15. To fix this, in Disk Management, right-click on the large/unidentified new data volume and click “Change Drive Letter and Paths…”. Next, click the Add.. button, assign a drive letter (D:) and then OK. You should now find your external drive listed in Windows Explorer and see the files and folders you copied into it while it had been connected to your Mac.

OS X new domain migration – retaining user profile with terminal commands

If you’ve been tasked with the domain migration of a number of OS X El Capitan and Mavericks iMacs or MacBook Pro or Mac Air workstations, you may need to retain the user profiles. Normally, when unbinding, and then binding to a new domain, your user’s settings will be lost. You may be tempted to use Migration Assistant, but this usually requires copying the entire profile somewhere else which can take a long time and use a lot of disk space.

With this list of steps, you can use commands, scripting, and setting permissions and ownership of the user directories to perform the domain migration in-place.

Below is the sequence of commands and workflow step by step to migrate an OS X mac to a different domain. The key is to delete the sqlindex files, and prepare the user account for it’s new permissions. Please note the guide may not make sense at first while reading, but it will allow you to migrate your macs so that the users keep their same profile. Let me know if this guide helps you in your domain migration and if you find any better solutions.

Tasks Commands
1 Login as admin user and list users  Terminal -> ls -alh /Users/
2 move domain User folders to .old sudo mv /Users/johndoe /Users/johndoe.old
3 Unbind Machine  Preferences->Accounts->Login Options->Network account server -> Directory utility ->Active directory->Unbind
4 Delete sqlindex files found in ls /var/db/dslocal/nodes/Default/ sudo rm -f /var/db/dslocal/nodes/Default/sqlindex
sudo rm -f /var/db/dslocal/nodes/Default/sqlindex-shm
sudo rm -f /var/db/dslocal/nodes/Default/sqlindex-wal
5 reboot sudo reboot
6 Bind to new domain Preferences->Accounts->Login Options->Network account server -> Directory utility ->Active directory->Unbind
7 reboot
8 login as user
9 Logout and login as admin
10 move User folder .new After you have logged in as the user under the new domain you need to move the newly created User home folder to johndoe.new and move the .old User folder to /Users/johndoe with the command:
sudo mv /Users/johndoe /Users/johndoe.new
11 move .old to new username sudo mv /Users/johndoe.old /Users/johndoe
12 Change ownership of user home folder sudo chown -R johndoe:”Domain\Domain Users” /Users/johndoe
13 logout as admin
14 Reboot
15 login as that user (johndoe)
16 Click on “Create a new keychain” much easier in El Capitan and Yosemite If “Create new Keychain” fails then goto Keychain Access –> Preferences –> Reset Default Keychain

Modern PHP development environment – Setup of Ansible, pycharm, sourcetree and workflow with bitbucket

When getting started with development with a cloud repository such as git, it may be a little daunting to decide how to get started. With some help from an associate, I put together a short simple guide to setup a development environment on OS X. I hope this information provides someone with a good start to development with bitbucket, version control, and PHP Development in conjunction with a cloud repository.

Bitbucket is similar to git, but allows free repos. We prefer to use bitbucket for a repository of code so that we can manage changes to our ubuntu servers and files. Bitbucket is the “Book of Truth” and will be the keeper of all files and things that are good. Ansible runs on a dedicated management ubuntu server and pushes out changes (playbooks) to either a single, a few, or all of our linux servers. Either way, with pull/push of data from our code repository, we can control what is deployed on our systems, an use our repo as our backup. If a server dies, we can setup a new system, and pull in the good data.

Setup

First, you need a bitbucket account and sign-on. Once signed on to https://bitbucket.org/brooksinstitute/ You should be able to create your first repo. You might want to create your own private repo for notes, configs etc. As mentioned earlier, bitbucket is where we keep our known-good source code, and changes to this should only be done from your own computer’s copy of the repo, and only changed with commits – more on this later.

sourcetree

Next on your local machine, download sourcetree https://www.sourcetreeapp.com/

Once downloaded and installed, tell sourcetree where your repos live at bitbucket (simple username/password login).

Next, SourceTree will ask you which remote repository you want to clone to your local machine. You want to clone the remote repos on bitbucket so that you can make changes to your local versions before you commit them back to bitbucket. If you work with a group of developers you will probably want someone to review your files before you commit. You should also “checkout” local copies within pycharm, if someone else will also be working on your local files.

pycharm

Now it’s time to install and configure pycharm Community Edition https://www.jetbrains.com/pycharm/ . Pycharm is a Development Environment (IDE) that provides code completion, nice pretty colors and integrates with VCS/Git to do versioning control of your local (cloned) repo. In Pycharm, you want to go to the File → Open menu, browse your local machine, and choose the root folder of the cloned repo of your choice. This will get you to the point where you can begin to edit files.

ansible

Ansible http://www.ansible.com/ is a management utility that helps you easily manage systems and deploy apps. Here is some introductory documentation http://docs.ansible.com/ansible/intro_getting_started.html. Ansible usually runs on a dedicated Admin server, and this is the server that issues commands or “playbooks”. Although your Admin server contains the ansible playbook files, we only want to make changes to the files linked to the bitbucket repo before we pull them into the Admin server and then execute the commands.


Vagrant

Vagrant https://www.vagrantup.com/ provides easy to configure, reproducible, and portable work environments built on top of industry-standard technology and controlled by a single consistent workflow to help maximize productivity. First download, install, and run VirtualBox https://www.virtualbox.org/wiki/Downloads , then open a terminal, and startup a vagrant “box” with the following:

   $ vagrant init hashicorp/precise32
   $ vagrant up

Vagrant will download and install the ‘precise32’ “box”. And now, in virtualbox you will see the new virtual machine. Then next from the command line you can issue the command ‘vagrant ssh’ which will open a shell to your new precise32 vm. You can use this vm to test your configurations and playbooks against before you roll them out to your production servers.

Workflow

When you’ve changed something in your local (cloned) repo, and you want to have that become the “truth” on bitbucket, do the following:

  1. Open the file from your local repo in pycharm (double-click on the file icon in the menu tree)
  2. Edit the file
  3. When done editing, right-click on the file → Git → Commit file
  4. Now you want to push this edited file up to bitbucket. Review the code, make comments and then push.


Ubuntu Linux Server setup guide – Setup ssh, keygen, brew, and ssh-copy-id on Mac OS X


iTerm on OS X
ssh config file in iTerm on OS X

What follows is a ubuntu/linux server setup guide that can be used to configure, 1. A new linux server and 2. setup an OS X workstation to easily connect to your linux servers with preshared keys.

  • Build the server on Hyperv, then setup your initial account during the Ubuntu LTS 14.04.2 setup.
  • Log in as the initial user and add accounts as necessary:
    • “sudo su -“ – this does a sudo and copies root path and all environmental variables
    • useradd -m -s /bin/bash jcoltrin
    • passwd jcoltrin
    • vi /etc/sudoers
      • (end of file) add line: jcoltrin ALL=NOPASSWD: ALL
    • su jcoltrin – make sure you can su.
    • sudo su – this sequence has allowed you to sudo without having to type in your password.
    • Just a note: modifying /etc/group – putting users in here is the wrong way of adding sudoers – no granular control – users here will be required to enter their password when doing sudo.
  • ctrl+l clears screen
  • Add static IP address and dns-nameservers to /etc/network/interfaces
    • Get the name of your network interface with command:
    • ifconfig -a

      In my case, the network interface name is ens33. So to make my ens33 interface a static interface, I configure the /etc/network/interface with the text editor vi. The first interface is lo, which is the loopback interface. The line ‘auto ens33’ is necessary because it is used to start the interface when the system boots.

    • 
      source /etc/network/interfaces.d/*
      
      # The loopback network interface
      auto lo
      iface lo inet loopback
      
      # The primary network interface
      auto ens33
      iface ens33 inet static
              address 10.0.10.151
              netmask 255.255.255.0
              gateway 10.0.10.254
              dns-nameservers 8.8.8.8 8.8.4.4


  • apt-get:
    • apt-get update – checks online for updates
    • apt-get upgrade – installs updates and security patches
    • apt-get dist-upgrade – note: make sure /boot dir is not more than 80% full. If it’s full it may have old kernel upgrades so google ubuntu clean old kernels.
    • reboot
Setup ssh, keygen, brew, and ssh-copy-id on Mac OS X

Now we need to establish a secure and easy connection from our mac to the new server. On our Mac issue the commands:

  • Install iTerm on your Mac. Configure to your liking, but it’s a good idea to set, in the Terminal settings, the scroll-back limit to either 99,999 or unlimited. Now in our new iTerminal, issue the command: ssh-keygen – this generates both public and private keys in our .ssh directory in our home directory.
    • Install HomeBrew on your Mac in order to get unix tools installed on your mac:
      • Make sure your account on your Mac is an administrator by going into System Preferences → Users and Groups → (unlock) → Select Account → checkmark Allow user to administer this computer.
      • First install XCode, then open a terminal again and paste in the command for installing homebrew from http://brew.sh
      • Install homebrew as it prompts, and run brew doctor so that we know we’re ready to install homebrew
      • brew install nmap ssh-copy-id wget htop ccze – this installs the linux tools we want on our mac
  • ssh-copy-id jcoltrin@serverIPaddress (password) – this copies our public key into the server we connected to. Now we can log into the servers from our mac terminal without having to type in the password.
    • Also on the mac we want to make it easy to ssh into, for example, server.domain.com.
    • vi .ssh/config
    • Line 1: host server
    • Line 2: hostname server.domain.com
    • Line 3: User jcoltrin
    • Line 4: KeepAlive yes
    • ctrl+wq!
    • The result should look like the following:

jcmbp:.ssh jcoltrin$ cat config

Host	    server
    Hostname server.domain.com
    User jcoltrin
    KeepAlive yes
    ServerAliveInterval 15

Host    myAmazonAWS1
    Hostname jasoncoltrin.com
    user ubuntu
    IdentityFile ~/.ssh/jasoncoltrin_keypair1.pem
    KeepAlive yes  
    ServerAliveInterval 15
  • ssh server – now we are able to issue this command and get in immediately without having to enter a password and also we can run sudo commands without having to enter our password again. As you can see in the config file above, we can also copy our .pem files into our .ssh directory and have config point to them so that we can easily ssh into our amazon AWS servers as well.
  • If we will be running websites, we now want to install virtualmin. Go to http://www.virtualmin.com/download.html#gpl and follow instructions here for downloading install.sh
Adding a new remote Administrative User’s ssh keys to a Linux Server

useradd -m -s /bin/bash newadmin1
mkdir ~newadmin1/.ssh
echo ssh-dss ****key data***..xxblahblahACBAM……kpucyrGw== [email protected] » ~newadmin1/.ssh/authorized_keys
chown -R newadmin1:newadmin1 ~newadmin1/.ssh
chmod 700 ~newadmin1/.ssh
chmod 600 ~newadmin1/.ssh/authorized_keys

vi /etc/sudoers

newadmin1 ALL=NOPASSWD: ALL

While this guide is not meant to be a comprehensive step-by-step guide, it should provide you with enough to setup an OS X workstation with pre-shared keys, and copy those keys to your new server. Working with iTerm and pre-shared keys, I think, is vastly superior to Putty on Windows. I hope this guide helps a few admins become more efficient and versatile working on OS X and linux.


How To Install Symantec BackupExec 2014 Mac Apple Client Step by Step

BackupExec2014

OSX Mac Client Installation


  1. Log into the Mac you want to backup with an admin account.
  2. Launch the terminal (command + spacebar, type terminal, enter).
  3. At the prompt type in: sudo su root , then enter the admin account password (this password will be configured later in the Symantec BUExec server client configuration)
  4. At the root prompt#, type in: cpan
  5. At the cpan> prompt, type in: force install Switch — at the prompt type “yes” to agree. The installer should finish with … /usr/bin/make install — OK
  6. Exit CPAN by typing: exit
  7. Obtain the Backup_Exec_2014_14.1.1786_MultiPlatforms_Multilingual iso, or installer DVD image. Inside the extracted or unzipped installer image,  you will find a folder named LinuxMac. Inside this folder look for the RALUS_RMALS_RAMS-1786.0.tar file approximately 155MB. Copy this .tar (.gz) file to your Mac’s desktop.
  8. Double-click on the file to unarchive the gzipped/tarball to the desktop. You should now have a folder of the same name on the desktop.
  9. Back in the terminal, cd into the folder. For example: cd /Users/admin/Desktop/RALUS_RMALS_RAMS-1786.0/
  10. At the prompt, type in: ./installrams  — follow the prompts (hit the “Return” key a few times. This should complete successfully.
  11. Back on your BackupExec 2014 server, go into the backup exec server and then the “Backup and Restore” tab. Right-click on an empty space under your already-added servers and choose “Add Server”.
  12. Scroll down and choose “Macintosh Computer” -> Next.
  13. Place checkmark in “allow trust”. -> Next.
  14. Type in the FQDN (servername.domainname) of the server or the IP address. -> Next
  15. Add/Edit the admin/root username/password that you used to install the CPAN module. If you have Macs with different admin accounts, use the username and pw of the admin account but identify them differently by changing the “Account Name: ” and Notes. -> Next -> Finish
  16. This should insert the server successfully. If there is a problem with the Trust relationship it is probably due to a bad username/password combination.
  17. Setup your initial backups, select/edit your source(s) and destination(s).
  18. That’s it! Sit back and relax knowing you at least have flat-file backups, and in the event of a complete OS/Server loss, you can re-install the OS, then re-install your BackupExec client, then do a restore of your files and settings. Be sure to test your backups by doing a test restore.

Configure Cisco 3750 Switch Port Team Channel and MacPro with Bonded Thunderbolt Ethernet LACP Link Aggregation

If you’ve got a new MacPro and want to utilize both of the two built-in Gigabit Ethernet ports (and possibly some Thunderbolt-to-ethernet adapters) in a bonded LACP Link Aggregation virtual adapter in conjunction with a Cisco 3750 switch, follow the instructions below.

The first part is configuring your switch to allow your Mac to create a bonded link. In my case, without first configuring the switch, I was able to create my Mac’s bonded ethernet adapters, but couldn’t pick up a DHCP address. I further went into the virtual adapter’s bond status and saw red dots and the messages “No Partner” and/or “Bad Link”. The problem was that I hadn’t setup my switch with the appropriate LACP protocol on it’s interfaces.

Here are the instructions for creating a bonded Ethernet LACP link aggregation from Apple: http://support.apple.com/kb/PH8356

Note that in the above article there are some requirements: you need at least one IEEE 802.3ad-compliant switch or another Mac OS X Server computer with the same number of ports.

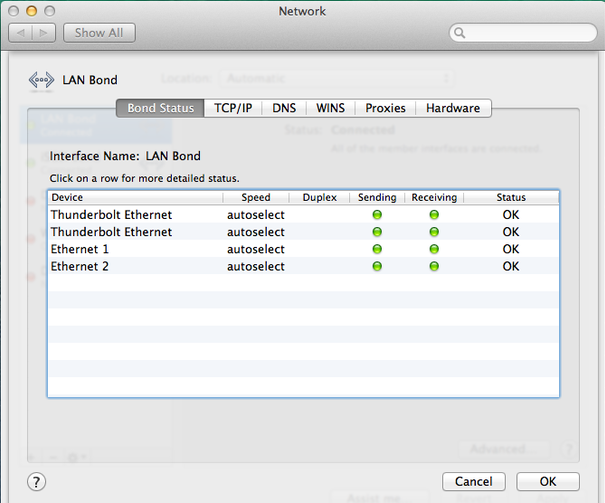
So I configured a Cisco 3750 switch with a new channel group, and added 4 ports into the channel group so that we can bond 4 NICs for the MacPro’s LAN connection at 4GBps

Here is the channel group configuration

!
interface Port-channel2
description LAN Etherchannel Team for MacPro
switchport access vlan 27
switchport trunk encapsulation dot1q
switchport mode access
!

And here are the gigabit interfaces configuration

!
interface GigabitEthernet1/0/13
description MacPro Eth1 to LAN
switchport access vlan 27
switchport trunk encapsulation dot1q
switchport mode access
channel-protocol lacp
channel-group 2 mode active
!
interface GigabitEthernet1/0/14
description MacPro Eth2 to LAN
switchport access vlan 27
switchport trunk encapsulation dot1q
switchport mode access
channel-protocol lacp
channel-group 2 mode active
!
interface GigabitEthernet1/0/15
description MacPro ThunderBolt BottomLeft to LAN
switchport access vlan 27
switchport trunk encapsulation dot1q
switchport mode access
channel-protocol lacp
channel-group 2 mode active
!
interface GigabitEthernet1/0/16
description MacPro ThunderBolt BottomRight to LAN
switchport access vlan 27
switchport trunk encapsulation dot1q
switchport mode access
channel-protocol lacp
channel-group 2 mode active
!

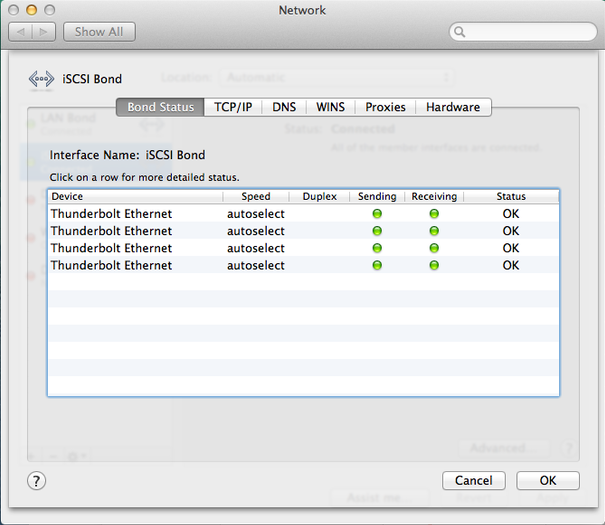
I further went on to create another 4xThunderbolt Ethernet Adapter for an iSCSI connection to a NAS by creating a new channel group 3 and added the remaining 4 thunderbolt interfaces into group 3:
!
interface Port-channel3
description iSCSI Etherchannel Team for Mac Pro
switchport access vlan 27
switchport trunk encapsulation dot1q
switchport mode access
!


!
interface GigabitEthernet1/0/17
description MacPro TB iSCSI
switchport access vlan 27
switchport trunk encapsulation dot1q
switchport mode access
channel-protocol lacp
channel-group 3 mode active
!
interface GigabitEthernet1/0/18
description MacPro TB iSCSI
switchport access vlan 27
switchport trunk encapsulation dot1q
switchport mode access
channel-protocol lacp
channel-group 3 mode active
!
interface GigabitEthernet1/0/19
description MacPro TB iSCSI
switchport access vlan 27
switchport trunk encapsulation dot1q
switchport mode access
channel-protocol lacp
channel-group 3 mode active
!
interface GigabitEthernet1/0/20
description MacPro TB iSCSI
switchport access vlan 27
switchport trunk encapsulation dot1q
switchport mode access
channel-protocol lacp
channel-group 3 mode active
!

Lastly I created a new iSCSI Bond on the MacPro successfully and provided the Bond adapter with a Manual Address 192.168.27.30.
Doing this left me with:
4GB bonded connection to LAN

Screen Shot 2014-04-09 at 3.27.10 PM

4GB bonded connection to iSCSI NAS complete

Screen Shot 2014-04-09 at 3.28.45 PM

Here’s what the 2nd bond looks like in ifconfig:

bond1: flags=8843<UP,BROADCAST,RUNNING,SIMPLEX,MULTICAST> mtu 1500
options=b<RXCSUM,TXCSUM,VLAN_HWTAGGING>
ether 68:5b:35:b9:4a:3a
inet6 fe80::6a5b:35ff:feb9:4a3a%bond1 prefixlen 64 scopeid 0x16
inet 192.168.27.30 netmask 0xffffff00 broadcast 192.168.27.255
nd6 options=1<PERFORMNUD>
media: autoselect (1000baseT <full-duplex>)
status: active
bond interfaces: en15 en13 en16 en14

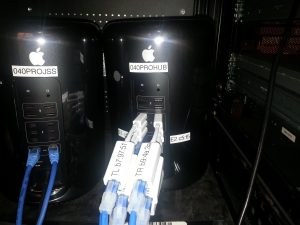
Here’s what the beast looks like from the outside:

MacPro with 8 thunderbolt to gigabit

Test I/O and copy speed results:
50GB of data copied with my new favorite file copy utility “bvckup2” from Server to NAS in 6 minutes, 45 seconds (!) utilizing 25% iSCSI Team 3Gbps around 104 MB/sec.

50GB of data copied with Windows copy/paste from Server to NAS utilizing 26% iSCSI Team 3Gbps in 7 minutes, 2 seconds.

… As opposed to 50GB over a USB 2.0 connection = 24hrs
… As opposed to 50GB over 10/100 LAN at 10MB/sec = 83 min
… As opposed to 30MB/sec on average gigabit LAN = 27 min
… As opposed to well-optimized Gigabit network around 60 MB/sec = 15 min
…As opposed to transfer speed record set on Feb 25, 2014 Sending data at a rate of 64 gigabits per second (Gb/s)(!?)