Bash shell script to query a domain name using dig without the any flag

How do I get all of the DNS records for a domain using the dig command in only “Answer Section” (+answer) format? The command should return A, MX, NS, TXT, SOA and CNAME records.

Normally using the “any” flag, we would get all of this information at once, however, when attempting to run a dig command with the ‘any’ switch, we do not get the DNS records we want:

dig jasoncoltrin.com any

The above command returns an answer section with only: “RFC8428” “”

According to chatgpt, this means that the ‘any’ query type is not guaranteed to return all the records for a given name, and some DNS servers may choose to return an empty answer instead. This is done to improve the performance and security of the DNS system.

Still, I want to have a single command to get the most information at once, and the following command does so, however, writing the command is impractical:

dig +noall +answer +multi jasoncoltrin.com A jasoncoltrin.com MX jasoncoltrin.com NS jasoncoltrin.com TXT jasoncoltrin.com SOA jasoncoltrin.com CNAME

I also tried the following with no luck:

dig +noall +answer jasoncoltrin.com A,MX,NS,TXT

This only returned the A records.

So instead, we can use a bash script to create a $domain variable, and have the script use the ‘read’ command to prompt us for the domain name:

#!/bin/bash

read -p "Enter the domain name: " domain

dig +noall +answer +multi $domain A $domain MX $domain NS $domain TXT $domain SOA $domain CNAME

To write the script, do the following:

vi digdomain.sh

(insert) > copy/paste script > (Escape) > :wq

Then make the script executable with the command:

chmod +x digdomain.sh

Run the command using the ./ prefix:

./digdomain.sh

When we run the script, we’re prompted for the domain name, then the result is most of the information we want in an easy-to-read format:

jason@ubuntu0:~$ ./digdomain.sh
Enter the domain name: jasoncoltrin.com
jasoncoltrin.com.       118 IN A 172.67.196.181
jasoncoltrin.com.       118 IN A 104.21.44.69
jasoncoltrin.com.       1854 IN MX 10 mailstore1.secureserver.net.
jasoncoltrin.com.       1854 IN MX 0 smtp.secureserver.net.
jasoncoltrin.com.       5652 IN NS daisy.ns.cloudflare.com.
jasoncoltrin.com.       5652 IN NS lee.ns.cloudflare.com.
jasoncoltrin.com.       300 IN TXT "Currently located in a black hole\" \"Likely to be eaten by a grue"
jasoncoltrin.com.       300 IN TXT "google-site-verification=key"
jasoncoltrin.com.       2052 IN SOA daisy.ns.cloudflare.com. dns.cloudflare.com. (
                                2305113011 ; serial
                                10000      ; refresh (2 hours 46 minutes 40 seconds)
                                2400       ; retry (40 minutes)
                                604800     ; expire (1 week)
                                3600       ; minimum (1 hour)
                                )

This made me happy because I had forgotten about my easter egg TXT record. 🙂

Site Maintenance – security and reliability

Thanks for all your support. Some of you may have noticed a little downtime. I invested a little professional expertise in the site and you should now see better performance and more site reliability and uptime. Special thanks to Gregory Morozov at upwork.com who quickly identified and resolved the following issues:

  • Block xmlrpc.php
  • Added the site to CloudFlare DNS (free tier)
  • Convert PHP to php-fpm – for many reasons, but one is control over max php processes (I’ll use: service php7.2-fpm restart – if I need to restart php.)
  • Relaxed Wordfence triggers so users don’t get denied access
  • Dropped memory usage from 700+MB to 400MB
  • Fixed invalid Repos, other updates and maintenance.
  • We’ll monitor the site usage into the beginning of next week to see if we need to add more memory to the instance.

How to clone a Dell Optiplex 7050 M.2 NVME Hard Drive with Clonezilla and an External USB HDD

I ran into trouble when trying to clone a new Optiplex 7050. My normal procedure for cloning with clonezilla required a little tweaking to accommodate Windows 10, UEFI, NVME M.2, Secure Boot, and RAID On. Follow the procedure below to clone your systems on these newer hard drives and BIOS versions.

As a side thought, I enjoy using Clonezilla and have used it for many years. I love the convenience of it and not having to manage Windows images with something like SCCM. While SCCM has a place in some organizations, I believe it’s perfectly fine to use Clonezilla to create OS images of different models of computers. I have approx 15 different OS images; everything from Lenovo laptops to Dell Optiplex 380’s to Optiplex 7050’s.

Requirements:

  • 1 x USB 2.0 or 3.0 USB thumb drive min 2GB capacity for the clonezilla bootable USB drive made bootable to 20170905-zesty version of clonezilla
  • 1 x USB 3.0 USB External HDD with a minimum HDD size that is larger than the TOTAL size of your M.2 NVME HDD. (I use a 4 TB Western Digital My Passport) – In my previous experience with Clonezilla, it has created images only writing images of the Used Space on the Source HDD, in this case with UEFI / NVME HDD’s, the image created on disk is the total size of the NVME drive.
  • 2 x Dell Optiplex 7050 (Source and Target) computers
  • 1 x Separate PC or laptop you can use to create a bootable USB Clonezilla Thumb Drive

1. Configure your Source Windows 10 Dell Optiplex 7050 machine as necessary. Install all applications, create user accounts, and uninstall bloatware. Make sure you create an administrator user account and password. In final preparation for cloning, either run Sysprep (found in C:\Windows\System32\Sysprep), or alternatively ensure you shut down Windows 10 completely by creating a Shutdown /s /t 0 shortcut and executing it.

2. On a separate PC, download Rufus which we’ll use to create a bootable USB thumb drive.

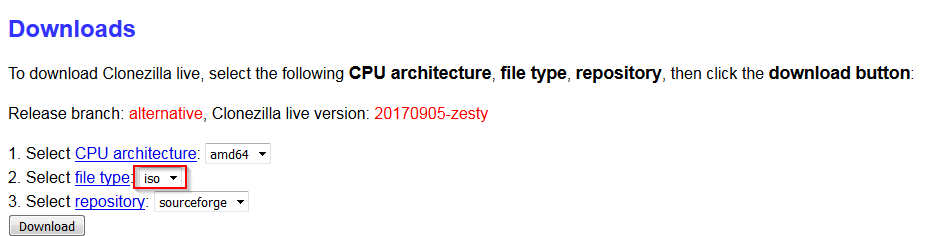
3. On a separate PC, download the AMD64 version of alternative (Ubuntu-based) as outlined on the Clonezilla website (this version is required for newer BIOS’):

4. Change the file type to ISO and hit Download.

5. Attach your USB thumb drive into your separate computer, run Rufus, tell Rufus to use the drive you just attached under Device, point Rufus ” to the .iso file you just downloaded.

6. Hit Start and the bootable USB thumb drive with Clonezilla will be created.

7. On the Source computer, insert the USB thumb drive into one of the front panel’s top (black) USB ports, and insert the USB External HDD separately into the Blue USB 3.0 port. Attach the keyboard, mouse, power, and monitor.

8. Power on the Source computer and start mashing the F12 key on the keyboard to get to the one-time boot menu.

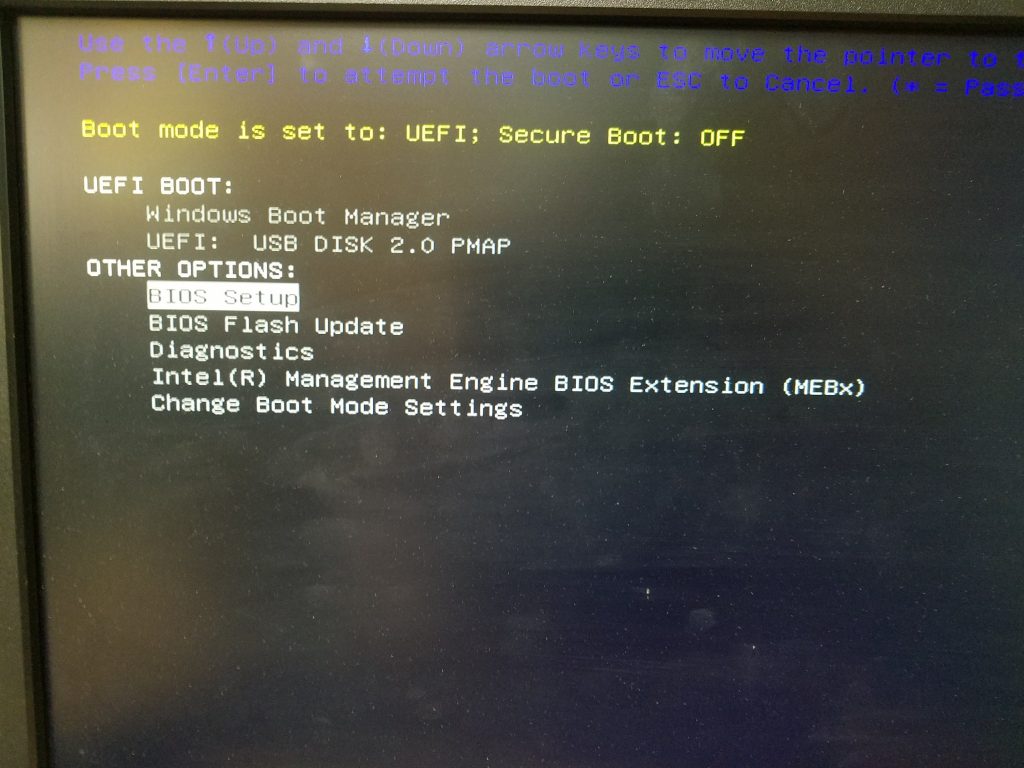
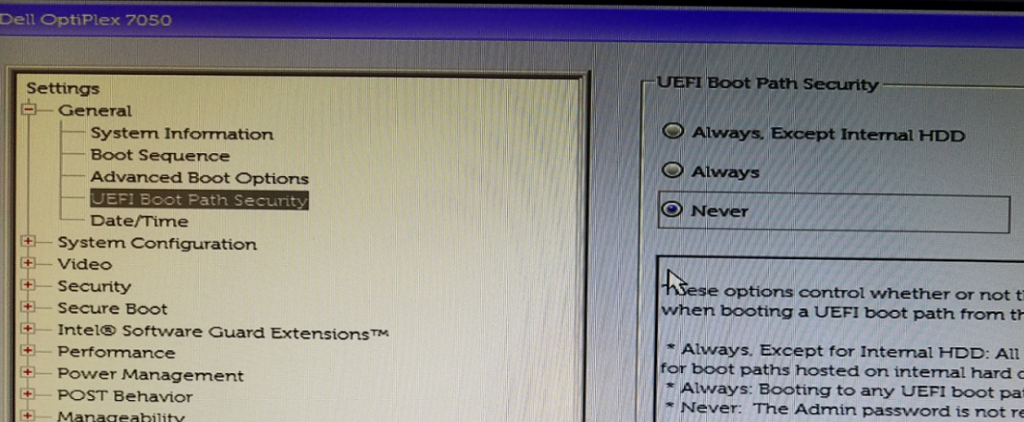
9. Before we begin, we need to make sure clonezilla can find our NVME HDD. By default UEFI and Secure Boot will be enabled. We need to disable these as well as Boot Path Security so that we can continue.

10. Select Setup from the Boot Menu:

11. In the BIOS, under the General Heading, select UEFI Boot Path Security and change it from Always to Never.

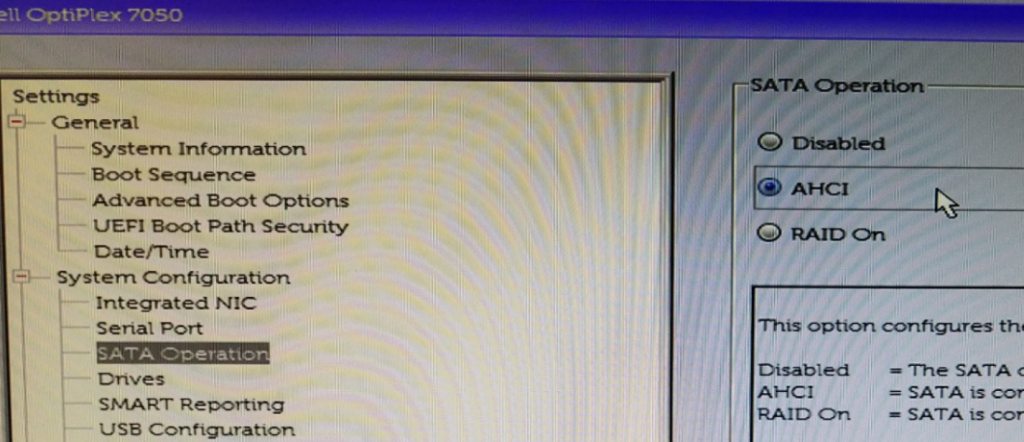
12. Next change System Configuration > SATA Operation from RAID On to AHCI

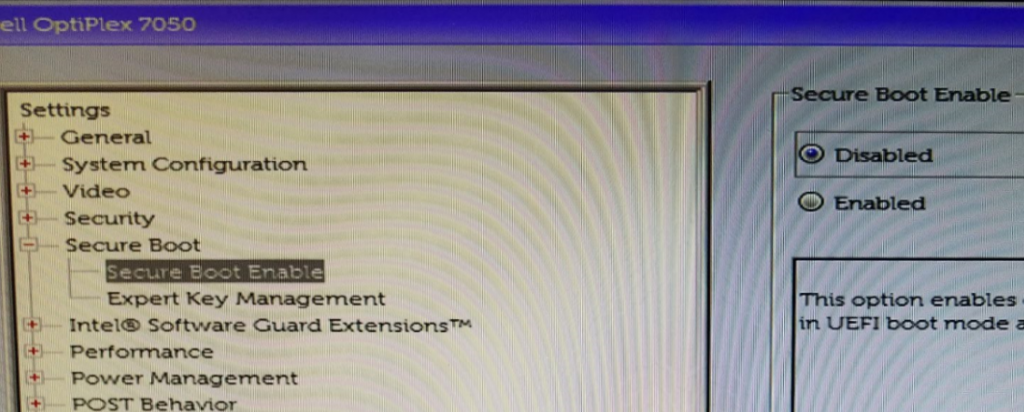
13. Lastly, change Secure Boot > Secure Boot Enable “Enabled” to “Disabled”

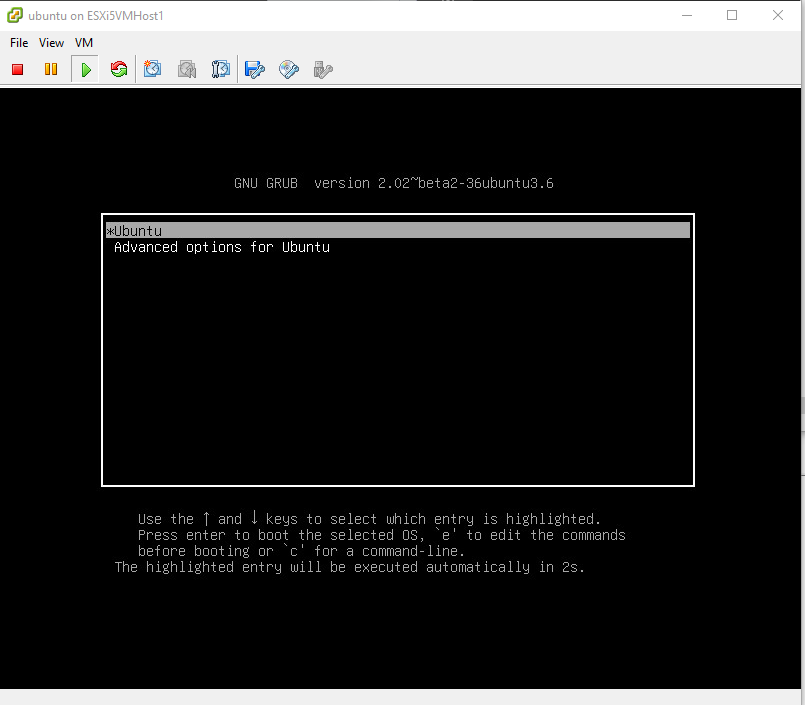
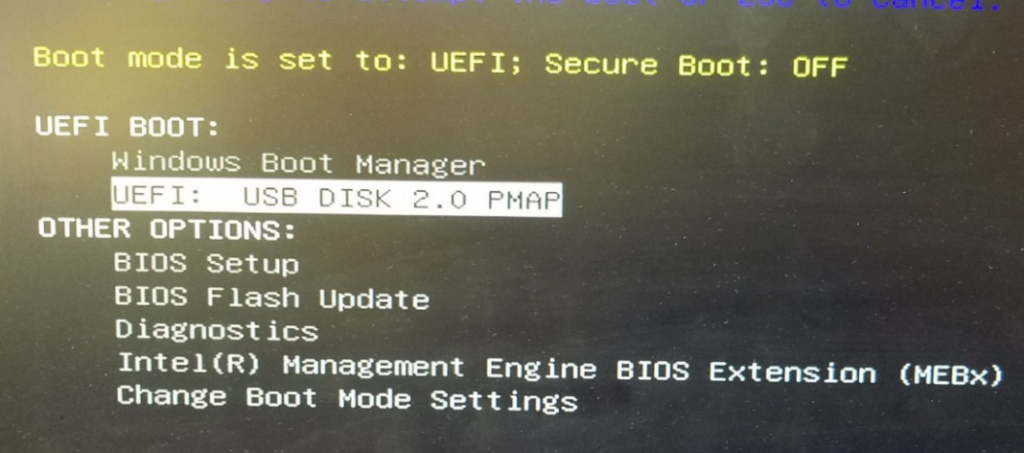
Apply, Save and Exit the BIOS. On the next boot, start mashing the F12 key again and this time select UEFI: USB DISK 2.0 PMAP

Clonezilla will boot from the USB drive so choose the default (hit Enter):

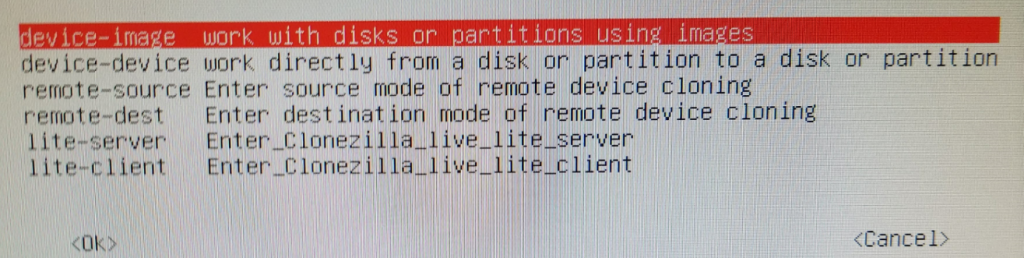
Select English > Don’t touch keymap > Start Clonezilla > device-image (Ok)

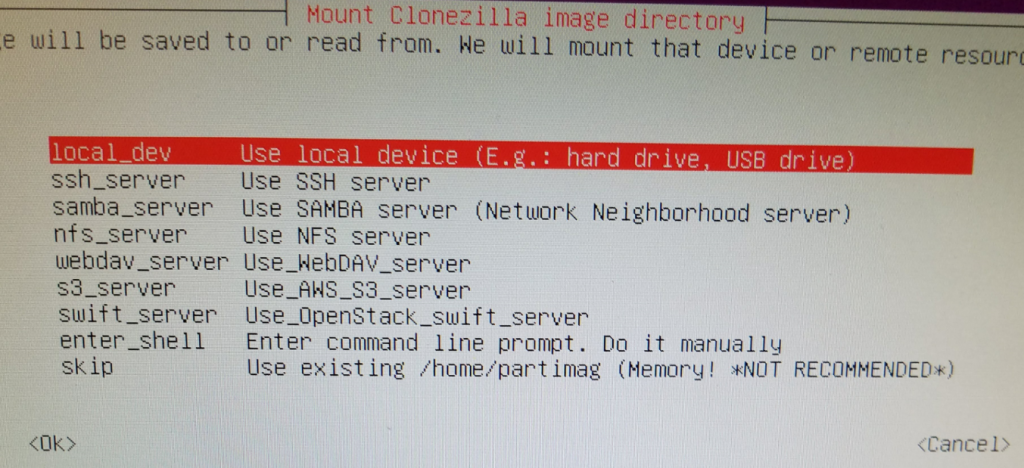
Under Mount Clonezilla image directory, choose Local_dev (Ok)

Press Enter to continue.

Review the clonezilla Scan disk preview to ensure it’s found both your Source and Target hard drives:

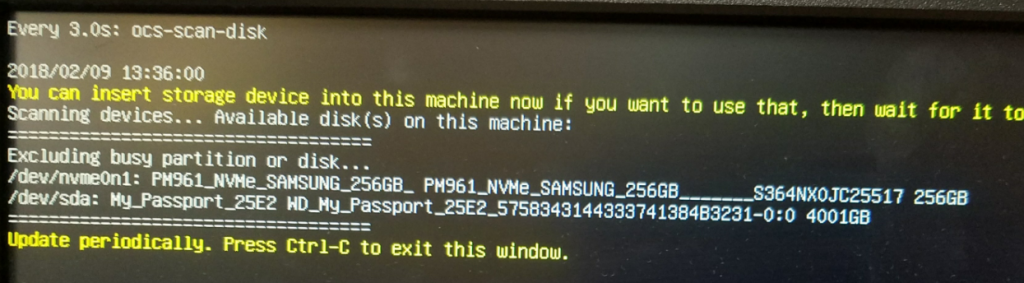
Press Ctrl-C to continue.

Arrow down and select your large external USB hard drive (sda1) to set the location of /home/partimg . This is where the clone image will be stored.

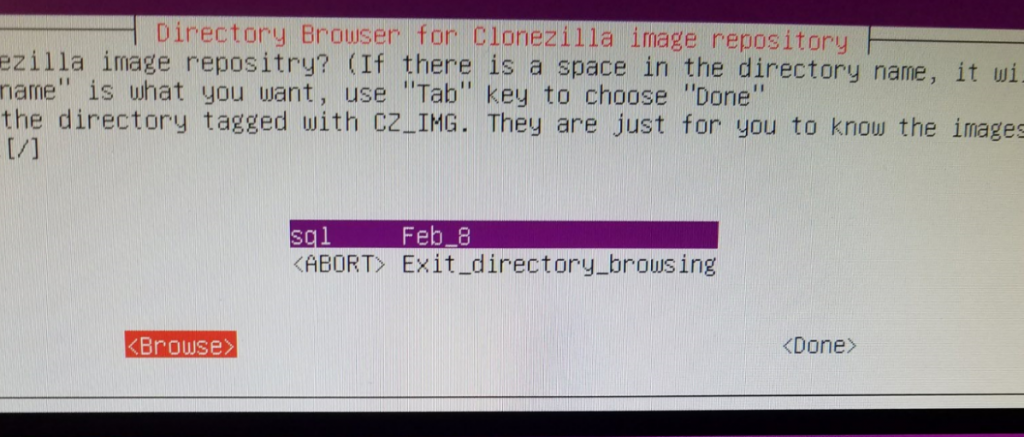
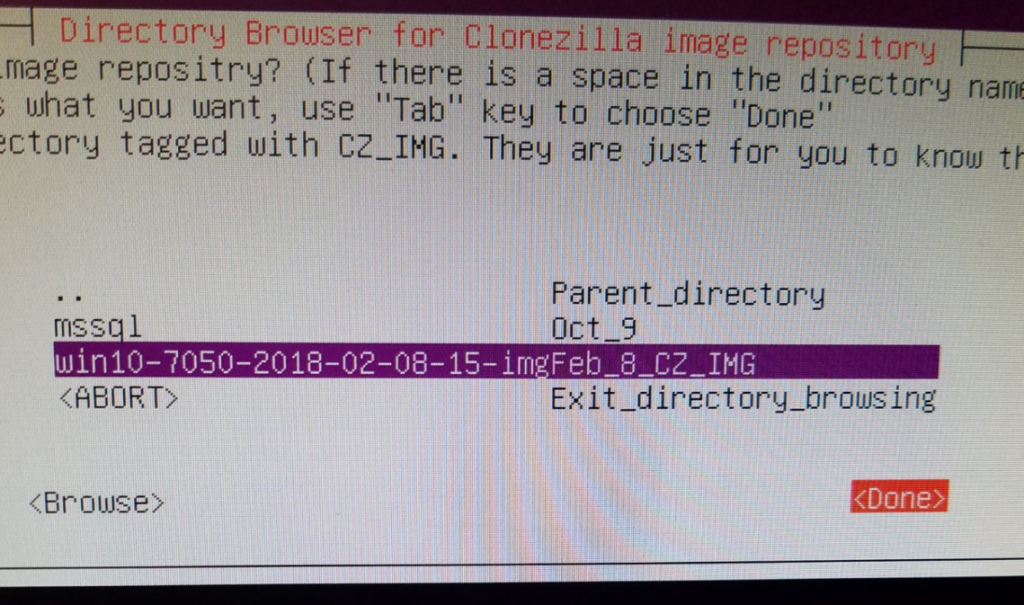
In the Directory Browser, hit “Browse” and go to your Parent Directory (top-most level) and select Done. This is where your image will be saved. You can see in my screenshot I’ve already saved an image here.

You will get a Summary location of Source (dev/sda1) and Target (/home/partimag). Press Enter to continue.

Choose Beginner mode

Choose Save Disk (Save_local_disk_as_an_image) – in my previous experience with Clonezilla, using normal spinning HDD’s and even SSD’s, I’ve used Samba to save my images to a separate server over the network using gigabit ethernet perfectly fine. However, in the case of these new computers and hard drives, I would get a permissions error when selecting SAMBA/SMB 2.1. The imaging would begin to take place and a couple smaller partitions would copy, but as soon as the primary large partition started it’s copy, I would get the permission error and the clone would halt. This is why we are using a local external USB hard drive.

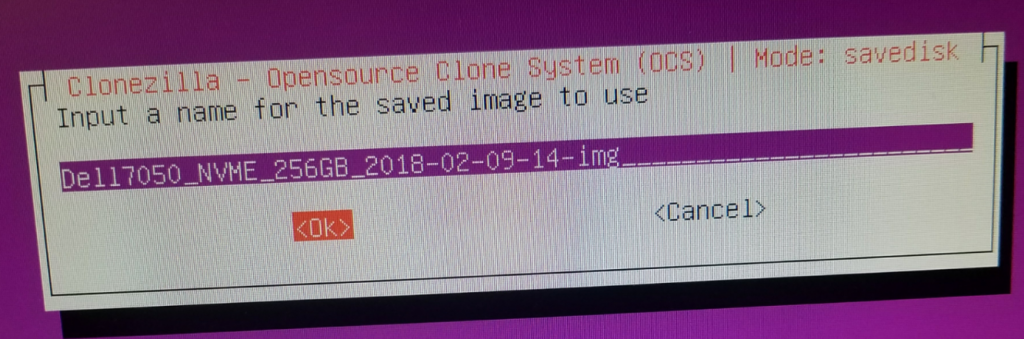
Give a descriptive name for the image (Dell7050_NVME_256GB_DATE-IMG) hit OK.

Select the local disk as source (should only be one here)

Select -sfsck (Skip Checking)

Select Yes, check the saved image

Select -senc Not to encrypt the image (or encrypt if desired)

Select Action to perform when everything is finished: -p power off.

Press Enter to continue, (Yes/Yes) – the image process will run and the image of the Source PC will be written to the External USB HDD. The machine should shut down when complete.

Image Target Computer

Now that we have our image saved on our external HDD, we can image our Target PC. On the powered-off PC, Connect the USB thumbdrive, External HDD, keyboard, mouse, and monitor, and again Boot into the BIOS.

On the new target computer, we want to again change the BIOS settings to mirror those we made in steps 11., 12., and 13.

After saving the BIOS, restart and hit F12 again, select the USB thumb drive, and boot Clonezilla.

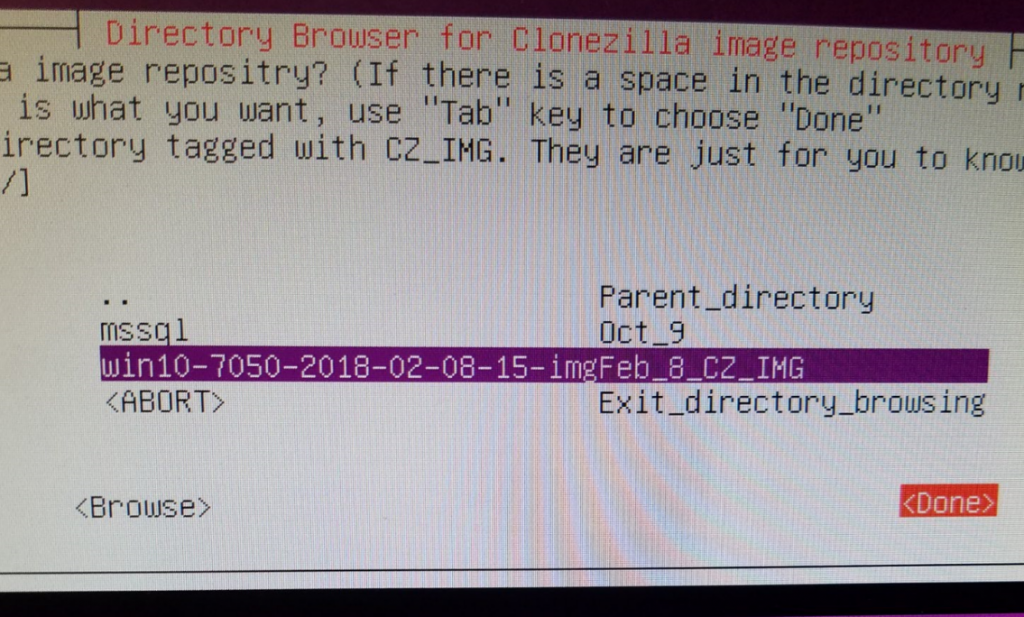
Start Clonezilla > Device Image > Local_dev > select image repository (sda1) > in Directory Browser, browse to the image we created, highlight it and select Done:

Choose Beginner Mode > Restore Disk:

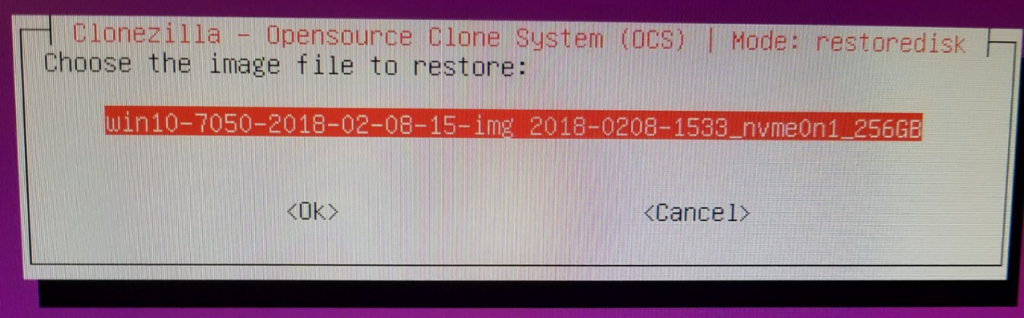
Choose the image to restore:

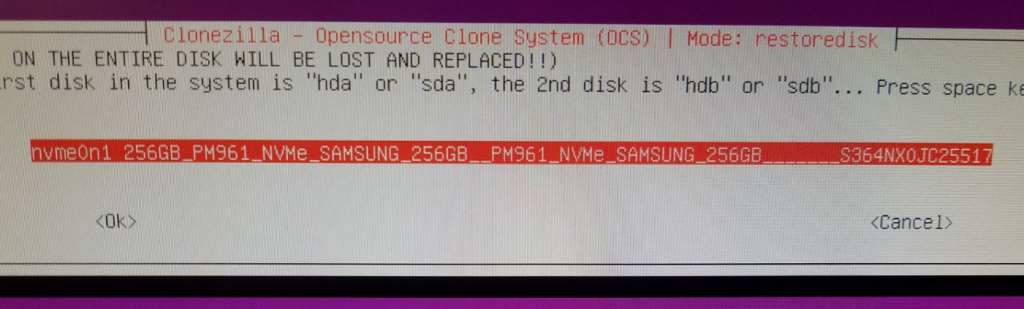
Select the target disk to restore onto (Should only be one listed here):

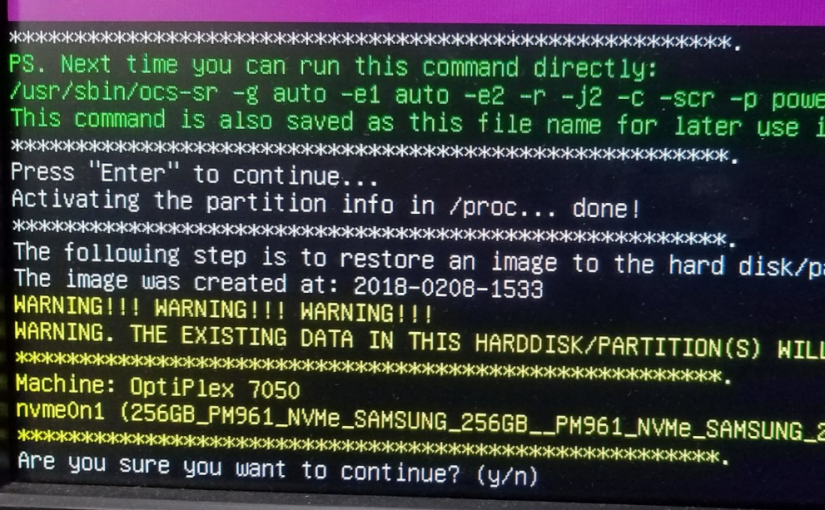
Select “Skip checking the image before restoring” > poweroff > Enter >

Heed the warning here. If important data is on the target disk, do not proceed. All data will be overwritten:

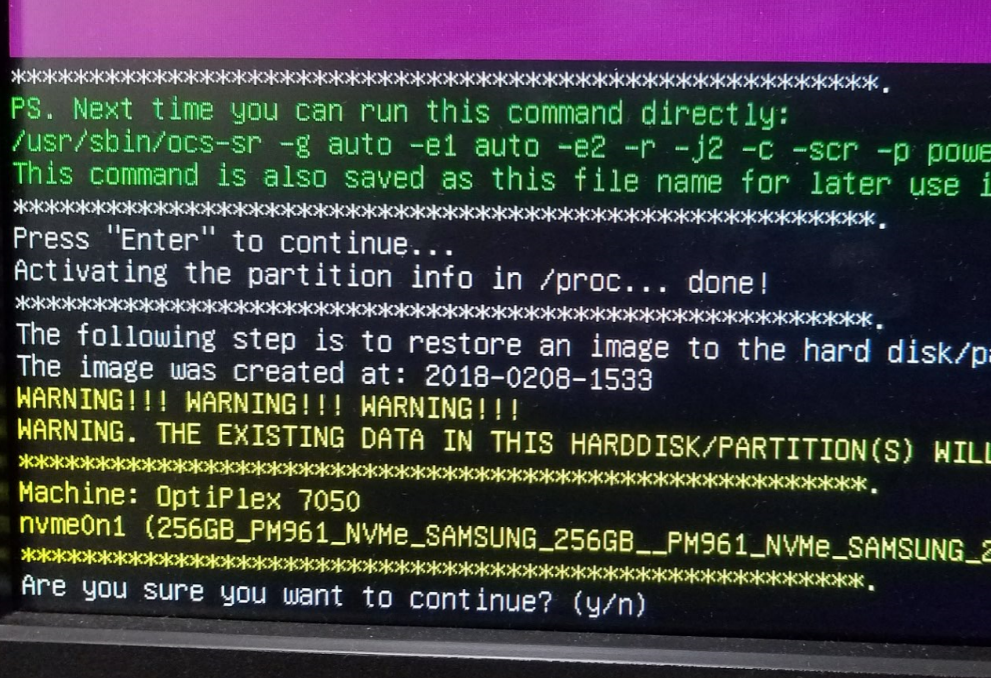
Hit y (enter) > y (enter) >

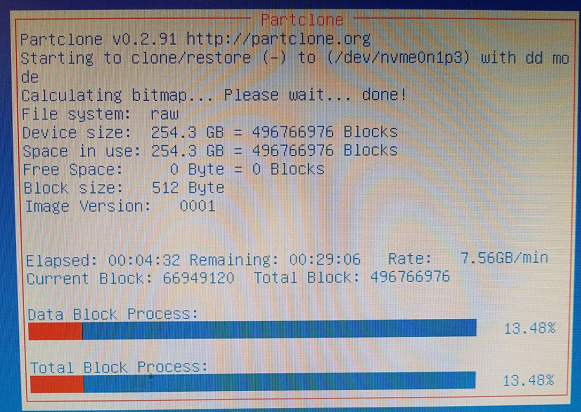
Partclone will run, clone the image to your disk, then shut down:

With the system powered down, remove your external HDD and boot thumb drive.

Power on the newly-imaged PC, hit the F12 button to go into the BIOS again. Reverse the changes made in steps 11, 12, and 13. Save the BIOS settings, and boot normally into windows. Congrats, you’re done! Hope this helps someone clone their newer systems with Clonezilla.

Security – Blue Team – Building a security project on a budget

How to Create and Build a Security Profile for Your Network on a Budget – Part 1

Start with Building a Foundation (or use an existing good one).

Credit to Kyle Bubp & irongeek.com: http://www.irongeek.com/i.php?page=videos/bsidescleveland2017/bsides-cleveland-102-blue-teamin-on-a-budget-of-zero-kyle-bubp

Use a Base Framework for your security project. There are a lot of standards available and the NIST government standards are a good solid foundation:

  • NIST 800-53
  • NIST Cybersecurity Framework
  • NIST CSF Tool
  • CIS Critical Security Controls
  • NIST-CSF tool – this is a nice visual tool – graphical interface for the stages of building a security program

Document everything

A core documentation repository is critical when setting up a security project – others will follow you and will need to look up the information you have recorded. It’s best to have a security incident response ticketing system and documentation before you need it. Have these tools up and ready.

For policy, procedure, how-tos, etc:

  • MediaWiki(free)
  • Atlassian Confluence ($10 for 10 users) – glyfee plugin for confluence
  • OneNote/SharePoint – not every company is entirely open source

Incident Response Ticketing/Documentation systems:

Map out your entire network

  • NetDB – Uses ARP tables and MAC databases on your network gear. (use a service account and NetDB will use ssh/telnet to find every device connected, will give a nice http interface. You can setup a cron job that will scan NetDB database every hour. You can pipe new device connections to an email address. Knowing if something comes onto your network is critical.

.ova is available at https://www.kylebubp.com/files/netdb.ova

Supports the following: Cisco, Palo Alto, JunoOS, Aruba, Dell Powerconnect

  • nmap scans + ndiff/yandiff – not just for red teams; export results, diff for changes. Alert if something changed.
  • NetDisco

https://sourceforge.net/projects/netdisco – uses SNMP to inventory your network devices.

  • Map your network – create a Visio document and have a good network map.

Visibility

Facebook-developed osquery and this tool can give you all you need.

Agents for MacOS, Windows, Linux

Deploy across your enterprise w/ Chef, Puppet, or SCCM

Do fun things like search for IoC’s (FBI file hashes, processes) – pipe the data into ElasticStack for visibility & search-ability

User Data Discovery

OpenDLP – (github) or (download an .ova) – will scan file shares and using a normal user account you can scan for available shares and data. Run over the weekend and see what you can find. Find the data owners and determine where the data should reside.

Hardening Your Network

CIS Benchmarks – Center for Internet Security Benchmarks: 100+ configuration guidelines for various technology groups to safeguard systems against today’s evolving cyber threats.

Out of the box, windows 10 is 22% for the CIS benchmark.

It’s difficult to secure your network if everything is a snowflake. While not exciting, configuration management is important. Deploy configs across your org using tools like GPO, Chef, or Puppet.

Change management is also important – use git repo for trackign changes to your config scripts.

Safety vs. Risk

Scanning for Vulnerabilities:

OpenVAS (greenbone) is a fork of Nessus which is still maintained, is the default vulnerability scanner in AlienVault. It does a great job in comparison with commercial products. Be careful, do some safe scans first and it’s not recommended to scan critical life-support equipment for example in a hospital.

Scan web apps:

Arachni Framework – for finding bugs in your developer’s code

OWASP ZAP (Zed Attack Proxy)

Nikto2 (Server config scanner)

Portswigger Burp Suite (not free – $350)

Harden your web servers:

Fail2ban – python-based IPS that runs off of Apache Logs

ModSecurity – Open source WAF for Apache & IIS

Linux Digital Forensics Web Resources

Below is a list of digital forensics resources for linux. I especially enjoyed reading LUIS ROCHA‘s intro guide to Linux Forensics (#19).

  1. VirusTotal – Free Online Virus, Malware and URL Scanner
  2. TSK Tool Overview – SleuthKitWiki
  3. The Sleuth Kit
  4. Taking advantage of Ext3 journaling file system in a forensic investigation
  5. SANS Digital Forensics and Incident Response Blog – Understanding EXT4 (Part 1)- Extents – SANS Institute
  6. SANS Digital Forensics and Incident Response Blog – Understanding EXT4 (Part 2)- Timestamps – SANS Institute
  7. SANS Digital Forensics and Incident Response Blog – Understanding EXT4 (Part 3)- Extent Trees – SANS Institute
  8. SANS Digital Forensics and Incident Response Blog – Understanding EXT4 (Part 4)- Demolition Derby – SANS Institute
  9. SANS Digital Forensics and Incident Response Blog – Understanding EXT4 (Part 5)- Large Extents – SANS Institute
  10. SANS Digital Forensics and Incident Response Blog – How To – Digital Forensics Copying A VMware VMDK – SANS Institute
  11. SANS Digital Forensics and Incident Response Blog – Blog – SANS Institute
  12. qemu-img(1)- QEMU disk image utility – Linux man page
  13. qemu-img for WIndows – Cloudbase Solutions
  14. National Software Reference Library (NSRL) – NIST
  15. ltrace – Wikipedia
  16. Logical Volume Manager (204.3)
  17. Linux-Unix and Computer Security Resources – Hal Pomeranz – Deer Run Associates
  18. The Law Enforcement and Forensic Examiner’s Introduction to Linux
  19. Intro to Linux Forensics – Count Upon Security
  20. https—www.kernel.org-doc-Documentation-filesystems-ext4.txt
  21. GitHub – log2timeline-plaso- Super timeline all the things
  22. Filesystem Hierarchy Standard
  23. Digital Forensics – SuperTimeline & Event Logs – Part I – Count Upon Security
  24. Digital Forensics – NTFS Metadata Timeline Creation – Count Upon Security
  25. Digital Forensics – Evidence Acquisition and EWF Mounting – Count Upon Security
  26. chkrootkit — locally checks for signs of a rootkit

Proxmox upgrade project from ESXi to Proxmox – nice speed increase

So I did a little upgrade project this weekend – went from a Dual-Core CPU workstation-class VMWare ESXi system running a pfSense VM with 512MB RAM & a SATA HDD plus 10/100Mb LAN, and moved to a Core i5 CPU workstation-class Proxmox hypervisor running the same version of pfSense with 2GB of RAM, SSD and gigabit NICs. The Core2Duo system had a 10/100Mb LAN card so the download speed was limited to 100Mb because of the hardware, not software, but I do believe the ping times can be attributed to the new hardware. Proxmox can be tricky to setup the NICs so I left notes on what I experienced below.

Proxmox Install notes:

3 NICs (one on board, and 2xintel NIC)

Initially I got my proxmox installed and running on my current network on a new workstation-class PC with just the on-board NIC connected. It picked up 10.0.10.175 from my dhcp server

On Proxmox I went to setup pfSense but prior to doing so I needed to bridge my NICs

Here is my NIC setup after setting up the Linux bridge NICs:

When I initially setup the vm, I created pfsense pretty standard, then before starting the VM, I added System > Network > Create > Linux Bridge, and I chose the two other Intel NIC’s (did this twice, once for each NIC.

When I started the pfSense vm I got the error:

Task viewer: VM 101 - Start

OutputStatus

Stop

bridge 'vmbr1' does not exist
kvm: -netdev type=tap,id=net1,ifname=tap101i1,script=/var/lib/qemu-server/pve-bridge,downscript=/var/lib/qemu-server/pve-bridgedown: network script /var/lib/qemu-server/pve-bridge failed with status 512
TASK ERROR: start failed: command '/usr/bin/kvm -id 101 -chardev 'socket,id=qmp,path=/var/run/qemu-server/101.qmp,server,nowait' -mon 'chardev=qmp,mode=control' -pidfile /var/run/qemu-server/101.pid -daemonize -smbios 'type=1,uuid=75940385-d64a-4fc8-b286-ade75fc08d52' -name pfsense2.x -smp '4,sockets=1,cores=4,maxcpus=4' -nodefaults -boot 'menu=on,strict=on,reboot-timeout=1000,splash=/usr/share/qemu-server/bootsplash.jpg' -vga cirrus -vnc unix:/var/run/qemu-server/101.vnc,x509,password -cpu kvm64,+lahf_lm,+sep,+kvm_pv_unhalt,+kvm_pv_eoi,enforce -m 2048 -k en-us -device 'pci-bridge,id=pci.1,chassis_nr=1,bus=pci.0,addr=0x1e' -device 'pci-bridge,id=pci.2,chassis_nr=2,bus=pci.0,addr=0x1f' -device 'piix3-usb-uhci,id=uhci,bus=pci.0,addr=0x1.0x2' -device 'usb-tablet,id=tablet,bus=uhci.0,port=1' -device 'virtio-balloon-pci,id=balloon0,bus=pci.0,addr=0x3' -iscsi 'initiator-name=iqn.1993-08.org.debian:01:6148cfb1fd55' -drive 'file=/dev/pve/vm-101-disk-1,if=none,id=drive-ide0,format=raw,cache=none,aio=native,detect-zeroes=on' -device 'ide-hd,bus=ide.0,unit=0,drive=drive-ide0,id=ide0,bootindex=100' -drive 'file=/var/lib/vz/template/iso/pfSense-CE-2.3.3-RELEASE-amd64.iso,if=none,id=drive-ide2,media=cdrom,aio=threads' -device 'ide-cd,bus=ide.1,unit=0,drive=drive-ide2,id=ide2,bootindex=200' -netdev 'type=tap,id=net0,ifname=tap101i0,script=/var/lib/qemu-server/pve-bridge,downscript=/var/lib/qemu-server/pve-bridgedown' -device 'e1000,mac=C2:8E:F1:2E:83:E5,netdev=net0,bus=pci.0,addr=0x12,id=net0,bootindex=300' -netdev 'type=tap,id=net1,ifname=tap101i1,script=/var/lib/qemu-server/pve-bridge,downscript=/var/lib/qemu-server/pve-bridgedown' -device 'e1000,mac=CE:AE:FA:44:EF:13,netdev=net1,bus=pci.0,addr=0x13,id=net1,bootindex=301' -netdev 'type=tap,id=net2,ifname=tap101i2,script=/var/lib/qemu-server/pve-bridge,downscript=/var/lib/qemu-server/pve-bridgedown' -device 'e1000,mac=D2:09:7A:FC:6D:95,netdev=net2,bus=pci.0,addr=0x14,id=net2,bootindex=302'' failed: exit code 1

So to fix this I first destroyed my initial vm 100 in the proxmox console with

qm destroy 100

Next with the info I found here: https://forum.proxmox.com/threads/cant-start-vms.13824/

It seems the Proxmox underlying debian OS didn’t know about my other NICs:

I ssh’d into the new server with putty and edited the interfaces file:

Nano /etc/network/interfaces

and changed this config:

auto vmbr0

iface vmbr0 inet static

        address  10.0.10.175

        netmask  255.255.255.0

        gateway  10.0.10.254

        bridge_ports eth0

        bridge_stp off

        bridge_fd 0

To this:

auto vmbr0

iface vmbr0 inet static

        address  10.0.10.175

        netmask  255.255.255.0

        gateway  10.0.10.254

        bridge_ports eth0

        bridge_stp off

        bridge_fd 0


auto vmbr1

iface vmbr1 inet dhcp


auto vmbr2

iface vmbr2 inet dhcp

Then I had proxmox reboot by issuing the command:

reboot

And my interfaces file ended up looking like this:

auto lo

iface lo inet loopback


iface eth0 inet manual

#TrustedLAN


iface eth1 inet manual


iface eth2 inet manual


auto vmbr0

iface vmbr0 inet static

        address  10.0.10.175

        netmask  255.255.255.0

        gateway  10.0.10.254

        bridge_ports eth0

        bridge_stp off

        bridge_fd 0


auto vmbr1

iface vmbr1 inet manual

        bridge_ports eth1

        bridge_stp off

        bridge_fd 0

#TrustedLAN


auto vmbr2

iface vmbr2 inet manual

        bridge_ports eth2

        bridge_stp off

        bridge_fd 0

#UntrustedWAN


I could now start the pfsense vm and the pfsense install now recognized my network cards <smiles>

In the pfsense setup I choose 1) and I am offered the following options:

With a little bit of guessing and using my laptop to find the LAN, I was able to get up and connected into my pfSense web console. From there, reset the power to my cable modem, and got a new Cox IP address.

The change in speeds was actually pretty remarkable.

Here are the speedtest.net results with the old Dual Core (Core2Duo) with an ESXi VM on a SATA HDD 512MB of RAM and 10/100 LAN:

And here are my speedtest.net results with a core i5 4-core Proxmox VM on an SSD, 2GB of RAM, and Gigabit NICs:

Below is an image of the old server on the left and a new server on the right.

VMWare is still running on the old server and I may keep it around, but also considering moving my domain controller & ISC DHCP server off of it and re-building it as another Proxmox VME as a cluster, but I’ve read that it’s best to have 3 servers for a Proxmox cluster.

All in all I’m pretty happy with the results of upgrading my home pfSense firewall from ESXi to Proxmox, and I hope this post helps someone with their Proxmox setup.

CockroachDB – how to build a 4 node SQL cluster on ubuntu and HyperV

CockroachDB Overview

Description: cockroach is an open source, survivable, strongly consistent, scale-out SQL database. If you wonder where google engineers go when they leave google, they go out on their own and build unbelievably great scalable and distributed open source software. Essentially if you want to run your own fault-tolerant SQL database across multiple datacenters and cloud services, using your own servers, allowing you complete control of your database, without paying hefty licensing fees, then run cockroach. The info in this post is not a review of cockroach, but rather a demonstration of a lab setup and POC.

To get started in our lab, first we want to build around 3 or 4 test clone servers or “nodes”. I use ubuntu on top of HyperV, but you can use any flavor of linux or MacOS you want. It can also run on Windows Docker.

If you’re like me and use Hyper-V on Win10, make 4 x Ubuntu 16.04 “clones” – first build a ‘goldmaster’ image, and clone it 4 times – guide here: https://4sysops.com/archives/clone-a-ubuntu-server-in-hyper-v-2012-r2/ – or use something like virtualboxes.org.

Create 4 virtual machines, each having it’s own IP address:
Node1: inet addr:10.0.10.169
Node2: inet addr:10.0.10.170
Node3: inet addr:10.0.10.171
Node4: inet addr:10.0.10.172

Make sure each node is up to date and has ntp installed and synchronized with the commands:

sudo apt-get install ntp

Use the command

timedatectl

To ensure that…

NTP synchronized: yes

At this point before you install/run cockroach, it’s wise to export each node VM with HyperV as a backup.

On Nodes 1,2,3,4 download the latest binary here https://www.cockroachlabs.com/docs/install- cockroachdb.html with the command:

sudo wget https://binaries.cockroachdb.com/cockroach-latest.linux-amd64.tgz

Extract the binary with the command:

tar -xvf cockroach-latest.linux-amd64.tgz

Move the binary to a location in your PATH or add the directory location to your path. You can learn about your path with the command:

sudo vi /etc/environment

And then move your extracted cockroach to /usr/sbin with the command:

sudo mv cockroach-latest.linux-amd64/cockroach /usr/sbin/

Do a sanity check with the command:

cockroach version

Start cockroach in insecure mode in the background on Node1 (master server) with the command:

sudo cockroach start --background --insecure --host=10.0.10.169

Result should be something like below:

CockroachDB node starting at 2017-03-15 23:16:23.118419329 -0700 PDT
 build: CCL beta-20170309 @ 2017/03/09 16:31:10 (go1.8)
 admin: http://10.0.10.169:8080
 sql: postgresql://[email protected]:26257?sslmode=disable
 logs: cockroach-data/logs
 store[0]: path=cockroach-data
 status: restarted pre-existing node
 clusterID: 08b6bfe6-4886-466b-a9c6-bc58a3809113
 nodeID: 1

Go ahead and browse to the admin page http://10.0.10.169:8080

On your other nodes:

sudo cockroach start --background --insecure --host=10.0.10.170 --join=10.0.10.169:26257

*where –host=current node ip address you’re having to join with the master server 10.0.10.169

Your results should look something like the following:

CockroachDB node starting at 2017-03-15 23:23:43.783097234 -0700 PDT
 build: CCL beta-20170309 @ 2017/03/09 16:31:10 (go1.8)
 admin: http://10.0.10.170:8080
 sql: postgresql://[email protected]:26257?sslmode=disable
 logs: cockroach-data/logs
 store[0]: path=cockroach-data
 status: initialized new node, joined pre-existing cluster
 clusterID: 08b6bfe6-4886-466b-a9c6-bc58a3809113
 nodeID: 2

Your web interface should provide you with performance graphs:

Identify the new nodes in the View Nodes List link:

Go on and add the remaining Nodes to the cluster.

???

Profit! – just kidding

Now you can go on to learn about cockroach SQL and create some databases and tables and test how pulling the plug on one of your nodes doesn’t bring down the DB, and how all the data is replicated to all 4 nodes. It’s recommended you don’t run this lab on a single workstation-class system, but something that meets the cockroach DB minimum system requirements. This product is still in beta and features are subject to change. Regardless, cockroachdb is an incredible addition to the open-source community and I’m sure will be very useful to a lot of systems admins and application developers.


Fix ubuntu when the OS will not boot – kernel panic – kernel panic not syncing vfs unable to mount root fs on unknown-block 0 0 – error /boot full remove old kernels from command line

To begin, it will probably take at least 30 minutes resolve this issue…

This fix solved my problem with the “vfs unable to mount root fs” error, but of course your results may vary. As always, first backup your system or do an export of the vm so you have a copy of the system as it existed before you started screwing around with it 😉

After running apt-get update / apt-get upgrade and then a reboot, you may receive the following error: kernel panic not syncing vfs unable to mount root fs on unknown-block 0 0 on ubuntu 16.04.

In many cases this  will be due to the /boot drive becoming 100% full because many updates have been made to the kernel. By default, ubuntu will retain the old kernels and add them to the list of available kernels you can boot into in the Grub2 boot loader menu. You can confirm that your drive is full by issueing the command:

df -h

The result will likely show the following:

In order to resolve this issue and boot successfully, while you’re looking at the error during boot, (you should already be at the console), and restart the vm or computer into the Grub2 menu then choose “Advanced options for ubuntu” view where you can see a list of old kernels you can boot into. Some report you can do this booting with the Shift key held down, or in the event it’s a virtual machine, you should be able to arrow-down in the Grub start screen and choose Advanced options for ubuntu on startup:

Grub2 boot menu.

Once you go into the advanced boot menu you will likely see several kernels listed. Choose the next-oldest kernel from the top/highest version of kernels. In my case I booted into the version labeled Ubuntu, with Linux 4.4.0-57-generic (my boot menu screenshot below is clean, but you’ll likely see several kernels listed).

Cross your fingers and hope you get to your login prompt. From here I jumped on putty and connected from that client, as I prefer it over the console.

Next, login and follow the directions that I found here:

http://askubuntu.com/questions/2793/how-do-i-remove-old-kernel-versions-to-clean-up-the-boot-menu

To save you the search, here are the instructions I used to first list and then remove the old kernels:

Open terminal and check your current kernel:

uname -a

DO NOT REMOVE THIS KERNEL! Make a note of the version in notepad or something.

Next, type the command below to view/list all installed kernels on your system.

dpkg --list | grep linux-image

Find all the kernels that are lower than your current kernel version. When you know which kernel to remove, continue below to remove it. Run the commands below to remove the kernel you selected.

sudo apt-get purge linux-image-x.x.x.x-generic

Or:

sudo apt-get purge linux-image-extra-x.x.x-xx-generic

Finally, run the commands below to update grub2

sudo update-grub2

Reboot your system.

sudo reboot

As you can see from my terminal history, I had to remove a few:

589  uname -a
 590  dpkg --list | grep linux-image
 591  sudo apt-get purge linux-image-4.4.0-21-generic
 592  sudo apt-get purge linux-image-4.4.0-22-generic
 593  sudo apt-get purge linux-image-4.4.0-24-generic
 594  df -h
 595  sudo apt-get purge linux-image-4.4.0-24-generic
 596  sudo apt-get purge linux-image-4.4.0-28-generic
 597  sudo apt-get purge linux-image-4.4.0-31-generic
 598  sudo apt-get purge linux-image-4.4.0-34-generic
 599  sudo apt-get purge linux-image-4.4.0-36-generic
 600  sudo apt-get purge linux-image-4.4.0-38-generic
 601  df -h
 602  sudo apt-get purge linux-image-4.4.0-42-generic
 603  sudo apt-get purge linux-image-4.4.0-45-generic
 604  sudo apt-get purge linux-image-4.4.0-47-generic
 605  sudo apt-get purge linux-image-4.4.0-51-generic
 606  sudo apt-get purge linux-image-4.4.0-53-generic
 607  sudo update-grub2
 608  dpkg --list | grep linux-image
 609  df -h
 610  sudo apt-get purge linux-image-extra-4.4.0-21-generic
 611  sudo apt-get purge linux-image-extra-4.4.0-22-generic
 612  sudo apt-get purge linux-image-extra-4.4.0-24-generic
 613  sudo apt-get purge linux-image-extra-4.4.0-28-generic
 614  sudo apt-get purge linux-image-extra-4.4.0-31-generic
 615  sudo update-grub2
 616  df -h
 617  sudo reboot
 618  dpkg --list | grep linux-image
 619  uname -a
 620  sudo reboot

After the reboot, you can see my /boot partition returned to a manageable size:

I hope this post helps someone save some time and help them fix their ubuntu boot problems. Please leave a comment if this helped resolve your issue or if there is a smarter/faster way to fix this problem.

Google Cloud Platform Overview

The pace of global cloud computing is continuing to grow exponentially. While Amazon still holds the lion’s share of cloud services, Google’s Cloud Platform has been growing at the fastest pace. In this article, we’ll first examine what makes the Google Cloud Platform different; provide you with a list of its components, solutions, and features; and finish up by discussing pricing.

Cloud Services trends and opinion

According to a Synergy Research Group study: “In terms of year-over-year growth, Google enjoys the lead at 162 percent, while Azure has grown by an even 100 percent. AWS is in fourth with a 53 percent year-over-year (YoY) growth rate.…

Read the rest of the article here…

Google Cloud Platform overview