How to clone a Dell Optiplex 7050 M.2 NVME Hard Drive with Clonezilla and an External USB HDD

I ran into trouble when trying to clone a new Optiplex 7050. My normal procedure for cloning with clonezilla required a little tweaking to accommodate Windows 10, UEFI, NVME M.2, Secure Boot, and RAID On. Follow the procedure below to clone your systems on these newer hard drives and BIOS versions.

As a side thought, I enjoy using Clonezilla and have used it for many years. I love the convenience of it and not having to manage Windows images with something like SCCM. While SCCM has a place in some organizations, I believe it’s perfectly fine to use Clonezilla to create OS images of different models of computers. I have approx 15 different OS images; everything from Lenovo laptops to Dell Optiplex 380’s to Optiplex 7050’s.

Requirements:

  • 1 x USB 2.0 or 3.0 USB thumb drive min 2GB capacity for the clonezilla bootable USB drive made bootable to 20170905-zesty version of clonezilla
  • 1 x USB 3.0 USB External HDD with a minimum HDD size that is larger than the TOTAL size of your M.2 NVME HDD. (I use a 4 TB Western Digital My Passport) – In my previous experience with Clonezilla, it has created images only writing images of the Used Space on the Source HDD, in this case with UEFI / NVME HDD’s, the image created on disk is the total size of the NVME drive.
  • 2 x Dell Optiplex 7050 (Source and Target) computers
  • 1 x Separate PC or laptop you can use to create a bootable USB Clonezilla Thumb Drive

1. Configure your Source Windows 10 Dell Optiplex 7050 machine as necessary. Install all applications, create user accounts, and uninstall bloatware. Make sure you create an administrator user account and password. In final preparation for cloning, either run Sysprep (found in C:\Windows\System32\Sysprep), or alternatively ensure you shut down Windows 10 completely by creating a Shutdown /s /t 0 shortcut and executing it.

2. On a separate PC, download Rufus which we’ll use to create a bootable USB thumb drive.

3. On a separate PC, download the AMD64 version of alternative (Ubuntu-based) as outlined on the Clonezilla website (this version is required for newer BIOS’):

4. Change the file type to ISO and hit Download.

5. Attach your USB thumb drive into your separate computer, run Rufus, tell Rufus to use the drive you just attached under Device, point Rufus ” to the .iso file you just downloaded.

6. Hit Start and the bootable USB thumb drive with Clonezilla will be created.

7. On the Source computer, insert the USB thumb drive into one of the front panel’s top (black) USB ports, and insert the USB External HDD separately into the Blue USB 3.0 port. Attach the keyboard, mouse, power, and monitor.

8. Power on the Source computer and start mashing the F12 key on the keyboard to get to the one-time boot menu.
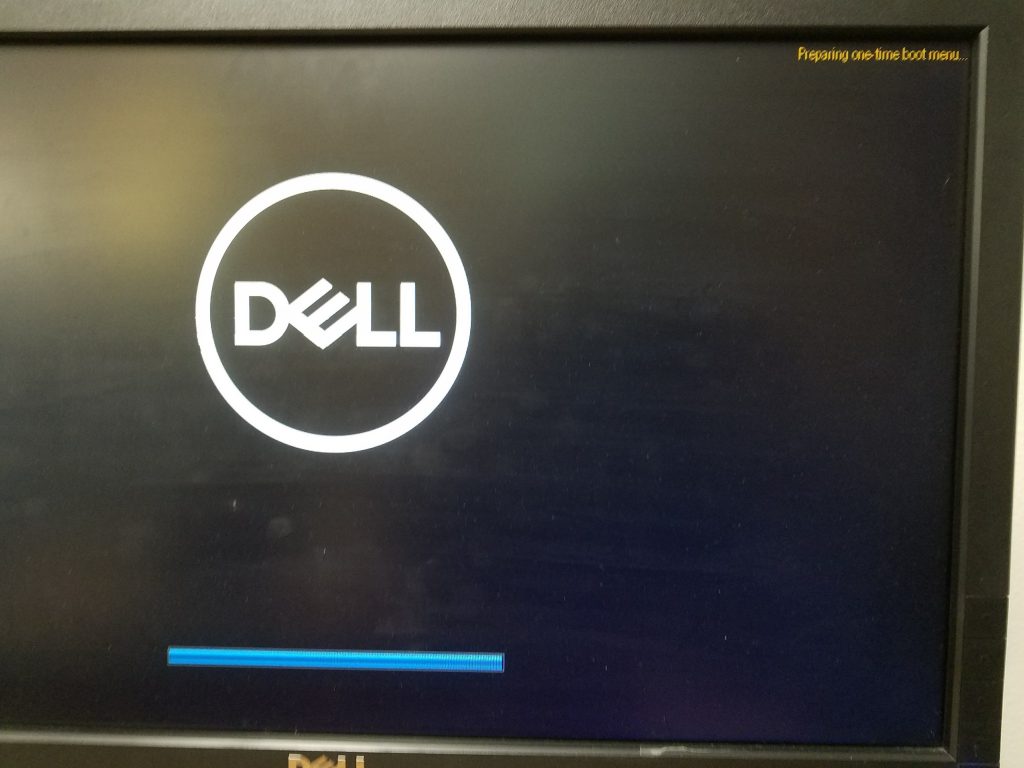
9. Before we begin, we need to make sure clonezilla can find our NVME HDD. By default UEFI and Secure Boot will be enabled. We need to disable these as well as Boot Path Security so that we can continue.

10. Select Setup from the Boot Menu:
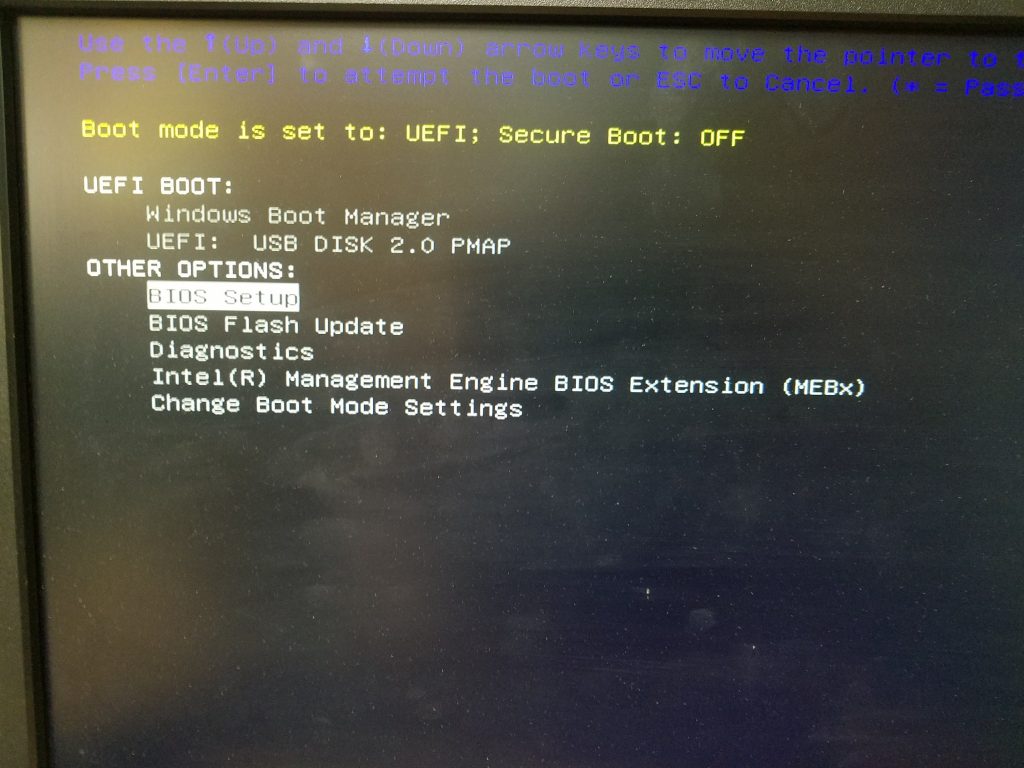
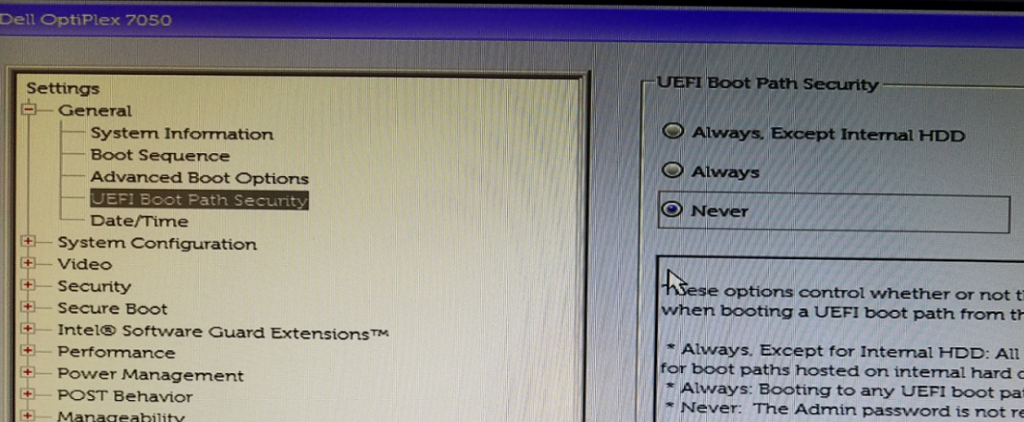
11. In the BIOS, under the General Heading, select UEFI Boot Path Security and change it from Always to Never.
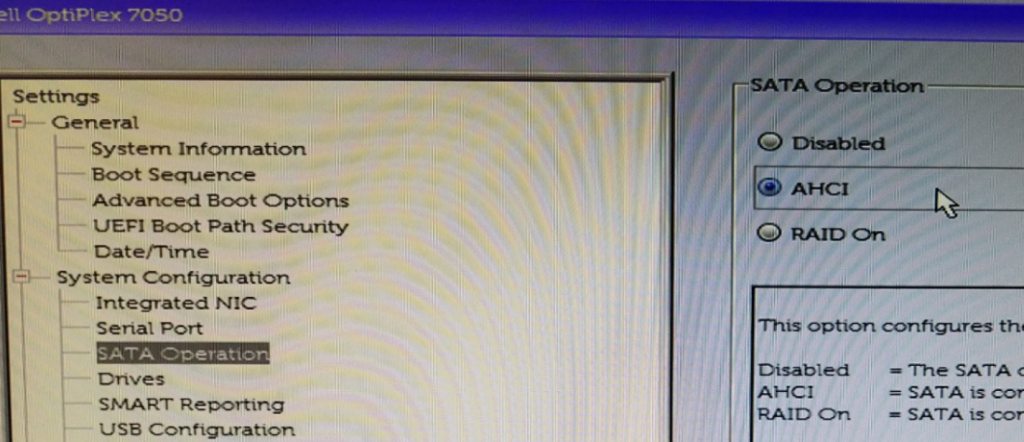
12. Next change System Configuration > SATA Operation from RAID On to AHCI
13. Lastly, change Secure Boot > Secure Boot Enable “Enabled” to “Disabled”
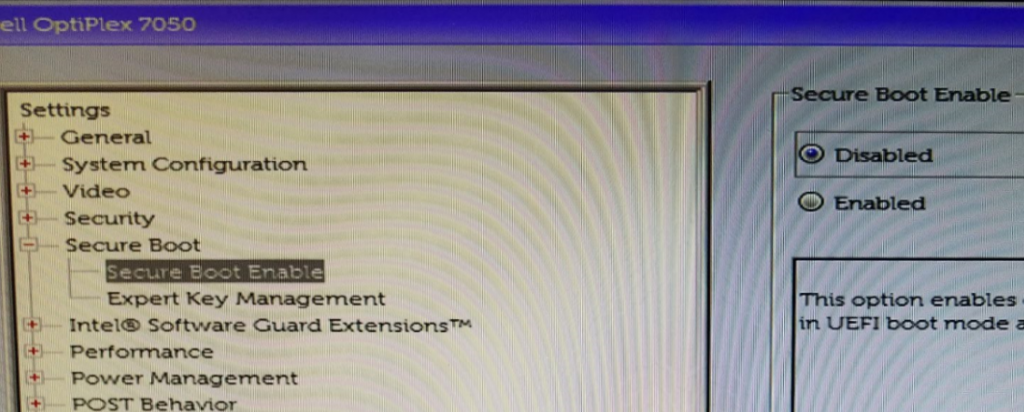
Apply, Save and Exit the BIOS. On the next boot, start mashing the F12 key again and this time select UEFI: USB DISK 2.0 PMAP
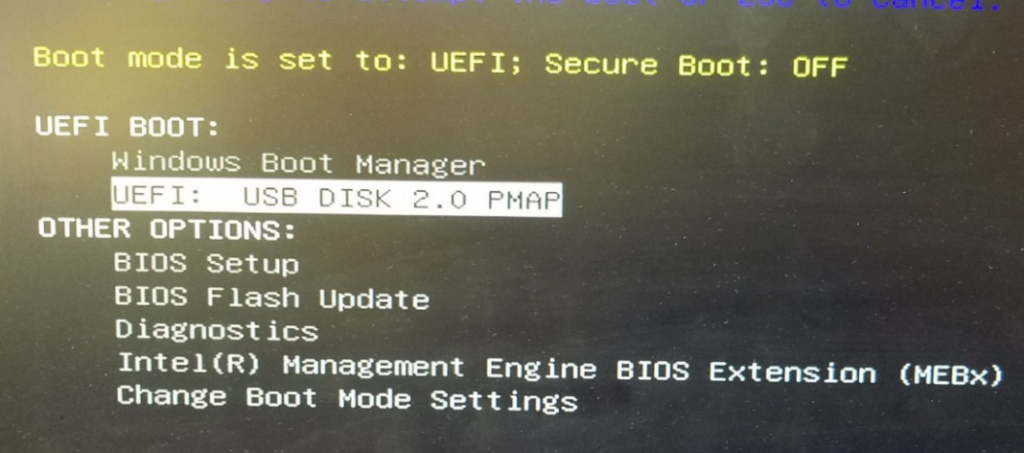
Clonezilla will boot from the USB drive so choose the default (hit Enter):

Select English > Don’t touch keymap > Start Clonezilla > device-image (Ok)

Under Mount Clonezilla image directory, choose Local_dev (Ok)
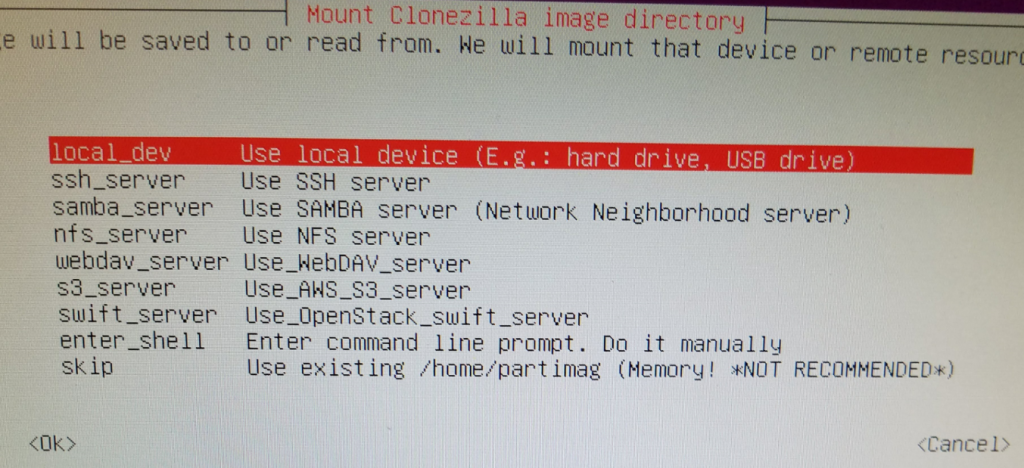
Press Enter to continue.

Review the clonezilla Scan disk preview to ensure it’s found both your Source and Target hard drives:

Press Ctrl-C to continue.

Arrow down and select your large external USB hard drive (sda1) to set the location of /home/partimg . This is where the clone image will be stored.
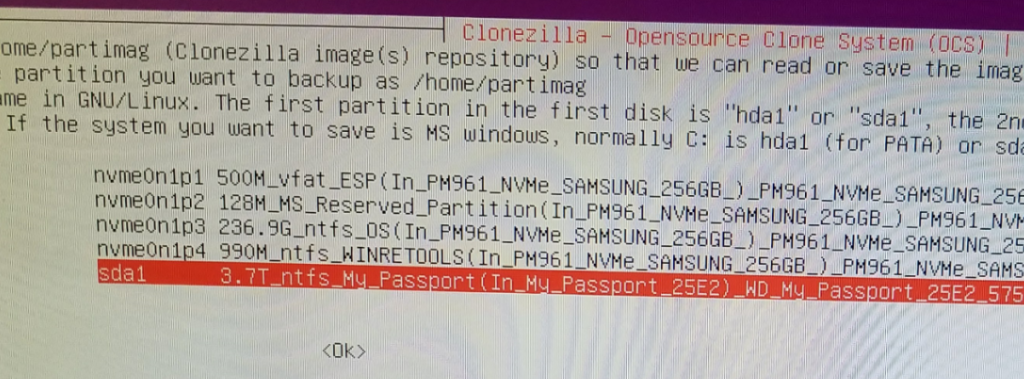
In the Directory Browser, hit “Browse” and go to your Parent Directory (top-most level) and select Done. This is where your image will be saved. You can see in my screenshot I’ve already saved an image here.
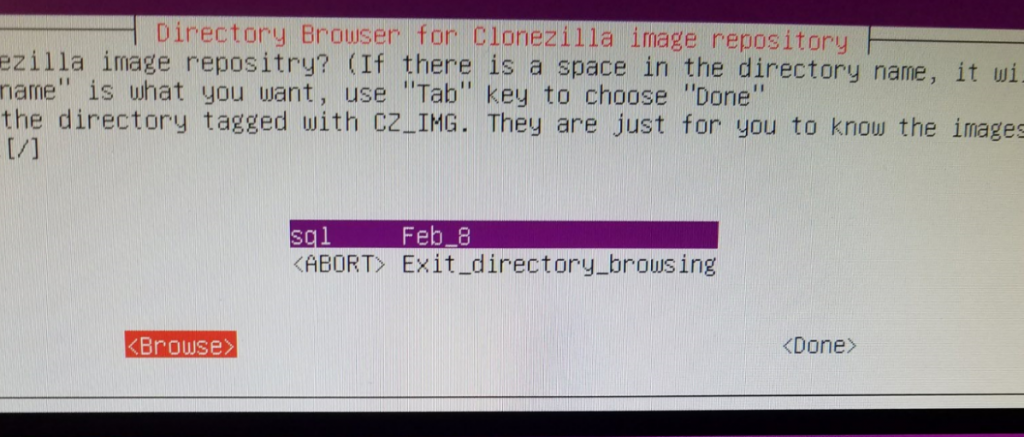
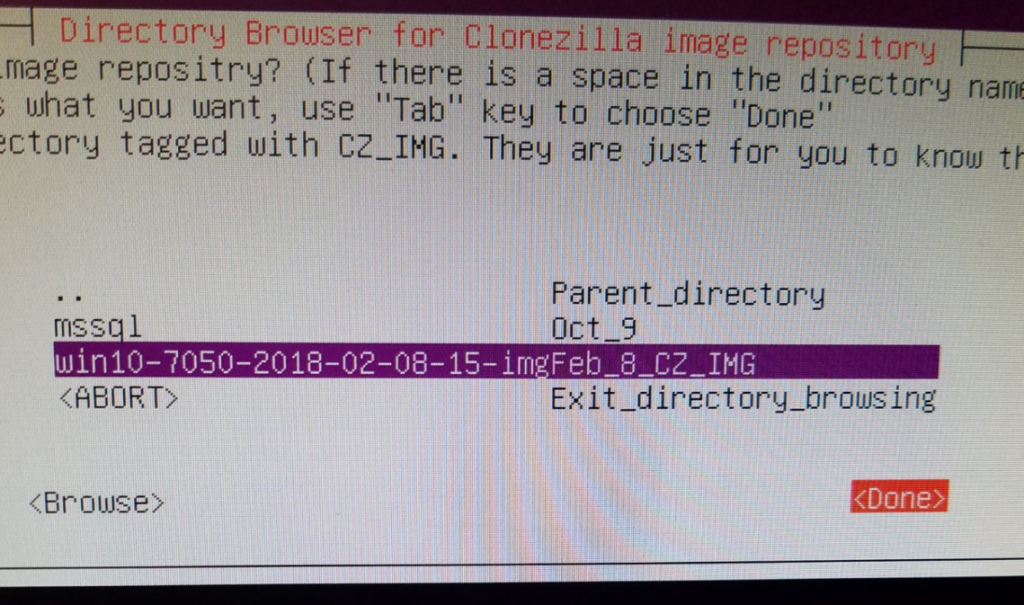
You will get a Summary location of Source (dev/sda1) and Target (/home/partimag). Press Enter to continue.

Choose Beginner mode

Choose Save Disk (Save_local_disk_as_an_image) – in my previous experience with Clonezilla, using normal spinning HDD’s and even SSD’s, I’ve used Samba to save my images to a separate server over the network using gigabit ethernet perfectly fine. However, in the case of these new computers and hard drives, I would get a permissions error when selecting SAMBA/SMB 2.1. The imaging would begin to take place and a couple smaller partitions would copy, but as soon as the primary large partition started it’s copy, I would get the permission error and the clone would halt. This is why we are using a local external USB hard drive.

Give a descriptive name for the image (Dell7050_NVME_256GB_DATE-IMG) hit OK.

Select the local disk as source (should only be one here)

Select -sfsck (Skip Checking)

Select Yes, check the saved image

Select -senc Not to encrypt the image (or encrypt if desired)

Select Action to perform when everything is finished: -p power off.

Press Enter to continue, (Yes/Yes) – the image process will run and the image of the Source PC will be written to the External USB HDD. The machine should shut down when complete.

Image Target Computer

Now that we have our image saved on our external HDD, we can image our Target PC. On the powered-off PC, Connect the USB thumbdrive, External HDD, keyboard, mouse, and monitor, and again Boot into the BIOS.

On the new target computer, we want to again change the BIOS settings to mirror those we made in steps 11., 12., and 13.

After saving the BIOS, restart and hit F12 again, select the USB thumb drive, and boot Clonezilla.

Start Clonezilla > Device Image > Local_dev > select image repository (sda1) > in Directory Browser, browse to the image we created, highlight it and select Done:
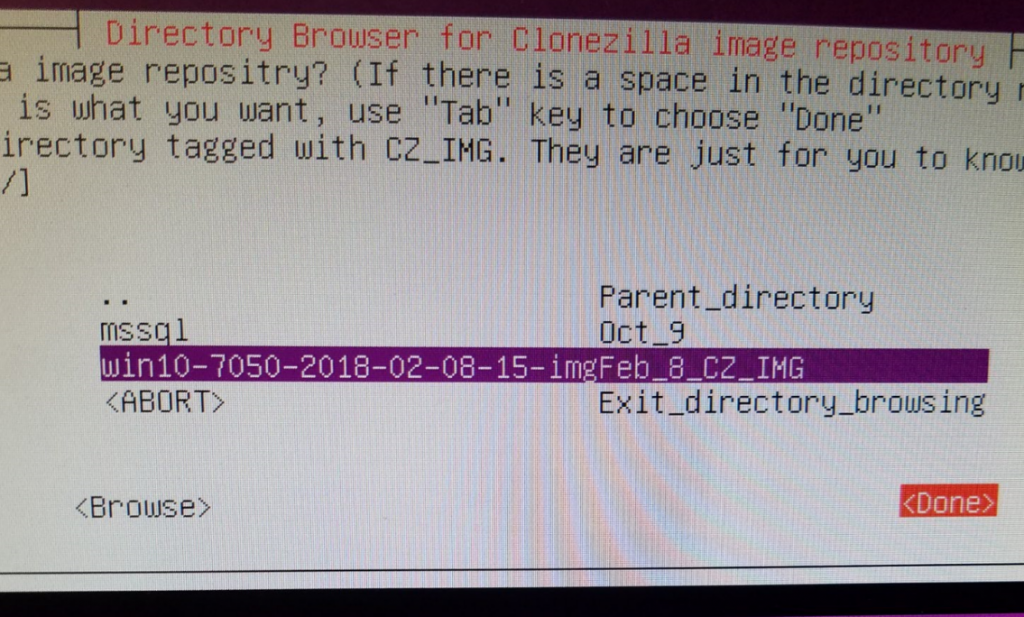
Choose Beginner Mode > Restore Disk:

Choose the image to restore:

Select the target disk to restore onto (Should only be one listed here):

Select “Skip checking the image before restoring” > poweroff > Enter >

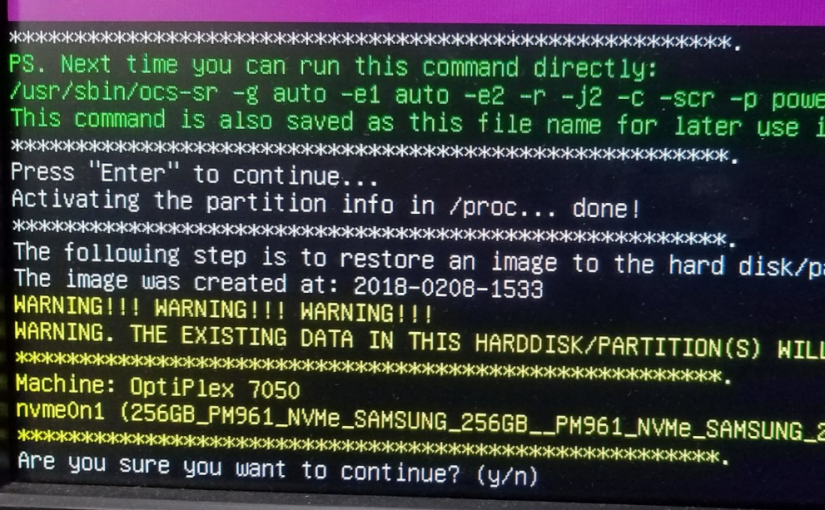
Heed the warning here. If important data is on the target disk, do not proceed. All data will be overwritten:
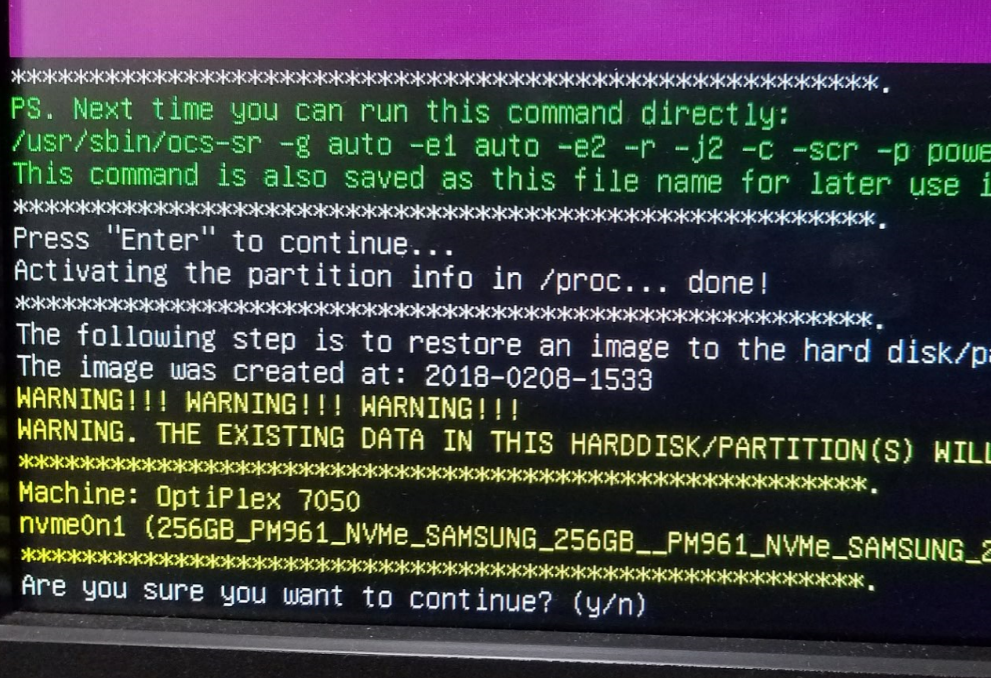
Hit y (enter) > y (enter) >

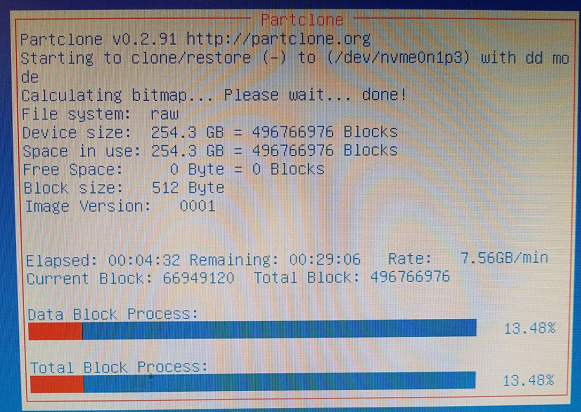
Partclone will run, clone the image to your disk, then shut down:
With the system powered down, remove your external HDD and boot thumb drive.

Power on the newly-imaged PC, hit the F12 button to go into the BIOS again. Reverse the changes made in steps 11, 12, and 13. Save the BIOS settings, and boot normally into windows. Congrats, you’re done! Hope this helps someone clone their newer systems with Clonezilla.

Solved – Dell Latitude 7370 cannot login to domain – No Logon Servers available

Solved – Windows 7 – WiFi login: There are currently no logon servers available to process your logon request.

I had an associate drop a Dell Latitude 7370 laptop on my desk saying he cannot print. I found that the user is able to logon to local workstation desktop using cached credentials but cannot logon to the domain. He is only logging into the laptop with his cached credentials, is not authenticating with the domain, and therefore cannot print. Logging off of the user’s account, and then trying to login as myself I get the error:

“There are currently no logon servers available to process your logon request. “

I log in with his cached credentials again and right-click on the wifi adapter and choose Troubleshoot but can’t find any problems. I occasionally and intermittently get the “Windows needs your current credentials” Pop-up notification in the lower right near the clock/systray but clicking on that icon does not do anything. I even set the Wireless network adapter properties for TCP/IP 4 to use the DNS IP Address of the domain controller explicitly instead of getting the setting from DHCP, but still, the laptop is unable to login to the network with the new domain password I set for the user’s account.

There is definitely something wrong with the wireless adapter. I notice that when disconnecting/reconnecting to the wireless SSID, that the Intel WiFi drivers pop up stating that I’m connected and that there is a signal strength. Knowing that Intel drivers sometimes try to do too much and interfere with wireless connections I do the following and fix the issue.

  1. Uninstalled Intel wifi driver package from Windows Control Panel > Programs and Features. (I uninstalled both the WiDi package as well as the Intel Wifi Drivers package). This removed the device from the Device Manager
  2. In device manager, right-click on the Network Adapters and choose “Scan for Hardware Changes.” This, in turn, finds the WiFi network adapter but it does not have drivers yet.
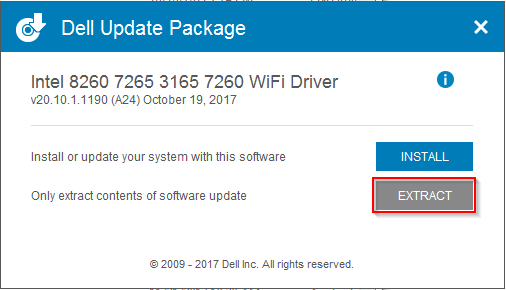
  3. Go to https://support.dell.com and type in the Service Tag, find the drivers section and download the following driver: Intel-8260-7265-3165-7260-WiFi-Driver_YM1PH_WIN_20.10.1.1190_A24.exe
  4. Run the .exe and when it asks if I want to install the driver or extract, I chose Extract only. I make a new folder under the root of my C: drive and finish the extraction. 
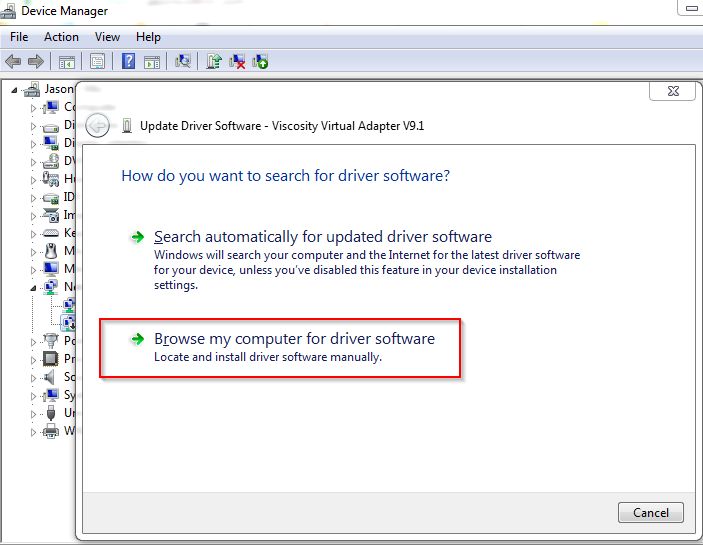
  5. Back in the Device Manager, Right-click on the WiFi adapter and choose to “Browse my computer for driver software”. 
  6. Point to the location of the extracted drivers, finish the installation and log off. The laptop can now find the logon server/domain controller and the user is back in business.

For some reason the full suite driver for this model of laptop interferes with DNS and the laptop cannot find the logon server and login to the domain. By extracting the drivers only and telling the device manager to use only the .inf files for the device, we can circumvent the driver suite and get our adapter talking to the domain controller for authentication.

Test USB 3.0 and USB 2.0 thumb flash drive on Windows 10 read write speeds

How to test USB thumb drives for USB 3.0, USB 2.0, and test Read and Write Speeds on Windows 10

Determine if USB Port is 2.0 or 3.0 in Windows 10:

Below are some directions and screenshots of how you can tell if a USB drive is connected to Windows 10 with USB 3.0 or USB 2.0., first insert the drive into a USB port on your Windows 10 computer.

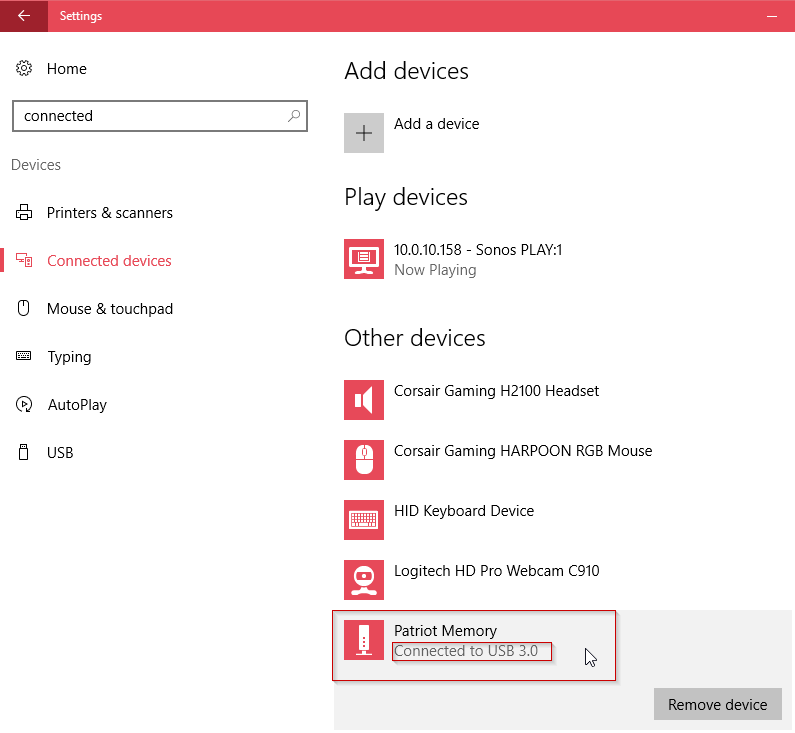
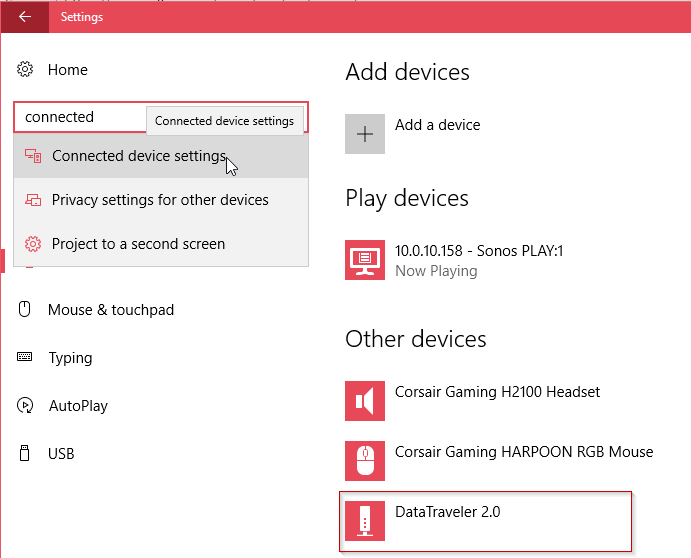
Click on the Start Button > then click on the Settings gear icon > in the “Find a Setting” box > type “Connected Devices” > then click on the “Connected Device Settings” icon. The USB 3.0 will show “Connected to USB 3.0”, the USB 2.0 drives will not display these words:

Testing Read and Write speeds of USB 2.0 and USB 3.0 with SpeedOut utility and  Windows 10.

I picked up a couple thumb drives this weekend that were on sale at Frys. I like to have both USB 2.0 and USB 3.0 drives on hand in case a computer doesn’t recognize USB 3.0 as a boot drive. I wanted to determine the Read and Write speeds of my USB drives to test if they actually display a difference according to their listed specs (spoiler alert: numbers can be deceiving.) My PC workstation has an Intel SSD drive and USB 3.0 ports.  I downloaded and ran the SpeedOut v0.5 utility against 4 different USB thumb drives:

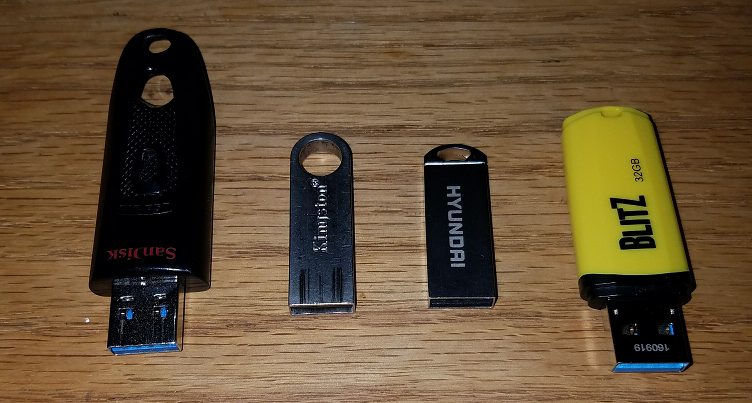
  1. Patriot Memory Flash PSF32GBLZ3USB 32GB USB3.0 BLITZ with a yellow plastic case.
  2. Hyundai USB 2.0 Bravo 16GB with a metal case.
  3. Kingston USB 2.0 DTS E9 Data Traveller 16GB with a metal case.
  4. SanDisk Ultra USB 3.0 32GB SDCZ48-032G with a plastic case.

All four drives were formatted FAT32 (and I tested the Patriot drive as NTFS.) The way you know if a device is connected to 3.0 USB in windows 10: Start > Settings > Search “Find a setting” : type in “devices” > Show all results > Connected Device Settings > Other devices > Find your USB drive and it should say “Connected to USB 3.0”. More details on where to find this setting at the bottom of the article.

Anyway, I ran SpeedOut utility against the Patriot USB 3.0 drive first, and the results were: 23.7 MB/s READ and 27.8 MB/s.

I ran the same SpeedOut test against on the same USB port using a HYUNDAI USB 2.0 BRAVO 16GB drive (wasn’t recognized as USB3.0 by Windows 10) and it’s results were: 21.9 READ and 10.5 WRITE.

Then I ran the same SpeedOut test again using a Kingston DTS E9 Data Traveler and it’s results were 17.158 READ and 9.8 MB/s WRITE.

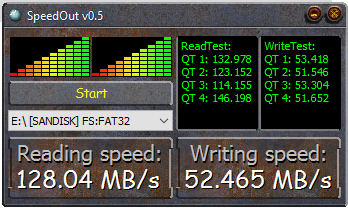
Lastly I ran the same SpeedOut test again using a SanDisk Ultra USB 3.0 32GB drive and the results were: 128.04 MB/s READ and 52.47 MB/s WRITE.

I gave the Patriot USB 3.0 drive another chance the results of a 2nd read write test against the drive were pretty good:

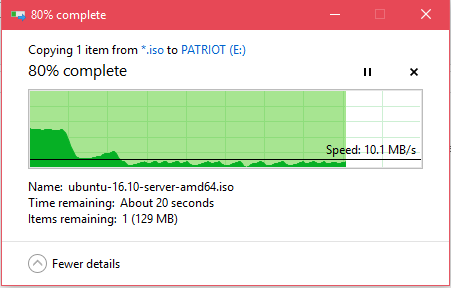
This test gave me hope that the drive would have decent write speeds but upon testing the copy of an ubuntu-16.10-server-amd64.iso (684.032 MB) file from my SSD drive to the Patriot USB 3.0 Drive, the results show surprisingly slow speeds after an initial burst of speed:

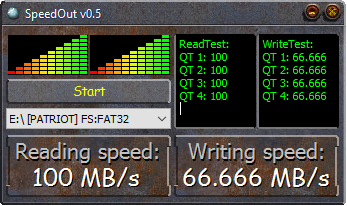
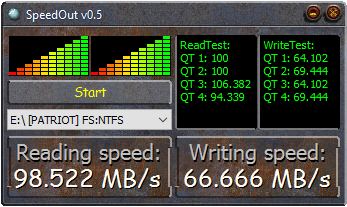
I thought perhaps this may have to do with the drive formatted as Fat32, so I formatted the drive as NTFS and tried again. Here is the SpeedOut result first:

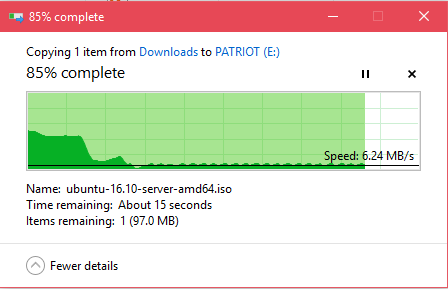
Now the same Ubuntu.iso copy and it’s results:

Same results. The write speed would alternate between 6.24 MB/s and 12 MB/s which is in all reality pretty abysmal for a USB 3.0 drive! The total copy time for the 684MB file was 55.12 seconds…

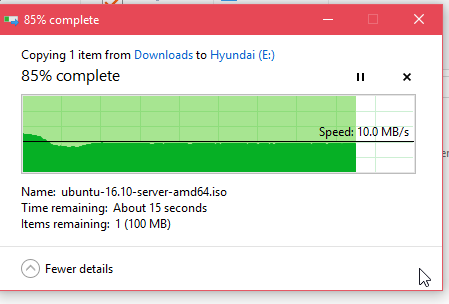
The total copy time for the HYUNDAI USB drive for the same ubuntu .iso was 1:10.02 seconds.

The USB Patriot USB 3.0 drive did not fare much better than the Hyundai USB 2.0 drive, but I did notice that there is an initial speed burst when copying data to the Patriot drive. To test this I copied a 100MB file to the Patriot drive and while the first copy of the 94MB file did quickly finish at around 60 MB/s, however subsequent tests were very low again in the 6-12MB/sec range. The Patriot drive is no other way to describe than flaky; fast sometimes for a little while, but ultimately pretty slow – just a little better than the USB 2.0 drives.

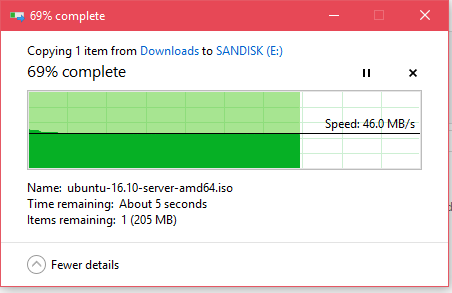
Lastly I tested the copy speed of the same Ubuntu .iso file to the SanDisk Ultra 3.0 32 GB drive formatted Fat32 and the amount of time to copy was  14.59 seconds!

Just because something says USB 3.0 and is on sale, doesn’t mean you’re going to get true USB 3.0 speeds reliably…