Configuring SonicWall TZ210 and XP/Vista/7 client with RDP passthrough

Clients on your network may wish to work from home. While there are alternatives like GoToMyPC or LogMeIn, this is a free alternative. You will need spare public IP addresses that you can configure your domain’s DNS and your SonicWall to allow RDP traffic to clients on your LAN.

1. Ensure the client has RDP enabled. On the Windows PC, go to System Settings and then the Remote tab and make sure “any RDP client” is allowed access. Some of your clients may be using Macs and do not use Windows RDP clients. Also, it’s best to narrow down access to only particular user accounts (the user and administrator). Once RDP is enabled be sure to test connecting from a different client within your Local Area Network. If you can’t RDP into the client from within your LAN, you sure won’t be able to get to the machine remotely!

2. Go to your Domain Registrar and setup a sub domain for your user. In this example, I’m using my.1and1.com. Once logged in, click on “Domains”, then click on “New” and then “Subdomain”. Give the subdomain a friendly name. In this case I am using Julie.domainname.com. Once the subdomain has been added, place a checkmark next to the new subdomain, and then click on the DNS button dropdown and click Edit. Under Advanced DNS Settings -> IP Address (A-Record) : Change the radio button to “Other IP Addresses”. Enter in the Public IP address you want specified for the client. Make sure you record the IP address, because we will be using it again soon on the SonicWALL. As far as DNS replication is concerned, I’ve found that it takes place pretty quickly, if not 5 to 10 minutes for the new address to be resolved.
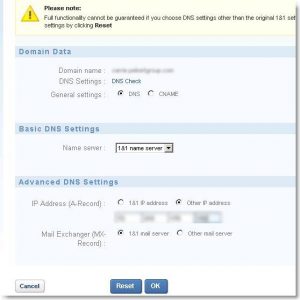
click image to enlarge


3. You should now see the entry along with the rest of your domain’s records. That should take care of the external DNS side of things.
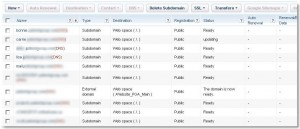
Click Image to Enlarge


4. Now log into your SonicWALL and browse to Network -> Address Objects. Here we will create two new address objects. “Username_Computer Private”, and “Username_Computer Public”. Click on the Add… button.

— For Username_Computer Private use:

Name: Username_Computer Private

Zone Assignment: LAN

Type: Host

IP Address: (Internal IP Address 192.168…..)

— Click the Add… button again for Username_Computer Public:

Name: Username_Computer Private

Zone Assignment: WAN

Type: Host

IP Address: (External IP address you created in your Domain’s registrar)

5. Now that the Address Objects have been created, we can move on to Services. On the sonicwall, browse to Network -> Services.

Click on Add Group. In the Name field, type in “Username Computer Services”. Then find Terminal Services in the list on the left side of the screen, and add it to the right-hand pane and click OK. That’s it for this part.

6. Now we are going to add NAT policies for our Network. Browse to Network -> NAT Policies.

First we are going to want to add a Loopback policy which should look like the following:
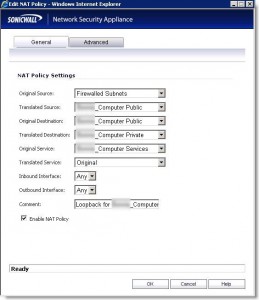
click image to enlarge


Be sure to add a comment “Loopback for Username_Computer”

Next, we’ll add Private to Public Translation which will look like the following. Make sure your Outbound interface is your WAN interface, typically X1:
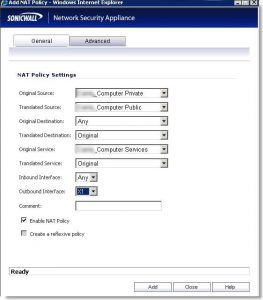
click image to enlarge


Next we’re going to do Public to Private Translation:
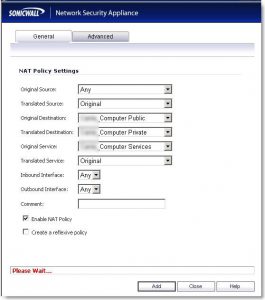
click image to enlarge


7. Lastly, we’re going to configure the firewall to allow traffic. Go to Firewall – Access Rules -> WAN to LAN which should have the following settings:
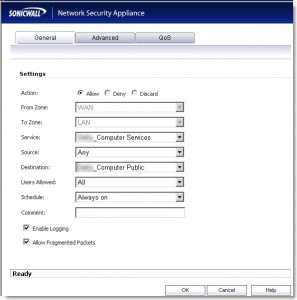
click image to enlarge


Action: Allow

From Zone: WAN

To Zone: LAN

Services: Username_Computer Services

Source: ANY

Destination: Username_Computer Public

Users allowed: All

Schedule: Always On


That should do it! You can now test by trying to RDP from any computer using the friendly subdomain name you setup with your domain’s registrar. If you are prompted for a username and password, your subdomain name and firewall are configured correctly.

Perhaps you may want to email your users the following instructions to assist them in connecting to their PC at work:

Greetings, you now have the ability to access your work PC from home. Before you try connecting for the first time, make sure you have the following:
1. A stable DSL, Cable, WiFi, Satellite, or 3G/4G internet connection (no dial-up).
2. A PC running at least: Windows XP with Service Pack 2 or Service Pack 3, Windows Vista, or Windows 7. To find the RDP client on a Windows PC, go to the Start button, then Programs, Accessories, Remote Desktop Connection.
3. A Mac with at least OSX and a Terminal Services (RDP) client. There are some free RDP clients like CoRD, or TSclientX that you can download and install on your Mac.
4. Up-to-date Anti-Virus protection.
If you’re going to access your work PC from your home PC, you will need to start up an RDP client on your home PC. Type in the friendly name for the PC at work for the “computer” name (give the user their friendly name somewhere in the email). For example, Scott would start an RDP session at home and use “Scott.DomainName.com” (without quotes) as the name of the computer he’s connecting into. When you’re prompted for your username and password, put in the domain name followed by a backslash and your username. In Scott’s case, the username is: DomainNameScottH. Then type in your password and click the Connect button. You may be prompted to login again. Simply login again using the same credentials you would normally use, as if you are sitting in front of your PC at work.
In our experience, there are some things to look out for when using Terminal Services:
1. You should only print to the printers connected to your PC at work. Trying to print to your printer at home may or may not work, and trying to do so may cause your session to hang or disconnect. If you have to print to your printer at home, you may want to email yourself the file. Also, trying to transfer files to and from your Home PC or Mac with your Work PC is slow and cumbersome. It’s best to leave work files on your PC at work.
2. Your session should stay active for long periods of time. If you are consistently losing your connection, you may need to speak to your ISP to see if there are interruptions in your service.
3. You can only RDP into your PC at work if it is powered up. PC’s at work that are set to sleep, hibernate, or shut down after a period of inactivity may not be accessible. If you plan on using your work PC from home, make sure it’s powered up and not set to automatically shutdown/sleep/hibernate.
“The Management”


SonicWALL WAN Probe Monitoring

Ensuring your secondary WAN interface activates in the event either your primary router or primary ISP stops responding.

In the previous post, we discussed how businesses are increasingly relying on their internet for cloud-based services such as email, shared documents and applications. Using multiple SonicWALL appliances and multiple WAN/ISP interfaces, you can help protect your users from an internet outage by configuring your routers to fail-over. A SonicWALL can perform either interface or physical probing.

If Probe Monitoring is not activated, the SonicWALL security appliance performs physical monitoring only on the Primary and Secondary WAN interfaces, meaning it only marks a WAN interface as Failed if the interface is disconnected or stops receiving an Ethernet-layer signal (Layer 2).

This is not an assured means of link monitoring, because it does not address most failure scenarios (for example, routing issues with your ISP or an upstream router that is no longer passing traffic). If the WAN interface is connected to a hub or switch, and the router providing the connection to the ISP (also connected to this hub or switch) were to fail, the SonicWALL will continue to believe the WAN link is usable, because the connection to the hub or switch is good. For this reason, if you setup failover with multiple routers, then you will also want to enable a TCP-based probe at the application Layer 4 so that you can ensure your packets/probes are monitored for successful connections, and your WAN fail-over will in turn work as expected.

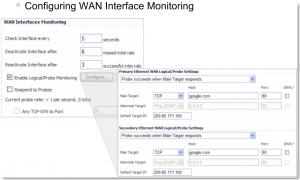
Under the WAN Interfaces Monitoring heading, you can customize how the SonicWALL security appliance monitors the WAN interface:

WANMonitoring

This example shows how a probe is configured correctly where you’re monitoring for successful (syn-ack’s) from google.com.

Options and Notes:

Check Interface every: Enter a number between 5 and 300. The default value is 5 seconds.

Deactivate Interface after _ missed intervals: Enter a number between 1 and 10. The default value is 3, which means the interface is considered inactive after 3 consecutive unsuccessful attempts.

Reactivate Interface after _ successful intervals: Enter a number between 1 and 100. The default value is 3, which means the interface is considered active after 3 consecutive successful attempts.

Respond to Probes: Use this field to allow the SonicWALL security appliance respond to SonicWALL TCP probes received on any of its WAN ports.

Any TCP-SYN to Port: Use this field to instruct the SonicWALL security appliance to respond to TCP probes to the specified port number without validating them first. The Any TCP-SYN to Port box should only be checked when receiving TCP probes from SonicWALL security appliances running SonicOS Standard or older, legacy SonicWALL security appliances.

Note: If there is a NAT device between the two devices sending and receiving TCP probes, the Any TCP-SYN to Port box must be checked and the same port number must be configured here and in the Configure WAN Probe Monitoring window.

Configure Probe Monitoring

Enable Logical/Probe Monitoring: Selecting this field instructs the SonicWALL security appliance to perform logical checks of upstream targets to ensure that the line is indeed usable, eliminating this potential problem, as well as to continue to do physical monitoring. Under the default probe monitoring configuration, the SonicWALL performs an ICMP ping probe of both WAN ports’ default gateways. Unfortunately, this is also not an assured means of link monitoring, because service interruption may be occurring farther upstream. If your ISP is experiencing problems in its routing infrastructure, a successful ICMP ping of their router causes the SonicWALL security appliance to believe the line is usable, when in fact, it may not be able to pass traffic to and from the public Internet at all.

To perform reliable link monitoring, you can choose TCP or ICMP (Ping) as the monitoring method, and can specify up to two targets for each WAN port. If you specify two targets, Main Target and Alternate Target, for each WAN interface, you can logically link the two probe targets so that if either one fails, the line will go down, or that both must fail for the line to be considered down. TCP is preferred because many devices on the public Internet now actively drop or block ICMP (Ping) requests.

SNWL?: Select this box if the target device is a SonicWALL security appliance. Do not check the SNWL? box for third-party devices, because the TCP probes may not work consistently.

Default Target IP: Optionally, you can enter a default target IP address in the Default Target IP field. In case of a DNS failure, when a host name is specified, the default target IP address is used.

There is much discussion below on the best strategies for setting up your probes. As always, test (and test again) your configurations in the lab prior to placing your firewall into production.


SonicWALL Hardware Failover/Load Balancing

SonicWALL Hardware Failover/Load Balancing

Interfaces1-650x288

With businesses today relying more and more on their Internet connection for critical email and cloud-based services, there is a growing need for providing hardware and ISP redundancy to ensure continuous uptime even in event of a hardware or ISP failure. The SonicWALL security appliance performs physical monitoring only on the Primary and Secondary WAN interfaces, meaning it only marks a WAN interface as Failed if the interface is disconnected or stops receiving an Ethernet-layer signal. For this reason, please see my next post to enable Probe Monitoring to cover all your bases in the event of a routing failure.

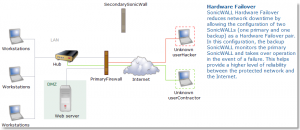
Due to this demand, two SonicWALL PRO appliances may run in Hardware Failover mode, which will provide security and connectivity in the event that one SonicWALL or an ISP becomes unstable or unavailable. In addition, SonicOS Enhanced firmware supports the ability to create multiple WAN interfaces (XO, X3), which can provide the use of multiple Internet connections either simultaneously or as a backup.

WAN Failover and Load Balancing allows you to designate the one of the user-assigned interfaces as a Secondary or backup WAN port. The secondary WAN port can be used in a simple active/passive setup, where traffic is only routed through the secondary WAN port if the primary WAN port is down and/or unavailable. This feature is referred to as basic failover. This allows the SonicWALL security appliance to maintain a persistent connection for WAN port traffic by failing over to the secondary WAN port. The primary and secondary WAN ports can also be used in a more dynamic active/active setup, where the administrator can choose a method of dividing outbound traffic flows between the Primary fixed WAN port and the user-assigned Secondary WAN port. This latter feature is referred to as load balancing.

WAN Failover and Load Balancing applies to outbound-initiated traffic only; it cannot be used to perform inbound Load Balancing functions, such as what a content switching or Load Balancing appliance provides.

Make sure that the SonicWALL appliance has the proper NAT policies for the Secondary WAN interface. An incorrect or missing NAT Policy for the Secondary WAN port is the most common problem seen when configuring WAN Failover & Load Balancing.

The Primary and Secondary WAN ports cannot be on the same IP subnet; each WAN connection must be on unique IP subnets in order to work properly.

You cannot use the WAN failover feature if you have configured the SonicWALL security appliance to use Transparent Mode in the Network > Interfaces page.

When you establish a connection with a WAN, you can create multiple interfaces, dividing up the task load over these interfaces. There are both Primary and Secondary WAN interfaces. This task distribution model maintains high performance, ensuring that one interface does not become an impasse to the point where it blocks traffic from passing. This process is WAN Load Balancing. While WAN Load Balancing addresses performance challenges, it can create other problems, including losing track of sessions. Session confusion can occur because some applications fail to adequately track multiple user sessions Load Balanced on multiple interfaces. These applications treat incoming packets as originating from different users because they use IP addresses to differentiate user sessions instead of application-layer user identification tags. To ensure that you have proper connectivity in all applications, SonicWALL provides a feature called Source and Destination IP addresses Binding, a solution that maintains a consistent mapping of traffic flows with a single outbound WAN interface.

Primary WAN Ethernet Interface: X1 should normally be the selection.

Secondary WAN Ethernet Interface: If there are multiple possible secondary WAN interfaces, select the WAN Interface to be used for Failover and Load Balancing. X3 should normally be the selection.

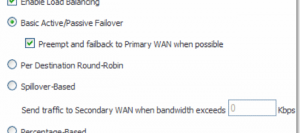
By default the Enable Load Balancing check box is selected.  The SonicWALL will select Basic Active/Passive Failover as the method, but there are several load balancing methods available:

Basic Active/Passive Failover: When selected, the SonicWALL security appliance only sends traffic through the Secondary WAN interface if the Primary WAN interface has been marked inactive. The SonicWALL security appliance is set to use this as the default load balancing method. If the Primary WAN fails, then the SonicWALL security appliance reverts to this method.

Preempt and fail back to Primary WAN when possible: When this check box is selected, the SonicWALL security appliance switches back to sending its traffic across the Primary WAN interface when it either resumes responding to the SonicWALL security appliances when the WAN’s physical link is restored or the logical probe targets on the WAN port resume responding.

Per Destination Round-Robin: When selected, the SonicWALL security appliance Load Balances outgoing traffic on a per-destination basis. This is a simple load balancing method and, though not very granular, allows you to utilize both links in a basic fashion.  Please note this feature will be overridden by specific static route entries.

Spillover-Based: When selected, the SonicWALL administrator can specify when the SonicWALL security appliance starts sending traffic through the Secondary WAN interface. This method allows the SonicWALL administrator to control when and if the Secondary interface is used. This method is used if you do not want outbound traffic sent across the Secondary WAN unless the Primary WAN is overloaded. The SonicWALL security appliance has a non-Management Interface exposed hold timer set to 20 seconds – if the sustained outbound traffic across the Primary WAN interface exceeds the administrator-defined bits per second (bps), then the SonicWALL security appliance spills outbound traffic to the Secondary WAN interface (on a per-destination basis). Please note this feature is overridden by specific static route entries.

Percentage-Based: When selected, you can specify the percentages of traffic sent through the Primary WAN and Secondary WAN interfaces. This method allows you to actively utilize both Primary and Secondary WAN interfaces. Please note this feature is overridden by specific static route entries.

Use Source and Destination IP Address Binding: When this checkbox is selected, it enables you to maintain a consistent mapping of traffic flows with a single outbound WAN interface, regardless of the percentage of traffic through that interface. Therefore, the outbound IP address of the connection remains consistent. However the percentage of traffic in each WAN interface may not match the percentage you specify in the Primary WAN Percentage field. This method uses only the source IP address and the destination IP address to determine when to bind a connection to a single interface and ignores all other information, such as source and destination TCP port numbers.

HardwareFailover2


Heartbeat1-932x288


Re-Establish-949x288