Exchange 2010 and Server 2008 R2 Prerequisites Installation Part 3

Server 2008 R2 Prerequisites Installation:

This sub-section will guide you to prepare your Active Directory and Domain environment.

1. To perform this tasks we need an User ID with Schema AdminsDomain Admins and Enterprise Admins group membership.

2. In the Active Directory Domain Server run the following command

Go to StartRunServerManagerCmd -i RSAT-ADDS .This command will install the Active Directory management tools.

3. In the Active Directory Domain Server run the following command.

setup /PrepareAD /OrganizationName: or setup /p /on:

Note: In this command is a variable this will vary according to your environment Ex: setup /PrepareAD /OrganizationName:jasoncoltrin. Before run this command browse to Exchange 2010 binaries path or include the Exchange binaries path Ex: “M:Setup.com /PrepareAD /OrganizationName:jasoncoltrin”

  1. For Hub Transport and Mailbox servers install the MS Filter Pack. The filterpack can be found here: http://www.microsoft.com/downloads/en/details.aspx?familyid=60c92a37-719c-4077-b5c6-cac34f4227cc&displaylang=en . Be sure to install the 64bit version. Run the setup wizard, and complete the install. *Note: On Exchange 2010 RTM, you can meet the prerequisite by installing 2007 Office System Converter: Microsoft Filter Pack. However, MS recommends that you upgrade to the Microsoft Office 2010 Filter Packs.
  2. In the PowerShell, type Import-Module ServerManager – Open powershell. type in import-module servermanager.
  3. Use the Add-WindowsFeature cmdlet to type (in actuality it’s much easier to install the features throught the PowerShell). Go to TechNet page here: http://technet.microsoft.com/en-us/library/bb691354.aspx and find the bullet that lists: “Install the Windows Server 2008 R2 operating system prerequisites”. Below is the command:
    Add-WindowsFeature NET-Framework,RSAT-ADDS,Web-Server,Web-Basic-Auth,Web-Windows-Auth,Web-Metabase,Web-Net-Ext,Web-Lgcy-Mgmt-Console,WAS-Process-Model,RSAT-Web-Server,Web-ISAPI-Ext,Web-Digest-Auth,Web-Dyn-Compression,NET-HTTP-Activation,RPC-Over-HTTP-Proxy,Desktop-Experience -Restart

    Prerequisites_Install_Progress
    Click to enlarge image
    * As an alternative you can run the script from the Scripts folder on the Exchange DVD. Go to Start | Run | cmd | Browse to Exchange 2010 Binaries Scripts folder by using cd Scripts command | Run ServerManagerCmd -ip Exchange-Typical.xml –RestartNote: This command should be run from Scripts directory of Exchange 2010 DVD *Note: it’s a good idea to extract the Exchange 2010 binaries to a folder off of your C: drive (something like c:exch2k10, so that it’s easier to find the “Scripts” folder.)
  4. Note: If you aren’t using the UM role you can remove Desktop-Experience. Conclude after the restart by configuring the TCP Port Service to start automatically using (only CAS roles):
    From the PowerShell, execute the command: Set-Service NetTcpPortSharing -StartupType Automatic

This prerequisites guide is not exhaustive, but you should now have all the prerequisites to installing Exchange 2010. Please let me know if you find any other prerequisites missing.

A great installation guide can be found here as well:

http://muc-ug.org.in/index.php/articles/exchange-2010/109-installing-exchange-server-2010.html


A good majority of the content provided in my Blog’s Exchange series is derived from J. Peter Bruzzese’ excellent Train Signals Exchange Server 2010 Video Disk Series, as well as my own Exchange 2010 lab. Trainsignal.com is an invaluable source for accurate, easy to understand, IT information and training. http://www.trainsignal.com


Exchange Server 2010 Overview Part 1

Microsoft’s Exchange Server:

Email is a mission critical tool for business. How do you provide that capability? Hosted, in-house, BPOS? There are many options. With Exchange you gain the following:

  • A reliable and flexible messaging platform for business communications.
  • Provides e-mail capabilities
  • Also provides calendar access and contact management
  • Users can have access to their communications anywhere; through their browser, mobile device, or their Outlook client.

Exchange 2010 adds the following:

  • Provides the email typical for Exchange that we’ve come to expect. Some features are the same as Exchange 2007, but new features are notable.
  • Continues the Server Roles for your organization’s deployment strategy. (5 Roles)
  • Includes High Availability and Site Resilience
  • Allows Unified Communications through the Unified Messaging Server Role that will give users a Universal Inbox (fax’s, voicemail, etc)

5 Server Roles: – Prior to Exchange Server 2010, you installed the entire Exchange infrastructure on an Exchange Server. Eg. if a Front-end server was only needed, you still had to install the entire Exchange Infrastructure. Now you have a lighter footprint with Roles. Server 2008 also uses Roles and Features.

  • The Mailbox Role: user mailboxes with mailbox DB’s. Also contains public folders.
  • Client Access Role: connection point for all users to their mailboxes internally or externally. (MAPI, OWA, Outlook Anywhere, ActiveSync, IMAP/POP)
  • Hub Transport Role: Flow of traffic to and from the Mailbox server. (These first 3 roles need to be installed in order for Exchange to work, but not necessarily on the same server.)
  • Optional Role – Unified Messaging Role: Provides the Universal Inbox for voicemail, email, faxes, etc.
  • Optional Role (recommended)- Edge Transport Role: Perimeter-based server to handle anti-spam and anti-virus protection and additional transport rules.

Requirments for Exchange 2010:

1. Domain Controller – AD Domain controller

2. DNS Services

3. Member Server (on which you will install Exchange)


For Exchange 2010 running behind your firewall or DMZ on your internal network, you can install the following 4 roles on their own server: Client Access Server, Mailbox Server, Hub Transport Server, and Unified Messaging Server.

To add an Edge Transport Server to your network, you will need to setup a Member Server that is not a member of the Domain. You install Exchange, but only the ET server role. This will sit out on the Perimeter Network (between internal and external firewalls – DMZ). Again, the ET server cannot be a member of the Domain.

New in Exchange 2010:

Storage Architecture – There’s a new focus on the database itself, not on a storage group. Storage groups have been removed from Exchange’s DB design (Exchange 2000 – 2007)

High Availability and Site Resiliency – Database Availability Groups have replaced legacy Exchange  HA versions.

Permissions – Role-based access control has been implemented – permissions to manage exchange.

Control – A cool new Web-Based Exchange Control Panel (ECP). Carries over Exchange 2007’s exchange management console and an exchange management shell.

Voicemail and Unified Messaging – including voicemail preview, better protection.

Exchange 2010 has something for everyone. It is a complete communications platform for organizations large and small.


A good majority of the content provided in my Exchange series is derived from J. Peter Bruzzese’ excellent Train Signals Exchange Server 2010 Video Disk Series. Trainsignal.com is an invaluable source for accurate, easy to understand, IT information and training. http://www.trainsignal.com

Networking Fundamentals – Part 2

Repeater: A repeater’s job is to repeat an electrical signal. The form that our data has taken to be sent across a cable is one’s and zeros. The repeater takes an incoming signal and then generates a new clean copy of that exact signal. This prevents maximum cable lengths from stopping transmissions and helps ward off attenuation; the gradual weakening of a signal.

Hubs – only one PC at a time can send data; if multiple PC’s are connected to a single hub, it’s One Big Collision Domain. To prevent collisions, a host will use CSMA/CD (Carrier sense multiple access with collision detection).

CSMA/CD:

  • carrier sensing scheme is used.
  • a transmitting data station that detects another signal while transmitting a frame, stops transmitting that frame, transmits a jam signal, and then waits for a random time interval before trying to send that frame again.

Bridge – used to create smaller collision domains. Place a bridge between multiple hubs. More collision domains is more beneficial. Segmenting the collision domains does not reduce the amount of broadcasts (for example, multiple hubs separated by multiple bridges is still one big broadcast domain). Every single host will receive a broadcast.

Broadcasts are not a bad thing, broadcasts can be beneficial by providing routing updates. But we do want to lower the number of broadcasts.

Switches: each host is in it’s own collision domain. Collisions cannot occur. Each host has more bandwidth available; not sharing bandwidth. Theoretically each host can run at 200mb (100mb sending, 100mb receiving with full duplex). Switches by default do not break up broadcast domains. Microsegmentation is a term sometimes used with Cisco documentation to describe the one host/one collision effect.

A switch will do one of three things with an incoming frame:

  • Forward it
  • Flood it
  • Filter it

The switch looks at it’s Mac address table to check if there is an entry for the destination MAC address, but first the switch will look to see if there’s an entry for the source MAC address in the frame. The switch uses the source MAC address to build the table. You can statically configure MAC address tables but not recommended.

#show mac-address-table    —   The command we use to look at the mac address table on a switch.

An unknown UNICAST frame is always flooded. – If an unknown unicast frame has to hit 79 other ports in an 80 port switch, it can cause a bit of overhead on the switch/cpu.

#show mac-address-table dynamic

If the switch does not have an entry for the destination mac address, and a host replies to the flood with the correct response, the switch will create an entry for the new host.

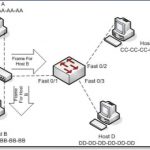
Take into consideration the following diagram:

SwitchFilterExample
click image to enlarge

In this instance, hosts A and B are in the same collision domain, separated by a hub. When Host A sends out a frame destined for Host B, and the frame arrives at the switch, the switch looks at it’s dynamic MAC address table and sees that the frame is destined for the same port as it’s origin. In this case the switch will FILTER the frame (drop the frame):

MacTableFilterExample
Click to enlarge image

Switches never send a frame back out the same port from which the frame arrived.

Flooding: When the switch has no entry for the frame’s destination MAC address. The frame is sent out every single port on the switch except the one it came in on. Unknown unicast frames  are always flooded.

Forwarding: when the switch does have an entry for the frame’s destination MAC address. Forwarding a frame means the frame is being sent out only one port on the switch.

Filtering: when the switch has an entry for both the source and the destination MAC address; the MAC table indicates that both addresses are found on the same port. (See image above)

Broadcast frames: a frame that is sent out every port on the switch except the one that received it. Broadcast frames are intended for all hosts, and the MAC broadcast address is ff-ff-ff-ff-ff-ff.

We can statically configure a port with a MAC address but not best practice. Dynamically learned MAC addresses will age out with a default of 300 seconds (5 minutes).

Command to see help for the tables is

#mac-address-table ?

then

#mac-address-table aging-time ?

0-0 Enter 0 to disable aging (not a good thing to do)

10-1000000 Aging time in seconds

The benefit of Dynamically configured MAC addresses is that if the host is not seen in 5 minutes or the interface goes down; physical damage to the port, when the host is connected to a different port, the switch will dynamically update the table with the source. The current entry will be aged out. Let the switch do it’s work, and use dynamically assigned addresses.

When the switch forwards, floods, or filters the frame, there is another decision to be made – how will the forwarding be processed?

Three different processing options:

  • Store-And-Forward
  • Cut-Through
  • Fragment-Free

Store and Forward is the default method on newer switches. The entire frame is stored and then forwarded.

Store and Forward – uses FCS – allows the recipient of the frame to determine if the data was corrupted during transmission (error detection). In the incoming frame the switch will read the destination MAC address before it looks at the FCS. The switch can check the FCS before forwarding the incoming frame. Gives us more error detection than the other two methods above.

Cut-Through – switch reads the MAC addresses on the incoming frame, and immediately begins forwarding the frame before rest of the frame is even read. Cut through is a lot faster. Cannot check for damaged frames.

Fragment-Free (middle ground for speed vs. error detection) works on the presumption that the corruption will be found in the first 64 bytes of the frame for damage. If no damage, then the forwarding process will begin.

Use virtual LANs to segment a network into smaller broadcast domains. In a production network, you can have a lot of hosts and each host can send out broadcasts with a cumulative effects. Hosts tend to respond to Broadcasts with a Broadcast of their own.

Broadcast Storm: can max out a switch’s resources (memory and cpu) making the switch useless. But before this, broadcasts may take up most of the bandwidth.

Create multiple broadcast domains to limit the scope of a broadcasts.

Basic command to view vlans is

#show vlan

but for practical use, the command below is better:

#show vlan brief

By default, you will have a single vlan on modern cisco switches.

To put for example two hosts in a separate single vlan (broadcast domain),

#conf t

#interface fast 0/2

#description Connected to Host 2

#switchport access vlan 24

#switchport mode access    — to makes access to only one vlan – no trunking

then

#int fast 0/4

#description Connected to Host 4

#switchport mode access

#switchport access vlan 24

#^Z

#copy run start

#show vlan brief

Once host2 and host4 are on the same vlan they won’t be able to ping other hosts on other vlans.

No traffic – pings or data packets can be sent from one VLAN to another without intervention of a Layer 3 device; most likely a router.


Exchange/SBS 2003 – You do not have permission to send to this recipient. -Solved!

There are a lot of variables where a problem like this can take a while to track down and resolve, so hopefully if you encounter this issue again, the resolution will be easy.

A user called complaining they would receive a bounceback message from Exchange whenever trying to send an email as a different user, for example, “[email protected]”. They had not previously experienced this problem trying to send on behalf of that user and “something suddenly changed.”

To make a long story short, in this case, the resolution was that the From: field contained a corrupt .NK2/NickName entry for the “Promoter” address. When auto-resolving the email address for the “From” field, I had to type in the first letter of the bad entry, arrow down to the corrupt entry in the nickname list, so that it was highlighted and hit the Delete button. Next, to put in the correct “From: Promoter” address, I had to manually click the “From” button, go to the Global Address List and select “Promoter”. This resolved the correct entry and the From: field was now populated with “Promoter” instead of “[email protected]”. The message could now be sent without a failure/bounceback/error message.

Read below for the workflow that caused the problem and what I had to do to resolve it:

The user opened a new mail message. The From field is “shown” and the user typed in the first letter of the address who the email is from. In this case, “p”. This auto-resolved the nickname as an email address “[email protected]”. The user would then type in the recipients name into the To: field (in this case [email protected]) and then supply a subject, a message body, and hit send. A moment later the following email arrived from the Exchange System:

Your message did not reach some or all of the intended recipients.

Subject: test Sent: 4/27/2011 11:43 AM
The following recipient(s) cannot be reached:
example@hotmail.com on 4/27/2011 11:42 AM            You do not have permission to send to this recipient.  For assistance, contact your system administrator.            MSEXCH:MSExchangeIS:/DC=local/DC=domain:servername

Solution:

The first thing to check was that the user has the ability to send on behalf of the “Promoter” account:

On the SBS2003 server, go to Server Management. Click on the View menu and checkmark the “Advanced Features”. Then browse   -> Active Directory Users and Computers -> Domain.local ->MyBusiness ->Users -> SBSUsers

Right click on the account that the user is trying to send on behalf of (in this case “Promoter”). Click on the Exchange General tab. Click on the Delivery Options… button. Under Send on behalf, make sure the user that is trying to send as is listed under “Grant this permission to:”. If not, click the Add button… and add the user.

Next, in Server Management, browse to Advanced Management -> EXCHANGESERVERNAME (Exchange) ->Servers -> SERVERNAME -> Protocols -> SMTP

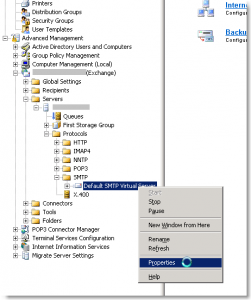
Right-click on “Default SMTP Virtual Server” and click Properties.

SMTP Properties.jpg
Click image to enlarge

Under the Access tab, click on the Relay… button

Under Relay Restrictions, “Only the list below” should be selected and Granted: the server’s IP address/SNM; and Granted loopback 127.0.0.1

Uncheck “Allow all computers which successfully authenticate to relay, regardless of the list above. Click on the Users… button. Under Permissions – Group or user names, make sure Authenticated Users has both Submit and Relay permission set to Allow. Click OK, OK, OK.

If any changes have been made to SMTP, right-click on Default SMTP Virtual Server under Protocols/SMTP and Stop/Start the Default SMTP Virtual Server.

Now, on the client, open a new mail message, remove the bad auto-resolving address, click on the From: button, select the account you wish to send from, and hit “Send”. See the 2nd paragraph of this post for further details on how to accomplish this part. The message should now be sent to the recipeint with the correct “From” address.


ActiveSynch troubleshooting on Exchange/SBS 2003

Do you have Exchange running in your environment but are having trouble connecting iPhones and Android phones? ActiveSync is much more preferable to POP or IMAP, so hunker down and fix ActiveSync on your server to get email, calendar, and contacts synched with your smartphones. Below are two of my favorite links for troubleshooting ActiveSync on Exchange and Small Business Server 2003. I was able to resolve issues on a few servers who’s certificates had expired by using the following resources:

Alan Hardisty’s ActiveSync Configuration Guide is a great starting point:

http://alanhardisty.wordpress.com/2010/02/28/exchange-2003-and-activesync-configuration-and-troubleshooting/

Secondly, the following website can test Exchange connectivity in a number of different ways:

https://testexchangeconnectivity.com/

The site above is able to test exchange connectivity with the following tests:

Microsoft Exchange ActiveSync Connectivity Tests
Microsoft Exchange Web Services Connectivity Tests
Microsoft Office Outlook Connectivity Tests
Internet E-Mail Tests