Sharing a Windows 7 Notebook/Laptop Wireless Connection with a Desktop PC Using A Bridge

I have a notebook that is connected to a wireless network and also has a Cat5 network port. I also have a desktop PC with no wireless card, but is too difficult to run a cable to the wireless router. How do you easily share your notebook laptop wireless connection in Windows 7 via a notebook’s Ethernet NIC port, so that the PC will pick up a DHCP address from the router, and not have to use Windows 7 ICS (Internet Connection Sharing) service?

It’s actually pretty easy to share your laptop’s wireless connection through the notebook’s NIC, to a Desktop PC’s network card. You can do this without an additional (second) router, or a crossover cable, or setting static IP addresses, etc.

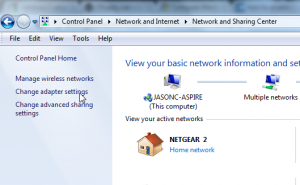
1. Go into your laptop’s Network Sharing Center and then click on the “Change Adapter Settings” link.

2. Next, you’ll see your Local Area Connection is in Network Cable Unplugged status (hold off on plugging in the network cable). You should also see your Wireless Network Connection is connected to the network/internet. I like change the view settings on the screen to View Details, and sort the adapters so that the two you’re trying to share are right next to each other.

Click Image to Enlarge

3. Next, hold down the Ctrl button and click on both adapters so that they are both highlighted. You can also click-drag your mouse highlight/select both adapters. After they are both selected, right-click on the two and choose “Bridge Connections.”
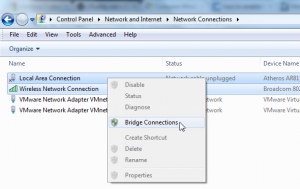
Click image to enlarge

4. After a few moments you should see a Network Bridge adapter created and then connected to the internet.
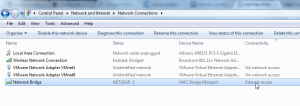
click image to enlarge

5. Now take a simple Cat5e/ethernet cable (not cross-over) and plug it into your PC’s NIC, and the other end into the laptop’s NIC port. The Local Area Connection adapter should change to “Enabled, Bridged”.

click image to enlarge

6. Your Desktop PC should pick up a new IP address from the same router as your laptop, and go online. If not, make sure the Local Area Connection adapter on the Desktop PC is set to DHCP, and then then hit “Troubleshoot Problems” on the network connection, or do a DHCP address release/renew. During testing, my PC warned me that there was an IP address conflict when first plugging in the cable from the laptop to the PC. I did a release/renew on the adapter and received a new IP address from the router, and all is well.

Hopefully this post will save you a little time when trying share your wireless internet connection on your laptop out to your PC.



SBS Server 2003 network connection NIC unresponsive. Solved!

After several restarts/reboots, a Small Business Server 2003 would not respond to pings, and was holding a network hostage by not servicing DNS requests. When trying to repair the Local Area Connection, the following error occurred: “Windows could not finish repairing the problem because the following  action cannot be completed:
Clearing the ARP cache”

After starting/stopping the Routing and Remote services service, and disabling/enabling the NIC in the Device Manager with no luck, we tried manually clearing the arp cache with the following actions:

Check the ARP table from the command line with the command:

arp -g

See if there are entries, and if so, delete them with the command:

arp -d *

This did not help and what did resolve/solve the issue was the following actions:

  1. Shut down the server (Start -> Shutdown)
  2. Once the server has completely shut down, remove the CAT5 Ethernet cable(s) from the Network Interface Card in the back of the server. Make a note which NIC port(s) the cable(s) are plugged into if there is more than one.
  3. Remove the power cable(s) from the back of the server. With both the power and Ethernet cables unplugged, press the power button on server to flush all electricity from the motherboard and interface cards.
  4. Replace the power and Ethernet cables, and power up/start the server normally. In our case the server began responding to pings and started running normally.
  5. After logging in, check to see that all services have started that are set to Automatic. To do this, go to Start -> Administrative Tools -> Services. Sort services by Startup Type. All of the services with the Startup Type: Automatic should be in the “Started” status (except for some that normally stay stopped like Performance Logs and .NET services).

Hopefully this tip will save you some frustration from wrestling with a non-responsive NIC or hunting down Microsoft hotfix updates.

A final note that if the unresponsive server is your primary DNS/DHCP server, and while it’s down clients are unable to get out to the internet or contact other network resources, you may wish to modify your DHCP client lease settings to include some (external) DNS servers other than your primary DNS/DHCP server.