linux iptables intro and basic network information

Introduction iptables – the standard linux firewall

iptables is a standard firewall built into common Linux distributions such as ubuntu, debian, and centOS.

First, packets are logical containers of data representing the flow of data. Protocols are languages and sets of rules used by network devices to send and/or receive data. Ports are numerical representations of protocols and are common throughout TCP/IP networking. Registered ports are those from 0 through 49151. IANA maintains the official list of both ranges.The dynamic or private ports are those from 49152 through 65535. One common use for ephemeral ports are used by servers to continue communications with a client that initially connected to one of the server’s well-known service listening ports. Here is a list of about 250 well-known ports.

iptables drops network packets when those packets meet a certain set of pre-defined CHAINS of rules stored in the computer’s memory. The chains can be placed in different binding orders and they organize the firewall.

A packet, or a datagram, is a unit of a series of bits that forms a container that can be examined, routed, dropped, and filtered in regards to it’s headers, source, destination, and content.

The packet is organized into different fields. It is typically 32bits and contains different data objects which contain mac address source/destination, and IP address source/destination. Cyclical redundancy checks (CRCs) are used to check the values of a packet before they are sent. When the datagrams reach their destination a checksum is attained and checked against the CRC field. In TCP, if the two match then the datagram is marked as successfully sent. If it is different, the source is notified that the packet is bad and will need to be resent.

Datagrams on a wired network really just represent electrons (ethernet) or pulses of light and radio waves that modulate in frequency and amplitude in optical transmissions.

CSMA/CD is used to manage collisions and prevents simultaneous transmission of data on both wired and wireless networks.

Layer 3 of the OSI model is where routers route packets to different vlans and subnets based on their field values using static routes and dynamic protocols such as RIP and OSPF. Layer 2 switches create connections between nodes with addresses in their MAC tables through Application Specific Integrated Circuit (ASICs).

Services running on a server rely on field data in each datagram. The traffic is organized by standard protocols that are bound to specific ports. Each port is represented by a number and are filtered by opening or closing the ports to accept or drop packets whole field data matches that port.

Like other firewalls, iptables manages ports on a NIC where packets can enter, pass, or exit. Ports can be opened, listen, or closed for each service or kind of traffic that will be allowed. Other ports are closed for traffic to be denied.

Chains are sets of rules that manage network traffic by opening or closing ports that can be applied or bound to a Network Interface in a particular order.

There are three kinds of CHAINS:

  1. INPUT – packets coming into the PC.
  2. OUTPUT – packets leaving out our PC.
  3. FORWARD – packets that pass through the PC if it’s multi-homed and being used as a router.

Here are common iptables switches used in chains:

  • -s = source address
  • -d = destination address
  • -p = protocol
  • -j = action
  • -P = specify default policy for a chain
  • -D = delete a rule for a chain
  • -R = replace a rule for a chain
  • -F = remove all rules for specified chain.
  • -L = list all chain rules
  • -A = add/append a rule to the end of a chain

Rules are used to define and manage the traffic you want to ALLOW first in iptables. Then you add the last rule, or the catch-all rule at the bottom of these rules. The last rule blocks all other traffic not previously allowed.

Example of a rule applied to the INPUT chain:

  1. Allow HTTP traffic for an Apache2 web server on port 80 on the interface named eth0:

iptables -A INPUT -j ACCEPT -p tcp –destination-port 80 -i eth0

2. Allow FTP packets for the VSFTPD daemon/service on port 21:

iptables -A INPUT -j ACCEPT -p tcp –destination-port 21 -i eth0

3. Allow SSH traffic for Secure Shell connections on port 22:

iptables -A INPUT -j ACCEPT -p tcp –destination-port 22 -i eth0

4. Apply a CATCH-ALL rule:

iptables -A INPUT -j DROP -p tcp -i eth0

*Note – catch-all rules must be entered and applied LAST.

You can define your own iptables chains as well as view the built-in chains present. Many users will define their own iptables rules in a shell script that is run automatically at boot.

 

Palo Alto PAN-VM-100-NFR Project

My associate, Chase, brought to my attention a new Not-For-Resale Virtual Machine by Palo Alto that is a virtual firewall/router. I’ve been looking for a good replacement for my home SonicWall TZ180W, and I think the Palo Alto firewall will be a more robust solution. Here is a brief outline of the project I will commit to completing over the course of many posts:

  1. Obtain hardware and setup with multiple NICs
  2. Setup VMWare’s ESXi v4.1
  3. Copy virtual machine to VMWare’s datastore
  4. Start VM, troubleshoot and make initial configuration
  5. Put in place at home, setup with my ISP, setup VPN, and setup a subnet for WiFi
  6. Tune firewall, filtering, and SSL

1. Obtain hardware and setup with multiple NICs that meet VMWare’s standards.

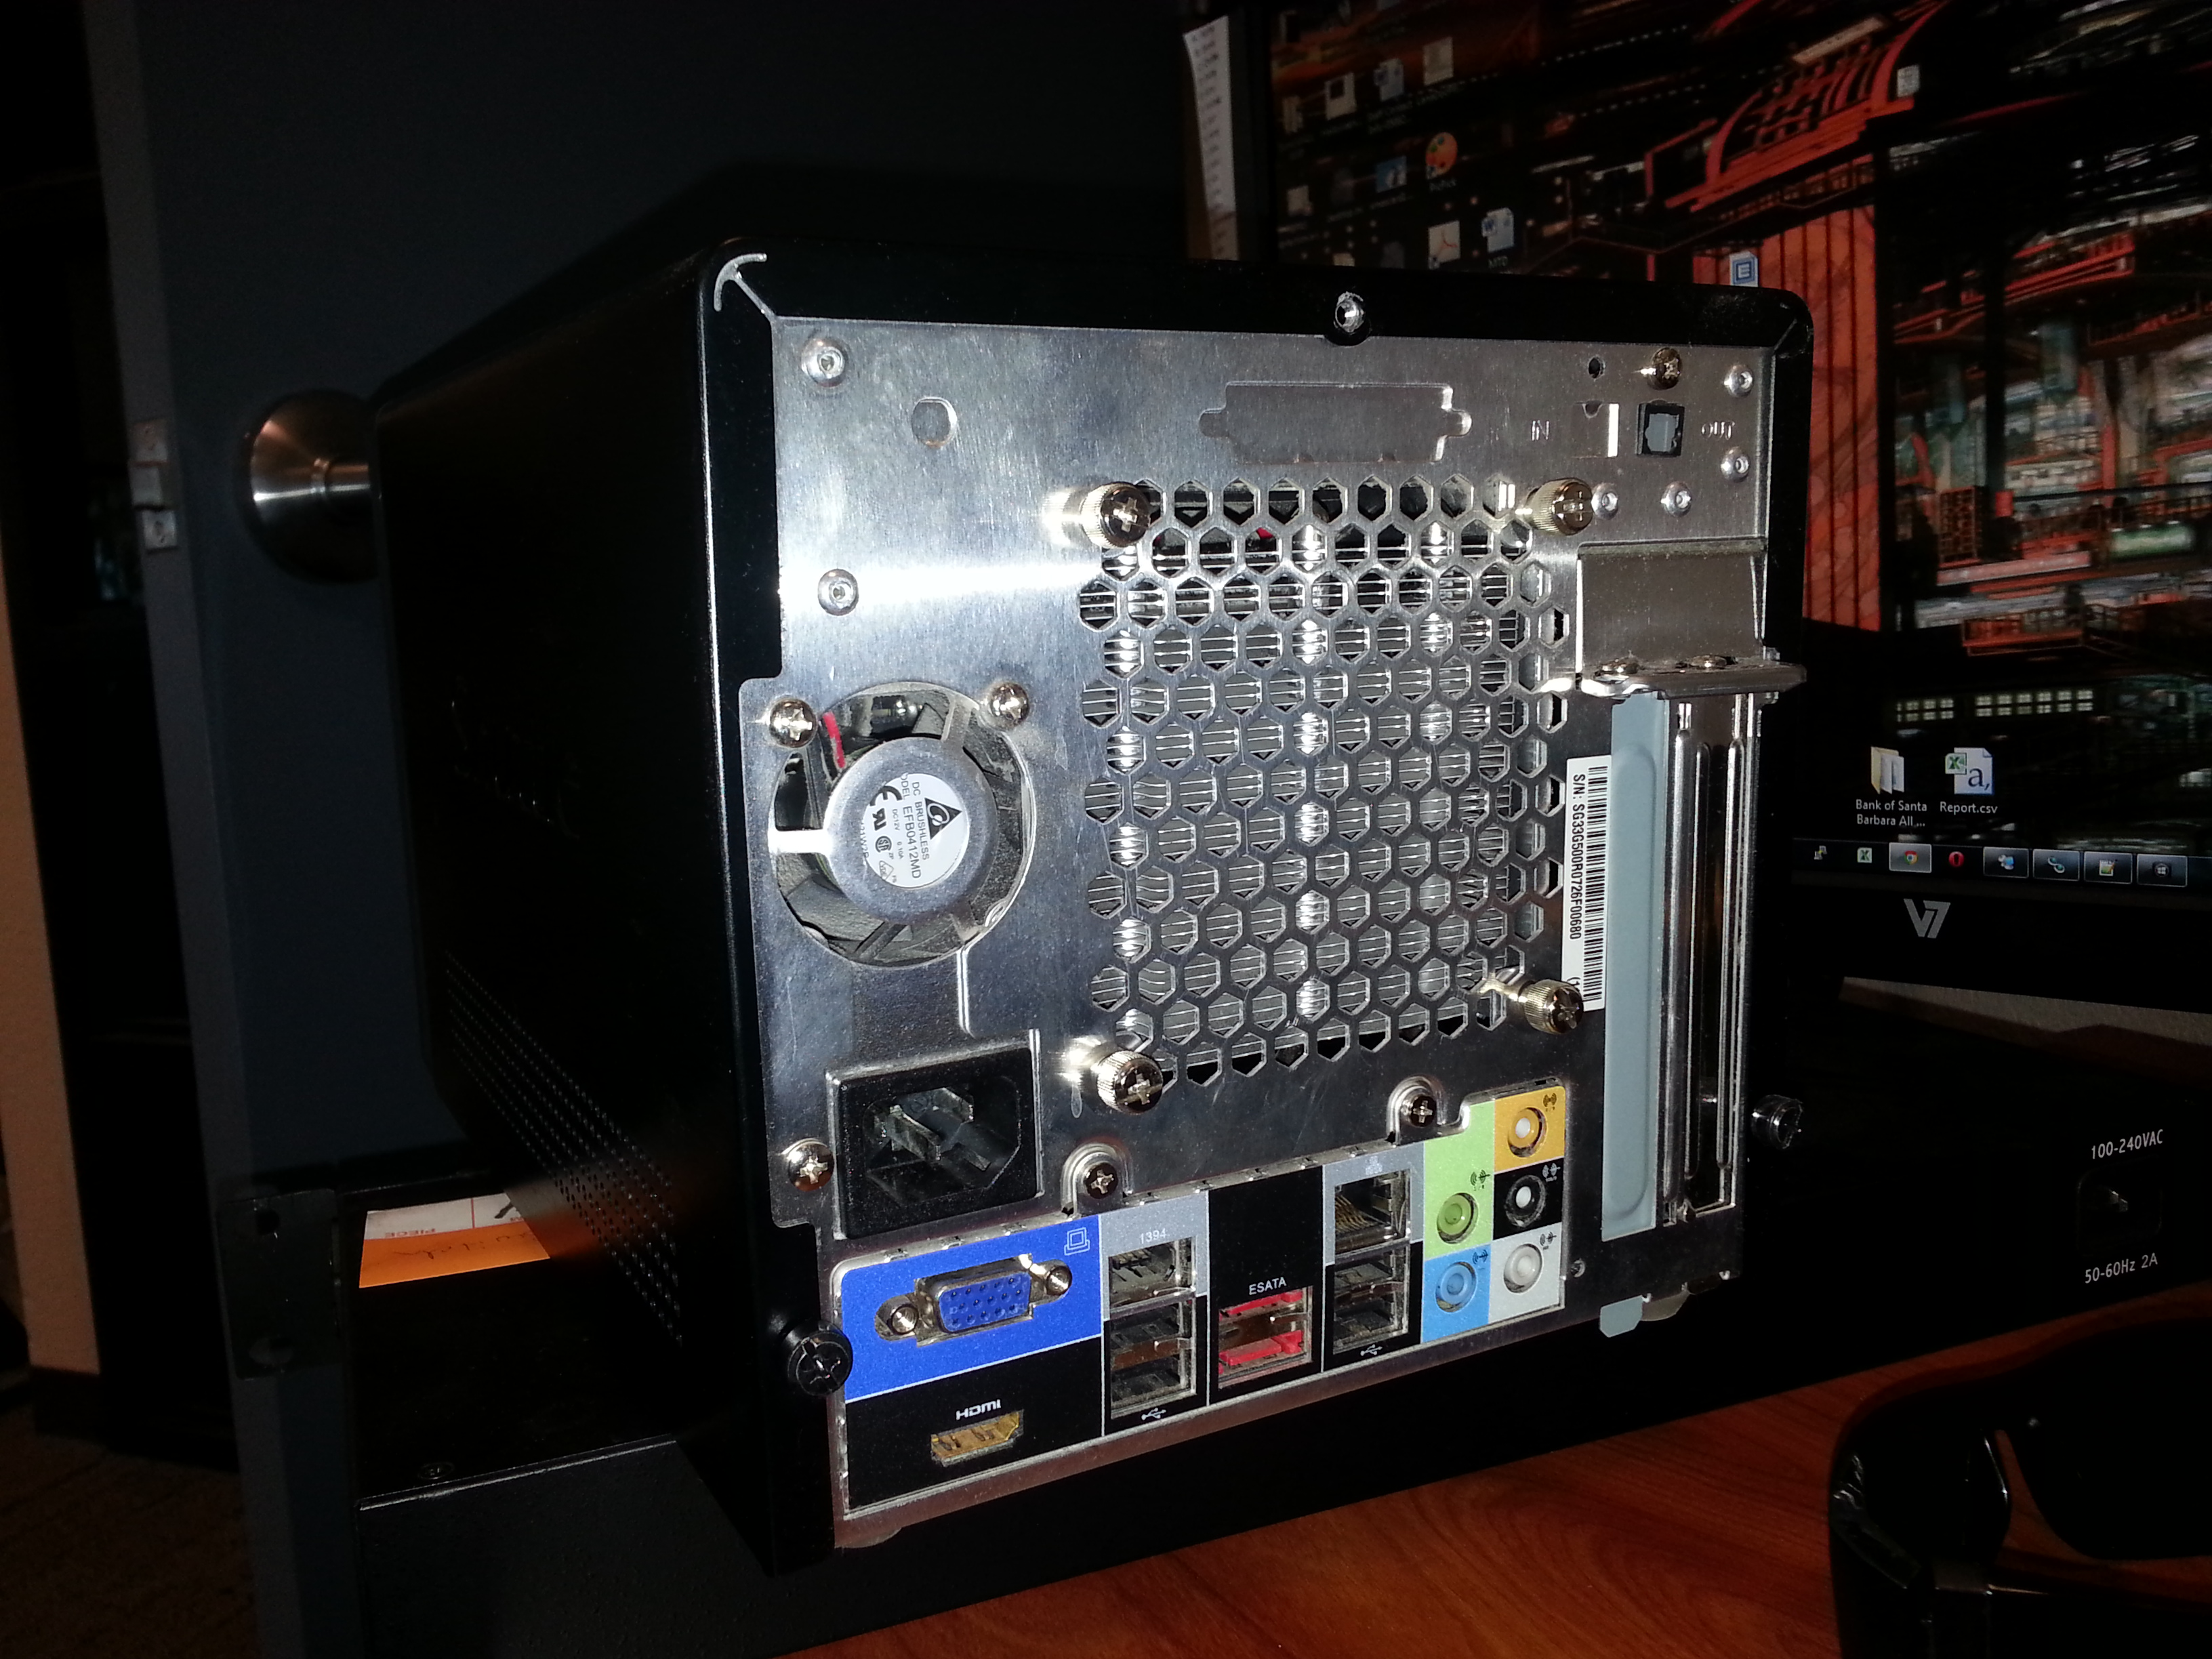
I had been using a Shuttle xPC SG33G50 for my linux box which was hosting my blog for a short period of time. Because my blog had since been moved to Amazon’s AWS cloud infrastructure, the Shuttle is now available as a project PC.

Shuttle SG33G50


As seen in the photo, the machine has PCI slots for cards, VGA, HDMI, FireWire, 6 USB ports (two in front, four in back), ESATA, one Gigabit NIC, and audio+optical ports. It’s nice because the machine small, quiet, uses little energy and has decent hardware specs.

Fortunately the Shuttle meets the standards of the PAN-VM-100 virtual machine: Minimum 4GB RAM, Virtualization Technology, Minimum 16GB hard disk space, and VMWare ESXi 4.1. What it does not have is dual Gigabit NIC’s. For that I purchased an Intel PRO/1000 pt Dual Port Server Adapter from Amazon.

The final configuration of the Shuttle PC contains: Intel Core2 E2180 2Ghz , 4GB DDR2-800 PC2-6400 Memory, Intel PRO/1000 Pt Dual Port Server Adapter, Targus 32GB SSD hard drive.

Once the adapter arrives from Amazon I’ll continue on to the setup of ESXi 4.1 and post my results


— Update – unfortunately, the hardware does not support virtualization and this project has been put on hold. The system was put to good use, however, and now is a PC for my two little girls. They love it! I am considering purchasing a server from www.geeks.com to run my virtual machines, and will update if and when that takes place.

Configuring SonicWall TZ210 and XP/Vista/7 client with RDP passthrough

Clients on your network may wish to work from home. While there are alternatives like GoToMyPC or LogMeIn, this is a free alternative. You will need spare public IP addresses that you can configure your domain’s DNS and your SonicWall to allow RDP traffic to clients on your LAN.

1. Ensure the client has RDP enabled. On the Windows PC, go to System Settings and then the Remote tab and make sure “any RDP client” is allowed access. Some of your clients may be using Macs and do not use Windows RDP clients. Also, it’s best to narrow down access to only particular user accounts (the user and administrator). Once RDP is enabled be sure to test connecting from a different client within your Local Area Network. If you can’t RDP into the client from within your LAN, you sure won’t be able to get to the machine remotely!

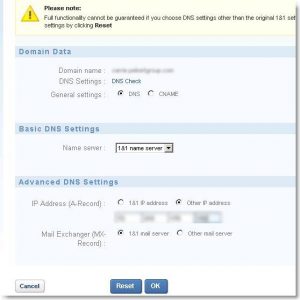
2. Go to your Domain Registrar and setup a sub domain for your user. In this example, I’m using my.1and1.com. Once logged in, click on “Domains”, then click on “New” and then “Subdomain”. Give the subdomain a friendly name. In this case I am using Julie.domainname.com. Once the subdomain has been added, place a checkmark next to the new subdomain, and then click on the DNS button dropdown and click Edit. Under Advanced DNS Settings -> IP Address (A-Record) : Change the radio button to “Other IP Addresses”. Enter in the Public IP address you want specified for the client. Make sure you record the IP address, because we will be using it again soon on the SonicWALL. As far as DNS replication is concerned, I’ve found that it takes place pretty quickly, if not 5 to 10 minutes for the new address to be resolved.

click image to enlarge


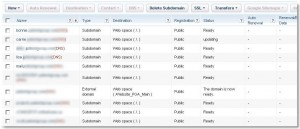
3. You should now see the entry along with the rest of your domain’s records. That should take care of the external DNS side of things.

Click Image to Enlarge


4. Now log into your SonicWALL and browse to Network -> Address Objects. Here we will create two new address objects. “Username_Computer Private”, and “Username_Computer Public”. Click on the Add… button.

— For Username_Computer Private use:

Name: Username_Computer Private

Zone Assignment: LAN

Type: Host

IP Address: (Internal IP Address 192.168…..)

— Click the Add… button again for Username_Computer Public:

Name: Username_Computer Private

Zone Assignment: WAN

Type: Host

IP Address: (External IP address you created in your Domain’s registrar)

5. Now that the Address Objects have been created, we can move on to Services. On the sonicwall, browse to Network -> Services.

Click on Add Group. In the Name field, type in “Username Computer Services”. Then find Terminal Services in the list on the left side of the screen, and add it to the right-hand pane and click OK. That’s it for this part.

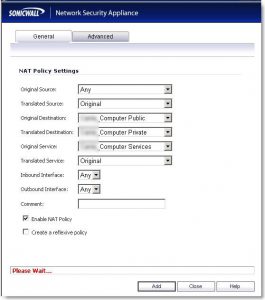
6. Now we are going to add NAT policies for our Network. Browse to Network -> NAT Policies.

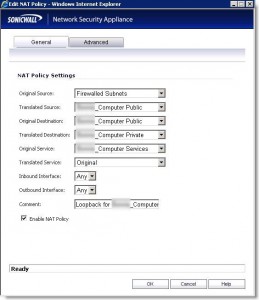
First we are going to want to add a Loopback policy which should look like the following:

click image to enlarge


Be sure to add a comment “Loopback for Username_Computer”

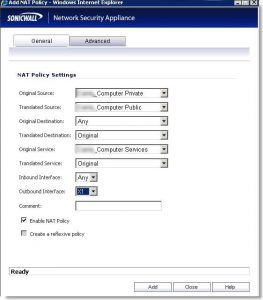
Next, we’ll add Private to Public Translation which will look like the following. Make sure your Outbound interface is your WAN interface, typically X1:

click image to enlarge


Next we’re going to do Public to Private Translation:

click image to enlarge


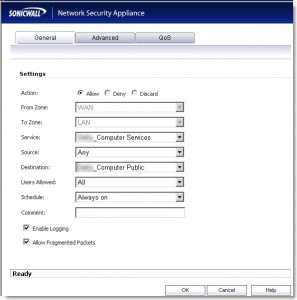
7. Lastly, we’re going to configure the firewall to allow traffic. Go to Firewall – Access Rules -> WAN to LAN which should have the following settings:

click image to enlarge


Action: Allow

From Zone: WAN

To Zone: LAN

Services: Username_Computer Services

Source: ANY

Destination: Username_Computer Public

Users allowed: All

Schedule: Always On


That should do it! You can now test by trying to RDP from any computer using the friendly subdomain name you setup with your domain’s registrar. If you are prompted for a username and password, your subdomain name and firewall are configured correctly.

Perhaps you may want to email your users the following instructions to assist them in connecting to their PC at work:

Greetings, you now have the ability to access your work PC from home. Before you try connecting for the first time, make sure you have the following:
1. A stable DSL, Cable, WiFi, Satellite, or 3G/4G internet connection (no dial-up).
2. A PC running at least: Windows XP with Service Pack 2 or Service Pack 3, Windows Vista, or Windows 7. To find the RDP client on a Windows PC, go to the Start button, then Programs, Accessories, Remote Desktop Connection.
3. A Mac with at least OSX and a Terminal Services (RDP) client. There are some free RDP clients like CoRD, or TSclientX that you can download and install on your Mac.
4. Up-to-date Anti-Virus protection.
If you’re going to access your work PC from your home PC, you will need to start up an RDP client on your home PC. Type in the friendly name for the PC at work for the “computer” name (give the user their friendly name somewhere in the email). For example, Scott would start an RDP session at home and use “Scott.DomainName.com” (without quotes) as the name of the computer he’s connecting into. When you’re prompted for your username and password, put in the domain name followed by a backslash and your username. In Scott’s case, the username is: DomainNameScottH. Then type in your password and click the Connect button. You may be prompted to login again. Simply login again using the same credentials you would normally use, as if you are sitting in front of your PC at work.
In our experience, there are some things to look out for when using Terminal Services:
1. You should only print to the printers connected to your PC at work. Trying to print to your printer at home may or may not work, and trying to do so may cause your session to hang or disconnect. If you have to print to your printer at home, you may want to email yourself the file. Also, trying to transfer files to and from your Home PC or Mac with your Work PC is slow and cumbersome. It’s best to leave work files on your PC at work.
2. Your session should stay active for long periods of time. If you are consistently losing your connection, you may need to speak to your ISP to see if there are interruptions in your service.
3. You can only RDP into your PC at work if it is powered up. PC’s at work that are set to sleep, hibernate, or shut down after a period of inactivity may not be accessible. If you plan on using your work PC from home, make sure it’s powered up and not set to automatically shutdown/sleep/hibernate.
“The Management”