
I took some time to get familiar with Oracle’s 11G and EPM solution in my lab. EPM is a large software suite and is useful for enterprises that are looking for management dashboards and end to end visibility.
11G/Hyperion/EPM Install Procedures
- Install 2008 R2 64 virtual machine
- Get VMWare ESXi running
- Upload Server 2008 R2 Standard ISO to your Datastore
- Create new virtual machine -> Typical
- Name VM (EPMTest1)
- Choose your datastore (datastore1)
- Guest OS: Server2008R2 64
- Use 1 NIC – type: VMXNET3
- Virtual disk size: at least 100GB – Thick Provisioned Lazy Zeroed
- (Edit VM settings before creation of VM -> Continue
- Under VM Properties:
- Change CPU and Memory as needed.
- For CD/DVD drive, use Datastore ISO file and browse to Server 2008 .ISO file, connect at power on.
- Under Options Tab, Advanced -> Boot Options -> Change Power on Boot Delay to 5000 ms.
- Under Advanced -> Memory Hot Add -> Enabled memory hot add
- Ok
- Right-click on EPMTest1 VM and choose open console
- Start vm and boot to iso/cd
- choose default language
- Install Now
- Select Windows Server 2008 R2 Standard Full Install
- Choose Custom installation
- Select your virtual disk -> next
- Files will copy/expand/install
- vm will reboot several times
- Change Administrator pw to ???????
- Once at desktop, check for network adapters. If unknown device exists, from vSphere Client, install VMWare tools.
- Ensure VM is online and can reach network resources
- Update OS with MS Updates
- Activate Server 2008
- Run script to install Roles (open powershell and paste in following command): ServerManagerCmd -Install Application-Server AS-Web-Support Web-Server Web-ASP Web-CGI Web-Mgmt-Service Web-Mgmt-Compat Web-Metabase Web-WMI Web-Lgcy-Scripting Web-Lgcy-Mgmt-Console
- Backup your VM prior to installing Oracle software (ghettovbs script does ok job and instructions are at: http://www.youtube.com/watch?v=fJmqrMAXQAg – scripts download located at https://github.com/lamw/ghettoVCB
- Install JRE
- Download 2 zip files – Oracle Client Runtime 11.2.0.1 from http://www.oracle.com/technetwork/database/enterprise-edition/downloads/112010-win32soft-098987.html –
- Install Oracle Client Runtime/database 11g 11.2.0.1
- Installation Instructions:
- Create new folder c:admin
- Create new folder c:adminepm_downloads
- Create new folder c:adminepm_unzipped
- you need to extract Database 11g zip files into exact same dir as file1. It cannot be in a separate dir. Extract to c:adminepm_unzipped
- Install Oracle Database 11g – run c:adminepm_unzippeddatabasesetup
- Enter Oracle Account info
- Enter proxy info (?) or Check I do not want to be informed of critical updates
- Install db software only
- Single instance
- english, next
- standard edition one
- Location c:appOracle
- Finish
- Installation Successful – Close
- Install and configure MS Office 2010
- In addition to the requirements listed in the previous sections, CLIENTHOST1 requires the following installations: Microsoft Office 2010 Microsoft Word, Excel, and PowerPoint must have the following characteristics:
- Be registered in the server’s registry for printing
- Be available to the “SYSTEM” account
- Have access to, and be able to print from the printers installed by Financial Reporting (HRPrinter1-5). The SYSTEM account issues all print requests, so it is important that the applications can print using the Print Server’s printers.
- A supported 32-bit version of GhostScript. http://www.ghostscript.com/download/gsdnld.html GPL 32bit – download and install
- Disable the following on CLIENTHOST1 to support Financial Reporting Print Server:
- Disable:
- All add-ins (including EPM System add-ins) from all Microsoft Office applications to enhance application launch time and reduce system resource consumption. If add-ins are present, they may display UI components that require user input.
- • SmartTags (Office 2002+) to enhance performance.
- • Microsoft Office Assistant which prompts the user for input and may halt printing.
- On Local PC – Create User DeployEPM -> Add DeployEPM to local Administrators Group
- On server, open Local Security Policy, drill down to Local Policy -> User Rights Assignment
- Add DeployEPM account to following policies
- • Act as part of the operating system
- • Bypass traverse checking
- • Log on as a batch job
- • Log on as a service
- Create Shared Filesystem on NAS/SAN (jason-nas1EPM_Shared)
- Map Network Drive Z: to jason-nas1EPM_Shared
- Check hostnames, check clock synchronizations
- Set up Oracle Database
- Create an Oracle 11g database with AL32UTF8 character set encoding and set these database parameters:
- NLS_LENGTH_SEMANTICS to CHAR * could not find these settings
- CURSOR_SHARING to FORCED *could not find these settings
- Open Database Configuration Assistant -> Create a database -> General Purpose -> Global DB Name: Test11gDB1.EPMTest1 SID: Test11gDB1
- Uncheck Configure Enterprise Manager
- Use Same Admin pw for all accounts SYS and SYSTEM
- Use DB File locations from template
- Character Sets – Use AL32UTF8 -> Next ->Next->Finish (Create DB)
- Once DB has been created, open Start->Programs->Admin Assistant For Windows, and browse to new DB
- Create the following database (and local server/domain/user) accounts:
- • One user for EPM System Repository
- • One user for Financial Management data repository
- • One user for a Planning data repository
- Each Planning application requires a separate database account. Before creating a new Planning application, you must create a new database user for it.
- Set table temp space if necessary
- Setup Firewall ports if necessary

- Create an Oracle 11g database with AL32UTF8 character set encoding and set these database parameters:
- Download EPM software from https://edelivery.oracle.com
- Download 11.1.2.1.0 media pack
- Download the following zip files:
- 05/05/2013 10:52 AM 1,831,124,877 V25459-01.zip
- 05/05/2013 11:25 AM 51,317,271 V25460-01.zip
- 05/05/2013 11:36 AM 1,090,549,336 V25461-01.zip
- 05/05/2013 11:28 AM 5,556,028 V25462-01.zip
- 05/05/2013 11:29 AM 28,348,437 V25463-01.zip
- 05/05/2013 07:19 PM 389,282,485 V25464-01.zip
- 05/05/2013 07:21 PM 96,713,567 V25468-01.zip
- 05/05/2013 07:41 PM 88,759,524 V25469-01.zip
- 05/05/2013 07:22 PM 143,329,315 V25470-01.zip
- 05/05/2013 07:23 PM 13,426,437 V25475-01.zip
- 05/05/2013 07:37 PM 199,685,657 V25476-01.zip
- 05/05/2013 07:24 PM 121,862,788 V25477-01.zip
- 05/05/2013 07:39 PM 102,999,780 V25479-01.zip
- 05/05/2013 07:41 PM 70,810,195 V25487-01.zip
- 05/05/2013 07:35 PM 1,488,695,147 V25494-01.zip
- 05/05/2013 10:05 AM 269,705,265 V25495-01.zip
- 05/05/2013 10:21 AM 1,094,215,607 V25496-01.zip
- 05/05/2013 10:30 AM 1,317,755,597 V25497-01.zip
- 05/05/2013 10:33 AM 1,168,889,472 V25498-01.zip
- 05/05/2013 10:47 AM 1,499,139,033 V25499-01.zip
- 05/05/2013 07:20 PM 93,168,097 V25500-01.zip
- Install and Configure Foundation Services
- Ready files for installation
- Create folder EPM_Unzipped
- Unzip all files into the same EPM_Unzipped folder
- On FNDHost1 (in this case, EPMTest1), log in as an administrator
- From Z:EPM_Unzipped run InstallTool.cmd
- Run installer – > Check that Prerequisites have been met – ok
- Enter Default Location of middleware home c:OracleMiddleware
- Select components individually
- Install the following components:
- • Foundation Services
- • Essbase — Administration Services Web Application
- • Essbase — Provider Services Web Application
- • Reporting and Analysis
- • Planning
- • Financial Close Management (Assembly missing) @followup
- • Disclosure Management (Assembly missing) @followup
- Financial Management — Financial Management Web Service (ADM Driver under Financial Management is selected by default)
- • Profitability and Cost Management (Assembly missing) @followup
- Unselect: Essbase — Essbase (Essbase Server is selected by default when you select Planning)
- Hit Next to Confirm, Next to install
- Download and apply patch 12552933 from http://support.oracle.com (unable to locate patch, need Support Identifier) @followup
- Run EPM Configuration -> Start -> Programs -> Oracle EPM System -> Foundation Services -> EPM System Configurator
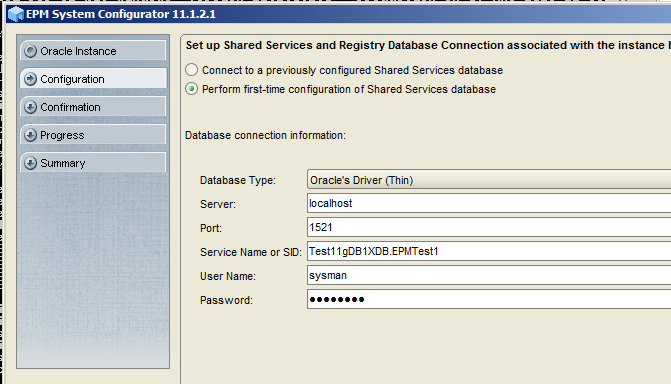
- If cannot connect to database – “Connection Refused”, try installing loopback adapter and open Command Prompt and run netca. Install a new Listener on default port 1521. Then go back and run Database Configuration Assistant. After configuration has succeeded make note of location of encryption key, in this case it’s c:/app/oracle/product/11.2.0/dbhome_1/servername_dbname/sysman/config/emkey.ora. Also make note of Database Control URL: https://WIN-9ANJ6AA1428:1158/em
At this point, I had significant problems trying to configure the installation with the System Configurator. Ultimately the resolution was to ensure I had the correct credentials for the installer to run normally.
I completed the configuration according to my environment and the setup completed successfully. After restarting the default websites, they wouldn’t display with a 404 message. I had to re-run the EPM Configuration and installed the default websites components. Starting up the EPM Services can take some time on a box with 8GB of RAM but eventually the services started and the sites came up and I was able to log into the Shared Services console and Workspace successfully. 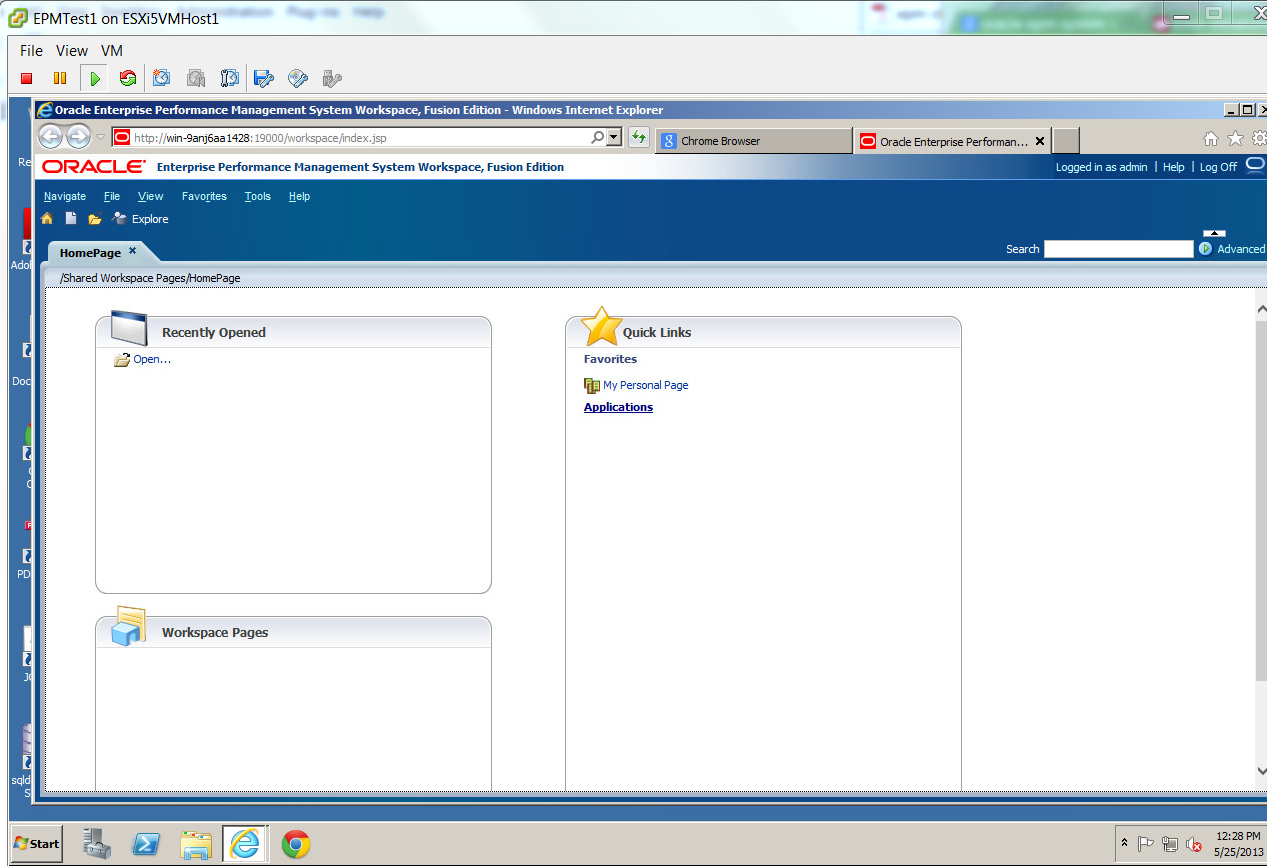
My next steps are to import some test data, create some applications, dashboards, and build some views.