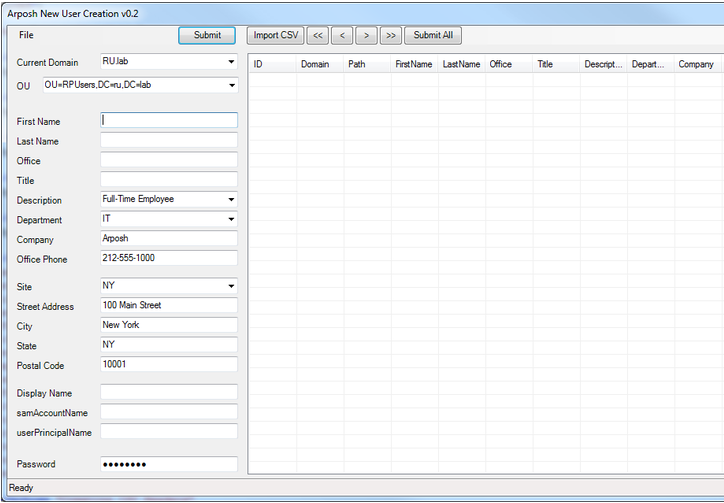
One of the tasks a system administrator will probably have to tackle at one point in their careers, is to quickly add a large amount of users to Active Directory. Without too much difficulty or money, one can accomplish the feat using the following powershell script: Active Directory User Creation Tool: http://community.spiceworks.com/scripts/show/1917-active-directory-user-creation-tool
So a quick kudos to [email protected] and Jim Smith for making this tool available for free online.
By following the instructions on the download page, it’s a few hours work to get the xml file and the csv template to work together to bulk import the users into AD.
Download the script, change then name to a .ps1 file and then execute the script with powershell (right-click on the powershell icon and choose “Run as Administrator”.) Because this is an unsigned script, and in case you can’t recall, the command to run first is:
Set-ExecutionPolicy RemoteSigned
One thing to note is when building your csv file, all cells must be quoted. An easier way to do this, rather than struggling with Excel functions, is to use Libre Office.
Open your csv file with Libre Office, do a Save As -> csv -> check ‘use filter’ -> check ‘Quote all text cells’ -> finish save to a new location with a new filename. Then open the file in a text editor to make sure all cells are quoted.
In the XML file, the most difficult part to configure is the canonical name used to populate the OU you want with the users. In our case we used:
Domain=
subdomain.domain.domain.com
Path=
OU=ImportedUsers,DC=subdomain,DC=domain,DC=domain,DC=com
This will make more sense once you are configuring your XML file. Before you do a big bulk import, generate a template with the script/tool, fill out the essential fields with test accounts (first, last, username, password, etc.), then re-import the template, configure your XML file, and then submit the import. Then test your imports with just a few users at a time.
If you can’t find your test user accounts that you imported in Active Directory, you might need to right-click on the root in Active Directory Users and Computers (ADUC) and do a “Find…” then search for the test user accounts. They may have been added to the wrong OU. Again, this will take some tweaking, but at least if you can get the users into an OU, later you can select the users, right-click and choose Move… to put them in the correct OU container.
Once your test accounts are being imported correctly, go back, edit your bulk user lists according to the template specifications, and have at it.
Another issue that came up is that in our source file for our users, we only had the First Name, Last Name in the same cell. In order to split the names into two separte columns, we used the following tips:
Split full name to first and last name with Text to Column command – http://www.extendoffice.com/documents/excel/829-excel-split-first-last-name.html
For the First Name/Last name split, create a temporary column named General to the right of the Last name column
This project on spiceworks looks like it’s actively developed so it might be worth while to contact the developer if you run into any trouble or have a feature request.

