If you have employees who change phone extensions, names, departments, address, or titles a lot, HR or management may want to have this contact information data updated in Office365. Oftentimes these little changes can add up and we want to make a lot of changes in bulk with a single command. Instead of updating manually, we can make the changes to an Excel csv file and upload the changes all at once.
Ok in order to import/update the contact information for employees in the Office 365 tenant using a csv file and PowerShell, do the following:
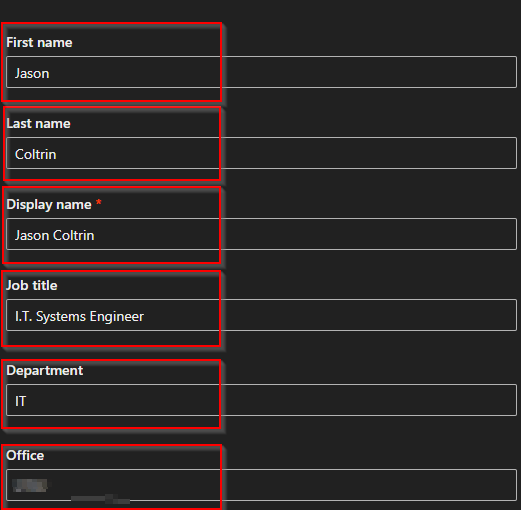
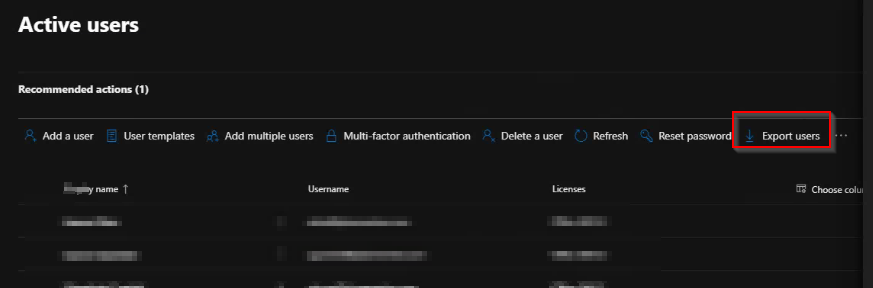
Edit the attached CSV file with information that needs to be imported into O365. **Note: the UserPrincipleName and DisplayName columns are required.** FYI, screenshot below is how I exported the required data from O365 and copied the required columns into the attached file.
If you have recently enabled MFA multi factor authentication or 2FA on your Office 365 tenant, your Microsoft Outlook for Office 365 MSO 16.0.11929 (desktop version) users may be prompted over and over for their password, even though you are sure you have the correct password and even the apppassword / app password hash. I’m sure you’ve tried to re-configure Outlook, look at Azure settings, reinstall Outlook, check your autodiscover records, make sure you have the correct Office Suite version and perhaps have even attempted to change the windows 10 registry with the following settings:
So I thought it would be helpful to have a step-by-step how to enable modern authentication in Exchange Online for Office 365 based on the instructions provided in the link above.
With MFA enabled, connecting to Exchange Online with powershell is not as simple as it used to be, but still not all that bad. I’ve found the easiest way to connect to Exchange Online with Powershell is to do the following.
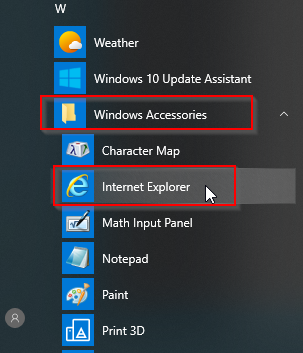
Note: A forewarning here, with certain browsers, when clicking on the Exchange Hybrid “Configure” button, and then installing the Hybrid configuration, the Office 365 login screen may may flash on the screen as a white box, and then disappears before you can authenticate and use your 2FA txt code. I’ve seen this when using Microsoft Edge, Chrome, and even the new version of Microsoft Edge based on Chromium. The only browser I’ve gotten this to consistently work with is the Internet Explorer browser built into Windows 10. The Internet Explorer browser is installed on Windows 10 by default, it’s hidden in the start menu under Accessories:
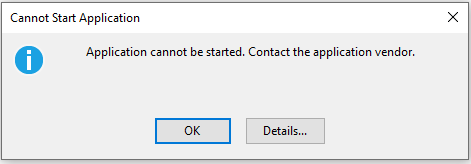
If you do attempt to run the Exchange Powershell Module using chrome you may encounter the error:
“Application cannot be started. Contact the application vendor.”
When clicking the Details… button, you may find information similar to the following:
PLATFORM VERSION INFO
	Windows 			: 10.0.18363.0 (Win32NT)
	Common Language Runtime 	: 4.0.30319.42000
	System.Deployment.dll 		: 4.8.3752.0 built by: NET48REL1
	clr.dll 			: 4.8.4121.0 built by: NET48REL1LAST_C
	dfdll.dll 			: 4.8.3752.0 built by: NET48REL1
	dfshim.dll 			: 10.0.18362.1 (WinBuild.160101.0800)

SOURCES
	Deployment url			: file:///C:/Users/Jason/Downloads/Microsoft.Online.CSE.PSModule.Client%20(3).application

IDENTITIES
	Deployment Identity		: Microsoft.Online.CSE.PSModule.Client.application, Version=16.0.3527.0, Culture=neutral, PublicKeyToken=45baf49ae30bdb15, processorArchitecture=msil

APPLICATION SUMMARY
	* Installable application.
	* Trust url parameter is set.
ERROR SUMMARY
	Below is a summary of the errors, details of these errors are listed later in the log.
	* Activation of C:\Users\Jason\Downloads\Microsoft.Online.CSE.PSModule.Client (3).application resulted in exception. Following failure messages were detected:
		+ Deployment and application do not have matching security zones.

COMPONENT STORE TRANSACTION FAILURE SUMMARY
	No transaction error was detected.

WARNINGS
	There were no warnings during this operation.

OPERATION PROGRESS STATUS
	* [4/3/2020 3:32:57 PM] : Activation of C:\Users\Jason\Downloads\Microsoft.Online.CSE.PSModule.Client (3).application has started.
	* [4/3/2020 3:32:57 PM] : Processing of deployment manifest has successfully completed.
	* [4/3/2020 3:32:57 PM] : Installation of the application has started.

ERROR DETAILS
	Following errors were detected during this operation.
	* [4/3/2020 3:32:57 PM] System.Deployment.Application.InvalidDeploymentException (Zone)
		- Deployment and application do not have matching security zones.
		- Source: System.Deployment
		- Stack trace:
			at System.Deployment.Application.DownloadManager.DownloadApplicationManifest(AssemblyManifest deploymentManifest, String targetDir, Uri deploymentUri, IDownloadNotification notification, DownloadOptions options, Uri& appSourceUri, String& appManifestPath)
			at System.Deployment.Application.ApplicationActivator.DownloadApplication(SubscriptionState subState, ActivationDescription actDesc, Int64 transactionId, TempDirectory& downloadTemp)
			at System.Deployment.Application.ApplicationActivator.InstallApplication(SubscriptionState& subState, ActivationDescription actDesc)
			at System.Deployment.Application.ApplicationActivator.PerformDeploymentActivation(Uri activationUri, Boolean isShortcut, String textualSubId, String deploymentProviderUrlFromExtension, BrowserSettings browserSettings, String& errorPageUrl, Uri& deploymentUri)
			at System.Deployment.Application.ApplicationActivator.PerformDeploymentActivationWithRetry(Uri activationUri, Boolean isShortcut, String textualSubId, String deploymentProviderUrlFromExtension, BrowserSettings browserSettings, String& errorPageUrl)
--- End of stack trace from previous location where exception was thrown ---
			at System.Runtime.ExceptionServices.ExceptionDispatchInfo.Throw()
			at System.Deployment.Application.ApplicationActivator.PerformDeploymentActivationWithRetry(Uri activationUri, Boolean isShortcut, String textualSubId, String deploymentProviderUrlFromExtension, BrowserSettings browserSettings, String& errorPageUrl)
			at System.Deployment.Application.ApplicationActivator.ActivateDeploymentWorker(Object state)

COMPONENT STORE TRANSACTION DETAILS
	No transaction information is available.
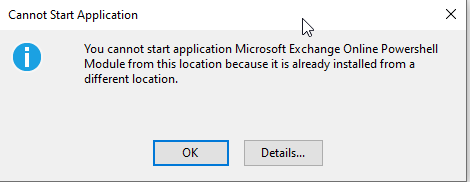
At this point, it may be necessary to uninstall the existing module and then re-install and run using Internet Explorer. You may even receive the following error:
"You cannot start application Microsoft Exchange Online Powershell Module from this location because it is already installed from a different location."
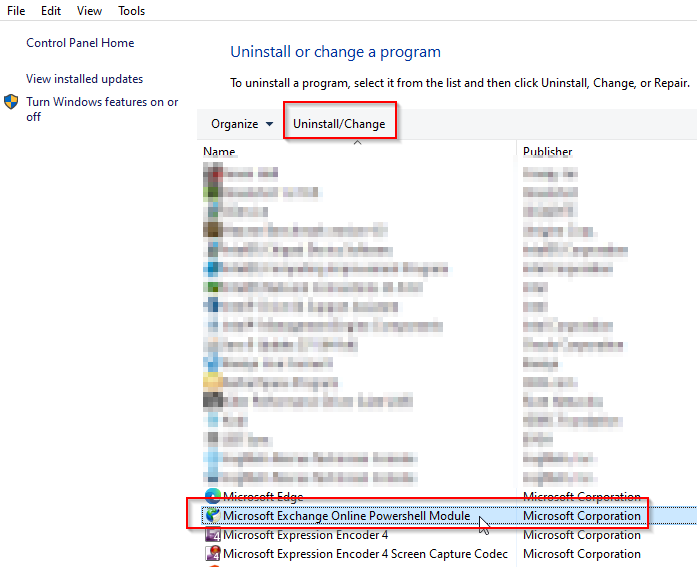
To uninstall the module, click the Start Button > type “appwiz.cpl” and press Enter.
Inside of the Programs and Features screen find the application and click Uninstall.
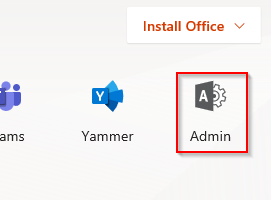
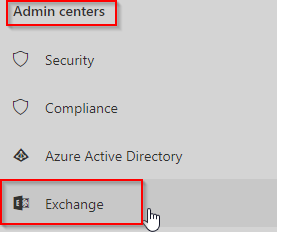
After uninstall, log into your tenant (with an administrator account) at https://www.office.com using Internet Explorer 11, and click the Admin link:
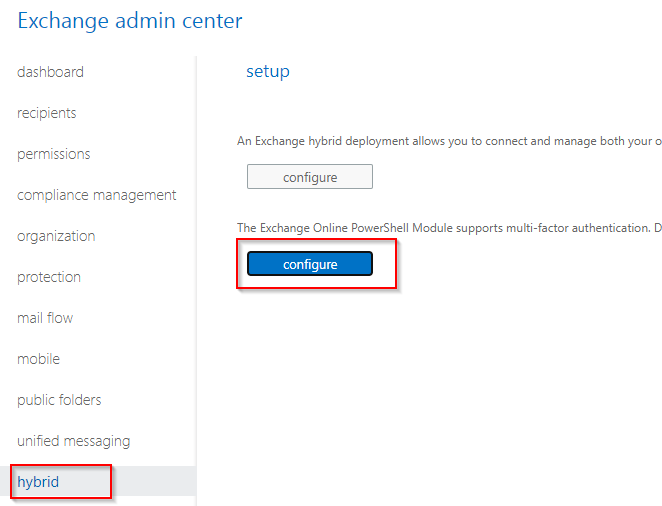
Next, Expand the Menu on the left menu by clicking Show All… and then click on Exchange:
Next we want to click on the Hybrid link to get to our Powershell Configure button:
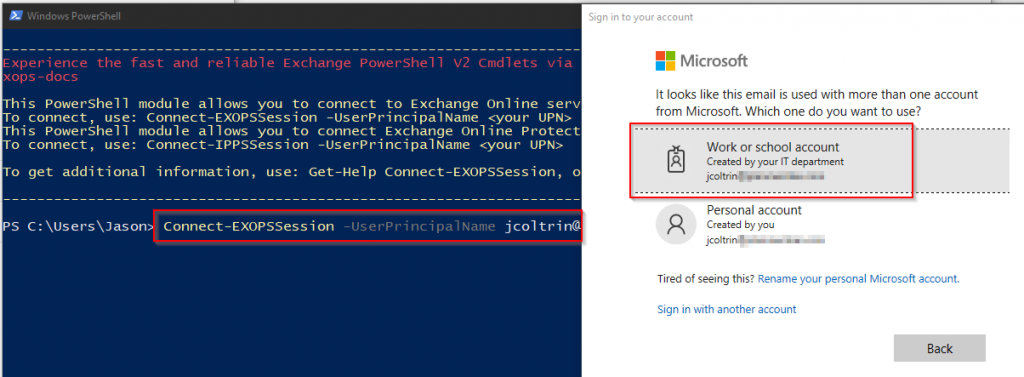
Go ahead and install the component if it asks, and when it completes, you’ll be greeted with a Windows Powershell screen with the following message:
Experience the fast and reliable Exchange PowerShell V2 Cmdlets via new PowerShellGallery module. Go to https://aka.ms/exops-docs

This PowerShell module allows you to connect to Exchange Online service.
To connect, use: Connect-EXOPSSession -UserPrincipalName <your UPN>
This PowerShell module allows you to connect Exchange Online Protection and Security & Compliance Center services also.
To connect, use: Connect-IPPSSession -UserPrincipalName <your UPN>

To get additional information, use: Get-Help Connect-EXOPSSession, or Get-Help Connect-IPPSSession
We now want to initiate our session using the instructions provided. At the prompt, type in the command:
You’ll now be prompted to sign into your tenant (Work or School). You’ll see some status bars go by and then be prompted with a warning about unapproved verbs (for example banish?)
So now we want to (only look before making changes) get our organization structure, and more precisely, find the status of our OAuth2ClientProfileEnabled setting by issuing the command:
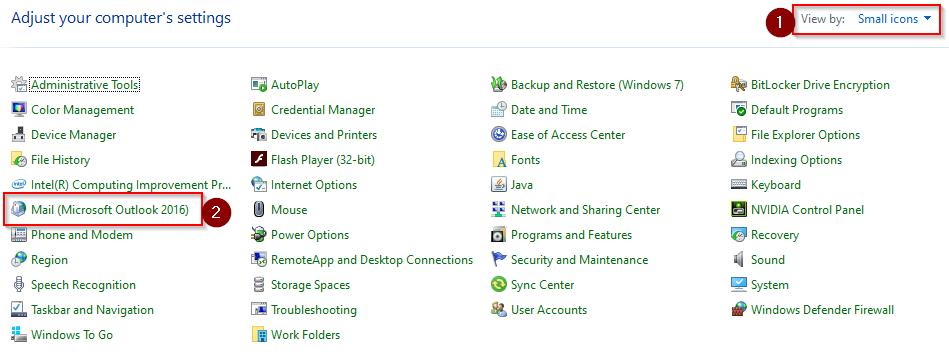
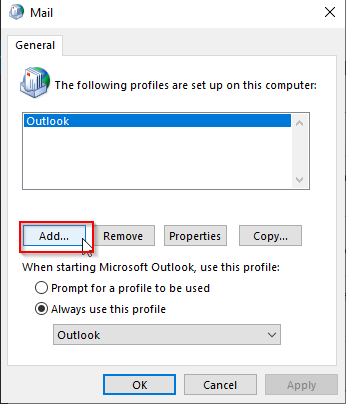
That’s about it! Give the setting about an hour to propagate and then try testing Outlook on the desktop again. You may get a few clients where their profile needs to be recreated. You can do this by going into the control panel > (1) choose Small Icons > (2) Mail Microsoft Outlook 2016.
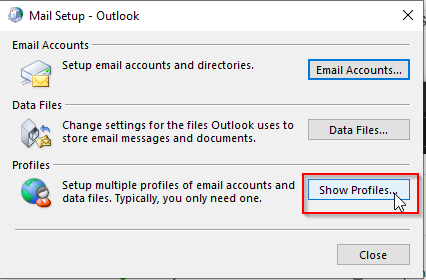
Then click Show Profiles
Click Add…
Now when setting up the new mail account, you should be prompted with the modern authentication and you’ll be prompted for your txt code or Microsoft Authentication Application.
Occasionally we’ll be required to set a user account on Office365 to never expire. It’s not advisable to perform this action, as a compromised account who’s passwords never expires can be a liability. However, in some cases a utility account such as a scanner/copier or kiosk account may require a password that does not change. The following tutorial will show you how to set an Office365 password to never expire using PowerShell.
First, we’ll want to ensure that the account password is not already set to expire and we want to confirm it’s status. Using PowerShell we can get information about an Office365 user account password expiration status.
1. Connect to Microsoft Online Services with PowerShell by running the following commands:
Import-Module MSOnline
Connect-MsolService
2. Next, replace <UserID> with the user account (email address) of the user’s properties we want to get with the following command:
3. Because we get the message returned that the property PasswordNeverExpires = False, we want set it to $True and set the account password to never expire with the following command:
Because our PasswordNeverExpires property is now set to True, our task is complete. Disconnect from Office365 and close powershell by entering the command: exit.
Use PowerShell to get the Windows Experience Index in Windows 10
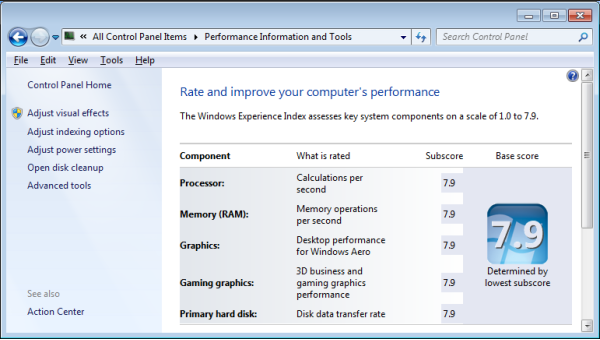
Windows 7 has the Windows Experience Index which is used often by hardware techs to get a good idea about the kind of hardware installed in a PC. It also allows you to quickly find where improvements can be made to get the machine to run faster. The following screenshot is an example of the Windows 7 Windows Experience Index:
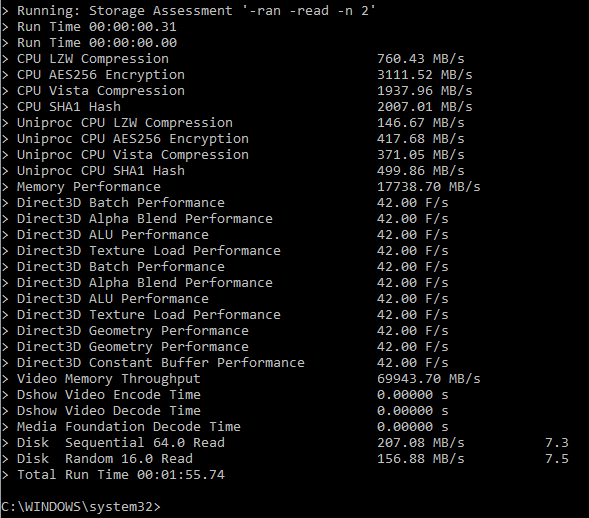
You can get an idea about how fast the components of your Windows 10 computer are by running the Windows System Assessment Tool, but the readout is a little hard to understand. Skip this part (winsat formal) to get the Windows Experience Index in Windows 10 or Windows 7 with PowerShell below.
First open an elevated command prompt and run the command:
winsat formal
Below is a screenshot of the command running and it’s output. Running this tool will slow down your PC for a few minutes as it runs the tests:
Results:
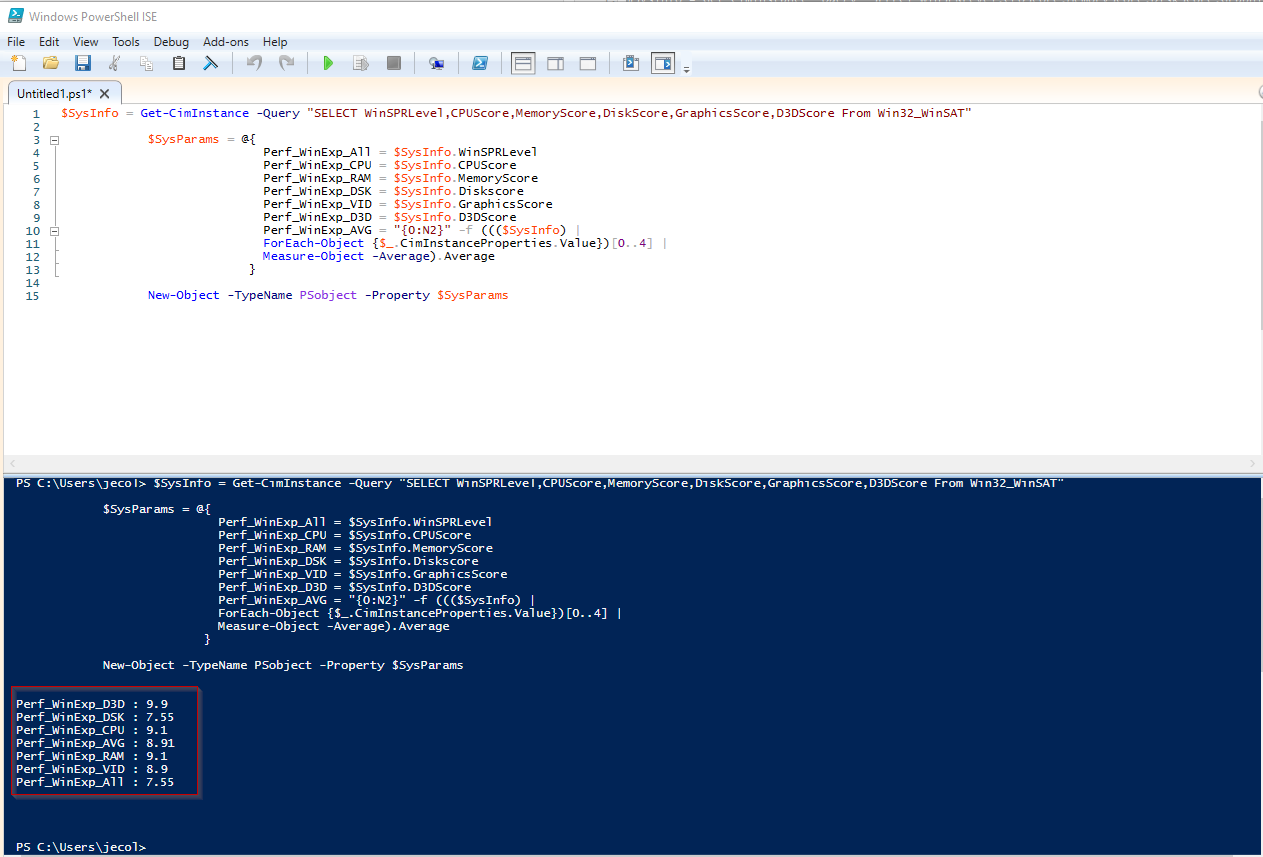
The Windows Experience Index WMI modules are still available in Windows 10, however, the scores are not readily apparent in the Windows 10 system settings.
To get your Windows 10 Windows Experience Index subscores with PowerShell, first open up the Windows PowerShell ISE. Next, go to the following link: https://pastebin.com/i5M81xsV, -credit goes to reddit user:
Copy the code into the Windows 10 PowerShell ISE and then run the script, or create a .ps1 file, and you can get the Windows Experience Index with PowerShell in either Windows 10 or Windows 7:
So you can see that in my results, my WEI score would be 7.5 – where the lowest subscore determines my overall result. Looking at the scores, I can improve my score and upgrade my computer by increasing the DSK (disk) performance. To do this I would probably have to upgrade my motherboard to one that supports an NVME hard drive.
My friend’s laptop’s lowest score is VID (video) which means his laptop GPU is keeping the score low. There are a few options for upgrading a laptop GPU, such as an external GPU, but this isn’t surprising as most laptops GPUs can’t compete with a full-sized computer and GPU.
How to get a list of users who have enabled Out of Office in Outlook with Office365 PowerShell
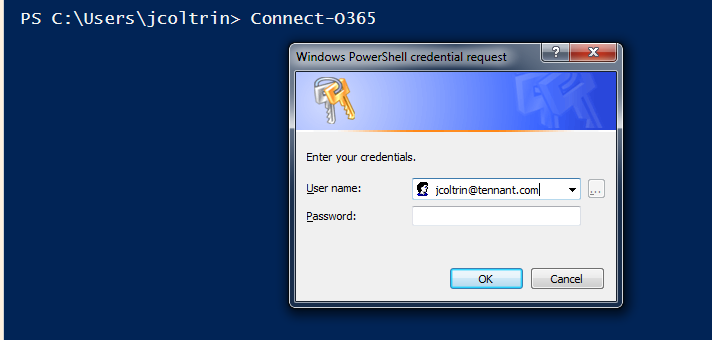
For administrators of Office 365, you may need to occasionally get a list of users who have set up or enabled their Out of Office in Outlook. In my case, we needed to see which parking spots were available on campus in a pinch, and who was not coming in the next day. To do this with PowerShell we’ll need to first connect to our Office 365 Exchange Tennant.
In PowerShell ISE, enter the following code into the code view, save the function as Connect-O365.ps1, and then hit the green Play button.
Next, execute the new function with the following command:
Connect-O365
Replace the username and password with your Office365 admin credentials (not your on-premise domain credentials.) This will log you into your Exchange Admin with PowerShell where we can run our Out of Office commands.
With authentication out of the way, now all we need to do is run the following command to get a list of mailbox identities who have AutoReply configured (and not disabled), and sort by Identity, Start Time, End Time, and Auto Reply State:
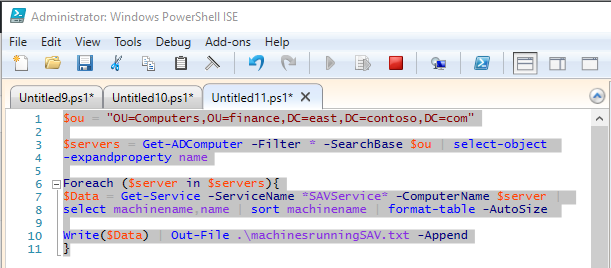
Sometimes you need to find all the computers on a domain that are running a certain particular service. By using Active Directory, supplying your canonical domain name, and define an output file, you can easily create a list of computers running a service.
First, start PowerShell as administrator, and import active-directory powershell components with the following command:
Import-Module ActiveDirectory
Then, open PowerShell ISE and copy in the following into a new .ps1 script:
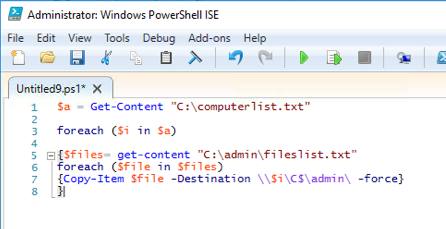
PowerShell – copy a list of files to a list of multiple computers
Here is a simple PowerShell script I found (linked below) that can easily copy a list of files to a list of computers. If you want to copy more than one file to a lot of computers on your network, this simple script should work ok. It’s better to use a network share and use a UNC path to denote where the file source and destinations.
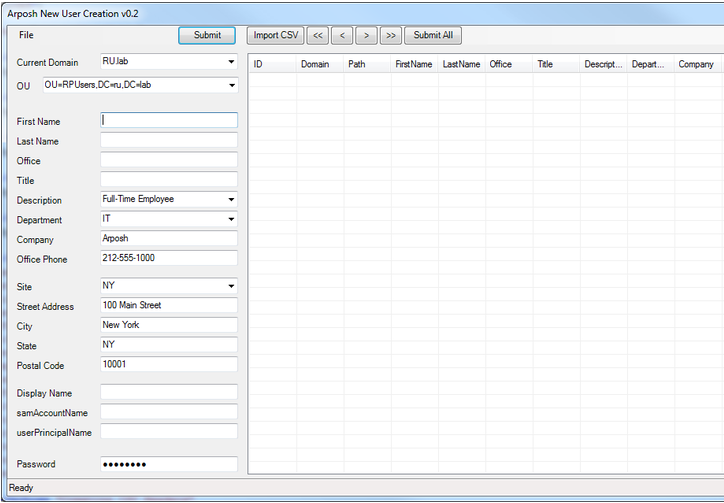
One of the tasks a system administrator will probably have to tackle at one point in their careers, is to quickly add a large amount of users to Active Directory. Without too much difficulty or money, one can accomplish the feat using the following powershell script: Active Directory User Creation Tool: http://community.spiceworks.com/scripts/show/1917-active-directory-user-creation-tool
So a quick kudos to [email protected] and Jim Smith for making this tool available for free online.
By following the instructions on the download page, it’s a few hours work to get the xml file and the csv template to work together to bulk import the users into AD.
Download the script, change then name to a .ps1 file and then execute the script with powershell (right-click on the powershell icon and choose “Run as Administrator”.) Because this is an unsigned script, and in case you can’t recall, the command to run first is:
Set-ExecutionPolicy RemoteSigned
One thing to note is when building your csv file, all cells must be quoted. An easier way to do this, rather than struggling with Excel functions, is to use Libre Office.
Open your csv file with Libre Office, do a Save As -> csv -> check ‘use filter’ -> check ‘Quote all text cells’ -> finish save to a new location with a new filename. Then open the file in a text editor to make sure all cells are quoted.
In the XML file, the most difficult part to configure is the canonical name used to populate the OU you want with the users. In our case we used:
This will make more sense once you are configuring your XML file. Before you do a big bulk import, generate a template with the script/tool, fill out the essential fields with test accounts (first, last, username, password, etc.), then re-import the template, configure your XML file, and then submit the import. Then test your imports with just a few users at a time.
If you can’t find your test user accounts that you imported in Active Directory, you might need to right-click on the root in Active Directory Users and Computers (ADUC) and do a “Find…” then search for the test user accounts. They may have been added to the wrong OU. Again, this will take some tweaking, but at least if you can get the users into an OU, later you can select the users, right-click and choose Move… to put them in the correct OU container.
Once your test accounts are being imported correctly, go back, edit your bulk user lists according to the template specifications, and have at it.
Another issue that came up is that in our source file for our users, we only had the First Name, Last Name in the same cell. In order to split the names into two separte columns, we used the following tips:
This project on spiceworks looks like it’s actively developed so it might be worth while to contact the developer if you run into any trouble or have a feature request.
This procedure shows how to grant users access to other user’s mailboxes in Office365 using PowerShell
How to:
*Grant a user access to a single mailbox
*Revoke the above permissions (recommended cause of action after the Administrator has finished his/her tasks)
1. Fire up PowerShell (Run As Administrator).
First make sure you have the remote signed execution policy set to true. You can do this by running PowerShell in admin mode and running:
PS> Set-ExecutionPolicy RemoteSigned
2. Next, run the following to authenticate your self and import PowerShell commands to your local session:
PS> $LiveCred = Get-Credential
(Supply credentials for MSOnline Portal: [email protected]/Password)
3. After supplying credentials to PowerShell as $LiveCred variable, authenticate and import PowerShell commands into your local session:
PS> $Session = New-PSSession -ConfigurationName Microsoft.Exchange-ConnectionUri https://ps.outlook.com/powershell/ -Credential $LiveCred -Authentication Basic –AllowRedirection
PS> Exit
Have the user who was granted access close/reopen Outlook and the new mailbox will be listed in their Outlook Account Tree
5. If you want to hide the user mailbox from appearing in the mailbox tree in Outlook who you just granted access, you can add the switch -AutoMapping $false
1. To Revoke access you would enter the command:
PS> Remove-MailboxPermission [email protected] -User [email protected] -AccessRights FullAccess -InheritanceType All