

In the process of building a Penetration Test Lab, I wanted to get started with the installation of Kali Linux virtual machine running on ProxMox. To get started, first download the latest version of Kali Linux (ISO) here. Grab the version
| Kali 64 bit | ISO | Torrent | 2.6G | 2017.1 |
Build your new VM (Proxmox > Create VM) using the ISO you’ve downloaded.
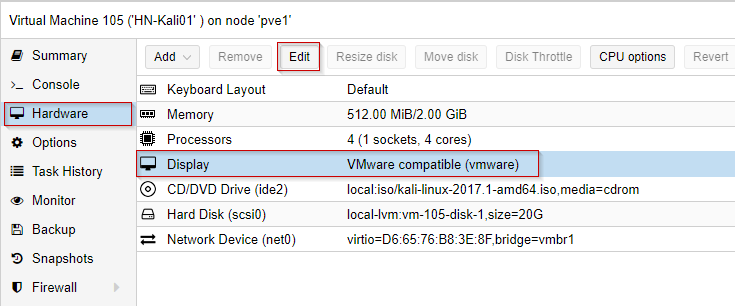
According to other user’s accounts of Kali not working after installation, it’s recommended to change the display type to VMWare compatible: After building the VM, change Hardware > Display > Edit > Choose VMWare compatible:
Kali installs onto a virtual hard drive on ProxMox (we will not be running a “live” version of Kali.) Start the new VM and scroll down the menu and choose Install – (not GUI install.)
During installation, when grub asks where to have grub installed, choose “select your own location.”
Manually enter the path: /dev/sda
Otherwise, if you choose the ‘default’ or the path already listed, after completing the installation and a restart, you’ll get a message “Booting from Hard Disk” and the boot sequence will not complete, the VM will essentially hang.
Kali has completed its setup, I’ve booted the Kali VM, I’ve logged in, and I’m on the desktop.
Run apt-get update and apt-get upgrade to update the packages on your system.
Before we go on to complete the setup of the rest of our lab with known-vulnerable hosts, let’s run some cursory nmap scans.
Let’s run a ping scan on our own network with the command:
nmap -v -sn 10.0.10.0/24
This says: nmap, print verbose output (-v), do a Ping Scan (-sn) – (disable the default port scan for each address), and use the network 10.0.10.0 with a CIDR of /24.
This scan will attempt to ping all 254 addresses. The highlights of the scan are below:
root@HN-kali01:~# nmap -v -sn 10.0.10.0/24

Starting Nmap 7.40 ( https://nmap.org ) at 2017-08-04 15:13 PDT
Initiating ARP Ping Scan at 15:13
Scanning 255 hosts [1 port/host]
Completed ARP Ping Scan at 15:13, 1.95s elapsed (255 total hosts)
Initiating Parallel DNS resolution of 255 hosts. at 15:13
Completed Parallel DNS resolution of 255 hosts. at 15:13, 5.53s elapsed
Nmap scan report for 10.0.10.0 [host down]
Nmap scan report for pfSense2x.jasoncoltrin.local (10.0.10.1)
Host is up (0.00048s latency).
MAC Address: 62:65:B1:30:52:A7 (Unknown)
Nmap scan report for 10.0.10.2 [host down]
Nmap scan report for 10.0.10.3 [host down]

...
...
Nmap scan report for 10.0.10.51
Host is up (0.00049s latency).
MAC Address: 18:03:73:34:34:36 (Dell)
Nmap scan report for 10.0.10.52 [host down]
Nmap scan report for 10.0.10.53 [host down]
So here we see that the scan detected my pfSense virtual machine firewall on IP 10.0.10.1, and gave me the MAC Address.
Let’s take a closer look at my the Dell workstation found on 10.0.10.51. To do so, let’s run a port scan:
nmap -p 1-65535 -sV -sS -T4 10.0.10.51
This scan does the following:
Run a full port scan on ports 1-65535, detect service versions, run a Stealth Syn scan, use T4 timing and the target of the scan is IP 10.0.10.51.
Below are the results:
root@HN-kali01:~# nmap -p 1-65535 -sV -sS -T4 10.0.10.51

Starting Nmap 7.40 ( https://nmap.org ) at 2017-08-04 15:17 PDT
Nmap scan report for 10.0.10.51
Host is up (0.00047s latency).
Not shown: 65528 filtered ports
PORT      STATE SERVICE      VERSION
135/tcp   open  msrpc        Microsoft Windows RPC
139/tcp   open  netbios-ssn  Microsoft Windows netbios-ssn
445/tcp   open  microsoft-ds Microsoft Windows 7 - 10 microsoft-ds (workgroup: WORKGROUP)
2179/tcp  open  vmrdp?
27036/tcp open  ssl/steam    Valve Steam In-Home Streaming service (TLSv1.2 PSK)
49666/tcp open  msrpc        Microsoft Windows RPC
49667/tcp open  msrpc        Microsoft Windows RPC
MAC Address: 18:03:73:34:34:36 (Dell)
Service Info: Host: JCDESKTOP; OS: Windows; CPE: cpe:/o:microsoft:windows

Service detection performed. Please report any incorrect results at https://nmap.org/submit/ .
Nmap done: 1 IP address (1 host up) scanned in 141.84 seconds
Because I don’t always like to use my new Kali VM via the ProxMox console, I want to run my Kali desktop over VNC & SSH. Here is a good resource for learning how to connect to your Kali Linux system with VNC over a secure SSH connection:
In the next post, we’ll look some more at NMAP, as well as some other pen-test tools.