Use Powershell to Get a List of Users with Out of Office enabled in Outlook Office365

How to get a list of users who have enabled Out of Office in Outlook with Office365 PowerShell

For administrators of Office 365, you may need to occasionally get a list of users who have set up or enabled their Out of Office in Outlook. In my case, we needed to see which parking spots were available on campus in a pinch, and who was not coming in the next day. To do this with PowerShell we’ll need to first connect to our Office 365 Exchange Tennant.

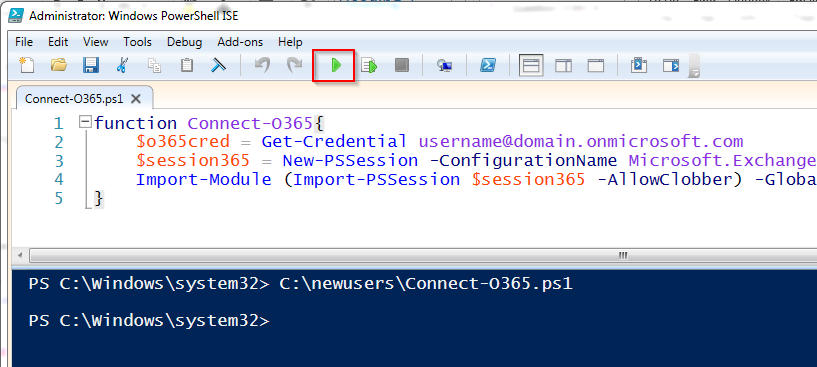
  1. In PowerShell ISE, enter the following code into the code view, save the function as Connect-O365.ps1, and then hit the green Play button.
  2. function Connect-O365{
     $o365cred = Get-Credential [email protected]
     $session365 = New-PSSession -ConfigurationName Microsoft.Exchange -ConnectionUri "https://ps.outlook.com/powershell/" -Credential $o365cred -Authentication Basic -AllowRedirection 
     Import-Module (Import-PSSession $session365 -AllowClobber) -Global
    }
  3. Next, execute the new function with the following command:
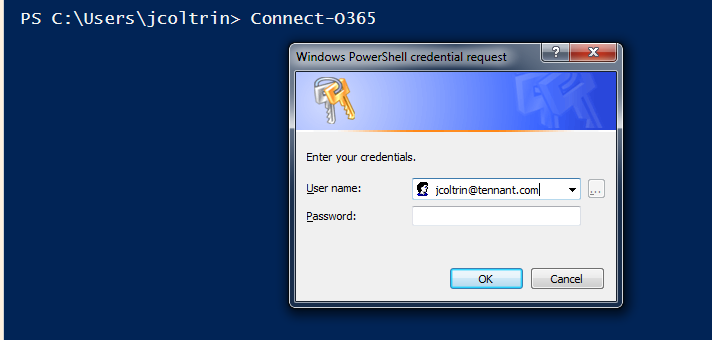
  4. Connect-O365
  5. Replace the username and password with your Office365 admin credentials (not your on-premise domain credentials.) This will log you into your Exchange Admin with PowerShell where we can run our Out of Office commands.
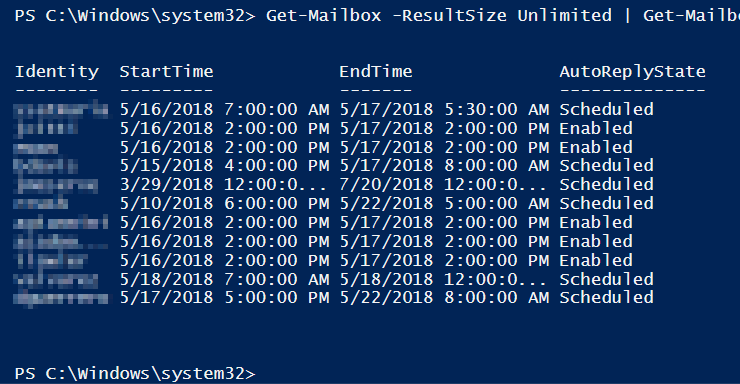
  6. With authentication out of the way, now all we need to do is run the following command to get a list of mailbox identities who have AutoReply configured (and not disabled), and sort by Identity, Start Time, End Time, and Auto Reply State:
  7. Get-Mailbox -ResultSize Unlimited | Get-MailboxAutoReplyConfiguration | Where-Object { $_.AutoReplyState -ne "Disabled" } | Select Identity,StartTime,EndTime,AutoReplyState
  8. This will run for a while, and could take several minutes, but should produce a list similar to the following:

How to setup PFSense with the new Secure and Private CloudFlare 1.1.1.1 DNS

How to setup pfSense with free Secure and Private DNS

You’re probably aware by now that Cloudflare and APNIC has begun to provide secure and private DNS – DNS over HTTPS (DOH), to the general public. You can learn more and read about the initiative here. This article will give a brief summary of why this is important, and how to configure your pfSense router to use these new addresses and disseminate them to your network clients.

By default, your Internet Service Provider (ISP) will provide your router with it’s own list of DNS server IP addresses when you first connect your device to the internet. DNS is used to find websites, and essentially only translates IP addresses to domain names and vice-versa. However, these DNS IP addresses provided by your ISP may also be running on servers that nefariously log and record your internet browsing history. In some cases, these servers may go so far as to even inject advertisements into your web browser whether or not you’d like to see those ads.

By changing your router and/or computer to use 1.1.1.1 or 1.0.0.1 as it’s DNS resolver, you bypass your ISP’s DNS servers, and get a secure and private response from Cloudflare. Cloudflare has a configuration page guide for IOS, Android, MacOS, Windows, Linux, and a Router here. Follow the procedure below on how to setup a pfSense firewall/router to use DNS for it’s queries, as well as set your pfSense’s DHCP Server service to broadcast the new DNS IP addresses to your network clients.

  1. Login to your pfSense firewall by pointing your web browser of choice to the login page (usually this is your Default Gateway IP Address).
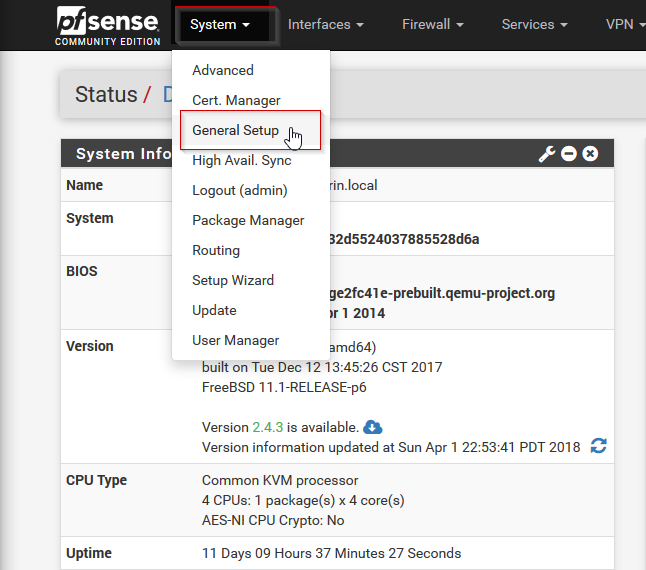
  2. At the Status / Dashboard page, in the upper left-hand menu, click System > General Setup
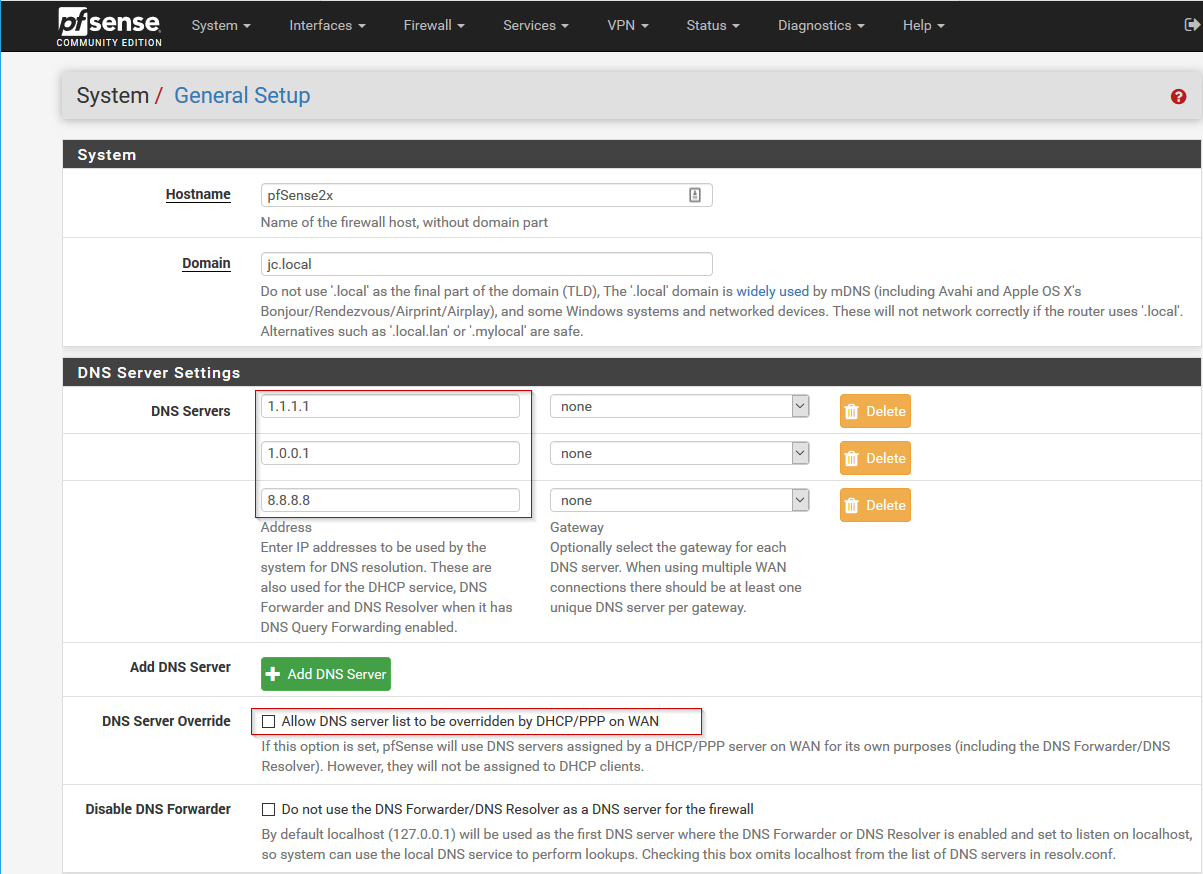
  3. Next, under DNS Server Settings, change the DNS servers in the first two fields to 1.1.1.1 and 1.0.0.1 respectively. Optionally, you can add 8.8.8.8 as a third IP address to use Google DNS in the event that the CloudFlare servers are unavailable, or are taken down by the government. It’s also a good idea to uncheck “Allow DNS server list override”. Once these changes have been made, scroll to the bottom of the page and hit Save
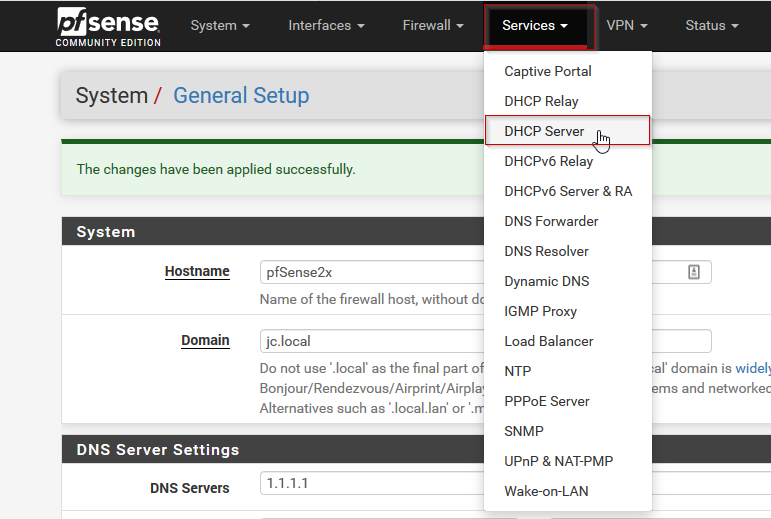
  4. Next, if our pfSense is also being used as a DHCP server, we also want our clients to get these IP addresses for their DNS server settings. To do so, at the top of the pfSense settings menu, click Services > DHCP Server
  5. In the DHCP Server settings, scroll down to Servers, and edit the DNS servers to contain the two new cloudflare DNS servers, (1.1.1.1 and 1.0.0.1), as well as Google’s 8.8.8.8, if desired. Next, scroll to the bottom of the page and hit Save.
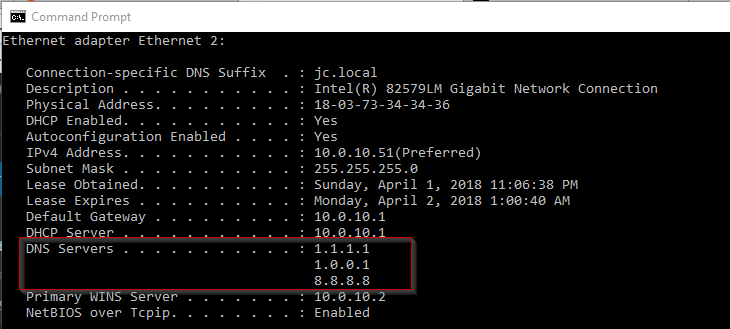
  6. Now would be a good time to restart your client computers to pick up the new IP address settings. You can confirm your computers have received the new IP addresses by opening a command prompt and issue the command:
  7. ipconfig /all | more

    This will give you something like the following information:

  8. As you can see our client has recieved the correct IP address from our pfSense DHCP server.
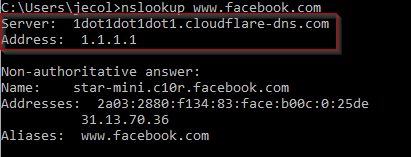
  9. To confirm our computer is actually getting it’s DNS queries from CloudFlare (1.1.1.1), we can issue a new command in the command prompt:
    nslookup www.facebook.com

    And we can find in our results that the responding server is named 1dot1dot1dot1.cloudflare-dns.com, and it’s address is 1.1.1.1:

In order to test that your DNS queries are indeed secure, you can use the link posted by John in the comments; thanks, John!


Amazon Workspaces – Overview, Proof of Concept, and Pricing

Overview and Whitepaper:

Using the AWS Management Console, you can deploy high-quality cloud desktops for any number of users.

Strategies and Challenges for IT who deploy desktops (whitepaper):

Strategy challenges:

  • Timely employee request fulfillment
  • Supporting contractors and temporary staff with a productive workspace
  • Merger and acquisition assistance
  • Increased application development and engineering activity
  • Provide and manage temporary desktops

Greatest Challenges:

  • Security of endpoints
  • Threat Detection/Prevention
  • Corporate file access and protection
  • Improve collaboration
  • Maintain compliance
  • Complexity of technology
  • Managing a heterogeneous device environment
  • SSO to corporate apps
  • Rogue employee devices
  • Rogue applications housing corporate data
  • Supporting LOBs and executive devices and apps

On Premises Virtual Desktop Infrastructure (For example building Terminal Server VDI’s or Citrix)

Upsides to On Premises Virtual Desktop Infrastructure:

  • Simplified management, centralized, hosted, managed, executed
  • Efficient provisioning and de-provisioning with standardized images allowing quick revoking of access
  • Centralized image management, proactive detection, rapid quarantine of suspicious behavior

Downsides to VDI:

  • Complex infrastructure that is difficult for IT to plan, configure, manage, and maintain.
  • Unfavorable economics that tip ROI equation in the wrong direction with un-utilized capacity, heavy upfront costs and cumbersome ops.
  • Unpredictable global access based on proximity of users due to low network bandwidth and unacceptable latency
  • Time-consuming implementations that involve multiple IT disciplines and months of planning, testing, and staging of infrastructure.
  • Difficult root cause analysis among multiple IT teams.

Amazon Workspaces Desktop as a Service a Viable alternative to VDI (Hosted Desktop Service)

Employee Benefits:

  • Employees not tethered to traditional desktops or laptops.
  • No cumbersome VPN connections
  • Increased collaboration and communication with simplified virtual workspaces

Business Benefits:

  • Rapid scale up or down; new employees, mergers and acquisitions, global growth
  • Integrate, consolidate, and deliver services and apps
  • Reduce capital expenditures, operational costs and streamline IT maintenance and infrastructure management

IT Benefits

  • Ability to meet security policy requirements and compliance standards by using protocols to compress, encrypt, and encode data so only images are transmitted and data no longer resides on local devices.
  • Enables creation of developer-style environments, granting developers quick an secure access to end-user environments for seamless dev testing, without impeding user productivity.
  • Allows devs to move fast and fail fast with access to desktop resources when they need them.
  • Keeps business data secure, centrally managed, and accessible to users.
  • Places productive workspace in the hands of end-users near instantaneously, while supporting secure access from multiple device types.
  • Manages apps centrally with the ability to securely package, deploy, and maintain a productive user environment.
  • Deliver a productive environment for users without the task of configuring a desktop asset.

Proof of Concept 

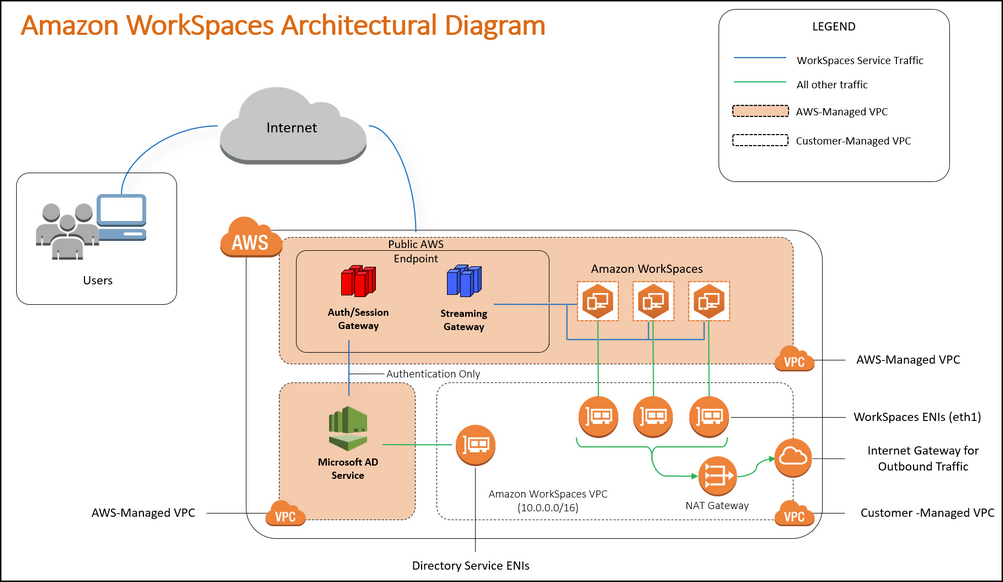
*Note, our org already has a VPN connection between Amazon AWS and our On-Prem domain and domain controllers. This allows me to find our domain with Amazon’s connector. Review the Architectural Diagram below to ensure you’re comfortable with how Workspaces can fit into your AWS presence and VPC’s.

  1. Log into AWS, > Workspaces > Get started
  2. Create AD connector (use Administrator account to connect) – also add WorkDocs Sync feature
  3. Create New Workspace > Choose Directory (local.domain.com) > search for user > jcoltrin (username: domain\jcoltrin) > add selected > Next > Select: Standard with Windows 7 (later I will add MS volume license for Office and other applications and then create an image.)
  4. I choose Performance: 2 vCPU, 7.5 GiB Memory – Hourly
  5. Download the Workspaces client here: https://clients.amazonworkspaces.com/

I sent myself the connection email which looks like the following:

————————-

Dear Jason,

A new Amazon WorkSpace has been provided for you. Follow the steps below to quickly get up and running with your WorkSpace:

1. Download and install a WorkSpaces Client for your favorite devices:

https://clients.amazonworkspaces.com/

2. Launch the client and enter the following registration code: XXxxXX+xxXXxx

3. Login with your Network/Domain password. Your username is jcoltrin

If you have any issues connecting to your WorkSpace, please contact your administrator.

Sincerely,

Amazon WorkSpaces

————————–

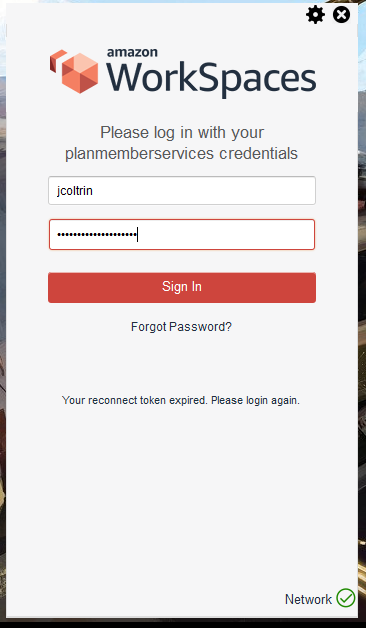
After verifying the registration code, log into the new virtual workspace with your domain credentials:

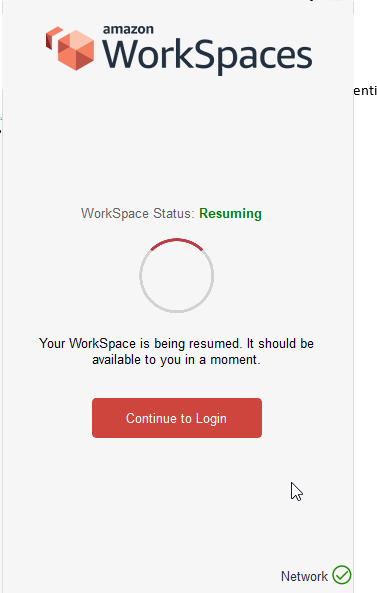
After logging in you may receive the following notice if resuming the workspace:

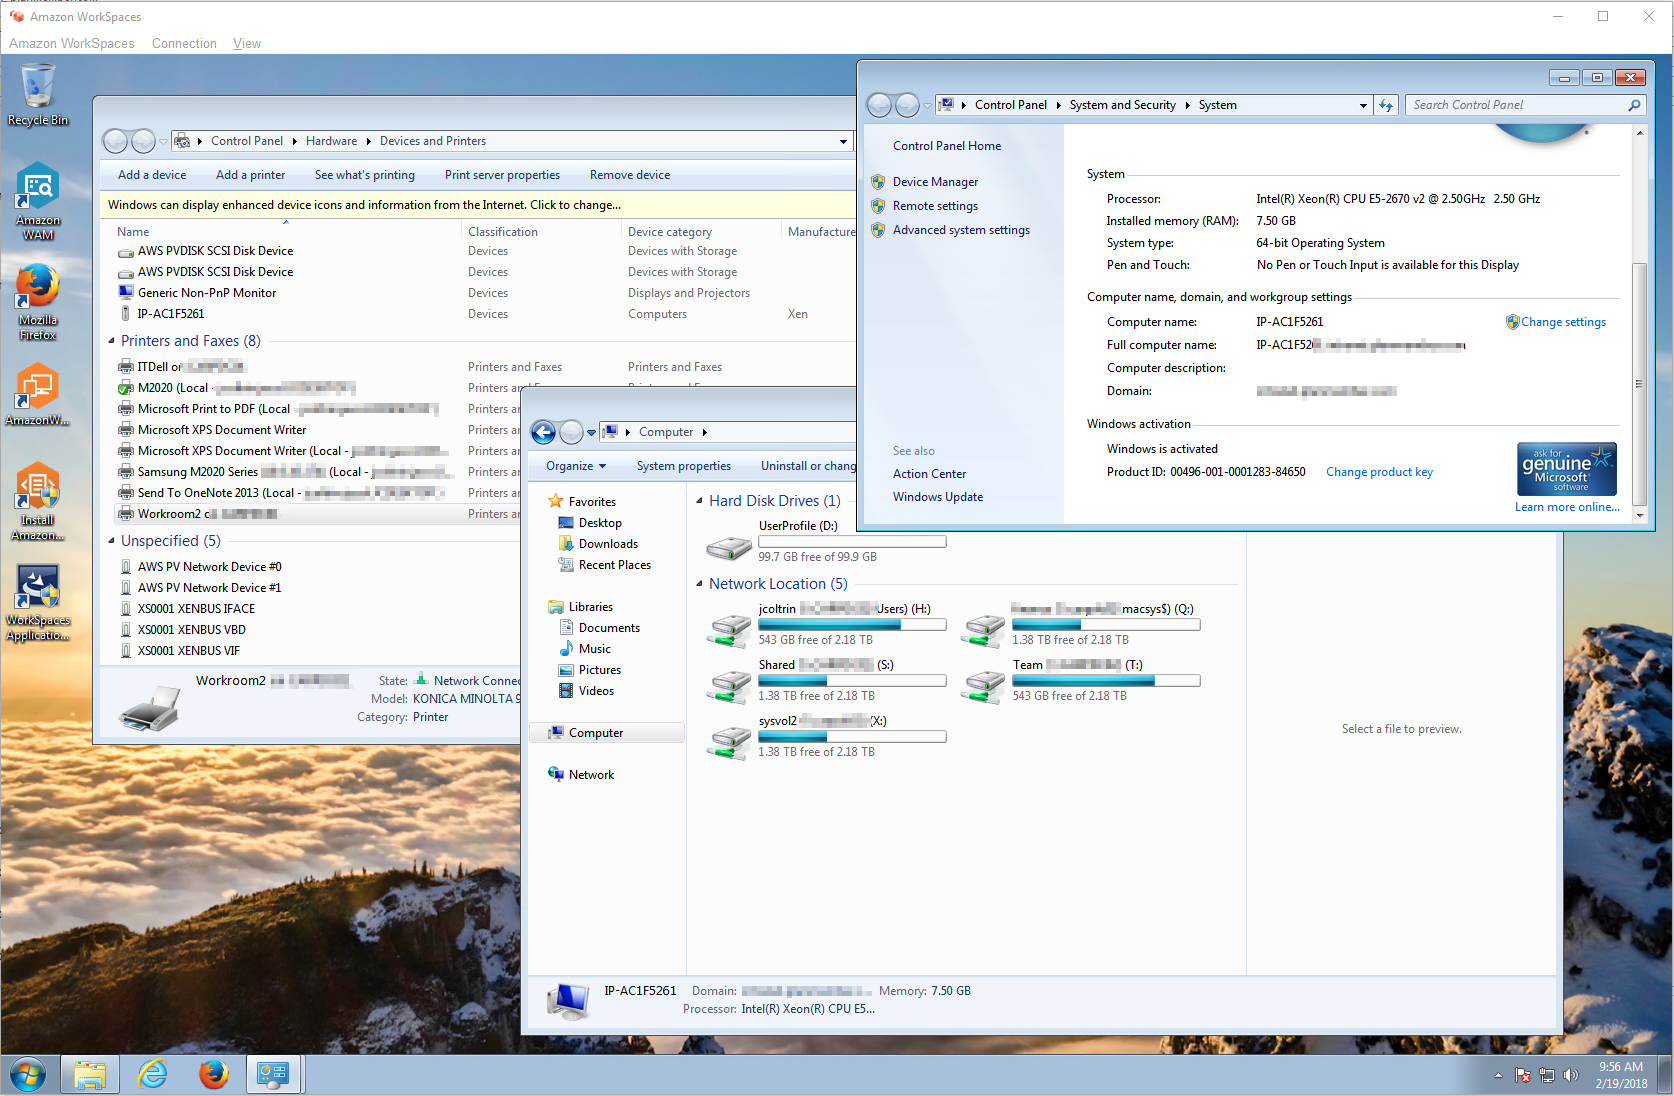
After logging in I received the following desktop:

Notice the following in the desktop image:

  • Network Drives mapped
  • Local and Remote Printers are created
  • Corporate desktop background
  • The computer is now a member of the domain with the computer name IP-AC1F5261
  • Icons available for AWS applications and Directory Sync (share files with my local workstation)

Finalizing for Production and Production Notes:

  • Finalize image with all necessary applications and test. Build your gold Images
  • Enlist a user to test running the workspace in production and adjust applications/workspace as necessary
  • Deploy to a set of users.
  • Rent before buy, buy before build.
  • Aligned with cloud technology
  • Builds on existing AWS infrastructure
  • Straightforward architecture
  • Give it to users and see how they like it
  • Multi-Region vs Single Region – within each region are availability zones. One workspace is not available in all regions. When building VPC, figure out which subnets support workspaces.
  • Subnets are fixed, build to allow for growth.
  • Workspaces are attached to AD connectors. You cannot move an old Workspace between AD Connectors. If availability zone becomes unavailable, then workspaces are unavailable. Use multiple availability zones to allow for this.
  • Only allow windows devices with certificates to connect. Etc. You’re going to have several AD connectors. Have a production AD connector and a testing AD Connector. Setup pure sandbox somewhere else for testing.
  • Each AD connector drops the computer into single OU, options are separate AD connector per department. Eg. Only accounting can connect from a certain dept. Or you cannot auth from outside, only on-prem. Create AD connector for consultants which drop them into separate subnet, monitoring.
  • Workspaces IP addresses stay there forever. IP addresses persist on rebuild etc. Cannot assign IP’s.
  • One VPC for workspaces.
  • Better segregation between work and personal side of things. BYOD is nice – pane of glass. Devs have good separation.
  • This gets Windows on Mac better than bootcamp
  • Reduced operational overhead, light-weight devices, drop them in mail ready to go. Send the registration code. People are lining up to get onboard. Tougher to please users are ecstatic about workspaces. Once implemented, IT itself will not go back to before.
  • Run pilots.
  • Replace end-of-life desktops
  • Great for Mergers and acquisitions
  • Users could connect with Zero client at the office and Home computer at home
  • Allow deployment of Zero clients in all facilities and retrofits
  • Hoteling/shared workspace areas. Smaller sites only need internet connectivity, not a WAN-enabled site.
  • Scalable and global
  • No upfront CapEx
  • Capacity-on-demand
  • Rate of innovation – customers drive features at Amazon
  • Instrumentation and controls – complexity and cost of on-prem is daunting
  • Cost savings – financial benefits – get out of the business of providing physical PC’s, building and configuring VDI service is complicated and costly, focus on service not infrastructure.
  • Workspaces API & CLI integration
  • Same image/applications leverage multiple Geos, ability to grow into other areas
  • Having desktop in cloud allows patch compliant capacities
  • Enabling support staff opportunities – support users all over world, help desk reps
  • Enable end users – automate the whole thing & allow user to migrate their data.

Pricing:

https://aws.amazon.com/workspaces/pricing/

https://aws.amazon.com/directoryservice/pricing/

There are two main options for Workspaces, Monthly pricing and Hourly Pricing.

At 160 hours per month, a “Performance-grade” workspace under the Hourly Pricing model would cost $7.25 + $0.57/hour = $98.45.

The same “Performance-Grade” workspace under the “Monthly” pricing would cost $55.

$55 x 12 months = $660

A new Dell 7050 PC typically costs $800

So it would take approximately 1 1/2 years of monthly payments to reach the cost of a normal desktop PC.

Hardware Options

Value Root Volume User Volume Monthly Pricing Hourly Pricing
1 vCPU, 2 GiB Memory 80 GB 10 GB $25 $7.25/month + $0.22/hour
1 vCPU, 2 GiB Memory 80 GB 50 GB $28 $9.75/month + $0.22/hour
1 vCPU, 2 GiB Memory 80 GB 100 GB $31 $13/month + $0.22/hour
1 vCPU, 2 GiB Memory 175 GB 100 GB $36 $19/month + $0.22/hour
Standard Root Volume User Volume Monthly Pricing Hourly Pricing
2 vCPU, 4 GiB Memory 80 GB 10 GB $33 $7.25/month + $0.30/hour
2 vCPU, 4 GiB Memory 80 GB 50 GB $35 $9.75/month + $0.30/hour
2 vCPU, 4 GiB Memory 80 GB 100 GB $38 $13/month + $0.30/hour
2 vCPU, 4 GiB Memory 175 GB 100 GB $44 $19/month + $0.30/hour
Performance Root Volume User Volume Monthly Pricing Hourly Pricing
2 vCPU, 7.5 GiB Memory 80 GB 10 GB $55 $7.25/month + $0.57/hour
2 vCPU, 7.5 GiB Memory 80 GB 50 GB $57 $9.75/month + $0.57/hour
2 vCPU, 7.5 GiB Memory 80 GB 100 GB $60 $13/month + $0.57/hour
2 vCPU, 7.5 GiB Memory 175 GB 100 GB $66 $19/month + $0.57/hour
Power Root Volume User Volume Monthly Pricing Hourly Pricing
4 vCPU, 16 GiB Memory 80 GB 10 GB $70 $7.25/month + $0.68/hour
4 vCPU, 16 GiB Memory 80 GB 50 GB $72 $9.75/month + $0.68/hour
4 vCPU, 16 GiB Memory 80 GB 100 GB $74 $13/month + $0.68/hour
4 vCPU, 16 GiB Memory 175 GB 100 GB $78 $19/month + $0.68/hour
Graphics Root Volume User Volume Monthly Pricing Hourly Pricing
8 vCPU, 15 GiB Memory, 1 GPU, 4 GiB Video Memory 100 GB 100 GB $22/month + $1.75/hour
Additional Storage $0.10/GB

Conclusion

Overall, I really like Workspaces, it was simple to setup and run. I believe the remote workspace from AWS can work very well for the enterprise and provides a flexibility to expand, create different images for different users easily and keep  data safe at AWS by only sending graphics/pixels over the wire. People can use their own BYOD devices such as Chromebooks etc. to perform their jobs.

The only drawback I’ve encountered is workspaces does not provide a pass-through video / camera devices for Skype video calls. If a user needs to use Skype or other video conferencing, they will have to start their call “outside” of Workspaces.

Let me know what you think about the product and this write-up.

How to clone a Dell Optiplex 7050 M.2 NVME Hard Drive with Clonezilla and an External USB HDD

I ran into trouble when trying to clone a new Optiplex 7050. My normal procedure for cloning with clonezilla required a little tweaking to accommodate Windows 10, UEFI, NVME M.2, Secure Boot, and RAID On. Follow the procedure below to clone your systems on these newer hard drives and BIOS versions.

As a side thought, I enjoy using Clonezilla and have used it for many years. I love the convenience of it and not having to manage Windows images with something like SCCM. While SCCM has a place in some organizations, I believe it’s perfectly fine to use Clonezilla to create OS images of different models of computers. I have approx 15 different OS images; everything from Lenovo laptops to Dell Optiplex 380’s to Optiplex 7050’s.

Requirements:

  • 1 x USB 2.0 or 3.0 USB thumb drive min 2GB capacity for the clonezilla bootable USB drive made bootable to 20170905-zesty version of clonezilla
  • 1 x USB 3.0 USB External HDD with a minimum HDD size that is larger than the TOTAL size of your M.2 NVME HDD. (I use a 4 TB Western Digital My Passport) – In my previous experience with Clonezilla, it has created images only writing images of the Used Space on the Source HDD, in this case with UEFI / NVME HDD’s, the image created on disk is the total size of the NVME drive.
  • 2 x Dell Optiplex 7050 (Source and Target) computers
  • 1 x Separate PC or laptop you can use to create a bootable USB Clonezilla Thumb Drive

1. Configure your Source Windows 10 Dell Optiplex 7050 machine as necessary. Install all applications, create user accounts, and uninstall bloatware. Make sure you create an administrator user account and password. In final preparation for cloning, either run Sysprep (found in C:\Windows\System32\Sysprep), or alternatively ensure you shut down Windows 10 completely by creating a Shutdown /s /t 0 shortcut and executing it.

2. On a separate PC, download Rufus which we’ll use to create a bootable USB thumb drive.

3. On a separate PC, download the AMD64 version of alternative (Ubuntu-based) as outlined on the Clonezilla website (this version is required for newer BIOS’):

4. Change the file type to ISO and hit Download.

5. Attach your USB thumb drive into your separate computer, run Rufus, tell Rufus to use the drive you just attached under Device, point Rufus ” to the .iso file you just downloaded.

6. Hit Start and the bootable USB thumb drive with Clonezilla will be created.

7. On the Source computer, insert the USB thumb drive into one of the front panel’s top (black) USB ports, and insert the USB External HDD separately into the Blue USB 3.0 port. Attach the keyboard, mouse, power, and monitor.

8. Power on the Source computer and start mashing the F12 key on the keyboard to get to the one-time boot menu.
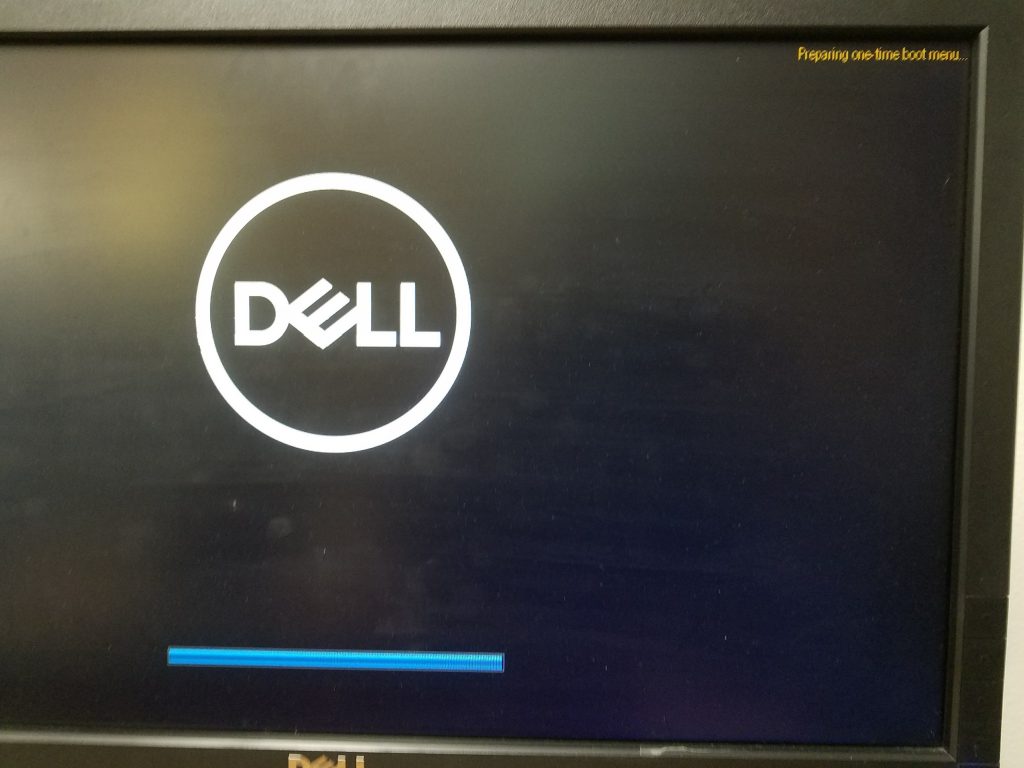
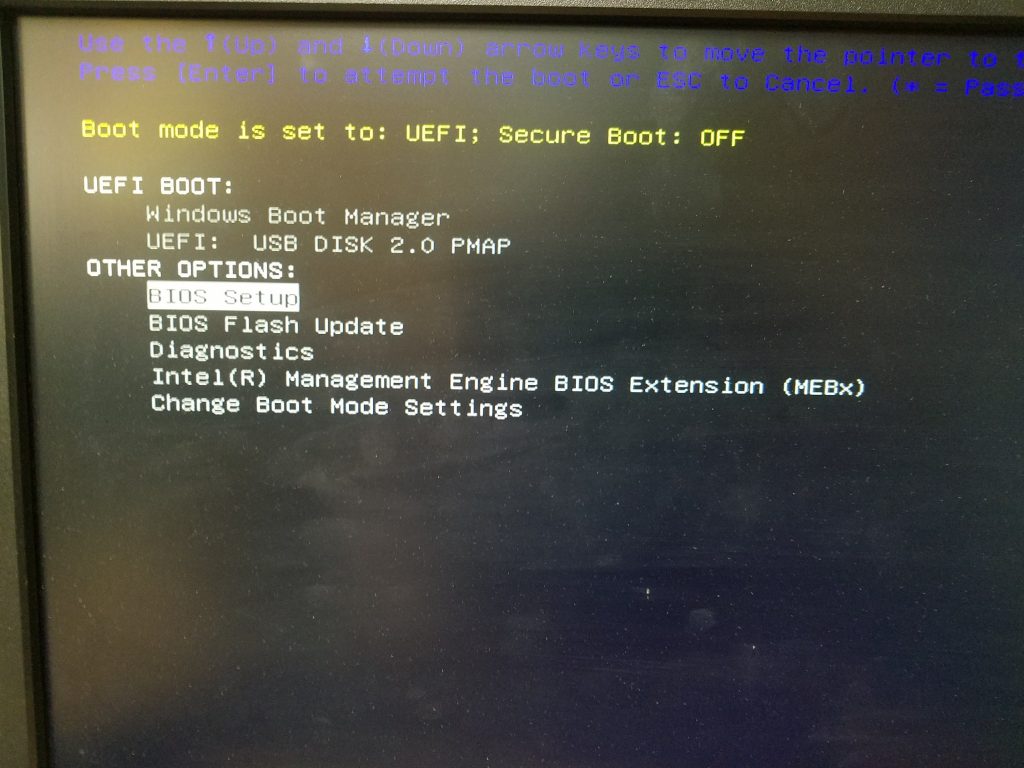
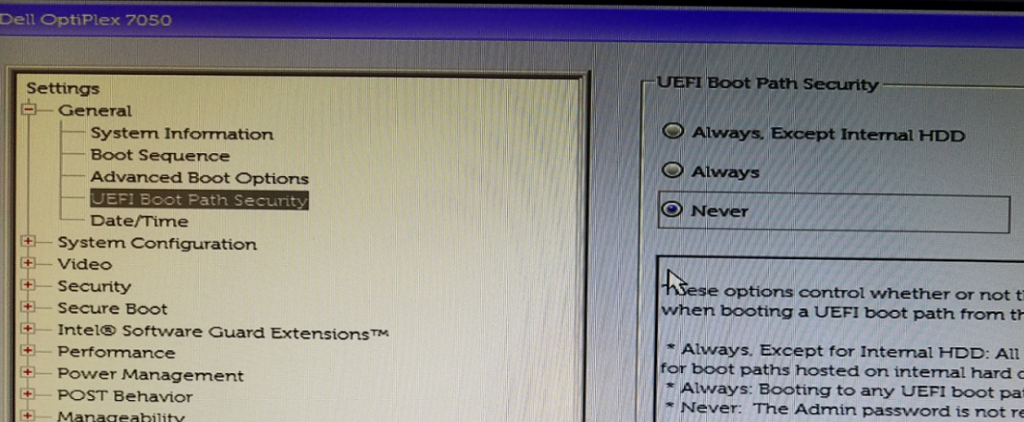
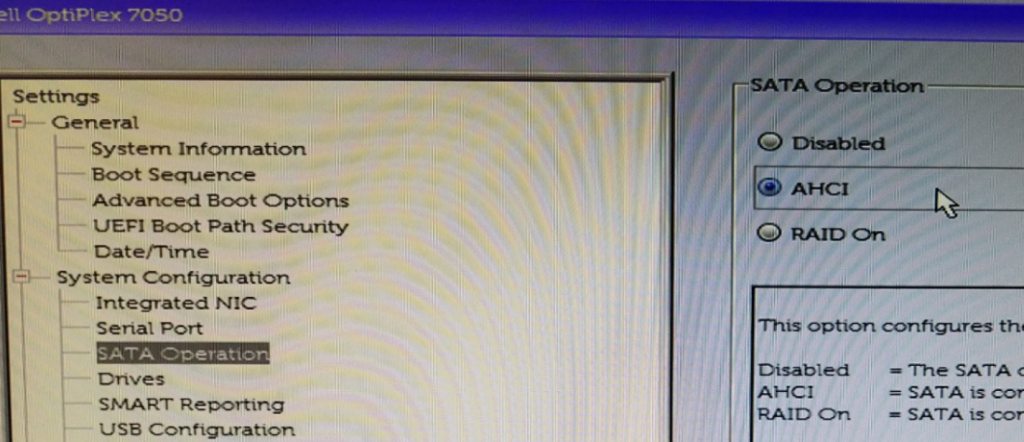
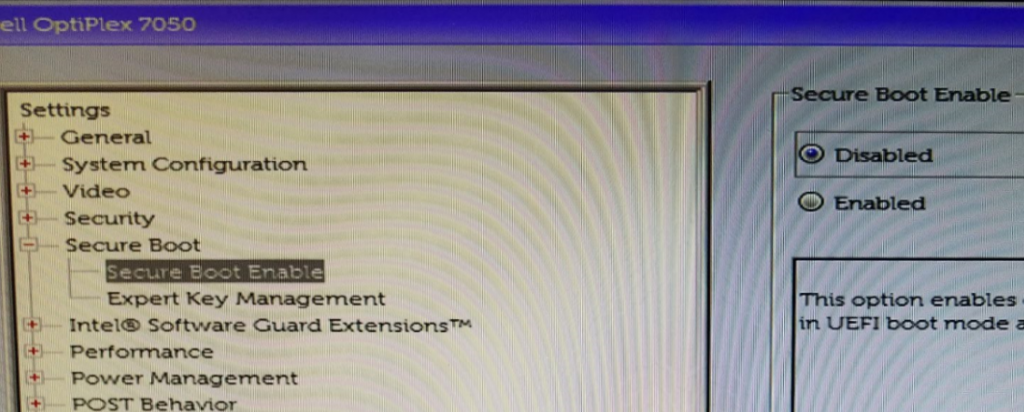
9. Before we begin, we need to make sure clonezilla can find our NVME HDD. By default UEFI and Secure Boot will be enabled. We need to disable these as well as Boot Path Security so that we can continue.

10. Select Setup from the Boot Menu:
11. In the BIOS, under the General Heading, select UEFI Boot Path Security and change it from Always to Never.
12. Next change System Configuration > SATA Operation from RAID On to AHCI
13. Lastly, change Secure Boot > Secure Boot Enable “Enabled” to “Disabled”
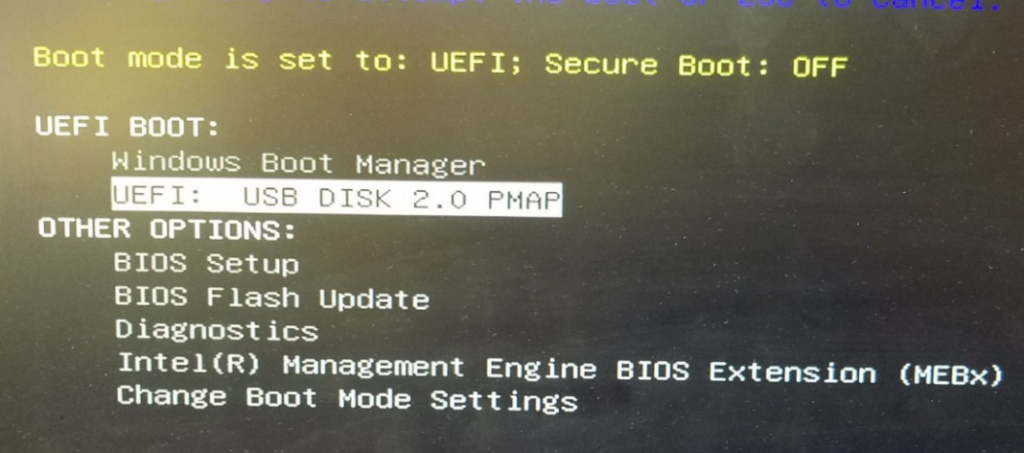
Apply, Save and Exit the BIOS. On the next boot, start mashing the F12 key again and this time select UEFI: USB DISK 2.0 PMAP
Clonezilla will boot from the USB drive so choose the default (hit Enter):

Select English > Don’t touch keymap > Start Clonezilla > device-image (Ok)

Under Mount Clonezilla image directory, choose Local_dev (Ok)
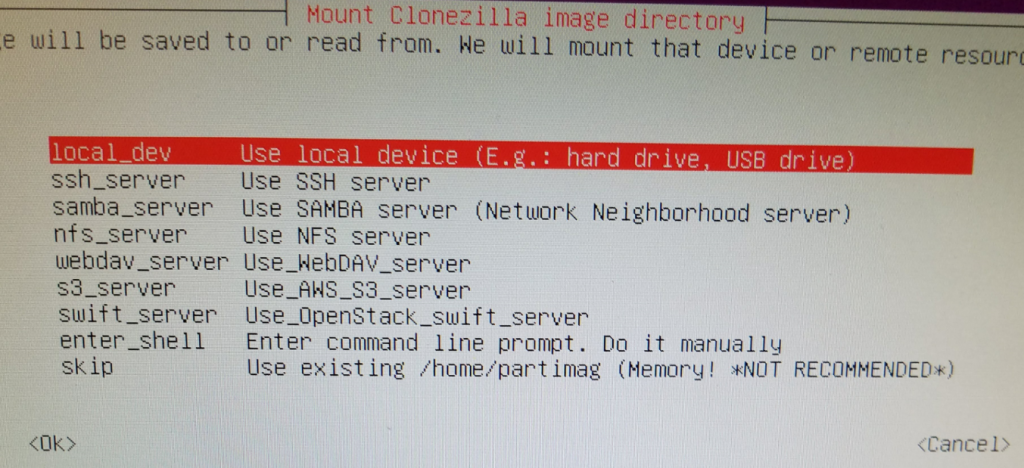
Press Enter to continue.

Review the clonezilla Scan disk preview to ensure it’s found both your Source and Target hard drives:

Press Ctrl-C to continue.

Arrow down and select your large external USB hard drive (sda1) to set the location of /home/partimg . This is where the clone image will be stored.
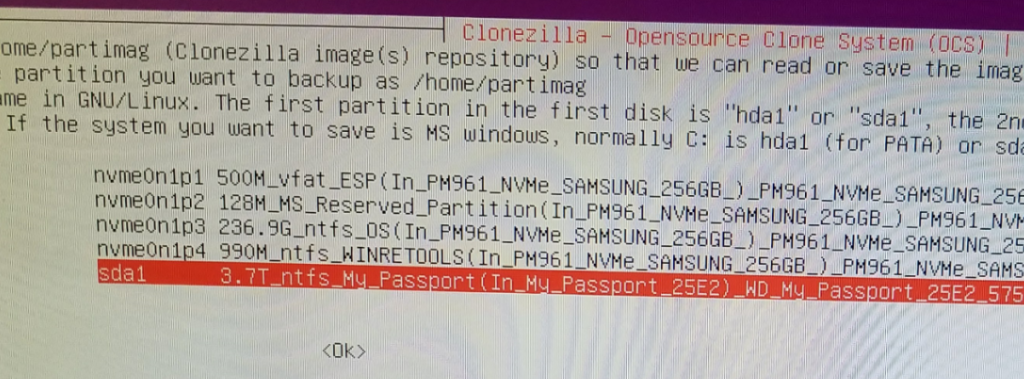
In the Directory Browser, hit “Browse” and go to your Parent Directory (top-most level) and select Done. This is where your image will be saved. You can see in my screenshot I’ve already saved an image here.
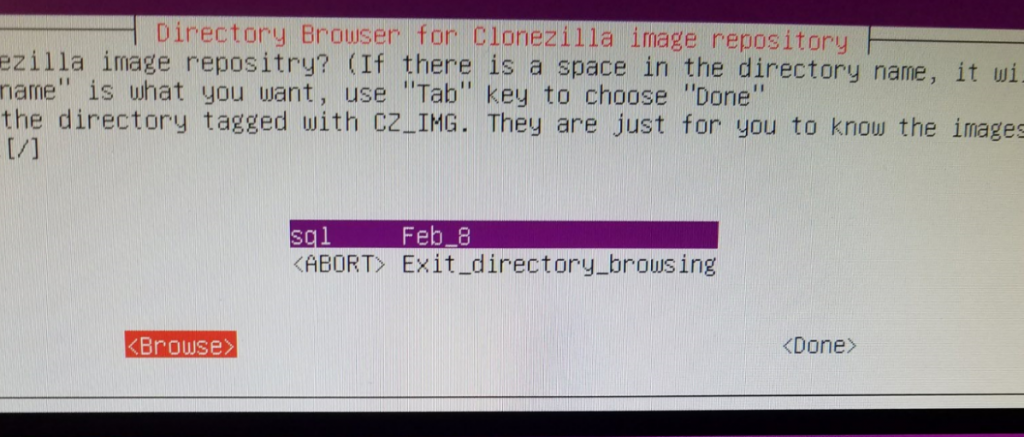
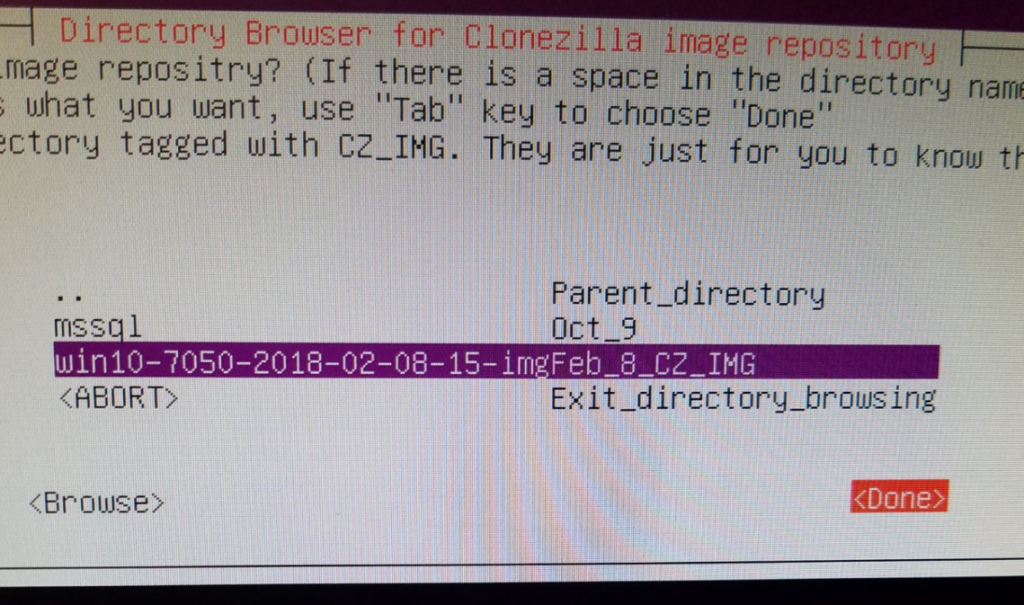
You will get a Summary location of Source (dev/sda1) and Target (/home/partimag). Press Enter to continue.

Choose Beginner mode

Choose Save Disk (Save_local_disk_as_an_image) – in my previous experience with Clonezilla, using normal spinning HDD’s and even SSD’s, I’ve used Samba to save my images to a separate server over the network using gigabit ethernet perfectly fine. However, in the case of these new computers and hard drives, I would get a permissions error when selecting SAMBA/SMB 2.1. The imaging would begin to take place and a couple smaller partitions would copy, but as soon as the primary large partition started it’s copy, I would get the permission error and the clone would halt. This is why we are using a local external USB hard drive.

Give a descriptive name for the image (Dell7050_NVME_256GB_DATE-IMG) hit OK.

Select the local disk as source (should only be one here)

Select -sfsck (Skip Checking)

Select Yes, check the saved image

Select -senc Not to encrypt the image (or encrypt if desired)

Select Action to perform when everything is finished: -p power off.

Press Enter to continue, (Yes/Yes) – the image process will run and the image of the Source PC will be written to the External USB HDD. The machine should shut down when complete.

Image Target Computer

Now that we have our image saved on our external HDD, we can image our Target PC. On the powered-off PC, Connect the USB thumbdrive, External HDD, keyboard, mouse, and monitor, and again Boot into the BIOS.

On the new target computer, we want to again change the BIOS settings to mirror those we made in steps 11., 12., and 13.

After saving the BIOS, restart and hit F12 again, select the USB thumb drive, and boot Clonezilla.

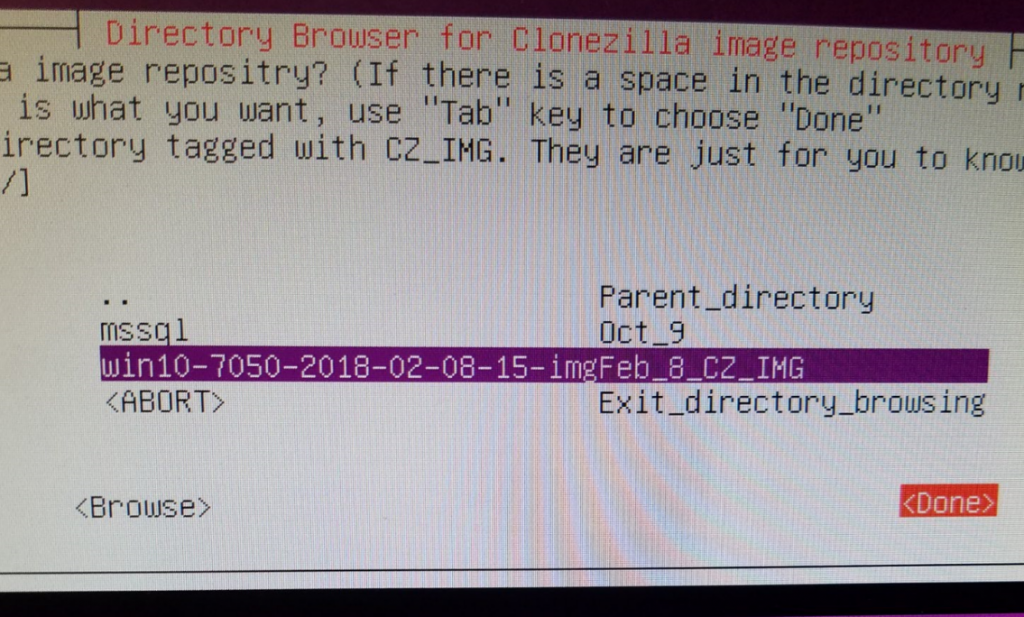
Start Clonezilla > Device Image > Local_dev > select image repository (sda1) > in Directory Browser, browse to the image we created, highlight it and select Done:
Choose Beginner Mode > Restore Disk:

Choose the image to restore:

Select the target disk to restore onto (Should only be one listed here):

Select “Skip checking the image before restoring” > poweroff > Enter >

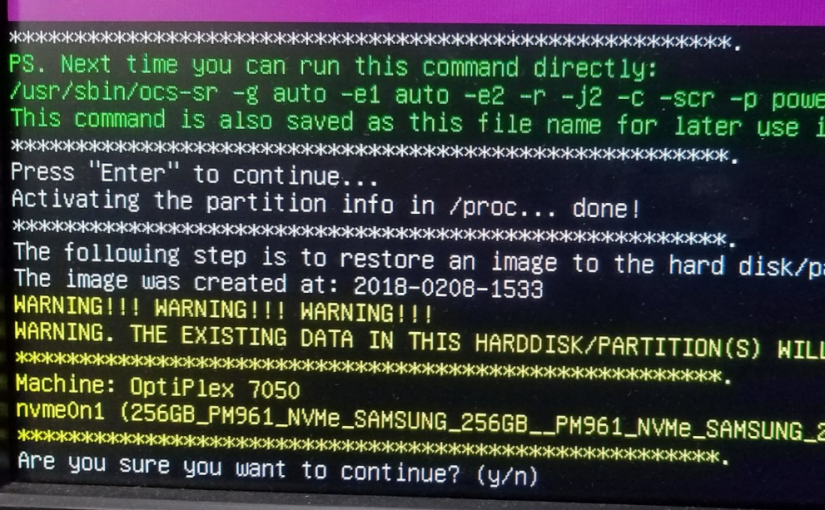
Heed the warning here. If important data is on the target disk, do not proceed. All data will be overwritten:
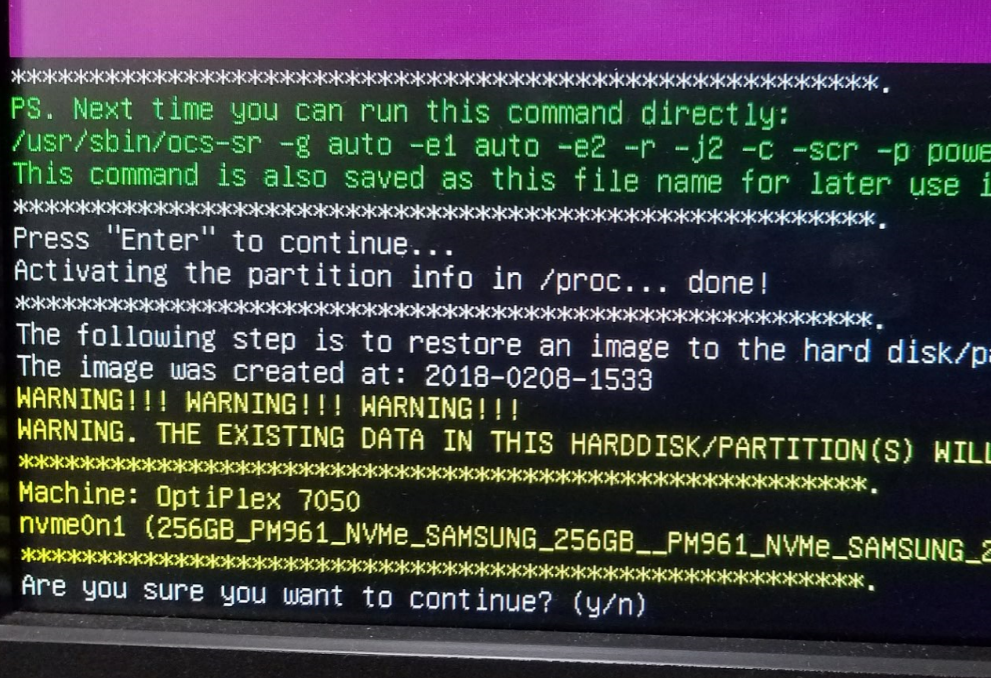
Hit y (enter) > y (enter) >

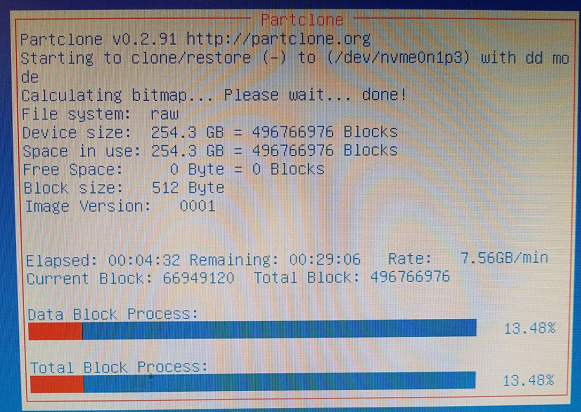
Partclone will run, clone the image to your disk, then shut down:
With the system powered down, remove your external HDD and boot thumb drive.

Power on the newly-imaged PC, hit the F12 button to go into the BIOS again. Reverse the changes made in steps 11, 12, and 13. Save the BIOS settings, and boot normally into windows. Congrats, you’re done! Hope this helps someone clone their newer systems with Clonezilla.