Server 2012 R2 SMB (SMB2) Shares inaccessable from 2000, XP SP3, Mac client computers – Solved

Recently a lot of users complained that they could not access or mount or connect to public shares hosted by a newer Server 2012 R2 virtual machine running on Xen. The users all had a common trait that they were trying to access the shares with SMB1 from XP, and OS X on Apple/Mac computers. Windows 7 and other Server 2012 computers could access the shares without any errors. After a lot of testing, the resolution turned out to be a registry change which turned off SMB2. During testing we did the following:

  1. I created test shares on the problem server on both the c and e drives, and still was not able to connect to them with OS X 10.9.1 or XP. Whether trying to mount the shares by UNC or DNS, or IP Address, or mapped drives, I could not mount or view the shares. I modified these new shared directories permissions to see if authentication, security, or permissions were the problem, but no difference. The error message on the Macs was: “There was a problem connecting to the server “servername”. The share does not exist.” and on XP was: “The specified network name is no longer available”.
  2. I created a new share on a separate Server 2012 R2 server. My mac was able to mount this share created on it. This anomaly is what is still vexing because it’s an identical share on an identical operating system, but still the public shares had to be fixed. I looked at differences between the two server’s registries and could not find any discrepancies in the hive located at HKEY_LOCAL_MACHINESYSTEMCurrentControlSetServicesLanmanServer. It would be nice for such an occasion to have an easy-to-use tool like linux’ diff, sdiff, or colordiff to compare registries side-by-side, but I digress.
  3. After finding the post by Nicolas Moreno here: http://social.technet.microsoft.com/Forums/windowsserver/en-US/bca317cd-87aa-4fd7-b12a-6715e6dddfe5/cant-access-unc-share-on-windows-server-2012-r2?forum=winserver8gen I checked the good working server and found that it’s server service is using Srv2 (smb2), but it is able to provide shares. Again, the server that can’t share with older clients also was using Srv2 (SMB2), but the symptoms were a lot like the post’s description.
  4. First, I took a snapshot of the virtual machine, I backed up the Registry Hive/Key with an export, and then made the registry change:
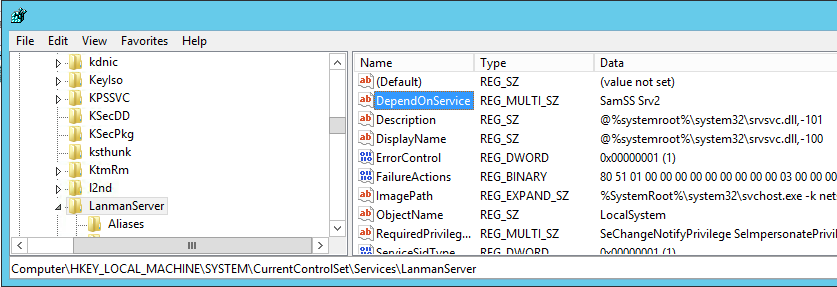
    HKEY_LOCAL_MACHINESYSTEMCurrentControlSetServicesLanmanServerDependOnServiceFrom: SamSS Srv2To: SamSS SrvScreen Shot 2014-02-20 at 10.32.29 AM
  5. After making the change and rebooting the server, all of the clients (2000, 2003, XP, Mac OSX 10.8 Mountain Lion, Snow Leopard, Mavericks) could access the shares again.

An associate had made changes to this server prior to the incident cropping up so it’s hard to be sure just when and what caused the SMB2 windows shares to block access, but for now everyone can access the public drives. Please leave a note if this resolution helped or if you found a way to get broken SMB2 shares working again without changing the registry.

 ic_launcher

Creating and Deploying Windows7 with WDS 2012

Below is a rough procedure for using Windows Deployment Services 2012 to create and deploy images in an Active Directory Domain environment. This procedure does not cover the installation of the WDS role in 2012, as that part is fairly straightforward.

– Prerequisites include: Server 2012, Deployment Toolbench, WAIK, and WDS Role installed. After the installation, RDP into your server.

– First step is to perform a clean install from the Windows 7 Enterprise 64 .iso dvd onto a PC model which will be cloned, for example Optiplex 745

– In this case we are using Volume licensing – licensing keys are not important, they are handled by a Volume Licensing Server, you won’t have to choose licensing while deploying images

– Open WDS

– Add boot image boot.wim stored on Win7 Enterprise CD

– Name the image (win7x64)

– Right-Click – Create capture image

– Store locally – name ‘win76capture’ – next – extract image

– In some instances you will need to add drivers. Add drivers – Add driver packages – you will need at a minimum network drivers – go to manufacturers support, get .exe drivers, use 7zip to extract contents into folder and browse to that folder to add them.

– go to remote machine – power on and hit F12 for boot options – network boot/PXE boot *note: some pc’s will not have boot to NIC enabled. Do so in BIOS of system (NIC Enabled with PXE) and set boot order: 1. CD 2. HDD 3. NIC

– Now it’s time to make the PC image. For uncloned models run a base install from Windows 7 CD. After the installation process runs it will restart several times.

– Before entering any settings, and at the point during the install where it ask for the user name/PC name, hit CTRL+SHIFT+F3 to go into Audit Mode – this will RESTART the pc into Audit Mode.

– After restart, the PC will land you on the desktop with the Sysprep Tool open in Audit Mode.

– If you miss the prompt to hit ctrl+shift+f3 you can get into audit mode by running from elevated cmd prompt: c:windowssystem32sysprepsysprep.exe /audit /restart

– Leave the Sysprep tool open with the following settings: Enter sysOOBE, Generalize (checked), Shutdown Options: Reboot

– Leave the Sysprep tool open and do all software installs and settings for the end user. Office 2010 automated installer, create shortcuts for web tools, install standard apps for example: firefox, 7zip, putty, reader, pdfcreator, java, winscp, vlc, iTunes, quicktime – many times mapped drives and folder redirects will be created with .bat scripts but often times printers will have to be connected when setting up for the user. Make sure system is not set to sleep in power settings, turn off UAC, install flash etc. Be sure to open applications such as MS Office to register/activate software.

– Click OK on SYSprep and OOBE

– Restart – PXE boot again – do capture.wim – it will ask ‘select file to save to … Save to local disk as *model*Win7x64.wim. If the capture process does not see the partition C or D (in some instances D drive will actually be your C: drive) then you’ve done something wrong with Audit mode and sys prep. The capture will complete and land you either at the Owner/PC Name settings at which point you’ll do a Ctrl+Shift+F3 or at your desktop. Once back at the desktop, browse to your server at servernameshare and copy the capture.wim file to the server.

– Make sure to start WDS as administrator and can add new Image Group. If you don’t add a New Image Group the ‘add new image’ wizard may tell you the image is invalid. If you get “File does not contain a valid install image” / Add Image failed. In WDS install images – add new Image Group, then try re-adding the captured .wim. If it still says invalid image, re-copy the captured image from the PC back to servernameWDS, create a new image group and add image again.

– Right-click – Create multicast transmission/Any PC can connect/Allow Multiple etc. Create a new multicast transmission for your new image.
– Boot client PC to be imaged into PXE again and clone the machine with new image that you just captured from it, to test and make sure it works, network, drivers etc are all in place.

– if errors occur, go to image then ‘Add driver packages to image’

– if everything is good open WSIM – 2 answer files will be created: 1. Unattended and 2. OOBE (out of the box experience)

– Use unattended file in c:remoteinstallwds clientunattendedwdsunattendedwin764.xml

– Use petenet live documentation for unattended file creation settings if necessary here: http://www.petenetlive.com/KB/Article/0000735.htm (three parts)

– Pass 1: 2 modules — 1. AMD64_ms-win-international-core-winpe_neutral … 2. AMD64_ms-win-setup-neutral – credentials domain: sec un: ***admin pw: *****04

– Pass 4: 1 module — AMD64-ms-win-unattendedjoin-neutral: machine objectOU: OU=autoinstall,OU=Workbench,OU=Workstations,OU=***,OU=*****,DC=***,DC=root,DC=******,DC=com — join domain: ****.root.****.com

– File – Open – oobeunattendedwin7x64.xml:

– Pass 4 (Specialize) — 2 modules: 1. AMD64_ms-win-shell-setup-neutral: configure organization, owner, PST —- 2. AMD64_ms-win-unattendedjoin_neutral: ID join domain /OU, credentials: ***/******

– Pass 7 (oobesystem) — 2 modules: 1. amd64_ms-win-internationalcore_neutral: EN-US (everything) — 2. AMD64_ms-win-shell-setup_neutral – a. OOBE – true,true,work,1,true,true b.UserAccounts – administrator pw: **** – Local Accounts – LocalAccount [Name=”admin”]: AddListItem, admin,admin,Administrators,admin – Passwrd: ******

– Go to WDS Install Image win764 – right-click – properties – checkmark Allow image unattended – select c:remote installwdsclientunattendedoobeunattendedwin764.xml – ok

– Right-click on Server – Properties – Boot tab: default boot image x64: use boot capture.wim. — under Client Tab: Enable unattended installation

– Browse to c:remoteinstallwdsclientunattendedwdsunattendedwin7x64.xml / enable logging

– Boot client pc pxe – options are win7x64 or capture – select win7x64 – option which image you want to install (win7x64)

– PC should finish installing the image and restart, leaving you at the Ctrl+Alt+Del and already named and joined to the domain. The PC should have been added to the OU domain.com/Workstations/Workbench/autoinstall

– Log in as domain admin, add the end user account temporarily to the local administrators group, log in as the user and setup the user profile and add printers.

– Remove end-user from local administrators group – that’s it!

DVR Security Surveillance Systems

I took a few hours to review Digital Video Recording and surveillance products and specifications. I’ve learned they’re all pretty much the same re-branded Chinese boxes with Linux embedded and ultimately it comes down to hardware capabilities and if there is a company associated and reviews.

As far as most features, best price, highest quality video and 16 channel video and audio support, I would recommend this unit:

CH Channel Full D1 Network DVR Recorder H 264 HDMI 16CH Video Audio _ eBay

http://www.ebay.com/itm/16-Ch-Channel-Full-D1-Network-DVR-Recorder-H-264-HDMI-16CH-Video-Audio-/261360151721

This one is nice because it has more features, two network cards, good quality D1 recording, H-264 and 16 channel, but does NOT include a hard drive. Also it is Generic and a lot of security “companies” buy these, brand them and charge $1200. So this one is around $600 but add on a hard drive for another $100. This unit does not include cameras.

This following DVR pretty much has the same features as the unit above but no dual network card and seems to be supported better and includes a 2TB hard drive. I would consider this unit to be the Ebay Special. A no-name – chinese knock-off that is just the same as all the others but includes better marketing and possibly a company behind it to get some kind of assistance if there are questions.

http://www.ebay.com/itm/ELEC-HDMI-1080P-16-CH-Channel-Full-D1-Realtime-CCTV-Security-DVR-NVR-DVD-RW-2TB-/110990543571

Elec® HDMI 1080p 16 CH Channel Full D1 Realtime CCTV Security DVR NVR DVD RW 2TB

I recommend this unit because it looks like it has a company behind it, includes the hard drive and DVD-RW drive. If it’s DOA, then you can do an EBAY return. This one is $400.

This following DVR is from a reputable seller (newegg), has a 1 year warranty, but only has 4 audio inputs, and does not include a hard drive:

http://www.newegg.com/Product/Product.aspx?Item=N82E16881338138 This one is $500.

Aposonic A-S1604T2D 16 x BNC Video Recorder - Newegg.com Aposonic A-S1604T2D 16 x BNC Video Recorder 2 - Newegg.com

I looked on Fry’s website and they didn’t have anything with close to the capabilities of the 3 models above.

Here is a good article about choosing the right DVR:

http://www.ebay.com/gds/Selecting-The-Right-Security-DVR-Resolution-VS-Speed-/10000000009337378/g.html

Essentially it says the newest/best DVR’s are capable of recording in the highest D1 resolution on 4 channels with H.264 compression. If audio recording is a capability you need then the first two units I listed have 16 audio inputs. Other systems only have BNC and no audio inputs, but there are RCA-to-BNC connectors and microphones available to convert a BNC video cable into a working Mic.

Stanford CS106a Assignment 2, Problem 4 – Target – Part 1

The problem is as follows:
Create a figure that is simply three GOval objects, two red and one white, drawn in the correct
order. The outer circle should have a radius of one inch (72 pixels), the white circle
has a radius of 0.65 inches, and the inner red circle has a radius of 0.3 inches. The
figure should be centered in the window of a GraphicsProgram subclass.

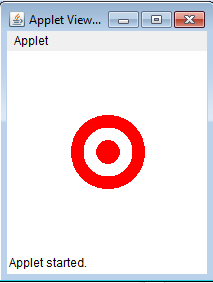
Here is my first part of the solution to the problem. The output is correct, however, the guide states I should use constants. I will re-write the program later in Part 2 once I have learned how to use constants. But for now here is the solution to the problem and the output below.


/*
* File: Target.java
* Name: Jason Coltrin
* Section Leader: n/a
* -----------------
* This file is the starter file for the Target problem.
* This figure is simply three GOval objects, two red and one white, drawn in the correct
* order. The outer circle should have a radius of one inch (72 pixels), the white circle
* has a radius of 0.65 inches, and the inner red circle has a radius of 0.3 inches. The
* figure should be centered in the window of a GraphicsProgram subclass.
*/

import acm.graphics.*;
import acm.program.*;

import java.awt.*;

public class Target extends GraphicsProgram {
public void run() {
drawLargeRedOval();
drawWhiteOval();
drawSmallRedOval();
}

// precondition: a canvas of 200pixels across and 200pixels top to bottom,
// the center is 100x100 pixels.
// postcondition is a red filled circle with 1 inch radius with 72pixels has
// a center of 36
// 100 - 36 = 64,64 is where the left and bottom of the rectangle in which
// the oval is located should be placed

public void drawLargeRedOval() {
GOval myOval = new GOval(64, 64, 72, 72);
myOval.setFilled(true);
myOval.setColor(Color.RED);
myOval.setFillColor(Color.RED);
add(myOval);

}

// precondition: a 200x200pxl canvas with a 72pxl red circle centered at
// 100x100
// postcondition: another white circle added on top of the red circle. .65
// of 72 = 46.8 - half of 46.8 = 23.4
// 100 - 23.4 = 76.6, is where the left and bottom of the GOval rectangle is
// set.
public void drawWhiteOval() {
GOval myOval = new GOval(76.6, 76.6, 46.8, 46.8);
myOval.setFilled(true);
myOval.setColor(Color.WHITE);
myOval.setFillColor(Color.WHITE);
add(myOval);
}

// precondition: a 200x200pxl canvas with a 46.8 white circle on top of a
// red 72pxl circle with a center of 100x100
// post condition: another red circle added on top of the white circle. .3
// of 72 = 21.6 - half of 21.6 = 10.8
// 100 - 10.8 = 89.2, is where the left and bottom of the small re oval is
// set.
public void drawSmallRedOval() {
GOval myOval = new GOval(89.2, 89.2, 21.6, 21.6);
myOval.setFilled(true);
myOval.setColor(Color.RED);
myOval.setFillColor(Color.RED);
add(myOval);
}
}

Target

Condition that I will work on in part 2:
Do you make appropriate use of constants? Several of the programs you’ll write – especially
the graphics programs – will require values that will not be immediately evident from context.
When appropriate, introduce constants into your program to make the program more
customizable and easier to read.

Here is the code that contains the constants. So for example, the boss wants to make the logo bigger, replacing the value of the constants is easier:


import acm.graphics.*;
import acm.program.*;

import java.awt.*;

public class Target extends GraphicsProgram {

final static double firstOvalxUpLeft = 64;
final static double firstOvalyUpLeft = 64;

final static double firstOvalHeight = 72;
final static double firstOvalWidth = 72;

final static double secondOvalxUpLeft = 76.6;
final static double secondOvalyUpLeft = 76.6;

final static double secondOvalHeight = 46.8;
final static double secondOvalWidth = 46.8;

final static double thirdOvalxUpLeft = 89.2;
final static double thirdOvalyUpLeft = 89.2;

final static double thirdOvalHeight = 21.6;
final static double thirdOvalWidth = 21.6;

public void run() {
drawLargeRedOval();
drawWhiteOval();
drawSmallRedOval();
}

// precondition: a canvas of 200pixels across and 200pixels top to bottom,
// the center is 100x100 pixels.
// postcondition is a red filled circle with 1 inch radius with 72pixels has
// a center of 36
// 100 - 36 = 64,64 is where the left and bottom of the rectangle in which
// the oval is located should be placed

public void drawLargeRedOval() {
GOval myOval = new GOval(firstOvalxUpLeft, firstOvalyUpLeft,
firstOvalHeight, firstOvalWidth);
myOval.setFilled(true);
myOval.setColor(Color.RED);
myOval.setFillColor(Color.RED);
add(myOval);

}

// precondition: a 200x200pxl canvas with a 72pxl red circle centered at
// 100x100
// postcondition: another white circle added on top of the red circle. .65
// of 72 = 46.8 - half of 46.8 = 23.4
// 100 - 23.4 = 76.6, is where the left and bottom of the GOval rectangle is
// set.
public void drawWhiteOval() {
GOval myOval = new GOval(secondOvalxUpLeft, secondOvalyUpLeft,
secondOvalHeight, secondOvalWidth);
myOval.setFilled(true);
myOval.setColor(Color.WHITE);
myOval.setFillColor(Color.WHITE);
add(myOval);
}

// precondition: a 200x200pxl canvas with a 46.8 white circle on top of a
// red 72pxl circle with a center of 100x100
// post condition: another red circle added on top of the white circle. .3
// of 72 = 21.6 - half of 21.6 = 10.8
// 100 - 10.8 = 89.2, is where the left and bottom of the small re oval is
// set.
public void drawSmallRedOval() {
GOval myOval = new GOval(thirdOvalxUpLeft, thirdOvalyUpLeft,
thirdOvalHeight, thirdOvalWidth);
myOval.setFilled(true);
myOval.setColor(Color.RED);
myOval.setFillColor(Color.RED);
add(myOval);
}
}

Stanford cs106a, Assignment 2; Problem 3. – FindRange – Part 2

After re-reading the instructions for these sets of problems, I found that I should replace multiple statements of code used for one action with a method().
Additionally, the best practice is comment your preconditions and post conditions before every method in your program.
This practice helps in writing the code without getting off track.
It took a little while to learn that if I initialize an “Int” variable in the class before my methods, and if I use “Int” with the same variable again inside the method, then I am re-declaring the variable as a local variable, and the class variable will not retain it’s values throughout the different methods. If you want a variable’s values to be available to that variable throughout your methods, only declare the type one time in the class.

A few “firsts” for me in this app was 1. The use of the break; command to exit a loop. and 2. The use of if(){} else {if{}} and 3. Methods() to replace multiple statements.

So here is the much-cleaned up and easier to read/use (and working) solution to Problem 3:


/*
* File: FindRange.java
* Name: Jason Coltrin
* Section Leader: n/a
* --------------------
* This file is the starter file for the FindRange problem.
* write a ConsoleProgram that reads in a list of integers, one per line, until a sentinel value of 0
* is entered. When the sentinel is read, your program should display the smallest and largest values
* in the list.
* The program should handle the following special cases:
* • If the user enters only one value before the sentinel, the program should report
* that value as both the largest and smallest.
* • If the user enters the sentinel on the very first input line, then no values have been
* entered, and your program should display a message to that effect.
*/

import acm.program.*;

public class FindRange extends ConsoleProgram {

int num1; // declare num1 as int
int num2; // declare num2 as int
int getNum = 1; // declare getNum as int and give initial value of 1. Later,
// if getNum = 0, then it will break the getuntilzero loop
int highNum; // declare the largest number as int
int lowNum; // declare the lowest number as int

public void run() {

// Print game description
println("This program finds the largest and smallest numbers.");

/*
* Precondition is high/low variables are initialized as int.Post
* condition is if getNum1 = 0 then message "Please try again.". If
* number is not = 0, set both highNum and lowNum to getNum1
*/
getNum1();

/*
* Precondition is highNum == lowNum. Get a new number, num2, and if
* num2 = 0 then print "Highest: highNum" and "Lowest: lowNum" and end
* the method/program. If num2 is not = 0 determine if num2 is greater
* than highNum or less than lowNum. If num2 > highNum, highNum is now
* equal to num2. If num2 < lowNum, then lowNum is now equal num2. If * num2 is equal to highNum and num2 is equal to lowNum, then getNum2 * again. Postcondition is num2 is now set to set to either lowNum or * highNum. lowNum is the lower number. highNum is the higher number. * lowNum is not equal to highNum. */ getNum2(); /* * Precondition is lowNum is not equal to highNum. get a new number * getNum. while getNum is not equal to 0, if getNum < lowNum, then * lowNum is now equal to getNum. if getNum is higher than highNum, then * highNum is now equal to highNum. get a new number again. if getNum is * equal to zero, display the highest and lowest numbers and end the * method/program Postcondition is largest and smallest numbers are * displayed. */ getUntilZero(); } public void getNum1() { num1 = readInt("?:"); if (num1 == 0) { println("Please try again without 0."); getNum1(); } highNum = num1; lowNum = num1; } public void getNum2() { if ((highNum != 0) && (lowNum != 0)) { num2 = readInt("?:"); if (num2 == 0) { println("Biggest number:" + highNum); println("Smallest number:" + lowNum); getUntilZero(); } else { if (num2 > highNum) {
highNum = num2;

} else {
if (num2 < lowNum) { lowNum = num2; } else { if ((num2 == highNum) && (num2 == lowNum)) getNum2(); } } } } } public void getUntilZero() { while ((getNum != 0) && (highNum != lowNum)) { getNum = readInt("?:"); if (getNum == 0) { displayHighLow(); endApp(); break; } else { if (getNum < lowNum) { lowNum = getNum; } else { if (getNum > highNum)
highNum = getNum;
}
}
}
}

// precondition is sentinel has been entered
// postcondition is smallest and largest numbers are displayed
private void displayHighLow() {
println("Smallest:" + lowNum);
println("Largest:" + highNum);
}

// :-)
private void endApp() {
println("Thanks for playing");

}
}

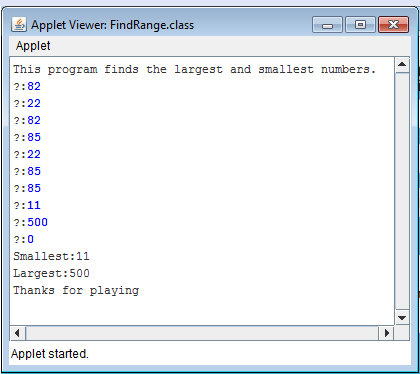
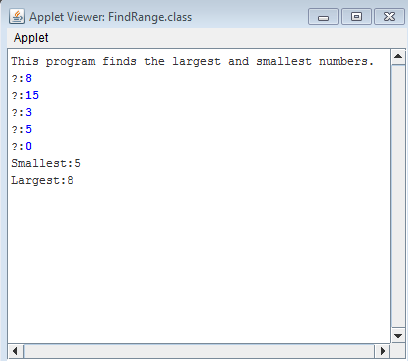
And here is the output:
Working

Stanford cs106a, Assignment 2; Problem 3. – FindRange – Part 1

The instructions are to write a ConsoleProgram that reads in a list of integers, one per line, until a sentinel
value of 0 is entered. When the sentinel is read, your program should display the smallest and largest values in the
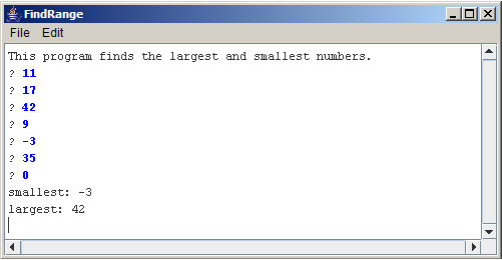
list, as illustrated in this sample run:
SampleFindRange

The program should handle the following special cases:
• If the user enters only one value before the sentinel, the program should report
that value as both the largest and smallest.
• If the user enters the sentinel on the very first input line, then no values have been
entered, and your program should display a message to that effect.

I found that programming this assignment got me familiar with using the debugger. I place breakpoints along the lines of code I want to watch. I start the program in debugging mode and then hit the resume (F8) button to run the program until the next break-point, error, or endless loop :-p. I can then watch as variables are assigned values, and at what point a “while” iteration loops. I can see if certain conditions are met and if so, what happens next.

Also, I found that it’s not over til it’s over and the project is not complete until the program has been tested extensively. Just when you think it’s complete and you run a test one more time, the program doesn’t behave as expected. This is just the case below. The program is mostly complete except for when multiple values are supplied; the program loses track of which number is the lowest. But for today I’m happy with the progress I made.

Besides the debugger I learned about the “break;” command, ‘and’ (&&) and ‘or’ (||) operators, and appropriate use of methods(). Although I did not create a method in this program, I understand I can take code that has been repeated somewhere, turn it into a method, and clean up the code in general.

Here’s where I am so far. First the code, then the condition cases fulfillment, a successful run, and then the last problematic condition that still needs to be resolved.


/*
* File: FindRange.java
* Name: Jason Coltrin
* Section Leader: n/a
* --------------------
* This file is the starter file for the FindRange problem.
* write a ConsoleProgram that reads in a list of integers, one per line, until a sentinel value of 0
* is entered. When the sentinel is read, your program should display the smallest and largest values
* in the list.
* The program should handle the following special cases:
* • If the user enters only one value before the sentinel, the program should report
* that value as both the largest and smallest.
* • If the user enters the sentinel on the very first input line, then no values have been
* entered, and your program should display a message to that effect.
*/

import acm.program.*;

public class FindRange extends ConsoleProgram {

public void run() {

println("This program finds the largest and smallest numbers.");

int getNum = readInt("?:"); // gets initial input from user
int sentinel = getNum; // sets first input to value sentinel
int highNum = 0;
int lowNum = 0;
highNum = getNum; // allow the first input highNum to be set as the
// largest number

if ((getNum == 0) && (highNum == 0)) { // check for first input zero
// constraint
println("No values have been entered. Please start over.");

} else { // if not 0, set getNum to be equal to highNum
if (getNum > highNum) {
highNum = getNum;
}
getNum = readInt("?:"); // ask for the 2nd getNum
if (getNum < highNum) { lowNum = getNum; // assign new getNum to lowNum if less than // highNum } if (getNum == 0) { // if second getNum is equal to 0, meet // constraint to set high/low to same number println("Smallest:" + highNum); println("Largest:" + highNum); lowNum = highNum; } } while ((sentinel != 0) && (lowNum != highNum)) { getNum = readInt("?:"); if (getNum == 0) { println("Smallest:" + lowNum); println("Largest:" + highNum); break; } if (getNum > highNum) {
highNum = getNum;

} else {

if (getNum < highNum) { lowNum = getNum; } } } } }
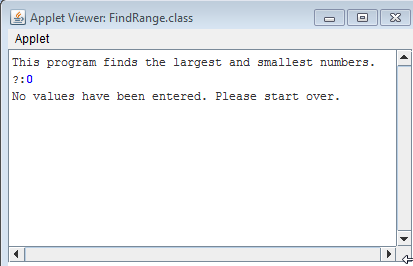
Condition 1 met:
NoValuesException
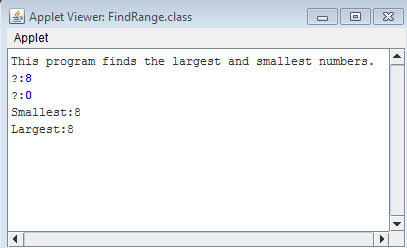
Condition 2 met:
OneNumberException
Success!...
success
But wait, not so fast...
BugDoh

Stanford cs106a Assignment 2, Problem 2 – Hailstone sequence

Here is my answer to the hailstone sequence problem. The problem is as follows:

Pick some positive integer and call it n.
If n is even, divide it by two.
If n is odd, multiply it by three and add one.
Continue this process until n is equal to one.

The numbers go up and down, but eventually—at least for all numbers that have ever been tried—comes down to end in 1. In some respects, this process is reminiscent of the formation of hailstones, which get carried upward by the winds over and over again before they finally descend to the ground. Because of this analogy, this sequence of numbers is usually called the Hailstone sequence, although it goes by many other names as well.


/*
* File: Hailstone.java
* Name: Jason Coltrin
* Section Leader: n/a
* --------------------
*This file is the starter file for the Hailstone problem.
*Pick some positive integer and call it n. If n is even,
*divide it by two. If n is odd, multiply it by three and
*add one. Continue this process until n is equal to one.
*/

import acm.program.*; //needed to run ConsoleProgram

public class Hailstone extends ConsoleProgram {
public void run() {

int n = readInt("Enter a number:"); // get user's number
int evenNum; // define even number as integer
int oddNum; // define odd number as integer
int halfNum; // define Hailstone step1 if number is even as integer
int tripleOne; // define Hailstone step1 if number is odd as integer 3n+1
int count = 0; // define steps it takes to get to 1 as count and initialize at 0

if (n == 1) {
println("Please enter a number larger than 1.");
}

while (n != 1) { // run if/else statement until n is not equal to 1

if ((n % 2) == 0) {
evenNum = n;
halfNum = (evenNum / 2);
println(evenNum + " is even, so I take half: " + halfNum);
n = halfNum;

} else {
oddNum = n;
tripleOne = ((3 * n) + 1);
println(oddNum + " is odd, so I make 3n+1: " + tripleOne);
n = tripleOne;

}
count++; //increment counter 1 for every while loop
}

println("You've reached the number 1, I'm stopping.");
println("The process took " + count + " steps to reach 1.");
}
}

This problem makes use of a while/if/else loop, and increment a counter. I thought I would have to use a For loop and a Boolean to increment the counter, but once I initialized the count variable at 0, it just took a little work to place the count++ in the correct location.

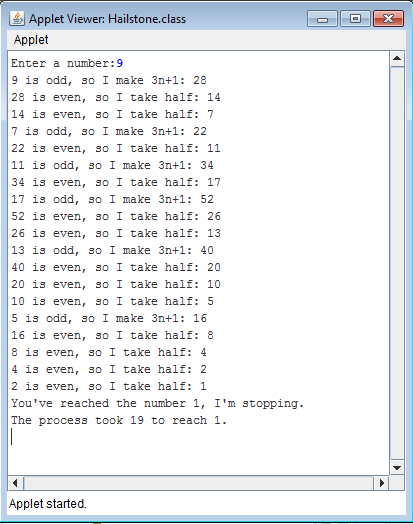
Here is what the output looks like:
HailstoneConsole

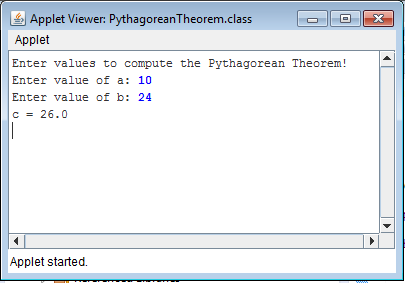
Stanford cs106a Assignment 2, Problem 1 – PythagoreanTheorem

Below is my answer for Problem 1, Assignment 2:

The question asks,
By using the Pythagorean Theorem, calculate the value of c, in relation to input provided by the user for the values of a, and b. Write a ConsoleProgram that accepts values for a and b as doubles (you can
assume that a and b will be positive) and then calculates the solution of c as a
double.

My solution is as follows:

/*
* File: PythagoreanTheorem.java
* Name: Jason Coltrin
* Section Leader: n/a
* -----------------------------
* This file is the starter file for the PythagoreanTheorem problem.
*/

import acm.program.*; //imports classes needed to run ConsoleProgram

public class PythagoreanTheorem extends ConsoleProgram {
public void run() {
println("Enter values to compute the Pythagorean Theorem!");

// sets user input of a: to n1 as double
double n1 = readDouble("Enter value of a: ");

// sets user input of b: to n2 as double
double n2 = readDouble("Enter value of b: ");

// order of calculation calculates in parentheses first, then + second,
// and sets value of sqr root to variable c.
double c = Math.sqrt((n1 * n1) + (n2 * n2));

// Prints the answer after "C ="
println("c = " + c);
}
}

The output looks like below:
A2-P1

“For” loop examples

A few for loop examples:

    • General form: 

for (init; condition; step) {
statements
}

  • init done once at start of the loop
  • condition (can be a boolean) checked before every iteration through the loop – we execute the statements if they are true.
  • step every time through loop after statements
  • example:

for (int i = 0; i < 5; i++) { println(i); }

The result here of course would be the counting up to 5, starting at 0, and the output would be 0, 1, 2, 3, 4

  • Another example of counting down:

for (int i = 6; i > 0; i -= 2) {

println(i);

}

This will cause 2 to be subtracted from i with each pass through the loop and will not print out 0 because 0 is not > 0:

6

4

2

Here is an enhanced "for" loop in Java introduced in Java 5:

public class Test {

public static void main(String args[]){
int [] numbers = {10, 20, 30, 40, 50};

for(int x : numbers ){
System.out.print( x );
System.out.print(",");
}
System.out.print("n");
String [] names ={"James", "Larry", "Tom", "Lacy"};
for (String name: names) {
System.out.print(name);
System.out.print(",");
}
}
}

Here your output will look like:
10,20,30,40,50,
James,Larry,Tom,Lacy

The "break" keyword will end the loop if a condition is met, for example:

for(int x : numbers ) {
if( x == 30 ) {
break;
}

As such the following output:
10,20

The continue keyword will continue the loop and for example, skipping thirty something like this:

if( x == 30 ) {
continue;
}

and the following output:
10,20,40,50

kudos to Stanford University & http://www.tutorialspoint.com/


Eclipse IDE Tips and Tricks

I wish I had know about these a couple weeks ago, but anyway here are a few tips and tricks I found for using the Eclipse IDE with Java:

// Eclipse tips and tricks
1. Quickly add main method by typing “main” followed by ctrl+space and then enter
2. Quickly format your source code by typing ctrl+shift+f or right click->source->Format
3. Type sysout then ctrl+space, then enter, to generate System.out.println();
4. F11 runs your application in debug mode – if no breakpoints, it will run normally
5. Hit ctrl+shift+o for organize imports. This will give you list of possible imports and then
add or the import to/from the top of the source file.
6. Type syserr and then ctrl+space to quickly type out System.err.println();.
7. to rename a variable, select the variable, right click, choose refactor -> rename, and all
of the instances where that variable name has been used will be changed.
8. You can rename a class as well by right-clicking on the .java file in the Package Explorer
pane, then -> refactor -> Rename.
9. When you highlight a line or block of code and push Ctrl + Alt together,
and the down arrow, it clones the line or block. (You may have to disable your intel
graphics card drivers or your screen will flip.)
10. Use Ctrl+Shift+/ to comment blocks of code and Ctrl + Shift + to uncomment them again.
11. If you want to find all the places a variable is used, right-click on the variable, choose
references -> workspace (or project, hierarchy). This will find all of the variables of
that name even in other classes/java files.
12. In order to find where a variable is declared, click on it, then press F3. This also works
for finding where other classes are declared in other files.
13. To remove/delete whole lines, click anywhere in the line and hit Ctrl+d.
14. Many methods, objects, arrays, etc will autocomplete. For example an array, type the
letter “A” then ctrl+space.
15. For new private fields, you can generate Getters and Setters automatically by right clicking
->Source ->Generate Getters & Setters. The same works for creating Constructors with the
correct parameters.
16. If you want to override methods in a superclass, right click -> source -> Override/Implement
methods…

I’m sure these will help me develop a little faster. Just formatting and adjusting my brackets to make things prettier has taken up a lot of time. Not to mention finding where variables are declared. I’m not familiar with what Getters & Setters or Overriding methods are used for at this time but apparently they are just busy work that is unnecessary to write out every time.