Exchange/SBS 2003 – You do not have permission to send to this recipient. -Solved!

There are a lot of variables where a problem like this can take a while to track down and resolve, so hopefully if you encounter this issue again, the resolution will be easy.

A user called complaining they would receive a bounceback message from Exchange whenever trying to send an email as a different user, for example, “[email protected]”. They had not previously experienced this problem trying to send on behalf of that user and “something suddenly changed.”

To make a long story short, in this case, the resolution was that the From: field contained a corrupt .NK2/NickName entry for the “Promoter” address. When auto-resolving the email address for the “From” field, I had to type in the first letter of the bad entry, arrow down to the corrupt entry in the nickname list, so that it was highlighted and hit the Delete button. Next, to put in the correct “From: Promoter” address, I had to manually click the “From” button, go to the Global Address List and select “Promoter”. This resolved the correct entry and the From: field was now populated with “Promoter” instead of “[email protected]”. The message could now be sent without a failure/bounceback/error message.

Read below for the workflow that caused the problem and what I had to do to resolve it:

The user opened a new mail message. The From field is “shown” and the user typed in the first letter of the address who the email is from. In this case, “p”. This auto-resolved the nickname as an email address “[email protected]”. The user would then type in the recipients name into the To: field (in this case [email protected]) and then supply a subject, a message body, and hit send. A moment later the following email arrived from the Exchange System:

Your message did not reach some or all of the intended recipients.

Subject: test Sent: 4/27/2011 11:43 AM
The following recipient(s) cannot be reached:
example@hotmail.com on 4/27/2011 11:42 AM            You do not have permission to send to this recipient.  For assistance, contact your system administrator.            MSEXCH:MSExchangeIS:/DC=local/DC=domain:servername

Solution:

The first thing to check was that the user has the ability to send on behalf of the “Promoter” account:

On the SBS2003 server, go to Server Management. Click on the View menu and checkmark the “Advanced Features”. Then browse   -> Active Directory Users and Computers -> Domain.local ->MyBusiness ->Users -> SBSUsers

Right click on the account that the user is trying to send on behalf of (in this case “Promoter”). Click on the Exchange General tab. Click on the Delivery Options… button. Under Send on behalf, make sure the user that is trying to send as is listed under “Grant this permission to:”. If not, click the Add button… and add the user.

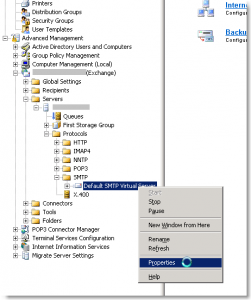
Next, in Server Management, browse to Advanced Management -> EXCHANGESERVERNAME (Exchange) ->Servers -> SERVERNAME -> Protocols -> SMTP

Right-click on “Default SMTP Virtual Server” and click Properties.

SMTP Properties.jpg
Click image to enlarge

Under the Access tab, click on the Relay… button

Under Relay Restrictions, “Only the list below” should be selected and Granted: the server’s IP address/SNM; and Granted loopback 127.0.0.1

Uncheck “Allow all computers which successfully authenticate to relay, regardless of the list above. Click on the Users… button. Under Permissions – Group or user names, make sure Authenticated Users has both Submit and Relay permission set to Allow. Click OK, OK, OK.

If any changes have been made to SMTP, right-click on Default SMTP Virtual Server under Protocols/SMTP and Stop/Start the Default SMTP Virtual Server.

Now, on the client, open a new mail message, remove the bad auto-resolving address, click on the From: button, select the account you wish to send from, and hit “Send”. See the 2nd paragraph of this post for further details on how to accomplish this part. The message should now be sent to the recipeint with the correct “From” address.


SonicWALL WAN Probe Monitoring

Ensuring your secondary WAN interface activates in the event either your primary router or primary ISP stops responding.

In the previous post, we discussed how businesses are increasingly relying on their internet for cloud-based services such as email, shared documents and applications. Using multiple SonicWALL appliances and multiple WAN/ISP interfaces, you can help protect your users from an internet outage by configuring your routers to fail-over. A SonicWALL can perform either interface or physical probing.

If Probe Monitoring is not activated, the SonicWALL security appliance performs physical monitoring only on the Primary and Secondary WAN interfaces, meaning it only marks a WAN interface as Failed if the interface is disconnected or stops receiving an Ethernet-layer signal (Layer 2).

This is not an assured means of link monitoring, because it does not address most failure scenarios (for example, routing issues with your ISP or an upstream router that is no longer passing traffic). If the WAN interface is connected to a hub or switch, and the router providing the connection to the ISP (also connected to this hub or switch) were to fail, the SonicWALL will continue to believe the WAN link is usable, because the connection to the hub or switch is good. For this reason, if you setup failover with multiple routers, then you will also want to enable a TCP-based probe at the application Layer 4 so that you can ensure your packets/probes are monitored for successful connections, and your WAN fail-over will in turn work as expected.

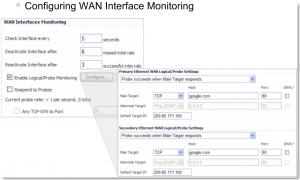
Under the WAN Interfaces Monitoring heading, you can customize how the SonicWALL security appliance monitors the WAN interface:

WANMonitoring

This example shows how a probe is configured correctly where you’re monitoring for successful (syn-ack’s) from google.com.

Options and Notes:

Check Interface every: Enter a number between 5 and 300. The default value is 5 seconds.

Deactivate Interface after _ missed intervals: Enter a number between 1 and 10. The default value is 3, which means the interface is considered inactive after 3 consecutive unsuccessful attempts.

Reactivate Interface after _ successful intervals: Enter a number between 1 and 100. The default value is 3, which means the interface is considered active after 3 consecutive successful attempts.

Respond to Probes: Use this field to allow the SonicWALL security appliance respond to SonicWALL TCP probes received on any of its WAN ports.

Any TCP-SYN to Port: Use this field to instruct the SonicWALL security appliance to respond to TCP probes to the specified port number without validating them first. The Any TCP-SYN to Port box should only be checked when receiving TCP probes from SonicWALL security appliances running SonicOS Standard or older, legacy SonicWALL security appliances.

Note: If there is a NAT device between the two devices sending and receiving TCP probes, the Any TCP-SYN to Port box must be checked and the same port number must be configured here and in the Configure WAN Probe Monitoring window.

Configure Probe Monitoring

Enable Logical/Probe Monitoring: Selecting this field instructs the SonicWALL security appliance to perform logical checks of upstream targets to ensure that the line is indeed usable, eliminating this potential problem, as well as to continue to do physical monitoring. Under the default probe monitoring configuration, the SonicWALL performs an ICMP ping probe of both WAN ports’ default gateways. Unfortunately, this is also not an assured means of link monitoring, because service interruption may be occurring farther upstream. If your ISP is experiencing problems in its routing infrastructure, a successful ICMP ping of their router causes the SonicWALL security appliance to believe the line is usable, when in fact, it may not be able to pass traffic to and from the public Internet at all.

To perform reliable link monitoring, you can choose TCP or ICMP (Ping) as the monitoring method, and can specify up to two targets for each WAN port. If you specify two targets, Main Target and Alternate Target, for each WAN interface, you can logically link the two probe targets so that if either one fails, the line will go down, or that both must fail for the line to be considered down. TCP is preferred because many devices on the public Internet now actively drop or block ICMP (Ping) requests.

SNWL?: Select this box if the target device is a SonicWALL security appliance. Do not check the SNWL? box for third-party devices, because the TCP probes may not work consistently.

Default Target IP: Optionally, you can enter a default target IP address in the Default Target IP field. In case of a DNS failure, when a host name is specified, the default target IP address is used.

There is much discussion below on the best strategies for setting up your probes. As always, test (and test again) your configurations in the lab prior to placing your firewall into production.


SonicWALL Hardware Failover/Load Balancing
SonicWALL Hardware Failover/Load Balancing

Interfaces1-650x288

With businesses today relying more and more on their Internet connection for critical email and cloud-based services, there is a growing need for providing hardware and ISP redundancy to ensure continuous uptime even in event of a hardware or ISP failure. The SonicWALL security appliance performs physical monitoring only on the Primary and Secondary WAN interfaces, meaning it only marks a WAN interface as Failed if the interface is disconnected or stops receiving an Ethernet-layer signal. For this reason, please see my next post to enable Probe Monitoring to cover all your bases in the event of a routing failure.

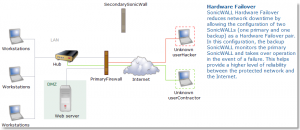
Due to this demand, two SonicWALL PRO appliances may run in Hardware Failover mode, which will provide security and connectivity in the event that one SonicWALL or an ISP becomes unstable or unavailable. In addition, SonicOS Enhanced firmware supports the ability to create multiple WAN interfaces (XO, X3), which can provide the use of multiple Internet connections either simultaneously or as a backup.

WAN Failover and Load Balancing allows you to designate the one of the user-assigned interfaces as a Secondary or backup WAN port. The secondary WAN port can be used in a simple active/passive setup, where traffic is only routed through the secondary WAN port if the primary WAN port is down and/or unavailable. This feature is referred to as basic failover. This allows the SonicWALL security appliance to maintain a persistent connection for WAN port traffic by failing over to the secondary WAN port. The primary and secondary WAN ports can also be used in a more dynamic active/active setup, where the administrator can choose a method of dividing outbound traffic flows between the Primary fixed WAN port and the user-assigned Secondary WAN port. This latter feature is referred to as load balancing.

WAN Failover and Load Balancing applies to outbound-initiated traffic only; it cannot be used to perform inbound Load Balancing functions, such as what a content switching or Load Balancing appliance provides.

Make sure that the SonicWALL appliance has the proper NAT policies for the Secondary WAN interface. An incorrect or missing NAT Policy for the Secondary WAN port is the most common problem seen when configuring WAN Failover & Load Balancing.

The Primary and Secondary WAN ports cannot be on the same IP subnet; each WAN connection must be on unique IP subnets in order to work properly.

You cannot use the WAN failover feature if you have configured the SonicWALL security appliance to use Transparent Mode in the Network > Interfaces page.

When you establish a connection with a WAN, you can create multiple interfaces, dividing up the task load over these interfaces. There are both Primary and Secondary WAN interfaces. This task distribution model maintains high performance, ensuring that one interface does not become an impasse to the point where it blocks traffic from passing. This process is WAN Load Balancing. While WAN Load Balancing addresses performance challenges, it can create other problems, including losing track of sessions. Session confusion can occur because some applications fail to adequately track multiple user sessions Load Balanced on multiple interfaces. These applications treat incoming packets as originating from different users because they use IP addresses to differentiate user sessions instead of application-layer user identification tags. To ensure that you have proper connectivity in all applications, SonicWALL provides a feature called Source and Destination IP addresses Binding, a solution that maintains a consistent mapping of traffic flows with a single outbound WAN interface.

Primary WAN Ethernet Interface: X1 should normally be the selection.

Secondary WAN Ethernet Interface: If there are multiple possible secondary WAN interfaces, select the WAN Interface to be used for Failover and Load Balancing. X3 should normally be the selection.

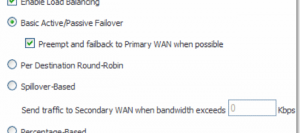
By default the Enable Load Balancing check box is selected.  The SonicWALL will select Basic Active/Passive Failover as the method, but there are several load balancing methods available:

Basic Active/Passive Failover: When selected, the SonicWALL security appliance only sends traffic through the Secondary WAN interface if the Primary WAN interface has been marked inactive. The SonicWALL security appliance is set to use this as the default load balancing method. If the Primary WAN fails, then the SonicWALL security appliance reverts to this method.

Preempt and fail back to Primary WAN when possible: When this check box is selected, the SonicWALL security appliance switches back to sending its traffic across the Primary WAN interface when it either resumes responding to the SonicWALL security appliances when the WAN’s physical link is restored or the logical probe targets on the WAN port resume responding.

Per Destination Round-Robin: When selected, the SonicWALL security appliance Load Balances outgoing traffic on a per-destination basis. This is a simple load balancing method and, though not very granular, allows you to utilize both links in a basic fashion.  Please note this feature will be overridden by specific static route entries.

Spillover-Based: When selected, the SonicWALL administrator can specify when the SonicWALL security appliance starts sending traffic through the Secondary WAN interface. This method allows the SonicWALL administrator to control when and if the Secondary interface is used. This method is used if you do not want outbound traffic sent across the Secondary WAN unless the Primary WAN is overloaded. The SonicWALL security appliance has a non-Management Interface exposed hold timer set to 20 seconds – if the sustained outbound traffic across the Primary WAN interface exceeds the administrator-defined bits per second (bps), then the SonicWALL security appliance spills outbound traffic to the Secondary WAN interface (on a per-destination basis). Please note this feature is overridden by specific static route entries.

Percentage-Based: When selected, you can specify the percentages of traffic sent through the Primary WAN and Secondary WAN interfaces. This method allows you to actively utilize both Primary and Secondary WAN interfaces. Please note this feature is overridden by specific static route entries.

Use Source and Destination IP Address Binding: When this checkbox is selected, it enables you to maintain a consistent mapping of traffic flows with a single outbound WAN interface, regardless of the percentage of traffic through that interface. Therefore, the outbound IP address of the connection remains consistent. However the percentage of traffic in each WAN interface may not match the percentage you specify in the Primary WAN Percentage field. This method uses only the source IP address and the destination IP address to determine when to bind a connection to a single interface and ignores all other information, such as source and destination TCP port numbers.
HardwareFailover2


Heartbeat1-932x288


Re-Establish-949x288

ActiveSynch troubleshooting on Exchange/SBS 2003

Do you have Exchange running in your environment but are having trouble connecting iPhones and Android phones? ActiveSync is much more preferable to POP or IMAP, so hunker down and fix ActiveSync on your server to get email, calendar, and contacts synched with your smartphones. Below are two of my favorite links for troubleshooting ActiveSync on Exchange and Small Business Server 2003. I was able to resolve issues on a few servers who’s certificates had expired by using the following resources:

Alan Hardisty’s ActiveSync Configuration Guide is a great starting point:

http://alanhardisty.wordpress.com/2010/02/28/exchange-2003-and-activesync-configuration-and-troubleshooting/

Secondly, the following website can test Exchange connectivity in a number of different ways:

https://testexchangeconnectivity.com/

The site above is able to test exchange connectivity with the following tests:

Microsoft Exchange ActiveSync Connectivity Tests
Microsoft Exchange Web Services Connectivity Tests
Microsoft Office Outlook Connectivity Tests
Internet E-Mail Tests