Solved – Cannot move files in SharePoint Online Office 365 from one folder to another folder

When attempting to move files in SharePoint Online Office365 from one folder to another you may find that you get errors or the moving process times out or fails with the error:

Error: We couldn't move the file because it's locked for editing or has been modified or deleted.

What has happened is some of the files in these folders have been marked as “checked out” or “locked”. This may have been done erroneously by a user or the status was corrupted when the files were originally uploaded into SharePoint.

Once the files are checked in, you can move them. As an alternative to moving the files, you may also be able to “Copy To…”, and then delete the original files. Again, you may not be able to delete the files you copied because the files you want to delete in SharePoint may also be locked or checked-out.

This is what worked for me:

  1. Use your favorite web browser and log into your SharePoint site (e.g. https://companyname.sharepoint.com/sites/sitename.
  2. Browse to the problem folders that contain files that you cannot move to another folder.
  3. In the folders, you should find files that are “checked out”. The files will have a green arrow icon next to the file icon.  
  4. Place a checkmark next to the file that is checked out.
  5. In the menu at the top-right choose “…”
  6. In the “…” menu, click “Discard check out”
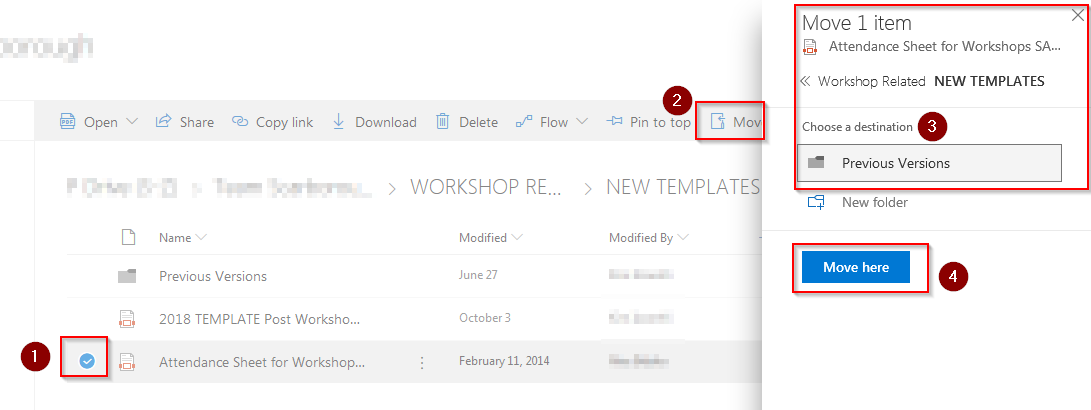
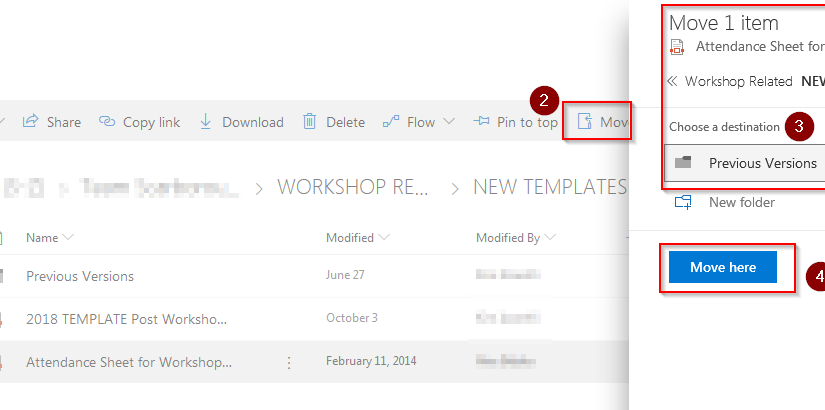
  7. Now try moving the file with the following sequence:
  8. If the problem files are Word/Excel files, you may need to Open the files in Word or Excel first, in order to check them back in.

How to Enable Archiving for Outlook Office 365 and Move Old Mail into Archive

At some point, a user’s mailbox will reach the default quota for Enterprise E1 default of 50 GB, and they will have to either move mail into an archive or delete mail to continue to receive email. The user may receive the warning:

Your mailbox is near the maximum storage limit. Archive or delete items to create additional free space.

Our options at this point is to do one of three things: Upgrade the user’s license from E1 to E3 to double the mailbox size, permanently delete mail out of the mailbox, or archive the mail. Microsoft provides 50 additional GB of archive space for an E1 license (this number is subject to change.)

In many instances, the user may not want to delete any mail and would prefer to archive the mail. In my opinion, the ideal way to handle archiving is to create an online archive, rather than create .pst files on the local machine which could end up getting lost or deleted. Also managing local .pst archive files can be a pain. And lastly, if the archive is only available as a .pst file in the user’s PC, the archived mail will not be available from webmail or a different device.

If we want to create an online archive for the user on Office 365, there are a few simple steps to take in the Office 365 Admin console.

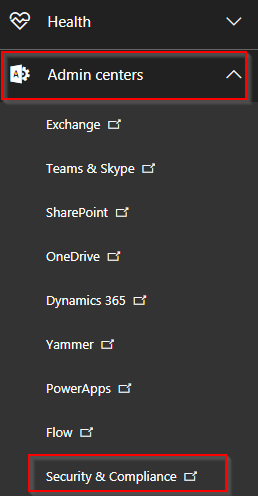
  1. Log into the Office365 Admin console, then click on Admin centers > Security and Compliance:
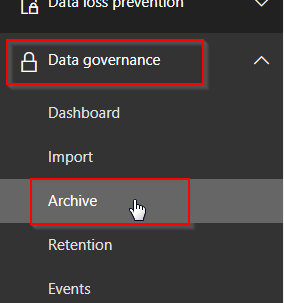
  2. Next, on the navigation bar, expand Data Governance, and click Archive
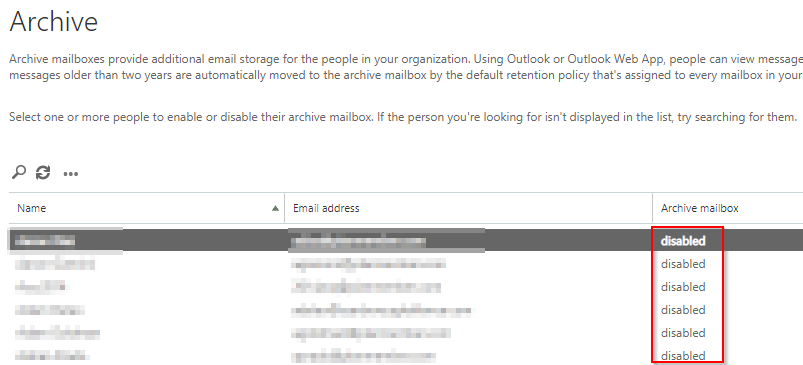
  3. Now on the right-hand pane, we will see all of our mailboxes and find out if the Archive Mailbox for Office 365 is enabled or disabled.
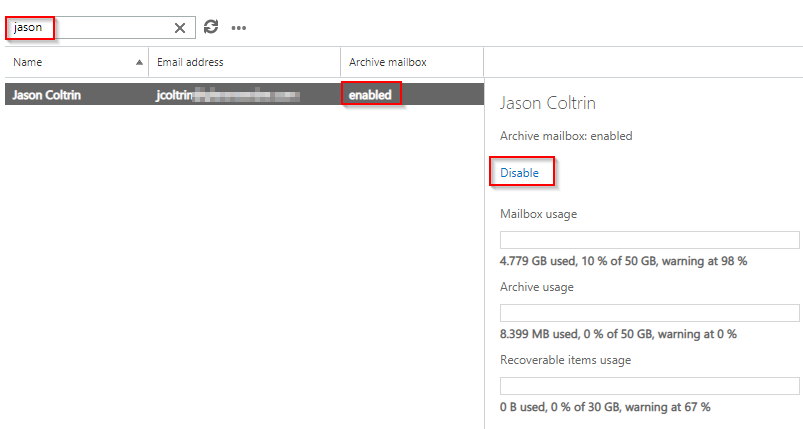
  4. To enable the archive on a disabled user’s mailbox, first select the user. If we have a lot of users, do a search for the user’s name and then highlight the correct mailbox we want to change.
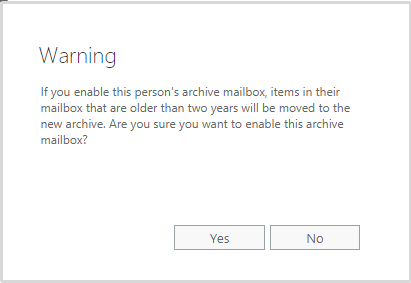
  5. We can see in the screenshot above, my account already has Archive mailbox: enabled. If the account’s archive had been disabled, we would simply click the Enable link. When we click enable, we will get the following Warning:
If you enable this person's archive mailbox, items in their mailbox that are older than two years will be moved to the new archive. Are you sure you want to enable this archive mailbox? Yes No

9. Click Yes.

10. What happens next is, as the warning states, mail that is over 2 years old will begin to be archived. We will also get some new features in both Outlook online, as well as in Outlook 2016/Outlook 2013. We can wait for the auto-archiving to take place, but we can also take some immediate action to archive old mail online.

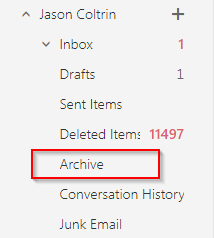
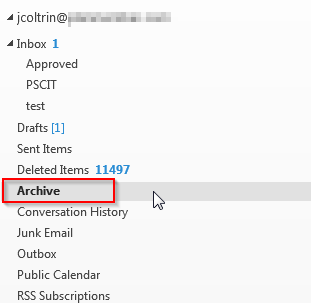
11. Pretty much immediately in Outlook online, we will get new Archive buttons, and an archive folder here:

We won’t see the archive buttons until we click on an individual message. If we do click on a message and select it, we will see the Archive button available.

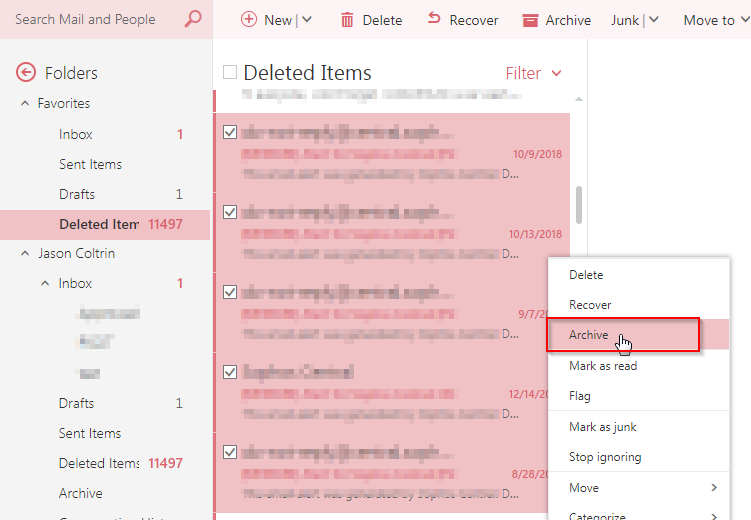
12.  We can also select multiple emails and then right-click on the highlighted messages. A wizard will appear on the screen. Click the Archive button to move these emails to the archive folder.

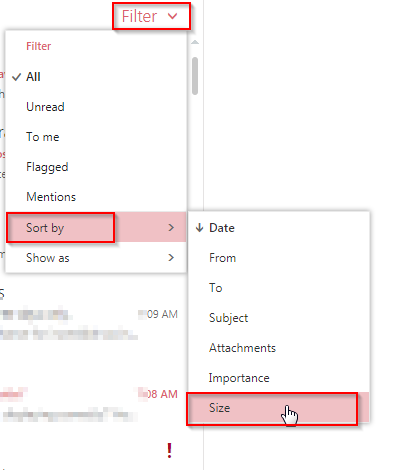
13. If reducing the size of the mailbox immediately is our goal, we can start by archiving our largest emails first. At the top of the mail folder, whether it be the inbox, Sent Items, or Deleted Items folder, we’d click the Filter button > Sort by > Size.

14. Select the “Enormous” items first by clicking on the top email, hold down the Shift button, then select the bottom email and it will highlight all of the messages in between. Next, right-click and choose Archive.

15. In the desktop version of Outlook 2013/2016, only after a few hours will we have our new Archive folder available. This may take up to 24 hours depending on the speed of replication of settings from Office 365 down to the client. Once the folder is available, however, I find the process of moving mail out of the inbox, sent items or cut/paste of subfolders into the archive much easier.

I don’t have mail over 2 years old in my mailbox, so I’m not sure if it will automatically create subfolders dependent on where they originally lived so let me know in the comments if you notice automatic folder creation.

In order for someone to find an old message, they will only need to search their mailbox in Outlook online or Search Archive in Outlook 2013/2016.


Solved – Office365 Sharepoint Open with File Explorer not working on Windows 10 Internet Explorer 11

On Office365 SharePoint, when trying to open a file in the Windows File Explorer, you might get something similar to the following error:

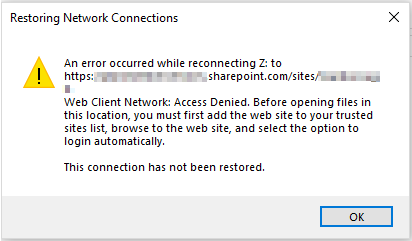
An error occurred while reconnecting Z: to (sharepoint location) - Web Client Network: Access Denied. Before opening files in this location you must first add the web site to your trusted sites list, browse to the web site, and select the option to login automatically. The connection has not been restored.

….or clicking the Open With Explorer button does nothing, or the button is greyed out.

If the button is greyed out using Windows 10 Edge, you might find things work better using the Internet Explorer web browser. Edge does not support Active X controls. So instead, Click on the the Start button, type in Internet Explorer, find and open Internet Explorer (11), and try again.

**Note: Consider using OneDrive Sync for managing SharePoint files in the File Explorer. We have a different article explaining how to set that up here: https://jasoncoltrin.com/2021/05/13/how-to-sync-a-sharepoint-library-to-windows-file-explorer-with-onedrive-files-on-demand/

To get to the Open in Explorer button.

  1. Log into https://portal.office.com
  2. Click on your apps menu and choose SharePoint
  3. Browse to a document library > Documents
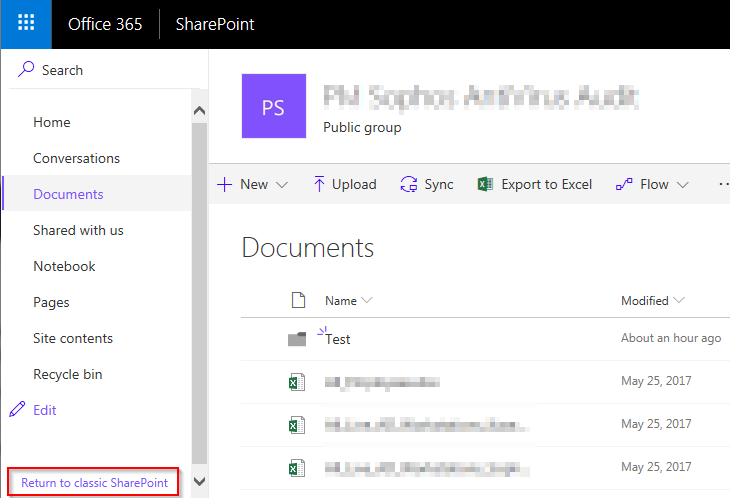
  4. In the bottom left corner of the browser click the “Return to classic SharePoint”
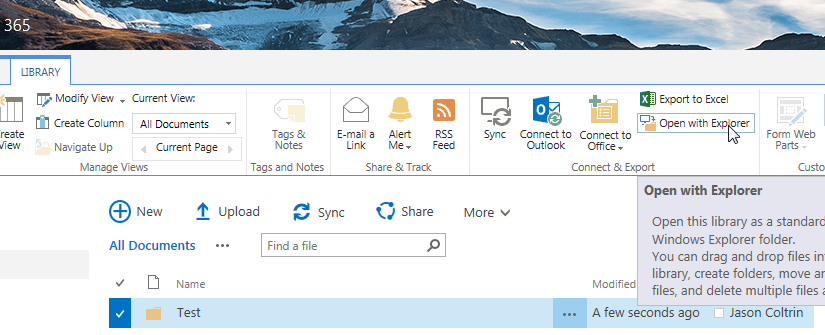
  5. Place a check mark next to a folder, click on the “Library” tab at the top of the screen, and then click “Open in Explorer”
  6.  

To resolve, make sure you have the following:

  • Windows 10 is up to date (v1803) as of this article
  • The Webclient service is Started and set to Automatic (Start > services.msc )

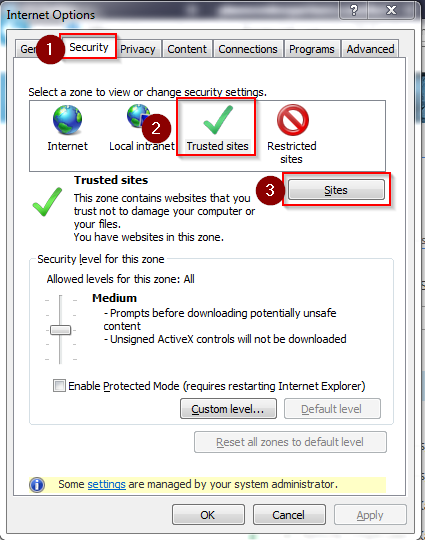
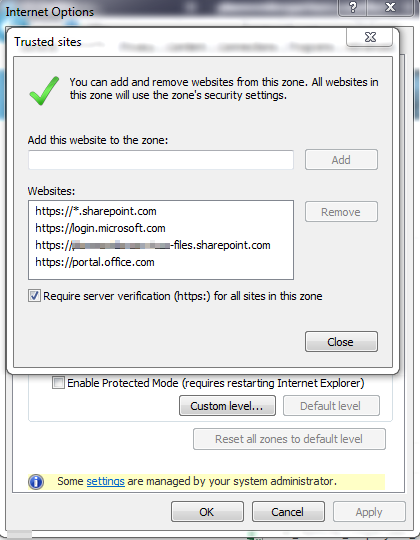
Make sure the following sites are added to your Trusted Sites in Internet Explorer settings:

  • https://yourdomain-files.sharepoint.com
  • https://*.sharepoint.com
  • https://login.microsoft.com
  • https://portal.office.com
  • https://yourdomain-myfiles.sharepoint.com

Next, restart your IE web browser, open IE, log into Office 365, and try again.

It may be beneficial to reset IE to its default settings:

IE > Gear Menu > Internet Options > Advanced Tab > Reset (delete personal settings) – use caution, try the following first, then if still having issues, try resetting your browser.


Solved – Skype for Business 2016 emoticons missing repair without re-install

How to repair and fix Skype for Business 2016 by clearing the cache, and get back the emoticons which have been replaced by words in parenthesis.

For example, an associate sent me the following screenshot:

We can see that the emoticons  have been replaced by (rock)(dance).

To fix this problem without re-installing Microsoft Office or Skype, clear the Skype Cache by doing the following (which I found in an MS Support forum here.)

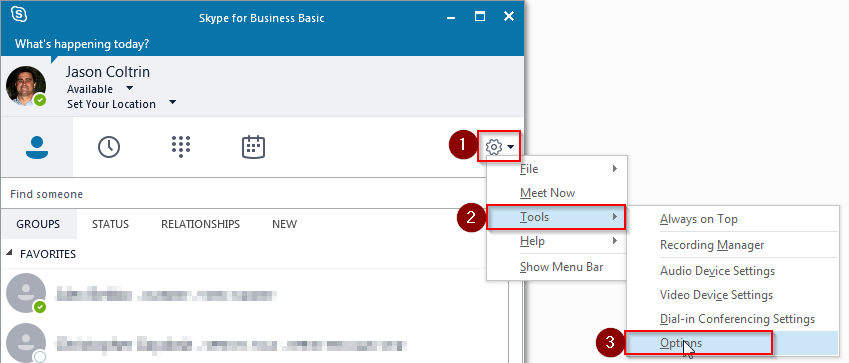
1. In the Skype main windows, click the gear in the top right-hand corner.

2. Choose File – Sign Out to log out of Skype for Business.

3. On the Sign In window, choose the link to Delete my sign-in info.

4. In the pop-up window to forget sign in info, click Yes.

5. Click the gear, choose File> Exit to exit and close Skype. Close all other Office Applications.

6. Go to the location:
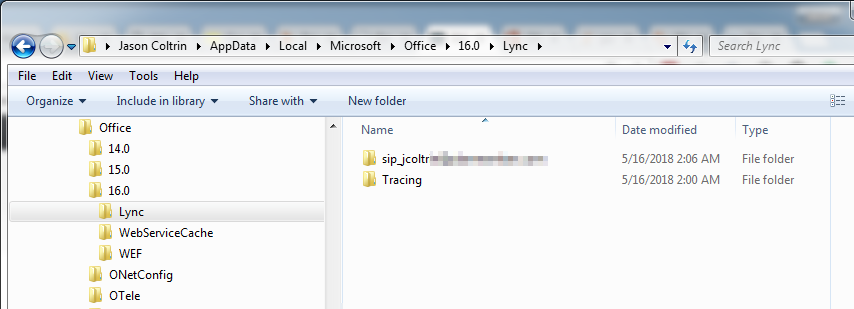
C:\Users\<username>\AppData\Local\Microsoft\Office\16.0\Lync – you can get here quickly by going to Start > Run > %appdata$% > Enter.

7. Locate the sip_YourProfileName folder and delete it if it exists. In some cases, it will not. Open the Tracing folder and delete all files inside of it. Do not delete the Tracing folder itself. If you receive a message that the action can’t be completed because a file is Open or that you need Administrator permission to delete a file, click the Skip button. Close Windows File Explorer

8. Open a command prompt (in Windows, click the Start button, type cmd and select the command prompt from the menu. Type ipconfig /flushdns and press the enter key on your keyboard to clear the DNS cache.

9. Sign back into Skype/Lync.

10. Once Skype is open, make sure you go back into Gear > Tools > Options > IM > and place a checkmark to show emoticons again.

11. Test to see if the emoticons have returned!

If all else fails, you might want to completely uninstall Office and/or Skype for Business, delete the Appdata\Local\Microsoft\Office\16.0\Lync folder completely, and then re-install again. But hopefully, this procedure will save you some time.

Lastly, a user comment below has had success with several people (thanks Chris!)

Set DisableRicherEditCanSetReadOnly to 1 in regedit 
path: Computer\HKEY_CURRENT_USER\Software\Microsoft\Office\16.0\Lync\

Always, back up the registry key before you change anything in the registry. 

Use Powershell to Get a List of Users with Out of Office enabled in Outlook Office365

How to get a list of users who have enabled Out of Office in Outlook with Office365 PowerShell

For administrators of Office 365, you may need to occasionally get a list of users who have set up or enabled their Out of Office in Outlook. In my case, we needed to see which parking spots were available on campus in a pinch, and who was not coming in the next day. To do this with PowerShell we’ll need to first connect to our Office 365 Exchange Tennant.

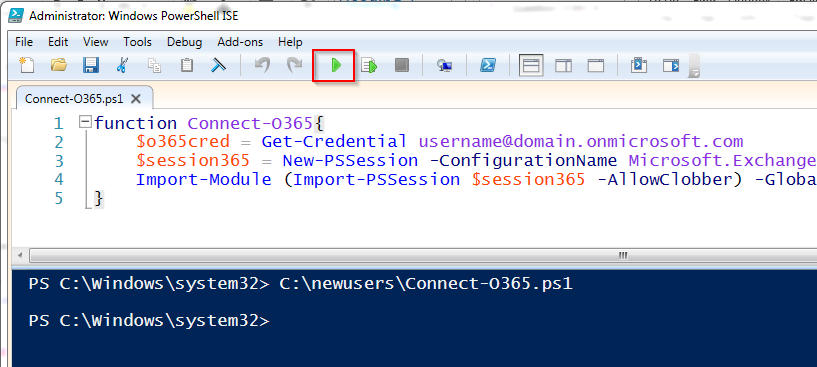
  1. In PowerShell ISE, enter the following code into the code view, save the function as Connect-O365.ps1, and then hit the green Play button.
  2. function Connect-O365{
     $o365cred = Get-Credential [email protected]
     $session365 = New-PSSession -ConfigurationName Microsoft.Exchange -ConnectionUri "https://ps.outlook.com/powershell/" -Credential $o365cred -Authentication Basic -AllowRedirection 
     Import-Module (Import-PSSession $session365 -AllowClobber) -Global
    }
  3. Next, execute the new function with the following command:
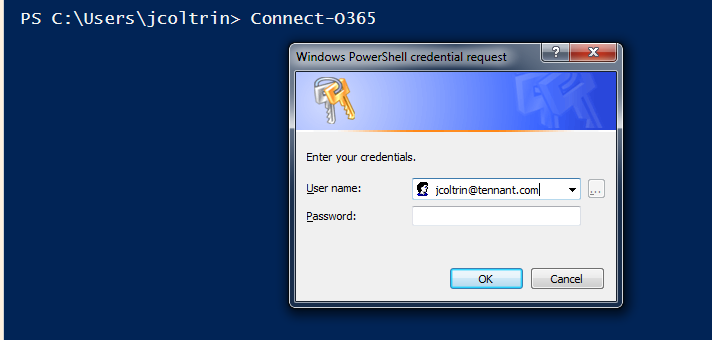
  4. Connect-O365
  5. Replace the username and password with your Office365 admin credentials (not your on-premise domain credentials.) This will log you into your Exchange Admin with PowerShell where we can run our Out of Office commands.
  6. With authentication out of the way, now all we need to do is run the following command to get a list of mailbox identities who have AutoReply configured (and not disabled), and sort by Identity, Start Time, End Time, and Auto Reply State:
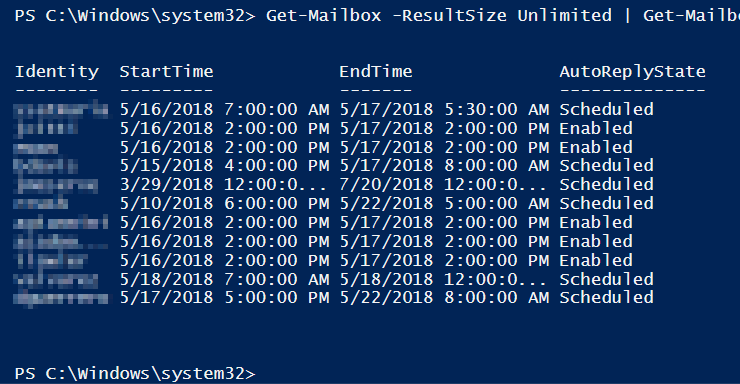
  7. Get-Mailbox -ResultSize Unlimited | Get-MailboxAutoReplyConfiguration | Where-Object { $_.AutoReplyState -ne "Disabled" } | Select Identity,StartTime,EndTime,AutoReplyState
  8. This will run for a while, and could take several minutes, but should produce a list similar to the following:

Office365 Outlook Room Calendar not showing details – displays busy only – fix when Set-MailboxFolderPermission does not resolve

Solved: Office365 O365 Resources Rooms and & Equipment cannot view details or subject in shared calendar, can only see “Busy” and Set-MailboxFolderPermission did not fix or resolve.

So a room calendar would not display who reserved the room, and users requested that the calendars for room reservations display who reserved the room and the details. By default the event only displays “Busy”. Most posts I found online for this issue have the same resolution: use Set-MailboxFolderPermission to display details, comments, subject, and organizer. I did this and tried this using the identity in quotes as well as the full email address of the room, however the Set-MailboxFolderPermission setting did not work and the calendar would still only show “Busy”.

I was able to resolve the problem by looking at the rights of the users.

I found that the Calendar Access Rights for the User: “Default” only had {AvailabilityOnly}

To check permissions and fix this issue, first open PowerShell and connect to your O365 Exchange. If you’ve enabled MFA on your Office365 account (two-factor authentication,) use the guide on how to connect to Exchange with Hybrid/Modern Authentication here. If you don’t use Modern 2FA authentication, use the following commands: 

$LiveCred = Get-Credential
$Session = New-PSSession -ConfigurationName Microsoft.Exchange-ConnectionUri https://ps.outlook.com/powershell/ -Credential $LiveCred -Authentication Basic -AllowRedirection
Import-PSSession $Session

Once connected, first check that the default user has the correct AccessRights and permissions to work with the calendar. As you can see below here, the Default user has {AvailabilityOnly} permissions when issuing the following command:

Get-MailboxFolderPermission [email protected]:\Calendar
PS C:\admin> Get-MailboxFolderPermission [email protected]:\Calendar

FolderName           User                 AccessRights
----------           ----                 ------------
Calendar             Default              {AvailabilityOnly}
Calendar             Anonymous            {None}

I changed the AccessRights from {AvailabilityOnly} to {PublishingAuthor} with the following command:

Set-MailboxFolderPermission -Identity "[email protected]:\Calendar" -User default -AccessRights PublishingAuthor

And then ensured the identity has the correct CalendarProcessing switches with this command:

Set-CalendarProcessing -Identity "[email protected]" -AddOrganizerToSubject $true -DeleteComments $false -DeleteSubject $false

Now the event’s details and subject can be viewed by everyone. This change takes place pretty quickly, within a minute – the “Busy” events should change to display the details when you close/open Outlook and/or switch between the calendars in Outlook online. Hope this saves someone else a call to MS Support.

In the event the new room’s Calendar is not auto processing or accepting meeting requests, check out my article here:

Solved – Office 365 Room Calendar Not Auto Processing or Accepting Meeting Requests

Please leave a comment, thanks.

New Active Directory User and Office365 New User Powershell Procedure

As a systems administrator, quite often you’ll need to create new user accounts in Active Directory and MSOnline Office 365. It’s good to streamline your new user creation procedure as much as possible to make the process faster and more accurate. Thanks to PowerShell, we can turn a whole bunch of point and clicks into just a few PowerShell commands. In this example procedure we will first create an Active Directory AD user account with powershell and a .csv file and then add that user into multiple groups with a different powershell script and a .txt file that has a list of the groups. We will also use another powershell script to get the canonical name of the groups so that our script can find the LDAP location of the group in Active Directory. Secondly, because we do not run our own exchange server we will use powershell to connect to Office365, and create a new user there, license the user, and then add the user to some distribution groups. Prerequisites are powershell, and import AD components and MSOnline components.

  1. Go to https://gallery.technet.microsoft.com/scriptcenter/PowerShell-Create-Active-7e6a3978 and download the create_ad_users.zip and extract to c:\newusers\
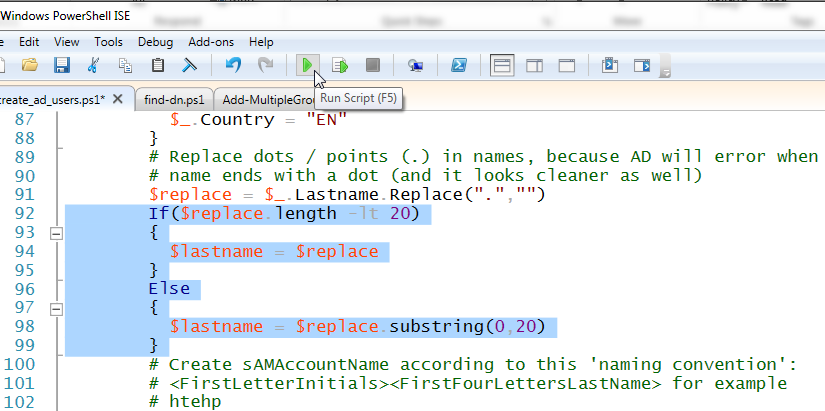
  2. Edit create_ad_users.ps1 lines 92 and 98 to accommodate longer last names. In the original script it only allows for first initial and then a truncated last name of 4 characters. In my case, we have some users with long last names, so I set those values to 20:
  3. If($replace.length -lt 20)
    {
      $lastname = $replace
    }
    Else
    {
      $lastname = $replace.substring(0,20)
    }
    
  4. Copy info from your HR department about the new user into the .csv file c:\newusers\import_create_ad_users.csv
  5. Run PS C:\newusers> .\create_ad_users.ps1
  6. Next check the new username in ADUC for such things as account name, address, phone number etc. to ensure the entries are accurate.
  7. With our new user account created, most likely we will want to make that user a member of several security groups. To do that with PowerShell, we need to make sure that we have the correct LDAP names for our groups and place them into a file named groups.txt. In order to do so, we need to run another powershell script named find-dn.ps1 . The code is as follows:
    # Function Find Distinguished Name
    function find-dn { param([string]$adfindtype, [string]$cName)
        # Create A New ADSI Call
        $root = [ADSI]''
        # Create a New DirectorySearcher Object
        $searcher = new-object System.DirectoryServices.DirectorySearcher($root)
        # Set the filter to search for a specific CNAME
        $searcher.filter = "(&(objectClass=$adfindtype) (CN=$cName))"
        # Set results in $adfind variable
        $adfind = $searcher.findall()
        
        # If Search has Multiple Answers 
        if ($adfind.count -gt 1) {
            $count = 0 
            foreach($i in $adfind)
            {
                # Write Answers On Screen
                write-host $count ": " $i.path
                $count += 1
            }
            # Prompt User For Selection
            $selection = Read-Host "Please select item: "
            # Return the Selection
            return $adfind[$selection].path
        }
        # Return The Answer
        return $adfind[0].path
    }

    This code should be inserted into a new PowerShell ISE tab and then saved as find-dn.ps1 . Running the code will produce a new PowerShell function (but will not write any output to the screen.) Find the group names in ADUC that you want the CN name for, and then use the following command(s) to return the CN name:

    find-dn "group" "FinanceGroup"

    The script will return something similar to the following:

    LDAP://CN=FinanceGroup,CN=Users,DC=intranet,DC=contoso,DC=com

    Remove the part “LDAP://” and copy the remaining string into the c:\newusers\groups.txt file, which after finding the rest of your group CN names, should look something similar to the following:

    CN=FinanceGroup,CN=Users,DC=intranet,DC=contoso,DC=com
    CN=HRGroup,CN=Users,DC=intranet,DC=contoso,DC=com
    CN=OperationsGroup,CN=Users,DC=intranet,DC=contoso,DC=com
    CN=ITGroup,CN=Users,DC=intranet,DC=contoso,DC=com
    CN=AccountingGroup,CN=Users,DC=intranet,DC=contoso,DC=com
    CN=ComplianceGroup,CN=Users,DC=intranet,DC=contoso,DC=com
    CN=MarketingGroup,CN=Users,DC=intranet,DC=contoso,DC=com
  8. Now that we have our CN security group names, we can add the user(s) into the groups with the following script. For this step we can utilize the script found here: https://community.spiceworks.com/topic/459481-adding-users-to-multiple-security-groups-in-ad – which was contributed by Martin9700 . Copy the following script into a new PowerShell ISE tab and name the file Add-MultipleGroups.ps1 :
    #requires -Version 3.0
    Param (
        [Parameter(Mandatory,ValueFromPipeline)]
        [String[]]$Groups,
        [Parameter(Mandatory)]
        [String[]]$Users,
        [switch]$Passthru
    )
    
    Begin {
        Try { Import-Module ActiveDirectory -ErrorAction Stop }
        Catch { Write-Error "Unable to load Active Directory module, is RSAT installed?"; Exit }
        $Result = @()
    }
    
    Process {
        ForEach ($Group in $Groups)
        {   Try {
                Add-ADGroupMember $Group -Members $Users -ErrorAction Stop
                $Result += [PSCustomObject]@{
                    Group = $Group
                    AddMembers = $Users -join ", "
                }
            }
            Catch {
                Write-Error "Error adding members to $Group because $($Error[0])"
                $Result += [PSCustomObject]@{
                    Group = $Group
                    AddMembers = $Error[0]
                }
            }
        }
    }
    
    End {
        If ($Passthru)
        {   $Result
        }
    }
  9. Run the following command to add user to the appropriate security groups:
PS C:\newusers> .\Add-MultipleGroups.ps1 -Groups "CN=ITGroup,CN=Users,DC=intranet,DC=contoso,DC=com","CN=OperationsGroup,CN=Users,DC=intranet,DC=contoso,DC=com" -users user1, user2

With the above script you can use the file to run a number of different options as well such as:

You can just put the group names in -Groups:

.\Add-MultipleGroups.ps1 -Groups "testgroup1","testgroup2" -users user1,user2,user3,user4

You can use a text file (either in Groups or via pipeline):

.\Add-MultipleGroups.ps1 -Groups (Get-content c:\groups.txt) -users user1,user2,user3,user4

Get-content c:\groups.txt | .\Add-MultipleGroups.ps1 -Groups -users user1,user2,user3,user4

You can also use Get-Content for users, but you can pipe it:

Get-content c:\groups.txt | .\Add-MultipleGroups.ps1 -Groups -users (Get-content c:\users.txt)

You can confirm in ADUC that the users are now members of the security groups in our groups.txt file.

Add users to Office 365 and Distribution Groups with PowerShell

Great! Now that we have our user accounts created on the AD side of things, we will move on to adding our user(s) into Office365:

With PowerShell up and running will will issue the following commands:

From https://www.petri.com/use-powershell-create-assign-licenses-office-365-users

Import-Module MSOnline

Connect-MsolService

Now we will create the user with the following command:

New-MsolUser -UserPrincipalName [email protected] -DisplayName ‘User 1’ -FirstName User -LastName 1

This command will return something like the following (sorry about the formatting:)

PS C:\Users\jcoltrin> New-MsolUser -UserPrincipalName [email protected] -DisplayName ‘User 1’ -FirstName User -LastName 1


Password                                   UserPrincipalName                          DisplayName                                isLicensed

--------                                   -----------------                          -----------                                ----------

Suso4007                                   [email protected]                       User 1                                False

Now we need to add a license to the user account. We need to do two things before we can assign the licenses. First is we need to to determine the different sku’s we have available to license, and second, we need to set the usage location. To accomplish the first part, we can issue the command:

Get-MsolAccountSku

Second, by using the instructions here: https://social.technet.microsoft.com/Forums/ie/en-US/bfde2a73-579c-409b-a7cd-77110048c7b7/license-enabling-script?forum=onlineservicesadministrationcenter

We can set the MS Online user’s principal location:

Set-MsolUser -UserPrincipalName [email protected] -UsageLocation US


Set-MsolUserLicense -UserPrincipalName [email protected] -AddLicenses Contoso:STANDARDPACK

Now that the user is licensed, we will add the account to a few Exchange Distribution Groups. We will need to import a new PSSession from outlook.com before we can run the Exchange commands. Import the session by first creating a function called “Connect-O365” by running the following (just like we created the function find-dn above):

function Connect-O365{
 $o365cred = Get-Credential [email protected]
 $session365 = New-PSSession -ConfigurationName Microsoft.Exchange -ConnectionUri "https://ps.outlook.com/powershell/" -Credential $o365cred -Authentication Basic -AllowRedirection 
 Import-Module (Import-PSSession $session365 -AllowClobber) -Global
}

Save and name this function: Connect-O365.ps1 and run it. We now have a function that we can run:

.\Connect-O365.ps1
Connect-O365

(enter creds)

Now we can add the distribution group members with the group identity and member name in quotes:

Add-DistributionGroupMember -Identity "Finance" -Member "[email protected]"

Add-DistributionGroupMember -Identity "AllEmployees" -Member "[email protected]"

A number of these scripts and commands can be combined into .ps1 files to optimize the workflow even further. With the information here you should have a good place to start. Let me know in the comments how you added your own features to the procedure.