Office365 Outlook Room Calendar not showing details – displays busy only – fix when Set-MailboxFolderPermission does not resolve

Solved: Office365 O365 Resources Rooms and & Equipment cannot view details or subject in shared calendar, can only see “Busy” and Set-MailboxFolderPermission did not fix or resolve.

So a room calendar would not display who reserved the room, and users requested that the calendars for room reservations display who reserved the room and the details. By default the event only displays “Busy”. Most posts I found online for this issue have the same resolution: use Set-MailboxFolderPermission to display details, comments, subject, and organizer. I did this and tried this using the identity in quotes as well as the full email address of the room, however the Set-MailboxFolderPermission setting did not work and the calendar would still only show “Busy”.

I was able to resolve the problem by looking at the rights of the users.

I found that the Calendar Access Rights for the User: “Default” only had {AvailabilityOnly}

To check permissions and fix this issue, first open PowerShell and connect to your O365 Exchange. If you’ve enabled MFA on your Office365 account (two-factor authentication,) use the guide on how to connect to Exchange with Hybrid/Modern Authentication here. If you don’t use Modern 2FA authentication, use the following commands: 

$LiveCred = Get-Credential
$Session = New-PSSession -ConfigurationName Microsoft.Exchange-ConnectionUri https://ps.outlook.com/powershell/ -Credential $LiveCred -Authentication Basic -AllowRedirection
Import-PSSession $Session

Once connected, first check that the default user has the correct AccessRights and permissions to work with the calendar. As you can see below here, the Default user has {AvailabilityOnly} permissions when issuing the following command:

Get-MailboxFolderPermission [email protected]:\Calendar
PS C:\admin> Get-MailboxFolderPermission [email protected]:\Calendar

FolderName           User                 AccessRights
----------           ----                 ------------
Calendar             Default              {AvailabilityOnly}
Calendar             Anonymous            {None}

I changed the AccessRights from {AvailabilityOnly} to {PublishingAuthor} with the following command:

Set-MailboxFolderPermission -Identity "[email protected]:\Calendar" -User default -AccessRights PublishingAuthor

And then ensured the identity has the correct CalendarProcessing switches with this command:

Set-CalendarProcessing -Identity "[email protected]" -AddOrganizerToSubject $true -DeleteComments $false -DeleteSubject $false

Now the event’s details and subject can be viewed by everyone. This change takes place pretty quickly, within a minute – the “Busy” events should change to display the details when you close/open Outlook and/or switch between the calendars in Outlook online. Hope this saves someone else a call to MS Support.

In the event the new room’s Calendar is not auto processing or accepting meeting requests, check out my article here:

Solved – Office 365 Room Calendar Not Auto Processing or Accepting Meeting Requests

Please leave a comment, thanks.

SmarterMail Enterprise 15.5 – Export / Import iCalendar/Outlook calendar into SmartMail

How to import iCalendar events into SmartMail / SmarterMail Enterprise IMAP calendar

So one of my clients have a team that have been using iCalendar to share calendars, but have decided to migrate to SmarterMail Enterprise 15.5 IMAP/Exchange for their team calendar sharing. While there is no direct way to import iCalendar events into SmartMail directly, there is a two-step approach that works pretty well.

In this case, the clients only want to migrate historical data and not current/future events. It sounds harder than it is, but the migrations shouldn’t take long and with minimal effort. If you don’t have spare gmail accounts to use then you may want to create new gmail accounts just for this purpose, or delete all calendar events in an existing google calendar between migrations.

One thing that I did notice is that reoccurring appointments will be transferred over and this may in turn create duplicates if you already have appointments in SmartMail that are reoccurring. It may be wise to remove reoccurring appointments from the source calendar prior to doing the first export.

As always it’s best to first backup your data prior to doing anything, then run a few tests to make sure that all calendar events, items, and attachments transfer successfully during the migration.

But in our test case, the Outlook (icalendar) – to – GMAIL – to – SmartMail works perfectly fine.

First go to Outlook > File menu > Open & Export > Import/Export > Select your iCalendar (and any other calendars you’d like to export):

Export to .CSV > Calendar (here you can select date range of events to be exported) > save to something like c:\Users\jcoltrin\Desktop\jasoncalendar.csv

Then

Login to any Google account/Gmail > Calendar > Gear Icon > Settings > Calendars > Import calendar > choose jasoncalendar.csv (import successful.)

Calendar items display in my google calendar:

Then now that the calendar items are in my google calendar, I went into smartmail account  > settings > Advanced Settings > Mailbox Migration > Account type: GMAIL > next > Check “Calendar” > do the Google authentication (which works well and uses Google’s authentication). >  Import

Now the same calendar items are in my Smartmail Calendar.

New Active Directory User and Office365 New User Powershell Procedure

As a systems administrator, quite often you’ll need to create new user accounts in Active Directory and MSOnline Office 365. It’s good to streamline your new user creation procedure as much as possible to make the process faster and more accurate. Thanks to PowerShell, we can turn a whole bunch of point and clicks into just a few PowerShell commands. In this example procedure we will first create an Active Directory AD user account with powershell and a .csv file and then add that user into multiple groups with a different powershell script and a .txt file that has a list of the groups. We will also use another powershell script to get the canonical name of the groups so that our script can find the LDAP location of the group in Active Directory. Secondly, because we do not run our own exchange server we will use powershell to connect to Office365, and create a new user there, license the user, and then add the user to some distribution groups. Prerequisites are powershell, and import AD components and MSOnline components.

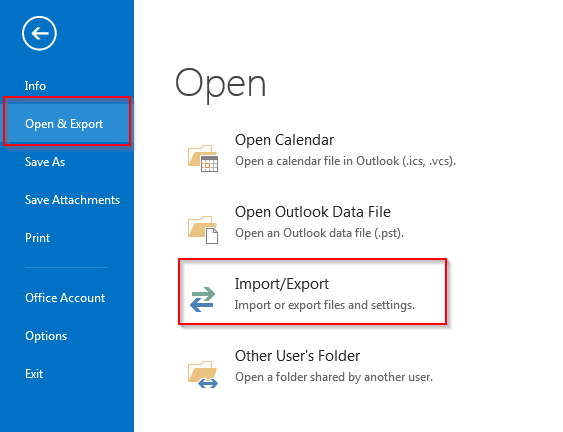
  1. Go to https://gallery.technet.microsoft.com/scriptcenter/PowerShell-Create-Active-7e6a3978 and download the create_ad_users.zip and extract to c:\newusers\
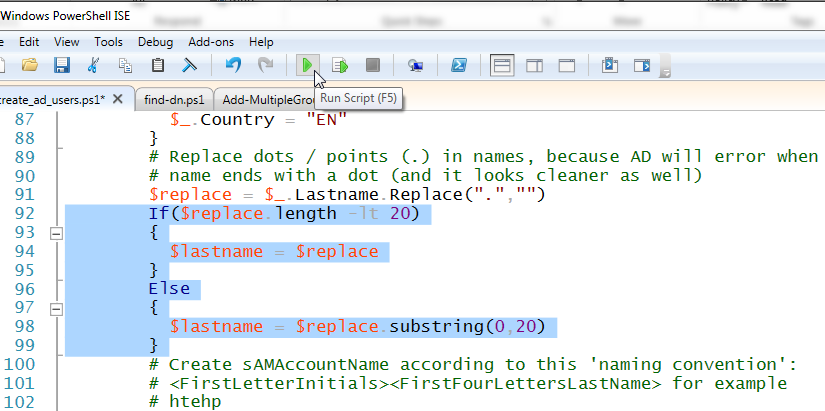
  2. Edit create_ad_users.ps1 lines 92 and 98 to accommodate longer last names. In the original script it only allows for first initial and then a truncated last name of 4 characters. In my case, we have some users with long last names, so I set those values to 20:
  3. If($replace.length -lt 20)
    {
      $lastname = $replace
    }
    Else
    {
      $lastname = $replace.substring(0,20)
    }
    
  4. Copy info from your HR department about the new user into the .csv file c:\newusers\import_create_ad_users.csv
  5. Run PS C:\newusers> .\create_ad_users.ps1
  6. Next check the new username in ADUC for such things as account name, address, phone number etc. to ensure the entries are accurate.
  7. With our new user account created, most likely we will want to make that user a member of several security groups. To do that with PowerShell, we need to make sure that we have the correct LDAP names for our groups and place them into a file named groups.txt. In order to do so, we need to run another powershell script named find-dn.ps1 . The code is as follows:
    # Function Find Distinguished Name
    function find-dn { param([string]$adfindtype, [string]$cName)
        # Create A New ADSI Call
        $root = [ADSI]''
        # Create a New DirectorySearcher Object
        $searcher = new-object System.DirectoryServices.DirectorySearcher($root)
        # Set the filter to search for a specific CNAME
        $searcher.filter = "(&(objectClass=$adfindtype) (CN=$cName))"
        # Set results in $adfind variable
        $adfind = $searcher.findall()
        
        # If Search has Multiple Answers 
        if ($adfind.count -gt 1) {
            $count = 0 
            foreach($i in $adfind)
            {
                # Write Answers On Screen
                write-host $count ": " $i.path
                $count += 1
            }
            # Prompt User For Selection
            $selection = Read-Host "Please select item: "
            # Return the Selection
            return $adfind[$selection].path
        }
        # Return The Answer
        return $adfind[0].path
    }

    This code should be inserted into a new PowerShell ISE tab and then saved as find-dn.ps1 . Running the code will produce a new PowerShell function (but will not write any output to the screen.) Find the group names in ADUC that you want the CN name for, and then use the following command(s) to return the CN name:

    find-dn "group" "FinanceGroup"

    The script will return something similar to the following:

    LDAP://CN=FinanceGroup,CN=Users,DC=intranet,DC=contoso,DC=com

    Remove the part “LDAP://” and copy the remaining string into the c:\newusers\groups.txt file, which after finding the rest of your group CN names, should look something similar to the following:

    CN=FinanceGroup,CN=Users,DC=intranet,DC=contoso,DC=com
    CN=HRGroup,CN=Users,DC=intranet,DC=contoso,DC=com
    CN=OperationsGroup,CN=Users,DC=intranet,DC=contoso,DC=com
    CN=ITGroup,CN=Users,DC=intranet,DC=contoso,DC=com
    CN=AccountingGroup,CN=Users,DC=intranet,DC=contoso,DC=com
    CN=ComplianceGroup,CN=Users,DC=intranet,DC=contoso,DC=com
    CN=MarketingGroup,CN=Users,DC=intranet,DC=contoso,DC=com
  8. Now that we have our CN security group names, we can add the user(s) into the groups with the following script. For this step we can utilize the script found here: https://community.spiceworks.com/topic/459481-adding-users-to-multiple-security-groups-in-ad – which was contributed by Martin9700 . Copy the following script into a new PowerShell ISE tab and name the file Add-MultipleGroups.ps1 :
    #requires -Version 3.0
    Param (
        [Parameter(Mandatory,ValueFromPipeline)]
        [String[]]$Groups,
        [Parameter(Mandatory)]
        [String[]]$Users,
        [switch]$Passthru
    )
    
    Begin {
        Try { Import-Module ActiveDirectory -ErrorAction Stop }
        Catch { Write-Error "Unable to load Active Directory module, is RSAT installed?"; Exit }
        $Result = @()
    }
    
    Process {
        ForEach ($Group in $Groups)
        {   Try {
                Add-ADGroupMember $Group -Members $Users -ErrorAction Stop
                $Result += [PSCustomObject]@{
                    Group = $Group
                    AddMembers = $Users -join ", "
                }
            }
            Catch {
                Write-Error "Error adding members to $Group because $($Error[0])"
                $Result += [PSCustomObject]@{
                    Group = $Group
                    AddMembers = $Error[0]
                }
            }
        }
    }
    
    End {
        If ($Passthru)
        {   $Result
        }
    }
  9. Run the following command to add user to the appropriate security groups:
PS C:\newusers> .\Add-MultipleGroups.ps1 -Groups "CN=ITGroup,CN=Users,DC=intranet,DC=contoso,DC=com","CN=OperationsGroup,CN=Users,DC=intranet,DC=contoso,DC=com" -users user1, user2

With the above script you can use the file to run a number of different options as well such as:

You can just put the group names in -Groups:

.\Add-MultipleGroups.ps1 -Groups "testgroup1","testgroup2" -users user1,user2,user3,user4

You can use a text file (either in Groups or via pipeline):

.\Add-MultipleGroups.ps1 -Groups (Get-content c:\groups.txt) -users user1,user2,user3,user4

Get-content c:\groups.txt | .\Add-MultipleGroups.ps1 -Groups -users user1,user2,user3,user4

You can also use Get-Content for users, but you can pipe it:

Get-content c:\groups.txt | .\Add-MultipleGroups.ps1 -Groups -users (Get-content c:\users.txt)

You can confirm in ADUC that the users are now members of the security groups in our groups.txt file.

Add users to Office 365 and Distribution Groups with PowerShell

Great! Now that we have our user accounts created on the AD side of things, we will move on to adding our user(s) into Office365:

With PowerShell up and running will will issue the following commands:

From https://www.petri.com/use-powershell-create-assign-licenses-office-365-users

Import-Module MSOnline

Connect-MsolService

Now we will create the user with the following command:

New-MsolUser -UserPrincipalName [email protected] -DisplayName ‘User 1’ -FirstName User -LastName 1

This command will return something like the following (sorry about the formatting:)

PS C:\Users\jcoltrin> New-MsolUser -UserPrincipalName [email protected] -DisplayName ‘User 1’ -FirstName User -LastName 1


Password                                   UserPrincipalName                          DisplayName                                isLicensed

--------                                   -----------------                          -----------                                ----------

Suso4007                                   [email protected]                       User 1                                False

Now we need to add a license to the user account. We need to do two things before we can assign the licenses. First is we need to to determine the different sku’s we have available to license, and second, we need to set the usage location. To accomplish the first part, we can issue the command:

Get-MsolAccountSku

Second, by using the instructions here: https://social.technet.microsoft.com/Forums/ie/en-US/bfde2a73-579c-409b-a7cd-77110048c7b7/license-enabling-script?forum=onlineservicesadministrationcenter

We can set the MS Online user’s principal location:

Set-MsolUser -UserPrincipalName [email protected] -UsageLocation US


Set-MsolUserLicense -UserPrincipalName [email protected] -AddLicenses Contoso:STANDARDPACK

Now that the user is licensed, we will add the account to a few Exchange Distribution Groups. We will need to import a new PSSession from outlook.com before we can run the Exchange commands. Import the session by first creating a function called “Connect-O365” by running the following (just like we created the function find-dn above):

function Connect-O365{
 $o365cred = Get-Credential [email protected]
 $session365 = New-PSSession -ConfigurationName Microsoft.Exchange -ConnectionUri "https://ps.outlook.com/powershell/" -Credential $o365cred -Authentication Basic -AllowRedirection 
 Import-Module (Import-PSSession $session365 -AllowClobber) -Global
}

Save and name this function: Connect-O365.ps1 and run it. We now have a function that we can run:

.\Connect-O365.ps1
Connect-O365

(enter creds)

Now we can add the distribution group members with the group identity and member name in quotes:

Add-DistributionGroupMember -Identity "Finance" -Member "[email protected]"

Add-DistributionGroupMember -Identity "AllEmployees" -Member "[email protected]"

A number of these scripts and commands can be combined into .ps1 files to optimize the workflow even further. With the information here you should have a good place to start. Let me know in the comments how you added your own features to the procedure.

Exchange/Outlook 2010 autodiscover certificate error name mismatch

Exchange/Outlook 2010 autodiscover certificate error name mismatch

Recently some users have been receiving the following autodiscover certificate error when opening outlook:

Security Alert: autodiscover.domainname.org

Information you exchange with this site cannot be viewed or changed by others. However, there is a problem with the site’s security certificate.

√ The security certificate is from a trusted party

√ The security certificate date is valid

X The name on the security certificate is invalid or does not match the name of the site

Firstly, we host exchange at a different hostedexchange.com, and our autodiscover uses a wildcard certificate “*.hostedexchange.com”. So starting with the client I made sure to view the certificate. The correct name on the certificate listed was “*hostedexchange.com.”

1. I installed the certificate on to the client PC into the trusted store. Closed outlook/opened again and still the same error.

2. I looked at the proxy settings in the account setup and found that the ‘server name’ and msstd: were correct, they were.

3. We used nslookup externally and found that there are no valid dns records pointing to autodiscover.domainname.org

4. We used https://www.testexchangeconnectivity.com/ and found that while it does automatically check for autodiscover.domainname.org, dns did not return a value; it failed

5. From the client we were able to ping autodiscover.domainname.com, the ping returned an internal ip address of our mail server.

6. So from the results above it appears as though the client (or citrix server’s hosted desktop in this instance) had an incorrect dns entry.

7. From a (run as administrator) command prompt I issued an “ipconfig /flushdns” command on the client server but the error persisted, and pings still replied from autodiscover.domainname.org

8. We checked the hosts file on the server (c:\windows\system32\drivers\etc), and sure enough there was an old entry for autodiscover.domainname.org

9. In order to edit the hosts file, did a “Run as administrator” to open notepad, edited the file and saved successfully.

10. Issued another ipconfig /flushdns

Now when the client opens, the request to get autodiscover.domainname.org fails, and there is no mismatch of certificate names.


How to grant users access to other user’s mailboxes in Office365 using PowerShell

This procedure shows how to grant users access to other user’s mailboxes in Office365 using PowerShell
How to:
*Grant a user access to a single mailbox
*Revoke the above permissions (recommended cause of action after the Administrator has finished his/her tasks)

1. Fire up PowerShell (Run As Administrator).

First make sure you have the remote signed execution policy set to true. You can do this by running PowerShell in admin mode and running:
PS> Set-ExecutionPolicy RemoteSigned

2. Next, run the following to authenticate your self and import PowerShell commands to your local session:
PS> $LiveCred = Get-Credential
(Supply credentials for MSOnline Portal: [email protected]/Password)

3. After supplying credentials to PowerShell as $LiveCred variable, authenticate and import PowerShell commands into your local session:
PS> $Session = New-PSSession -ConfigurationName Microsoft.Exchange-ConnectionUri https://ps.outlook.com/powershell/ -Credential $LiveCred -Authentication Basic –AllowRedirection

You’re In!
PS> Import-PSSession $Session

4. For example, to grant [email protected] full access to [email protected], you would enter the command:
PS> Add-MailboxPermission [email protected] -User [email protected] -AccessRights FullAccess -InheritanceType All

PS> Exit
Have the user who was granted access close/reopen Outlook and the new mailbox will be listed in their Outlook Account Tree
5. If you want to hide the user mailbox from appearing in the mailbox tree in Outlook who you just granted access, you can add the switch -AutoMapping $false

1. To Revoke access you would enter the command:
PS> Remove-MailboxPermission [email protected] -User [email protected] -AccessRights FullAccess -InheritanceType All

Outlook 2010 – Cannot create new profile; An unknown error occurred, error code: 0x80070057 – Solved!

One of our Windows 7 Pro, 32 bit users (not SP1), experienced Outlook 2010 failing on a regular basis. The client was setup with Auto-discover and the application would crash / freeze/ hang randomly as well as could be made to crash by going into the Calendar, create a New Meeting->Scheduling Assistant -> and enter another user’s name.

Additionally, we tried closing Outlook, going to the Control Panel and chosing the Mail applet. Click on Profiles -> Profiles -> Show Profiles… -> Add…

The Outlook wizard would start, but then fail with the error message:

“An unknown error occurred, error code: 0x80070057”.

The Event Viewer (Local) -> (Windows Logs: Application) would have a cryptic message with the following information:

Event 1000, Application Error

Faulting application name: OUTLOOK.EXE, version: 14.0.4760.1000, time stamp: 0x4ba8fefdFaulting module name: OUTLOOK.EXE, version: 14.0.4760.1000, time stamp: 0x4ba8fefdException code: 0xc0000005Fault offset: 0x0054ac63Faulting process id: 0x1174Faulting application start time: 0x01cc0e56a826f1c7Faulting application path: C:Program FilesMicrosoft OfficeOffice14OUTLOOK.EXEFaulting module path: C:Program FilesMicrosoft OfficeOffice14OUTLOOK.EXEReport Id: 375d88cc-7a62-11e0-a74c-b8ac6fc5d92c

Running a search on these errors produced a lot of options for repairing the problem including checking OWA IIS certificates, installing .NET on the exchange server, Exchange SP2/SP3,  editing your hosts file, Exchange PowerShell setting virtual directory, and the list goes on.

The solution that resolved this issue finally for us was to install on the Outlook client, the hotfix created by Microsoft here: http://support.microsoft.com/default.aspx?scid=kb;en-US;2281463

The download is not easily accessible on this page, so don’t be discouraged and go ahead and “View and request hotfix downloads” from the link at the top of the page.

This link will send you to a Hotfix Request page where you place a checkmark on the update you wish to download. Be careful because if you visit the page with a x64 machine, you will most likely be prompted to download the x64 client. It’s best to visit the hotfix page on the client that has the problem. Enter your email address and then confirm. Type in the captcha and then hit “Request hotfix.” You will be quickly emailed the link to the hotfix download as well as a password.

*Note: Prior to installing a hotfix of this nature, it is always recommended you backup your system (Windows 7 backup is a pretty good free image-based backup, my next best recommendation is something like Acronis 10.) Also, it is a good idea to take a manual System Restore point: Start -> Right-click on Computer, choose Properties, System Protection, Create.

Once the hotfix has been downloaded, when you try to run the .exe you will be prompted for the password for the file to run. Enter the password that was emailed to you and complete the setup. After the hotfix completes, for good measure, go ahead and reboot. After the restart, keep Outlook closed and go back to the Mail control panel applet. Go to Profiles ->Show Profiles… -> Add… and create a new Outlook Profile. Under “When starting Microsoft Outlook, use the profile: -> Always use this profile -> Hit the dropdown for the newly created profile.

Start Outlook. This will create a new Outlook profile for the user. Also, a new .ost file will be created which if the mailbox size is large, it may take a considerable amount of time to rebuilt the new profile. You may need to visit the old profile in the Control Panel Mail Applet to see if any data files were attached or settings/signatures were modified or need to be created or copied to the new profile.

You can test to see if the application crashes by visiting the Calendar Scheduling Assistant.