Exchange 2010 – Part 19 – Client Access Server Security and Secure Socket Layer Certificates

Client Access Server Security and Secure Socket Layer Certificates

In this post we will review:

– CAS security through digital certificates and how these vary.

– We’ll also review the different SSL certificate types.

– Lastly, we’ll work through the following:

  1. Create a Certificate Signing Request (CSR)
  2. Obtain a certificate from a Certification Authority (CA)
  3. Install the SSL Certificate on the Client Access Server

Up until this point in your Exchange deployment, you may have configured access with the default self-signed certificate. This may be problematic because it doesn’t support all of the access methods (Outlook Anywhere) and isn’t the most secure method of authentication. You may decide to obtain a trusted certificate from a third-party commercial Certification Authority (CA) and install that certificate on the Client Access Server. You do also have the ability to use a PKI certificate through Microsoft Certificate Services which you can setup internally, however, the infrastructure costs and labor may not be worth the trouble.

Managing Authentication

  • A digital certificate will authenticate to the client that the server with the certificate is trust-worthy. The server can prove, they are who they say they are.
  • In addition, a digital certificate will ensure the data that is exchanged is protected.
  • By default, with Exchange 2010, client communications are encrypted using SSL with Outlook Web App, Exchange ActiveSync, and Outlook Anywhere (SSL will not use the Self-Signed Certificates). By default, POP and IMAP aren’t configured to communicate over SSL. You will use the IIS Manager to ensure SSL is enabled on the virtual directory.

Go to the IIS Manager on your mailbox server. Select the server itself, scroll down to Server Certificates. Here you’ll find the Microsoft Exchange Certificate (Issued to itself by itself).

Click Image to Enlarge

You can double-click on the certificate and check out the properties and see that it’s not trusted.

In IIS, expand Sites and then Default Web Site.  If we look at the different sites in IIS, as far as SSL turned on, click on OWA, and then Secure Socket Layer settings, and see if it says “Require SSL”. We can test to see if that works by browsing to localhost in the web browser. An easy way to do this is to click on the “Browse: 443 (https)” link in the Actions pane:

iissslbrowse443
Click Image to Enlarge

This will open the browser and we’ll be brought to our Outlook Web App. We will have a certificate error. Users will have to install the certificate if they want to get rid of the Red Security Trust Bar in their browser. In this case we will want to install the certificate into the Trusted Certificate Store. Windows cannot validate the certificate, but since we know where the certificate is from we can install it and accept the warning.

Three types of Certificates:

  1. Self-signed: Signed by the application itself (in our case Exchange 2010) and will allow for OWA and/or ActiveSync functionality but not Outlook Anywhere. *For these to work you have to manually copy them over to the trusted root certificate store of the client computer or mobile device.
  2. Public Key Infrastructure (PKI): Requires setting up certificate servers and establishing the certificates for communication.
  3. Trusted Third-Party Certificates: Provided by a CA, these are automatically trusted by clients (unlike the two options above), so the deployment is simplified.

Certificate Types

When you go to purchase a certificate from a CA you’re going to find that different types to purchase.

  • Wildcard Certificates: Can represent multiple domain names (for example *.jasoncoltrin.com), however these types of certs provide a less secure method because the wildcard can be used for any sub-domain. Microsoft does not recommend wildcard certs, but to use SAN’s.
  • Subject Alternative Name (SAN) or Unified Communications Certificates (UCC) certificates are considered better in this regard because you specifically list out each of the trusted domain names. *It is considered best practice to use as few host names as possible (perhaps as few as three).

The CA Process for Obtaining and Installing Certs

  • Take a look at the GoDaddy website for SSL Certificates
  • Begin the process of managing a purchased certificate
  • We will return to our Exchange Server and use the Exchange Certificate Wizard to obtain a Certificate Signing Request (CSR)
  • Use the CSR to complete the GoDaddy certificate process
  • Once that certificate is provided (up to 72 hours), we will install it on our Client Access Server
On our Mailbox Server, open the EMC, browse to Server Configuration.
Under the Server Config Node, beneath the servers, we will have our Exchange Certificates.
What we really want is an SSL certificate from a CA.
In the GoDaddy website, we’ll purchase our cert, manage our Products -> manage my certificates, and then in the SSL management, we will click “Request Certificate”. It will ask where the cert will be hosted. We will want to choose Third Party or dedicated server. Now we will need to Enter your Certificate Signing Request (CSR). Use at least a 2048 bit key.


Go back to the EMC, under server configuration, in the Actions Pane, click on New Exchange Certificate. For Starters, enter a friendly name for the certificate.
If we want to Enable Wildcard Certificate we can do that here. But we don’t want that at this time, we want a literal domain name so leave unchecked and click next.
Now depending on the cert purchased, our options here will be different. For example we have 5 certs purchased and can only use 5 names.
For Federated Sharing, we will place a checkmark in the Public Certificate because in the future we may want to Federate with a different site.
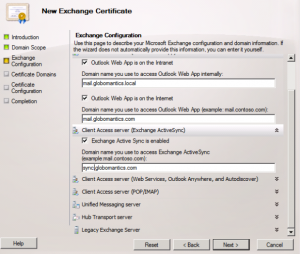
For Client Access Server (Outlook Web App), for the Intranet – you may want to use a local name like mail.jasoncoltrin.local and for the Internet – use mail.jasoncoltrin.com
New Exchange Certificate
Click Image to Enlarge
We want Exchange ActiveSync, so perhaps sync.jasoncoltrin.com is the name we’ll want to use. Most use mail.domainname.com.
Go down the list and have Exchange Web services enabled; Outlook Anywhere enabled.
Autodiscover used on the internet: Autodiscover URL to use: autodiscover.jasoncoltrin.com.
The use of sync.jasoncoltrin.com differentiates and relates to mobile devices. When you set up the cert, that’s when it (the name) counts. For the dropping of POP and IMAP support, in all honesty is probably a good thing, and we prefer a more secure protocol and have everyone come in through ActiveSync. With ActiveSync we have the ability to wipe devices.
At this time we don’t need a cert that supports POP or IMAP.
For Unified Messaging, you can go with a self-signed cert.
At this time we are going to skip Hub Transport server mutual TLS and Hub Transport server for POP/IMAP.
At this time we are not going to use Legacy Exchange Server.
Clicking next will give us a review of our cert (request). In our case we have 6 names. To bring this down to 5, we can change intranet/internet mail.jasoncoltrin.local to mail.jasoncoltrin.com and save a name.
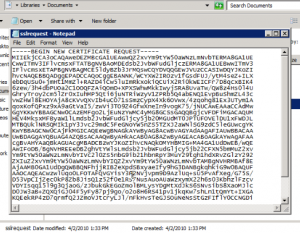
Click next, and the wizard will ask for some information. The full legal organization name, Org unit (none), Country, City, State, Certificate Request File Path – name the file something like “SSLRequest”, then New and Finish. Make sure the CSR generated is 2048 bit. Once finished, browse to where the file was placed, open the Certificate request with notepad, and copy and paste the entire string including –Begin new cert —  to   —End New Cert..— into the GoDaddy.com CSR text box.
SSLCertcopytoCSR
Click Image to Enlarge

After submitting the encrypted data to GoDaddy, you will see the Subject Alt Names and Primary Domain Name. Your cert will be issued shortly (72hrs), and at that time we will be able to import it. Once the cert is issued, you can download it from GoDaddy. The cert will come down zipped, so unzip it.

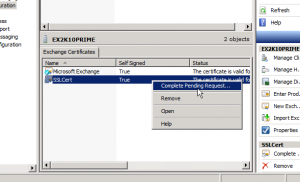
Go back to the EMC, You will still see your requests and your self signed cert. Right-click on the SSL Cert and choose Complete Pending Request.
CompleteCertRequest
Click Image to Enlarge

Browse to the downloaded cert (domain.com – not the intermediate cert), click complete, and that’s all there is to it. So we’ve installed it but don’t have any services using it. Right-click on the cert and choose Assign Services to Certificate.
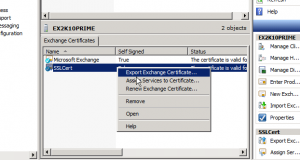
AssignCertServices
Click Image to Enlarge

Use SMTP, IIS, click Next, and then Assign.
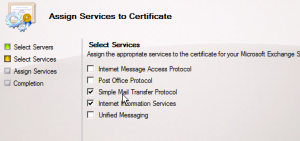
AssignServices
Click Image to Enlarge

Do we want to override? Yes.

When we downloaded and unzipped the SSL Certificate, we also received an Intermediate Certificate. The intermediate certificate is used to enhance the security of the root certificate. These are also called a Chained Root Certificates. There are instructions on the GoDaddy site for installing the Intermediate Certificate. It is optional, but you should install the Intermediate certificate if the CA provides you with one, but we will forego that for now. Your CA may or may not issue Intermediate certificates.

In conclusion, in this lesson we discussed the benefits of SSL digital certificates, encouraged SAN certificates, worked through the process of requesting a certificate from the GoDaddy Certificate Authority, and installed and enabled services using that cert on our Exchange Client Access Server.


A large majority of the content provided in my Blog’s Exchange series is derived from J. Peter Bruzzese’ excellent Train Signals Exchange Server 2010 Video Disk Series, as well as my own Exchange 2010 lab. Trainsignal.com is an invaluable source for accurate, easy to understand, IT information and training. http://www.trainsignal.com

Exchange 2010 – Part 17 – Using the ECP to manage ActiveSync

Using the ECP to Manage ActiveSync

In this post, we will be visiting the Exchange Control Panel (ECP) to see all the new administrative control we have been given with SP1, without having to work on a system with the EMC Management Tools installed. You may recall our first visit to the Exchange Mangement Console in Part 8 of this series.

To get to the Exchange Control Panel, log into your OWA site as an administrator. From here, you will see the options button in the upper right-hand corner of OWA, this contains the link to the ECP.

From within the Administrative Control Panel we can perform the following (new w/SP1) administrative tasks:

  • Manage default access for mobile devices
  • Configure email alerts when a mobile device is quarantined
  • Create personalized recognition or quarantined messages
  • List quarantined mobile devices
  • Create and manage device access rules
  • Allow/Block specific devices
  • Initiate password recovery or remote wipe of a user’s mobile device

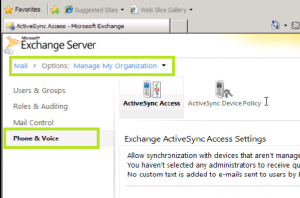
To manage the default access for mobiles, go OWA as administrator, then go to options -> View all options -> Manage My Organization -> Phone and Voice:

ECP Mobile
Click Image to Enlarge

Here, when a device that isn’t managed by a rule or personal exemption connects to Exchange we can allow access, block, or quarantine (on a case by case basis) mobile devices. If we choose, we can send out notification warnings that will go out to administrators.

Under ActiveSync Device Policies, we have a duplicate of what is in the EMC, in that we have a default policy, and the ability to look at, and change, policy settings (Device Security, Sync Settings, Device Settings).

We can create additional activesync policies here as well. Polices created here will be replicated in the EMC. There are some options/tabs that exist only in the EMC however; Device Applications Tab and the “Other” tab: discrete management of Applications on Mobile Devices.

So this is a short post but I think is worthwhile looking at the new enhancements for the Exchange Control Panel in SP1.


A good majority of the content provided in my Blog’s Exchange series is derived from J. Peter Bruzzese’ excellent Train Signals Exchange Server 2010 Video Disk Series, as well as my own Exchange 2010 lab. Trainsignal.com is an invaluable source for accurate, easy to understand, IT information and training. http://www.trainsignal.com
Exchange 2010 – Part 16 – Concepts and Management of Outlook Web App and ActiveSync

Concepts and Management of Outlook Web App and ActiveSync

In this post, first, we will explain virtual directories and how they are related to the CAS services.

Next we will help you understand Outlook Web App (OWA) and ActiveSync features.

Last, we will use a Scenario to help guide us in the creation and application of OWA and ActiveSync policies.

Scenario: OWA and ActiveSync Management

First, we will help our IT team gain a greater understanding of OWA and ActiveSync.

Next, we will perform the following OWA management tasks:

  • Adjust the authentication for the virtual directory to allow for Integrated Windows authentication. This allows for single sign-on for internal clients.
  • Disable WebReady Document Viewing for the virtual directory.
  • Create an OWA policy and apply it to a researcher user “Alex Heyne” that will ensure he only uses OWA Lite.

Finally, we will do the following ActiveSync management tasks:

  • Block “Unknown Servers” from the virtual directory.
  • Create an ActiveSync policy and apply to all users in the Chicago OU.

Virtual Directories

Web applications are represented by virtual directories that point off toward physical folders.

  • For example, Exchange Outlook Web App has an OWA virtual directory that points off to a literal folder on your system.

You access the virtual directory through its virtual directory name, not its physical folder name (although the two may be the same.)

You can see virtual directories in IIS and also quickly find the physical location on your system through the Properties of the virtual directory.

Although you have default virtual directories created for you when you install the CAS role, you can create additional virtual directories if you like.

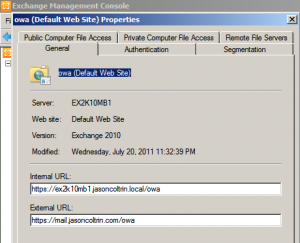
In the EMC, go to Server Configuration -> Client Access. Here you will find owa (Default Web Site). Looking at the properties of OWA, we can see both the internal and external URL’s, as well as a number of tabs used to configure OWA.

Exchange Management Console OWA properties
Click Image to Enlarge

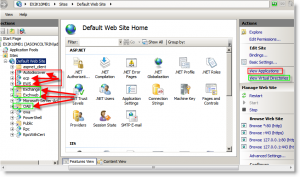
Each of the options in the tabs is part of IIS on the client access role. For the most part, if you want to see the location of the virtual directories and their physical location on the server, we would need to open ISS:

IIS Virtual and Application directories
Click Image to Enlarge

Here, take note that some of the sites are considered Virtual Applications (highlighted in red), as opposed to Virtual Directories (highlighted in green). Sometimes you’ll need to use IIS to configure things like SSL.

But for now, lets look more into OWA in the EMC.

Virtual Directory Settings vs. Policy Settings

Virtual directory settings are made through the Server Configuration node

  • Some virtual directory settings are only found under the Server node, whereas others may be configured in a policy as well.
Policies are created under the Organization Configuration node
  • Policies override virtual directory settings
  • There are default OWA and ActiveSync policies create
  • Only one policy (one for OWA and one for ActiveSync) can be applied to a mailbox at a time and if no policy is applied, the virtual directory settings apply.
Understanding OWA Features:
Virtual Directory Property Tabs:
  • General
  • Authentication
  • Segmentation
  • Public and Private Computer File Access – WebReady Document Viewing
  • Remote File Servers
Policy Setting Tabs:
  • General
  • Segmentation
  • Public and Private Computer File Access – WebReady Document Viewing
Note: Public and Private Computer File Access provides two tabs but you cannot have different settings on each one.
In the EMC -> Server Configuration -> Client Access -> OWA Settings for this virtual directory.
General Tab: shows internal url and external url (informational) -config is actually in DNS
Authentication Tab: Use forms-based authentication. Logon format – Domainusername is secure but not completely secure without SSL.
Use one or more standard authentication methods:
-Integrated Windows Authentication. The client computer has to be a member of the same domain or in a trusted domain.
-Digest authentication for windows domain servers (users have an account in AD)
-Basic authentication (password is sent in clear text). Can be used in a secure way if you use SSL.
Segmentation Tab: you can determine if you wan to enable or disable certain features.
For example “Premium Client” is the full version of Outlook Web App. You can choose to use a “Lite version” of OWA. You can force the lite version of OWA for users of Firefox or Safari. You can disable things like Instant Messaging and Text Messaging.
Public Computer File Access tab:
-Direct File Access – determines how files will be allowed or denied access. If you connect on a “Public” computer, you can enable or disable the ability for users to open file attachments. Direct File Access allows you to allow or block or Force Save of even unknown files.
-In the Private File Access tab: same exact settings as above.
WebReady Document Viewing: allows OWA documents to be converted to HTML and shown in the browsers. You can force docs to be changed to HTML before being opened in a supported application.
You may not want a certain document to be shown in the browser. This provides an opportunity for users to view the document at least even if they don’t have a supporting application.
Remote File Servers Tab: you might want to allow or block file servers here. You can enter the domain suffixes that should be treated as internal.
You have an opportunity to use Policies to override the settings placed on the virtual directory settings.
Under Organization Configuration -> Client Access role.
Provide a new policy name. Enable/disable features -> New. Now after creating the policy, go back and open up the policy. You will have more features available now that the policy has been created. It’s important to consider these items again. If you do not enable direct file access, users will not be able to download attachment files.
Once the policy has been created, you need to apply the policy. Take for example, you wish to apply a new policy to an individual user. Go into Recipient Configuration, pick the mailbox, go to Mailbox Features tab -> Select OWA ->Properties. Now you can choose an OWA mailbox policy to take precedence over the virtual directory settings.
Outlook ActiveSync Features:
Virtual Directory Property Tabs:
  • General
  • Authentication
  • Remote File Servers
Policy Setting Tabs:
  • General (Allow non-provision-able devices -this allows mobile phones to sync even if they do not support policy settings)
  • Password
  • Sync Settings
  • Device
  • Device Applications
  • Other
Note: Some features require Exchange Enterprise Client Access Licenses for mailboxes that have policy setting restrictions
Go to the EMC ->Server configuration -> Client Access -> Exchange Activesync tab properties.
3 tabs:
General tab – internal and external urls
Authentication tab – Basic authentication/certificates
Remote File Servers – same configuration of virtual directories
EMC -> Organization Configuration -> Client Access -> Exchange ActiveSync Mailbox Policies
-allow non-provision-able devices
Password tab -> many options here for passwords (length, expiration, require encryption, etc.)
Sync Settings -> Include past calendar items, Include past email items, Allow Direct Push when roaming (you can force it so that roaming users will not get Direct Push). Allow attachments.. etc.
Device tab -> Allow removable storage, allow camera, allow wifi, allow infared, allow bluetooth etc.
Device Appliations tab -> Allow browser, allow unsigned applications (Need enterprise CAL)
Other tab -> (Need Enterprise CAL)
To block unknown servers from the virtual directory (by default is allow), go to the EMC -> Server Configuration -> Client Access -> Exchange ActiveSync Tab -> Virtual Directory Properties. Go to the Remote file servers tab -> Unknown servers by default is set to allow. OWA has the ability to access file shares and SharePoint libraries. If there are no dots in a URL a user clicks, it is considered internal. If there are one or more dots in the URL, then it will only be considered internal if the domain suffix has been added to the configuration.
The following Exchange Management Console Shell commandlet will apply a custom activesync mailbox policy to the OU Chicago:
Get-Mailbox -OrganizationalUnit Chicago | Set-CASMailbox ActiveSyncMailboxPolicy “ASChicago”
So in this post, we reviewed:
  • The feature settings for Outlook Web App and ActiveSync
  • Both virtual directory settings (found under the Server Configuration node) and policy settings (found under the Organization Configuration note)
  • Made virtual directory adjustments and created policies and then applied those to users within our organization using a powershell commandlet.


A good majority of the content provided in my Blog’s Exchange series is derived from J. Peter Bruzzese’ excellent Train Signals Exchange Server 2010 Video Disk Series, as well as my own Exchange 2010 lab. Trainsignal.com is an invaluable source for accurate, easy to understand, IT information and training. http://www.trainsignal.com


Exchange 2010 – Part 15 – Overview of the Exchange CAS Server Role

The Exchange 2010 CAS Server Role

In this post, we will review the purpose of the Client Access Server (CAS) Role in Exchange 2010.

We will discuss the following CAS Role aspects:

  • Outlook Web App
  • Exchange Active Sync
  • Outlook Anywhere
  • POP3 and IMAP
  • The Availability Service
  • The Autodiscover Service

Take for example the scenario: a Team Meeting to Discuss CAS role

  • The more mobile your users wish to be, the more the CAS Role comes into focus
  • You most likely will have mobile users that want to connect to Exchange using their browser, mobile, smart phone or tablet, through Outlook or some POP/IMAP oriented mail application
  • The role of an administrator is to ensure connectivity from any remote location, and that connectivity is provided without compromising security


The Evolution of CAS

  • Exchange 2000/2003 didn’t have CAS servers, they had “Front End” servers
  •      – With “Front End” servers, internal clients connected with Outlook using MAPI. MAPI is “Messaging Application Program Interface” – it allows you to send email with Outlook. MAPI is the protocol Outlook uses to connect with Exchange. Internal Outlook clients connected directly to Mailbox servers using MAPI over RPC.
  •      – External clients used the “Front End” as more of a proxy that could handle RPC over HTTP (for Outlook Anywhere), HTTPS (for Outlook Web Access, or OWA), and POP/IMAP. Clients connect in, provide credentials, and the Front End server would decide which mailbox to connect.
  • Exchange 2007 introduces the CAS role which is more than a proxy server but offloads a significant amount of the load that the mailbox servers typically handled
  •      – Internal MAPI clients still connect directly to the MB role. In 2007, The Client Access Role started to handle middle tier of a three tier application (the logic tier).
  • Exchange 2010 introduces a new service (MSExchangeRPC) so that the CAS Role is “true” middle tier. It now takes on the brunt of the work that the MailBox Role had to do in the past.

The Exchange 2010 CAS Role is Middle Tier

  • In Exchange 2010, the CAS Role handles both external and internal connections to the Mailbox role; with the exception of Public Folder connections. So whether they’re coming from OWA or Outlook inside the LAN, they will both go through the CAS Role.
  • MAPI and directory connections are handled by thte CAS server now, relieving a ton of load off the Mailbox server role, and ultimately increasing the number of concurrent connections to a Mailbox server (in Exchange 2007, we had 64K and now we have 250K).
  • By offloading the CAS features, now we have a lot more responsibility with CAS, so we need to ensure load balancing and CAS Array concerns as well as security concerns are met.

CAS Role Aspects

  •  Outlook Web App: Allows you to access email through a web browser (including IE, Firefox, Safari and Chrome). This used to be called “Outlook Web Access”. The biggest change that users appreciate is that it works in different browsers on the same level. It is handled by the CAS Role and IIS
  • Exchange ActiveSync: Allows you to synch your data between your mobile device or smart phone and Exchange – There are varying levels of ActiveSync support in devices and one key security element is remote wipe, which is not available for all devices.
  • Outlook Anywhere: Allows you to connect to your Exchange Mailbox externally using Outlook (RPC over HTTP) without going through a VPN connection. Its great for Outlook at home with the “In-house” experience.
  • POP/IMAP support – Mail clients other than Outlook (e.g. Mozilla Thunderbird/Live Mail) that connect with POP or IMAP are supported through the CAS role.
  • Availability Service: Shows free/busy data to Outlook 2007/2010 users.
  • Autodiscover Service: Helps Outlook clients and some mobile phones to automatically receive profile settings and locate Exchange services.

Looking at the Exchange Management Console:

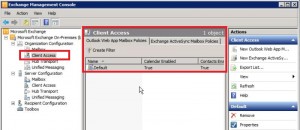
Under Organization Configuration, you can make changes to the Client Access Role:

ClientAccessRole

At this point you have two options, modify the default policy of Outlook Web App Policies or the Exchange ActiveSync Mailbox Policies.

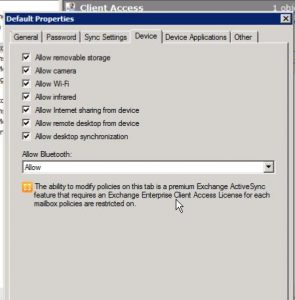
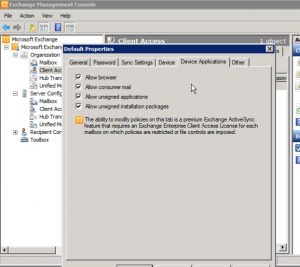
As an administrator you can control functionality of the user experience and even the devices connecting to the CAS.

Is modifying the following options a good or bad April Fools joke to play on your User’s smart phones?

Click Image to Enlarge


ActiveSynchOptions2
Click Image to Enlarge

Maybe not such a good idea to mess with these…

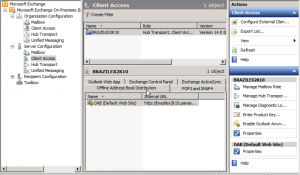
Client Access under the Server Configuration Node in the EMC, provides us with much more configuration options.

ServerConfigCAS

Some of the different tabs located here are:

  • Outlook Web App – Config changes to owa Default Web Site
  • Exchange Control Panel – connected with IIS ecp default web site
  • Exchange ActiveSync – Configure IIS/ActiveSync default website
  • POP3/IMAP4 – configure these mail protocols
  • Offline Address Book Distribution – If you recall we talked about the OAB now being distributed through web services
  • Outlook Anywhere – in a future post we will hit the “Enable Outlook Anywhere…” feature and go through it’s configuration.

So in review we’ve explained the purpose of the Client Access Server roles, discussed the different CAS features, and toured the EMC locations for working with the Client Access Service.


A good majority of the content provided in my Blog’s Exchange series is derived from J. Peter Bruzzese’ excellent Train Signals Exchange Server 2010 Video Disk Series, as well as my own Exchange 2010 lab. Trainsignal.com is an invaluable source for accurate, easy to understand, IT information and training. http://www.trainsignal.com
Exchange 2010: Exchange Management Console (EMC) – Part 8

A quick overview of the Exchange Management Console, or EMC; a very capable management console accessed via the OWA web interface.

We can access the EMC through Outlook Web App. On the Exchange Mailbox server itself, you can get to OWA through the address https://localhost/owa

Note: I encountered an issue here. When first logging into OWA I received the following error message: “Your mailbox appears to be unavailable. Try to access it again in 10 seconds. If you see this error again, contact your helpdesk.”

My first instinct when I receive a message like this is to check services. Yes, as I suspected, upon viewing my primary Exchange server services, the Microsoft Exchange Server Information Store Service was not started. I started the service manually, logged into OWA again, and found I could now completely log in and see my OWA inbox.

Once inside the administrator’s mailbox, you can manage the organization by clicking on the Options drop-down in the upper right-hand corner, and then on “See all options…”

ManageOptions
Now that you’ve clicked into all of the options, you will want to change the Mail > Options: “Manage Myself” drop-down to “My Organization”. You are now in the Exchange Management Console.EMC

Once inside the EMC you have the following Options:

  1. Users and Groups – contains Mailboxes, Distribution Groups, and External Contacts
  2. Roles and Auditing – contains Administrator Roles, User Roles, and Auditing. There are some nice Auditing controls available here including * Run a non-owner mailbox access report… * Run a litigation hold report… * Run an administrator role group report… * Export Mailbox Audit Logs… * Export the Administrator Audit Log…
  3. Mail Control – contains Rules, Journaling, and Delivery Reports
  4. Phone and Voice – contains ActiveSync Access (Quarantined Devices and Device Access Rules); and ActiveSync Device Policy
Take note that Multi Mailbox Search (which is under mail control in RTM). RVAC, even the admin is not able to see the Multi Mailbox Search; you have the add the administrator into the Discovery Management Role Group. Once added to that group, you will see MultiMailbox search in the Administrators EMC.


A good majority of the content provided in my Blog’s Exchange series is derived from J. Peter Bruzzese’ excellent Train Signals Exchange Server 2010 Video Disk Series, as well as my own Exchange 2010 lab. Trainsignal.com is an invaluable source for accurate, easy to understand, IT information and training. http://www.trainsignal.com
ActiveSynch troubleshooting on Exchange/SBS 2003

Do you have Exchange running in your environment but are having trouble connecting iPhones and Android phones? ActiveSync is much more preferable to POP or IMAP, so hunker down and fix ActiveSync on your server to get email, calendar, and contacts synched with your smartphones. Below are two of my favorite links for troubleshooting ActiveSync on Exchange and Small Business Server 2003. I was able to resolve issues on a few servers who’s certificates had expired by using the following resources:

Alan Hardisty’s ActiveSync Configuration Guide is a great starting point:

http://alanhardisty.wordpress.com/2010/02/28/exchange-2003-and-activesync-configuration-and-troubleshooting/

Secondly, the following website can test Exchange connectivity in a number of different ways:

https://testexchangeconnectivity.com/

The site above is able to test exchange connectivity with the following tests:

Microsoft Exchange ActiveSync Connectivity Tests
Microsoft Exchange Web Services Connectivity Tests
Microsoft Office Outlook Connectivity Tests
Internet E-Mail Tests