Exchange 2010 – Understanding and Managing Databases – Part 11

In this post, we will discuss the following topics:

  • The concept of the Exchange Database including the Extensible Storage Engine or ESE
  • The way transaction logs and database files work together – storage architecture
  • How to create and mount databases
  • Some best practice concepts and implementing them with a newly created mailbox database
It’s important for you to visually realize that every email that goes to your Mailbox server must go into a database, and this creates challenges because of the huge variety of messages Exchange handles. From the tiny on-line emails to the monster MB emails with video attachments.
The I/O profile of a Mailbox server is not predictable (RANDOM). Read/write that occurs between memory and disk is substantial. At times there may be waves of messages, other times may be idle.
Exchange uses the Extensible Storage Engine (ESE) database engine (MS has mentioned moving this to SQL but that has been determined to be too much of an investment, so ESE remains in Exchange 2010). The ESE engine has received some enhancements to improve I/O by 70% (meaning, Exchange 2010 can read/write emails to disk 70% faster than 2007 using the same engine). These improvements included increasing the page size from 8kb to 32kb, storing header data in a single DB table, and compressing attachments. In turn, because of these optimizations, you actually have more options for using lower-end disks for your Exchange server.
Disk Types for Exchange:
  • Better IOPS performance mean flexibility in storage options:
  •      High-end storage (SANs or RAID arrays)
  •      Exchange 2010 uses reduced I/O and this allows for Lower cost SATA disks or Just a Bunch of Disks (JBOD) storage
  • One important point to keep in mind is that Microsoft removes Single Instance Storage with Exchange 2010
  •      The idea behind SIS is when a message is sent to a bunch of people (perhaps with a large file included) the original message is stored once.
  •      SIS is replaced by database compression technology and new tools to help administrators to purge mailboxes and reduce the overall size of the database
To visualize email flow consider the following:
The email comes in, the CPU/Memory sends it to the hard disk but not immediately into the database, because it might be busy. First it goes into transaction logs, which ensure the data is written into the database. Transaction logs don’t do anything, they are 1 MB in size and the amount of files/logs grows. But they are written into the “one monolithic database” file. The exchange store uses write-ahead Transaction Logs and CheckPoint files to help prevent data loss. These files record all changes that have been committed to the in-memory database. While checkpoint files record which data has been committed. If the DB is corrupted, and the transaction logs are safe, your DB will be up to date. Its recommended to keep TL and DB on separate disks. JRS files are used when the hard drive runs out of space and help to stop the queue DB cleanly. When the store runs out of hard disk space, the transport service will be stopped. At 1 GB it will run out of space and is BAD. Space cannot be reclaimed. *Make extra effort to ensure you do not run out of disk space!*
In the Exchange Management Console -> Mailbox server role -> Database Management tab, we can see the database file path and where the Transaction Logs are located.
In the Mailbox Database folder on the hard drive, in the transaction logs, when the placeholder E00 log is complete, it will be renamed.
When you create a new Mailbox, you can change the DB file locations. (PS command: new – mailboxdatabase Server…)
Exchange 2010 Database Best Practices:
  • Place transaction logs and database files on separate disks (off the system disk and/or the location where Exchange is installed – you can move the location of your DB)
  • Place transaction logs on a mirrored volume
  • Place database files on a RAID 5
  • Use the Exchange 2010 Mailbox Server Role Requirements Calculator to help you determine your storage needs. The latest version can be found here: http://blogs.technet.com/b/exchange/archive/2009/11/09/exchange-2010-mailbox-server-role-requirements-calculator.aspx
  • Note: Standard Edition supports 5 databases. Enterprise Edition supports 100 databases
For an existing DB, you can “Move Database Path” at any time and change the default locations for transaction logs and database file location.
EMC -> Organization Configuration -> Mailbox -> Database Management Tab -> Right-click on Database -> Properties ->
Maintenance Tab ->
Database Management Properties
  • Mount and Dismount the Database
  • Move Database and Log Paths
  • Background Database Maintenance (24×7 ESE scanning)
  • Circular Logging
  • Storage Limits
  • Deletion Settings
We will touch upon Journal Recipient later.
Here the Exchange Mailbox Database Maintenance Schedule can be adjusted or Customized.
Database maintenance performs the following maintenance tasks:
  1. Purging mailbox DB and PF DB indexes
  2. Maintaining Tombstones
  3. Cleans up deleted Items Dumpster
  4. Removes public folders that have exceeded expiration time
  5. Removes Deleted Public Folders which have exceeded the tombstone lifetime
  6. Cleans up conflicting Public Folder messages
  7. Updates server versions
  8. Checks schedule plus Free/Busy and offline folders
  9. Cleans up deleted mailboxes
  10. Checks message tables for orphaned messages
  11. Cleans up reliable event tables
By default, from 1am to 5 am, these tasks above are completed.
An online defragmentation process will be run to free up pages in the database at the end of every maintenance schedule. This is done to reduce the amount of I/O.
Legacy versions of Exchange would do a DB check-sum and look at every page to see if there was corruption at end of maintenance schedule.
However, ESE Scanning does the DB check sum process for corruption on the fly, outside of the maintenance schedule. Un-checking the option for ESE 24/7, the defrag will still take place at the end of the scheduled maintenance.
– Enable Circular Logging – saves disk space – allows exchange to overwrite transaction logs. If your database is corrupt, the transaction logs will restore the DB from the logs. It’s not recommended to use this option – but good if you want to save disk space (perhaps you can turn this on for specific databases)
Limits Tab:
Storage limits – mailbox and storage limits
By default, every day at 1am if the user hits these limits, they will be sent a notification that their mailbox has gotten so large that they will either be prohibited to send or send and receive.
Issue Warning at (kb):
Prohibit send at (kb):
Prohibit send and receive at (kb):
Deletion settings defaults:
Keep deleted items for (days): – deleted items do not count against user’s total mailbox size
Keep deleted mailboxes for (days)
Don’t permanently delete items until the database has been backed up (recommended to enable this option)
In summary, there is a lot to consider when managing an Exchange database. We talked about the concept of an Exchange Database, Transaction logs and database files, mounting/dismounting databases, best practices for configuring DB’s and logs, and finally, maintaining our databases with best practices.
A good majority of the content provided in my Blog’s Exchange series is derived from J. Peter Bruzzese’ excellent Train Signals Exchange Server 2010 Video Disk Series, as well as my own Exchange 2010 lab. Trainsignal.com is an invaluable source for accurate, easy to understand, IT information and training. http://www.trainsignal.com
Exchange 2010 – Mailbox Server Role Overview – Part 10

In this post we will review the overall purpose of the Mailbox role.

We will also review the management options that relate to the Mailbox role including:

  • Database Management
  • Messaging Records Management (MRM)
  • Address Lists
  • The Offline Address Book
  • Public Folders
Mailbox Server Role functions:
A server that runs the Mailbox Server role (“Mailbox server”) performs the following:
  • Hosts mailbox databases (which hold recipient mailboxes)
  • Hosts public folder databases
  • Handles email address policies
  • Generates Offline Address Books (OABs)
  • Generates Address Lists
  • Enables content indexing
  • Allows for messaging records management (MRM)
  • Allows for retention policies
As you can tell that the role is an important one and that High Availability and Site Resilience is a key concern and Exchange 2010 has been designed specifically to provide those features.
The mailbox server has quite a bit of connectivity to all the other server roles (except for the Edge Transport Server).
____________________________________
Configuration Aspects of the Mailbox Role
Organization Configuration
  • Database Management and Database Availabilty Groups
  • Messaging Records Management (MRM)
  •      Managed Default Folders
  •      Managed Custom Folders
  •      Managed Folder Mailbox Policies
  • Address Lists
  • Offline Address book
  • Sharing Policies
Server Configuration
  • Most of the configuration work is being done on the Organization Configuration side. In Exchange 2007, Database Management was under Server Config – related to storage groups. Very limited settings including MRM schedule and a view of Database Copies (if any exist).
MRM – policies to adjust for example, how long items stay in the deleted items folders in (all) user’s mailboxes. Sharing policies control how to share calendars with persons outside the organization.
Click image to enlarge

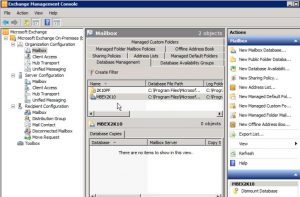
To manage the mailbox server, open the EMC, go to Organization Configuration -> Mailbox. You’ll notice that I have two databases. One is the Mailbox database and the other is the Public Folders database. You can right-click on the Mailbox Database and choose properties, where you will find General, Maintenace, Limits, and Client Settings Tabs.

Database availability groups tab will by default not contain objects as this tab is used for High Availability/Fail-over configuration.

The Managed Default Folders tab – lists out typical folders in a user’s mailbox. You can also create additional default folders. You may want to create two different Deleted Items folders.

Managed Custom Folders – place a folder in User’s Outlook – for example, Archive, you can create it, and place it in this tab.

Managed Folder Mailbox Policies – no policies by default, create a policy and then apply – we will go over this later.

Offline Address Book – default OAB

Address Lists – pre-configured Address Lists as well as the Default Global Address List. You may want to create lists for departments, sites, organizations.

Sharing Policies – Default Sharing Policy

_________________________

Server Configuration

Mailbox Role configuration

ServerConfigurationMailbox
Click Image to Enlarge

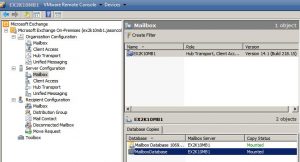
In the top pane, right click on the Mailbox and click on properties. Here you will find a General tab, a Systems Settings tab, and a Customer Feedback Options. For some unknown reason, Scheduled Managed Folder Assistant tab is not available on my installation as it is in others. This may be due to permissions.

By Right-clicking on the database copy, you can get the General Status of the Mailbox Database: the Content Index State, the Status (Mounted), the Copy queue length and Replay Queue Length. Under the Status tab you will find: Seeding, Messages, Latest available log time, Last inspected log time, Last copied log time, and Last replayed log time. Here you can also View Errors Messages.


A good majority of the content provided in my Blog’s Exchange series is derived from J. Peter Bruzzese’ excellent Train Signals Exchange Server 2010 Video Disk Series, as well as my own Exchange 2010 lab. Trainsignal.com is an invaluable source for accurate, easy to understand, IT information and training. http://www.trainsignal.com
Transitioning Exchange 2007 to Exchange 2010 – Part 9

This post has to do with transitioning from Exchange 2007 to 2010. Essentially you will be installing Exchange 2010 on the 2007 Exchange server, setup some co-existence if necessary, transfer the mailboxes, and then uninstall Exchange 2007.

* Upgrades – There is no “In-Place” upgrade from 2007 to 2010

– You can either deploy fresh, migrate, or transition.

*Migration

From Exchange 5.5 or 2000 to Exchange 2010 – when moving over to Exchange 2010 you will not be able to move over mailboxes or use transitioning coexistence. You might have to upgrade from 5.5 or 2000 to 2003, and then transition. Quest is a good transitioning tool from older versions to 2010. Lotus Domino has a transition path to 2007.

*Transition: involves introducing an Exchange Server(s) into the environment and moving over mailboxes and public folders

– Co-Existence: the state of your Exchange environment when different versions of Exchange are running together side-by-side within the same Exchange Organization

You can run exchange 2003, 2007, and 2010 all co-existing together. Slowly move the mailboxes and public folders over.

When migrating from a single 2007 server:

1. Ensure Exchange 2007 servers are running SP2

2. Deploy Exchange 2010 Servers in this order: Client Access Server, then Hub Transport Server, Unified Messaging, and then Mailbox server

3. Configure legacy DNS host name records* and implement new certificates for CAS

*Legacy DNS host name records: only necessary if you cannot transition quickly and need to provide remote OWA/Mobile usage.

4. Move over mailboxes and public folder data to Exchange 2010.

5. Tie up loose ends and uninstall Exchange 2007

Legacy Host Names and Certificates for CAS

  • If you plan for a period of co-existence with 2007, you will need to establish a legacy host name
  • The goal is to move your primary namespace, mail.companyname.com and autodiscover.companyname.com over to Exchange 2010
  • So for example, your mail.companyname.com domain continues but a new legacy.companyname.com is put in place for 2003/2007 users of OWA, ActiveSync, etc…
  • You will need to obtain a new certificate for Exchange and you should consider a Subject Alternative Name (SAN) certificate although wildcard certificates are also supported

Some DNS Record Types Review:

  • A Record: an address record that maps a host name to an IP address
  • NS Record: a name server record that maps a domain name to a list of DNS servers that are authoritative for that domain
  • MX Record: mail exchange record – maps a domain name to a list of mail exchange servers for that record
  • CNAME Record: gives the ability to provide an alias of one name to another
  • SRV Record: links a particular service to a specific server
  • SOA: Specifies the DNS server providing authoritative service for a particular domain

Users trying to log into an Exchange 2010 server, but have not had their mailbox transitioned yet, will be re-directed to the previous server if the legacy A record is listed in DNS.

Deployment Assistant: (upgrade means transistion) -this tool can be used from the website or downloaded.

The tool can be found here:

http://technet.microsoft.com/en-us/exdeploy2010/default.aspx#Index

Disjointed namespace: the FQDN of a server does not match the domain of which it is a member.

Transitioning Paths Vary

* Depending on your organization you may have the following variables in play for your transition to mold itself around:

– Exchange 2003 to 2010 (or mixed 2003/2007 to 2010)

– Public folders need to be transitioned

– Co-existence is necessary (requires legacy host name)

* Our example transition includes the following concerns:

-Public folders do, in fact, exist and need to be transitioned

-Co-existence is not necessary (we will perform the move in a minimal amount of time over a weekend of inactivity within the organization)

In a transition from Exchange 2007 to 2010 here are the following necessary items:

  1. Exchange 2007 is already running SP2
  2. The Server is 2008 and the forest functional level is already higher than the required 2003 forest functional level mode
  3. Exchange 2010 is already installed with CAS/HT/MB roles
Items to Complete:
  1. Move Offline Address Book (OAB) generation to Exchange 2010
  2. Move Exchange 2007 Mailboxes to 2010
  3. Move Public Folder data to Exchange 2010
  4. Ensure funtionality, test connectivity options, remove Exchange 2007

To check the domain functional level

  1. Go to Active Directory Computers and Users
  2. Right-click on the domain name, click “Raise Domain Functional Level”
  3. Look at Current Domain Functional Level


Moving the OAB generation from 2007 over to Exchange 2010

  1. Open Exchange Management Console
  2. Expand Organization Configuration node
  3. Select the Mailbox node
  4. Select Offline Address Book tab
  5. Select the Default Offline Address book, ->Actions -> Properties -> Distribution tab
  6. Make sure Enable Web-based distribution is On (checked)
  7. Enable public folder distribution (On/checked) -> ok

Warning (ok)

In the actions pane click Move

Click Browse -> Select the new Exchange 2010 server -> Move

Completed (Warning) -> Finish

Generation server should now be your new 2010 server.

Online Mailbox Moves:

  • Previous transitions called for mailboxes to be offline for a period of time while they moved to the new server
  • Exchange 2010 eliminates this issue by allowing the mailbox to be moved while still online. Note: If transitioning from Exchange 2003 to 2010 you will still need to do an offline mailbox move
  • To the user, short of a restart of Outlook, they will not know a difference or notice any loss of service
  • Need to use the wizard or new powershell cmdlet New-MoveRequest

You need to start on the new Exchange 2010 server to move mailboxes from 2007 to 2010

Start Exchange Management Console

Go to Recipient Configuration node -> Mailbox

Add a column (Database) and place next to the display name

Select multiple users -> Actions -> New Local Move Request…

Target Mailbox Database (Browse) -> Select new 2010 server DB -> ok -> Next

Move options:

If corrupted messages are found:

  • Skip the mailbox (recommended)
  • Skip the corrupted messages
Next -> New -> Finish
Move Request -> If you look at the status it should say completed
Using the exchange management shell: (more flexibility and control)
get-help new-moverequest -examples
(3 examples)
System will perform check of mailbox for readiness
>New MoveRequest Identity ‘[email protected]’ -TargetDatabase “MBEX2K10”
To test
>get move-request
-shows which move requests have been completed
For example to move just mailboxes from one organizational unit into exchange 2010

> get user organizationalunit LegalDept | New MoveRequest -TargetDatabase “MBEX2K10”

Replicating Public Folder Structure:

Once we have replicas we can remove the original copy

Go to Toolbox – Public Folder Management Console – should connect back to your 2007 exchange server.

We first need an Exchange 2010 Public Folder database:
Organization Configuration under Mailbox

Database Management Tab -> Actions -> New Public Folder Database

Give it a name (2K10PF) -> Next -> New -> Finish.

Go back to PF management console -> Right click on folder and choose properties -> Replication tab -> Add -> Select new 2K10PF database -> OK

Change “Use public folder database replication schedule” to Run Every Hour.

Now we’ve asked the public folders to replicate over. One way to check if it’s working ok is right click on the root, and choose connect to server, select 2010 server, and find the replicated folders (update Heirarchy)

Now you can remove 2007 replicas. Make sure you have complete all public folders.

2007 Exchange Pre-Removal Tasks 

  • If you are confident that your Exchange 2010 server(s) are ready to work alone – don’t uninstall the Exchange 2007 server yet…
  • In the EMC Toolbox is the Exchange Best Practices Analyzer – use it!
  • Use the Exchange Remote Connectivity Analyzer Tool is another option
  • When your testing is complete and you feel comfortable — Uninstall Exchange 2007 from the Programs and Features item in the control panel

Decommissioning is simply removing the Programs and Features. It will go through the process of uninstalling the various roles (MB, CAS, etc)

We have ended the period of coexistence, and have transitioned over to 2010.


A good majority of the content provided in my Blog’s Exchange series is derived from J. Peter Bruzzese’ excellent Train Signals Exchange Server 2010 Video Disk Series, as well as my own Exchange 2010 lab. Trainsignal.com is an invaluable source for accurate, easy to understand, IT information and training. http://www.trainsignal.com