How to format a large external usb hard drive for use between both an OS X Mac and a Windows 10 PC

All versions of Windows since Windows Vista should be able to access a GUID drive. Because OS X is able to partition a GUID partition, we want to partition our large external hard drives with this compatible partition table. So, any modern computer since 2006 should be compatible. GUID doesn’t suffer from the restriction of a maximum partition size of 2TB, so if we have a hard drive larger than 2TB, we won’t be required to build multiple partitions with MBR.

Here’s a good quote for other important features regarding GUID (GPT stands for GUID Partition Table).

“On an MBR disk, the partitioning and boot data is stored in one place. If this data is overwritten or corrupted, you’re in trouble. In contrast, GPT stores multiple copies of this data across the disk, so it’s much more robust and can recover if the data is corrupted. GPT also stores cyclic redundancy check (CRC) values to check that its data is intact — if the data is corrupted, GPT can notice the problem and attempt to recover the damaged data from another location on the disk. MBR had no way of knowing if its data was corrupted — you’d only see there was a problem when the boot process failed or your drive’s partitions vanished.”

exFAT was released in 2006 as well, but Microsoft added backwards-compatibility to previous Windows versions from before Vista. The main benefit to it is that it doesn’t have the file size restrictions of FAT32, so individual files with exFAT can be larger than 4GB each. It probably isn’t super important for smaller files, but it could be a necessity for people working on larger files like videos or disk images.

Below is a step-by-step procedure for formatting a large External USB drive which can be used by both a Mac and a PC. This setup will utilize the newest, most fault-tolerant partition tables, and allows for the largest volume and file size capabilities. In my case I am formatting an 8TB Seagate Backup Plus+ USB 3.0 external HDD hard drive.

First, plug a new USB drive into a Mac:

  1. The Mac will automatically prompt if you want to use the drive as a Time Machine backup Disk – click “Don’t Use”
  2. Open Disk Utility
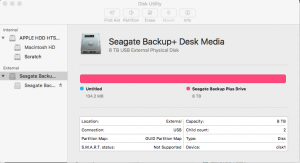
  3. On the left side of Disk Utility, under External, you should see your drive listed.
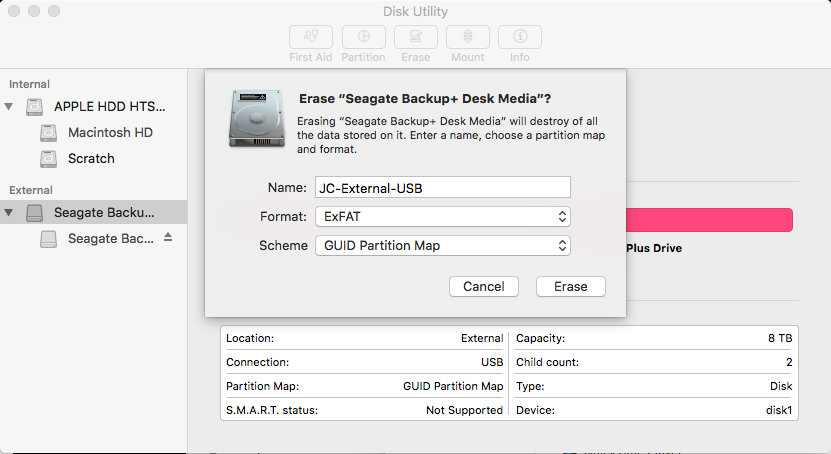
  4. Select the “highest-level” of the drive, not the partitions located underneath. In my case, Seagate Backup+ Desk Media.PC Mac External drive format (1)
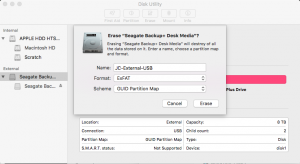
  5. At the top of Disk Utility, click the “Erase” button.PC Mac External drive format (2)
  6. Name your disk, such as “JC-External”.
  7. Under “Format” drop-down menu, select “ExFAT”
  8. Under “Scheme” drop-down menu, select “GUID Partition Map”PC Mac External drive format (3)
  9. Click “Erase”
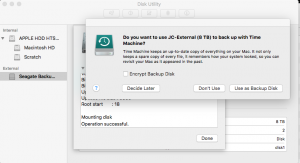
  10. Once the drive has been erased, again, Time Machine will prompt to use as a backup disk – select “Don’t Use”PC Mac External drive format (4)
  11. Click “Done”
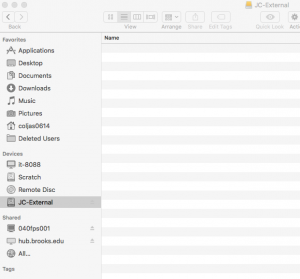
  12. Your drive should now be listed under Devices in the Finder.PC Mac External drive format (5)
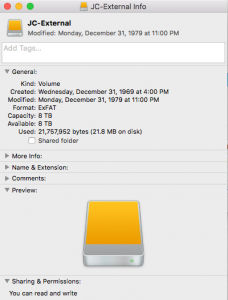
  13. Control-click or right-click on the device in the Finder, and click “Get Info”.  You can see that indeed it created an 8TB ExFAT Volume, but the Sharing and Permissions cannot be modified. Permissions can only be set if the drive is formatted with  “OS X Extended”. Also, notice that the Created/Modified dates may not be accurate, however, files and folders contained in the drive will display accurate modified dates/times.PC Mac External drive format (6)
  14. One thing to note, is after initially formatting the drive on a Mac, and then attaching the external drive to a Windows 10 PC, the drive may not immediately display with a drive letter by default in the Windows File Explorer. Go into Windows 10 Disk Management and find the drive listed in the discovered drives, but you may find that a drive letter is not associated with the volume.
  15. To fix this, in Disk Management, right-click on the large/unidentified new data volume and click “Change Drive Letter and Paths…”. Next, click the Add.. button, assign a drive letter (D:) and then OK. You should now find your external drive listed in Windows Explorer and see the files and folders you copied into it while it had been connected to your Mac.

Exchange 2010 – Understanding and Managing Databases – Part 11

In this post, we will discuss the following topics:

  • The concept of the Exchange Database including the Extensible Storage Engine or ESE
  • The way transaction logs and database files work together – storage architecture
  • How to create and mount databases
  • Some best practice concepts and implementing them with a newly created mailbox database
It’s important for you to visually realize that every email that goes to your Mailbox server must go into a database, and this creates challenges because of the huge variety of messages Exchange handles. From the tiny on-line emails to the monster MB emails with video attachments.
The I/O profile of a Mailbox server is not predictable (RANDOM). Read/write that occurs between memory and disk is substantial. At times there may be waves of messages, other times may be idle.
Exchange uses the Extensible Storage Engine (ESE) database engine (MS has mentioned moving this to SQL but that has been determined to be too much of an investment, so ESE remains in Exchange 2010). The ESE engine has received some enhancements to improve I/O by 70% (meaning, Exchange 2010 can read/write emails to disk 70% faster than 2007 using the same engine). These improvements included increasing the page size from 8kb to 32kb, storing header data in a single DB table, and compressing attachments. In turn, because of these optimizations, you actually have more options for using lower-end disks for your Exchange server.
Disk Types for Exchange:
  • Better IOPS performance mean flexibility in storage options:
  •      High-end storage (SANs or RAID arrays)
  •      Exchange 2010 uses reduced I/O and this allows for Lower cost SATA disks or Just a Bunch of Disks (JBOD) storage
  • One important point to keep in mind is that Microsoft removes Single Instance Storage with Exchange 2010
  •      The idea behind SIS is when a message is sent to a bunch of people (perhaps with a large file included) the original message is stored once.
  •      SIS is replaced by database compression technology and new tools to help administrators to purge mailboxes and reduce the overall size of the database
To visualize email flow consider the following:
The email comes in, the CPU/Memory sends it to the hard disk but not immediately into the database, because it might be busy. First it goes into transaction logs, which ensure the data is written into the database. Transaction logs don’t do anything, they are 1 MB in size and the amount of files/logs grows. But they are written into the “one monolithic database” file. The exchange store uses write-ahead Transaction Logs and CheckPoint files to help prevent data loss. These files record all changes that have been committed to the in-memory database. While checkpoint files record which data has been committed. If the DB is corrupted, and the transaction logs are safe, your DB will be up to date. Its recommended to keep TL and DB on separate disks. JRS files are used when the hard drive runs out of space and help to stop the queue DB cleanly. When the store runs out of hard disk space, the transport service will be stopped. At 1 GB it will run out of space and is BAD. Space cannot be reclaimed. *Make extra effort to ensure you do not run out of disk space!*
In the Exchange Management Console -> Mailbox server role -> Database Management tab, we can see the database file path and where the Transaction Logs are located.
In the Mailbox Database folder on the hard drive, in the transaction logs, when the placeholder E00 log is complete, it will be renamed.
When you create a new Mailbox, you can change the DB file locations. (PS command: new – mailboxdatabase Server…)
Exchange 2010 Database Best Practices:
  • Place transaction logs and database files on separate disks (off the system disk and/or the location where Exchange is installed – you can move the location of your DB)
  • Place transaction logs on a mirrored volume
  • Place database files on a RAID 5
  • Use the Exchange 2010 Mailbox Server Role Requirements Calculator to help you determine your storage needs. The latest version can be found here: http://blogs.technet.com/b/exchange/archive/2009/11/09/exchange-2010-mailbox-server-role-requirements-calculator.aspx
  • Note: Standard Edition supports 5 databases. Enterprise Edition supports 100 databases
For an existing DB, you can “Move Database Path” at any time and change the default locations for transaction logs and database file location.
EMC -> Organization Configuration -> Mailbox -> Database Management Tab -> Right-click on Database -> Properties ->
Maintenance Tab ->
Database Management Properties
  • Mount and Dismount the Database
  • Move Database and Log Paths
  • Background Database Maintenance (24×7 ESE scanning)
  • Circular Logging
  • Storage Limits
  • Deletion Settings
We will touch upon Journal Recipient later.
Here the Exchange Mailbox Database Maintenance Schedule can be adjusted or Customized.
Database maintenance performs the following maintenance tasks:
  1. Purging mailbox DB and PF DB indexes
  2. Maintaining Tombstones
  3. Cleans up deleted Items Dumpster
  4. Removes public folders that have exceeded expiration time
  5. Removes Deleted Public Folders which have exceeded the tombstone lifetime
  6. Cleans up conflicting Public Folder messages
  7. Updates server versions
  8. Checks schedule plus Free/Busy and offline folders
  9. Cleans up deleted mailboxes
  10. Checks message tables for orphaned messages
  11. Cleans up reliable event tables
By default, from 1am to 5 am, these tasks above are completed.
An online defragmentation process will be run to free up pages in the database at the end of every maintenance schedule. This is done to reduce the amount of I/O.
Legacy versions of Exchange would do a DB check-sum and look at every page to see if there was corruption at end of maintenance schedule.
However, ESE Scanning does the DB check sum process for corruption on the fly, outside of the maintenance schedule. Un-checking the option for ESE 24/7, the defrag will still take place at the end of the scheduled maintenance.
– Enable Circular Logging – saves disk space – allows exchange to overwrite transaction logs. If your database is corrupt, the transaction logs will restore the DB from the logs. It’s not recommended to use this option – but good if you want to save disk space (perhaps you can turn this on for specific databases)
Limits Tab:
Storage limits – mailbox and storage limits
By default, every day at 1am if the user hits these limits, they will be sent a notification that their mailbox has gotten so large that they will either be prohibited to send or send and receive.
Issue Warning at (kb):
Prohibit send at (kb):
Prohibit send and receive at (kb):
Deletion settings defaults:
Keep deleted items for (days): – deleted items do not count against user’s total mailbox size
Keep deleted mailboxes for (days)
Don’t permanently delete items until the database has been backed up (recommended to enable this option)
In summary, there is a lot to consider when managing an Exchange database. We talked about the concept of an Exchange Database, Transaction logs and database files, mounting/dismounting databases, best practices for configuring DB’s and logs, and finally, maintaining our databases with best practices.
A good majority of the content provided in my Blog’s Exchange series is derived from J. Peter Bruzzese’ excellent Train Signals Exchange Server 2010 Video Disk Series, as well as my own Exchange 2010 lab. Trainsignal.com is an invaluable source for accurate, easy to understand, IT information and training. http://www.trainsignal.com