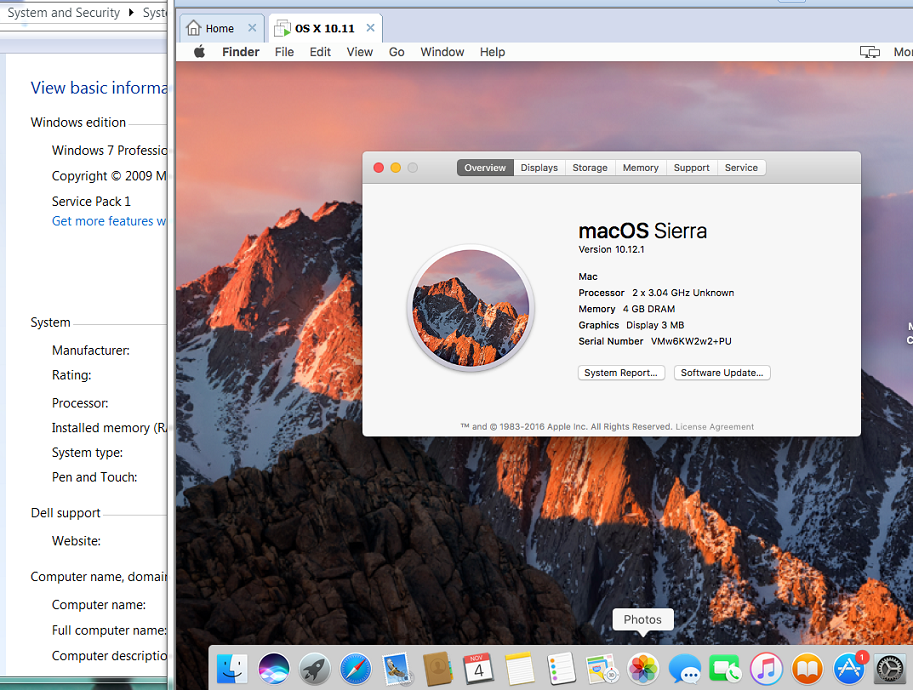
How to run Mac OS X El Capitan on Windows 7 or Windows 10 – How to build a Hackintosh VM Virtual Machine

Here is a guide to show how to build an OS X El Capitan virtual machine that runs on top of Windows 7 or Windows 10. Thanks to this video, (where only the first 3:30 minutes are relevant to this guide,) I wrote a step by step solution to building a hackintosh virtual machine that runs on top of Windows. Once you have OS X El Capitan running on Windows you can easily build a bootable OS X USB drive to further install the latest OS X operating system on a normal Mac. Building a hackintosh may be against the OS X terms of use so I don’t advise selling such a machine/solution and this guide is only for your testing and troubleshooting.

  1. Download VMware Player from official VMware website (30 day free trial):
    https://www.vmware.com/products/player
  2. Download OS X El Capitan: https://goo.gl/vXKKL6
  3. Download latest Unlocker app at http://www.insanelymac.com/forum/files/file/339-unlocker/
  4. Unpack Unlocker and copy to the same directory as your unpacked OS X El Cap.vmdk files.
  5. Run the unlocker file named “Win-Install”
  6. Create a new folder on the desktop and name El Cap Install Folder.
  7. Open VMWare Player -> New VM -> Typical -> Install OS Later -> Mac OS 10.11 -> Install to new El Cap Install folder you created. Store as single file -> Edit VM -> Set more ram and CPU -> Select HDD and remove -> Add new HDD -> SATA -> Use existing HDD -> Browse to El Cap.vmdk you downloaded and unpacked-> Keep existing format > Remove CD/DVD -> Show all USB devices -> finish ->
  8. Open the new Virtual Machine configuration file (OS X 10.11.vmx) inside your your “El Cap Install” folder, and open with notepad.

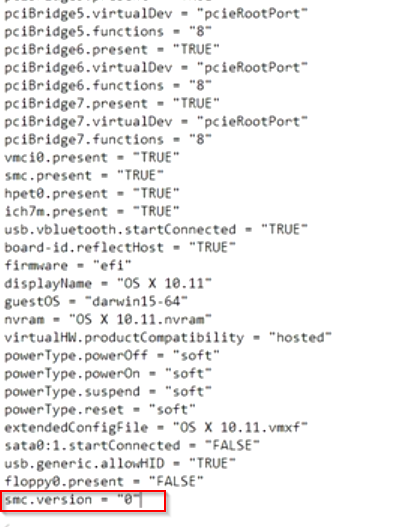
    vmx edit
    vmx edit
  9. At the end of the file add the line:
    smc.version = "0"
  10. Save
  11. Power on the OS X VM!

*Note, if you go on to build a USB bootable os x installation drive, after you insert your USB key drive into the computer, it may not show up on your OS X desktop. To fix this, click on the USB drive icon at the bottom right-hand corner of the vmware player frame.

attach-usb-drive-to-hackintosh-osx-in-vmware-player

Excel slow when entering or putting text into cells old version issue solved

You might run into the problem or issue where it’s really slow when a user enters text into an Excel 2003 2010 2013 .xls or .xlsx cells for certain files. This input delay may be due to and advanced cell fill feature that you don’t really need. You might want to try the following fix:

  1. Open Excel
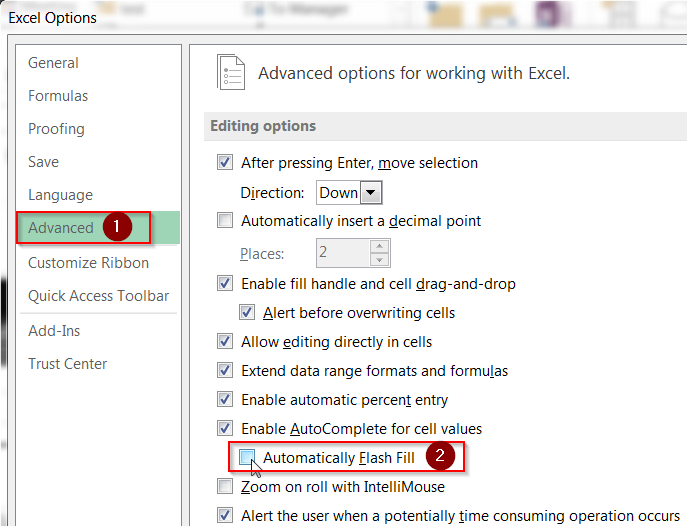
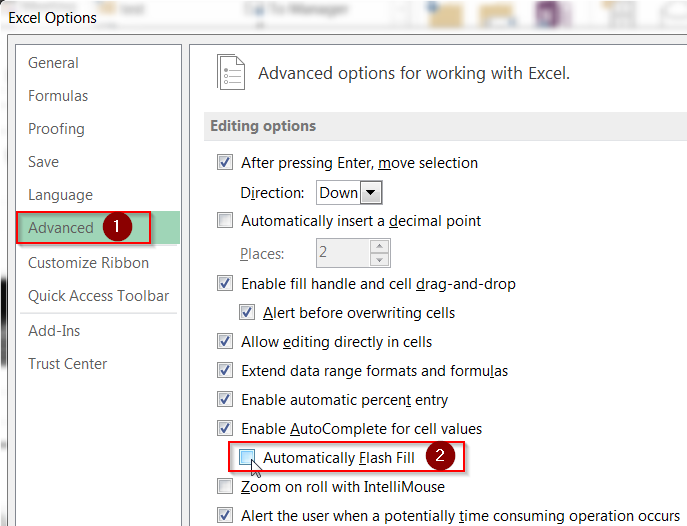
  2. Go to File -> Options -> Advanced
  3. Go the the “Enable AutoComplete for cell values”
  4. Under this setting uncheck “Automatically Flash Fill”
  5. Click OK

fix-slow-excel-input-delay

Hopefully this will resolve the 3 to 4 second delay when trying to type into excel cells and you can stop going crazy haha.

Adobe Acrobat Reader prints page tiny small backwards in the corner solved solution

If when you print a page from Adobe Acrobat or Reader and the page comes out very tiny as an image in the upper right corner / left corner, you may need to adjust your print settings.

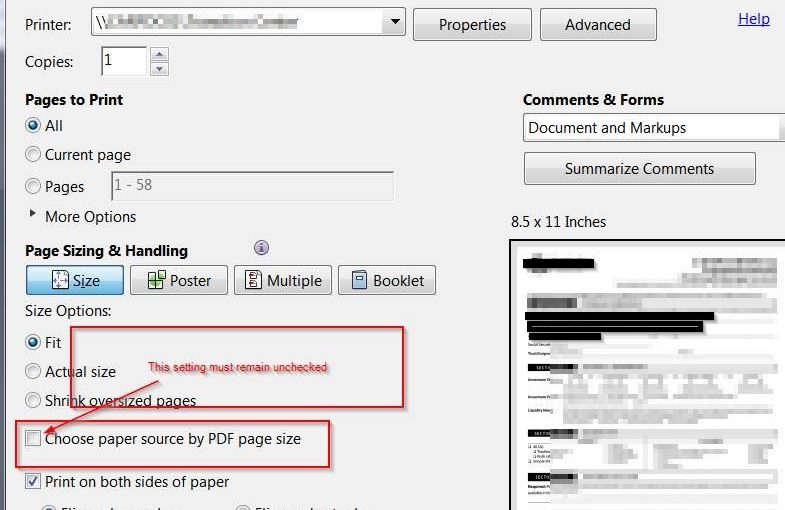
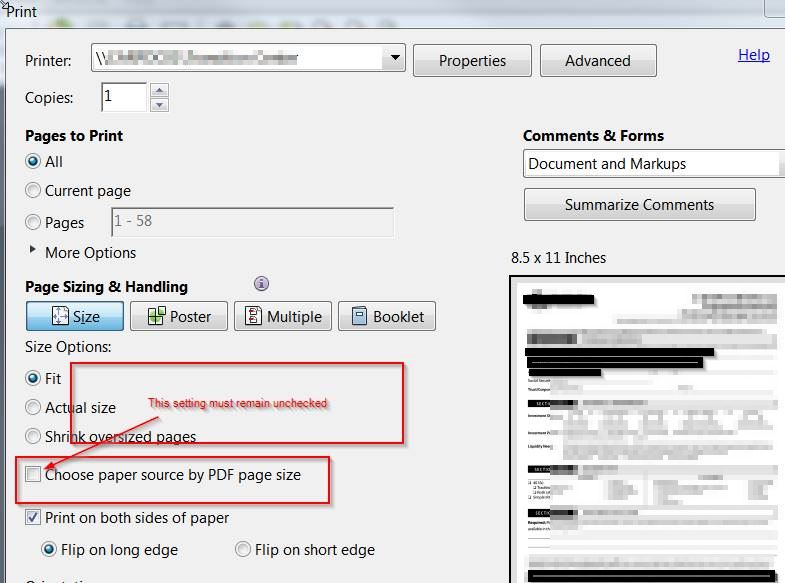
Go to the File menu, the click Print or press CTRL + P on your keyboard. This will bring up your print dialog box. Here, for some (unknown) reason, the checkbox “Choose paper source by PDF page size” may have been checked.

This is likely the reason why the page prints tiny even though you have selected “Actual size” or “Print as an image”.

This took a little bit of trial and error and testing, but unchecking the option “Choose paper source by PDF page size” fixes the very small image of the print job and will again print normally.

How to setup an Amazon AWS VPC, What is a VPC, and Subnets, Part 1 of 3

Amazon Web Services (AWS) provides the capacity to create a Virtual Private Cloud (VPC), which is a virtual network dedicated to your AWS account. In the first part of this three-part series, I will show you how to create a VPC with the corresponding subnets.

Read the rest of the articles Here

https://4sysops.com/archives/aws-vpc-overview-setup-subnets/

Get a list of computers, 32/64 bit architecture, Service Pack level, and IP address in active directory with PowerShell

To get an inventory .csv file list of all computers in AD, run the following command in powershell:

Make sure you import Active Directory modules into PowerShell prior to running the command.

Get-ADComputer -Filter * -Property * | Select-Object Name,OperatingSystem,OperatingSystemServicePack,OperatingSystemVersion,ipv4* | Export-Csv -Path "c:\admin\ComputersList.csv"

If you first receive the following error:

“The term ‘Get-ADComputer’ is not recognized as the name of a cmdlet, function, script file, or operable program. Check the spelling of the name, or if a path was included, verify that the path is correct and try again.”

This error indicates that the Active Directory module has not been imported into PowerShell. First do this by running the command:

import-module activedirectory

This script should produce and export a .csv file list that looks like the following:

Name OperatingSystem OperatingSystemServicePack OperatingSystemVersion IPv4Address
DC01 Windows Server 2008 R2 Standard Service Pack 1 6.1 (7601) 10.1.3.4
JasonCWKS Windows 7 Professional Service Pack 1 6.1 (7601) 10.1.2.129
JColtrinWin7 Windows 7 Professional Service Pack 1 6.1 (7601) 10.1.2.85

If you want to take this further, and get the csname (computer name), caption (Operating system title), OS Architecture (32/64 bit), and ServicePackMajorVersion (service pack level) from a list of IP’s that the previous command produced you can do the following:

  1. Copy the IP addresses of all the machines to a new file called win7pcs.txt and place it in C:\admin\
  2. Open Powershell ISE  and enter the following script:
$a = Get-Content "C:\admin\win7pcs.txt" 
foreach ($i in $a) 
{Get-WmiObject Win32_OperatingSystem -ComputerName $i | Format-Table csname,caption,OSArchitecture,ServicePackMajorVersion -AutoSize
}

This should produce the following output for each IP address:

csname caption OSArchitecture ServicePackMajorVersion
—— ——- ————– ———————–
JasonCWKS Microsoft Windows 7 Professional 64-bit 1

csname caption OSArchitecture ServicePackMajorVersion
—— ——- ————– ———————–
JcoltrinWin7 Microsoft Windows 7 Professional 32-bit 1

How to Install ISC DHCP Server on Ubuntu 16.04

The Internet Systems Consortium (ISC) Dynamic Host Configuration Protocol (DHCP) server is free, open-source, and easy to install. Both enterprises and small networks have used ISC DHCP in production for many years.

In this guide, I’ll demonstrate how to locate your current DHCP server and then install and set up an ISC DHCP server. We’ll then move on to gaining control of your new DHCP server, best practices, monitoring the logs, and setting up static address reservations.

Read the rest of the article here:

https://4sysops.com/archives/install-isc-dhcp-server-on-ubuntu-16-04/

Install OpenDNS Umbrella Virtual Appliances on Hyper-V 2012 R2

You’re probably already familiar with OpenDNS; the service has long been trusted with consumer-grade firewalls and Wi-Fi Access Points. OpenDNS is now owned by Cisco, and the service is relatively inexpensive at approximately $115 for a three-year, 250-license package on CDW. OpenDNS Umbrella extends that protection to your enterprise by categorizing your DNS traffic in the OpenDNS data centers, rather than relying on your own firewall’s DNS capabilities. This is especially useful if you are running pfSense firewalls, as the packaged domain blocking and reporting is minimal in several areas.

In addition to Umbrella, OpenDNS can protect your roaming devices by installing a remote client. For now, we’ll look at the default reporting and why it’s necessary to set up virtual appliances.

Read the rest of the article here:

https://4sysops.com/archives/install-opendns-umbrella-virtual-appliances-on-hyper-v-2012-r2/

Set up Ubuntu as a domain controller with SAMBA on VirtualBox

If you want to run a domain controller on your network but don’t have access to a Windows Server license, you can use SAMBA, the free open-source software, and VirtualBox, the free virtualization software. We’ll describe the procedure for setting up a virtual server using VirtualBox and netboot.xyz iPXE and move on to setting up your domain controller with SAMBA.

Read my full article here:

https://4sysops.com/archives/set-up-ubuntu-as-a-domain-controller-with-samba-on-virtualbox/

Clone a Ubuntu server in Hyper-V 2012 R2

Ubuntu runs on Hyper-V perfectly fine, so you may want to run many Ubuntu Virtual Machines (VMs) on Hyper-V Server 2012. R2 This article will show you how to clone or duplicate a single Ubuntu server on Hyper-V with different network interfaces and host names. Cloning Linux servers on Hyper-V is easy and quick when you have the right knowledge and tools.

Read my full article here:

https://4sysops.com/archives/clone-a-ubuntu-server-in-hyper-v-2012-r2/