Stanford’s CS106a Programming Methodology Courses

I’ve been studying the free Standford CS106a lectures for some time now on YouTube – Playlist Here – and have been following along with the assignments. The first assignments revolve around manipulating a java-based robot application named Karel. Karel can only perform a limited amount of movements like move, turn left, pick beeper, and put beeper. The assignment I’ve been working on involves moving Karel around a number of different worlds and place beepers in a checker pattern. However, if trying to move through a wall, Karel can be blocked. Other errors like these pop up and make my life suck. During the programming of the checkerboard application, I utilized and became familiar with the following:

  1. Program structure
  2. Top-down programming/decomposition/subproblems
  3. Conditional statements (if) (if/else)
  4. Iterative Statements (for/while)
  5. Method definition – private void name () { … }
  6. Recursion – having a method call itself
  7. Using import to include definitions from libraries

Programming with Java is all about primitives, camelcase, fence posts, and calling methods on objects! Programming is quite methodical and step-by-step in the first stages of an application. Thinking about what are my most simple, primitive moves and actions first, and then building on those is the start. Then once the most simple steps have been defined, I start to create methods that are more universal, and writing statements that are sub-methods of the top level methods. When programming top-down it’s fun because I am beginning to rely on the skills I’ve learned to trust that I can write later what I’d defined as a method.

Anyway, getting to where Karel ends in the video linked below has been a pretty mind-wracking endeavor. I’ve pretty much started over with the code three times but I can finally see the light at the end of the tunnel. One of the most difficult obstacles is writing the code so that it will run the same in all of the different “worlds” (8×8) (8×1) (1×8) etc. Also another thing about programming I’ve found is that by relying on my own skills and knowledge I have found I can arrive at a solution faster than searching online and there are many different ways of accomplishing the same task.

2013-07-13 16.09.29


Java Variables

Java variables come in two types:

Primitive

Object Reference

Primitives hold fundamental values (simple bit patterns including integers, Boolean, and floating point numbers.


Object references hold, well, references to objects.

1. Variables must have a type

2. Variables must have a name

A variable is similar to a cup or a container. Each cup holds a value.

The sizes for six numeric primitives in Java are byte (8), short (16), int (32), and long (64).

You can assign a value to a variable in several ways:

1. Type a literal value after the equals sign

2. assign the value of one variable to another (x=y)

3. use an expression combining the two (x = y + 32)

Here are some examples of literal values that have been marked in bold:

int size = 28;     -declare an int named ‘size’, assign it the value 28

char initial = ‘j’;     -declare a char named ‘initial’, assign it the value ‘j’

double d = 465.783;     -declare a double named ‘d’, assign it the value of 465.783

Boolean isCrazy;     -declare a Boolean named ‘isCrazy’ (no assignment)

isCrazy = true;     -assign the value ‘true’ to the previously-declared isCrazy

int y = x + 234     -declare an int named ‘y’, assign it the value that is the sum of whatever x is now plus 234

Android Development cont…

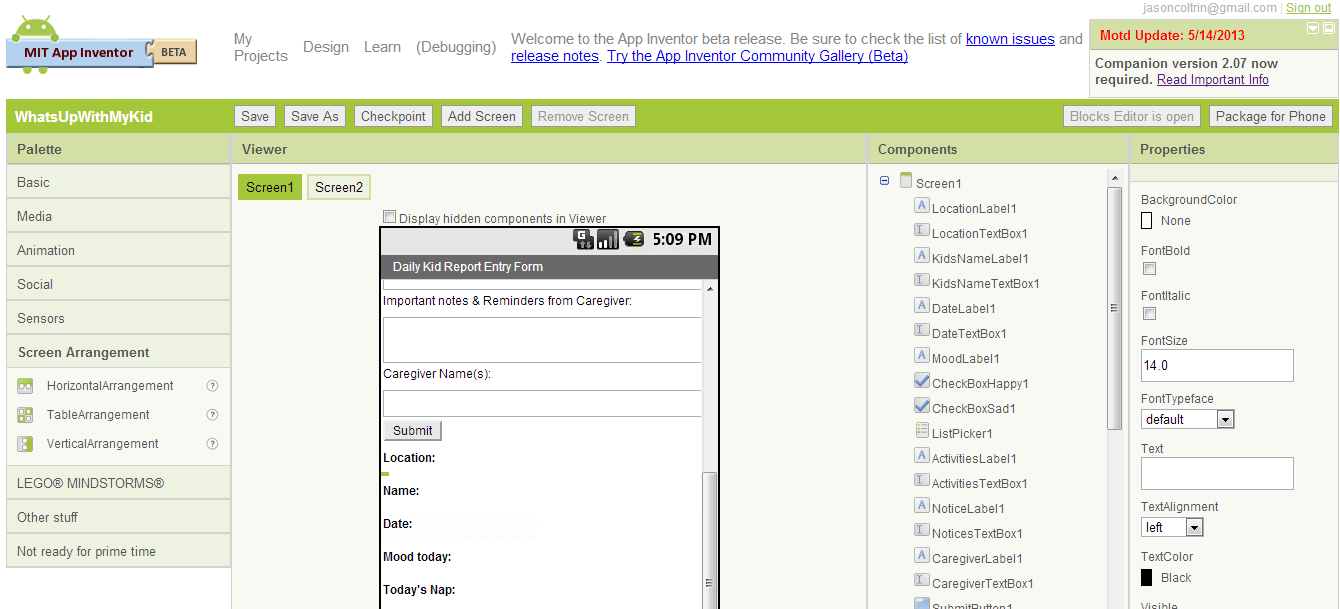
So I’ve gotten a little further in development of Android apps. Although I spend a little time each day digging further into Java, I’ve begun using the free App Inventor by MIT for Android. The App Inventor API is a lot like Scratch. UI Objects can be dragged and dropped from the palate onto the viewer. From here, the components used are listed in the component viewer and the properties of each are listed on the right.

My first project is a Daily Kids Report where caregivers can fill out a form and then submit it.

appinventor


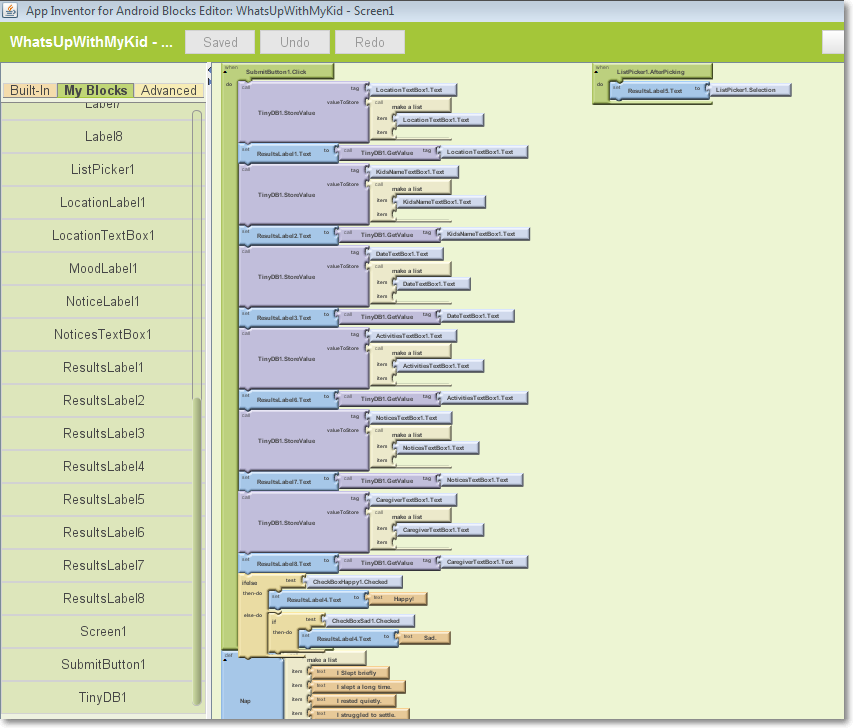
Once your objects have been placed in the Viewer, the workflow, methods and actions are “coded” with the “Blocks Editor”. Each of blocks that I’ve used are placed into the “My Blocks”. Each block has a set of defined functions and properties that will only fit with other “blocks”.

BlocksEditor

Even a “simple” app can get complicated, but I’ve found this type of programming has accelerated my development goals and is giving me a great introduction into programming structures and logic.

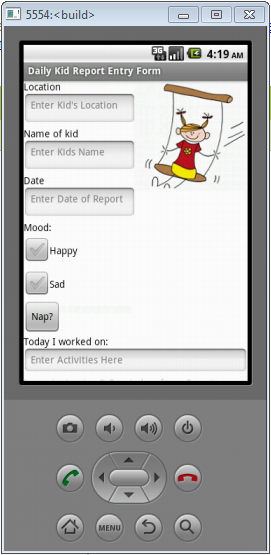
Finally, as the app is developed, it’s compiled and run on the fly in an Android Emulator. Once you’re satisfied with the results, you can easily package the app as an .apk that can be installed on a phone (that allows ‘non-signed’ developer mode installs).

KRv1

I’ve gotten to the point where I’m happy with the basic structure and data points the app collects. My next goal is to change the way the Submit button works and have it populate a second Preview screen. Then in the Preview screen, if satisfied with he results, the user has the option to send an SMS text message or email with the information that was entered in an easy to read format.

Other ideas I have are to add the ability to include a photo or record a short voice message.

Android App Development with Eclipse, the Android SDK, and more Java

So my foray into Android App development has begun and I’m happy that I have eclipse up and running with the Android SDK. I have a virtual NexusOne up and running my first Hello World App. The only real snag I encountered was being unable to build an .apk and run my first few test apps because of the error: SDK does not have any Build Tools installed. I went to C:UsersJasonandroid-sdks and found that the Build Tools directory was empty (despite running the SDK manager and re-installing the Build-Tools component.) This was resolved by re-downloading the SDK, extracting the zipped files to C:Downloadsadt-bundle-windows-x86_64-20130522 and then manually copied the contents of the Build Tools folder from the unzipped location to my c:users directory.

HelloWorld

I’ve also progressed in my Java studies to become better at understanding and looking for what code will compile and which code will produce a compiler error. Also I’m becoming more comfortable with string arrays, getting java to find out how many words are in each list, generate random numbers that are constrained to a random number within the array, and building a string phrase using words within the arrays. For example:

String[] cats = {“Tricksie”, “Gunner”, “Bear”, “Apache”, “Esmeralda”};

int x = cats.length;

int rand1 = (int) (Math.random() * x);

String phrase = cats[rand1] ;

System.out.println(phrase + ” is a name for a cat.”);

– The first output could be: Bear is a name for a cat.

– The second output would probably be a different name and so on.

The logic of while and if methods can get tricky when creating an application that will output results when checking on conditions of your variables. For example,

class Test {

public static void main(String [] args) {

int x = 0;

int y = 0;

while ( x < 5 ) {

x = x + 1;

y = y + x;

System.out.print(x + “” + y +” “);

x = x + 1;

}

}

}

In this instance, the output would be:

11 34 59

If x starts out as a 0, then it passes the condition of being < 5 so it continues. x is added to 1 so it’s value = 0 + 1 = 1. It is told to print out it’s value as 1 and then add another 1 onto itself, and so on until it’s value is greater than 5, at which time the output ceases due to while condition no longer being true.

While, do-while, and for loops always has to pass a conditional test, or an expression that results in a boolean value; either true or false.


My first Serious Business Java App

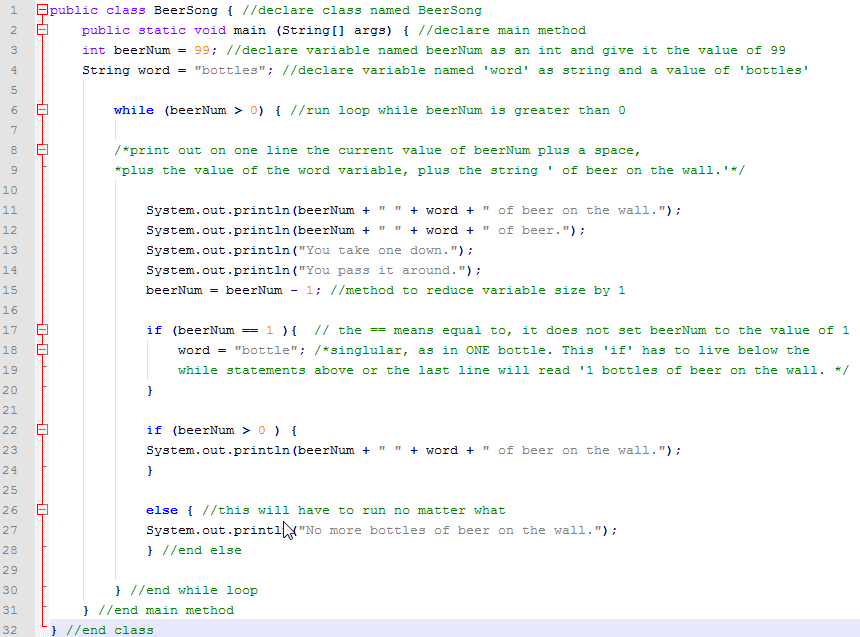
OK so this java application is not so serious, but it does include a class with a main(), an int and a String variable, a while loop, and an if test. A little more polish and I’ll be building that brewery back end in no time.

BeerSongCode

And the output when the class/app is run:

 5 bottles of beer.
 You take one down.
 You pass it around.
 4 bottles of beer on the wall.
 4 bottles of beer on the wall.
 4 bottles of beer.
 You take one down.
 You pass it around.
 3 bottles of beer on the wall.
 3 bottles of beer on the wall.
 3 bottles of beer.
 You take one down.
 You pass it around.
 2 bottles of beer on the wall.
 2 bottles of beer on the wall.
 2 bottles of beer.
 You take one down.
 You pass it around.
 1 bottle of beer on the wall.
 1 bottle of beer on the wall.
 1 bottle of beer.
 You take one down.
 You pass it around.
 No more bottles of beer on the wall.

I recommend the book Head First Java if you want to learn to write Java applications.


11G-Hyperion-EPM Install Procedures

I took some time to get familiar with Oracle’s 11G and EPM solution in my lab. EPM is a large software suite and is useful for enterprises that are looking for management dashboards and end to end visibility.

11G/Hyperion/EPM Install Procedures

  • Install 2008 R2 64 virtual machine
    • Get VMWare ESXi running
    • Upload Server 2008 R2 Standard ISO to your Datastore
    • Create new virtual machine -> Typical
    • Name VM (EPMTest1)
    • Choose your datastore (datastore1)
    • Guest OS: Server2008R2 64
    • Use 1 NIC – type: VMXNET3
    • Virtual disk size: at least 100GB – Thick Provisioned Lazy Zeroed
    • (Edit VM settings before creation of VM -> Continue
    • Under VM Properties:
      • Change CPU and Memory as needed.
      • For CD/DVD drive, use Datastore ISO file and browse to Server 2008 .ISO file, connect at power on.
      • Under Options Tab, Advanced -> Boot Options -> Change Power on Boot Delay to 5000 ms.
      • Under Advanced -> Memory Hot Add -> Enabled memory hot add
      • Ok
    • Right-click on EPMTest1 VM and choose open console
    • Start vm and boot to iso/cd
    • choose default language
    • Install Now
    • Select Windows Server 2008 R2 Standard Full Install
    • Choose Custom installation
    • Select your virtual disk -> next
    • Files will copy/expand/install
    • vm will reboot several times
    • Change Administrator pw to ???????
    • Once at desktop, check for network adapters. If unknown device exists, from vSphere Client, install VMWare tools.
    • Ensure VM is online and can reach network resources
    • Update OS with MS Updates
    • Activate Server 2008
    • Run script to install Roles (open powershell and paste in following command): ServerManagerCmd -Install Application-Server AS-Web-Support Web-Server Web-ASP Web-CGI Web-Mgmt-Service Web-Mgmt-Compat Web-Metabase Web-WMI Web-Lgcy-Scripting Web-Lgcy-Mgmt-Console
    • Backup your VM prior to installing Oracle software (ghettovbs script does ok job and instructions are at: http://www.youtube.com/watch?v=fJmqrMAXQAg – scripts download located at https://github.com/lamw/ghettoVCB
    • Install JRE
    • Download 2 zip files – Oracle Client Runtime 11.2.0.1 from http://www.oracle.com/technetwork/database/enterprise-edition/downloads/112010-win32soft-098987.html –
    • Install Oracle Client Runtime/database 11g 11.2.0.1
      • Installation Instructions:
      • Create new folder c:admin
      • Create new folder c:adminepm_downloads
      • Create new folder c:adminepm_unzipped
      • you need to extract Database 11g zip files into exact same dir as file1. It cannot be in a separate dir. Extract to c:adminepm_unzipped
      • Install Oracle Database 11g – run c:adminepm_unzippeddatabasesetup
      • Enter Oracle Account info
      • Enter proxy info (?) or Check I do not want to be informed of critical updates
      • Install db software only
      • Single instance
      • english, next
      • standard edition one
      • Location c:appOracle
      • Finish
      • Installation Successful – Close
    • Install and configure MS Office 2010
      • In addition to the requirements listed in the previous sections, CLIENTHOST1 requires the following installations: Microsoft Office 2010 Microsoft Word, Excel, and PowerPoint must have the following characteristics:
      • Be registered in the server’s registry for printing
      • Be available to the “SYSTEM” account
      • Have access to, and be able to print from the printers installed by Financial Reporting (HRPrinter1-5). The SYSTEM account issues all print requests, so it is important that the applications can print using the Print Server’s printers.
      • A supported 32-bit version of GhostScript. http://www.ghostscript.com/download/gsdnld.html GPL 32bit – download and install
      • Disable the following on CLIENTHOST1 to support Financial Reporting Print Server:
        • Disable:
        • All add-ins (including EPM System add-ins) from all Microsoft Office applications to enhance application launch time and reduce system resource consumption. If add-ins are present, they may display UI components that require user input.
        • • SmartTags (Office 2002+) to enhance performance.
        • • Microsoft Office Assistant which prompts the user for input and may halt printing.
    • On Local PC – Create User DeployEPM -> Add DeployEPM to local Administrators Group
    • On server, open Local Security Policy, drill down to Local Policy -> User Rights Assignment
    • Add DeployEPM account to following policies
      • • Act as part of the operating system
      • • Bypass traverse checking
      • • Log on as a batch job
      • • Log on as a service
    • Create Shared Filesystem on NAS/SAN (jason-nas1EPM_Shared)
    • Map Network Drive Z: to jason-nas1EPM_Shared
    • Check hostnames, check clock synchronizations
    • Set up Oracle Database
      • Create an Oracle 11g database with AL32UTF8 character set encoding and set these database parameters:
        • NLS_LENGTH_SEMANTICS to CHAR * could not find these settings
        • CURSOR_SHARING to FORCED *could not find these settings
        • Open Database Configuration Assistant -> Create a database -> General Purpose -> Global DB Name: Test11gDB1.EPMTest1 SID: Test11gDB1
        • Uncheck Configure Enterprise Manager
        • Use Same Admin pw for all accounts SYS and SYSTEM
        • Use DB File locations from template
        • Character Sets – Use AL32UTF8 -> Next ->Next->Finish (Create DB)
        • Once DB has been created, open Start->Programs->Admin Assistant For Windows, and browse to new DB
        • Create the following database (and local server/domain/user) accounts:
        • • One user for EPM System Repository
        • • One user for Financial Management data repository
        • • One user for a Planning data repository
        • Each Planning application requires a separate database account. Before creating a new Planning application, you must create a new database user for it.
        • Set table temp space if necessary
        • Setup Firewall ports if necessary
        • EPM_Install_Progress2
    • Download EPM software from https://edelivery.oracle.com
      • Download 11.1.2.1.0 media pack
      • Download the following zip files:
        • 05/05/2013  10:52 AM     1,831,124,877 V25459-01.zip
        • 05/05/2013  11:25 AM        51,317,271 V25460-01.zip
        • 05/05/2013  11:36 AM     1,090,549,336 V25461-01.zip
        • 05/05/2013  11:28 AM         5,556,028 V25462-01.zip
        • 05/05/2013  11:29 AM        28,348,437 V25463-01.zip
        • 05/05/2013  07:19 PM       389,282,485 V25464-01.zip
        • 05/05/2013  07:21 PM        96,713,567 V25468-01.zip
        • 05/05/2013  07:41 PM        88,759,524 V25469-01.zip
        • 05/05/2013  07:22 PM       143,329,315 V25470-01.zip
        • 05/05/2013  07:23 PM        13,426,437 V25475-01.zip
        • 05/05/2013  07:37 PM       199,685,657 V25476-01.zip
        • 05/05/2013  07:24 PM       121,862,788 V25477-01.zip
        • 05/05/2013  07:39 PM       102,999,780 V25479-01.zip
        • 05/05/2013  07:41 PM        70,810,195 V25487-01.zip
        • 05/05/2013  07:35 PM     1,488,695,147 V25494-01.zip
        • 05/05/2013  10:05 AM       269,705,265 V25495-01.zip
        • 05/05/2013  10:21 AM     1,094,215,607 V25496-01.zip
        • 05/05/2013  10:30 AM     1,317,755,597 V25497-01.zip
        • 05/05/2013  10:33 AM     1,168,889,472 V25498-01.zip
        • 05/05/2013  10:47 AM     1,499,139,033 V25499-01.zip
        • 05/05/2013  07:20 PM        93,168,097 V25500-01.zip
    • Install and Configure Foundation Services
      • Ready files for installation
      • Create folder EPM_Unzipped
      • Unzip all files into the same EPM_Unzipped folder
      • On FNDHost1 (in this case, EPMTest1), log in as an administrator
      • From Z:EPM_Unzipped run InstallTool.cmd
      • Run installer – > Check that Prerequisites have been met – ok
      • Enter Default Location of middleware home c:OracleMiddleware
      • Select components individually
      • Install the following components:
        • • Foundation Services
        • • Essbase — Administration Services Web Application
        • • Essbase — Provider Services Web Application
        • • Reporting and Analysis
        • • Planning
        • • Financial Close Management (Assembly missing) @followup
        • • Disclosure Management (Assembly missing) @followup
        • Financial Management — Financial Management Web Service (ADM Driver under Financial Management is selected by default)
        • • Profitability and Cost Management (Assembly missing) @followup
        • Unselect: Essbase — Essbase (Essbase Server is selected by default when you select Planning)
        • Hit Next to Confirm, Next to install
        • Download and apply patch 12552933 from http://support.oracle.com (unable to locate patch, need Support Identifier) @followup
    • Run EPM Configuration -> Start -> Programs -> Oracle EPM System -> Foundation Services -> EPM System Configurator
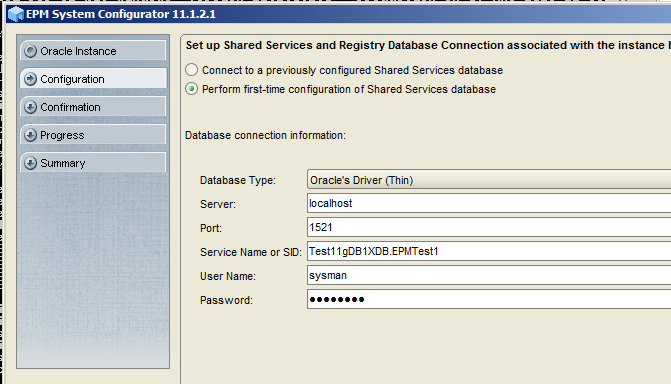
    • If cannot connect to database – “Connection Refused”, try installing loopback adapter and open Command Prompt and run netca. Install a new Listener on default port 1521. Then go back and run Database Configuration Assistant. After configuration has succeeded make note of location of encryption key, in this case it’s c:/app/oracle/product/11.2.0/dbhome_1/servername_dbname/sysman/config/emkey.ora. Also make note of Database Control URL: https://WIN-9ANJ6AA1428:1158/em
At this point, I had significant problems trying to configure the installation with the System Configurator. Ultimately the resolution was to ensure I had the correct credentials for the installer to run normally.
EPMSetup
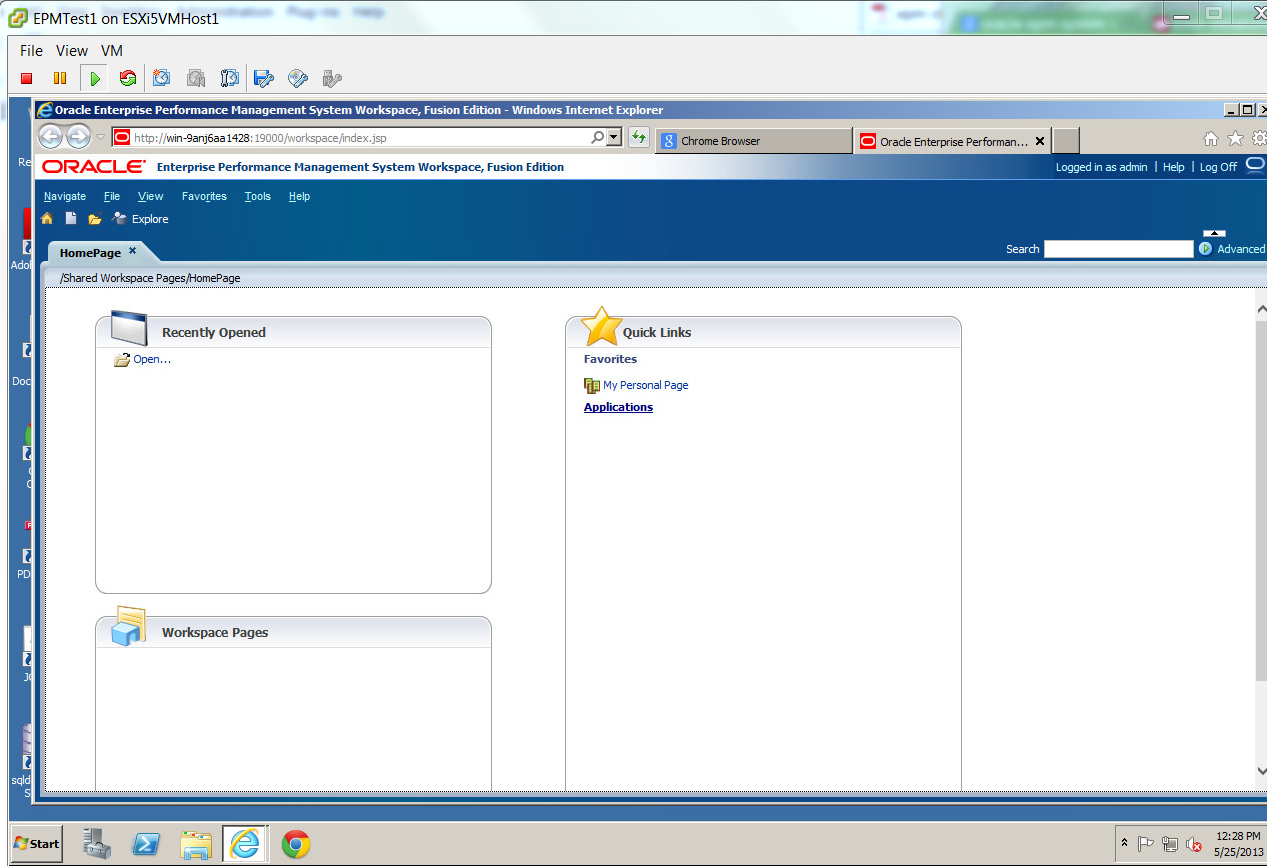
I completed the configuration according to my environment and the setup completed successfully. After restarting the default websites, they wouldn’t display with a 404 message. I had to re-run the EPM Configuration and installed the default websites components. Starting up the EPM Services can take some time on a box with 8GB of RAM but eventually the services started and the sites came up and I was able to log into the Shared Services console and Workspace successfully. ScreenShot003
My next steps are to import some test data, create some applications, dashboards, and build some views.

ESXi 5.1 – Setting up an Ubuntu Server as a SAMBA Domain Controller

If you want to run a domain controller on your network but don’t have access to a Windows Server license, you can use SAMBA, the free open-source software, and VirtualBox, the free virtualization software. We’ll describe the procedure for setting up a virtual server using VirtualBox and netboot.xyz iPXE and move on to setting up your domain controller with SAMBA.

Read more here:

https://4sysops.com/archives/set-up-ubuntu-as-a-domain-controller-with-samba-on-virtualbox/

IIS7 Server 2008 Renew a self-signed certificate for Certificate Date Expired

IIS 7 and IIS 7.5 – How to renew a self-signed certificate and bind to your website.

Almost one year ago I built an Act server for a client. Act includes a web interface which can be reached by a secured SSL website on port 443. When I setup the site, I used a self-signed certificate as the client is budget conscious and is ok with using a non-third-party trusted certificate.

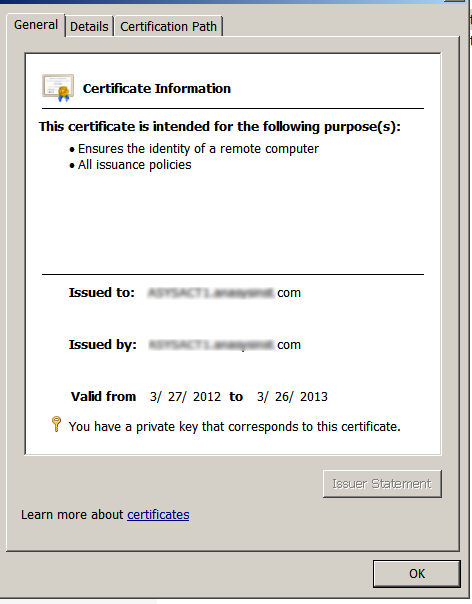
We monitor all of the servers for certificates that will expire and we received an alert that the SSL Certificate on server ***, port 443, is going to expire in 7 days. I browsed to the website, accepted the certificate warning and then opened the certificate itself. Sure enough, the clock is ticking and the cert was to expire on 3/26/13.

cert1expire


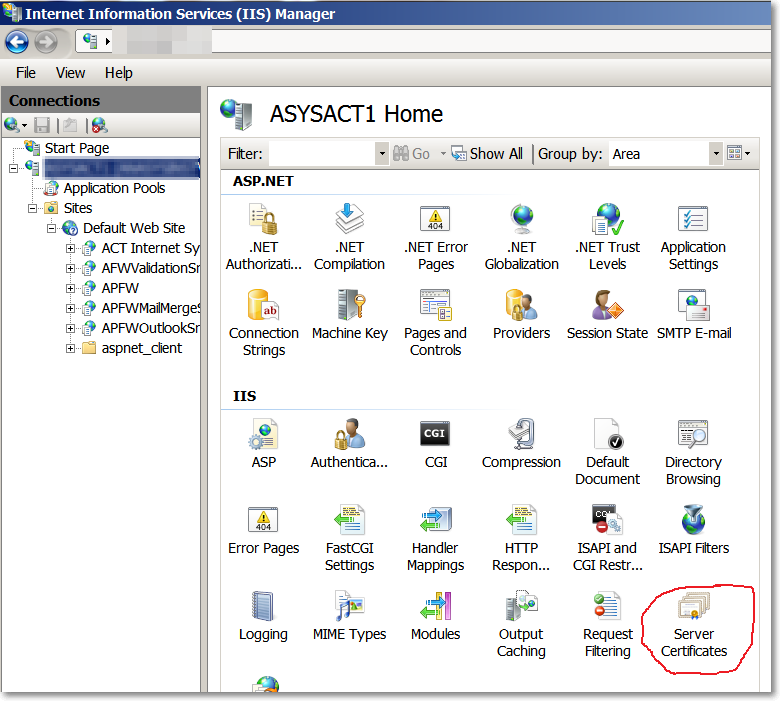
To replace the certificate with a new self-signed certificate, hop on to the server’s console that hosts the IIS site and open Internet Information Services (IIS) Manager.

  1. Select the server (name) under the Connections Pane on the far left of the application.
  2. Under the middle pane, double-click on the Server Certificates icon.

IIS1

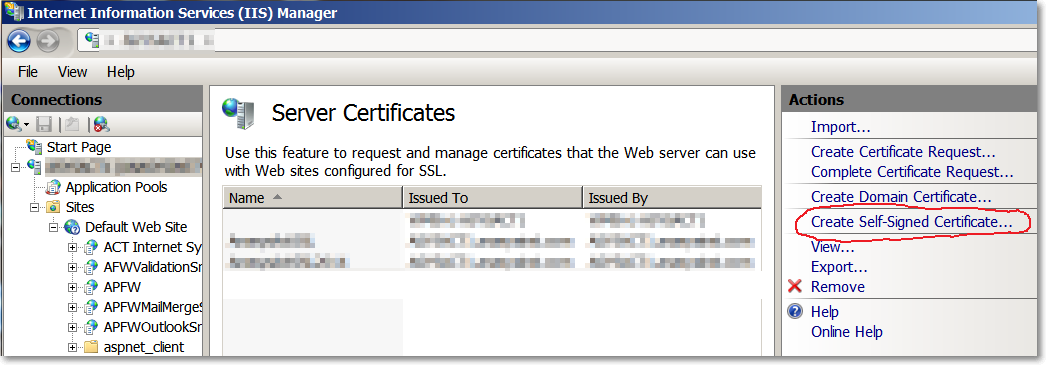
3. Here you will see all of the listed self-signed certificates including the one that will expire. On the right-hand pane under Actions, click on Create Self-Signed Certificate…

renewcert

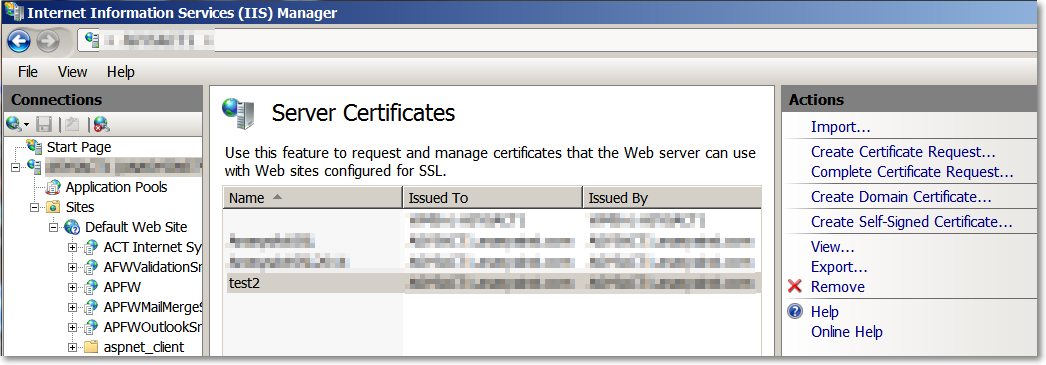
4. Specify a friendly name for the cert. I used companynameservername2014. Click OK. You should now see your new self-signed cert available in your list of certificates.

renewcert1


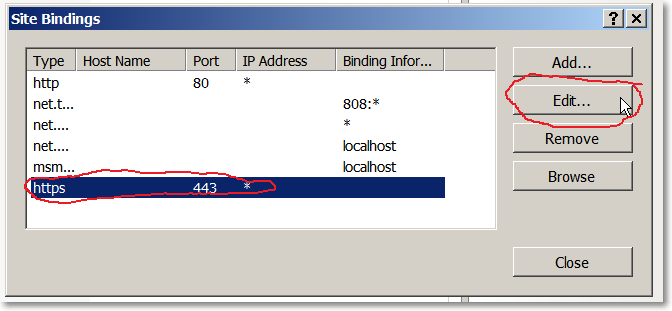
5. Now that the certificate has been created we need to bind it to our website. Under the Connections pane, right-click on the Default Web Site and click on Edit Bindings. Find https, click on it to select it and then click Edit…

bindings


5. Inside the Edit Site Bindings, change the Drop-down combo box to the SSL certificate you want to use. Click ok – you’re done!

6. To test, browse to the site you host with https:// and look at the certificate, you should see it is now set to expire 1 year from now.


Palo Alto PAN-VM-100-NFR Project

My associate, Chase, brought to my attention a new Not-For-Resale Virtual Machine by Palo Alto that is a virtual firewall/router. I’ve been looking for a good replacement for my home SonicWall TZ180W, and I think the Palo Alto firewall will be a more robust solution. Here is a brief outline of the project I will commit to completing over the course of many posts:

  1. Obtain hardware and setup with multiple NICs
  2. Setup VMWare’s ESXi v4.1
  3. Copy virtual machine to VMWare’s datastore
  4. Start VM, troubleshoot and make initial configuration
  5. Put in place at home, setup with my ISP, setup VPN, and setup a subnet for WiFi
  6. Tune firewall, filtering, and SSL

1. Obtain hardware and setup with multiple NICs that meet VMWare’s standards.

I had been using a Shuttle xPC SG33G50 for my linux box which was hosting my blog for a short period of time. Because my blog had since been moved to Amazon’s AWS cloud infrastructure, the Shuttle is now available as a project PC.

Shuttle SG33G50


As seen in the photo, the machine has PCI slots for cards, VGA, HDMI, FireWire, 6 USB ports (two in front, four in back), ESATA, one Gigabit NIC, and audio+optical ports. It’s nice because the machine small, quiet, uses little energy and has decent hardware specs.

Fortunately the Shuttle meets the standards of the PAN-VM-100 virtual machine: Minimum 4GB RAM, Virtualization Technology, Minimum 16GB hard disk space, and VMWare ESXi 4.1. What it does not have is dual Gigabit NIC’s. For that I purchased an Intel PRO/1000 pt Dual Port Server Adapter from Amazon.

The final configuration of the Shuttle PC contains: Intel Core2 E2180 2Ghz , 4GB DDR2-800 PC2-6400 Memory, Intel PRO/1000 Pt Dual Port Server Adapter, Targus 32GB SSD hard drive.

Once the adapter arrives from Amazon I’ll continue on to the setup of ESXi 4.1 and post my results


— Update – unfortunately, the hardware does not support virtualization and this project has been put on hold. The system was put to good use, however, and now is a PC for my two little girls. They love it! I am considering purchasing a server from www.geeks.com to run my virtual machines, and will update if and when that takes place.

Exchange/Outlook 2010 autodiscover certificate error name mismatch

Exchange/Outlook 2010 autodiscover certificate error name mismatch

Recently some users have been receiving the following autodiscover certificate error when opening outlook:

Security Alert: autodiscover.domainname.org

Information you exchange with this site cannot be viewed or changed by others. However, there is a problem with the site’s security certificate.

√ The security certificate is from a trusted party

√ The security certificate date is valid

X The name on the security certificate is invalid or does not match the name of the site

Firstly, we host exchange at a different hostedexchange.com, and our autodiscover uses a wildcard certificate “*.hostedexchange.com”. So starting with the client I made sure to view the certificate. The correct name on the certificate listed was “*hostedexchange.com.”

1. I installed the certificate on to the client PC into the trusted store. Closed outlook/opened again and still the same error.

2. I looked at the proxy settings in the account setup and found that the ‘server name’ and msstd: were correct, they were.

3. We used nslookup externally and found that there are no valid dns records pointing to autodiscover.domainname.org

4. We used https://www.testexchangeconnectivity.com/ and found that while it does automatically check for autodiscover.domainname.org, dns did not return a value; it failed

5. From the client we were able to ping autodiscover.domainname.com, the ping returned an internal ip address of our mail server.

6. So from the results above it appears as though the client (or citrix server’s hosted desktop in this instance) had an incorrect dns entry.

7. From a (run as administrator) command prompt I issued an “ipconfig /flushdns” command on the client server but the error persisted, and pings still replied from autodiscover.domainname.org

8. We checked the hosts file on the server (c:\windows\system32\drivers\etc), and sure enough there was an old entry for autodiscover.domainname.org

9. In order to edit the hosts file, did a “Run as administrator” to open notepad, edited the file and saved successfully.

10. Issued another ipconfig /flushdns

Now when the client opens, the request to get autodiscover.domainname.org fails, and there is no mismatch of certificate names.