Bash shell script to query a domain name using dig without the any flag

How do I get all of the DNS records for a domain using the dig command in only “Answer Section” (+answer) format? The command should return A, MX, NS, TXT, SOA and CNAME records.

Normally using the “any” flag, we would get all of this information at once, however, when attempting to run a dig command with the ‘any’ switch, we do not get the DNS records we want:

dig jasoncoltrin.com any

The above command returns an answer section with only: “RFC8428” “”

According to chatgpt, this means that the ‘any’ query type is not guaranteed to return all the records for a given name, and some DNS servers may choose to return an empty answer instead. This is done to improve the performance and security of the DNS system.

Still, I want to have a single command to get the most information at once, and the following command does so, however, writing the command is impractical:

dig +noall +answer +multi jasoncoltrin.com A jasoncoltrin.com MX jasoncoltrin.com NS jasoncoltrin.com TXT jasoncoltrin.com SOA jasoncoltrin.com CNAME

I also tried the following with no luck:

dig +noall +answer jasoncoltrin.com A,MX,NS,TXT

This only returned the A records.

So instead, we can use a bash script to create a $domain variable, and have the script use the ‘read’ command to prompt us for the domain name:

#!/bin/bash

read -p "Enter the domain name: " domain

dig +noall +answer +multi $domain A $domain MX $domain NS $domain TXT $domain SOA $domain CNAME

To write the script, do the following:

vi digdomain.sh

(insert) > copy/paste script > (Escape) > :wq

Then make the script executable with the command:

chmod +x digdomain.sh

Run the command using the ./ prefix:

./digdomain.sh

When we run the script, we’re prompted for the domain name, then the result is most of the information we want in an easy-to-read format:

jason@ubuntu0:~$ ./digdomain.sh
Enter the domain name: jasoncoltrin.com
jasoncoltrin.com.       118 IN A 172.67.196.181
jasoncoltrin.com.       118 IN A 104.21.44.69
jasoncoltrin.com.       1854 IN MX 10 mailstore1.secureserver.net.
jasoncoltrin.com.       1854 IN MX 0 smtp.secureserver.net.
jasoncoltrin.com.       5652 IN NS daisy.ns.cloudflare.com.
jasoncoltrin.com.       5652 IN NS lee.ns.cloudflare.com.
jasoncoltrin.com.       300 IN TXT "Currently located in a black hole\" \"Likely to be eaten by a grue"
jasoncoltrin.com.       300 IN TXT "google-site-verification=key"
jasoncoltrin.com.       2052 IN SOA daisy.ns.cloudflare.com. dns.cloudflare.com. (
                                2305113011 ; serial
                                10000      ; refresh (2 hours 46 minutes 40 seconds)
                                2400       ; retry (40 minutes)
                                604800     ; expire (1 week)
                                3600       ; minimum (1 hour)
                                )

This made me happy because I had forgotten about my easter egg TXT record. 🙂

Site Maintenance – security and reliability

Thanks for all your support. Some of you may have noticed a little downtime. I invested a little professional expertise in the site and you should now see better performance and more site reliability and uptime. Special thanks to Gregory Morozov at upwork.com who quickly identified and resolved the following issues:

  • Block xmlrpc.php
  • Added the site to CloudFlare DNS (free tier)
  • Convert PHP to php-fpm – for many reasons, but one is control over max php processes (I’ll use: service php7.2-fpm restart – if I need to restart php.)
  • Relaxed Wordfence triggers so users don’t get denied access
  • Dropped memory usage from 700+MB to 400MB
  • Fixed invalid Repos, other updates and maintenance.
  • We’ll monitor the site usage into the beginning of next week to see if we need to add more memory to the instance.

How to setup PFSense with the new Secure and Private CloudFlare 1.1.1.1 DNS

How to setup pfSense with free Secure and Private DNS

You’re probably aware by now that Cloudflare and APNIC has begun to provide secure and private DNS – DNS over HTTPS (DOH), to the general public. You can learn more and read about the initiative here. This article will give a brief summary of why this is important, and how to configure your pfSense router to use these new addresses and disseminate them to your network clients.

By default, your Internet Service Provider (ISP) will provide your router with it’s own list of DNS server IP addresses when you first connect your device to the internet. DNS is used to find websites, and essentially only translates IP addresses to domain names and vice-versa. However, these DNS IP addresses provided by your ISP may also be running on servers that nefariously log and record your internet browsing history. In some cases, these servers may go so far as to even inject advertisements into your web browser whether or not you’d like to see those ads.

By changing your router and/or computer to use 1.1.1.1 or 1.0.0.1 as it’s DNS resolver, you bypass your ISP’s DNS servers, and get a secure and private response from Cloudflare. Cloudflare has a configuration page guide for IOS, Android, MacOS, Windows, Linux, and a Router here. Follow the procedure below on how to setup a pfSense firewall/router to use DNS for it’s queries, as well as set your pfSense’s DHCP Server service to broadcast the new DNS IP addresses to your network clients.

  1. Login to your pfSense firewall by pointing your web browser of choice to the login page (usually this is your Default Gateway IP Address).
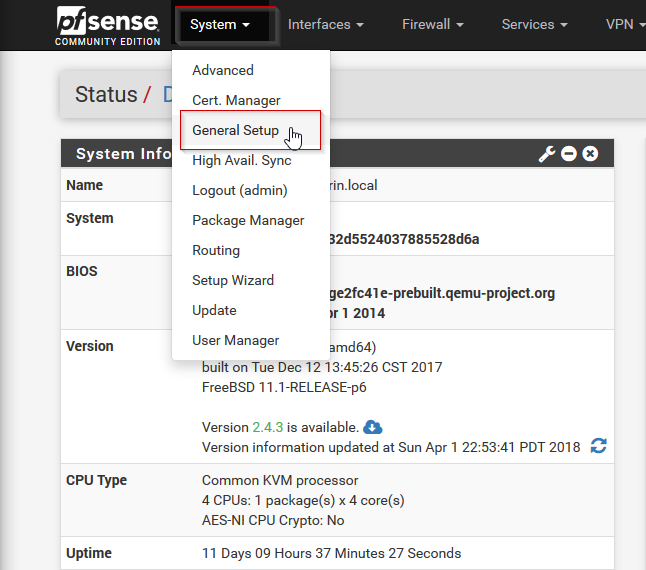
  2. At the Status / Dashboard page, in the upper left-hand menu, click System > General Setup
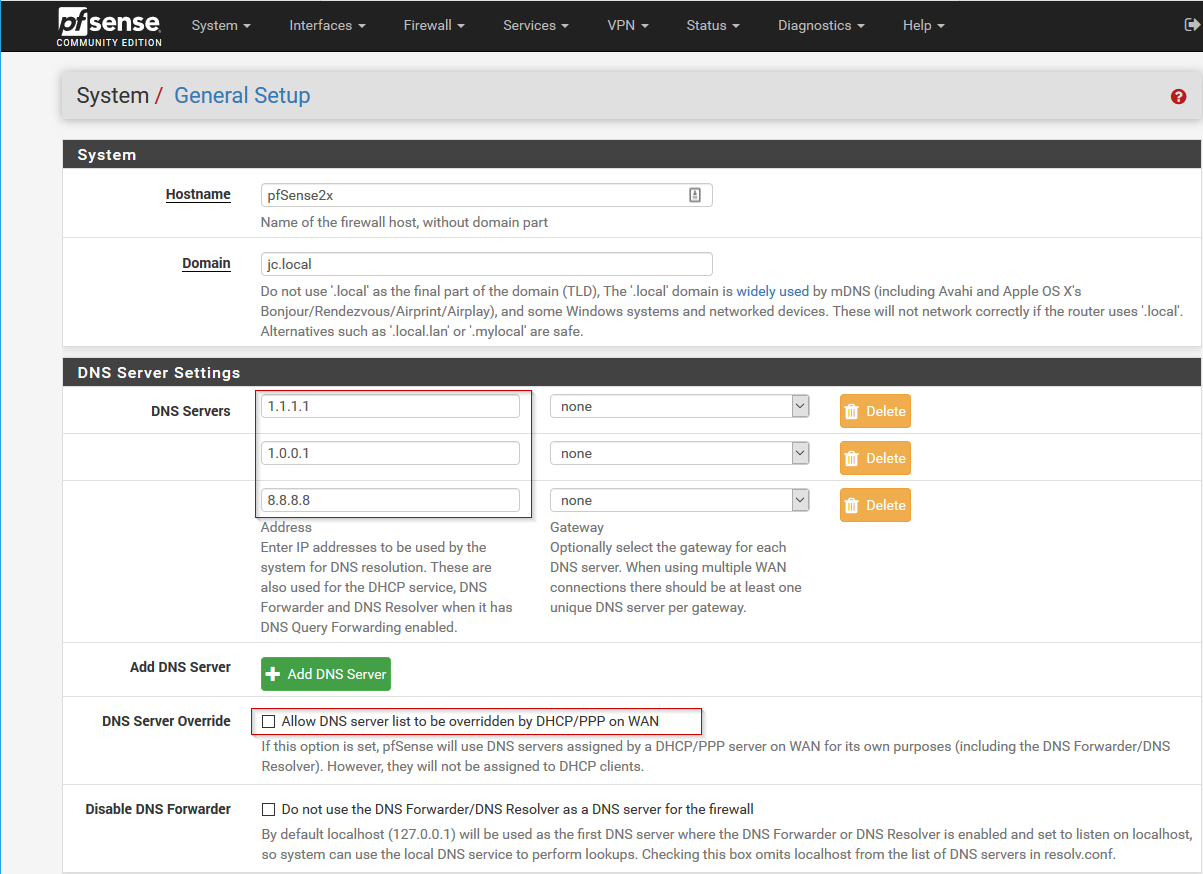
  3. Next, under DNS Server Settings, change the DNS servers in the first two fields to 1.1.1.1 and 1.0.0.1 respectively. Optionally, you can add 8.8.8.8 as a third IP address to use Google DNS in the event that the CloudFlare servers are unavailable, or are taken down by the government. It’s also a good idea to uncheck “Allow DNS server list override”. Once these changes have been made, scroll to the bottom of the page and hit Save
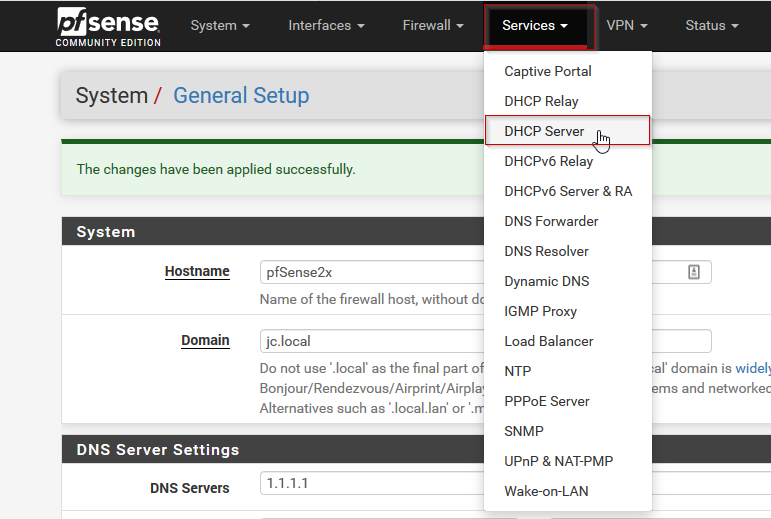
  4. Next, if our pfSense is also being used as a DHCP server, we also want our clients to get these IP addresses for their DNS server settings. To do so, at the top of the pfSense settings menu, click Services > DHCP Server
  5. In the DHCP Server settings, scroll down to Servers, and edit the DNS servers to contain the two new cloudflare DNS servers, (1.1.1.1 and 1.0.0.1), as well as Google’s 8.8.8.8, if desired. Next, scroll to the bottom of the page and hit Save.
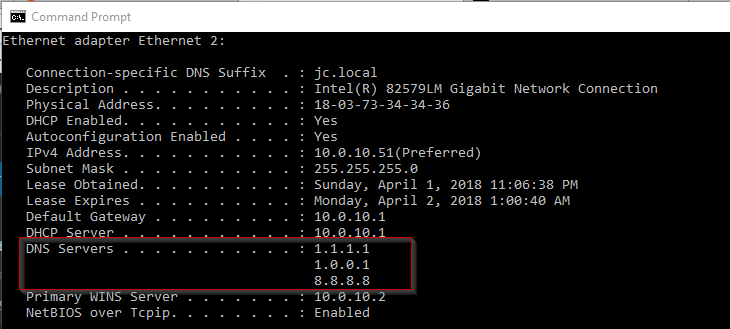
  6. Now would be a good time to restart your client computers to pick up the new IP address settings. You can confirm your computers have received the new IP addresses by opening a command prompt and issue the command:
  7. ipconfig /all | more

    This will give you something like the following information:

  8. As you can see our client has recieved the correct IP address from our pfSense DHCP server.
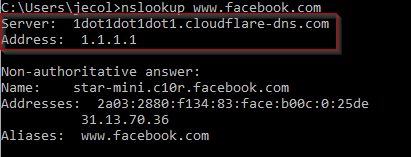
  9. To confirm our computer is actually getting it’s DNS queries from CloudFlare (1.1.1.1), we can issue a new command in the command prompt:
    nslookup www.facebook.com

    And we can find in our results that the responding server is named 1dot1dot1dot1.cloudflare-dns.com, and it’s address is 1.1.1.1:

In order to test that your DNS queries are indeed secure, you can use the link posted by John in the comments; thanks, John!