How to identify and Expand AWS EBS volumes in Windows Server 2012

If you have a disk drive that is running out of space because a database is starting to grow too large for the drive in an EBS volume on AWS, you may be asked to modify or expand the volume. In this case, we are tasked with expanding the “E drive” on a Windows Server 2012 AWS virtual machine. Because this is not a boot volume, and because it is an NVMe-based gp2 volume, it will be fairly easy to expand the volume without having to do things like shut down the instance, take a snapshot, expand the snapshot etc.

When you have a lot of disks attached to a Windows Server corresponding to a lot of different volumes attached to the instance in AWS, it can be a little tricky identifying the correct volume to expand. Read below to learn how to match an EBS volume in AWS to a Disk drive in Windows, expand the volume in AWS, and then finally resize the disk in Windows.

Identify Volumes Associated with Instance

First, log into AWS

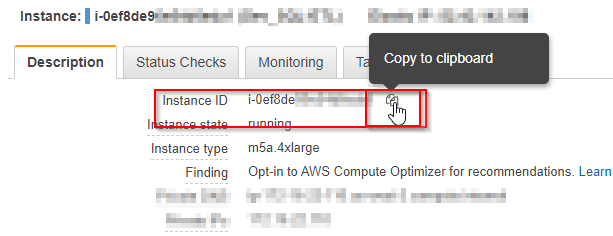
Next, Go to EC2 > Find your instance in EC2 by name, select it, then copy the instance ID.

get instance id

Next, navigate in AWS to EBS > Volumes.

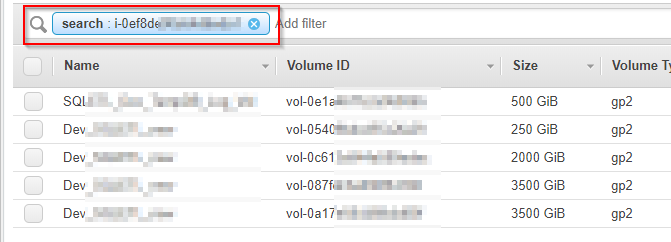
Find all the volume names associated with the instance by pasting the Instance ID into the search box at the top of the screen.

Identify the EBS Device in Windows

Now we’ll switch over to Windows. RDP into the server we want to modify. Once we’re in the server’s desktop, we want to download ebsnvme-id.zip from https://docs.aws.amazon.com/AWSEC2/latest/WindowsGuide/nvme-ebs-volumes.html And unzip/copy the .exe to your desktop.

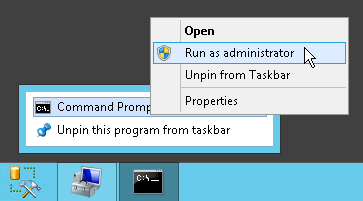
Next find the command prompt and open CMD as administrator (right-click on CMD icon > run as administrator.)

Run CMD as Administrator

Change directory in CMD to your desktop with the command:

cd c:\users\jcoltrin\desktop

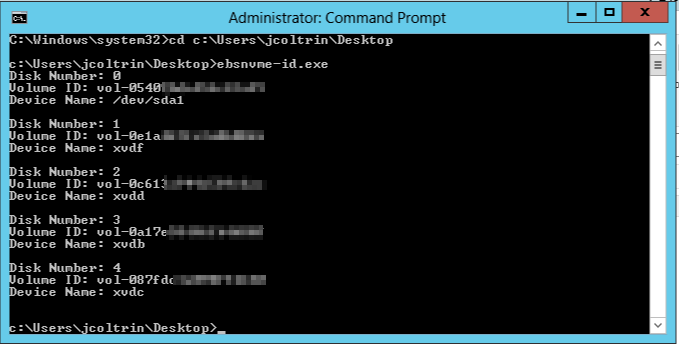
Run the ebsnvme-id.exe in the Administrator Command Prompt

run ebsnvme-id.exe in cmd

Identify Disk in Windows and Match to Volume ID

Next, on the Windows server, open Server Manager

Windows 2012 Server Manager

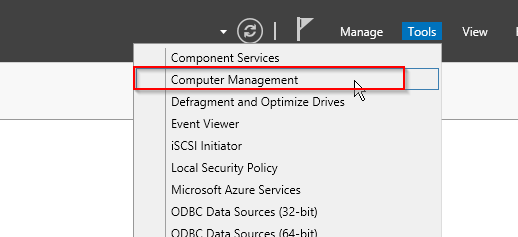
In the upper-right corner of Server Manager, go to Tools > Computer Management

Server 2012 Computer Management

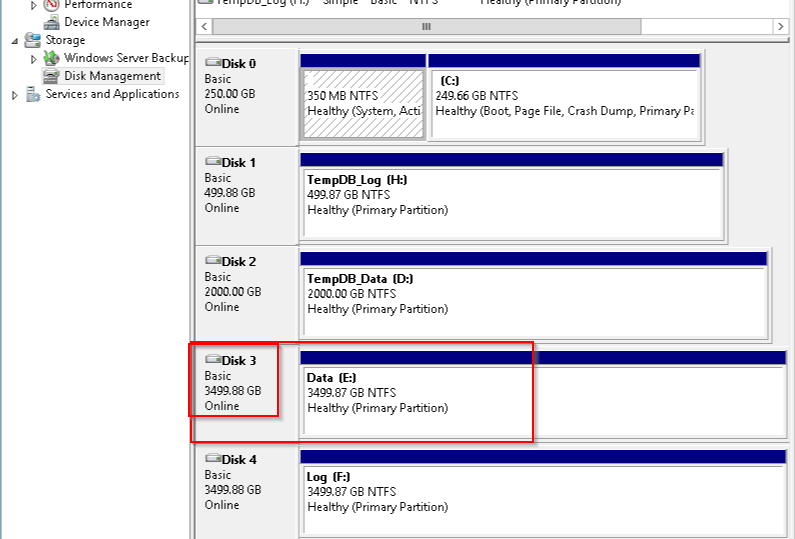
Make note of which disk (Disk 0, Disk 1, Disk 2, etc) corresponds to the Device Name and Volume ID that you want to change. In my case I want to expand Disk E, which is also known as Disk 3. Looking at the output of the CMD screenshot above, I can see Disk 3 shows my Volume ID is vol-0a17e…, and Device Name is XVDB.

Server 2012 Disk Management

Modify and Expand EBS Volume in AWS

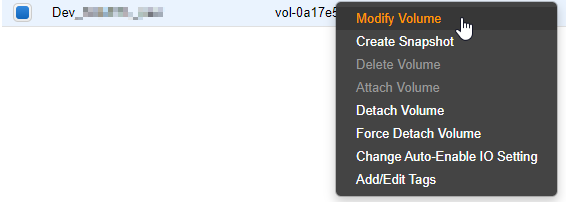
Now that we are sure which volume it is we want to expand, and that this is not our Boot drive we can right-click on the vol-0a17e… volume in EBS and choose Modify Volume. **If the Disk is your boot drive, a snapshot should be taken first, and then shut down to expand the snapshot volume, then detach the snapshot, and attach the expanded volume.

EBS Modify Volume

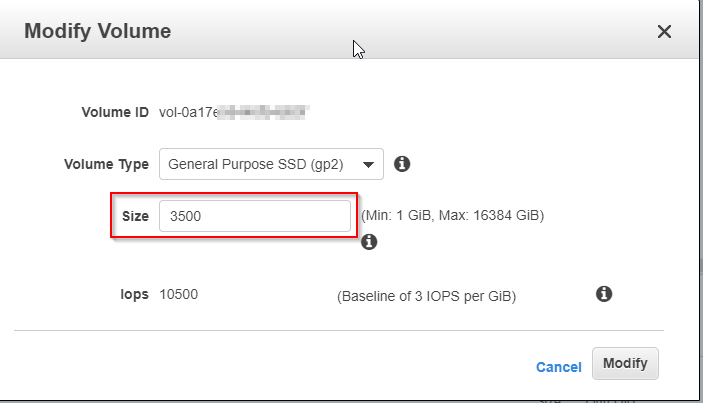
A new dialog box pops up asking for the new size of the volume:

EBS Modify Volume Size Dialog

Enter the new size and click Modify.

Switch gears and now go back to your RDP session, go to Disk Managment, Right click on the volume and choose Extend Volume… > use all of the available space and click ok.

Our Volume size has now been increased and we can continue to grow!

How to Set Clock Time on AD domain Controller and Sync Windows Clients

How to find your Active Directory Network Time Server

If someone complains that the time on a Windows 7 /Windows 10 PC is off, we can first sync the Domain Controller to an External Time Source, then sync their PC to the DC. How do you sync the computer to the same time as the cell phone/NIST/External Time Source, and make sure that all computers on your network have the same time as the domain controller?

First, determine from a client computer which computer is the authority for your time server. This is usually your Primary Domain Controller. To do so, on the client PC, open a command prompt and run the command:

net time

This should return something similar to the following:

This shows “Current time at \\NETTIMESERVER.domain.com” which is your net time authority.

How to check your domain controller time against a global time provider:

On the server that net time identified (NETTIMESERVER / primary domain controller,) right-click on your PowerShell icon and choose Run as Administrator.

Run the following command to only check how much time your server is off from the global time authority. This command doesn’t do the sync, it just displays how much time your server is off. The result will display plus or minus hours/minutes/seconds/fractions of seconds.

w32tm /stripchart /computer:time.windows.com /dataonly

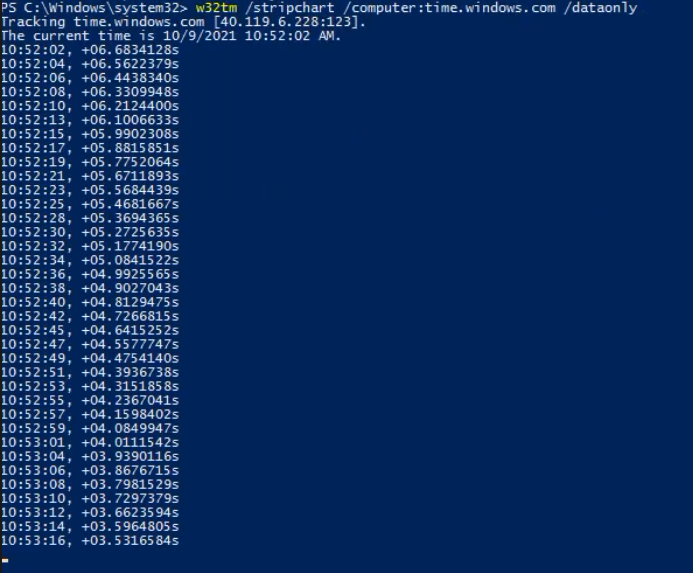
The results should display something similar to the following (hit CTRL+C to stop the data stream):

So we can see our DC is ahead by 39 seconds.

Sync Domain Controllers Time Against Global Time Authority

So now we want to manually configure our server to use a certain global time provider: time.windows.com – to do this run the following command:

w32tm /config /manualpeerlist:time.windows.com /syncfromflags:MANUAL

The terminal should return “The command completed successfully.”

Next type:

w32tm /config /update

Again you should receive a message “The command completed successfully.”

Now to immediately synchronize the time use the following command:

w32tm /resync

We can now check again how much the time is off from the global provider by issuing the stripchart/dataonly command and check the results. You can see here that our time is now off by less than a second:

Sometimes it will take a while for the server’s time to completely sync, and we’ll see a slow progression until the time is accurate (screenshot at bottom of page:)


Sync Windows 7 or Windows 10 with Domain Controller

PC’s on the network that authenticate against our domain controller should automatically pick up the new time from the time server after a reboot. However, we can manually sync the time on the client with the net time domain controller. To do so, open powershell or the command prompt as administrator, and issue the command:

net time \\NETTIMESERVER.DOMAIN.com /set /y

This command should return the message “The command completed successfully.”

Our time on our PC is now synced with the domain controller, and the domain controller is now synced with time.windows.com.

Install OpenDNS Umbrella Virtual Appliances on Hyper-V 2012 R2

You’re probably already familiar with OpenDNS; the service has long been trusted with consumer-grade firewalls and Wi-Fi Access Points. OpenDNS is now owned by Cisco, and the service is relatively inexpensive at approximately $115 for a three-year, 250-license package on CDW. OpenDNS Umbrella extends that protection to your enterprise by categorizing your DNS traffic in the OpenDNS data centers, rather than relying on your own firewall’s DNS capabilities. This is especially useful if you are running pfSense firewalls, as the packaged domain blocking and reporting is minimal in several areas.

In addition to Umbrella, OpenDNS can protect your roaming devices by installing a remote client. For now, we’ll look at the default reporting and why it’s necessary to set up virtual appliances.

Read the rest of the article here:

https://4sysops.com/archives/install-opendns-umbrella-virtual-appliances-on-hyper-v-2012-r2/

powershell – Find all computers in a domain or OU running a service

Sometimes you need to find all the computers on a domain that are running a certain particular service. By using Active Directory, supplying your canonical domain name, and define an output file, you can easily create a list of computers running a service.

First, start PowerShell as administrator, and import active-directory powershell components with the following command:

Import-Module ActiveDirectory

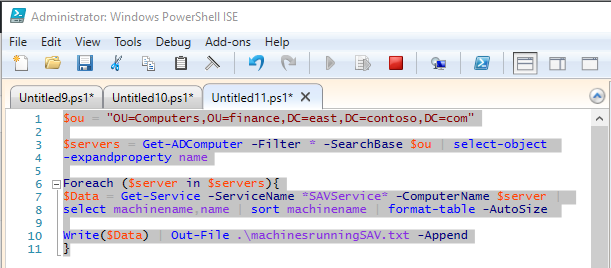
Then, open PowerShell ISE and copy in the following into a new .ps1 script:

$ou = "OU=Computers,OU=finance,DC=east,DC=contoso,DC=com"

$servers = Get-ADComputer -Filter * -SearchBase $ou | select-object 
-expandproperty name

Foreach ($server in $servers){
$Data = Get-Service -ServiceName *SAVService* -ComputerName $server | 
select machinename,name | sort machinename | format-table -AutoSize 

Write($Data) | Out-File .\machinesrunningSAVService.txt -Append
}

Run the script, and your output file will look similar to the following:

MachineName Name      
----------- ----      
hostname1   SAVService


MachineName Name      
----------- ----      
hostname2   SAVService


MachineName Name      
----------- ----      
hostname3   SAVService

Microsoft Bizspark – free business software for 3 years

If you’re thinking about which cloud service to use for a startup business, Microsoft just upped the ante with BizSpark.

Microsoft BizSpark https://www.microsoft.com/bizspark#start-two is really an amazing deal for business start-ups. If you wish you could get Microsoft software for free or for a huge discount check out their offer. BizSpark offers the following services and software for free for three years:

BizSpark gives startups 3 years of free stuff – software, services, tech support, and Azure cloud. Your startup qualifies if it is less than 5 years old, is privately held, and earns less than $1M annually. And at the end of your 3 years, you keep all the software you’ve downloaded – at no cost.

To expand on this service what you get with the Microsoft Bizspark details are the following:

Get up to $750 per month of FREE Azure cloud services for 3 years; that’s $150 per month each for up to 5 developers.

This potentially is a $27000 value!

Membership puts all Microsoft development and test software at your fingertips, including Azure, Windows, and Office 365 – for free. Plus, enjoy access to hundreds of free training classes, technical content, and 4 break-fix phone support incidents to help you on your journey.

It’s pretty amazing that BizSpark, in addition, also offers up to $120,000 worth of Azure credit.

Makes me want to go out and start a new business – hmm, maybe jasoncoltrin.com would qualify?

Adding users to Active Directory with a bulk import


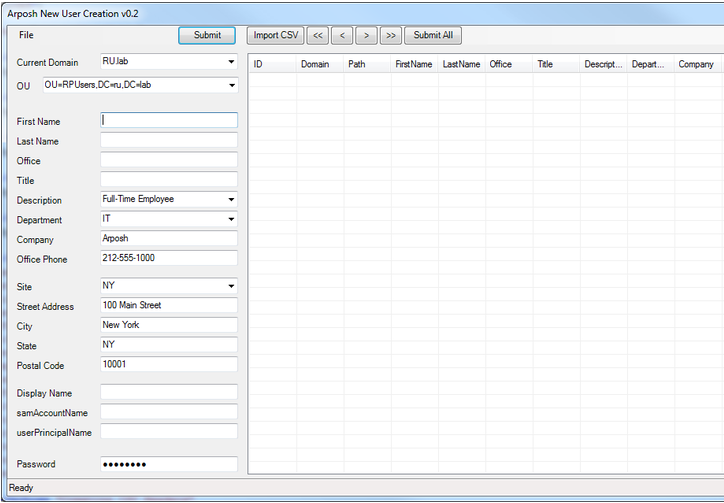
One of the tasks a system administrator will probably have to tackle at one point in their careers, is to quickly add a large amount of users to Active Directory. Without too much difficulty or money, one can accomplish the feat using the following  powershell script: Active Directory User Creation Tool: http://community.spiceworks.com/scripts/show/1917-active-directory-user-creation-tool 

So a quick kudos to [email protected] and Jim Smith for making this tool available for free online.

By following the instructions on the download page, it’s a few hours work to get the xml file and the csv template to work together to bulk import the users into AD.

Download the script, change then name to a .ps1 file and then execute the script with powershell (right-click on the powershell icon and choose “Run as Administrator”.) Because this is an unsigned script, and in case you can’t recall, the command to run first is:

Set-ExecutionPolicy RemoteSigned

One thing to note is when building your csv file, all cells must be quoted.  An easier way to do this, rather than struggling with Excel functions, is to use Libre Office.

Open your csv file with Libre Office, do a Save As -> csv -> check ‘use filter’ -> check ‘Quote all text cells’ -> finish save to a new location with a new filename. Then open the file in a text editor to make sure all cells are quoted.

In the XML file, the most difficult part to configure is the canonical name used to populate the OU you want with the users. In our case we used:

Domain=
subdomain.domain.domain.com
Path=
OU=ImportedUsers,DC=subdomain,DC=domain,DC=domain,DC=com

This will make more sense once you are configuring your XML file. Before you do a big bulk import, generate a template with the script/tool, fill out the essential fields with test accounts (first, last, username, password, etc.), then re-import the template, configure your XML file, and then submit the import. Then test your imports with just a few users at a time.

If you can’t find your test user accounts  that you imported in Active Directory, you might need to right-click on the root in Active Directory Users and Computers (ADUC) and do a “Find…” then search for the test user accounts. They may have been added to the wrong OU. Again, this will take some tweaking, but at least if you can get the users into an OU, later you can select the users, right-click and choose Move… to put them in the correct OU container.

Once your test accounts are being imported correctly, go back, edit your bulk user lists according to the template specifications, and have at it.

Another issue that came up is that in our source file for our users, we only had the First Name, Last Name in the same cell. In order to split the names into two separte columns, we used the following tips:

Split full name to first and last name with Text to Column command – http://www.extendoffice.com/documents/excel/829-excel-split-first-last-name.html
For the First Name/Last name split, create a temporary column named General to the right of the Last name column

This project on spiceworks looks like it’s actively developed so it might be worth while to contact the developer if you run into any trouble or have a feature request.


Symantec Exec 2014 Beta Signups have begun – support for Windows Server 2012 R2

Symantec does not yet support BackupExec Server running on Windows Server 2012. There are a lot of frustrated customers because of this issue. A lot of admins are downgrading to Server 2008 R2 for just this reason. Backup Exec 2014 is slated for late Q2 early Q3 of 2014. Currently BE2012 SP2 running on Server 2008 R2 does have a 2012 client/agent and supports backing up 2012 clients only, but a Backup Exec 2014 beta (aka Backup Exec 2012 R2) signup has started today.

Symantec WS2012 support:
http://www.symantec.com/business/support/index?page=content&id=TECH196108

Symantec WS2012 support news:
http://www.symantec.com/connect/blogs/backup-exec-2012-r2-update-news-about-windows-server-2012-r2-support-and-target-ga

Blog post released yesterday says BE2014 Beta signups have started:
https://www-secure.symantec.com/connect/blogs/backup-exec-beta-program-important-update

Here is the Beta signup info:

Symantec Backup Exec™ 2014 Beta

Updated – February 20, 2014
We are happy to announce the next beta program for Backup Exec is open for registrations. We are seeking existing Backup Exec customers and Backup Exec prospects who are interested in testing, validating and actively providing feedback on Backup Exec within their labs and/or production environments.

 This new version of Backup Exec delivers one of the most powerful and reliable backup and recovery solutions available today. You can be among the first to see all of Backup Exec’s new features, and your valuable feedback can help shape the future of Backup Exec.

 What’s new in this new release?

Job Monitor is back!
Monitor the status of all of your jobs from one convenient panel
Back up multiple servers in a single job
Customize selections for multiple servers all at once
Configure the order of backup sources
GRT support for Exchange 2013 CU3 & SharePoint 2013
Support for Enterprise Vault 10.0.3 and 10.0.4
Support for Domino 9
New platform support
Windows Server 2012 (agent and Backup Exec server)
Windows Server 2012 R2 (agent and Backup Exec server)
VMware vSphere 5.5
Hyper-V 2012 R2
Red Hat Enterprise Linux 5.9
Red Hat Enterprise Linux 6.3
Red Hat Enterprise Linux 6.4
SUSE Linux Enterprise Server 11 SP2
Simplified upgrade experience
Scheduler enhancements
And much more!
 If you would like to participate in this Beta program, please click on “Join this Beta Program” below.

We look forward to your participation in the Backup Exec Beta.

Kind regards,

Backup Exec @ Symantec

Forward-looking Statements: Any forward-looking indication of plans for products is preliminary and all future release dates are tentative and are subject to change. Any future release of the product or planned modifications to product capability, functionality, or feature are subject to ongoing evaluation by Symantec, and may or may not be implemented and should not be considered firm commitments by Symantec and should not be relied upon in making purchasing decisions.

Requirements
Willing to submit incident reports as problems are discovered in your testing.
Willing to complete a daily journal of your beta activities (some days it may simply be one sentence).
Ability to install the Beta release into a test (non-production) and/or production environment.

Server 2012 R2 SMB (SMB2) Shares inaccessable from 2000, XP SP3, Mac client computers – Solved

Recently a lot of users complained that they could not access or mount or connect to public shares hosted by a newer Server 2012 R2 virtual machine running on Xen. The users all had a common trait that they were trying to access the shares with SMB1 from XP, and OS X on Apple/Mac computers. Windows 7 and other Server 2012 computers could access the shares without any errors. After a lot of testing, the resolution turned out to be a registry change which turned off SMB2. During testing we did the following:

  1. I created test shares on the problem server on both the c and e drives, and still was not able to connect to them with OS X 10.9.1 or XP. Whether trying to mount the shares by UNC or DNS, or IP Address, or mapped drives, I could not mount or view the shares. I modified these new shared directories permissions to see if authentication, security, or permissions were the problem, but no difference. The error message on the Macs was: “There was a problem connecting to the server “servername”. The share does not exist.” and on XP was: “The specified network name is no longer available”.
  2. I created a new share on a separate Server 2012 R2 server. My mac was able to mount this share created on it. This anomaly is what is still vexing because it’s an identical share on an identical operating system, but still the public shares had to be fixed. I looked at differences between the two server’s registries and could not find any discrepancies in the hive located at HKEY_LOCAL_MACHINESYSTEMCurrentControlSetServicesLanmanServer. It would be nice for such an occasion to have an easy-to-use tool like linux’ diff, sdiff, or colordiff to compare registries side-by-side, but I digress.
  3. After finding the post by Nicolas Moreno here: http://social.technet.microsoft.com/Forums/windowsserver/en-US/bca317cd-87aa-4fd7-b12a-6715e6dddfe5/cant-access-unc-share-on-windows-server-2012-r2?forum=winserver8gen I checked the good working server and found that it’s server service is using Srv2 (smb2), but it is able to provide shares. Again, the server that can’t share with older clients also was using Srv2 (SMB2), but the symptoms were a lot like the post’s description.
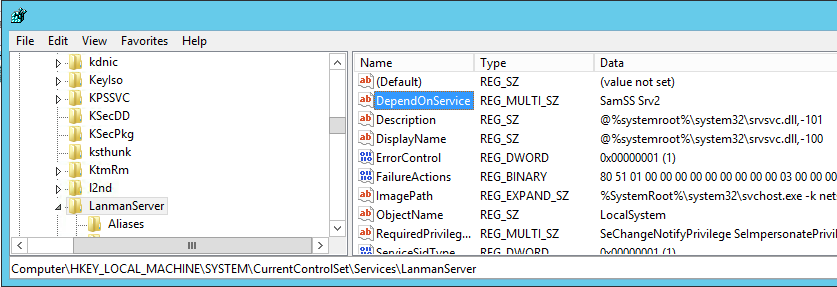
  4. First, I took a snapshot of the virtual machine, I backed up the Registry Hive/Key with an export, and then made the registry change:
    HKEY_LOCAL_MACHINESYSTEMCurrentControlSetServicesLanmanServerDependOnServiceFrom: SamSS Srv2To: SamSS SrvScreen Shot 2014-02-20 at 10.32.29 AM
  5. After making the change and rebooting the server, all of the clients (2000, 2003, XP, Mac OSX 10.8 Mountain Lion, Snow Leopard, Mavericks) could access the shares again.

An associate had made changes to this server prior to the incident cropping up so it’s hard to be sure just when and what caused the SMB2 windows shares to block access, but for now everyone can access the public drives. Please leave a note if this resolution helped or if you found a way to get broken SMB2 shares working again without changing the registry.

 ic_launcher

Creating and Deploying Windows7 with WDS 2012

Below is a rough procedure for using Windows Deployment Services 2012 to create and deploy images in an Active Directory Domain environment. This procedure does not cover the installation of the WDS role in 2012, as that part is fairly straightforward.

– Prerequisites include: Server 2012, Deployment Toolbench, WAIK, and WDS Role installed. After the installation, RDP into your server.

– First step is to perform a clean install from the Windows 7 Enterprise 64 .iso dvd onto a PC model which will be cloned, for example Optiplex 745

– In this case we are using Volume licensing – licensing keys are not important, they are handled by a Volume Licensing Server, you won’t have to choose licensing while deploying images

– Open WDS

– Add boot image boot.wim stored on Win7 Enterprise CD

– Name the image (win7x64)

– Right-Click – Create capture image

– Store locally – name ‘win76capture’ – next – extract image

– In some instances you will need to add drivers. Add drivers – Add driver packages – you will need at a minimum network drivers – go to manufacturers support, get .exe drivers, use 7zip to extract contents into folder and browse to that folder to add them.

– go to remote machine – power on and hit F12 for boot options – network boot/PXE boot *note: some pc’s will not have boot to NIC enabled. Do so in BIOS of system (NIC Enabled with PXE) and set boot order: 1. CD 2. HDD 3. NIC

– Now it’s time to make the PC image. For uncloned models run a base install from Windows 7 CD. After the installation process runs it will restart several times.

– Before entering any settings, and at the point during the install where it ask for the user name/PC name, hit CTRL+SHIFT+F3 to go into Audit Mode – this will RESTART the pc into Audit Mode.

– After restart, the PC will land you on the desktop with the Sysprep Tool open in Audit Mode.

– If you miss the prompt to hit ctrl+shift+f3 you can get into audit mode by running from elevated cmd prompt: c:windowssystem32sysprepsysprep.exe /audit /restart

– Leave the Sysprep tool open with the following settings: Enter sysOOBE, Generalize (checked), Shutdown Options: Reboot

– Leave the Sysprep tool open and do all software installs and settings for the end user. Office 2010 automated installer, create shortcuts for web tools, install standard apps for example: firefox, 7zip, putty, reader, pdfcreator, java, winscp, vlc, iTunes, quicktime – many times mapped drives and folder redirects will be created with .bat scripts but often times printers will have to be connected when setting up for the user. Make sure system is not set to sleep in power settings, turn off UAC, install flash etc. Be sure to open applications such as MS Office to register/activate software.

– Click OK on SYSprep and OOBE

– Restart – PXE boot again – do capture.wim – it will ask ‘select file to save to … Save to local disk as *model*Win7x64.wim. If the capture process does not see the partition C or D (in some instances D drive will actually be your C: drive) then you’ve done something wrong with Audit mode and sys prep. The capture will complete and land you either at the Owner/PC Name settings at which point you’ll do a Ctrl+Shift+F3 or at your desktop. Once back at the desktop, browse to your server at servernameshare and copy the capture.wim file to the server.

– Make sure to start WDS as administrator and can add new Image Group. If you don’t add a New Image Group the ‘add new image’ wizard may tell you the image is invalid. If you get “File does not contain a valid install image” / Add Image failed. In WDS install images – add new Image Group, then try re-adding the captured .wim. If it still says invalid image, re-copy the captured image from the PC back to servernameWDS, create a new image group and add image again.

– Right-click – Create multicast transmission/Any PC can connect/Allow Multiple etc. Create a new multicast transmission for your new image.
– Boot client PC to be imaged into PXE again and clone the machine with new image that you just captured from it, to test and make sure it works, network, drivers etc are all in place.

– if errors occur, go to image then ‘Add driver packages to image’

– if everything is good open WSIM – 2 answer files will be created: 1. Unattended and 2. OOBE (out of the box experience)

– Use unattended file in c:remoteinstallwds clientunattendedwdsunattendedwin764.xml

– Use petenet live documentation for unattended file creation settings if necessary here: http://www.petenetlive.com/KB/Article/0000735.htm (three parts)

– Pass 1: 2 modules — 1. AMD64_ms-win-international-core-winpe_neutral … 2. AMD64_ms-win-setup-neutral – credentials domain: sec un: ***admin pw: *****04

– Pass 4: 1 module — AMD64-ms-win-unattendedjoin-neutral: machine objectOU: OU=autoinstall,OU=Workbench,OU=Workstations,OU=***,OU=*****,DC=***,DC=root,DC=******,DC=com — join domain: ****.root.****.com

– File – Open – oobeunattendedwin7x64.xml:

– Pass 4 (Specialize) — 2 modules: 1. AMD64_ms-win-shell-setup-neutral: configure organization, owner, PST —- 2. AMD64_ms-win-unattendedjoin_neutral: ID join domain /OU, credentials: ***/******

– Pass 7 (oobesystem) — 2 modules: 1. amd64_ms-win-internationalcore_neutral: EN-US (everything) — 2. AMD64_ms-win-shell-setup_neutral – a. OOBE – true,true,work,1,true,true b.UserAccounts – administrator pw: **** – Local Accounts – LocalAccount [Name=”admin”]: AddListItem, admin,admin,Administrators,admin – Passwrd: ******

– Go to WDS Install Image win764 – right-click – properties – checkmark Allow image unattended – select c:remote installwdsclientunattendedoobeunattendedwin764.xml – ok

– Right-click on Server – Properties – Boot tab: default boot image x64: use boot capture.wim. — under Client Tab: Enable unattended installation

– Browse to c:remoteinstallwdsclientunattendedwdsunattendedwin7x64.xml / enable logging

– Boot client pc pxe – options are win7x64 or capture – select win7x64 – option which image you want to install (win7x64)

– PC should finish installing the image and restart, leaving you at the Ctrl+Alt+Del and already named and joined to the domain. The PC should have been added to the OU domain.com/Workstations/Workbench/autoinstall

– Log in as domain admin, add the end user account temporarily to the local administrators group, log in as the user and setup the user profile and add printers.

– Remove end-user from local administrators group – that’s it!