How to identify and Expand AWS EBS volumes in Windows Server 2012

If you have a disk drive that is running out of space because a database is starting to grow too large for the drive in an EBS volume on AWS, you may be asked to modify or expand the volume. In this case, we are tasked with expanding the “E drive” on a Windows Server 2012 AWS virtual machine. Because this is not a boot volume, and because it is an NVMe-based gp2 volume, it will be fairly easy to expand the volume without having to do things like shut down the instance, take a snapshot, expand the snapshot etc.

When you have a lot of disks attached to a Windows Server corresponding to a lot of different volumes attached to the instance in AWS, it can be a little tricky identifying the correct volume to expand. Read below to learn how to match an EBS volume in AWS to a Disk drive in Windows, expand the volume in AWS, and then finally resize the disk in Windows.

Identify Volumes Associated with Instance

First, log into AWS

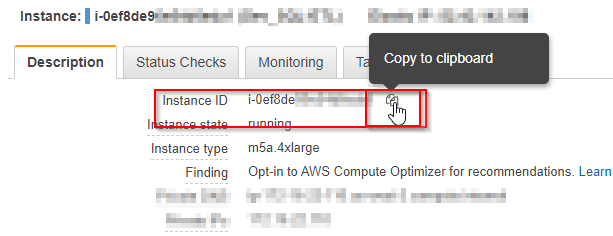
Next, Go to EC2 > Find your instance in EC2 by name, select it, then copy the instance ID.

get instance id

Next, navigate in AWS to EBS > Volumes.

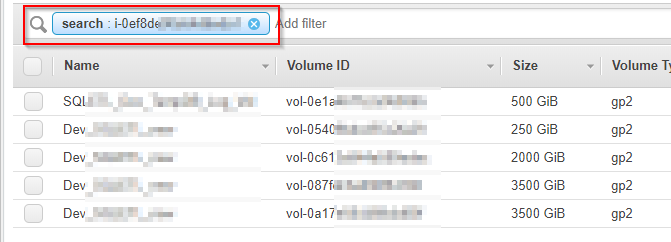
Find all the volume names associated with the instance by pasting the Instance ID into the search box at the top of the screen.

Identify the EBS Device in Windows

Now we’ll switch over to Windows. RDP into the server we want to modify. Once we’re in the server’s desktop, we want to download ebsnvme-id.zip from https://docs.aws.amazon.com/AWSEC2/latest/WindowsGuide/nvme-ebs-volumes.html And unzip/copy the .exe to your desktop.

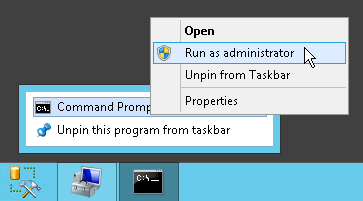
Next find the command prompt and open CMD as administrator (right-click on CMD icon > run as administrator.)

Run CMD as Administrator

Change directory in CMD to your desktop with the command:

cd c:\users\jcoltrin\desktop

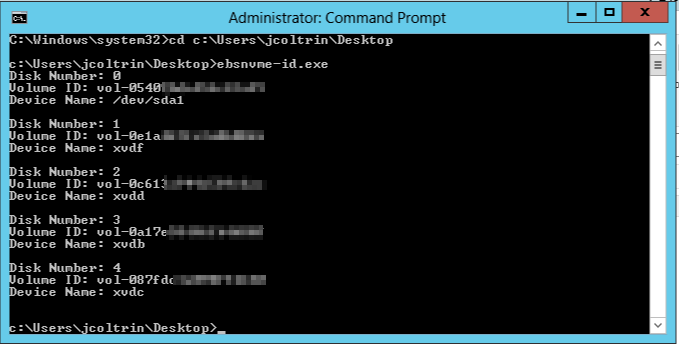
Run the ebsnvme-id.exe in the Administrator Command Prompt

run ebsnvme-id.exe in cmd

Identify Disk in Windows and Match to Volume ID

Next, on the Windows server, open Server Manager

Windows 2012 Server Manager

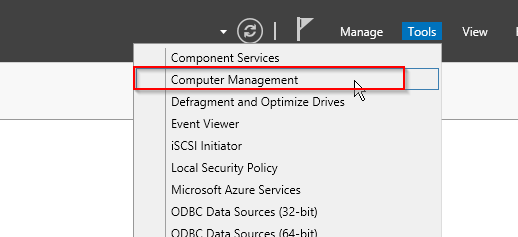
In the upper-right corner of Server Manager, go to Tools > Computer Management

Server 2012 Computer Management

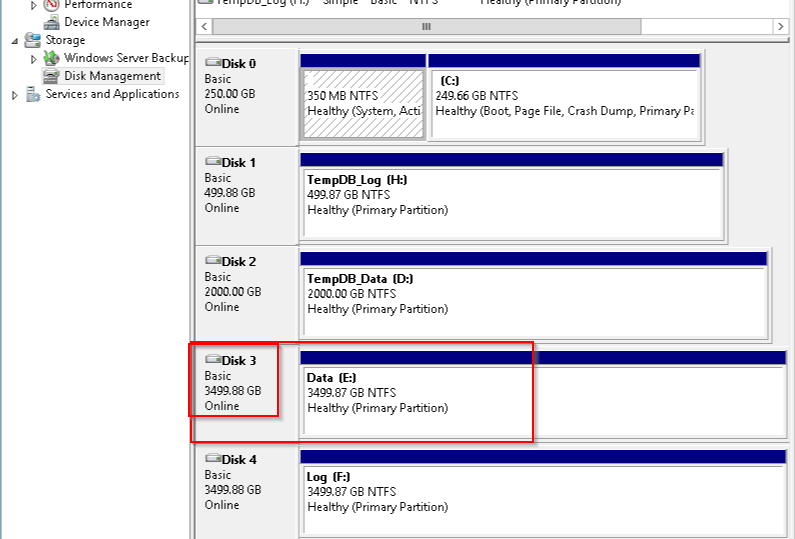
Make note of which disk (Disk 0, Disk 1, Disk 2, etc) corresponds to the Device Name and Volume ID that you want to change. In my case I want to expand Disk E, which is also known as Disk 3. Looking at the output of the CMD screenshot above, I can see Disk 3 shows my Volume ID is vol-0a17e…, and Device Name is XVDB.

Server 2012 Disk Management

Modify and Expand EBS Volume in AWS

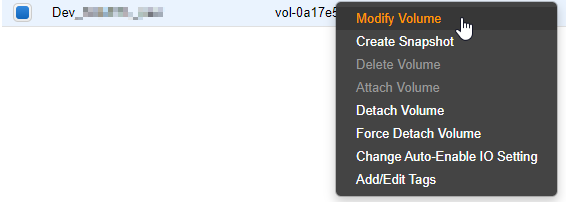
Now that we are sure which volume it is we want to expand, and that this is not our Boot drive we can right-click on the vol-0a17e… volume in EBS and choose Modify Volume. **If the Disk is your boot drive, a snapshot should be taken first, and then shut down to expand the snapshot volume, then detach the snapshot, and attach the expanded volume.

EBS Modify Volume

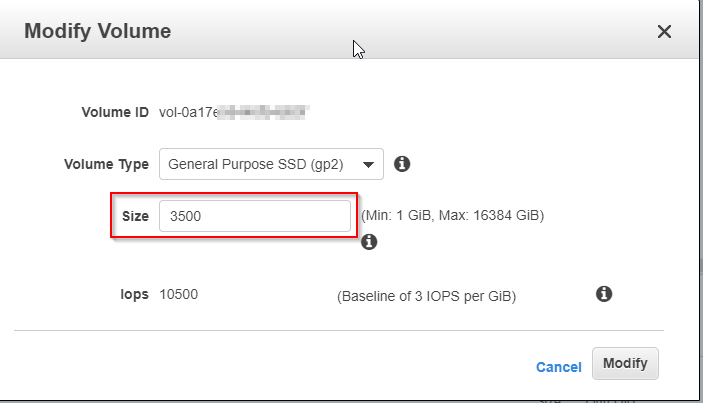
A new dialog box pops up asking for the new size of the volume:

EBS Modify Volume Size Dialog

Enter the new size and click Modify.

Switch gears and now go back to your RDP session, go to Disk Managment, Right click on the volume and choose Extend Volume… > use all of the available space and click ok.

Our Volume size has now been increased and we can continue to grow!

How to clone a Dell Optiplex 7050 M.2 NVME Hard Drive with Clonezilla and an External USB HDD

I ran into trouble when trying to clone a new Optiplex 7050. My normal procedure for cloning with clonezilla required a little tweaking to accommodate Windows 10, UEFI, NVME M.2, Secure Boot, and RAID On. Follow the procedure below to clone your systems on these newer hard drives and BIOS versions.

As a side thought, I enjoy using Clonezilla and have used it for many years. I love the convenience of it and not having to manage Windows images with something like SCCM. While SCCM has a place in some organizations, I believe it’s perfectly fine to use Clonezilla to create OS images of different models of computers. I have approx 15 different OS images; everything from Lenovo laptops to Dell Optiplex 380’s to Optiplex 7050’s.

Requirements:

  • 1 x USB 2.0 or 3.0 USB thumb drive min 2GB capacity for the clonezilla bootable USB drive made bootable to 20170905-zesty version of clonezilla
  • 1 x USB 3.0 USB External HDD with a minimum HDD size that is larger than the TOTAL size of your M.2 NVME HDD. (I use a 4 TB Western Digital My Passport) – In my previous experience with Clonezilla, it has created images only writing images of the Used Space on the Source HDD, in this case with UEFI / NVME HDD’s, the image created on disk is the total size of the NVME drive.
  • 2 x Dell Optiplex 7050 (Source and Target) computers
  • 1 x Separate PC or laptop you can use to create a bootable USB Clonezilla Thumb Drive

1. Configure your Source Windows 10 Dell Optiplex 7050 machine as necessary. Install all applications, create user accounts, and uninstall bloatware. Make sure you create an administrator user account and password. In final preparation for cloning, either run Sysprep (found in C:\Windows\System32\Sysprep), or alternatively ensure you shut down Windows 10 completely by creating a Shutdown /s /t 0 shortcut and executing it.

2. On a separate PC, download Rufus which we’ll use to create a bootable USB thumb drive.

3. On a separate PC, download the AMD64 version of alternative (Ubuntu-based) as outlined on the Clonezilla website (this version is required for newer BIOS’):

4. Change the file type to ISO and hit Download.

5. Attach your USB thumb drive into your separate computer, run Rufus, tell Rufus to use the drive you just attached under Device, point Rufus ” to the .iso file you just downloaded.

6. Hit Start and the bootable USB thumb drive with Clonezilla will be created.

7. On the Source computer, insert the USB thumb drive into one of the front panel’s top (black) USB ports, and insert the USB External HDD separately into the Blue USB 3.0 port. Attach the keyboard, mouse, power, and monitor.

8. Power on the Source computer and start mashing the F12 key on the keyboard to get to the one-time boot menu.
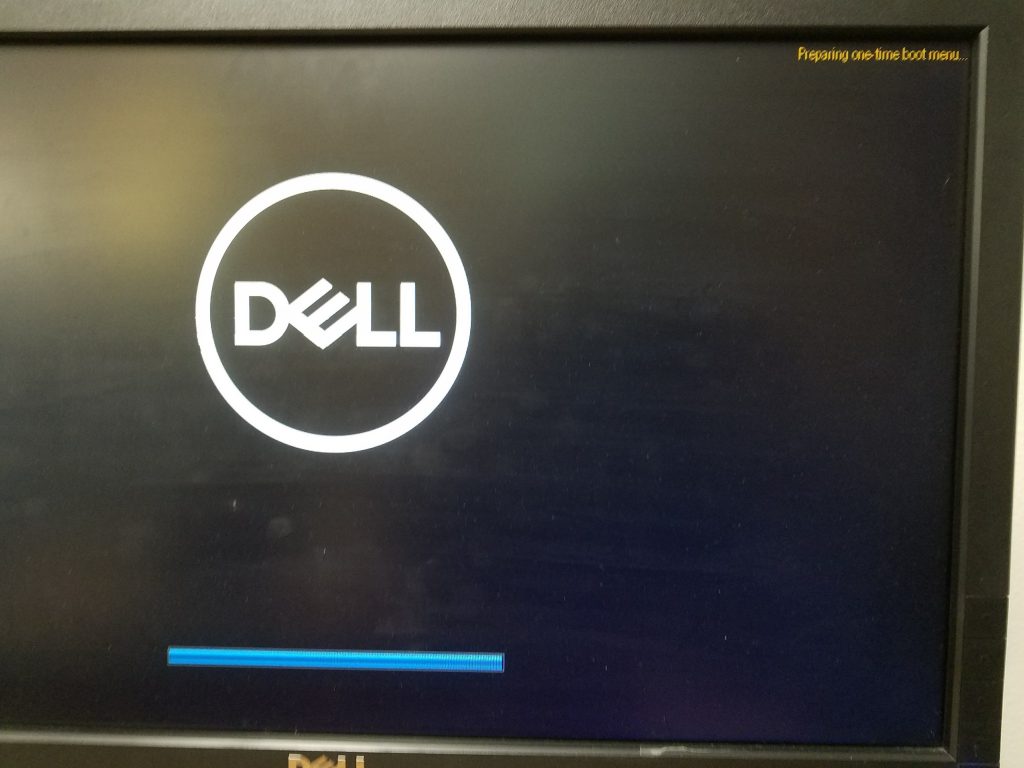
9. Before we begin, we need to make sure clonezilla can find our NVME HDD. By default UEFI and Secure Boot will be enabled. We need to disable these as well as Boot Path Security so that we can continue.

10. Select Setup from the Boot Menu:
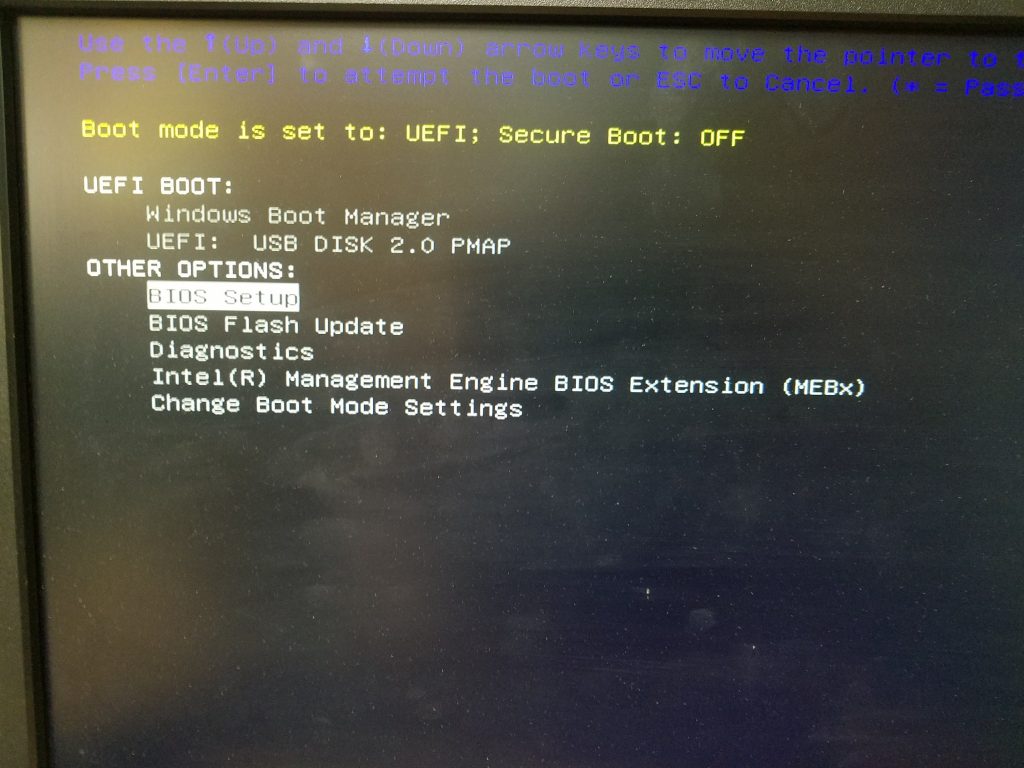
11. In the BIOS, under the General Heading, select UEFI Boot Path Security and change it from Always to Never.
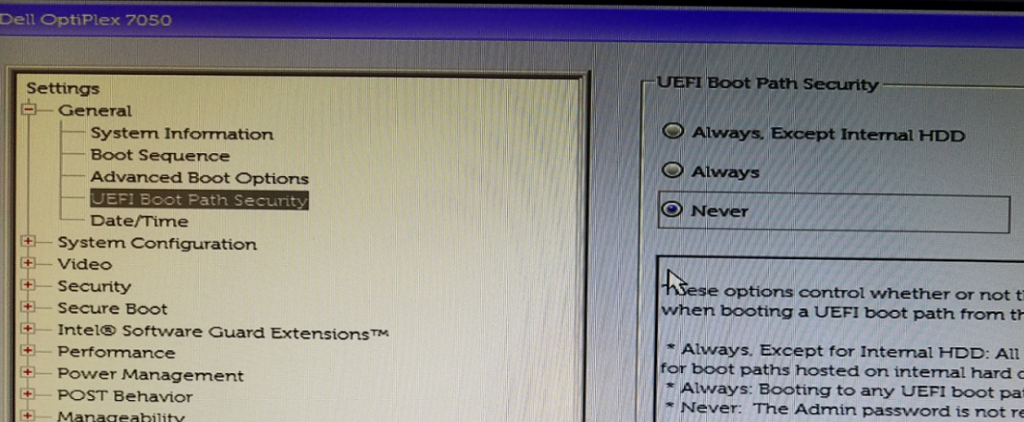
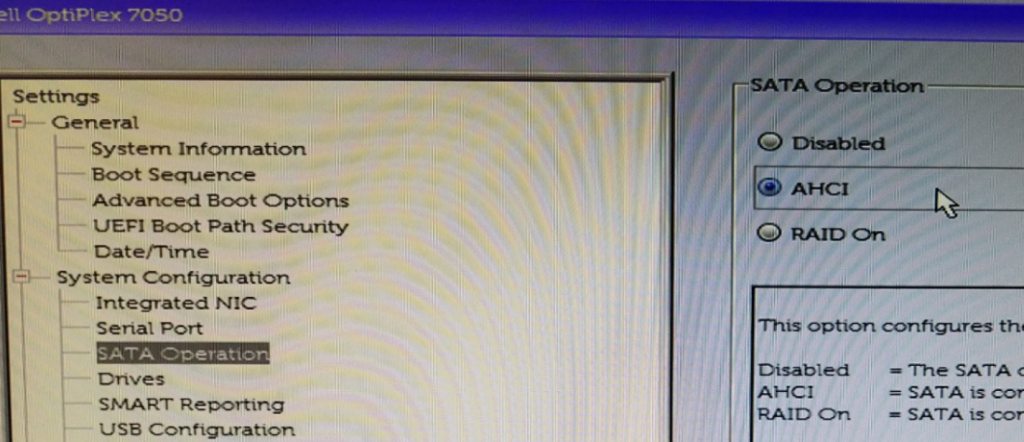
12. Next change System Configuration > SATA Operation from RAID On to AHCI
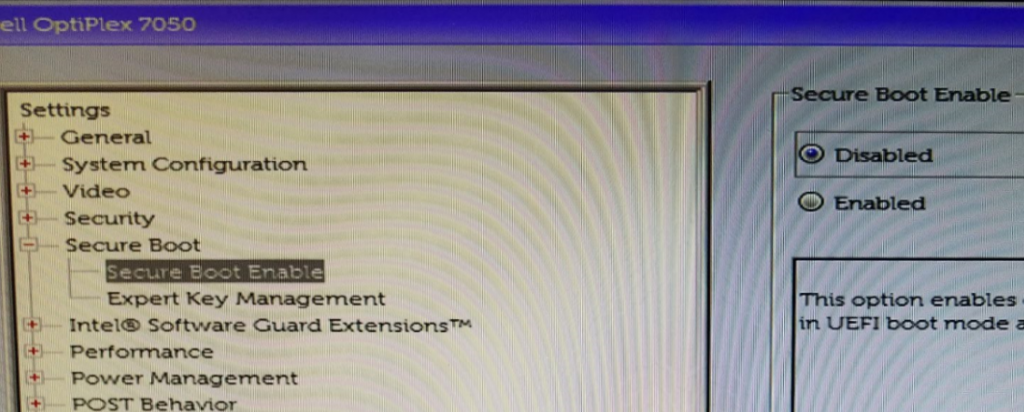
13. Lastly, change Secure Boot > Secure Boot Enable “Enabled” to “Disabled”
Apply, Save and Exit the BIOS. On the next boot, start mashing the F12 key again and this time select UEFI: USB DISK 2.0 PMAP
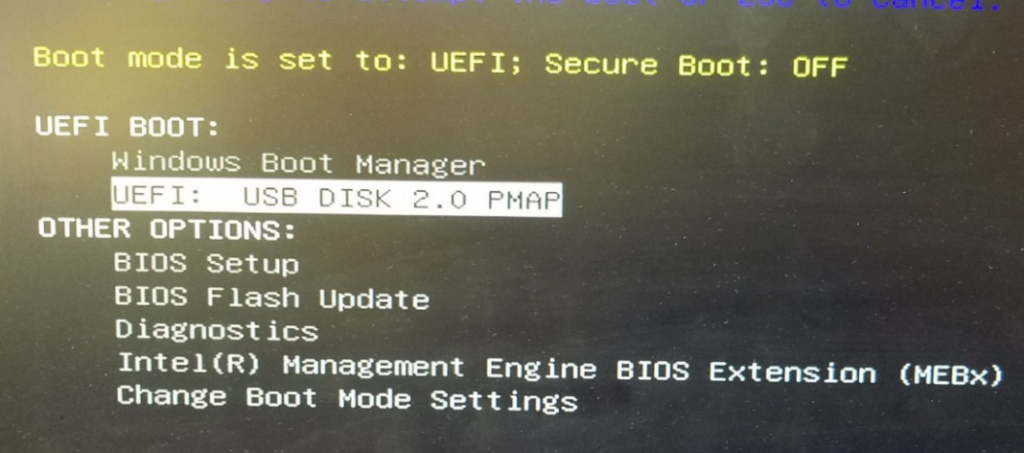
Clonezilla will boot from the USB drive so choose the default (hit Enter):

Select English > Don’t touch keymap > Start Clonezilla > device-image (Ok)

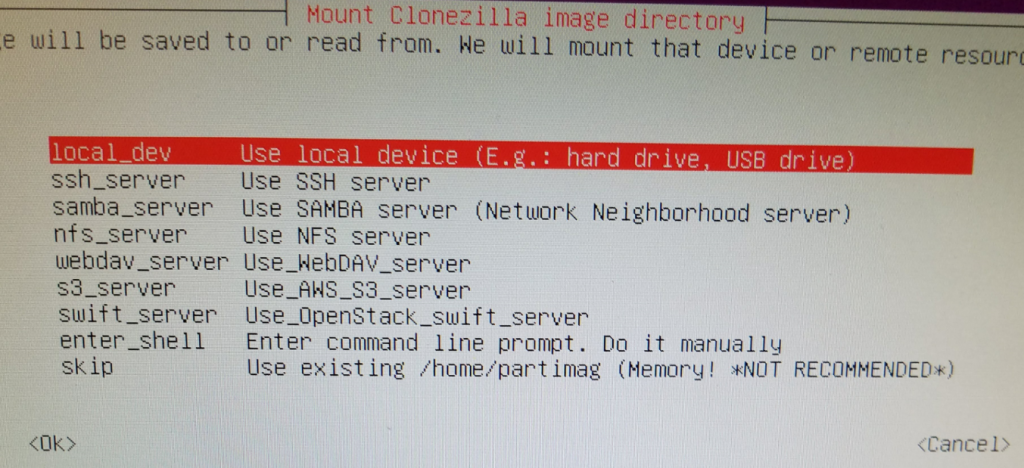
Under Mount Clonezilla image directory, choose Local_dev (Ok)
Press Enter to continue.

Review the clonezilla Scan disk preview to ensure it’s found both your Source and Target hard drives:

Press Ctrl-C to continue.

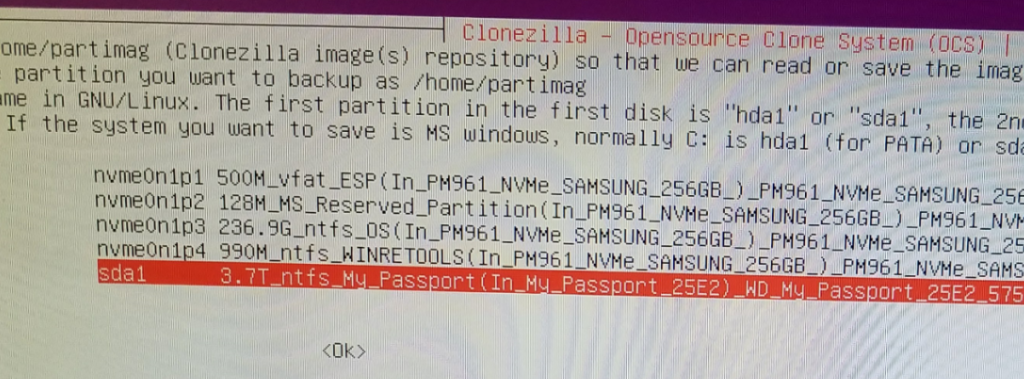
Arrow down and select your large external USB hard drive (sda1) to set the location of /home/partimg . This is where the clone image will be stored.
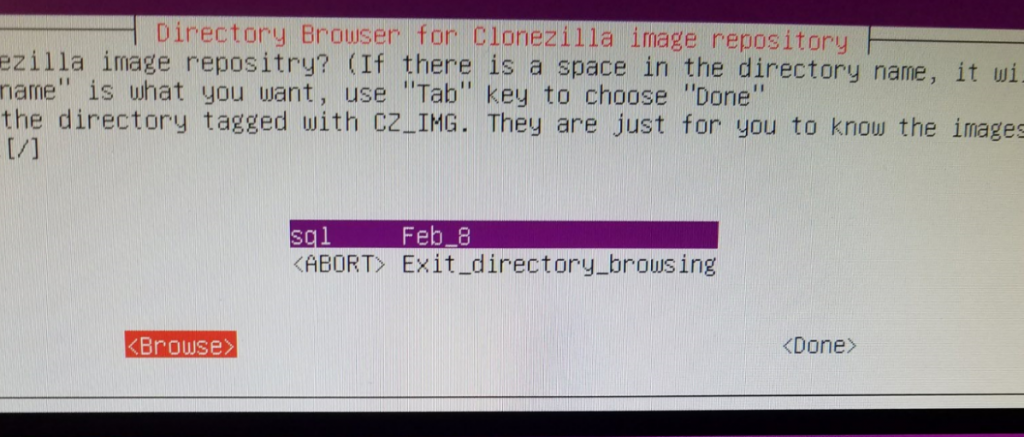
In the Directory Browser, hit “Browse” and go to your Parent Directory (top-most level) and select Done. This is where your image will be saved. You can see in my screenshot I’ve already saved an image here.
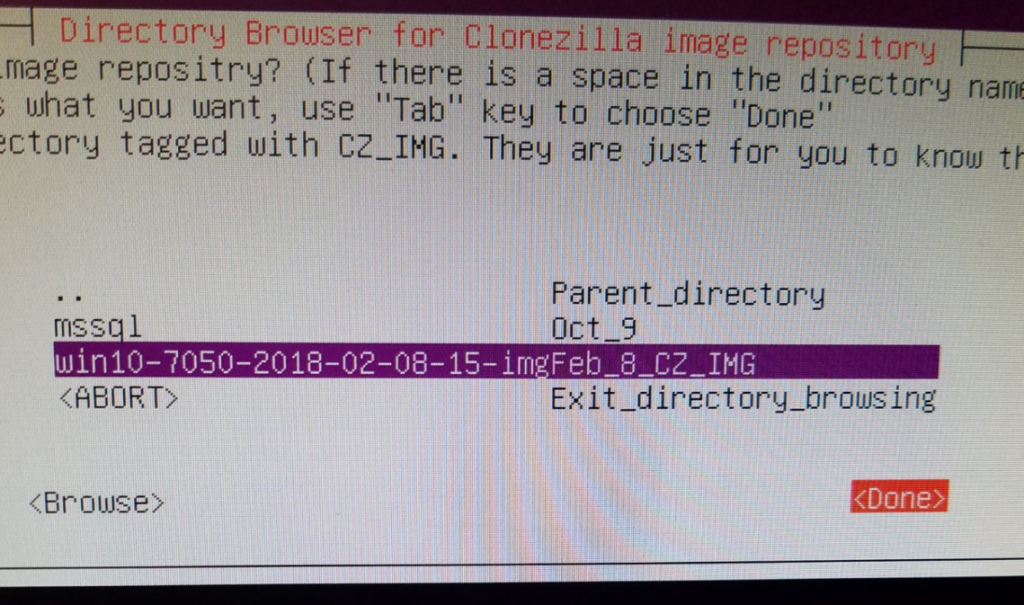
You will get a Summary location of Source (dev/sda1) and Target (/home/partimag). Press Enter to continue.

Choose Beginner mode

Choose Save Disk (Save_local_disk_as_an_image) – in my previous experience with Clonezilla, using normal spinning HDD’s and even SSD’s, I’ve used Samba to save my images to a separate server over the network using gigabit ethernet perfectly fine. However, in the case of these new computers and hard drives, I would get a permissions error when selecting SAMBA/SMB 2.1. The imaging would begin to take place and a couple smaller partitions would copy, but as soon as the primary large partition started it’s copy, I would get the permission error and the clone would halt. This is why we are using a local external USB hard drive.

Give a descriptive name for the image (Dell7050_NVME_256GB_DATE-IMG) hit OK.

Select the local disk as source (should only be one here)

Select -sfsck (Skip Checking)

Select Yes, check the saved image

Select -senc Not to encrypt the image (or encrypt if desired)

Select Action to perform when everything is finished: -p power off.

Press Enter to continue, (Yes/Yes) – the image process will run and the image of the Source PC will be written to the External USB HDD. The machine should shut down when complete.

Image Target Computer

Now that we have our image saved on our external HDD, we can image our Target PC. On the powered-off PC, Connect the USB thumbdrive, External HDD, keyboard, mouse, and monitor, and again Boot into the BIOS.

On the new target computer, we want to again change the BIOS settings to mirror those we made in steps 11., 12., and 13.

After saving the BIOS, restart and hit F12 again, select the USB thumb drive, and boot Clonezilla.

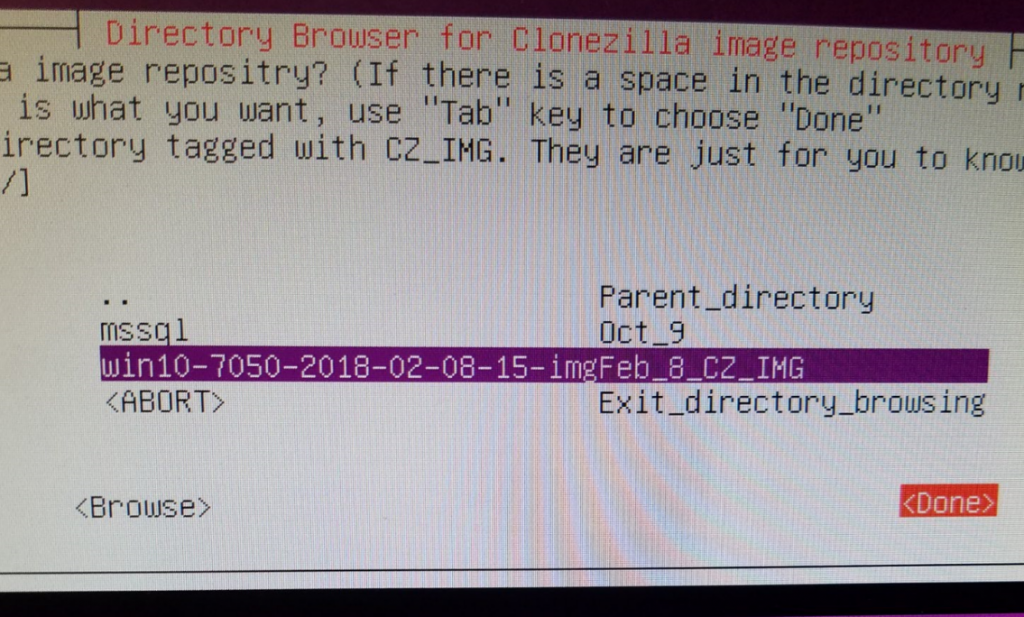
Start Clonezilla > Device Image > Local_dev > select image repository (sda1) > in Directory Browser, browse to the image we created, highlight it and select Done:
Choose Beginner Mode > Restore Disk:

Choose the image to restore:

Select the target disk to restore onto (Should only be one listed here):

Select “Skip checking the image before restoring” > poweroff > Enter >

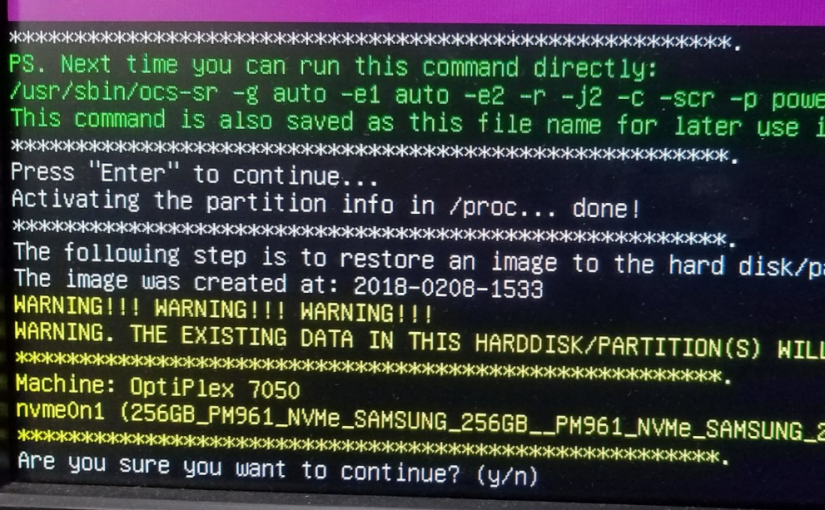
Heed the warning here. If important data is on the target disk, do not proceed. All data will be overwritten:
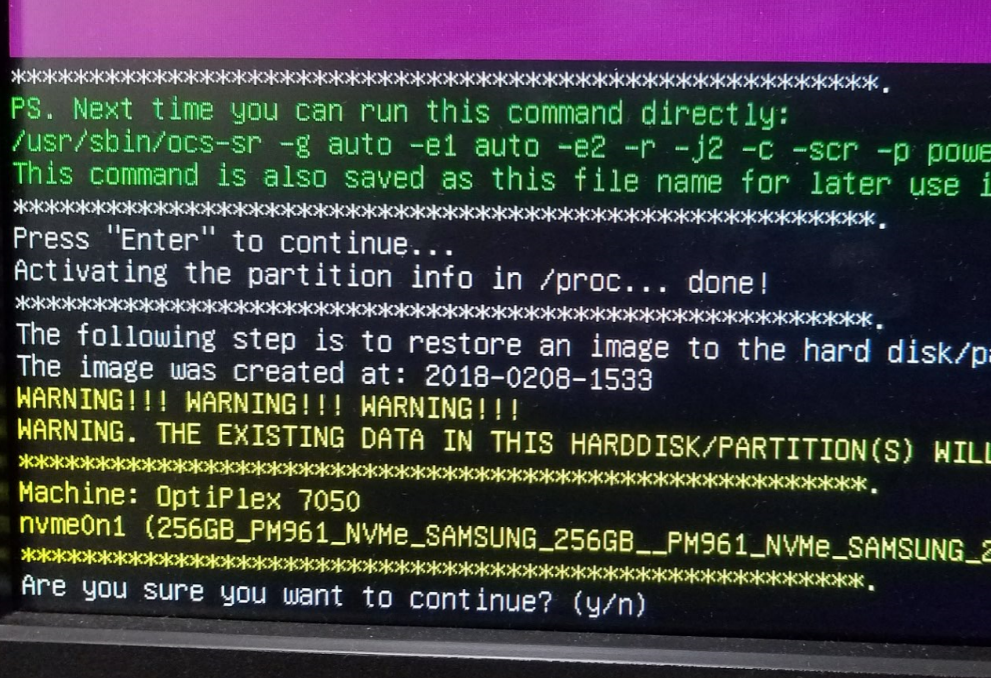
Hit y (enter) > y (enter) >

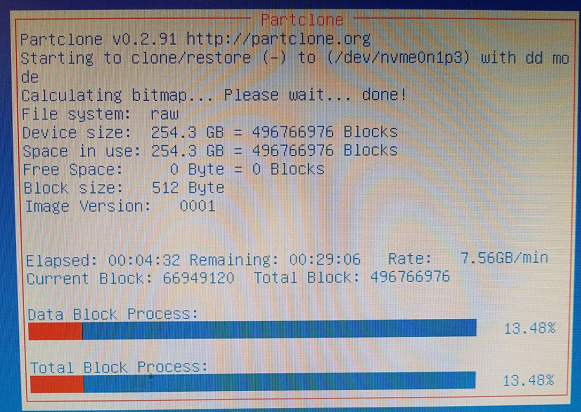
Partclone will run, clone the image to your disk, then shut down:
With the system powered down, remove your external HDD and boot thumb drive.

Power on the newly-imaged PC, hit the F12 button to go into the BIOS again. Reverse the changes made in steps 11, 12, and 13. Save the BIOS settings, and boot normally into windows. Congrats, you’re done! Hope this helps someone clone their newer systems with Clonezilla.
Solved – Unable to remove OneDrive for Business from Windows 7

Solved – Unable to remove OneDrive for Business from Windows 7 – two versions of OneDrive on the same Windows 7 / Windows 10 PC. Remove / uninstall old version of OneDrive for Business. 

This may not be the most elegant/logical way of stopping the old/bad OneDrive from running, so let me know in the comments if you found the correct “Microsoft way” of fixing this issue. Others have spent hours trying to resolve this issue and hopefully you’ll get some kind of resolution with this information.

In some instances OneDrive for Business will ask you to upgrade. When you Update or upgrade OneDrive for Business it could keep the old version of OneDrive for Business on your computer, making it so that you have two versions of OneDrive for Business (even the icons look slightly different.) This may come pre-packaged with a Click to Run (clicktorun) install of Office or pre-installed on your system. You probably want to remove the older version of OneDrive for Business, but even after trying to uninstall OneDrive for Business old version from Programs and Features in the Control panel, even after restarting, the program comes back and you can’t delete it!

You probably still want to use OneDrive for Business, but you should only use the updated version that works correctly with Office365 and SharePoint Online.

Anyway, once your updated/upgraded OneDrive for Business is updated and installed, make sure you have all your important files inside the new OneDrive for Business and that the files are synced with SharePoint or where ever they should be. Make sure you have backups of the important files somewhere else like an external drive as well just to be safe. Once we disable the old OneDrive for Business / Groove.exe, make sure those old files are already synced with the new OneDrive for Business service. Once you have your files all synced and what-not with the new OneDrive for Business, we can disable/remove the old/bad version of OneDrive.

The older version of OneDrive for Business actually runs as Groove.exe. While the Task Manager is open (tick the check-mark or hit the button that says ‘Show Processes from All Users), track down Groove.exe by right-clicking on the bad OneDrive in the systray and then in the OneDrive menu, choose Exit (down by the clock – there may be two cloud icons down there, be sure to exit the correct one.) Then launch the old/bad OneDrive again from the Start > Program Files > OneDrive for Business. Do this several times and you will see Groove.exe pop in and out of existence inside the Task Manager. While it’s up and running, right click on the groove.exe in the task manager and choose “Open File Location”. The file will probably live somewhere similar to the following location:

C:\Program Files\Microsoft Office 15\root\office15\Groove.exe

Be sure to End Task or Exit out of the bad OneDrive for Business or Groove.exe, then rename the Groove.exe file to Groove.exe.old .

Now that this has been done, you may want to remove the old/bad OneDrive for Business link in your Explorer Favorites list. Do this with a left-click on the top-most Favorites link and in the right-hand pane, right-click on the old/bad OneDrive for Business shortcut and click Remove. Additionally you may want to remove the old/bad program shortcut in your Start Menu.

How to format a large external usb hard drive for use between both an OS X Mac and a Windows 10 PC

All versions of Windows since Windows Vista should be able to access a GUID drive. Because OS X is able to partition a GUID partition, we want to partition our large external hard drives with this compatible partition table. So, any modern computer since 2006 should be compatible. GUID doesn’t suffer from the restriction of a maximum partition size of 2TB, so if we have a hard drive larger than 2TB, we won’t be required to build multiple partitions with MBR.

Here’s a good quote for other important features regarding GUID (GPT stands for GUID Partition Table).

“On an MBR disk, the partitioning and boot data is stored in one place. If this data is overwritten or corrupted, you’re in trouble. In contrast, GPT stores multiple copies of this data across the disk, so it’s much more robust and can recover if the data is corrupted. GPT also stores cyclic redundancy check (CRC) values to check that its data is intact — if the data is corrupted, GPT can notice the problem and attempt to recover the damaged data from another location on the disk. MBR had no way of knowing if its data was corrupted — you’d only see there was a problem when the boot process failed or your drive’s partitions vanished.”

exFAT was released in 2006 as well, but Microsoft added backwards-compatibility to previous Windows versions from before Vista. The main benefit to it is that it doesn’t have the file size restrictions of FAT32, so individual files with exFAT can be larger than 4GB each. It probably isn’t super important for smaller files, but it could be a necessity for people working on larger files like videos or disk images.
Below is a step-by-step procedure for formatting a large External USB drive which can be used by both a Mac and a PC. This setup will utilize the newest, most fault-tolerant partition tables, and allows for the largest volume and file size capabilities. In my case I am formatting an 8TB Seagate Backup Plus+ USB 3.0 external HDD hard drive.

First, plug a new USB drive into a Mac:

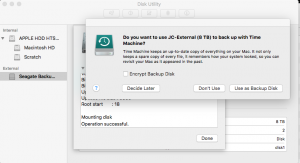
  1. The Mac will automatically prompt if you want to use the drive as a Time Machine backup Disk – click “Don’t Use”
  2. Open Disk Utility
  3. On the left side of Disk Utility, under External, you should see your drive listed.
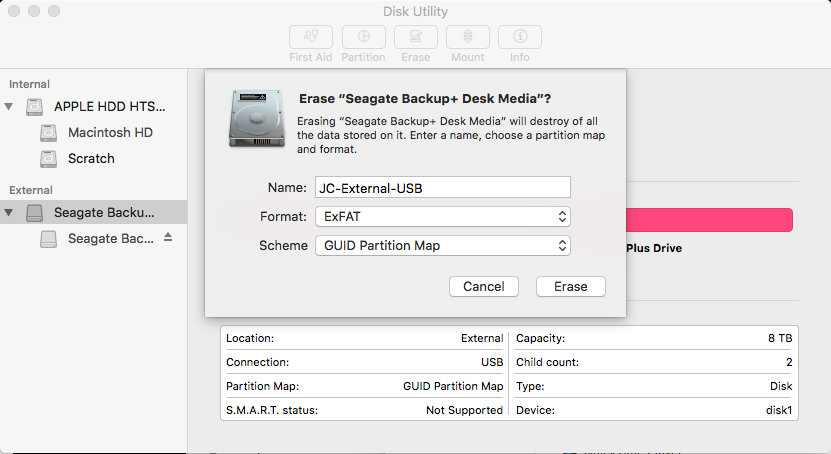
  4. Select the “highest-level” of the drive, not the partitions located underneath. In my case, Seagate Backup+ Desk Media.PC Mac External drive format (1)
  5. At the top of Disk Utility, click the “Erase” button.PC Mac External drive format (2)
  6. Name your disk, such as “JC-External”.
  7. Under “Format” drop-down menu, select “ExFAT”
  8. Under “Scheme” drop-down menu, select “GUID Partition Map”PC Mac External drive format (3)
  9. Click “Erase”
  10. Once the drive has been erased, again, Time Machine will prompt to use as a backup disk – select “Don’t Use”PC Mac External drive format (4)
  11. Click “Done”
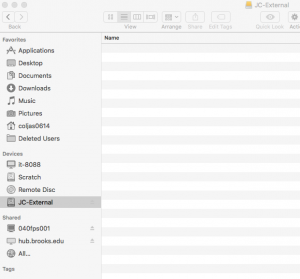
  12. Your drive should now be listed under Devices in the Finder.PC Mac External drive format (5)
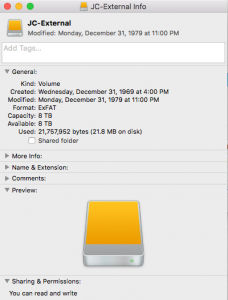
  13. Control-click or right-click on the device in the Finder, and click “Get Info”.  You can see that indeed it created an 8TB ExFAT Volume, but the Sharing and Permissions cannot be modified. Permissions can only be set if the drive is formatted with  “OS X Extended”. Also, notice that the Created/Modified dates may not be accurate, however, files and folders contained in the drive will display accurate modified dates/times.PC Mac External drive format (6)
  14. One thing to note, is after initially formatting the drive on a Mac, and then attaching the external drive to a Windows 10 PC, the drive may not immediately display with a drive letter by default in the Windows File Explorer. Go into Windows 10 Disk Management and find the drive listed in the discovered drives, but you may find that a drive letter is not associated with the volume.
  15. To fix this, in Disk Management, right-click on the large/unidentified new data volume and click “Change Drive Letter and Paths…”. Next, click the Add.. button, assign a drive letter (D:) and then OK. You should now find your external drive listed in Windows Explorer and see the files and folders you copied into it while it had been connected to your Mac.

Hyper-V failed to generate initial replica for server

turbolift_access_denied

I recently found that one of my virtual machines had failed it’s initial replication off to a server located at a different site. I looked at a few of the Hyper-V-VMMS Admin Event Logs and found some of the following errors:

Event ID: 32042 – Hyper-V failed to generate initial replica for ‘040REP001’: General access denied error (0x80070005). (Virtual machine ID GUID)

Event ID: 33680 – Replication operation for virtual machine ‘ServerName’ failed.

Event ID: 32086 – Hyper-V suspended replication for virtual machine ‘ServerName’ due to a non-recoverable failure. Resume replication after correcting the failure.

Also Event ID’s 33676, 18012, 16370

I googled around and found that most resolutions revolved around fixing the “Virtual Machine” group permissions of the parent Folder or Volume by using the icacls command that looks something like this:

icacls “C:ProgramDataMicrosoftWindowsHyper-VVirtual Machines5A6F2E44-7F95-4CF8-89E5-AE8A6648C93A.xml” /grant “NT VIRTUAL MACHINE5A6F2E44-7F95-4CF8-89E5-AE8A6648C93A”:(F) /L

or this:

icacls “C:UsersPublicDocumentsHyper-VVirtual Hard DisksMountPointHere” /grant “NT VIRTUAL MACHINEVirtual Machines”:F /T

The folder that the .vhd was contained in did not have “Virtual Machine” group permissions (c:\hyper-v\exports), so I decided I should move the VM and it’s virtual hard disk to a new location that does have the correct permissions. Since this was an old export, I found the original location of the .vhd in the config file in c:\hyper-v\exports\config.xml.

Since I didn’t like the current location of the virtual machine and .vhd anyway, I decided rather than trying to fix permissions, I’d move it to a better location in a folder that would inherit the correct permissions.

To resolve the replica problem I did the following:

1. Disabled alerting on the server, then shut down the VM.

2. Disabled replication on the vm – right-click on VM in HyperV Manager -> Replication -> Remove Replication

3. Moved all Virtual Machine folders associated with MyServerName out of a folder I had created “c:\Hyper-V\Exports”  including the .vhd within (folders that did not have the permissions) and cut/pasted into “C:\Users\Public\Documents\Hyper-V\Virtual hard disks\” folder that was already created. This folder inherited permissions from the parent folder including the “Virtual Machines” group.

4. On the shut-down VM, I then went into the VM’s settings and then IDE Controller 0 -> Hard Drive -> Changed Location of Virtual Hard Disk by hitting the “Browse…” button, browsed to the new .vhd location folder with the correct permissions -> OK

5. Started the Virtual Machine successfully, then re-enabled replication with the remote site Replica server and, – yes! – initial replica started normally and health is normal again. Sending initial Replica now at 3%.

6. Re-enabled alerting on the server.

Hope this helps someone else who’s replications are failing and they’re struggling with the “General Permissions Error” problems associated with snapshots and replication.