
When I pick up there is a dead line. The caller id says the call originates from Minnesota. A quick search online says others have listened to a automated message for Card Holder services to lower rates. Definitely going to block this one.
Getting started with Bitcoin – Coinbase.com and Changetip.com
Plug: Since I’ve put a lot work into my site and sharing my knowledge and troubleshooting skills on jasoncoltrin.com, please consider leaving a bitcoin “tip” at the bottom of this page. Thanks!

.
So perhaps you’ve read about Bitcoin and don’t know how to get started? Read below to get a REAL quick overview and links to get a Bitcoin wallet.
Bitcoin seems to be here to stay, and it’s acceptance and list of Merchants that use Bitcoin is growing.
According to coinbase.com, Bitcoin is digital money used for instant transfer of value anywhere in the world. Bitcoin was developed to make payments methods for the internet age an improvement over traditional banking.
Bitcoin is safe because the Bitcoin protocols, algorithms, and sourcecode is open and has been audited and vetted by thousands of security researchers around the world.
Bitcoin is not tied to or pegged to any other currency’s value. Bitcoin value is determined by buying and selling of Bitcoins on the open market, much like stocks or property.
Bitcoin can change value because it is traded for dollars, Euros, Yen and other currencies 24 hours a day. Depending on demand, the price can fluctuate. Bitcoin value can be volatile because it is an emerging technology.
Unlike credit cards or Paypal, bitcoin is not owned by a company. Bitcoin is the world’s first completely open payment network which anyone with an internet connection can use. Bitcoin was designed to be used on the internet, and doesn’t depend on banks or private companies to process transactions.
Bitcoin allows you to instantly send any amount of money to anyone without needing a bank. It allows you to access your money without needing an ATM or credit card – bitcoin gives you back control over your money. Plus you can pay friends back for dinner, buy your next computer, and donate to charity, all using bitcoin.
Here are some businesses that accept Bitcoin:
Below is a larger list of merchants and partners of Bitcoin and Coinbase.com:
https://www.coinbase.com/clients
Coinbase.com is one of the first US-Based Bitcoin exchanges, and according to Business Insider: “Of all the startups in the bitcoin ecosystem, Coinbase is probably most prominent. Early in 2015, it closed a $75 million funding round — the largest ever for the industry at the time — at a (unconfirmed) $400 million valuation. It then went on to launch the first US-based bitcoin exchange. ”
The signup for a Coinbase.com account is easy and I funded money into my account within 10 minutes. The transaction won’t complete with my bank until approximately 4 business days later, however. Coinbase.com does have a Mobile App, but doesn’t appear to have a way to add funds into your wallet from your bank within the app.
Lastly, I wanted a way to monetize jasoncoltrin.com without adding annoying advertisements and found that the “tipping” application changetip.com fits this necessity to a “t”. According to changetip.com, “ChangeTip allows you to send small amounts of money all over the web and it’s free! All of the social platforms you can send money via ChangeTip include Twitter, Reddit, Facebook, Github, YouTube, Slack, WordPress, Google+, Tumblr, and StockTwits.“
So there you have it, now you can get started with Bitcoin by creating a US-Based Bitcoin account through coinbase.com, buy goods with Bitcoin, and “tip” jasoncoltrin.com, as well as any other user’s videos, content, or blog posts through the use of changetip.com.
WP-Filebase plugin for WordPress – changing maximum upload file size limits in php
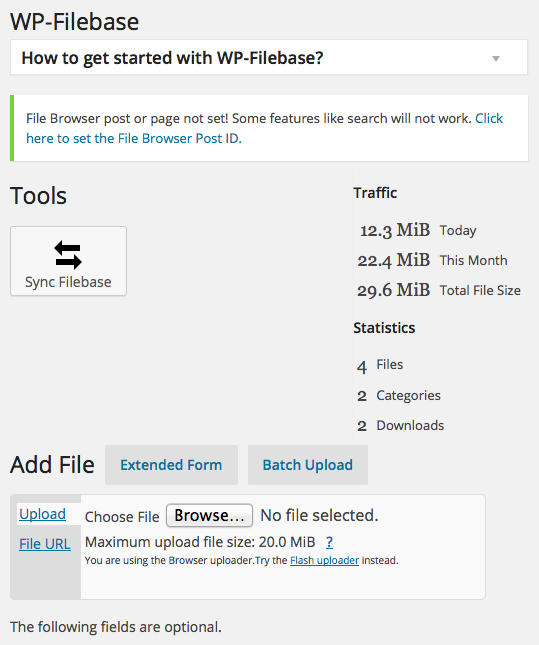
So my new favorite plugin for WordPress is WP-Filebase; a free, easy way to upload files into WordPress that makes those files easy for others to download. While the plugin seems a little daunting at first to manage, it pretty much follows the typical methods other plugins employ such as shortcode. While editing a page or post there is a WP-Filebase button next to the other editing buttons such as “insert link” or “Italic”. Once the basic concepts are mastered, it becomes a pleasure to create categories, upload, and post files for download. There are a ton of other features to categorize, post and track hits with WP-Filebase if you want.
One issue I encountered when using WP-Filebase is that by default the upload size for files in php and WordPress are pretty small, and that the upload size for my entire site had to be increased. When I tried to upload a file with WP-Filebase of any size larger than 2MB, the upload would quit and fail without much information or error messages. When you’re expecting to see “File added”, and instead the page just refreshes without an error, it can be a little frustrating. Here are the steps I took to increase the file upload size:
Login to an ssh session on the server running WordPress.
Before you edit php.ini, it’s always a good idea to make a copy of the original file with a command of something like:
cp /etc/php5/apache2/php.ini /home/jcoltrin/php.ini.original
edit /etc/php5/apache2/php.ini with the command:
sudo vi /etc/php5/apache2/php.ini
Below this paragraph are the php settings to find and change in the vi editor. To find the settings, it can be useful for vi to be in command mode (the vi editor starts in command mode by default). While in command mode, hit the forward slash key /, and then type the keyword, then hit [enter/return]. The vi editor will jump to the first instance of the keyword it finds. You can then simply hit the n key to cycle to the next instance of that keyword. Then hit the i key to go into insertion mode. Now you can hit the delete/backspace keys and use your arrow keys to edit the settings. When you’re done editing, hit the Escape key, then the : key, then type wq, then hit enter. There are ton of other shortcuts, tips and cheats for vi you can find here: http://www.lagmonster.org/docs/vi.html .
upload_max_filesize = 20M
post_max_size = 20M
max_execution_time = 500
max_input_time = 500
After making these changes, I wanted to be sure they stuck if apache restarts. I did this by restarting apache and then viewing the php settings coming from the web browser itself.
Restarted apache2 with:
sudo /etc/init.d/apache2 restart
Made sure these limits stuck by creating a new file in the root of my apache website files location:
sudo touch /var/www/phpinfo.php
Insert the following line into phpinfo.php (only):
<?php phpinfo(); ?>
Then visited the file by going to http://domainname.com/phpinfo.php
I found that the settings were active and applied successfully by looking at the phpinfo settings website.
I then tested uploads of 12.9MB files which were previously unable to upload and can now upload successfully.
Delete the phpinfo.php you created (you probably don’t want this file hanging around for the world to find.)
That’s it, enjoy using WP-Filebase, and uploading/downloading files of any size to your heart’s content.
Hyper-V failed to generate initial replica for server
I recently found that one of my virtual machines had failed it’s initial replication off to a server located at a different site. I looked at a few of the Hyper-V-VMMS Admin Event Logs and found some of the following errors:
Event ID: 32042 – Hyper-V failed to generate initial replica for ‘040REP001’: General access denied error (0x80070005). (Virtual machine ID GUID)
Event ID: 33680 – Replication operation for virtual machine ‘ServerName’ failed.
Event ID: 32086 – Hyper-V suspended replication for virtual machine ‘ServerName’ due to a non-recoverable failure. Resume replication after correcting the failure.
Also Event ID’s 33676, 18012, 16370
I googled around and found that most resolutions revolved around fixing the “Virtual Machine” group permissions of the parent Folder or Volume by using the icacls command that looks something like this:
icacls “C:ProgramDataMicrosoftWindowsHyper-VVirtual Machines5A6F2E44-7F95-4CF8-89E5-AE8A6648C93A.xml” /grant “NT VIRTUAL MACHINE5A6F2E44-7F95-4CF8-89E5-AE8A6648C93A”:(F) /L
or this:
icacls “C:UsersPublicDocumentsHyper-VVirtual Hard DisksMountPointHere” /grant “NT VIRTUAL MACHINEVirtual Machines”:F /T
The folder that the .vhd was contained in did not have “Virtual Machine” group permissions (c:\hyper-v\exports), so I decided I should move the VM and it’s virtual hard disk to a new location that does have the correct permissions. Since this was an old export, I found the original location of the .vhd in the config file in c:\hyper-v\exports\config.xml.
Since I didn’t like the current location of the virtual machine and .vhd anyway, I decided rather than trying to fix permissions, I’d move it to a better location in a folder that would inherit the correct permissions.
To resolve the replica problem I did the following:
1. Disabled alerting on the server, then shut down the VM.
2. Disabled replication on the vm – right-click on VM in HyperV Manager -> Replication -> Remove Replication
3. Moved all Virtual Machine folders associated with MyServerName out of a folder I had created “c:\Hyper-V\Exports” including the .vhd within (folders that did not have the permissions) and cut/pasted into “C:\Users\Public\Documents\Hyper-V\Virtual hard disks\” folder that was already created. This folder inherited permissions from the parent folder including the “Virtual Machines” group.
4. On the shut-down VM, I then went into the VM’s settings and then IDE Controller 0 -> Hard Drive -> Changed Location of Virtual Hard Disk by hitting the “Browse…” button, browsed to the new .vhd location folder with the correct permissions -> OK
5. Started the Virtual Machine successfully, then re-enabled replication with the remote site Replica server and, – yes! – initial replica started normally and health is normal again. Sending initial Replica now at 3%.
6. Re-enabled alerting on the server.
Hope this helps someone else who’s replications are failing and they’re struggling with the “General Permissions Error” problems associated with snapshots and replication.
Microsoft Hyper-V 2012 High Availability and Live Migration
I’m about 75% of the way through the Introduction to Hyper-V Jump start in the Microsoft Virtual academy. There is a lot of great information contained in the videos and .ppt downloads. Below are some of the highlights of the material that I am not as familiar with: High-Availability and Clustering. Microsoft Hyper-V in Server 2012 provides “Complete Redundancy In the Box.”
Virtualization can cause problems if you take 10 or 20 servers and virtualize them all onto a single piece of hardware (your host server); you’ve created a single point of failure. If your single host goes down you lose a whole workload. Because Microsoft realizes that the value of these hosts exponentially increases, they’ve worked hard to create complete redundancy and protection in all core services; from the bottom of the stack, to the top. Below are the five levels, from the physical to the virtual, where Server 2012 can protect your data.
1. Hardware Fault:
- Windows Hardware Error Architecture (WHEA)
- Reliability, Availability, Serviceability (RAS)
Server 2012 provides RAS Hardware Fault detection capabilities. For example, if a memory controller detects an address is failing, hyper-v is notified, and the address space is taken offline. The information about the hardware fault is sent to the BDC store so it survives reboots, and the server never allocates this area of memory again. This is a nice feature that fixes hardware errors without user intervention.
2. Physical Node Redundancy:
- Live Migration for Planned Downtime
- Failover Cluster for Unplanned Downtime
If a server is going to go down unplanned, we want the workloads to failover without any user intervention. In planned downtime, we can live-migrate, perform maintenance on our host, then live-migrate our workloads back over to our repaired host. This physical node redundancy is provided with Hyper-V 2012.
3. I/O Redundancy:
- Network Load Balancing & Failover via Windows NIC Teaming
- Storage Multi-Path I/O (MPIO)
- Multi-Channel SMB (Server 2012 Fileserver)
Storage Multi-path I/O provides redundancy for example iSCSI and Fiber Channel both from a Host level and a Guest level. If you’re using a Server 2012 fileserver as back-end storage, you get redundancy her as well.
4. Application/Service Failover:
- Non-Cluster Aware Apps: Hyper-V App Monitoring
- VM Guest Cluster: iSCSI, Fiber Channel
- VM Guest Teaming of SR-IOV NICs
If you’re running VM’s and you want to provide failover of applications within the virtual machine, you can cluster applications already. For Non-cluster aware (legacy) apps, Server 2012 provides App Monitoring which does light-level health monitoring such as restarting processes and notifications automatically etc.
5. Disaster Recovery:
- Hyper-V Replica for Asynchronous Replication
- CSV 2.0 Integration with Storage Arrays for Synchronous Replication
If you want to failover to another site completely, with cluster shared volumes, you need redundancy – two of everything. All nodes simultaneously monitor eachother through a heartbeat network. Every node keeps track of every other node in the cluster in a registry database (states/properties). If a node crashes, all the other nodes know about what workloads and VM’s were running on the crashed node. It will connect to the appropriate VHDs on the network, and pick up that workload. There are two types of clustering that we can consider: Host Clustering and Guest Clustering.
Host Clustering: The most common type of clustering, were we are clustering the physical servers, and we can move apps and vms between the servers.
- Avoids a single point of failure when consolidating
- VM’s can survive a host crash because the replica VM is restarted on another node, VMs can be restarted on the same node also when a the VM OS crashes or hangs.
- Zero downtime maintenance and patching (live-migrate VMs to other hosts
- Mobility and Load distribution – Live Migrate VMs to different servers to load balance.
Guest Cluster: Two virtual machines running Windows Server and form a cluster themselves for high availability. If one of the two needs to be patched, we can fail over to the other VM. If one of the two crashes, it will fail-over for example that SQL server to the live VM. The difference between virtual and physical options for storage on Guest Clusters is it requires virtualized HBAs: Virtualized Fiber Channel, Fiber Channel over Ethernet and iSCSI (not Serial Attached SCSI).
Combining Host and Guest Clustering:
It’s recommended to combine Host and Guest clustering for flexibility and protection. You can combine all VMs as long as your VMs pass the Clusters Best Practice Analyzer, known as “Validate”.
Kudos to Microsoft Virtual Academy, Symon Perriman, and Jeff Woolsey
How To Install Symantec BackupExec 2014 Mac Apple Client Step by Step
BackupExec2014
OSX Mac Client Installation
- Log into the Mac you want to backup with an admin account.
- Launch the terminal (command + spacebar, type terminal, enter).
- At the prompt type in: sudo su root , then enter the admin account password (this password will be configured later in the Symantec BUExec server client configuration)
- At the root prompt#, type in: cpan
- At the cpan> prompt, type in: force install Switch — at the prompt type “yes” to agree. The installer should finish with … /usr/bin/make install — OK
- Exit CPAN by typing: exit
- Obtain the Backup_Exec_2014_14.1.1786_MultiPlatforms_Multilingual iso, or installer DVD image. Inside the extracted or unzipped installer image, you will find a folder named LinuxMac. Inside this folder look for the RALUS_RMALS_RAMS-1786.0.tar file approximately 155MB. Copy this .tar (.gz) file to your Mac’s desktop.
- Double-click on the file to unarchive the gzipped/tarball to the desktop. You should now have a folder of the same name on the desktop.
- Back in the terminal, cd into the folder. For example: cd /Users/admin/Desktop/RALUS_RMALS_RAMS-1786.0/
- At the prompt, type in: ./installrams — follow the prompts (hit the “Return” key a few times. This should complete successfully.
- Back on your BackupExec 2014 server, go into the backup exec server and then the “Backup and Restore” tab. Right-click on an empty space under your already-added servers and choose “Add Server”.
- Scroll down and choose “Macintosh Computer” -> Next.
- Place checkmark in “allow trust”. -> Next.
- Type in the FQDN (servername.domainname) of the server or the IP address. -> Next
- Add/Edit the admin/root username/password that you used to install the CPAN module. If you have Macs with different admin accounts, use the username and pw of the admin account but identify them differently by changing the “Account Name: ” and Notes. -> Next -> Finish
- This should insert the server successfully. If there is a problem with the Trust relationship it is probably due to a bad username/password combination.
- Setup your initial backups, select/edit your source(s) and destination(s).
- That’s it! Sit back and relax knowing you at least have flat-file backups, and in the event of a complete OS/Server loss, you can re-install the OS, then re-install your BackupExec client, then do a restore of your files and settings. Be sure to test your backups by doing a test restore.
Veeam One – Free Monitoring and Alerting of Hypervisors Review
Veeam One Monitor – Free Edition – Review
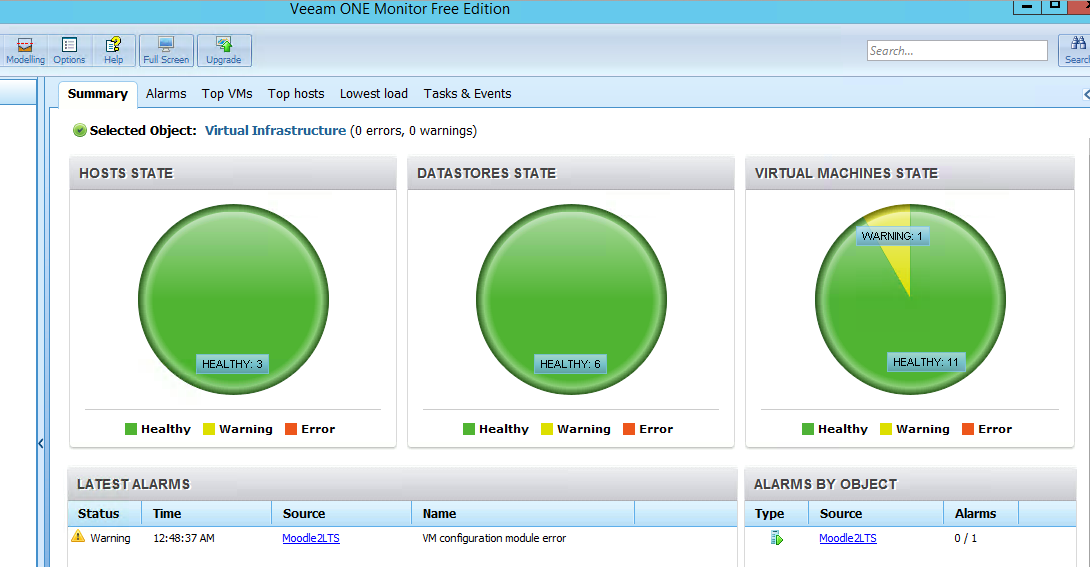
So with the migration of the majority of our servers to Hyper-V, I’ve been on the lookout for software that will manage and monitor our VM’s and Hyper-V hosts. Microsoft does leave a lot to be desired in the realm of monitoring and alerting of Server 2012 Hyper-V, so when I read a post in www.reddit.com/r/sysadmin that Veeam One has a free version, I took the opportunity to try it out.
Veeam has a good reputation in the backup and replication of VMware systems, so I was hoping to find good support for Hyper-V, which I’m happy to say, I did. After registering for a free account, I began to download a 600MB .iso file. This initially led me to believe I would be running another virtual machine from which I would create using the .iso, similar to PHD Virtual, however, this was not the case; it installs a Fat Client Application (Yay, not another web-based console!) I was easily able to mount the .iso as a virtual DVD drive by right-clicking on the file in Server 2012 and then ran setup. The installer went through a setup for Veeam One and also installed SQL Server 2008 R2 64bit Express edition. I initially had trouble adding Hyper-V hosts into the software until I provided a server name using the FQDN and credentials (servername.domain.root.company.com / domain.root.company.comusername).
Once I was able to Add Servers, the software recognized all of the virtual machines running on each host, as well as populating the Local “storages” of the hosts (both RAID and iSCSI volumes). I continued on and setup Alerting to use our SMTP relay and soon my mailbox was being flooded with alerts. I happened to finish the installation during our scheduled backups so I wasn’t surprised that I was getting Disk Queue Length alerts. However, I was concerned that there were many warnings in regards to Memory Pressure. Hyper-V uses a feature called Dynamic Memory that when a virtual machine is first created, you are given the option of setting a Startup RAM amount in MB the amount of memory you want the machine to have available during start-up. You are also given the option to Enable Dynamic Memory and set a Minimum RAM and a Maximum RAM. In our case I had one of our hosts setup with 2 VMs to NOT use Dynamic memory and were hard-set to use 8GB and then 16GB Startup RAM out of a total available 32GB. Additionally, I had a 3rd VM on the same host set to use 4GB Start-up RAM with Dynamic RAM enabled (512 min/10GB max). This 3rd VM is the one that was complaining about this “Memory Pressure” stuff, and earlier in the month had spontaneously restarted, which prodded me to dig deeper and optimize our Hyper-V setup.
Memory Pressure is described by Veeam as:
“Dynamic Memory determines the amount of memory needed by a virtual machine by calculating memory pressure. To perform this calculation, Hyper-V looks at the total committed memory of the guest operating system running in the virtual machine and then calculates pressure as the ratio of how much memory the virtual machine wants, to how much it has. The higher VM average pressure you have, the more the VM starts paging memory to disk with disastrous effect on the VM’s performance.”
and further with a Resolution:
“Most likely high demand for Memory resources is caused by application workloads inside the VM. To troubleshoot memory pressure check dynamic memory allocation, buffer, and limits for this VM. If there is not enough physical memory available on the host to give the VM it’s requested amount of memory, consider relocating this VM to another host or verify memory usage for existing VMs on the same host.”
By highlighting first the Host with the problem VM, then selecting the memory tab, I found that the Hyper-V Services Memory Consumed average percentage was hovering near 130%.
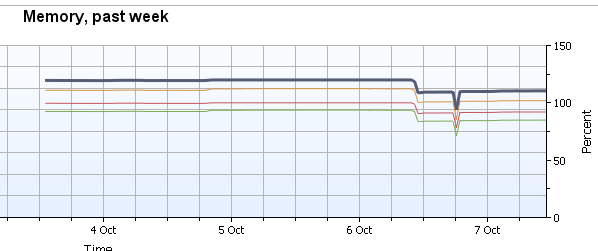
You can see that mid-day on the 6th, I ‘moved’ the problematic VM off of the host and the memory pressure was relieved enough to not receive alerts.
A couple things to note during the “Move” of the VM from one Server 2012 Hyper-V host to another, I did have to modify the Processor of the VM and place a checkmark in the Compatibility Configuration to enable the “Migrate to a physical computer with a different processor version”. Additionally, although the live migration or move did complete successfully after the move and the system stayed up and remained in service, after a restart it lost it’s IP Configuration. The new host had more memory available for the moved VM, and so I allotted more memory to it while the system was shut down. I noticed on power-up that the IP address had changed and so found that the Network Adapter Advanced Features had reverted back to a Dynamic Mac, instead of the hard-coded “Static” MAC Address. After changing this to it’s previous Mac Address, the server picked up the correct IP address and the move was complete.
In the graph above you’ll also notice a dip in memory. This was due to one of our Database servers going down. This is critical VM for our site and it was very beneficial to have Veeam One available to help troubleshoot the problem. First I checked the Server 2012 Event logs and found the following events.
info: 5.52pm Event 18510, Hyper-V-Worker ‘DBServer’ saved successfully. (Virtual machine ID 7DFDBBE8-CD76-4EBC-B015-27FF251BCFA5)
info: 5:52pm Event 16642, Hyper-V Hypervisor Hyper-V successfully deleted a partition (partition 2).
Error 5:51 Event 4096, Hyper-V-Integration-Data-Exchange: ‘DBServer’: The Data Exchange integration service is either not enabled, not running or not initialized. (Virtual machine ID 7DFDBBE8-CD76-4EBC-B015-27FF251BCFA5)
Veeam says:
The VM Configuration is no longer accessible.
Cause: Virtual Machine might not have right permissions on vsconfig.dll file or VMMS service is not started.
Resolution: Check that virtual machine configuration module (also called the “store”) is contained in the vsconfig.dll file an the path to the vsconfig.dll file is valid and has the right permissions. By default the vsconfig.dll file is installed at \windowssystem32. Verify that the VMMS service is in the running state in the Service Control Manager and that the failed operation now succeeds.
I Checked hyperv001, the Hyper-V Virtual Machine Management Service is in the Running/Automatic state. Logged in as Local System. I modified the Recovery options on the service from 1st failure: Restart the Service, 2nd failure: Restart the Service, Subsequent failures: Take no Action to: Restart the Service and Restart service after from 2 minutes to 1 minute.
I spun up the failed VM successfully (without changing any of the VM’s settings) and DB services were restored.I ran a Hyper-V Export successfully on ‘DBServer’ to D:ExportsDBServer to make sure we have a good image of the VM backed up.The HyperV Data Exchange Service is described as: Provides a mechanism to exchange data between the virtual machine and the operating system running.
The Startup Type for the service is: Manual (Trigger Start). This type of data integration seems related to “Integration Services” which is what you install inside a Windows OS with a virtual DVD in order for driver compatibility etc. Also I saw indications that we might need to “modify” NUMA or “extra processor features”.It could be that Linux DBServer doesn’t play well with Hyper-V CPU and/or integrated services and we may need to power-down the VMs, modify the processor features, or NUMA, then power them up again.
The Startup Type for the service is: Manual (Trigger Start). This type of data integration seems related to “Integration Services” which is what you install inside a Windows OS with a virtual DVD in order for driver compatibility etc. Also I saw indications that we might need to “modify” NUMA or “extra processor features”.It could be that Linux DBServer doesn’t play well with Hyper-V CPU and/or integrated services and we may need to power-down the VMs, modify the processor features, or NUMA, then power them up again.
I Double-checked NUMA/Compatibility on both WebServer and DBServer:
DBServer:
Compatiblity is Checked, 6processors, 3 NUMA Nodes, 2 Sockets
WebServer:
Compatibility is UnChecked, 8processors, 2 NUMA Nodes, 1 SocketFor the DBServer, I believe we may need to shut down and UnCheck Compatibility option, in effect the opposite of “Dumbing-down” the CPU on the problematic server.
Compatiblity is Checked, 6processors, 3 NUMA Nodes, 2 Sockets
WebServer:
Compatibility is UnChecked, 8processors, 2 NUMA Nodes, 1 SocketFor the DBServer, I believe we may need to shut down and UnCheck Compatibility option, in effect the opposite of “Dumbing-down” the CPU on the problematic server.
If the services fail again and the DBServer VM shuts down again, I’m going to:
1. Shut down the DBServer
2 . Do another Export of the VM so as to get another good backup
3. give it the same Hyper-V VM CPU settings as WebServer (8 processors, Compatibility Unchecked etc.)
4. Startup the system again and monitor.
–
In regards to Veeam One Monitor, in conclusion I think it’s a well-rounded monitoring system, in that it contains descriptive error analysis, cause and resolutions, easy to understand alerting , management of alerts, is well laid-out, and easy to setup and configure. I’m glad that I found this software at the right time, because I’m not sure I could have set up the same amount of alerts and visibility into hyper-v in the same amount of time as something like Nagios. Also I do believe the software helped me become aware of potential problems with our Hyper-V resource allocations, and resolutions to a downed critical VM.
–
Alerts have died down significantly to a trickle and now I’m only getting alerts when backups are running. I may need to modify my thresholds for disk queue length, or look further into optimizing my storage and/or networking. Because I have a background in Resolving, Exluding, and Editing Exclusions, the ability to fine-tune alerts is relatively easy for me, however, Veeam One has a nicely intuitive way of changing altering to fit your comfort level. I found that by excluding the really noisy top-level alerts until I got a handle on things, I was then better able to go back, re-enable the alerts and check into why they were occurring. I’m happy with the monitoring solution from Veeam and although it seems sufficient enough without buying the pro version, I’d be inclined to getting an approval for money and see what the finer details of the Pro version have in store.
linux iptables intro and basic network information
Introduction iptables – the standard linux firewall
iptables is a standard firewall built into common Linux distributions such as ubuntu, debian, and centOS.
First, packets are logical containers of data representing the flow of data. Protocols are languages and sets of rules used by network devices to send and/or receive data. Ports are numerical representations of protocols and are common throughout TCP/IP networking. Registered ports are those from 0 through 49151. IANA maintains the official list of both ranges.The dynamic or private ports are those from 49152 through 65535. One common use for ephemeral ports are used by servers to continue communications with a client that initially connected to one of the server’s well-known service listening ports. Here is a list of about 250 well-known ports.
iptables drops network packets when those packets meet a certain set of pre-defined CHAINS of rules stored in the computer’s memory. The chains can be placed in different binding orders and they organize the firewall.
A packet, or a datagram, is a unit of a series of bits that forms a container that can be examined, routed, dropped, and filtered in regards to it’s headers, source, destination, and content.
The packet is organized into different fields. It is typically 32bits and contains different data objects which contain mac address source/destination, and IP address source/destination. Cyclical redundancy checks (CRCs) are used to check the values of a packet before they are sent. When the datagrams reach their destination a checksum is attained and checked against the CRC field. In TCP, if the two match then the datagram is marked as successfully sent. If it is different, the source is notified that the packet is bad and will need to be resent.
Datagrams on a wired network really just represent electrons (ethernet) or pulses of light and radio waves that modulate in frequency and amplitude in optical transmissions.
CSMA/CD is used to manage collisions and prevents simultaneous transmission of data on both wired and wireless networks.
Layer 3 of the OSI model is where routers route packets to different vlans and subnets based on their field values using static routes and dynamic protocols such as RIP and OSPF. Layer 2 switches create connections between nodes with addresses in their MAC tables through Application Specific Integrated Circuit (ASICs).
Services running on a server rely on field data in each datagram. The traffic is organized by standard protocols that are bound to specific ports. Each port is represented by a number and are filtered by opening or closing the ports to accept or drop packets whole field data matches that port.
Like other firewalls, iptables manages ports on a NIC where packets can enter, pass, or exit. Ports can be opened, listen, or closed for each service or kind of traffic that will be allowed. Other ports are closed for traffic to be denied.
Chains are sets of rules that manage network traffic by opening or closing ports that can be applied or bound to a Network Interface in a particular order.
There are three kinds of CHAINS:
- INPUT – packets coming into the PC.
- OUTPUT – packets leaving out our PC.
- FORWARD – packets that pass through the PC if it’s multi-homed and being used as a router.
Here are common iptables switches used in chains:
- -s = source address
- -d = destination address
- -p = protocol
- -j = action
- -P = specify default policy for a chain
- -D = delete a rule for a chain
- -R = replace a rule for a chain
- -F = remove all rules for specified chain.
- -L = list all chain rules
- -A = add/append a rule to the end of a chain
Rules are used to define and manage the traffic you want to ALLOW first in iptables. Then you add the last rule, or the catch-all rule at the bottom of these rules. The last rule blocks all other traffic not previously allowed.
Example of a rule applied to the INPUT chain:
- Allow HTTP traffic for an Apache2 web server on port 80 on the interface named eth0:
iptables -A INPUT -j ACCEPT -p tcp –destination-port 80 -i eth0
2. Allow FTP packets for the VSFTPD daemon/service on port 21:
iptables -A INPUT -j ACCEPT -p tcp –destination-port 21 -i eth0
3. Allow SSH traffic for Secure Shell connections on port 22:
iptables -A INPUT -j ACCEPT -p tcp –destination-port 22 -i eth0
4. Apply a CATCH-ALL rule:
iptables -A INPUT -j DROP -p tcp -i eth0
*Note – catch-all rules must be entered and applied LAST.
You can define your own iptables chains as well as view the built-in chains present. Many users will define their own iptables rules in a shell script that is run automatically at boot.
Usage of suid and sgid in linux
So when it comes to certain files and executable scripts, as a linux admin you may want to allow certain users to run these scripts with elevated privileges.
setuid and setgid allow you to grant limited elevated privileges (root) without having to add the users to the sudoers file.
Similar to chmod, where you indicate where you want to set the user id bit, you can set the permissions with 4, 2 and 1: suid = 4 sgid = 2 stickybit = 1
To do a suid:
$chmod 4777 script – would give you permissions of
-rwsrwxrwx 1 jason jason
to do sgid use:
$chmod 2777 script – would give you
-rwxrwsrwx 1 jason jason
by using $chmod 6777 script – you would get
-rwsrwsrwx 1 jason jason
For setting back to normal you would use
$chmod 0777 script
SGID is often used with folders for example
$mkdir groupFolder
#chmod 2775 groupFolder
would give you:
-drwxrwsr-x 2 jason jason
when you set groupid on the folder, anyone that adds a file to that folder, the group ownership of the file will receive the group ownership of that folder.
If you have a file that is suid, and is malicious, you can find files on your system that have the suid and/or sgid bit set:
find . -perm +6000
find . -perm +2000
find . -perm +4000
You should occasionally look for these files so you know which files and/or folders are automatically setting permissions.
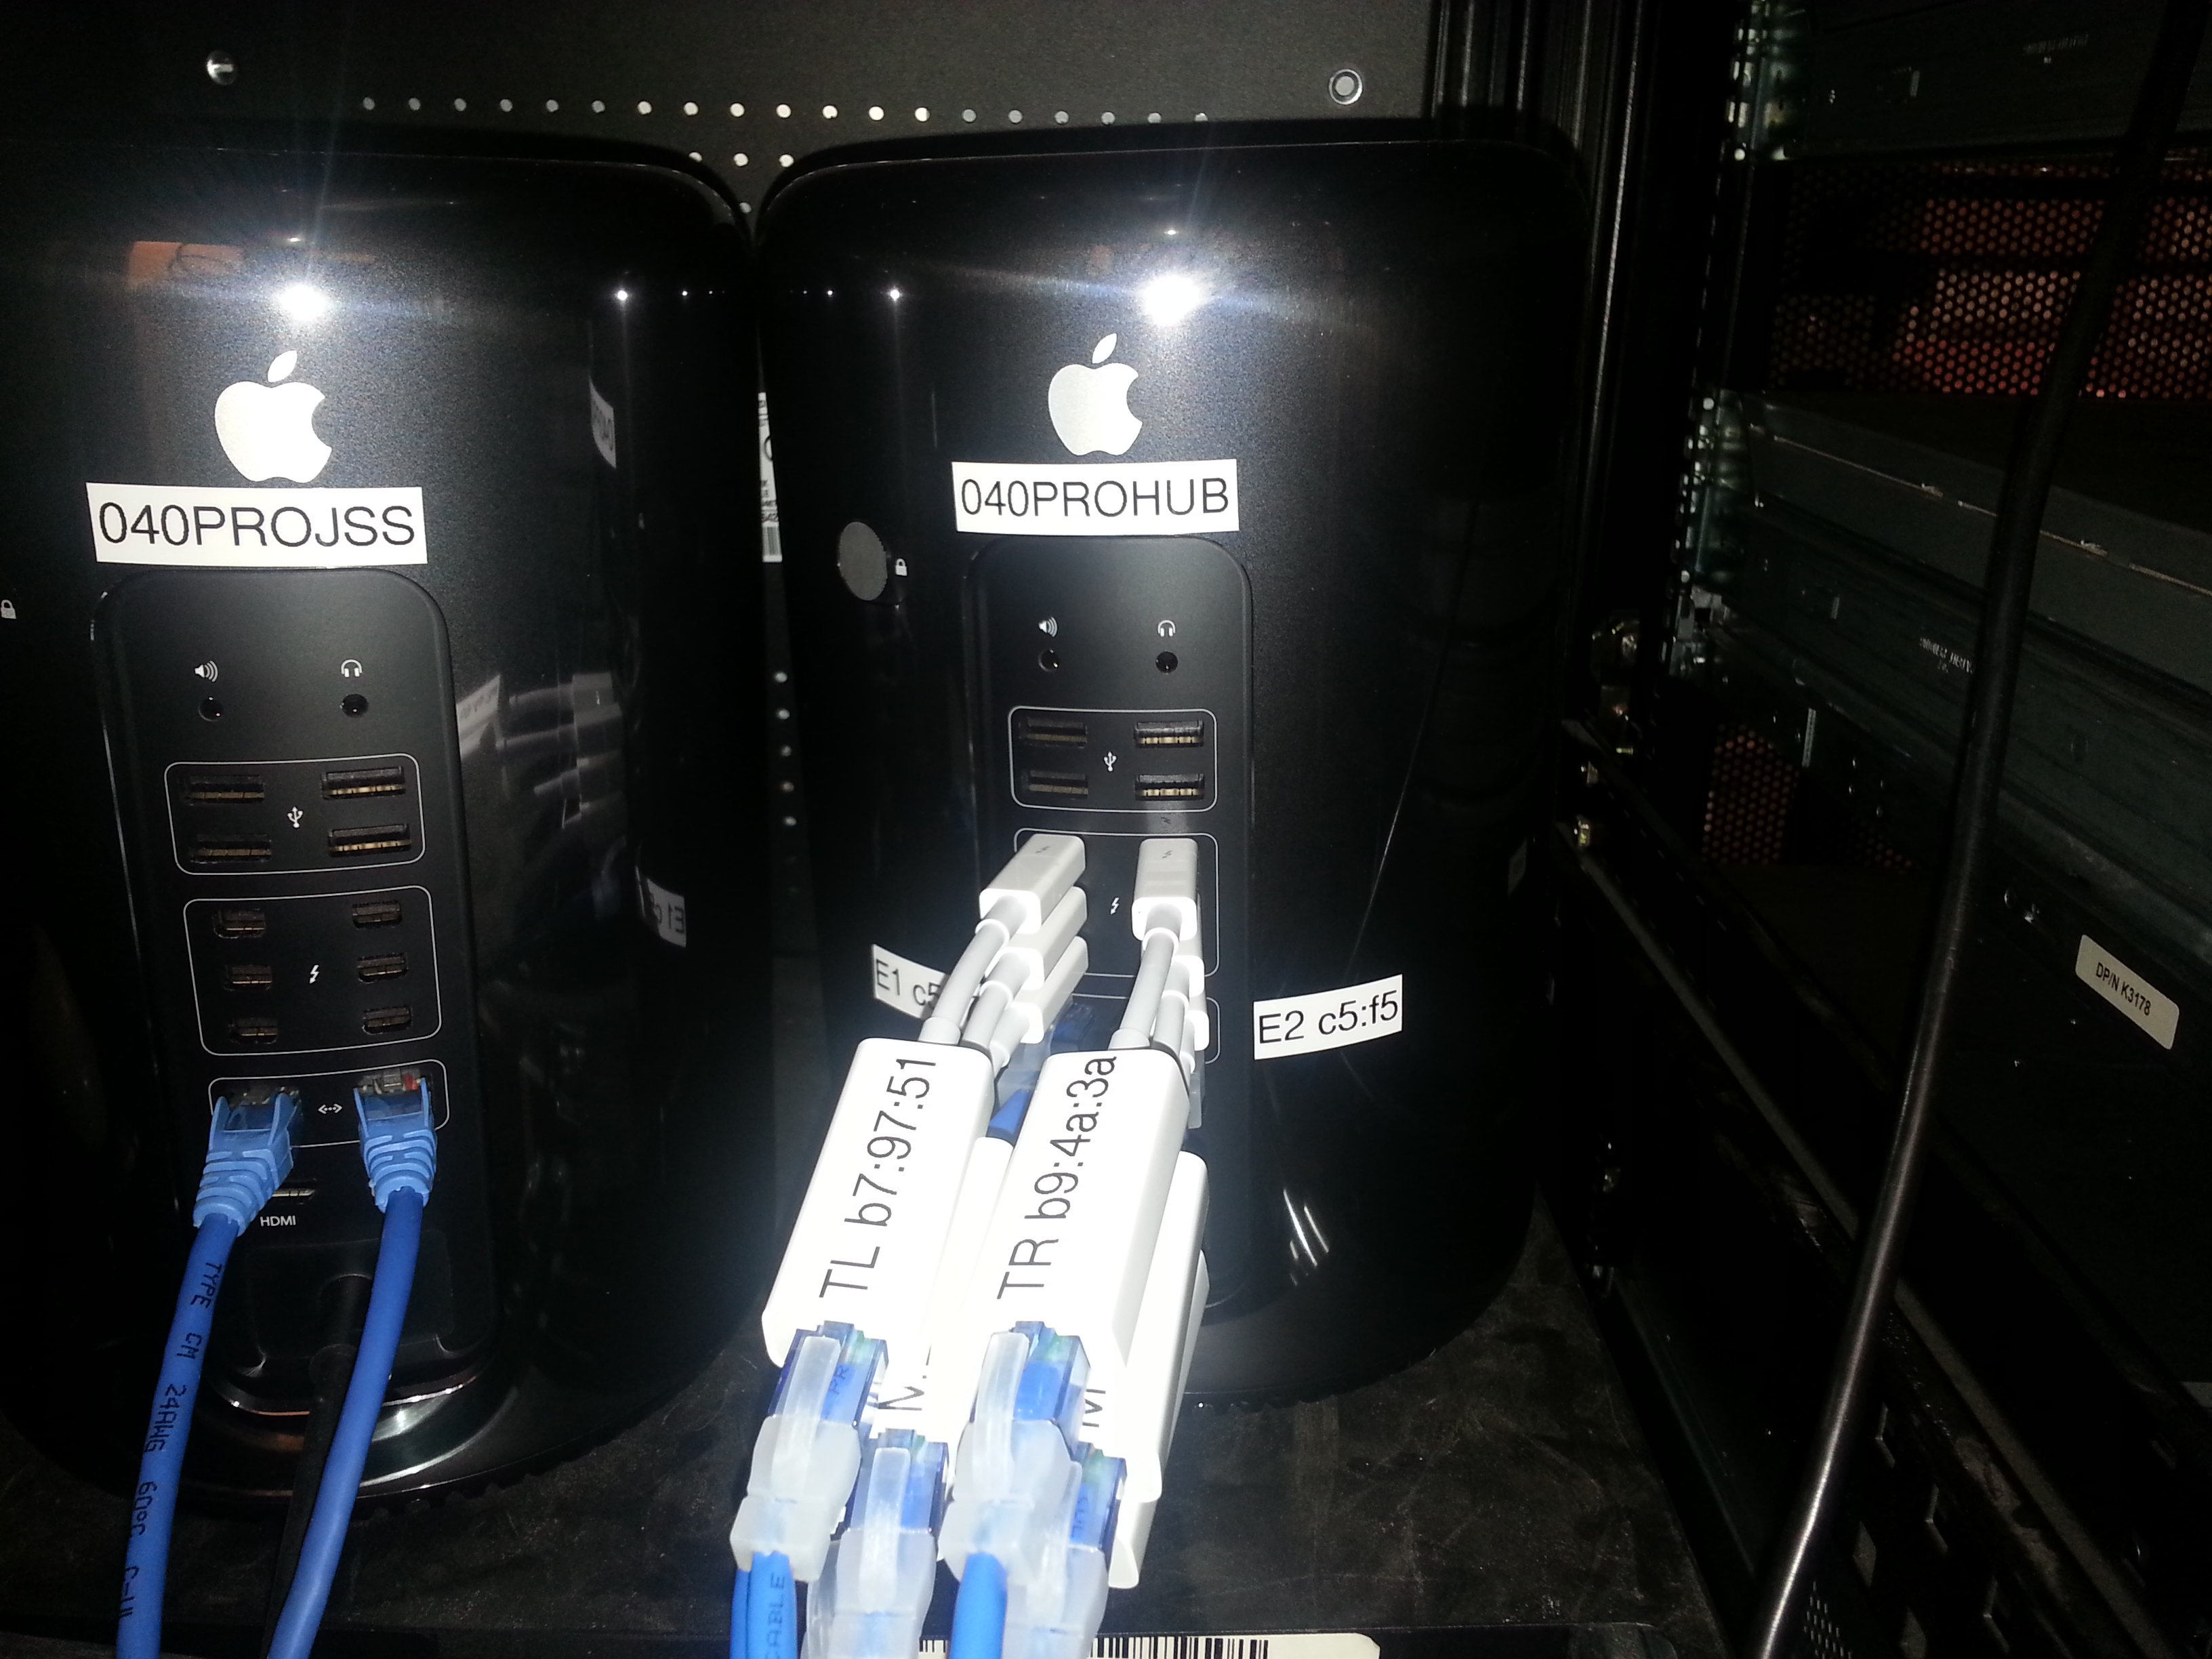
Configure Cisco 3750 Switch Port Team Channel and MacPro with Bonded Thunderbolt Ethernet LACP Link Aggregation
If you’ve got a new MacPro and want to utilize both of the two built-in Gigabit Ethernet ports (and possibly some Thunderbolt-to-ethernet adapters) in a bonded LACP Link Aggregation virtual adapter in conjunction with a Cisco 3750 switch, follow the instructions below.
The first part is configuring your switch to allow your Mac to create a bonded link. In my case, without first configuring the switch, I was able to create my Mac’s bonded ethernet adapters, but couldn’t pick up a DHCP address. I further went into the virtual adapter’s bond status and saw red dots and the messages “No Partner” and/or “Bad Link”. The problem was that I hadn’t setup my switch with the appropriate LACP protocol on it’s interfaces.
Here are the instructions for creating a bonded Ethernet LACP link aggregation from Apple: http://support.apple.com/kb/PH8356
Note that in the above article there are some requirements: you need at least one IEEE 802.3ad-compliant switch or another Mac OS X Server computer with the same number of ports.
So I configured a Cisco 3750 switch with a new channel group, and added 4 ports into the channel group so that we can bond 4 NICs for the MacPro’s LAN connection at 4GBps
Here is the channel group configuration
!
interface Port-channel2
description LAN Etherchannel Team for MacPro
switchport access vlan 27
switchport trunk encapsulation dot1q
switchport mode access
!
And here are the gigabit interfaces configuration
!
interface GigabitEthernet1/0/13
description MacPro Eth1 to LAN
switchport access vlan 27
switchport trunk encapsulation dot1q
switchport mode access
channel-protocol lacp
channel-group 2 mode active
!
interface GigabitEthernet1/0/14
description MacPro Eth2 to LAN
switchport access vlan 27
switchport trunk encapsulation dot1q
switchport mode access
channel-protocol lacp
channel-group 2 mode active
!
interface GigabitEthernet1/0/15
description MacPro ThunderBolt BottomLeft to LAN
switchport access vlan 27
switchport trunk encapsulation dot1q
switchport mode access
channel-protocol lacp
channel-group 2 mode active
!
interface GigabitEthernet1/0/16
description MacPro ThunderBolt BottomRight to LAN
switchport access vlan 27
switchport trunk encapsulation dot1q
switchport mode access
channel-protocol lacp
channel-group 2 mode active
!
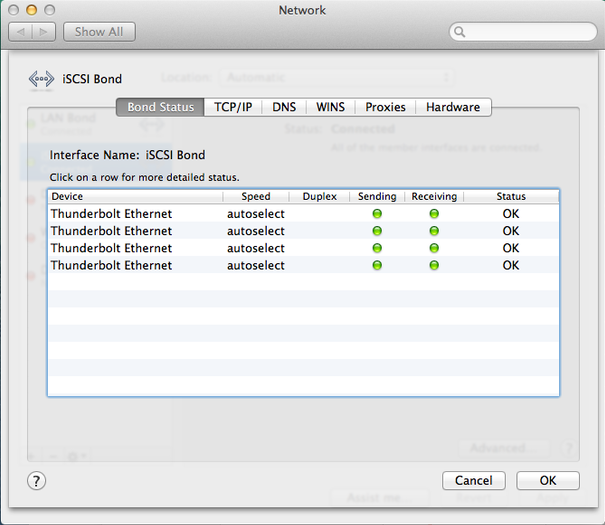
I further went on to create another 4xThunderbolt Ethernet Adapter for an iSCSI connection to a NAS by creating a new channel group 3 and added the remaining 4 thunderbolt interfaces into group 3:
!
interface Port-channel3
description iSCSI Etherchannel Team for Mac Pro
switchport access vlan 27
switchport trunk encapsulation dot1q
switchport mode access
!
…
…
…
!
interface GigabitEthernet1/0/17
description MacPro TB iSCSI
switchport access vlan 27
switchport trunk encapsulation dot1q
switchport mode access
channel-protocol lacp
channel-group 3 mode active
!
interface GigabitEthernet1/0/18
description MacPro TB iSCSI
switchport access vlan 27
switchport trunk encapsulation dot1q
switchport mode access
channel-protocol lacp
channel-group 3 mode active
!
interface GigabitEthernet1/0/19
description MacPro TB iSCSI
switchport access vlan 27
switchport trunk encapsulation dot1q
switchport mode access
channel-protocol lacp
channel-group 3 mode active
!
interface GigabitEthernet1/0/20
description MacPro TB iSCSI
switchport access vlan 27
switchport trunk encapsulation dot1q
switchport mode access
channel-protocol lacp
channel-group 3 mode active
!
Lastly I created a new iSCSI Bond on the MacPro successfully and provided the Bond adapter with a Manual Address 192.168.27.30.
Doing this left me with:
4GB bonded connection to LAN
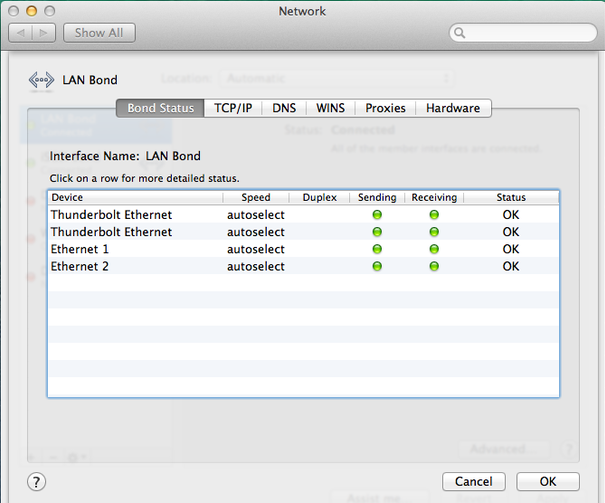
4GB bonded connection to iSCSI NAS complete
Here’s what the 2nd bond looks like in ifconfig:
bond1: flags=8843<UP,BROADCAST,RUNNING,SIMPLEX,MULTICAST> mtu 1500
options=b<RXCSUM,TXCSUM,VLAN_HWTAGGING>
ether 68:5b:35:b9:4a:3a
inet6 fe80::6a5b:35ff:feb9:4a3a%bond1 prefixlen 64 scopeid 0x16
inet 192.168.27.30 netmask 0xffffff00 broadcast 192.168.27.255
nd6 options=1<PERFORMNUD>
media: autoselect (1000baseT <full-duplex>)
status: active
bond interfaces: en15 en13 en16 en14
Here’s what the beast looks like from the outside:
Test I/O and copy speed results:
50GB of data copied with my new favorite file copy utility “bvckup2” from Server to NAS in 6 minutes, 45 seconds (!) utilizing 25% iSCSI Team 3Gbps around 104 MB/sec.
50GB of data copied with Windows copy/paste from Server to NAS utilizing 26% iSCSI Team 3Gbps in 7 minutes, 2 seconds.
… As opposed to 50GB over a USB 2.0 connection = 24hrs
… As opposed to 50GB over 10/100 LAN at 10MB/sec = 83 min
… As opposed to 30MB/sec on average gigabit LAN = 27 min
… As opposed to well-optimized Gigabit network around 60 MB/sec = 15 min
…As opposed to transfer speed record set on Feb 25, 2014 Sending data at a rate of 64 gigabits per second (Gb/s)(!?)