Office 365 Outlook for Desktop constantly prompts for login password after enabling MFA two factor authentication – how to Enable Modern Authentication for Exchange Online

If you have recently enabled MFA multi factor authentication or 2FA on your Office 365 tenant, your Microsoft Outlook for Office 365 MSO 16.0.11929 (desktop version) users may be prompted over and over for their password, even though you are sure you have the correct password and even the apppassword / app password hash. I’m sure you’ve tried to re-configure Outlook, look at Azure settings, reinstall Outlook, check your autodiscover records, make sure you have the correct Office Suite version and perhaps have even attempted to change the windows 10 registry with the following settings:

[HKEY_CURRENT_USER\Software\Microsoft\Office\16.0\Outlook\AutoDiscover]
"ExcludeExplicitO365Endpoint"=dword:00000001

[HKEY_CURRENT_USER\Software\Microsoft\Office\16.0\Outlook\AutoDiscover]
"ExcludeLastKnownGoodUrl"=dword:00000001

[HKEY_CURRENT_USER\Software\Microsoft\Office\16.0\Outlook\AutoDiscover]
"ExcludeHttpsRootDomain"=dword:00000001

[HKEY_CURRENT_USER\Software\Microsoft\Office\16.0\Outlook\AutoDiscover]
"ExcludeSrvRecord"=dword:00000001

However doing these things did not resolve the issue, and the only fix that worked for us, was to follow the instructions on how to enable modern authentication for Exchange Online here: https://docs.microsoft.com/en-us/exchange/clients-and-mobile-in-exchange-online/enable-or-disable-modern-authentication-in-exchange-online

So I thought it would be helpful to have a step-by-step how to enable modern authentication in Exchange Online for Office 365 based on the instructions provided in the link above.

With MFA enabled, connecting to Exchange Online with powershell is not as simple as it used to be, but still not all that bad. I’ve found the easiest way to connect to Exchange Online with Powershell is to do the following.

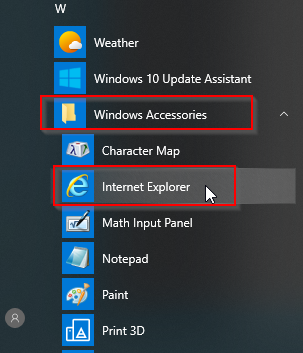
Note: A forewarning here, with certain browsers, when clicking on the Exchange Hybrid “Configure” button, and then installing the Hybrid configuration, the Office 365 login screen may may flash on the screen as a white box, and then disappears before you can authenticate and use your 2FA txt code. I’ve seen this when using Microsoft Edge, Chrome, and even the new version of Microsoft Edge based on Chromium. The only browser I’ve gotten this to consistently work with is the Internet Explorer browser built into Windows 10. The Internet Explorer browser is installed on Windows 10 by default, it’s hidden in the start menu under Accessories:

If you do attempt to run the Exchange Powershell Module using chrome you may encounter the error:

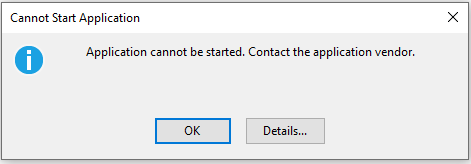
“Application cannot be started. Contact the application vendor.”

When clicking the Details… button, you may find information similar to the following:

PLATFORM VERSION INFO
	Windows 			: 10.0.18363.0 (Win32NT)
	Common Language Runtime 	: 4.0.30319.42000
	System.Deployment.dll 		: 4.8.3752.0 built by: NET48REL1
	clr.dll 			: 4.8.4121.0 built by: NET48REL1LAST_C
	dfdll.dll 			: 4.8.3752.0 built by: NET48REL1
	dfshim.dll 			: 10.0.18362.1 (WinBuild.160101.0800)

SOURCES
	Deployment url			: file:///C:/Users/Jason/Downloads/Microsoft.Online.CSE.PSModule.Client%20(3).application

IDENTITIES
	Deployment Identity		: Microsoft.Online.CSE.PSModule.Client.application, Version=16.0.3527.0, Culture=neutral, PublicKeyToken=45baf49ae30bdb15, processorArchitecture=msil

APPLICATION SUMMARY
	* Installable application.
	* Trust url parameter is set.
ERROR SUMMARY
	Below is a summary of the errors, details of these errors are listed later in the log.
	* Activation of C:\Users\Jason\Downloads\Microsoft.Online.CSE.PSModule.Client (3).application resulted in exception. Following failure messages were detected:
		+ Deployment and application do not have matching security zones.

COMPONENT STORE TRANSACTION FAILURE SUMMARY
	No transaction error was detected.

WARNINGS
	There were no warnings during this operation.

OPERATION PROGRESS STATUS
	* [4/3/2020 3:32:57 PM] : Activation of C:\Users\Jason\Downloads\Microsoft.Online.CSE.PSModule.Client (3).application has started.
	* [4/3/2020 3:32:57 PM] : Processing of deployment manifest has successfully completed.
	* [4/3/2020 3:32:57 PM] : Installation of the application has started.

ERROR DETAILS
	Following errors were detected during this operation.
	* [4/3/2020 3:32:57 PM] System.Deployment.Application.InvalidDeploymentException (Zone)
		- Deployment and application do not have matching security zones.
		- Source: System.Deployment
		- Stack trace:
			at System.Deployment.Application.DownloadManager.DownloadApplicationManifest(AssemblyManifest deploymentManifest, String targetDir, Uri deploymentUri, IDownloadNotification notification, DownloadOptions options, Uri& appSourceUri, String& appManifestPath)
			at System.Deployment.Application.ApplicationActivator.DownloadApplication(SubscriptionState subState, ActivationDescription actDesc, Int64 transactionId, TempDirectory& downloadTemp)
			at System.Deployment.Application.ApplicationActivator.InstallApplication(SubscriptionState& subState, ActivationDescription actDesc)
			at System.Deployment.Application.ApplicationActivator.PerformDeploymentActivation(Uri activationUri, Boolean isShortcut, String textualSubId, String deploymentProviderUrlFromExtension, BrowserSettings browserSettings, String& errorPageUrl, Uri& deploymentUri)
			at System.Deployment.Application.ApplicationActivator.PerformDeploymentActivationWithRetry(Uri activationUri, Boolean isShortcut, String textualSubId, String deploymentProviderUrlFromExtension, BrowserSettings browserSettings, String& errorPageUrl)
--- End of stack trace from previous location where exception was thrown ---
			at System.Runtime.ExceptionServices.ExceptionDispatchInfo.Throw()
			at System.Deployment.Application.ApplicationActivator.PerformDeploymentActivationWithRetry(Uri activationUri, Boolean isShortcut, String textualSubId, String deploymentProviderUrlFromExtension, BrowserSettings browserSettings, String& errorPageUrl)
			at System.Deployment.Application.ApplicationActivator.ActivateDeploymentWorker(Object state)

COMPONENT STORE TRANSACTION DETAILS
	No transaction information is available.

At this point, it may be necessary to uninstall the existing module and then re-install and run using Internet Explorer. You may even receive the following error:

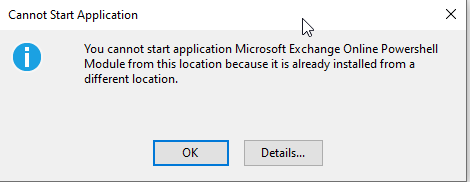
"You cannot start application Microsoft Exchange Online Powershell Module from this location because it is already installed from a different location."

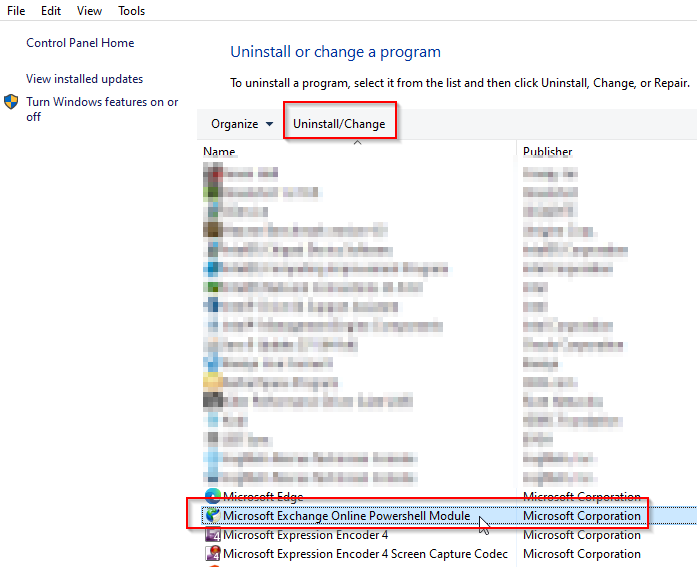
To uninstall the module, click the Start Button > type “appwiz.cpl” and press Enter.

Inside of the Programs and Features screen find the application and click Uninstall.

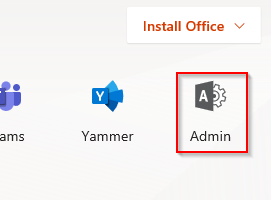
After uninstall, log into your tenant (with an administrator account) at https://www.office.com using Internet Explorer 11, and click the Admin link:

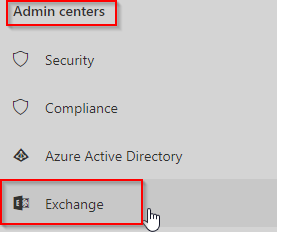
Next, Expand the Menu on the left menu by clicking Show All… and then click on Exchange:

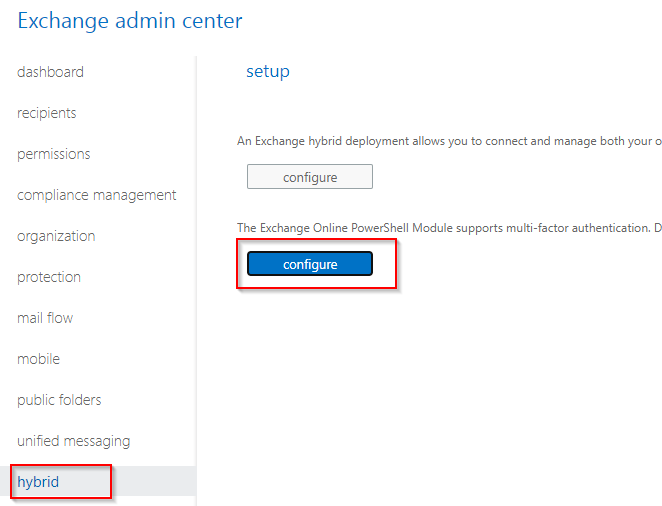
Next we want to click on the Hybrid link to get to our Powershell Configure button:

Go ahead and install the component if it asks, and when it completes, you’ll be greeted with a Windows Powershell screen with the following message:

Experience the fast and reliable Exchange PowerShell V2 Cmdlets via new PowerShellGallery module. Go to https://aka.ms/exops-docs

This PowerShell module allows you to connect to Exchange Online service.
To connect, use: Connect-EXOPSSession -UserPrincipalName <your UPN>
This PowerShell module allows you to connect Exchange Online Protection and Security & Compliance Center services also.
To connect, use: Connect-IPPSSession -UserPrincipalName <your UPN>

To get additional information, use: Get-Help Connect-EXOPSSession, or Get-Help Connect-IPPSSession

We now want to initiate our session using the instructions provided. At the prompt, type in the command:

Connect-EXOPSSession -UserPrincipalName [email protected]

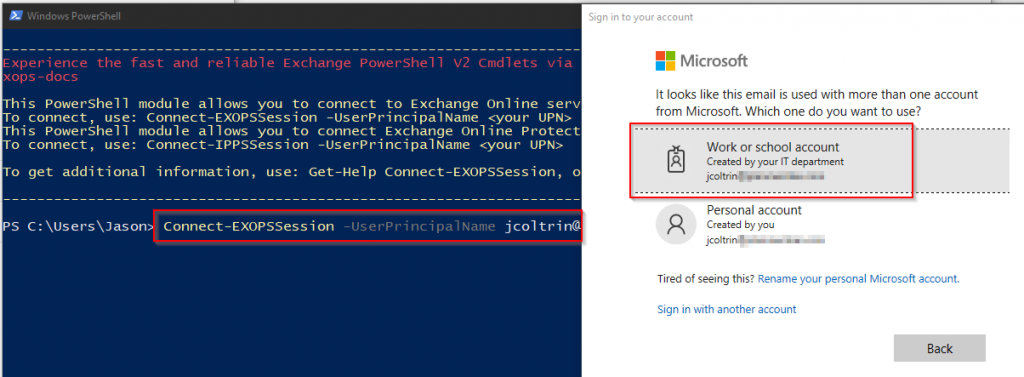
You’ll now be prompted to sign into your tenant (Work or School). You’ll see some status bars go by and then be prompted with a warning about unapproved verbs (for example banish?)

So now we want to (only look before making changes) get our organization structure, and more precisely, find the status of our OAuth2ClientProfileEnabled setting by issuing the command:

Get-OrganizationConfig | Format-Table Name,OAuth* -Auto

Your output should look similar to the following (with the exception being that your result will probably be set to False:)

Finally we can set this to True by using the following command:

Set-OrganizationConfig -OAuth2ClientProfileEnabled $true

To verify the command was successful, run the previous command again:

Get-OrganizationConfig | Format-Table Name,OAuth* -Auto

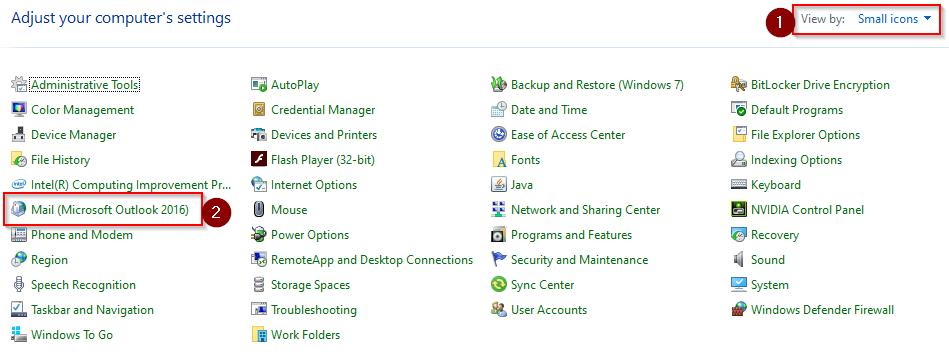
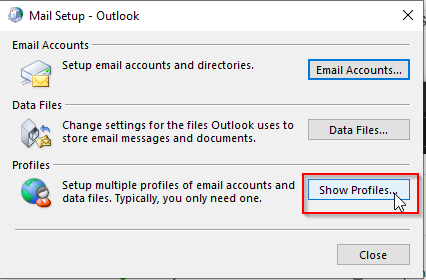
That’s about it! Give the setting about an hour to propagate and then try testing Outlook on the desktop again. You may get a few clients where their profile needs to be recreated. You can do this by going into the control panel > (1) choose Small Icons > (2) Mail Microsoft Outlook 2016.

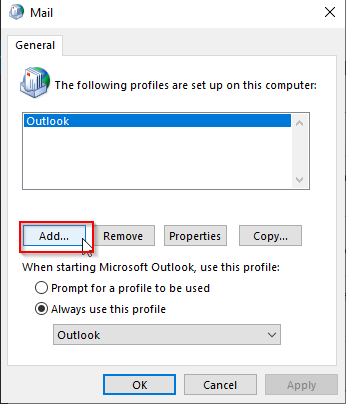
Then click Show Profiles

Click Add…

Now when setting up the new mail account, you should be prompted with the modern authentication and you’ll be prompted for your txt code or Microsoft Authentication Application.

How to grant users access to other user’s mailboxes in Office365 using PowerShell

This procedure shows how to grant users access to other user’s mailboxes in Office365 using PowerShell
How to:
*Grant a user access to a single mailbox
*Revoke the above permissions (recommended cause of action after the Administrator has finished his/her tasks)

1. Fire up PowerShell (Run As Administrator).

First make sure you have the remote signed execution policy set to true. You can do this by running PowerShell in admin mode and running:
PS> Set-ExecutionPolicy RemoteSigned

2. Next, run the following to authenticate your self and import PowerShell commands to your local session:
PS> $LiveCred = Get-Credential
(Supply credentials for MSOnline Portal: [email protected]/Password)

3. After supplying credentials to PowerShell as $LiveCred variable, authenticate and import PowerShell commands into your local session:
PS> $Session = New-PSSession -ConfigurationName Microsoft.Exchange-ConnectionUri https://ps.outlook.com/powershell/ -Credential $LiveCred -Authentication Basic –AllowRedirection

You’re In!
PS> Import-PSSession $Session

4. For example, to grant [email protected] full access to [email protected], you would enter the command:
PS> Add-MailboxPermission [email protected] -User [email protected] -AccessRights FullAccess -InheritanceType All

PS> Exit
Have the user who was granted access close/reopen Outlook and the new mailbox will be listed in their Outlook Account Tree
5. If you want to hide the user mailbox from appearing in the mailbox tree in Outlook who you just granted access, you can add the switch -AutoMapping $false

1. To Revoke access you would enter the command:
PS> Remove-MailboxPermission [email protected] -User [email protected] -AccessRights FullAccess -InheritanceType All

Exchange 2010 – Part 19 – Client Access Server Security and Secure Socket Layer Certificates

Client Access Server Security and Secure Socket Layer Certificates

In this post we will review:

– CAS security through digital certificates and how these vary.

– We’ll also review the different SSL certificate types.

– Lastly, we’ll work through the following:

  1. Create a Certificate Signing Request (CSR)
  2. Obtain a certificate from a Certification Authority (CA)
  3. Install the SSL Certificate on the Client Access Server

Up until this point in your Exchange deployment, you may have configured access with the default self-signed certificate. This may be problematic because it doesn’t support all of the access methods (Outlook Anywhere) and isn’t the most secure method of authentication. You may decide to obtain a trusted certificate from a third-party commercial Certification Authority (CA) and install that certificate on the Client Access Server. You do also have the ability to use a PKI certificate through Microsoft Certificate Services which you can setup internally, however, the infrastructure costs and labor may not be worth the trouble.

Managing Authentication

  • A digital certificate will authenticate to the client that the server with the certificate is trust-worthy. The server can prove, they are who they say they are.
  • In addition, a digital certificate will ensure the data that is exchanged is protected.
  • By default, with Exchange 2010, client communications are encrypted using SSL with Outlook Web App, Exchange ActiveSync, and Outlook Anywhere (SSL will not use the Self-Signed Certificates). By default, POP and IMAP aren’t configured to communicate over SSL. You will use the IIS Manager to ensure SSL is enabled on the virtual directory.

Go to the IIS Manager on your mailbox server. Select the server itself, scroll down to Server Certificates. Here you’ll find the Microsoft Exchange Certificate (Issued to itself by itself).

Click Image to Enlarge

You can double-click on the certificate and check out the properties and see that it’s not trusted.

In IIS, expand Sites and then Default Web Site.  If we look at the different sites in IIS, as far as SSL turned on, click on OWA, and then Secure Socket Layer settings, and see if it says “Require SSL”. We can test to see if that works by browsing to localhost in the web browser. An easy way to do this is to click on the “Browse: 443 (https)” link in the Actions pane:

iissslbrowse443
Click Image to Enlarge

This will open the browser and we’ll be brought to our Outlook Web App. We will have a certificate error. Users will have to install the certificate if they want to get rid of the Red Security Trust Bar in their browser. In this case we will want to install the certificate into the Trusted Certificate Store. Windows cannot validate the certificate, but since we know where the certificate is from we can install it and accept the warning.

Three types of Certificates:

  1. Self-signed: Signed by the application itself (in our case Exchange 2010) and will allow for OWA and/or ActiveSync functionality but not Outlook Anywhere. *For these to work you have to manually copy them over to the trusted root certificate store of the client computer or mobile device.
  2. Public Key Infrastructure (PKI): Requires setting up certificate servers and establishing the certificates for communication.
  3. Trusted Third-Party Certificates: Provided by a CA, these are automatically trusted by clients (unlike the two options above), so the deployment is simplified.

Certificate Types

When you go to purchase a certificate from a CA you’re going to find that different types to purchase.

  • Wildcard Certificates: Can represent multiple domain names (for example *.jasoncoltrin.com), however these types of certs provide a less secure method because the wildcard can be used for any sub-domain. Microsoft does not recommend wildcard certs, but to use SAN’s.
  • Subject Alternative Name (SAN) or Unified Communications Certificates (UCC) certificates are considered better in this regard because you specifically list out each of the trusted domain names. *It is considered best practice to use as few host names as possible (perhaps as few as three).

The CA Process for Obtaining and Installing Certs

  • Take a look at the GoDaddy website for SSL Certificates
  • Begin the process of managing a purchased certificate
  • We will return to our Exchange Server and use the Exchange Certificate Wizard to obtain a Certificate Signing Request (CSR)
  • Use the CSR to complete the GoDaddy certificate process
  • Once that certificate is provided (up to 72 hours), we will install it on our Client Access Server
On our Mailbox Server, open the EMC, browse to Server Configuration.
Under the Server Config Node, beneath the servers, we will have our Exchange Certificates.
What we really want is an SSL certificate from a CA.
In the GoDaddy website, we’ll purchase our cert, manage our Products -> manage my certificates, and then in the SSL management, we will click “Request Certificate”. It will ask where the cert will be hosted. We will want to choose Third Party or dedicated server. Now we will need to Enter your Certificate Signing Request (CSR). Use at least a 2048 bit key.


Go back to the EMC, under server configuration, in the Actions Pane, click on New Exchange Certificate. For Starters, enter a friendly name for the certificate.
If we want to Enable Wildcard Certificate we can do that here. But we don’t want that at this time, we want a literal domain name so leave unchecked and click next.
Now depending on the cert purchased, our options here will be different. For example we have 5 certs purchased and can only use 5 names.
For Federated Sharing, we will place a checkmark in the Public Certificate because in the future we may want to Federate with a different site.
For Client Access Server (Outlook Web App), for the Intranet – you may want to use a local name like mail.jasoncoltrin.local and for the Internet – use mail.jasoncoltrin.com

New Exchange Certificate
Click Image to Enlarge

We want Exchange ActiveSync, so perhaps sync.jasoncoltrin.com is the name we’ll want to use. Most use mail.domainname.com.
Go down the list and have Exchange Web services enabled; Outlook Anywhere enabled.
Autodiscover used on the internet: Autodiscover URL to use: autodiscover.jasoncoltrin.com.
The use of sync.jasoncoltrin.com differentiates and relates to mobile devices. When you set up the cert, that’s when it (the name) counts. For the dropping of POP and IMAP support, in all honesty is probably a good thing, and we prefer a more secure protocol and have everyone come in through ActiveSync. With ActiveSync we have the ability to wipe devices.
At this time we don’t need a cert that supports POP or IMAP.
For Unified Messaging, you can go with a self-signed cert.
At this time we are going to skip Hub Transport server mutual TLS and Hub Transport server for POP/IMAP.
At this time we are not going to use Legacy Exchange Server.
Clicking next will give us a review of our cert (request). In our case we have 6 names. To bring this down to 5, we can change intranet/internet mail.jasoncoltrin.local to mail.jasoncoltrin.com and save a name.
Click next, and the wizard will ask for some information. The full legal organization name, Org unit (none), Country, City, State, Certificate Request File Path – name the file something like “SSLRequest”, then New and Finish. Make sure the CSR generated is 2048 bit. Once finished, browse to where the file was placed, open the Certificate request with notepad, and copy and paste the entire string including –Begin new cert —  to   —End New Cert..— into the GoDaddy.com CSR text box.

SSLCertcopytoCSR
Click Image to Enlarge

After submitting the encrypted data to GoDaddy, you will see the Subject Alt Names and Primary Domain Name. Your cert will be issued shortly (72hrs), and at that time we will be able to import it. Once the cert is issued, you can download it from GoDaddy. The cert will come down zipped, so unzip it.

Go back to the EMC, You will still see your requests and your self signed cert. Right-click on the SSL Cert and choose Complete Pending Request.

CompleteCertRequest
Click Image to Enlarge

Browse to the downloaded cert (domain.com – not the intermediate cert), click complete, and that’s all there is to it. So we’ve installed it but don’t have any services using it. Right-click on the cert and choose Assign Services to Certificate.

AssignCertServices
Click Image to Enlarge

Use SMTP, IIS, click Next, and then Assign.

AssignServices
Click Image to Enlarge

Do we want to override? Yes.

When we downloaded and unzipped the SSL Certificate, we also received an Intermediate Certificate. The intermediate certificate is used to enhance the security of the root certificate. These are also called a Chained Root Certificates. There are instructions on the GoDaddy site for installing the Intermediate Certificate. It is optional, but you should install the Intermediate certificate if the CA provides you with one, but we will forego that for now. Your CA may or may not issue Intermediate certificates.

In conclusion, in this lesson we discussed the benefits of SSL digital certificates, encouraged SAN certificates, worked through the process of requesting a certificate from the GoDaddy Certificate Authority, and installed and enabled services using that cert on our Exchange Client Access Server.


A large majority of the content provided in my Blog’s Exchange series is derived from J. Peter Bruzzese’ excellent Train Signals Exchange Server 2010 Video Disk Series, as well as my own Exchange 2010 lab. Trainsignal.com is an invaluable source for accurate, easy to understand, IT information and training. http://www.trainsignal.com

Exchange 2010 – Part 16 – Concepts and Management of Outlook Web App and ActiveSync

Concepts and Management of Outlook Web App and ActiveSync

In this post, first, we will explain virtual directories and how they are related to the CAS services.

Next we will help you understand Outlook Web App (OWA) and ActiveSync features.

Last, we will use a Scenario to help guide us in the creation and application of OWA and ActiveSync policies.

Scenario: OWA and ActiveSync Management

First, we will help our IT team gain a greater understanding of OWA and ActiveSync.

Next, we will perform the following OWA management tasks:

  • Adjust the authentication for the virtual directory to allow for Integrated Windows authentication. This allows for single sign-on for internal clients.
  • Disable WebReady Document Viewing for the virtual directory.
  • Create an OWA policy and apply it to a researcher user “Alex Heyne” that will ensure he only uses OWA Lite.

Finally, we will do the following ActiveSync management tasks:

  • Block “Unknown Servers” from the virtual directory.
  • Create an ActiveSync policy and apply to all users in the Chicago OU.

Virtual Directories

Web applications are represented by virtual directories that point off toward physical folders.

  • For example, Exchange Outlook Web App has an OWA virtual directory that points off to a literal folder on your system.

You access the virtual directory through its virtual directory name, not its physical folder name (although the two may be the same.)

You can see virtual directories in IIS and also quickly find the physical location on your system through the Properties of the virtual directory.

Although you have default virtual directories created for you when you install the CAS role, you can create additional virtual directories if you like.

In the EMC, go to Server Configuration -> Client Access. Here you will find owa (Default Web Site). Looking at the properties of OWA, we can see both the internal and external URL’s, as well as a number of tabs used to configure OWA.

Exchange Management Console OWA properties
Click Image to Enlarge

Each of the options in the tabs is part of IIS on the client access role. For the most part, if you want to see the location of the virtual directories and their physical location on the server, we would need to open ISS:

IIS Virtual and Application directories
Click Image to Enlarge

Here, take note that some of the sites are considered Virtual Applications (highlighted in red), as opposed to Virtual Directories (highlighted in green). Sometimes you’ll need to use IIS to configure things like SSL.

But for now, lets look more into OWA in the EMC.

Virtual Directory Settings vs. Policy Settings

Virtual directory settings are made through the Server Configuration node

  • Some virtual directory settings are only found under the Server node, whereas others may be configured in a policy as well.
Policies are created under the Organization Configuration node
  • Policies override virtual directory settings
  • There are default OWA and ActiveSync policies create
  • Only one policy (one for OWA and one for ActiveSync) can be applied to a mailbox at a time and if no policy is applied, the virtual directory settings apply.
Understanding OWA Features:
Virtual Directory Property Tabs:
  • General
  • Authentication
  • Segmentation
  • Public and Private Computer File Access – WebReady Document Viewing
  • Remote File Servers
Policy Setting Tabs:
  • General
  • Segmentation
  • Public and Private Computer File Access – WebReady Document Viewing
Note: Public and Private Computer File Access provides two tabs but you cannot have different settings on each one.
In the EMC -> Server Configuration -> Client Access -> OWA Settings for this virtual directory.
General Tab: shows internal url and external url (informational) -config is actually in DNS
Authentication Tab: Use forms-based authentication. Logon format – Domainusername is secure but not completely secure without SSL.
Use one or more standard authentication methods:
-Integrated Windows Authentication. The client computer has to be a member of the same domain or in a trusted domain.
-Digest authentication for windows domain servers (users have an account in AD)
-Basic authentication (password is sent in clear text). Can be used in a secure way if you use SSL.
Segmentation Tab: you can determine if you wan to enable or disable certain features.
For example “Premium Client” is the full version of Outlook Web App. You can choose to use a “Lite version” of OWA. You can force the lite version of OWA for users of Firefox or Safari. You can disable things like Instant Messaging and Text Messaging.
Public Computer File Access tab:
-Direct File Access – determines how files will be allowed or denied access. If you connect on a “Public” computer, you can enable or disable the ability for users to open file attachments. Direct File Access allows you to allow or block or Force Save of even unknown files.
-In the Private File Access tab: same exact settings as above.
WebReady Document Viewing: allows OWA documents to be converted to HTML and shown in the browsers. You can force docs to be changed to HTML before being opened in a supported application.
You may not want a certain document to be shown in the browser. This provides an opportunity for users to view the document at least even if they don’t have a supporting application.
Remote File Servers Tab: you might want to allow or block file servers here. You can enter the domain suffixes that should be treated as internal.
You have an opportunity to use Policies to override the settings placed on the virtual directory settings.
Under Organization Configuration -> Client Access role.
Provide a new policy name. Enable/disable features -> New. Now after creating the policy, go back and open up the policy. You will have more features available now that the policy has been created. It’s important to consider these items again. If you do not enable direct file access, users will not be able to download attachment files.
Once the policy has been created, you need to apply the policy. Take for example, you wish to apply a new policy to an individual user. Go into Recipient Configuration, pick the mailbox, go to Mailbox Features tab -> Select OWA ->Properties. Now you can choose an OWA mailbox policy to take precedence over the virtual directory settings.
Outlook ActiveSync Features:
Virtual Directory Property Tabs:
  • General
  • Authentication
  • Remote File Servers
Policy Setting Tabs:
  • General (Allow non-provision-able devices -this allows mobile phones to sync even if they do not support policy settings)
  • Password
  • Sync Settings
  • Device
  • Device Applications
  • Other
Note: Some features require Exchange Enterprise Client Access Licenses for mailboxes that have policy setting restrictions
Go to the EMC ->Server configuration -> Client Access -> Exchange Activesync tab properties.
3 tabs:
General tab – internal and external urls
Authentication tab – Basic authentication/certificates
Remote File Servers – same configuration of virtual directories
EMC -> Organization Configuration -> Client Access -> Exchange ActiveSync Mailbox Policies
-allow non-provision-able devices
Password tab -> many options here for passwords (length, expiration, require encryption, etc.)
Sync Settings -> Include past calendar items, Include past email items, Allow Direct Push when roaming (you can force it so that roaming users will not get Direct Push). Allow attachments.. etc.
Device tab -> Allow removable storage, allow camera, allow wifi, allow infared, allow bluetooth etc.
Device Appliations tab -> Allow browser, allow unsigned applications (Need enterprise CAL)
Other tab -> (Need Enterprise CAL)
To block unknown servers from the virtual directory (by default is allow), go to the EMC -> Server Configuration -> Client Access -> Exchange ActiveSync Tab -> Virtual Directory Properties. Go to the Remote file servers tab -> Unknown servers by default is set to allow. OWA has the ability to access file shares and SharePoint libraries. If there are no dots in a URL a user clicks, it is considered internal. If there are one or more dots in the URL, then it will only be considered internal if the domain suffix has been added to the configuration.
The following Exchange Management Console Shell commandlet will apply a custom activesync mailbox policy to the OU Chicago:
Get-Mailbox -OrganizationalUnit Chicago | Set-CASMailbox ActiveSyncMailboxPolicy “ASChicago”
So in this post, we reviewed:
  • The feature settings for Outlook Web App and ActiveSync
  • Both virtual directory settings (found under the Server Configuration node) and policy settings (found under the Organization Configuration note)
  • Made virtual directory adjustments and created policies and then applied those to users within our organization using a powershell commandlet.


A good majority of the content provided in my Blog’s Exchange series is derived from J. Peter Bruzzese’ excellent Train Signals Exchange Server 2010 Video Disk Series, as well as my own Exchange 2010 lab. Trainsignal.com is an invaluable source for accurate, easy to understand, IT information and training. http://www.trainsignal.com


Exchange 2010 – Part 14 – Creating Recipient Types

Exchange 2010 – Part 14 – Creating Recipient Types

In Exchange 2010, you can have a wide variety of recipients. In this post we will discuss and create the various recipient types, including:

  • User Mailboxes
  • Resource Mailboxes (Room and Equipment)
  • Contacts
  • Mail Users
  • Distribution Groups
  • Dynamic Distribution Groups
If you have multiple sites or locations with their own Exchange servers, you may wish to prepare, or create and train, a “Recipient Creation Team” in each location. Often times the creation of recipients is something that can be handled by a junior level admin, and so you could give their user account permissions to do just that, after they have been trained.
A review of Recipient Types that we can create:
The EMC makes it easy for us to create recipient types. On our mailbox server, we can open the Exchange Management Console, and expand Recipient Configuration which is under Microsoft Exchange -> Microsoft Exchange On-Premises->Recipient Configuration

Click Image to Enlarge

– The Mailbox Type:
  • User Mailbox (can use an existing user account or create a user account at the same time if you have permission)
  • Resource Mailboxes: Room Mailbox/Equipment
  • Linked Mailbox
– The Mail Contact
– The Mail User
– The Distribution Group
– The Dynamic Distribution Group
The “Disconnected Mailboxes” feature controls mailboxes that you disconnect from their active directory user (and can be connected to a different user).
The “Move Requests” feature is used if we might need to move users from different versions of Exchange or move them from one MB DB to another, and can view those move requests here.
When we highlight the Recipient Configuration in the EMC, in the Actions pane we have two options:
  1. Modify Recipient Scope… Lets say we only want to see those recipients that are in a specific Organizational Unit (narrow the scope).
  2. Modify the Maximum Number of Recipients to Display… – lets say we have a large organization with over 2000 mailboxes, by default, in the Results Pane, the Maximum recipients to display is set at 1000. We can change this number higher or lower to organize the results to our preference.
We will typically use the Mailbox Type -> User Mailbox. A UM is an AD user account that is connected to a mailbox on the Exchange user.
The Resource Mailbox types:
  • Room mailbox – a mailbox that represents a conference room (we need one of these for the bathroom at home) *Note – when created, these accounts are disabled by default
  • Equipment – projector that has a schedule; is it available or not available

Linked Mailboxes: an individual in one forest may have a mailbox in another forest. Requires a specific scenario; linked mailboxes rarely created.

Mail Contacts: allow you to have an AD contact object that can be searched and located but is external mailbox and cannot be assigned to a user. Someone working with your company but not for your company. This user cannot log into the domain.

Mail User: AD user, someone that can log into the domain. From a recipient perspective, they may have a gmail or hotmail account. Has an AD account but not a mail account.

The Distribution Group: Groups of mail contacts and users

The Dynamic Distribution Group: For example, adding a user to a Dynamic Distribution group named Marketing, a marketing user will become a member of the Marketing Distribution group. If that person moves to sales, that attribute changes that they will automatically become a member of the Sales Distribution Group.

Creating the different recipient types in the EMC is pretty straight-forward with the Wizard. The only sticky part is when it asks for the Mailbox Database to use. You should by now know how to locate your current Mailbox Database, if not, see my earlier post.

Functionality Changes in SP1:

  • Hierarchical Address Books
  • Internet Calendar Publishing
  • The Calendar Repair Assistant enhancements

Hierarchical Address Books

With hierarchical address book support you have the ability to configure address lists and offline address books (OABs) in a hierarchical view for your users

  • Note: this is not new to SP1 but most admins never used this because it involved such convoluted adjustments through ADSI Edit that it was passed over as a feature.
  • Now? You still have to jump through many flaming hoops with doggies following behind  but you can now do it through the Exchange Management Shell and it isn’t as difficult.

For example in Outlook, in the Address Book – All Users – you typically have all the users listed. With SP1, you have a new organization tab. Once you set up a hierarchy, you will see the hierarchy in that tab.

Click Image to Enlarge

Internet Calendar Publishing

Exchange RTM allowed for the sharing of calendar information through a federation trust and an organization relationship or sharing policy. SP1 introduces Internet calendar publishing. Allows users of Exchange the ability to share calendar information to anyone on the internet.

Key points include:

  • Federation is not necessary
  • Internet users are not required to belong to any form of authentication group (like Windows Live) and all they require is a browser to access it.
  • Users can invite friends, family, business persons to view their calendar by providing them a link
  • Exchange admins can control who can publish their calendar and what can be shared

The Calendar Repair Assistant Enhancements

Introduced in the RTM of Exchange 2010, the CRA repairs problems with the calendar assistant

New scenarios that are detected and repaired with the Calendar Repair Assistant in SP1 include:

  • If an attendee’s calendar is missing an occurrence or an exception of a meeting
  • If an attendee’s start/end time doesn’t match the organizer’s star/end time (*includes time zone inconsistencies)
  • The location of the attendee is different from that of the organizer
  • Organizer is missing an item
  • Recurrence patterns of an attendee and an organizer are different

Thanks for reading through this post and I hope you gained some understanding of the different Recipient types in Exchange 2010 as well as learned about new SP1 features.


A good majority of the content provided in my Blog’s Exchange series is derived from J. Peter Bruzzese’ excellent Train Signals Exchange Server 2010 Video Disk Series, as well as my own Exchange 2010 lab. Trainsignal.com is an invaluable source for accurate, easy to understand, IT information and training. http://www.trainsignal.com

Exchange 2010 – Part 13 – Address Lists and the Offline Address Book (OAB)

Address Lists and the Offline Address Book in Exchange 2010

In this post, we will review different address list types, including:

  • Global Address List
  • Custom Address Lists
  • Offline Address Lists
– We will try creating new address lists based on Organizational Units
– We will review the Offline Address Book (OAB) settings
– We will create new Offline Address Books and assign them
In review, let’s discuss and describe Address Lists and the OAB:
  • An address list allows persons to browse different recipients in your Exchange organization so that you can contact other persons easily. It’s difficult (for most people, not me) to remember email addresses for 100’s of associates.
  • In Exchange 2010 there are three different types of address lists
  •      – Global Address List (GAL): A collection of all mailbox-enabled users, mail-enabled users, mail-enabled contacts, dynamic distribution groups, mail-enabled groups, mail-enabled public folders, and system mailboxes. By default you have one Global Address List, but Exchange may handle multiple companies or organizations, with different GALs. If you have an organization with the need for multiple GALs, you will need to produce them using the Exchange Management Shell.
  •      – Custom Address Lists: Although typically there are breakdowns of the GAL into lists like All Contacts, All Groups, All Rooms, All Users and Public Folders (if you use these) you can create customized lists. You’re going to find that the custom lists are pretty flexible. Be sure you do not over-do the custom lists, but keep them in logical groups. You want to keep these as simple as possible.
  •      – Offline Address Book: Although a separate aspect of the Organization structure, this is connected with address lists. For users that are on the road a lot and are offline, they will still want to be able to find email addresses.
Now we can jump into a scenario:
– Create 3 new address lists (New York, Chicago, and Dallas). Note: These will be based off of Organizational Units.
– Create and configure a new Offline Address Book and apply it to the mailbox database.
– Create a special “Dallas” OAB and assign it only to those persons in the Dallas OU.
On your mailbox server, open Active Directory Users and Computers and ensure that the corresponding Organizational Units are available and ready.
For example, if a user is logged in, they will see all the users in the Global Address List. If the user goes offline (disable the Network Interface), and goes to the different address lists, they will be able to still view the Global Address List as it is set to be an Offline Address Book by default. However, the other Address Lists will be unavailable.
Go to the Exchange Management Console -> MS Exchange -> MS Exchange on-Premises -> Organization Configuration ->Mailbox ->Address Lists tab. Click on New Address List (wizard).
Place the new list in the top-level container (All Address Lists). Under Filter Settings, you will select the recipient container where you want to apply the filter (Organizational Unit). In our case we can select New York -> OK.
 ScreenShot042
Under Recipient Types, we can narrow down to specific types such as:
– Users with Exchange Mailboxes
– Users with external email addresses
– Resource mailboxes (Room or Equipment mailboxes)
– Contacts with external email addresses
– Mail-enabled groups
In our case we will use All recipient types.
At this point we can choose Conditions:ScreenShot0411
It depends on how involved you want to get in building an Address list and you can even apply Custom Attributes. Once you’ve selected the attributes you desire, go ahead and click the preview button at the bottom of the screen to get an idea of how the Address List will look.
Next you can schedule when the address list should be applied (perhaps in the evening/after hours.)
Now we’ve created our 3 Address Lists.
In the EMC, under Recipient Configuration, select one of your users and under the General Tab, you can see the Custom Attributes… button, where you can setup address lists that relate back to these custom Attributes. Under the General tab you can also hide a user from Exchange Address Lists.
However although we’ve created 3 new Address Lists, when a user is offline, they still will only see the Global Address List. First, lets look at the properties of our Default Offline Address Book.
In the EMC -> Org Config -> Mailbox ->Offline Address Book tab.
The default Generation Server will be a Mailbox Server. The distribution Mechanism is Web-Based. If you look at the properties of the Default Offline Address Book, under the General Tab, you can find Updates are scheduled to run at 5:00am. Under the Address Lists tab, you can add include other lists… Add -> so if you want an individual see lists exactly as they see it at work, but we will create a separate OAB. Now under the Distribution Tab, with modern Outlook clients, Exchange will use Web-based distribution from a virtual directory. The virtual directory may or may not reside on your Mailbox server. The Mailbox server provides the OAB, however, the OAB will be distributed by a Virtual Directory.
ScreenShot0431
Now we want to create a new Offline Address Book and apply it to our Mailbox database where all of our users reside.
Mailbox -> New Offline Address Book.
Name it something like New Default OAB. For the Address book generation server choose your Mailbox server. We will include the default Global Address List, and Include the following address lists:
We will select the three address lists New York, Dallas, and Chicago:ScreenShot044
After hitting Next, we will be prompted for Distribution Points.
We will Enable Web-Based distribution here and choose our default virtual directory (client-access server). If we had older Outlook clients we would Enable public Folder Distribution. We do have the option of choosing both Web-based and public folder distribution, however which is nice.
Now we have a new Offline Address Book. In Database Management, we will see our Mailbox Databases. We can organize our Offline Address Books to different Mailbox Databases. With a particular mailbox selected, in the action pane, you can set the default OAB as well.
If you want to apply an Offline Address book only to a limited amount of special recipients, first create the SpecialOAB, then open up the Exchange Management Shell. First we need to get the users who have the Organizational Unit Dallas, and pipe it out to set the OAB. Your code will look something like the following:
[PS] C:Windowssystem32>Get-User -OrganizationalUnit Dallas | set-Mailbox -OfflineAddressBook “SpecialOAB”
In review:
  • We looked at different address list types
  •      – Global Address List
  •      – Custom Address Lists
  •      – Offline Address Lists
  • We created several new address lists based on Organizational Units but also showed how to determine other conditions to filter which users are in an address list
  • We reviewed the settings for the Offline Address Book (OAB) and especially discussed the generation and distribution methods
  •      – Generation is done on the Mailbox server
  •      – Distribution is done through Public Folders or Web-based
  • We created new Offline Address Books and assigned one to the mailbox database and used the EMS to assign the other to individuals.
Lastly, in one of my previous posts http://www.jasoncoltrin.com/?p=77 , I explained how changes to these Offline Address Books in certain instances can take up to 56 hours to propagate down to the client. If you have changes you want to make available to clients who are going offline, there are some manual steps you need to take to ensure they get the latest Offline Address Book right away.
A good majority of the content provided in my Blog’s Exchange series is derived from J. Peter Bruzzese’ excellent Train Signals Exchange Server 2010 Video Disk Series, as well as my own Exchange 2010 lab. Trainsignal.com is an invaluable source for accurate, easy to understand, IT information and training. http://www.trainsignal.com

Transitioning Exchange 2007 to Exchange 2010 – Part 9

This post has to do with transitioning from Exchange 2007 to 2010. Essentially you will be installing Exchange 2010 on the 2007 Exchange server, setup some co-existence if necessary, transfer the mailboxes, and then uninstall Exchange 2007.

* Upgrades – There is no “In-Place” upgrade from 2007 to 2010

– You can either deploy fresh, migrate, or transition.

*Migration

From Exchange 5.5 or 2000 to Exchange 2010 – when moving over to Exchange 2010 you will not be able to move over mailboxes or use transitioning coexistence. You might have to upgrade from 5.5 or 2000 to 2003, and then transition. Quest is a good transitioning tool from older versions to 2010. Lotus Domino has a transition path to 2007.

*Transition: involves introducing an Exchange Server(s) into the environment and moving over mailboxes and public folders

– Co-Existence: the state of your Exchange environment when different versions of Exchange are running together side-by-side within the same Exchange Organization

You can run exchange 2003, 2007, and 2010 all co-existing together. Slowly move the mailboxes and public folders over.

When migrating from a single 2007 server:

1. Ensure Exchange 2007 servers are running SP2

2. Deploy Exchange 2010 Servers in this order: Client Access Server, then Hub Transport Server, Unified Messaging, and then Mailbox server

3. Configure legacy DNS host name records* and implement new certificates for CAS

*Legacy DNS host name records: only necessary if you cannot transition quickly and need to provide remote OWA/Mobile usage.

4. Move over mailboxes and public folder data to Exchange 2010.

5. Tie up loose ends and uninstall Exchange 2007

Legacy Host Names and Certificates for CAS

  • If you plan for a period of co-existence with 2007, you will need to establish a legacy host name
  • The goal is to move your primary namespace, mail.companyname.com and autodiscover.companyname.com over to Exchange 2010
  • So for example, your mail.companyname.com domain continues but a new legacy.companyname.com is put in place for 2003/2007 users of OWA, ActiveSync, etc…
  • You will need to obtain a new certificate for Exchange and you should consider a Subject Alternative Name (SAN) certificate although wildcard certificates are also supported

Some DNS Record Types Review:

  • A Record: an address record that maps a host name to an IP address
  • NS Record: a name server record that maps a domain name to a list of DNS servers that are authoritative for that domain
  • MX Record: mail exchange record – maps a domain name to a list of mail exchange servers for that record
  • CNAME Record: gives the ability to provide an alias of one name to another
  • SRV Record: links a particular service to a specific server
  • SOA: Specifies the DNS server providing authoritative service for a particular domain

Users trying to log into an Exchange 2010 server, but have not had their mailbox transitioned yet, will be re-directed to the previous server if the legacy A record is listed in DNS.

Deployment Assistant: (upgrade means transistion) -this tool can be used from the website or downloaded.

The tool can be found here:

http://technet.microsoft.com/en-us/exdeploy2010/default.aspx#Index

Disjointed namespace: the FQDN of a server does not match the domain of which it is a member.

Transitioning Paths Vary

* Depending on your organization you may have the following variables in play for your transition to mold itself around:

– Exchange 2003 to 2010 (or mixed 2003/2007 to 2010)

– Public folders need to be transitioned

– Co-existence is necessary (requires legacy host name)

* Our example transition includes the following concerns:

-Public folders do, in fact, exist and need to be transitioned

-Co-existence is not necessary (we will perform the move in a minimal amount of time over a weekend of inactivity within the organization)

In a transition from Exchange 2007 to 2010 here are the following necessary items:

  1. Exchange 2007 is already running SP2
  2. The Server is 2008 and the forest functional level is already higher than the required 2003 forest functional level mode
  3. Exchange 2010 is already installed with CAS/HT/MB roles
Items to Complete:
  1. Move Offline Address Book (OAB) generation to Exchange 2010
  2. Move Exchange 2007 Mailboxes to 2010
  3. Move Public Folder data to Exchange 2010
  4. Ensure funtionality, test connectivity options, remove Exchange 2007

To check the domain functional level

  1. Go to Active Directory Computers and Users
  2. Right-click on the domain name, click “Raise Domain Functional Level”
  3. Look at Current Domain Functional Level


Moving the OAB generation from 2007 over to Exchange 2010

  1. Open Exchange Management Console
  2. Expand Organization Configuration node
  3. Select the Mailbox node
  4. Select Offline Address Book tab
  5. Select the Default Offline Address book, ->Actions -> Properties -> Distribution tab
  6. Make sure Enable Web-based distribution is On (checked)
  7. Enable public folder distribution (On/checked) -> ok

Warning (ok)

In the actions pane click Move

Click Browse -> Select the new Exchange 2010 server -> Move

Completed (Warning) -> Finish

Generation server should now be your new 2010 server.

Online Mailbox Moves:

  • Previous transitions called for mailboxes to be offline for a period of time while they moved to the new server
  • Exchange 2010 eliminates this issue by allowing the mailbox to be moved while still online. Note: If transitioning from Exchange 2003 to 2010 you will still need to do an offline mailbox move
  • To the user, short of a restart of Outlook, they will not know a difference or notice any loss of service
  • Need to use the wizard or new powershell cmdlet New-MoveRequest

You need to start on the new Exchange 2010 server to move mailboxes from 2007 to 2010

Start Exchange Management Console

Go to Recipient Configuration node -> Mailbox

Add a column (Database) and place next to the display name

Select multiple users -> Actions -> New Local Move Request…

Target Mailbox Database (Browse) -> Select new 2010 server DB -> ok -> Next

Move options:

If corrupted messages are found:

  • Skip the mailbox (recommended)
  • Skip the corrupted messages
Next -> New -> Finish
Move Request -> If you look at the status it should say completed
Using the exchange management shell: (more flexibility and control)
get-help new-moverequest -examples
(3 examples)
System will perform check of mailbox for readiness
>New MoveRequest Identity ‘[email protected]’ -TargetDatabase “MBEX2K10”
To test
>get move-request
-shows which move requests have been completed
For example to move just mailboxes from one organizational unit into exchange 2010

> get user organizationalunit LegalDept | New MoveRequest -TargetDatabase “MBEX2K10”

Replicating Public Folder Structure:

Once we have replicas we can remove the original copy

Go to Toolbox – Public Folder Management Console – should connect back to your 2007 exchange server.

We first need an Exchange 2010 Public Folder database:
Organization Configuration under Mailbox

Database Management Tab -> Actions -> New Public Folder Database

Give it a name (2K10PF) -> Next -> New -> Finish.

Go back to PF management console -> Right click on folder and choose properties -> Replication tab -> Add -> Select new 2K10PF database -> OK

Change “Use public folder database replication schedule” to Run Every Hour.

Now we’ve asked the public folders to replicate over. One way to check if it’s working ok is right click on the root, and choose connect to server, select 2010 server, and find the replicated folders (update Heirarchy)

Now you can remove 2007 replicas. Make sure you have complete all public folders.

2007 Exchange Pre-Removal Tasks 

  • If you are confident that your Exchange 2010 server(s) are ready to work alone – don’t uninstall the Exchange 2007 server yet…
  • In the EMC Toolbox is the Exchange Best Practices Analyzer – use it!
  • Use the Exchange Remote Connectivity Analyzer Tool is another option
  • When your testing is complete and you feel comfortable — Uninstall Exchange 2007 from the Programs and Features item in the control panel

Decommissioning is simply removing the Programs and Features. It will go through the process of uninstalling the various roles (MB, CAS, etc)

We have ended the period of coexistence, and have transitioned over to 2010.


A good majority of the content provided in my Blog’s Exchange series is derived from J. Peter Bruzzese’ excellent Train Signals Exchange Server 2010 Video Disk Series, as well as my own Exchange 2010 lab. Trainsignal.com is an invaluable source for accurate, easy to understand, IT information and training. http://www.trainsignal.com

Exchange 2010 – The Exchange Management Console and Shell – Part 7

* There are 3 tools for managing Exchange. 1. The Exchange Management Console, 2. The Exchange Management Shell, and, 3. The Exchange Control Panel, which is accessed through Outlook Web App (OWA)

* We will first look at the use of the EMC and explore its various nodes, panes, and actions we can perform

* Then we’ll look at the purpose of PowerShell and the EMS, focusing on how commands are formed using cmdlets and how they are made more complex and useful through pipe-lining.

The EMC has 4 primary interface elements:

  1. Console Tree
  2. Result Pane
  3. Work Pane
  4. Action Pane
The EMC is based on MS MMC 3.0 and the GUI version used for Exchange.
Organization Configuration
Server Configuration
Recipient Configuration
Under Server Configuration, when you click on Mailbox, Client Access or Hub Transport, you’ll notice that there are two middle panes. A results pane and a work pane.
The Actions pane can be turned off by clicking Show/Hide the action pane button on the toolbar. When you turn it off, you can still perform functions by right-clicking on objects.
One thing to note in the Console Tree is that you have by default the “Microsoft Exchange on-Premises.” It is designed so that you can manage Exchange Servers in the cloud.
The Exchange Management Shell is a requirement for Exchange Administrators (and there are questions about it in exams). Learning PowerShell is not an option, it is a necessity.
The EMS is built upon PowerShell (PS)
  • PS is both a command-line tool and a scripting platform.
  • Exchange 2010 requires PowerShell v2.
  • PowerShell commands are built using cmdlets
  • Through PowerShell commands, you can manage EVERY aspect of Exchange, whereas the EMC you can manage ALMOST every aspect of Exchange
Local Shell and Remote Shell
  • The EMC allows you to make configuration changes to the Organization or to individual Servers. In Exchange 2007, you could only run the POwerShell compone3nts on the local machine.
  • With Exchange 2010 you can connect to a remote session on a remote Exchange 2010 system.
  • When you open the EMS it connects to the closest exchange session
  • you cannot connect remotely to an Edge Transport Server
  • Remote Sessions are created using the New-PSSession and Import-PSSession cmdlets
What are CMDLETS?
  • Simple verb-noun structure
  • Common verbs are : Get, Set, Remove, Test, Enable, Disable, Install, Uninstall, New and Move
  • Pipelines | help to string cmdlets together
  • Examples:
  • Get-Mailbox
  • Get-MailboxStatistics <Mailbox>
  • Get-Mailbox -OrganizationalUnit Sales
  • Get-Mailbox | Set-Mailbox -prohibitsendquota 500MB (this will take every mailbox in the organzation and set the prohibit send quota to 500MB – manually would take forever!
The Exchange Management Shell contains modules we need. You can import them into PowerShell, but the EMS already is loaded.
Try for example:
>get-excommand – quite a number of different cmdlets! To investigate how to use one of these commands?
>get-help test-systemhealth
This outputs
Name:
Synopsis:
Syntax: (might want to port out to txt and print)
Description:
Related Links:
Remarks: (Examples)
>Get-Service -> shows all the services running on our system
>Get-Mailbox ->  shows all the mailboxes on the server – names, where they reside, quota.
To narrow down to the sales org unit use:
>get-mailbox – OrganizationalUnit Sales
>Get-MailboxStatistics jason.coltrin
shows last login time, storage stats, etc
>get-mailbox -OrganizationalUnit Sales | Set-Mailbox -ProhibitSendQuota 500MB
To give a number of users mailbox with one line of code you can do the following:
Andy Grogan created a script to create (fake) users on a domain. You can create several hundred users.
Go to UserTools, and you can see a .csv file which contains basic info for creating users. You can change these, and use your real names and create an entire domain of your users.
The script will create an Organizational Unit called “Exchange Users”
You can download the script here:
and here is a screenshot of the script and .csv files:
Click image to enlarge
Run the powershell script within powershell, and you should see the users scroll down the screen as they are created.
Now that the users have been created, go to your Mailbox server and go to Organization Configuration -> Mailbox -> “MailboxDatabase” is the database where we will be placing our new users. We will use the ExchangeUsers OU to help build mailboxes for our lab users.
Under Recipient Configuration, we do not yet have users listed. We do not have mailboxes for them.
Go to the EMS and type in the following command:
> get-user -OrganizationalUnit ExchangeUsers | where-object{$_.RecipientType -eq “User”} | Enable-Mailbox -Database “MailboxDatabase”
Now that your users have been given mailboxes, goto OWA at https://yourdomain/owa , log in as one of the users and test sending/receiving to the administrator.

Exchange 2010 Installation Considerations Part 2

More requirements for Exchange 2010:

Your Forest is required to be running at Server 2008 R2 Forest Functional Level.

x64 based hardware is required.

There is no in-place upgrade for Exchange 2007 to 2010.

It’s always important to map out your network prior to installing servers.

Consider your existing infrastructure and the needs of the company.

Discuss your design and deployment goals for using Exchange 2010.

Review the order of your deployments and consider the physical network layout and network connection speeds.

The following table shows minimum CPU core requirements for Exchange 2010 components:

Exchange2010_Cores
Click image to enlarge

The following table shows the minimum memory requirements for Exchange 2010:

Exchange2010_Memory
Click Image to Enlarge

Exchange Server 2010 is available in two different editions: Standard and Enterprise

The edition is determined by the product key, however, when installing as a trial version it will be running as Enterprise Edition.

The Exchange Management tools can run on Windows 7, Windows Vista with Service Pack 2, Server 2008 SP2, Windows Server 2008 R2.

Standard Edition – Limited to 5 Databases per server

Enterprise Edition – Can run up to 100 databases per server (previous editions both standard and enterprise allow database availability groups (High Availability) but require cluster which require Enterprise Edition of Server 2008 Enterprise.

Client Access Licensing (CAL’s) also come with both Standard and Enterprise versions. Sometimes the type of license will limit clients. For example, mobile devices without the correct license may not be able to use certain features.

Prerequisites: Use the powershell commandlet or Server Roles and Features to install prerequisites. Different Exchange roles will have certain requirements. Eg. the UM role requires the Desktop Experience feature installed.


More Hardware Requirements:

Processor(s): x64 Intel or AMD

Memory: can change due to different role being installed, but typically 4GB min per server. If combining roles, 8GB. Add 2-10MB memory per mailbox. The maximum memory for a Mailbox role is 64GB

Disk Space: For the Mailbox Role, you will need a minimum of 1.2GB to install Exchange.

Server OS: Server 2008 or Server 2008 R2

Prerequisites for Server 2008 SP2

  1. .NET Framework 3.5 SP1
  2. Install the .NET Framework 3.5 Family Update
  3. Windows Remote Management (WinRM) 2.0 here: http://support.microsoft.com/kb/968929
  4. PowerShell v2
  5. For Hub Transport and MailBox servers, install the MS Filter Pack. *Note: On Exchange 2010 RTM, you can meet the prerequisite by installing 2007 Office System Converter: Microsoft Filter Pack. However, MS recommends that you upgrade to the Microsoft Office 2010 Filter Packs.
  6. From an elevated command prompt, from the Scripts folder, issue the following commands:
  • Sc config NetTCPPortSharing start auto
  • ServerMangerCmd -ip Exchange-Typical.xml -Restart

7.  With the Unified Messaging role type:

  • ServerManagerCmd -i Desktop-Experience

Some useful tools in the scoping and stress testing of Exchange are:

1. Risk and Health Assessment Program for Exchange Server (ExRAP) – Scoping Tool v1.5 http://www.microsoft.com/download/en/details.aspx?id=20857

2. Planning and deployment guide: http://technet.microsoft.com/en-us/library/aa995902.aspx *Especially the Mailbox Server Storage Design

3. Install and run Jetstress on your hardware prior to deployment

The documentation for the Exchange Server 2010 version of Jetstress is available on TechNet at the following location.

http://technet.microsoft.com/en-us/library/ff706601.aspx


Version Build Usage Link
14.01.0225.017 32 bit
  • Exchange 2003[1]
http://www.microsoft.com/downloads/en/details.aspx?FamilyID=6c9c1180-4dd8-49c4-85fe-ca1cdcb2453c&displayLang=us
14.01.0225.017 64 bit
  • Exchange 2007
  • Exchange 2010
http://www.microsoft.com/downloads/en/details.aspx?displaylang=en&FamilyID=13267027-8120-48ed-931b-29eb0aa52aa6

Table 1 – Jetstress version and download table


[1] Refer to Appendix D – Exchange 2003 for information on configuring Jetstress 14.01.225.x for Exchange 2003


A good majority of the content provided in my Blog’s Exchange series is derived from J. Peter Bruzzese’ excellent Train Signals Exchange Server 2010 Video Disk Series as well as my own Exchange 2010 lab. Trainsignal.com is an invaluable source for accurate, easy to understand, IT information and training. http://www.trainsignal.com


Offline Outlook Address Book – delays in syncing Outlook and Exchange 2010 – Solved!

When an administrator makes a change in Active Directory/Exchange, why do the changes not appear in the Outlook Offline Address Book immediately?

I found that it may take up to two days for the changes to appear in Outlook.

In Exchange 2010 it takes even longer to synchronize the changes in the OAB than Exchange 2007.  After the OAB is updated, which by default is once a day, it may take up to 8hrs for the OAB to be available to the client. The reason is that the OAB is generated in the MAILBOX role and needs to be copied to the CLIENT ACCESS role. The CLIENT ACCESS role checks for changes every 8 hrs. On top of these delays, if a client does not close/open his or her Outlook, it can take even longer for a change to take place.

If you want the changes to appear in your Outlook Address Book right away, you need to do the following:

  1. Make a change or changes to the OAB. An administrator can do this by going to their Exchange server, and open the Exchange Management Console. Drill down from Microsoft Exchange to ->Microsoft Exchange On-Premises ->Recipient Configuration -> Mailbox. Right-click on the user in which you want to make changes or add another SMTP address. Add or Edit the addresses, etc.EMC1
  2. Manually update OAB  in the Exchange server. Go to the Exchange Management Console -> Microsoft Exchange -> Microsoft Exchange On-Premises -> Organization Configuration -> Right-Click on Mailbox and choose Properties. Click on the Offline Address Book tab. Right-click on the default offline address book and choose Update. EMC2
  3. Restart Microsoft Exchange File Distribution service. On the Exchange server, go to Start -> Run -> type in Services.msc and hit Enter/OK. Browse to the Microsoft Exchange File Distribution service, right-click on the service and click Restart.Services
  4. You may need to Sync the Domain Controllers between sites (in a multi-site environment).
  5. Download the OAB in Outlook. Open Outlook on the client that wants the change. Go to the File tab/menu. Click on the Account Settings button and then click on Download Address Book…OutlookDownloadAddressBook

Otherwise, the process may take up to 56  hrs (24hrs to generate OAB, 8 hrs to update the CLIENT ACCESS, and 24 hrs to update Outlook).