How to set Windows Date and Time formats to the internationally recognized ISO 8601 standard

YYYY-MM-DD is the standardized international date formatting scheme as codified in ISO 8601. The standard aims to provide a well-defined unambiguous method of representing calendar dates and times in worldwide communications.

The standard has the additional benefit of organizing file and folders in a data-system in an intuitive ascending or descending order. Additionally not only is this good for Excel sorting, it’s also excellent for file naming as it sorts properly (based on date) even if the sort is done alphabetically and not numerically.

Also, the ISO 8601 is a format recognized internationally, and will prevent costly mistakes (the refund expires on 2/22/21,) and inconveniences (my plane arrives in Japan at 5:30P on 12-23-22.)

Question: Yes this is all fine and good but I can’t remember all this, how do I get used to the correct date format?

Answer: Change the Short Date format under Windows Settings > Region Settings or Date and Time Format.

  1. Click on the Windows Start button and type Region
  2. Click on Region Settings or Change the Date and Time Format
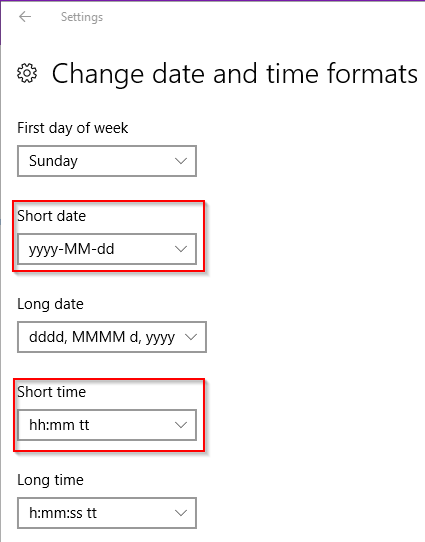
  3. In the Date and Time Format settings, change the Short Date format to yyyy-MM-dd
Windows Region Time Date Format Settings YYYY-MM-DD

4. Additionally we can change the Short Time format to hh:mm tt (which adheres to the ISO 8601 format)

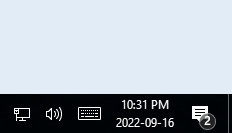
5. Now we can see in the bottom-right corner of our screen, our date and time formats are displayed:

Systray Time Date Format

ISO 8601 Filename conventions

Naming files using the ISO 8601 scheme can have many variations, however the following makes most sense to me.

The timestamp is only a portion of the filename, it should not dictate how the other portions are formatted.

Typically dashes are used to separate fragments of a filename, while underscores delimit tokens within a fragment.

As such, the timestamp and the filename should be delimited by dashes, as they are different sections. Keep underscores within a section.

Then you get filenames which look like YYYY-MM-DD-file_name-v3.41. Which is clean and consistent (and easily copy / paste-able.)

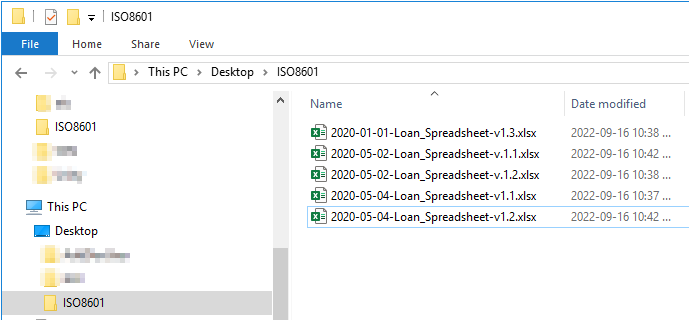
Which of these filenames below is going to have you pulling your hair out, and which will leave you nice and happy when sorting by date in Windows File Explorer?

Loan – Spreadsheet v 1.1 May 4, 2020.xlsx

Loan – Spreadsheet v 1.1 May 2, 2020.xlsx

Loan – Spreadsheet v 1.3 January 1, 2020.xlsx

Loan – Spreadsheet v 1.2 May 2, 2020.xlsx

Loan – Spreadsheet v 1.2 May 4, 2020.xlsx

or

2020-05-04-Loan_Spreadsheet-v.1.1.xlsx

2020-05-02-Loan_Spreadsheet-v.1.1.xlsx

2020-01-01-Loan_Spreadsheet-v.1.3.xlsx

2020-05-02-Loan_Spreadsheet-v.1.2.xlsx

2020-05-04-Loan_Spreadsheet-v.1.2.xlsx

You guessed it – ISO 8601!

Site Maintenance – security and reliability

Thanks for all your support. Some of you may have noticed a little downtime. I invested a little professional expertise in the site and you should now see better performance and more site reliability and uptime. Special thanks to Gregory Morozov at upwork.com who quickly identified and resolved the following issues:

  • Block xmlrpc.php
  • Added the site to CloudFlare DNS (free tier)
  • Convert PHP to php-fpm – for many reasons, but one is control over max php processes (I’ll use: service php7.2-fpm restart – if I need to restart php.)
  • Relaxed Wordfence triggers so users don’t get denied access
  • Dropped memory usage from 700+MB to 400MB
  • Fixed invalid Repos, other updates and maintenance.
  • We’ll monitor the site usage into the beginning of next week to see if we need to add more memory to the instance.

18 Things I’ve learned Trading Options on Robinhood and TD Ameritrade in the past 12 Months

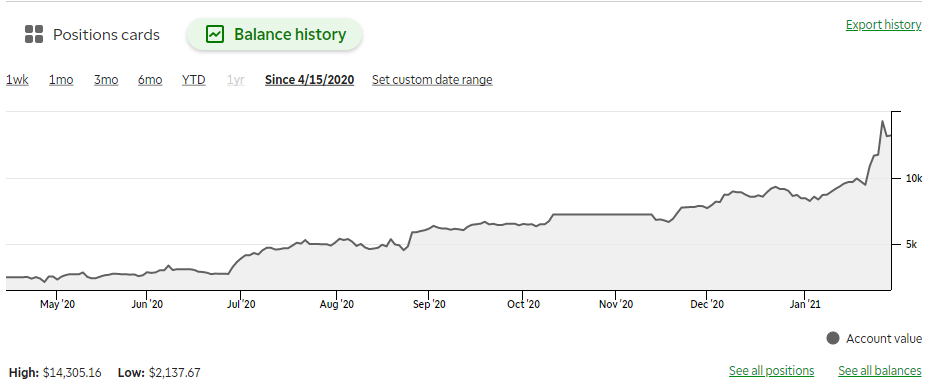
So for the past 12 months or so I’ve tried my hand had trading options on Robinhood and TD Ameritrade, and I want to pass on what I’ve learned so perhaps someone new to options can get a head start. *Disclaimer: I’m in no way endorsing or advocating trading options. What you do with your money and your trades has no association with the information presented here. By reading this information you’re agreeing that you hold harmless and no liability to myself, my employer or this website. If that scares you, please click here. In all my trades, I’ve only made a little bit of money with a total amount of trade money equaling under $1000. *update 1/30/21* I’ve now made more than a little money 🙂 Starting in April of last year I funded $2500 into my TD Ameritrade account. Using the principles I have below, AND A LOT OF LUCK, my account has grown to around $17k. This was done with a combination of stocks and options purchases. This may not happen to you, and I’m not saying it will, this post is merely for advice and informational purposes. As you can see, I didn’t become a millionaire in a month. If that’s what you want, head on over to wallstreetbets with your 50k to blow. But I did earn enough for a pretty nice used car or family vacation…

Before you get started, it’s important to know that trading options are essentially gambling; it’s almost pure speculation on whether or not the market or stock will go up or down and your bets will pan out. I say almost because there are traders out there who make a consistent living doing options trading. This article is not for those who already know the in’s and out’s of options trading or are looking for information about advanced options trading strategies (spreads etc). But back to gambling… if you have a tendency to let emotions get control of you if you win or lose, or if you’ll hurt yourself or your family because one of your trades goes the wrong way, then stay out of options trading. I won’t go into all the other investment vehicles you can use to safeguard your money for retirement, and at a bare minimum, don’t even think of trading options if you don’t first have an emergency fund of several thousand dollars.

I work for a brokerage, and I’m in no way endorsing trading of options as a retirement vehicle. If you trade options, you may lose everything you have in your bank in one week if you’re not careful. Trading options can be stressful and painful when things don’t go your way. You really do have to watch your puts and calls pretty much every minute of the day while your trades are active. But on the flip side, if you are frugal and learn as much as you can, trading options can be a nice way to generate money quickly without too much physical work. Options trading really is just for “play” money; I advocate putting 99% of your money into a Roth IRA or 401K.

Now onto the eighteen things I’ve learned trading options. I, myself, read my list EVERY TIME I’M ABOUT TO PUT IN AN OPTIONS ORDER. I’ve probably canceled a dozen trades after I’ve read my own list just because I’ve let emotions get hold of me and this list brings me back to reality. This list isn’t necessarily in order of importance.

  1. Limit your losses (always) – Decide how much your bottom limit is and stick to it. If I ever let another option expire worthlessly, I’m worthless. It’s my money. Always keep enough in the brokerage account to at least place a couple more orders. When you have to add money to your brokerage account from savings to keep trading, you’re losing.
  2. Don’t buy options for smaller companies, stocks, or obscure ETFs based on hunches or charts. Smaller stocks sometimes don’t have the volumes and there will be no one around to buy your Out-of-the-Money option if the market is heading the wrong direction. They often have fewer price points and options in the option chains.
  3. If you win (your option hits its price target), you’ll probably be up a good amount, so sell when the trend is favorable.  You’ll never know what will happen in the next few hours or days. DISCIPLINE! Some news might hit, the president will tweet about China, or a scandal could erupt, and everything goes down or vice-versa.
  4. You’ll never time the sale of an In-the-money option exactly at the peak price of the day so it’s ok to sell after it’s coming down from the intra-day high. Better to make some money on the drop from the high than to wait for it to get back to the peak.
  5. It’s ok to sell for a $5, $10, or $20 profit if you’re In The Money and not feeling it and the trend changes or news hits.
  6. The whole reason you’re doing this is to make money whether or not the market is Rising or Falling. Don’t get emotional about what you want to happen to the market or company. Only go by the numbers and make money off of the trend, whether it’s a Call or a Put.
  7. Don’t let an option ride overnight especially if your option is expiring soon. After-market trading is a good way to lose a lot of money real quick once the market opens. You need your sleep and you don’t like to wake up early. This is not set in stone because you could be betting on a piece of big after-hours news or earnings. Also, if you have more money, you can purchase more expensive options that expire in a few months, which is absolutely better than buying a weekly that expires in a few days. This takes the ease off of after-hours fluctuations.
  8. Sometimes stocks are so beaten up, some more bad news just clears the way for a rally because there isn’t any reason to punish the stock further.
  9. Same with good news, a stock could be so bid-up that more good news essentially causes a ceiling and there is no reason for it to go up more because it is already so priced for perfection so it goes down.
  10. In a bad market, bulls want red openings and bears want green openings.  In a bad market, bulls will buy low right?  And in a bad market bears will fade a gap (short). 
  11. Keep a good positive mindset and just keep hitting singles for $20, $30, $50, whatever, and keep the loser mentality away.
  12. It sucks you can only do 4 same-day trades in 5 days (with Robinhood,) but don’t allow that fact make you ride an option longer than its value. Theta will steal your money anyway so stick to day trades with options. If you have a long-term bet then buy the actual stock, or buy an expensive option that expires in a few months/year.
  13. Implied Volatility (IV) – when looking to buy an option, look at the Implied Volatility. If it is something high like 91%, then you can probably expect to see the value of your options (most likely) swing/drop 91% during the term of your option. Options are not the best vehicle during earnings. It’s best to sell and make any profit you can before earnings come out. I YOLO bought $375 worth of SBUX options on Thursday with IV of 91% which expired the next day (Friday.) The option made almost no money on Thursday, then favorable earnings came out that Thurs night. The stock jumped up a little in after-hours trading then went back down again. The next morning it dropped like a rock 91 %. I got out that morning and lost $300. Then later that day, like not even 2 hours later, the stock went back up to its previous close. See the chart below. I could have just held on through the IV and not lost as much, but it takes real guts to hold in that situation, which you don’t want to go through, believe me. Again, holding options through earnings is very risky unless it’s something like MSFT which beat it’s projected earnings by a lot and IV was low. Place your bet either prior to or after the earnings and then watch the market reaction. Because this option was expiring the same day, theta was going to quickly eat into its value even if I held during the rise after the sharp drop. IV I’m not entirely sure about, so comment if you know more about this below.
  14. No “options guru tweet” nor r/wallstreetbets post will give you a winning trade every time. Trust your own instincts, gather as much information and news as you can, and find out what works for you, not someone else.
  15. In general it’s better to buy “natural” monthly options with non-weekly strike dates. For some reason, the weeklies don’t tend to do as well.
  16. In general, it’s better to buy an option with an expiration a few months out. Yes the option you’re buying on a Tuesday has better “YOLO” returns if it expires on Friday, but just the same, you have a bigger chance of losing everything very quickly. At least with an option a few months out, you can hold through a few dips without too much consequence, and then if a big pop occurs you can capitalize on it. Again, discipline. If you get a pop on an option, even if it expires in say, 2 months, cash out and bank the money. I’ve never regretted taking a big earnings pop and banking it. More often than not, the next couple days/weeks, the stock returns to it’s previous trend. The point is, you don’t know what the stock will do. Take your gains and get out. Then sit with your cash in your account, smile, take a breath, do your research again, and wait for the next opportunity.
  17. TD Ameritrade is my broker of choice now, and although I’ve got a little money in Robinhood, it’s practices lately are forcing me to close my Robinhood account. FYI, you don’t have to sell your securities in Robinhood in order to put them in a different brokerage, you can transfer. There is a $75 fee associated with the transfer, so it may or may not make more sense to sell your securities and just pull the money out or the transfer may make more sense if there are tax ramifications.
  18. Aside from Options, now that I have more cash in my account, I’ve done pretty well with “lots” of stocks. By “lots” I mean purchasing lower priced stocks in quantities of 100 shares. That way if the price goes up 1 point, I know I’ve made $100 on that stock that day. Just because they are shares, doesn’t mean I have to hold on to them for a longer period of time. There are better tax advantages when you hold on to a stock for at least one year, but I use the same principles above and sell and bank stock gains the same as I do options.

That’s it for now! I hope some of the information was valuable, and I wish you an exciting and profitable foray into the world of trading options.

How to set an Office365 user Password to never expire with PowerShell

Occasionally we’ll be required to set a user account on Office365 to never expire. It’s not advisable to perform this action, as a compromised account who’s passwords never expires can be a liability. However, in some cases a utility account such as a scanner/copier or kiosk account may require a password that does not change. The following tutorial will show you how to set an Office365 password to never expire using PowerShell.

First, we’ll want to ensure that the account password is not already set to expire and we want to confirm it’s status. Using PowerShell we can get information about an Office365 user account password expiration status.

1. Connect to Microsoft Online Services with PowerShell by running the following commands:

Import-Module MSOnline
Connect-MsolService

2. Next, replace <UserID> with the user account (email address) of the user’s properties we want to get with the following command:

Get-MsolUser -UserPrincipalName <user ID> | Select PasswordNeverExpires

Our result should look like the following:

3. Because we get the message returned that the property PasswordNeverExpires = False, we want set it to $True and set the account password to never expire with the following command:

Set-MsolUser -UserPrincipalName <[email protected]> -PasswordNeverExpires $true

Again, change the <[email protected]> identifier to the email address of the account you want to change. Our result will not produce an output:

4. To verify the account password will no longer expire, we’ll run our first command again to see the result:

Get-MsolUser -UserPrincipalName <user ID> | Select PasswordNeverExpires

Our result should look similar to the following:

Because our PasswordNeverExpires property is now set to True, our task is complete. Disconnect from Office365 and close powershell by entering the command: exit.

Solved – Cannot move files in SharePoint Online Office 365 from one folder to another folder

When attempting to move files in SharePoint Online Office365 from one folder to another you may find that you get errors or the moving process times out or fails with the error:

Error: We couldn't move the file because it's locked for editing or has been modified or deleted.

What has happened is some of the files in these folders have been marked as “checked out” or “locked”. This may have been done erroneously by a user or the status was corrupted when the files were originally uploaded into SharePoint.

Once the files are checked in, you can move them. As an alternative to moving the files, you may also be able to “Copy To…”, and then delete the original files. Again, you may not be able to delete the files you copied because the files you want to delete in SharePoint may also be locked or checked-out.

This is what worked for me:

  1. Use your favorite web browser and log into your SharePoint site (e.g. https://companyname.sharepoint.com/sites/sitename.
  2. Browse to the problem folders that contain files that you cannot move to another folder.
  3. In the folders, you should find files that are “checked out”. The files will have a green arrow icon next to the file icon.  
  4. Place a checkmark next to the file that is checked out.
  5. In the menu at the top-right choose “…”
  6. In the “…” menu, click “Discard check out”
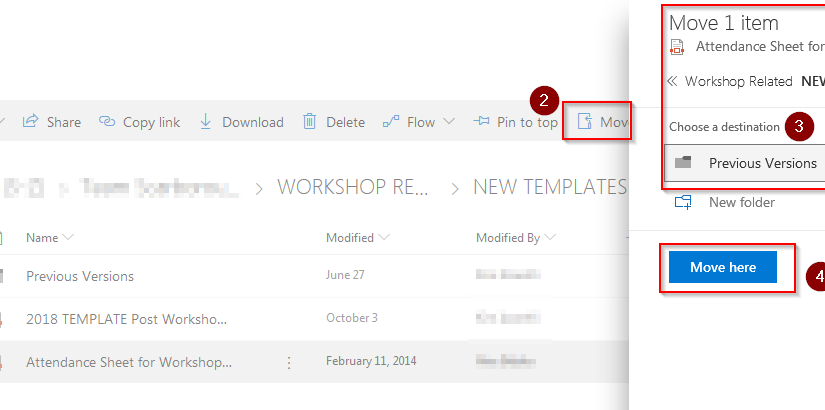
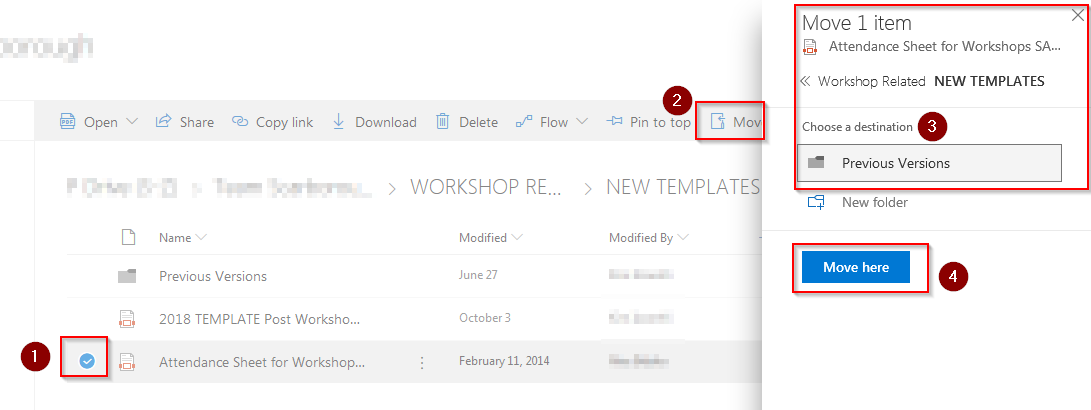
  7. Now try moving the file with the following sequence:
  8. If the problem files are Word/Excel files, you may need to Open the files in Word or Excel first, in order to check them back in.

How to Set Clock Time on AD domain Controller and Sync Windows Clients

How to find your Active Directory Network Time Server

If someone complains that the time on a Windows 7 /Windows 10 PC is off, we can first sync the Domain Controller to an External Time Source, then sync their PC to the DC. How do you sync the computer to the same time as the cell phone/NIST/External Time Source, and make sure that all computers on your network have the same time as the domain controller?

First, determine from a client computer which computer is the authority for your time server. This is usually your Primary Domain Controller. To do so, on the client PC, open a command prompt and run the command:

net time

This should return something similar to the following:

This shows “Current time at \\NETTIMESERVER.domain.com” which is your net time authority.

How to check your domain controller time against a global time provider:

On the server that net time identified (NETTIMESERVER / primary domain controller,) right-click on your PowerShell icon and choose Run as Administrator.

Run the following command to only check how much time your server is off from the global time authority. This command doesn’t do the sync, it just displays how much time your server is off. The result will display plus or minus hours/minutes/seconds/fractions of seconds.

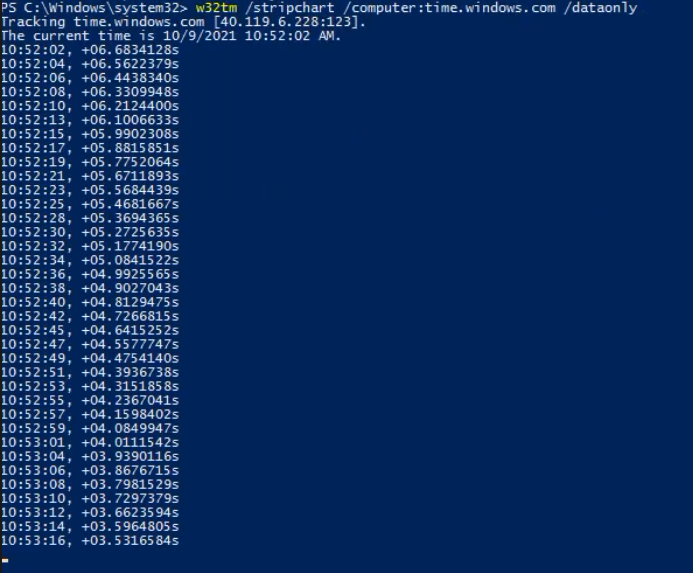
w32tm /stripchart /computer:time.windows.com /dataonly

The results should display something similar to the following (hit CTRL+C to stop the data stream):

So we can see our DC is ahead by 39 seconds.

Sync Domain Controllers Time Against Global Time Authority

So now we want to manually configure our server to use a certain global time provider: time.windows.com – to do this run the following command:

w32tm /config /manualpeerlist:time.windows.com /syncfromflags:MANUAL

The terminal should return “The command completed successfully.”

Next type:

w32tm /config /update

Again you should receive a message “The command completed successfully.”

Now to immediately synchronize the time use the following command:

w32tm /resync

We can now check again how much the time is off from the global provider by issuing the stripchart/dataonly command and check the results. You can see here that our time is now off by less than a second:

Sometimes it will take a while for the server’s time to completely sync, and we’ll see a slow progression until the time is accurate (screenshot at bottom of page:)


Sync Windows 7 or Windows 10 with Domain Controller

PC’s on the network that authenticate against our domain controller should automatically pick up the new time from the time server after a reboot. However, we can manually sync the time on the client with the net time domain controller. To do so, open powershell or the command prompt as administrator, and issue the command:

net time \\NETTIMESERVER.DOMAIN.com /set /y

This command should return the message “The command completed successfully.”

Our time on our PC is now synced with the domain controller, and the domain controller is now synced with time.windows.com.

Solved – Skype for Business 2016 emoticons missing repair without re-install

How to repair and fix Skype for Business 2016 by clearing the cache, and get back the emoticons which have been replaced by words in parenthesis.

For example, an associate sent me the following screenshot:

We can see that the emoticons  have been replaced by (rock)(dance).

To fix this problem without re-installing Microsoft Office or Skype, clear the Skype Cache by doing the following (which I found in an MS Support forum here.)

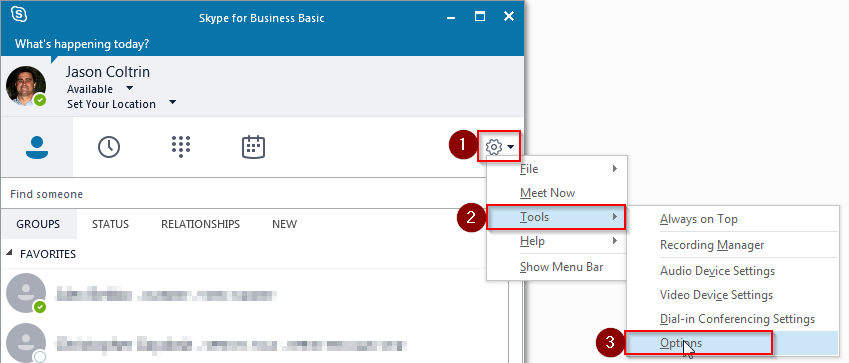
1. In the Skype main windows, click the gear in the top right-hand corner.

2. Choose File – Sign Out to log out of Skype for Business.

3. On the Sign In window, choose the link to Delete my sign-in info.

4. In the pop-up window to forget sign in info, click Yes.

5. Click the gear, choose File> Exit to exit and close Skype. Close all other Office Applications.

6. Go to the location:
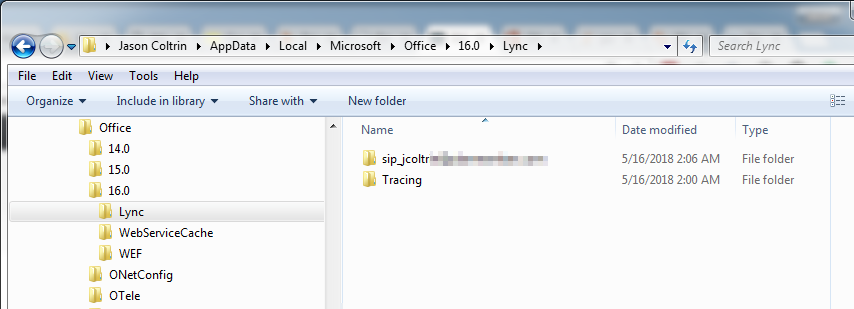
C:\Users\<username>\AppData\Local\Microsoft\Office\16.0\Lync – you can get here quickly by going to Start > Run > %appdata$% > Enter.

7. Locate the sip_YourProfileName folder and delete it if it exists. In some cases, it will not. Open the Tracing folder and delete all files inside of it. Do not delete the Tracing folder itself. If you receive a message that the action can’t be completed because a file is Open or that you need Administrator permission to delete a file, click the Skip button. Close Windows File Explorer

8. Open a command prompt (in Windows, click the Start button, type cmd and select the command prompt from the menu. Type ipconfig /flushdns and press the enter key on your keyboard to clear the DNS cache.

9. Sign back into Skype/Lync.

10. Once Skype is open, make sure you go back into Gear > Tools > Options > IM > and place a checkmark to show emoticons again.

11. Test to see if the emoticons have returned!

If all else fails, you might want to completely uninstall Office and/or Skype for Business, delete the Appdata\Local\Microsoft\Office\16.0\Lync folder completely, and then re-install again. But hopefully, this procedure will save you some time.

Lastly, a user comment below has had success with several people (thanks Chris!)

Set DisableRicherEditCanSetReadOnly to 1 in regedit 
path: Computer\HKEY_CURRENT_USER\Software\Microsoft\Office\16.0\Lync\

Always, back up the registry key before you change anything in the registry. 

Use Powershell to Get a List of Users with Out of Office enabled in Outlook Office365

How to get a list of users who have enabled Out of Office in Outlook with Office365 PowerShell

For administrators of Office 365, you may need to occasionally get a list of users who have set up or enabled their Out of Office in Outlook. In my case, we needed to see which parking spots were available on campus in a pinch, and who was not coming in the next day. To do this with PowerShell we’ll need to first connect to our Office 365 Exchange Tennant.

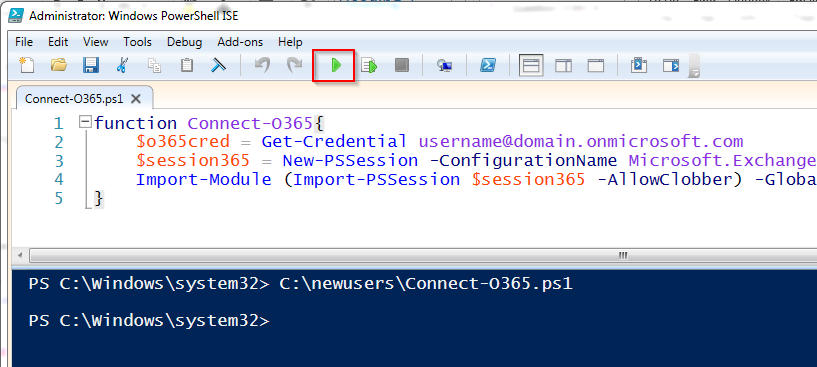
  1. In PowerShell ISE, enter the following code into the code view, save the function as Connect-O365.ps1, and then hit the green Play button.
  2. function Connect-O365{
     $o365cred = Get-Credential [email protected]
     $session365 = New-PSSession -ConfigurationName Microsoft.Exchange -ConnectionUri "https://ps.outlook.com/powershell/" -Credential $o365cred -Authentication Basic -AllowRedirection 
     Import-Module (Import-PSSession $session365 -AllowClobber) -Global
    }
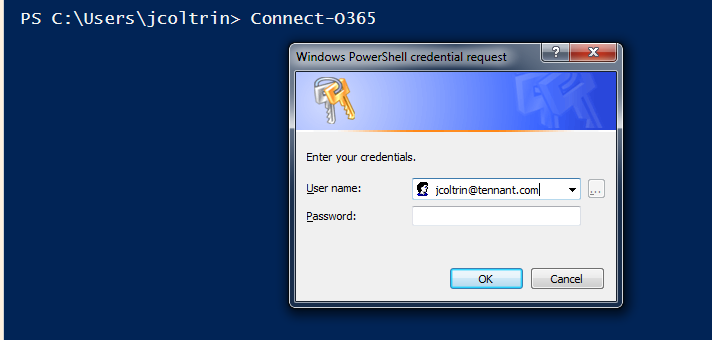
  3. Next, execute the new function with the following command:
  4. Connect-O365
  5. Replace the username and password with your Office365 admin credentials (not your on-premise domain credentials.) This will log you into your Exchange Admin with PowerShell where we can run our Out of Office commands.
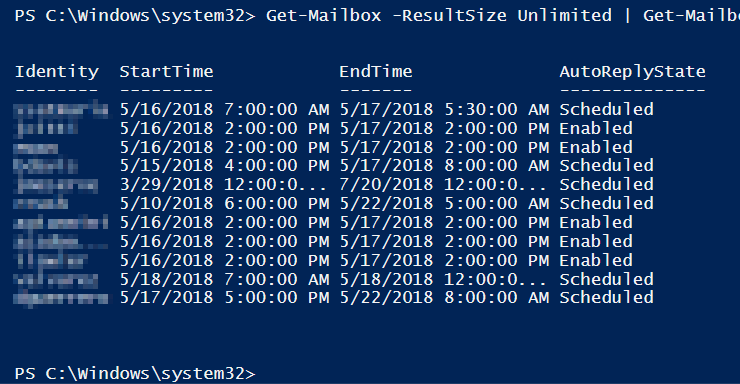
  6. With authentication out of the way, now all we need to do is run the following command to get a list of mailbox identities who have AutoReply configured (and not disabled), and sort by Identity, Start Time, End Time, and Auto Reply State:
  7. Get-Mailbox -ResultSize Unlimited | Get-MailboxAutoReplyConfiguration | Where-Object { $_.AutoReplyState -ne "Disabled" } | Select Identity,StartTime,EndTime,AutoReplyState
  8. This will run for a while, and could take several minutes, but should produce a list similar to the following:

How to clone a Dell Optiplex 7050 M.2 NVME Hard Drive with Clonezilla and an External USB HDD

I ran into trouble when trying to clone a new Optiplex 7050. My normal procedure for cloning with clonezilla required a little tweaking to accommodate Windows 10, UEFI, NVME M.2, Secure Boot, and RAID On. Follow the procedure below to clone your systems on these newer hard drives and BIOS versions.

As a side thought, I enjoy using Clonezilla and have used it for many years. I love the convenience of it and not having to manage Windows images with something like SCCM. While SCCM has a place in some organizations, I believe it’s perfectly fine to use Clonezilla to create OS images of different models of computers. I have approx 15 different OS images; everything from Lenovo laptops to Dell Optiplex 380’s to Optiplex 7050’s.

Requirements:

  • 1 x USB 2.0 or 3.0 USB thumb drive min 2GB capacity for the clonezilla bootable USB drive made bootable to 20170905-zesty version of clonezilla
  • 1 x USB 3.0 USB External HDD with a minimum HDD size that is larger than the TOTAL size of your M.2 NVME HDD. (I use a 4 TB Western Digital My Passport) – In my previous experience with Clonezilla, it has created images only writing images of the Used Space on the Source HDD, in this case with UEFI / NVME HDD’s, the image created on disk is the total size of the NVME drive.
  • 2 x Dell Optiplex 7050 (Source and Target) computers
  • 1 x Separate PC or laptop you can use to create a bootable USB Clonezilla Thumb Drive

1. Configure your Source Windows 10 Dell Optiplex 7050 machine as necessary. Install all applications, create user accounts, and uninstall bloatware. Make sure you create an administrator user account and password. In final preparation for cloning, either run Sysprep (found in C:\Windows\System32\Sysprep), or alternatively ensure you shut down Windows 10 completely by creating a Shutdown /s /t 0 shortcut and executing it.

2. On a separate PC, download Rufus which we’ll use to create a bootable USB thumb drive.

3. On a separate PC, download the AMD64 version of alternative (Ubuntu-based) as outlined on the Clonezilla website (this version is required for newer BIOS’):

4. Change the file type to ISO and hit Download.

5. Attach your USB thumb drive into your separate computer, run Rufus, tell Rufus to use the drive you just attached under Device, point Rufus ” to the .iso file you just downloaded.

6. Hit Start and the bootable USB thumb drive with Clonezilla will be created.

7. On the Source computer, insert the USB thumb drive into one of the front panel’s top (black) USB ports, and insert the USB External HDD separately into the Blue USB 3.0 port. Attach the keyboard, mouse, power, and monitor.

8. Power on the Source computer and start mashing the F12 key on the keyboard to get to the one-time boot menu.
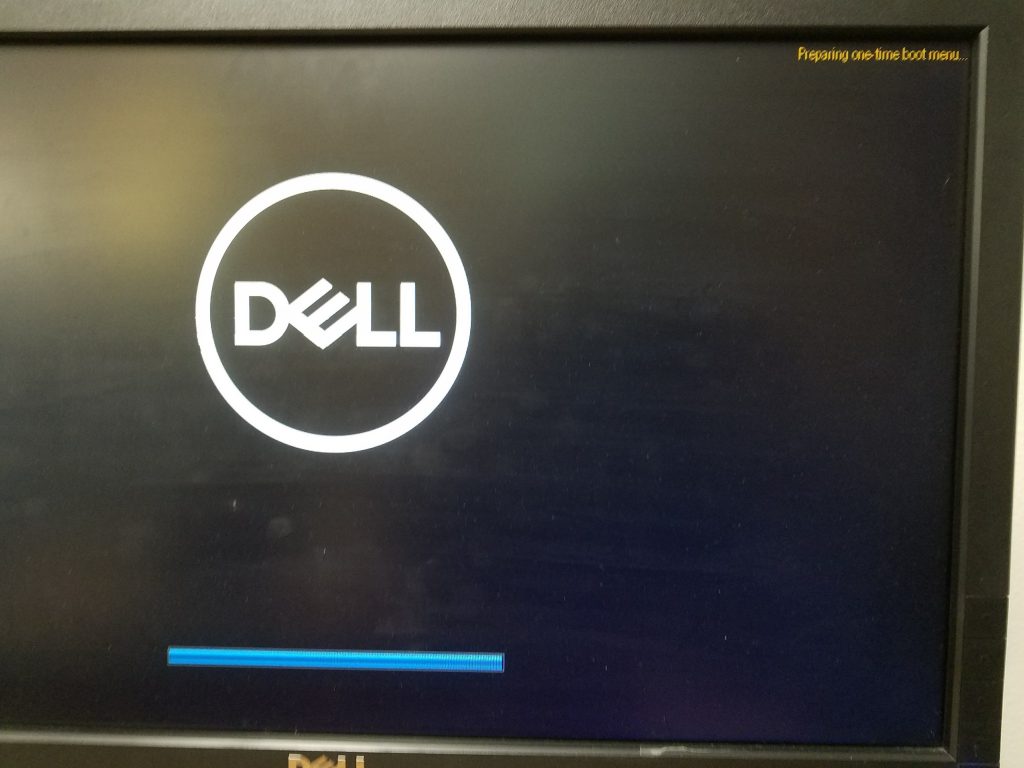
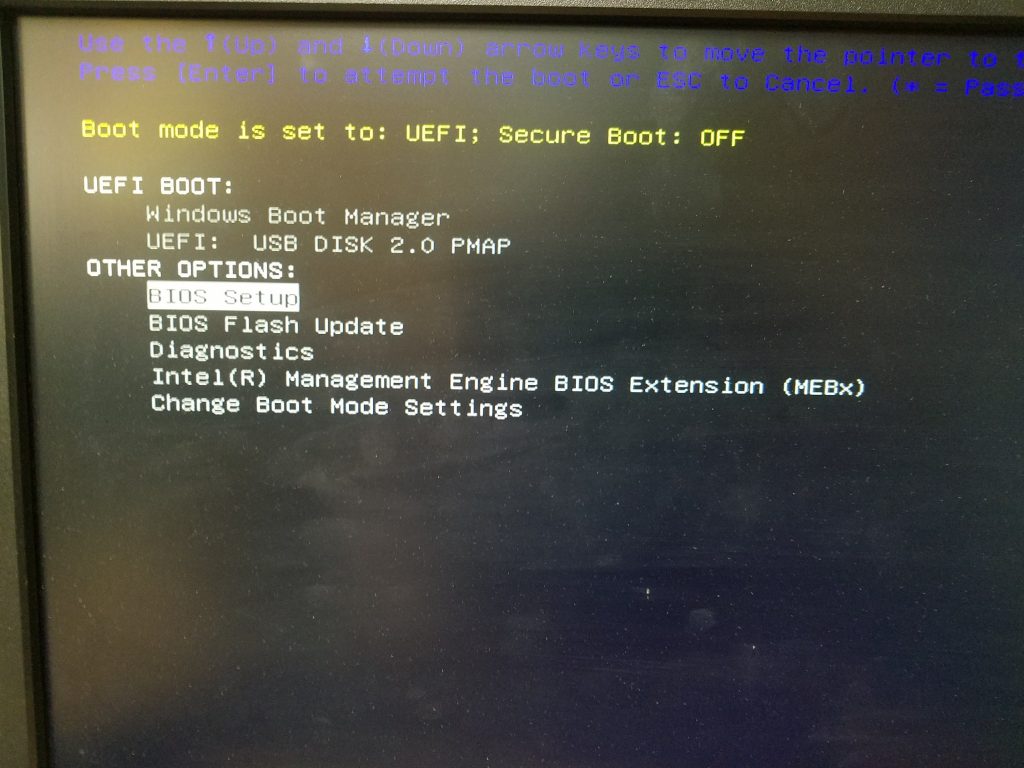
9. Before we begin, we need to make sure clonezilla can find our NVME HDD. By default UEFI and Secure Boot will be enabled. We need to disable these as well as Boot Path Security so that we can continue.

10. Select Setup from the Boot Menu:
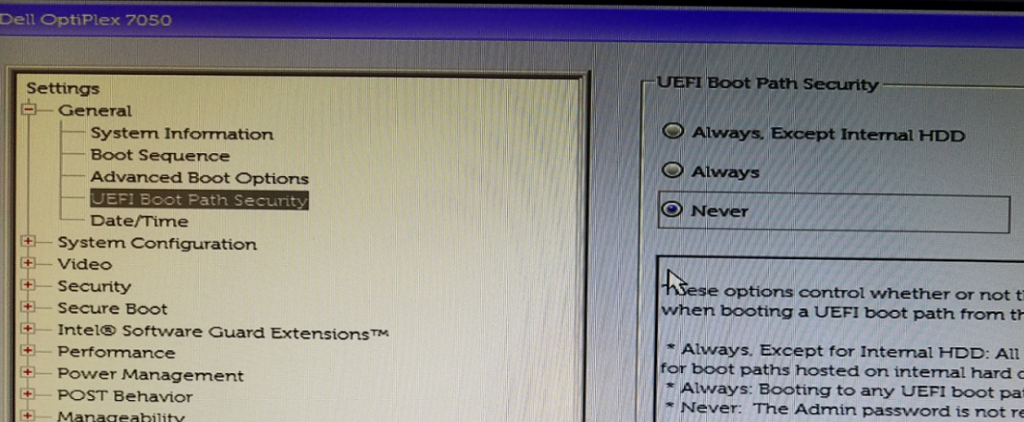
11. In the BIOS, under the General Heading, select UEFI Boot Path Security and change it from Always to Never.
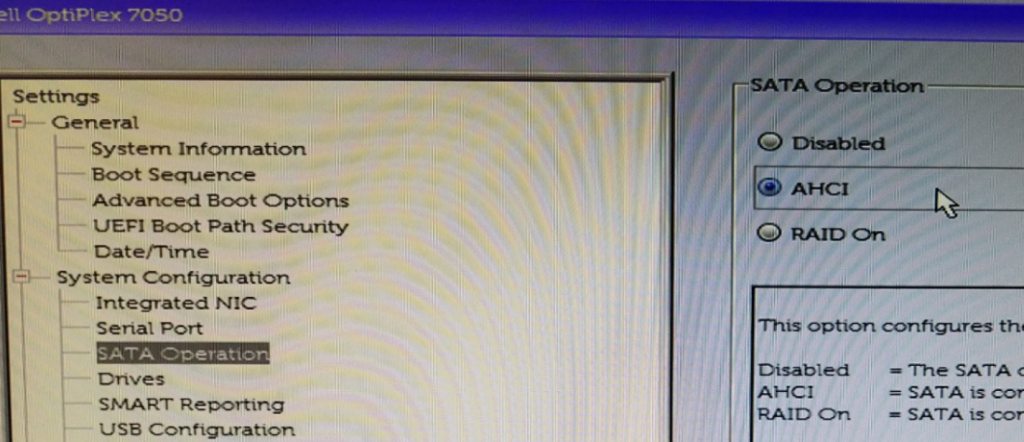
12. Next change System Configuration > SATA Operation from RAID On to AHCI
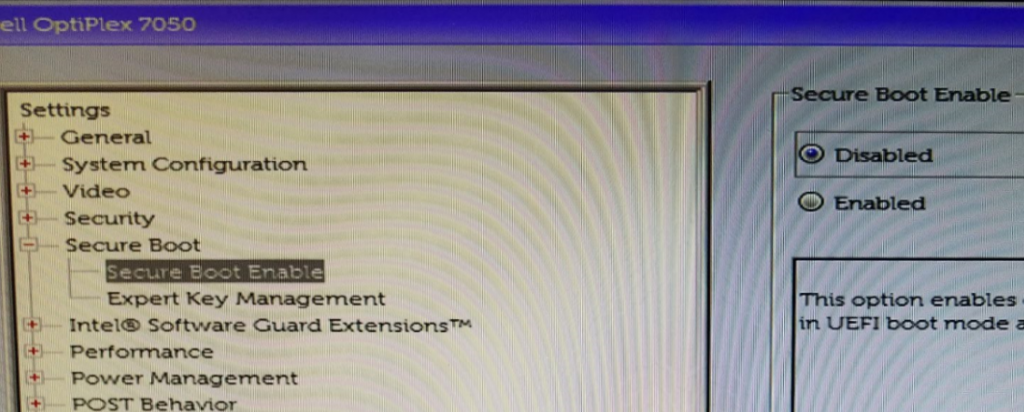
13. Lastly, change Secure Boot > Secure Boot Enable “Enabled” to “Disabled”
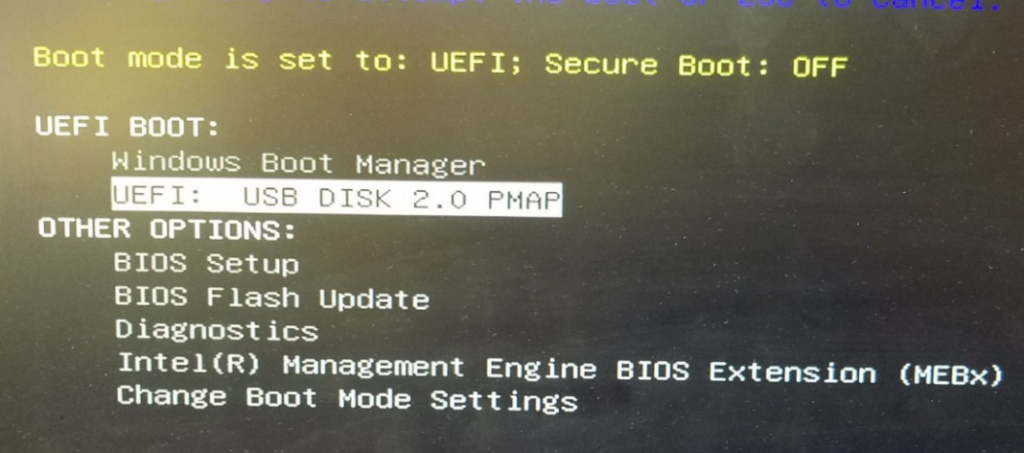
Apply, Save and Exit the BIOS. On the next boot, start mashing the F12 key again and this time select UEFI: USB DISK 2.0 PMAP
Clonezilla will boot from the USB drive so choose the default (hit Enter):

Select English > Don’t touch keymap > Start Clonezilla > device-image (Ok)

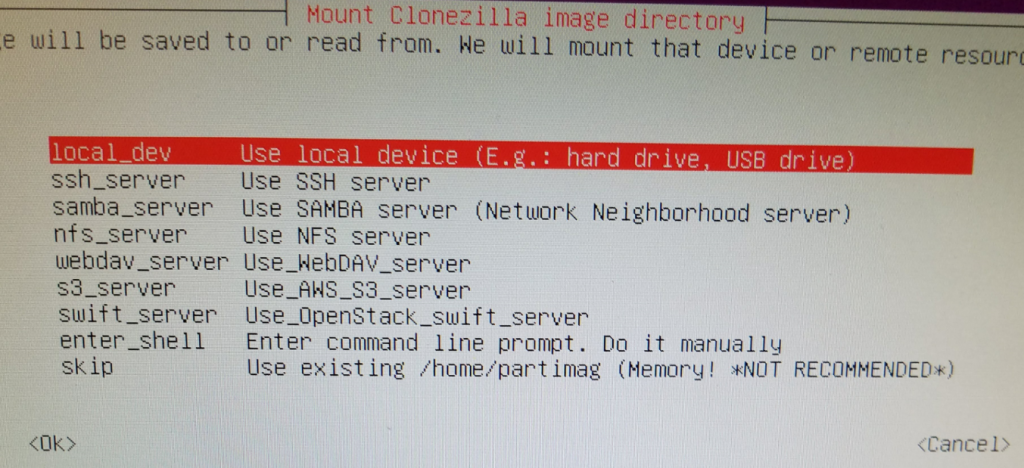
Under Mount Clonezilla image directory, choose Local_dev (Ok)
Press Enter to continue.

Review the clonezilla Scan disk preview to ensure it’s found both your Source and Target hard drives:

Press Ctrl-C to continue.

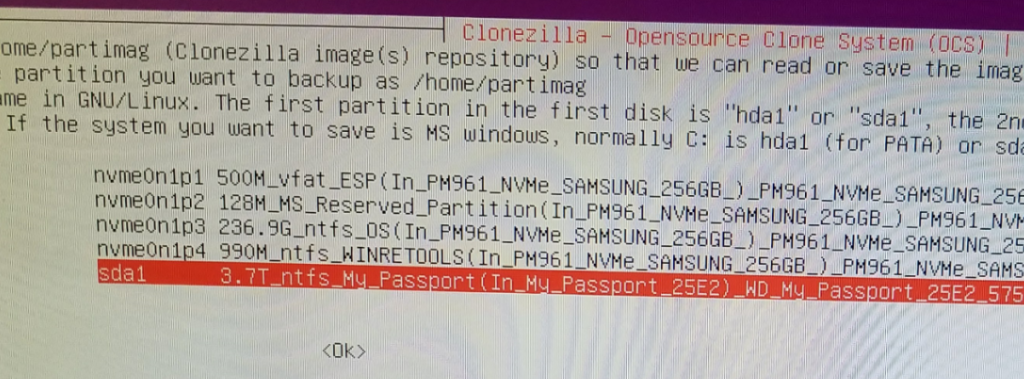
Arrow down and select your large external USB hard drive (sda1) to set the location of /home/partimg . This is where the clone image will be stored.
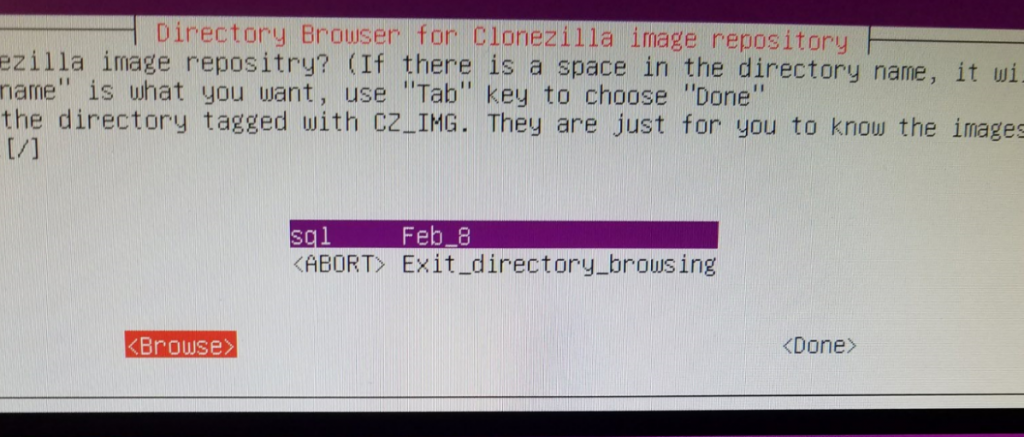
In the Directory Browser, hit “Browse” and go to your Parent Directory (top-most level) and select Done. This is where your image will be saved. You can see in my screenshot I’ve already saved an image here.
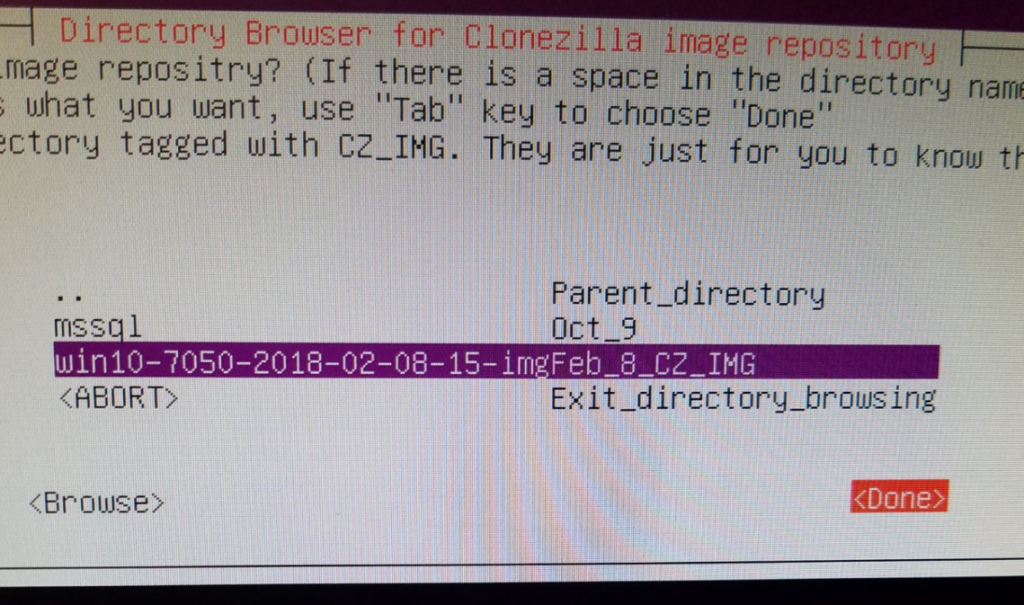
You will get a Summary location of Source (dev/sda1) and Target (/home/partimag). Press Enter to continue.

Choose Beginner mode

Choose Save Disk (Save_local_disk_as_an_image) – in my previous experience with Clonezilla, using normal spinning HDD’s and even SSD’s, I’ve used Samba to save my images to a separate server over the network using gigabit ethernet perfectly fine. However, in the case of these new computers and hard drives, I would get a permissions error when selecting SAMBA/SMB 2.1. The imaging would begin to take place and a couple smaller partitions would copy, but as soon as the primary large partition started it’s copy, I would get the permission error and the clone would halt. This is why we are using a local external USB hard drive.

Give a descriptive name for the image (Dell7050_NVME_256GB_DATE-IMG) hit OK.

Select the local disk as source (should only be one here)

Select -sfsck (Skip Checking)

Select Yes, check the saved image

Select -senc Not to encrypt the image (or encrypt if desired)

Select Action to perform when everything is finished: -p power off.

Press Enter to continue, (Yes/Yes) – the image process will run and the image of the Source PC will be written to the External USB HDD. The machine should shut down when complete.

Image Target Computer

Now that we have our image saved on our external HDD, we can image our Target PC. On the powered-off PC, Connect the USB thumbdrive, External HDD, keyboard, mouse, and monitor, and again Boot into the BIOS.

On the new target computer, we want to again change the BIOS settings to mirror those we made in steps 11., 12., and 13.

After saving the BIOS, restart and hit F12 again, select the USB thumb drive, and boot Clonezilla.

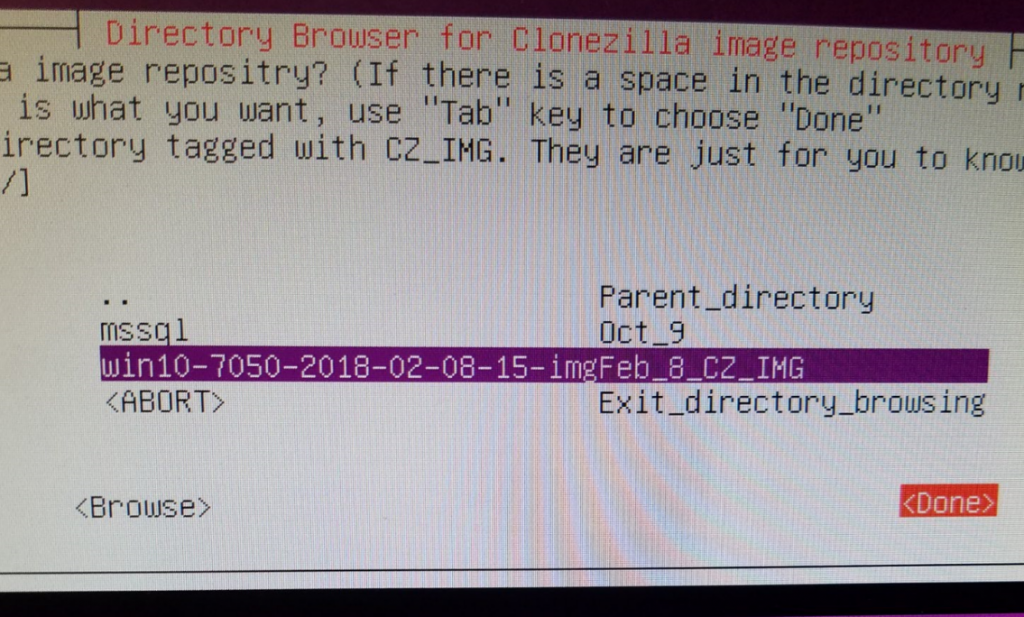
Start Clonezilla > Device Image > Local_dev > select image repository (sda1) > in Directory Browser, browse to the image we created, highlight it and select Done:
Choose Beginner Mode > Restore Disk:

Choose the image to restore:

Select the target disk to restore onto (Should only be one listed here):

Select “Skip checking the image before restoring” > poweroff > Enter >

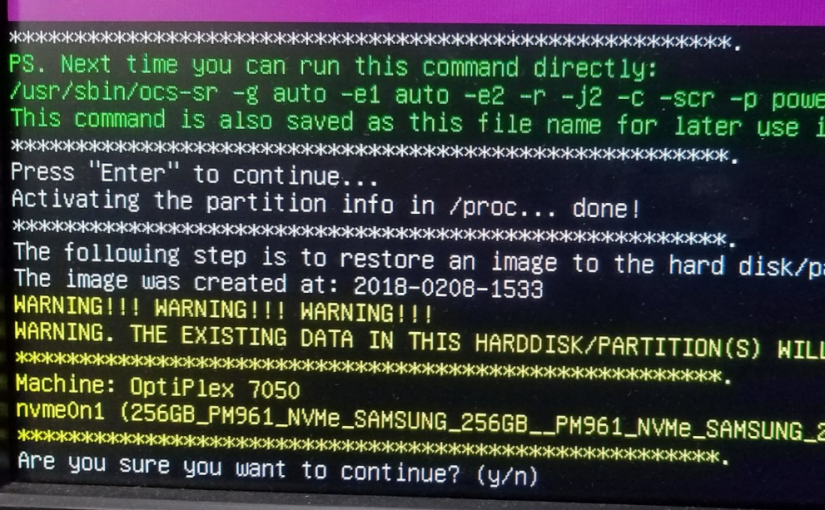
Heed the warning here. If important data is on the target disk, do not proceed. All data will be overwritten:
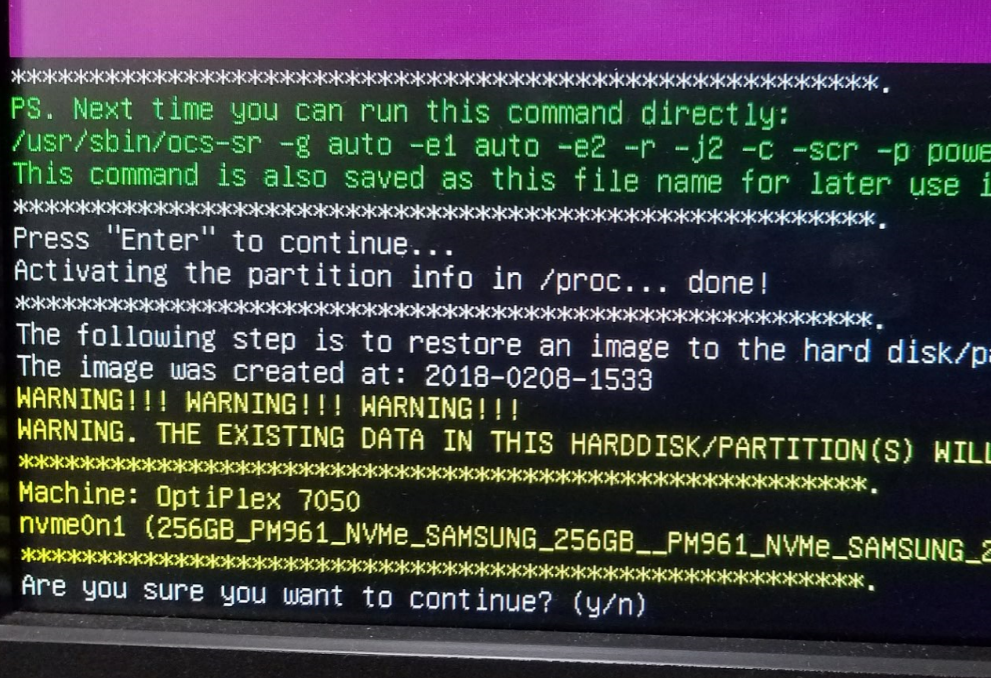
Hit y (enter) > y (enter) >

Partclone will run, clone the image to your disk, then shut down:
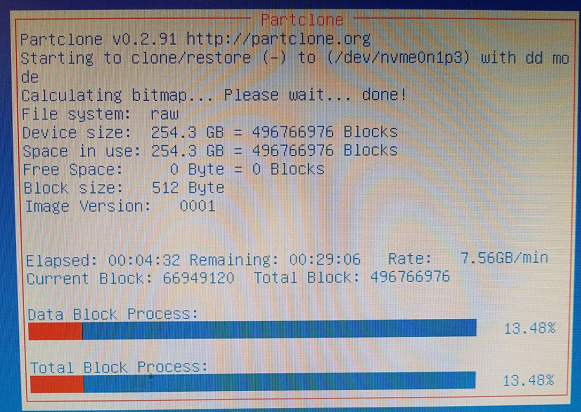
With the system powered down, remove your external HDD and boot thumb drive.

Power on the newly-imaged PC, hit the F12 button to go into the BIOS again. Reverse the changes made in steps 11, 12, and 13. Save the BIOS settings, and boot normally into windows. Congrats, you’re done! Hope this helps someone clone their newer systems with Clonezilla.
Solved – Dell Latitude 7370 cannot login to domain – No Logon Servers available

Solved – Windows 7 – WiFi login: There are currently no logon servers available to process your logon request.

I had an associate drop a Dell Latitude 7370 laptop on my desk saying he cannot print. I found that the user is able to logon to local workstation desktop using cached credentials but cannot logon to the domain. He is only logging into the laptop with his cached credentials, is not authenticating with the domain, and therefore cannot print. Logging off of the user’s account, and then trying to login as myself I get the error:

“There are currently no logon servers available to process your logon request. “

I log in with his cached credentials again and right-click on the wifi adapter and choose Troubleshoot but can’t find any problems. I occasionally and intermittently get the “Windows needs your current credentials” Pop-up notification in the lower right near the clock/systray but clicking on that icon does not do anything. I even set the Wireless network adapter properties for TCP/IP 4 to use the DNS IP Address of the domain controller explicitly instead of getting the setting from DHCP, but still, the laptop is unable to login to the network with the new domain password I set for the user’s account.

There is definitely something wrong with the wireless adapter. I notice that when disconnecting/reconnecting to the wireless SSID, that the Intel WiFi drivers pop up stating that I’m connected and that there is a signal strength. Knowing that Intel drivers sometimes try to do too much and interfere with wireless connections I do the following and fix the issue.

  1. Uninstalled Intel wifi driver package from Windows Control Panel > Programs and Features. (I uninstalled both the WiDi package as well as the Intel Wifi Drivers package). This removed the device from the Device Manager
  2. In device manager, right-click on the Network Adapters and choose “Scan for Hardware Changes.” This, in turn, finds the WiFi network adapter but it does not have drivers yet.
  3. Go to https://support.dell.com and type in the Service Tag, find the drivers section and download the following driver: Intel-8260-7265-3165-7260-WiFi-Driver_YM1PH_WIN_20.10.1.1190_A24.exe
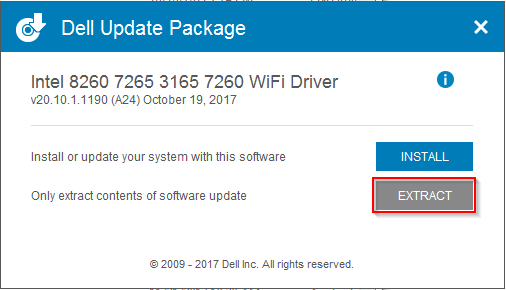
  4. Run the .exe and when it asks if I want to install the driver or extract, I chose Extract only. I make a new folder under the root of my C: drive and finish the extraction. 
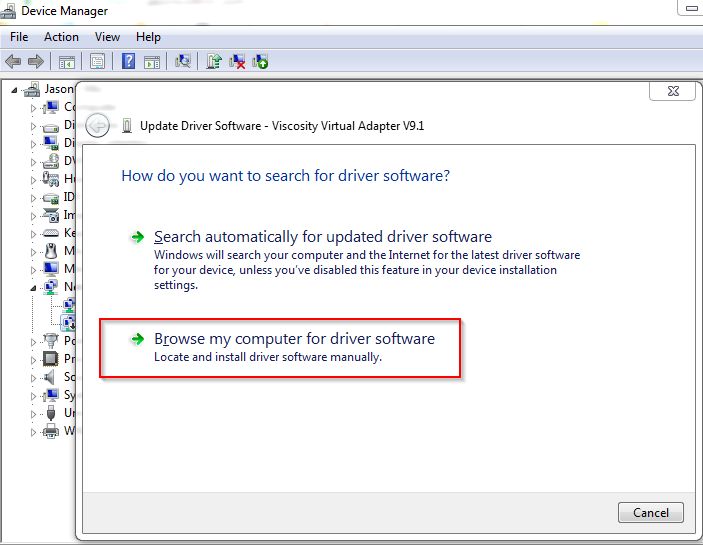
  5. Back in the Device Manager, Right-click on the WiFi adapter and choose to “Browse my computer for driver software”. 
  6. Point to the location of the extracted drivers, finish the installation and log off. The laptop can now find the logon server/domain controller and the user is back in business.

For some reason the full suite driver for this model of laptop interferes with DNS and the laptop cannot find the logon server and login to the domain. By extracting the drivers only and telling the device manager to use only the .inf files for the device, we can circumvent the driver suite and get our adapter talking to the domain controller for authentication.