Get a list of computers, 32/64 bit architecture, Service Pack level, and IP address in active directory with PowerShell

To get an inventory .csv file list of all computers in AD, run the following command in powershell:

Make sure you import Active Directory modules into PowerShell prior to running the command.

Get-ADComputer -Filter * -Property * | Select-Object Name,OperatingSystem,OperatingSystemServicePack,OperatingSystemVersion,ipv4* | Export-Csv -Path "c:\admin\ComputersList.csv"

If you first receive the following error:

“The term ‘Get-ADComputer’ is not recognized as the name of a cmdlet, function, script file, or operable program. Check the spelling of the name, or if a path was included, verify that the path is correct and try again.”

This error indicates that the Active Directory module has not been imported into PowerShell. First do this by running the command:

import-module activedirectory

This script should produce and export a .csv file list that looks like the following:

Name OperatingSystem OperatingSystemServicePack OperatingSystemVersion IPv4Address
DC01 Windows Server 2008 R2 Standard Service Pack 1 6.1 (7601) 10.1.3.4
JasonCWKS Windows 7 Professional Service Pack 1 6.1 (7601) 10.1.2.129
JColtrinWin7 Windows 7 Professional Service Pack 1 6.1 (7601) 10.1.2.85

If you want to take this further, and get the csname (computer name), caption (Operating system title), OS Architecture (32/64 bit), and ServicePackMajorVersion (service pack level) from a list of IP’s that the previous command produced you can do the following:

  1. Copy the IP addresses of all the machines to a new file called win7pcs.txt and place it in C:\admin\
  2. Open Powershell ISE  and enter the following script:
$a = Get-Content "C:\admin\win7pcs.txt" 
foreach ($i in $a) 
{Get-WmiObject Win32_OperatingSystem -ComputerName $i | Format-Table csname,caption,OSArchitecture,ServicePackMajorVersion -AutoSize
}

This should produce the following output for each IP address:

csname caption OSArchitecture ServicePackMajorVersion
—— ——- ————– ———————–
JasonCWKS Microsoft Windows 7 Professional 64-bit 1

csname caption OSArchitecture ServicePackMajorVersion
—— ——- ————– ———————–
JcoltrinWin7 Microsoft Windows 7 Professional 32-bit 1

Set up Ubuntu as a domain controller with SAMBA on VirtualBox

If you want to run a domain controller on your network but don’t have access to a Windows Server license, you can use SAMBA, the free open-source software, and VirtualBox, the free virtualization software. We’ll describe the procedure for setting up a virtual server using VirtualBox and netboot.xyz iPXE and move on to setting up your domain controller with SAMBA.

Read my full article here:

https://4sysops.com/archives/set-up-ubuntu-as-a-domain-controller-with-samba-on-virtualbox/

Clone a Ubuntu server in Hyper-V 2012 R2

Ubuntu runs on Hyper-V perfectly fine, so you may want to run many Ubuntu Virtual Machines (VMs) on Hyper-V Server 2012. R2 This article will show you how to clone or duplicate a single Ubuntu server on Hyper-V with different network interfaces and host names. Cloning Linux servers on Hyper-V is easy and quick when you have the right knowledge and tools.

Read my full article here:

https://4sysops.com/archives/clone-a-ubuntu-server-in-hyper-v-2012-r2/

Powershell – remotely copy multiple files to a list of computers

How to copy multiple files to a list of computers

PowerShell – copy a list of files to a list of multiple computers

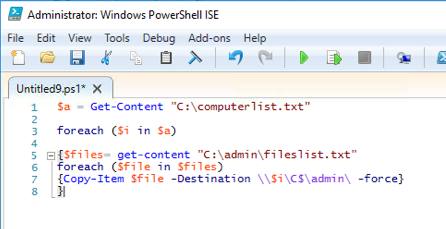
Here is a simple PowerShell script I found (linked below) that can easily copy a list of files to a list of computers. If you want to copy more than one file to a lot of computers on your network, this simple script should work ok. It’s better to use a network share and use a UNC path to denote where the file source and destinations.

$a = Get-Content "C:\computerlist.txt" 

foreach ($i in $a) 

{$files= get-content "C:\fileslist.txt"
foreach ($file in $files)
{Copy-Item $file -Destination \\$i\C$\admin\ -force}
}

Here is a sample of what the computerlist.txt will look like:

hostname1.contoso.com
hostname2.contoso.com
hostname3.contoso.com

And here is a sample of what the fileslist.txt will look like:

\\fileserver\share\IT\myscript.ps1
\\fileserver\share\IT\Readme.txt
\\fileserver\share\IT\uninstall.bat

https://social.technet.microsoft.com/Forums/office/en-US/09575f93-7b17-4621-804d-4b018df34771/powershell-copy-a-list-of-files-to-multiple-servers-and-backup-exisiting-files?forum=winserverpowershell

Powershell – remotely copy multiple files to a list of computers

How to copy multiple files to a list of computers

PowerShell – copy a list of files to a list of multiple computers

Here is a simple PowerShell script I found (linked below) that can easily copy a list of files to a list of computers. If you want to copy more than one file to a lot of computers on your network, this simple script should work ok. It’s better to use a network share and use a UNC path to denote where the file source and destinations.

$a = Get-Content "C:\computerlist.txt" 

foreach ($i in $a) 

{$files= get-content "C:\fileslist.txt"
foreach ($file in $files)
{Copy-Item $file -Destination \\$i\C$\admin\ -force}
}

Here is a sample of what the computerlist.txt will look like:

hostname1.contoso.com
hostname2.contoso.com
hostname3.contoso.com

And here is a sample of what the fileslist.txt will look like:

\\fileserver\share\IT\myscript.ps1
\\fileserver\share\IT\Readme.txt
\\fileserver\share\IT\uninstall.bat


https://social.technet.microsoft.com/Forums/office/en-US/09575f93-7b17-4621-804d-4b018df34771/powershell-copy-a-list-of-files-to-multiple-servers-and-backup-exisiting-files?forum=winserverpowershell


Windows 10 Best Free Video Screen Capture Open Broadcaster Software Install Tutorial

This video demonstrates how to use Open Broadcaster Software for capturing your desktop into a record-able video. OBS is free software that you can also use to record your gaming sessions to never miss that moment during your computer game. Here is a good post on Reddit.com describing how to set up OBS for capturing your game with a 20 second “buffer” so you can show your frags on youtube or convert them to a gif. But for now, below I put together a tutorial on how to setup OBS to record your desktop screen and audio to make videos like the one here:


Microsoft Bizspark – free business software for 3 years

If you’re thinking about which cloud service to use for a startup business, Microsoft just upped the ante with BizSpark.

Microsoft BizSpark https://www.microsoft.com/bizspark#start-two is really an amazing deal for business start-ups. If you wish you could get Microsoft software for free or for a huge discount check out their offer. BizSpark offers the following services and software for free for three years:

BizSpark gives startups 3 years of free stuff – software, services, tech support, and Azure cloud. Your startup qualifies if it is less than 5 years old, is privately held, and earns less than $1M annually. And at the end of your 3 years, you keep all the software you’ve downloaded – at no cost.

To expand on this service what you get with the Microsoft Bizspark details are the following:

Get up to $750 per month of FREE Azure cloud services for 3 years; that’s $150 per month each for up to 5 developers.

This potentially is a $27000 value!

Membership puts all Microsoft development and test software at your fingertips, including Azure, Windows, and Office 365 – for free. Plus, enjoy access to hundreds of free training classes, technical content, and 4 break-fix phone support incidents to help you on your journey.

It’s pretty amazing that BizSpark, in addition, also offers up to $120,000 worth of Azure credit.

Makes me want to go out and start a new business – hmm, maybe jasoncoltrin.com would qualify?

Solved – Dell Optiplex 790 2nd HDD disk drive not found in Windows 10 Disk Management but BIOS sees the drive

disk

I have a Dell Optiplex I’m putting together for an IP Camera security system. The security cameras use a lot of disk space, so I connected a 2nd Seagate 2TB drive to the black SATA port labeled SATA1. The BIOS sees the drive, but when I logged into Windows 10 and looked in Disk Management, the drive wasn’t found. If the new hard drive isn’t in Disk Management, but the BIOS does see the drive, there’s something wrong with either the BIOS / SATA / RAID configuration, or there’s something wrong with the drive itself. I attempted to Scan for Hardware Changes in the Device Manager – no luck. I also went into Disk Management -> Action -> Rescan Disks -> no luck.

Here is the SATA Port layout:

SATA 0 (Blue) – Primary HDD 500GB Seagate ST3500413AS

SATA 1 (Black) – Secondary  HDD 2TB Seagate ST2000DM001-1CH164

SATA 2 (White) – CD / DVD

SATA 3 (White) – empty

I went to Dell’s support website, ran the System Detect (for some reason entering the Service Tag didn’t work) and then went to look at the available drivers. I was thinking of updating the BIOS from A09 to A18, but then noticed under Serial ATA there is a Seagate Firmware update named B765JC49.zip – unpacked is 2 folders, DOS and Windows, in the Windows folder is the file B7032100.exe – this is the file I installed. During the setup, the computer is restarted, and like most firmware utilities (I love these), you get a nice old-school 8-bit text interface with a resounding SUCCESS in big blue letters when it’s done.

So this was really all I did, and after flashing the Seagate Firmware, and logging into windows, immediately the drive was detected and prompted me to initialize and format the disk. So I did just that; initialized the drive as MBR, then changed the CD-ROM to drive letter E:, and formatted the new drive as NTFS on drive letter D: labelled as “Data”. Life is good again. Hopefully this post will be found by someone else having difficulty when their computer doesn’t see the new 2nd disk drive and save them a little time and frustration in the process.