Spammy phone calls from 281-806-5695, 725-696-3397, 650-722-1909

Apparently I am approved for a large loan for my business, although I don’t even own a business… block these numbers too: 281-806-5695 , 725-696-3397 from yesterday, and from the day before,  650-722-1909 . I wonder why I seem to be getting so many of these spam phone calls when there are heavy penalties for violating the “Do not call” list? Time to check the National Do Not Call registry again and re-register.

If you’re also getting annoying spam calls from these numbers please go to https://complaints.donotcall.gov/complaint/complaintcheck.aspx and file a complaint.

Adding users to Active Directory with a bulk import


One of the tasks a system administrator will probably have to tackle at one point in their careers, is to quickly add a large amount of users to Active Directory. Without too much difficulty or money, one can accomplish the feat using the following  powershell script: Active Directory User Creation Tool: http://community.spiceworks.com/scripts/show/1917-active-directory-user-creation-tool 

So a quick kudos to [email protected] and Jim Smith for making this tool available for free online.

By following the instructions on the download page, it’s a few hours work to get the xml file and the csv template to work together to bulk import the users into AD.

Download the script, change then name to a .ps1 file and then execute the script with powershell (right-click on the powershell icon and choose “Run as Administrator”.) Because this is an unsigned script, and in case you can’t recall, the command to run first is:

Set-ExecutionPolicy RemoteSigned

One thing to note is when building your csv file, all cells must be quoted.  An easier way to do this, rather than struggling with Excel functions, is to use Libre Office.

Open your csv file with Libre Office, do a Save As -> csv -> check ‘use filter’ -> check ‘Quote all text cells’ -> finish save to a new location with a new filename. Then open the file in a text editor to make sure all cells are quoted.

In the XML file, the most difficult part to configure is the canonical name used to populate the OU you want with the users. In our case we used:

Domain=
subdomain.domain.domain.com
Path=
OU=ImportedUsers,DC=subdomain,DC=domain,DC=domain,DC=com

This will make more sense once you are configuring your XML file. Before you do a big bulk import, generate a template with the script/tool, fill out the essential fields with test accounts (first, last, username, password, etc.), then re-import the template, configure your XML file, and then submit the import. Then test your imports with just a few users at a time.

If you can’t find your test user accounts  that you imported in Active Directory, you might need to right-click on the root in Active Directory Users and Computers (ADUC) and do a “Find…” then search for the test user accounts. They may have been added to the wrong OU. Again, this will take some tweaking, but at least if you can get the users into an OU, later you can select the users, right-click and choose Move… to put them in the correct OU container.

Once your test accounts are being imported correctly, go back, edit your bulk user lists according to the template specifications, and have at it.

Another issue that came up is that in our source file for our users, we only had the First Name, Last Name in the same cell. In order to split the names into two separte columns, we used the following tips:

Split full name to first and last name with Text to Column command – http://www.extendoffice.com/documents/excel/829-excel-split-first-last-name.html
For the First Name/Last name split, create a temporary column named General to the right of the Last name column

This project on spiceworks looks like it’s actively developed so it might be worth while to contact the developer if you run into any trouble or have a feature request.


Another spam number 218-595-4572

When I pick up there is a dead line. The caller id says the call originates from Minnesota. A quick search online says others have listened to a automated message for Card Holder services to lower rates. Definitely going to block this one.

Microsoft Hyper-V 2012 High Availability and Live Migration

I’m about 75% of the way through the Introduction to Hyper-V Jump start in the Microsoft Virtual academy. There is a lot of great information contained in the videos and .ppt downloads.  Below are some of the highlights of the material that I am not as familiar with: High-Availability and Clustering. Microsoft Hyper-V in Server 2012  provides “Complete Redundancy In the Box.”

Virtualization can cause problems if you take 10 or 20 servers and virtualize them all onto a single piece of hardware (your host server); you’ve created a single point of failure. If your single host goes down you lose a whole workload. Because Microsoft realizes that the value of these hosts exponentially increases, they’ve worked hard to create complete redundancy and protection in all core services; from the bottom of the stack, to the top. Below are the five levels, from the physical to the virtual, where Server 2012 can protect your data.

1. Hardware Fault:

  • Windows Hardware Error Architecture (WHEA)
  • Reliability, Availability, Serviceability (RAS)

Server 2012 provides RAS Hardware Fault detection capabilities. For example, if a memory controller detects an address is failing, hyper-v is notified, and the address space is taken offline. The information about the hardware fault is sent to the BDC store so it survives reboots, and the server never allocates this area of memory again. This is a nice feature that fixes hardware errors without user intervention.

2. Physical Node Redundancy:

  • Live Migration for Planned Downtime
  • Failover Cluster for Unplanned Downtime

If a server is going to go down unplanned, we want the workloads to failover without any user intervention. In planned downtime, we can live-migrate, perform maintenance on our host, then live-migrate our workloads back over to our repaired host. This physical node redundancy is provided with Hyper-V 2012.

3. I/O Redundancy:

  • Network Load Balancing & Failover via Windows NIC Teaming
  • Storage Multi-Path I/O (MPIO)
  • Multi-Channel SMB (Server 2012 Fileserver)

Storage Multi-path I/O provides redundancy for example iSCSI and  Fiber Channel both from a Host level and a Guest level. If you’re using a Server 2012 fileserver as back-end storage, you get redundancy her as well.

4. Application/Service Failover:

  • Non-Cluster Aware Apps: Hyper-V App Monitoring
  • VM Guest Cluster: iSCSI, Fiber Channel
  • VM Guest Teaming of SR-IOV NICs

If you’re running VM’s and you want to provide failover of applications within the virtual machine, you can cluster applications already. For Non-cluster aware (legacy) apps, Server 2012 provides App Monitoring which does light-level health monitoring such as restarting processes and notifications automatically etc.

5. Disaster Recovery:

  • Hyper-V Replica for Asynchronous Replication
  • CSV 2.0 Integration with Storage Arrays for Synchronous Replication

If you want to failover to another site completely, with cluster shared volumes, you need redundancy – two of everything. All nodes simultaneously monitor eachother through a heartbeat network. Every node keeps track of every other node in the cluster in a registry database (states/properties). If a node crashes, all the other nodes know about what workloads and VM’s were running on the crashed node. It will connect to the appropriate VHDs on the network, and pick up that workload. There are two types of clustering that we can consider: Host Clustering and Guest Clustering.

Host Clustering: The most common type of clustering, were we are clustering the physical servers, and we can move apps and vms between the servers.

  • Avoids a single point of failure when consolidating
  • VM’s can survive a host crash because the replica VM is restarted on another node, VMs can be restarted on the same node also when a the VM OS crashes or hangs.
  • Zero downtime maintenance and patching (live-migrate VMs to other hosts
  • Mobility and Load distribution – Live Migrate VMs to different servers to load balance.

Guest Cluster: Two virtual machines running Windows Server and form a cluster themselves for high availability. If one of the two needs to be patched, we can fail over to the other VM. If one of the two crashes, it will fail-over for example that SQL server to the live VM. The difference between virtual and physical options for storage on Guest Clusters is it requires virtualized HBAs: Virtualized Fiber Channel, Fiber Channel over Ethernet and iSCSI (not Serial Attached SCSI).

Combining Host and Guest Clustering:

It’s recommended to combine Host and Guest clustering for flexibility and protection. You can combine all VMs as long as your VMs pass the Clusters Best Practice Analyzer, known as “Validate”.


Kudos to Microsoft Virtual Academy, Symon Perriman, and Jeff Woolsey

Configure Cisco 3750 Switch Port Team Channel and MacPro with Bonded Thunderbolt Ethernet LACP Link Aggregation

If you’ve got a new MacPro and want to utilize both of the two built-in Gigabit Ethernet ports (and possibly some Thunderbolt-to-ethernet adapters) in a bonded LACP Link Aggregation virtual adapter in conjunction with a Cisco 3750 switch, follow the instructions below.

The first part is configuring your switch to allow your Mac to create a bonded link. In my case, without first configuring the switch, I was able to create my Mac’s bonded ethernet adapters, but couldn’t pick up a DHCP address. I further went into the virtual adapter’s bond status and saw red dots and the messages “No Partner” and/or “Bad Link”. The problem was that I hadn’t setup my switch with the appropriate LACP protocol on it’s interfaces.

Here are the instructions for creating a bonded Ethernet LACP link aggregation from Apple: http://support.apple.com/kb/PH8356

Note that in the above article there are some requirements: you need at least one IEEE 802.3ad-compliant switch or another Mac OS X Server computer with the same number of ports.

So I configured a Cisco 3750 switch with a new channel group, and added 4 ports into the channel group so that we can bond 4 NICs for the MacPro’s LAN connection at 4GBps

Here is the channel group configuration

!
interface Port-channel2
description LAN Etherchannel Team for MacPro
switchport access vlan 27
switchport trunk encapsulation dot1q
switchport mode access
!

And here are the gigabit interfaces configuration

!
interface GigabitEthernet1/0/13
description MacPro Eth1 to LAN
switchport access vlan 27
switchport trunk encapsulation dot1q
switchport mode access
channel-protocol lacp
channel-group 2 mode active
!
interface GigabitEthernet1/0/14
description MacPro Eth2 to LAN
switchport access vlan 27
switchport trunk encapsulation dot1q
switchport mode access
channel-protocol lacp
channel-group 2 mode active
!
interface GigabitEthernet1/0/15
description MacPro ThunderBolt BottomLeft to LAN
switchport access vlan 27
switchport trunk encapsulation dot1q
switchport mode access
channel-protocol lacp
channel-group 2 mode active
!
interface GigabitEthernet1/0/16
description MacPro ThunderBolt BottomRight to LAN
switchport access vlan 27
switchport trunk encapsulation dot1q
switchport mode access
channel-protocol lacp
channel-group 2 mode active
!

I further went on to create another 4xThunderbolt Ethernet Adapter for an iSCSI connection to a NAS by creating a new channel group 3 and added the remaining 4 thunderbolt interfaces into group 3:
!
interface Port-channel3
description iSCSI Etherchannel Team for Mac Pro
switchport access vlan 27
switchport trunk encapsulation dot1q
switchport mode access
!


!
interface GigabitEthernet1/0/17
description MacPro TB iSCSI
switchport access vlan 27
switchport trunk encapsulation dot1q
switchport mode access
channel-protocol lacp
channel-group 3 mode active
!
interface GigabitEthernet1/0/18
description MacPro TB iSCSI
switchport access vlan 27
switchport trunk encapsulation dot1q
switchport mode access
channel-protocol lacp
channel-group 3 mode active
!
interface GigabitEthernet1/0/19
description MacPro TB iSCSI
switchport access vlan 27
switchport trunk encapsulation dot1q
switchport mode access
channel-protocol lacp
channel-group 3 mode active
!
interface GigabitEthernet1/0/20
description MacPro TB iSCSI
switchport access vlan 27
switchport trunk encapsulation dot1q
switchport mode access
channel-protocol lacp
channel-group 3 mode active
!

Lastly I created a new iSCSI Bond on the MacPro successfully and provided the Bond adapter with a Manual Address 192.168.27.30.
Doing this left me with:
4GB bonded connection to LAN

Screen Shot 2014-04-09 at 3.27.10 PM

4GB bonded connection to iSCSI NAS complete

Screen Shot 2014-04-09 at 3.28.45 PM

Here’s what the 2nd bond looks like in ifconfig:

bond1: flags=8843<UP,BROADCAST,RUNNING,SIMPLEX,MULTICAST> mtu 1500
options=b<RXCSUM,TXCSUM,VLAN_HWTAGGING>
ether 68:5b:35:b9:4a:3a
inet6 fe80::6a5b:35ff:feb9:4a3a%bond1 prefixlen 64 scopeid 0x16
inet 192.168.27.30 netmask 0xffffff00 broadcast 192.168.27.255
nd6 options=1<PERFORMNUD>
media: autoselect (1000baseT <full-duplex>)
status: active
bond interfaces: en15 en13 en16 en14

Here’s what the beast looks like from the outside:

MacPro with 8 thunderbolt to gigabit

Test I/O and copy speed results:
50GB of data copied with my new favorite file copy utility “bvckup2” from Server to NAS in 6 minutes, 45 seconds (!) utilizing 25% iSCSI Team 3Gbps around 104 MB/sec.

50GB of data copied with Windows copy/paste from Server to NAS utilizing 26% iSCSI Team 3Gbps in 7 minutes, 2 seconds.

… As opposed to 50GB over a USB 2.0 connection = 24hrs
… As opposed to 50GB over 10/100 LAN at 10MB/sec = 83 min
… As opposed to 30MB/sec on average gigabit LAN = 27 min
… As opposed to well-optimized Gigabit network around 60 MB/sec = 15 min
…As opposed to transfer speed record set on Feb 25, 2014 Sending data at a rate of 64 gigabits per second (Gb/s)(!?)

Stanford CS106a Assignment 2, Problem 4 – Target – Part 1

The problem is as follows:
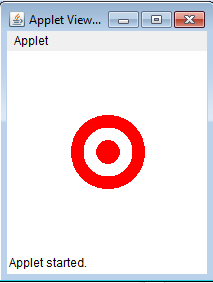
Create a figure that is simply three GOval objects, two red and one white, drawn in the correct
order. The outer circle should have a radius of one inch (72 pixels), the white circle
has a radius of 0.65 inches, and the inner red circle has a radius of 0.3 inches. The
figure should be centered in the window of a GraphicsProgram subclass.

Here is my first part of the solution to the problem. The output is correct, however, the guide states I should use constants. I will re-write the program later in Part 2 once I have learned how to use constants. But for now here is the solution to the problem and the output below.


/*
* File: Target.java
* Name: Jason Coltrin
* Section Leader: n/a
* -----------------
* This file is the starter file for the Target problem.
* This figure is simply three GOval objects, two red and one white, drawn in the correct
* order. The outer circle should have a radius of one inch (72 pixels), the white circle
* has a radius of 0.65 inches, and the inner red circle has a radius of 0.3 inches. The
* figure should be centered in the window of a GraphicsProgram subclass.
*/

import acm.graphics.*;
import acm.program.*;

import java.awt.*;

public class Target extends GraphicsProgram {
public void run() {
drawLargeRedOval();
drawWhiteOval();
drawSmallRedOval();
}

// precondition: a canvas of 200pixels across and 200pixels top to bottom,
// the center is 100x100 pixels.
// postcondition is a red filled circle with 1 inch radius with 72pixels has
// a center of 36
// 100 - 36 = 64,64 is where the left and bottom of the rectangle in which
// the oval is located should be placed

public void drawLargeRedOval() {
GOval myOval = new GOval(64, 64, 72, 72);
myOval.setFilled(true);
myOval.setColor(Color.RED);
myOval.setFillColor(Color.RED);
add(myOval);

}

// precondition: a 200x200pxl canvas with a 72pxl red circle centered at
// 100x100
// postcondition: another white circle added on top of the red circle. .65
// of 72 = 46.8 - half of 46.8 = 23.4
// 100 - 23.4 = 76.6, is where the left and bottom of the GOval rectangle is
// set.
public void drawWhiteOval() {
GOval myOval = new GOval(76.6, 76.6, 46.8, 46.8);
myOval.setFilled(true);
myOval.setColor(Color.WHITE);
myOval.setFillColor(Color.WHITE);
add(myOval);
}

// precondition: a 200x200pxl canvas with a 46.8 white circle on top of a
// red 72pxl circle with a center of 100x100
// post condition: another red circle added on top of the white circle. .3
// of 72 = 21.6 - half of 21.6 = 10.8
// 100 - 10.8 = 89.2, is where the left and bottom of the small re oval is
// set.
public void drawSmallRedOval() {
GOval myOval = new GOval(89.2, 89.2, 21.6, 21.6);
myOval.setFilled(true);
myOval.setColor(Color.RED);
myOval.setFillColor(Color.RED);
add(myOval);
}
}

Target

Condition that I will work on in part 2:
Do you make appropriate use of constants? Several of the programs you’ll write – especially
the graphics programs – will require values that will not be immediately evident from context.
When appropriate, introduce constants into your program to make the program more
customizable and easier to read.

Here is the code that contains the constants. So for example, the boss wants to make the logo bigger, replacing the value of the constants is easier:


import acm.graphics.*;
import acm.program.*;

import java.awt.*;

public class Target extends GraphicsProgram {

final static double firstOvalxUpLeft = 64;
final static double firstOvalyUpLeft = 64;

final static double firstOvalHeight = 72;
final static double firstOvalWidth = 72;

final static double secondOvalxUpLeft = 76.6;
final static double secondOvalyUpLeft = 76.6;

final static double secondOvalHeight = 46.8;
final static double secondOvalWidth = 46.8;

final static double thirdOvalxUpLeft = 89.2;
final static double thirdOvalyUpLeft = 89.2;

final static double thirdOvalHeight = 21.6;
final static double thirdOvalWidth = 21.6;

public void run() {
drawLargeRedOval();
drawWhiteOval();
drawSmallRedOval();
}

// precondition: a canvas of 200pixels across and 200pixels top to bottom,
// the center is 100x100 pixels.
// postcondition is a red filled circle with 1 inch radius with 72pixels has
// a center of 36
// 100 - 36 = 64,64 is where the left and bottom of the rectangle in which
// the oval is located should be placed

public void drawLargeRedOval() {
GOval myOval = new GOval(firstOvalxUpLeft, firstOvalyUpLeft,
firstOvalHeight, firstOvalWidth);
myOval.setFilled(true);
myOval.setColor(Color.RED);
myOval.setFillColor(Color.RED);
add(myOval);

}

// precondition: a 200x200pxl canvas with a 72pxl red circle centered at
// 100x100
// postcondition: another white circle added on top of the red circle. .65
// of 72 = 46.8 - half of 46.8 = 23.4
// 100 - 23.4 = 76.6, is where the left and bottom of the GOval rectangle is
// set.
public void drawWhiteOval() {
GOval myOval = new GOval(secondOvalxUpLeft, secondOvalyUpLeft,
secondOvalHeight, secondOvalWidth);
myOval.setFilled(true);
myOval.setColor(Color.WHITE);
myOval.setFillColor(Color.WHITE);
add(myOval);
}

// precondition: a 200x200pxl canvas with a 46.8 white circle on top of a
// red 72pxl circle with a center of 100x100
// post condition: another red circle added on top of the white circle. .3
// of 72 = 21.6 - half of 21.6 = 10.8
// 100 - 10.8 = 89.2, is where the left and bottom of the small re oval is
// set.
public void drawSmallRedOval() {
GOval myOval = new GOval(thirdOvalxUpLeft, thirdOvalyUpLeft,
thirdOvalHeight, thirdOvalWidth);
myOval.setFilled(true);
myOval.setColor(Color.RED);
myOval.setFillColor(Color.RED);
add(myOval);
}
}

Stanford cs106a, Assignment 2; Problem 3. – FindRange – Part 1

The instructions are to write a ConsoleProgram that reads in a list of integers, one per line, until a sentinel
value of 0 is entered. When the sentinel is read, your program should display the smallest and largest values in the
list, as illustrated in this sample run:
SampleFindRange

The program should handle the following special cases:
• If the user enters only one value before the sentinel, the program should report
that value as both the largest and smallest.
• If the user enters the sentinel on the very first input line, then no values have been
entered, and your program should display a message to that effect.

I found that programming this assignment got me familiar with using the debugger. I place breakpoints along the lines of code I want to watch. I start the program in debugging mode and then hit the resume (F8) button to run the program until the next break-point, error, or endless loop :-p. I can then watch as variables are assigned values, and at what point a “while” iteration loops. I can see if certain conditions are met and if so, what happens next.

Also, I found that it’s not over til it’s over and the project is not complete until the program has been tested extensively. Just when you think it’s complete and you run a test one more time, the program doesn’t behave as expected. This is just the case below. The program is mostly complete except for when multiple values are supplied; the program loses track of which number is the lowest. But for today I’m happy with the progress I made.

Besides the debugger I learned about the “break;” command, ‘and’ (&&) and ‘or’ (||) operators, and appropriate use of methods(). Although I did not create a method in this program, I understand I can take code that has been repeated somewhere, turn it into a method, and clean up the code in general.

Here’s where I am so far. First the code, then the condition cases fulfillment, a successful run, and then the last problematic condition that still needs to be resolved.


/*
* File: FindRange.java
* Name: Jason Coltrin
* Section Leader: n/a
* --------------------
* This file is the starter file for the FindRange problem.
* write a ConsoleProgram that reads in a list of integers, one per line, until a sentinel value of 0
* is entered. When the sentinel is read, your program should display the smallest and largest values
* in the list.
* The program should handle the following special cases:
* • If the user enters only one value before the sentinel, the program should report
* that value as both the largest and smallest.
* • If the user enters the sentinel on the very first input line, then no values have been
* entered, and your program should display a message to that effect.
*/

import acm.program.*;

public class FindRange extends ConsoleProgram {

public void run() {

println("This program finds the largest and smallest numbers.");

int getNum = readInt("?:"); // gets initial input from user
int sentinel = getNum; // sets first input to value sentinel
int highNum = 0;
int lowNum = 0;
highNum = getNum; // allow the first input highNum to be set as the
// largest number

if ((getNum == 0) && (highNum == 0)) { // check for first input zero
// constraint
println("No values have been entered. Please start over.");

} else { // if not 0, set getNum to be equal to highNum
if (getNum > highNum) {
highNum = getNum;
}
getNum = readInt("?:"); // ask for the 2nd getNum
if (getNum < highNum) { lowNum = getNum; // assign new getNum to lowNum if less than // highNum } if (getNum == 0) { // if second getNum is equal to 0, meet // constraint to set high/low to same number println("Smallest:" + highNum); println("Largest:" + highNum); lowNum = highNum; } } while ((sentinel != 0) && (lowNum != highNum)) { getNum = readInt("?:"); if (getNum == 0) { println("Smallest:" + lowNum); println("Largest:" + highNum); break; } if (getNum > highNum) {
highNum = getNum;

} else {

if (getNum < highNum) { lowNum = getNum; } } } } }
Condition 1 met:
NoValuesException
Condition 2 met:
OneNumberException
Success!...
success
But wait, not so fast...
BugDoh

Eclipse IDE Tips and Tricks

I wish I had know about these a couple weeks ago, but anyway here are a few tips and tricks I found for using the Eclipse IDE with Java:

// Eclipse tips and tricks
1. Quickly add main method by typing “main” followed by ctrl+space and then enter
2. Quickly format your source code by typing ctrl+shift+f or right click->source->Format
3. Type sysout then ctrl+space, then enter, to generate System.out.println();
4. F11 runs your application in debug mode – if no breakpoints, it will run normally
5. Hit ctrl+shift+o for organize imports. This will give you list of possible imports and then
add or the import to/from the top of the source file.
6. Type syserr and then ctrl+space to quickly type out System.err.println();.
7. to rename a variable, select the variable, right click, choose refactor -> rename, and all
of the instances where that variable name has been used will be changed.
8. You can rename a class as well by right-clicking on the .java file in the Package Explorer
pane, then -> refactor -> Rename.
9. When you highlight a line or block of code and push Ctrl + Alt together,
and the down arrow, it clones the line or block. (You may have to disable your intel
graphics card drivers or your screen will flip.)
10. Use Ctrl+Shift+/ to comment blocks of code and Ctrl + Shift + to uncomment them again.
11. If you want to find all the places a variable is used, right-click on the variable, choose
references -> workspace (or project, hierarchy). This will find all of the variables of
that name even in other classes/java files.
12. In order to find where a variable is declared, click on it, then press F3. This also works
for finding where other classes are declared in other files.
13. To remove/delete whole lines, click anywhere in the line and hit Ctrl+d.
14. Many methods, objects, arrays, etc will autocomplete. For example an array, type the
letter “A” then ctrl+space.
15. For new private fields, you can generate Getters and Setters automatically by right clicking
->Source ->Generate Getters & Setters. The same works for creating Constructors with the
correct parameters.
16. If you want to override methods in a superclass, right click -> source -> Override/Implement
methods…

I’m sure these will help me develop a little faster. Just formatting and adjusting my brackets to make things prettier has taken up a lot of time. Not to mention finding where variables are declared. I’m not familiar with what Getters & Setters or Overriding methods are used for at this time but apparently they are just busy work that is unnecessary to write out every time.

Object Reference and Arrays

The standard eight primitive variable types are:

boolean char byte short int long float double

a mnemonic to remember this is:

Be careful!

Bears

Shouldn’t

Ingest

Large

Furry

Dogs

I think I’m beginning to understand object references in Java as well as arrays. Object references use a dot where you use the thing before the dot to get to the thing after the dot. For example:

myCat.meow();

means use (the object referenced by) “myCat” to invoke the “meow()” method.

In order to 1. declare an object, 2. create an object,  and 3. assign the object there are 3 steps:

1st, declare a reference variable:

Cat myCat   — the reference variable is named myCat, and the variable is forever of the type Cat.

2nd, create an object

new Cat();   — tells the java virtual machine to allocate space for a new Cat object on the heap

3rd, link the object and the reference

Cat myCat = new Cat();   — Assigns the new Cat object to the reference variable myCat

As references are modified throughout an application, it may turn out that an object that used to refer to one object no longer refers to that object and now refers to another object. But that does not mean that the object reference has disappeared, nor the object that it originally referred to. However, abandoned objects that are left on the heap are fodder for the garbage collector. Also references can point to Null which means for example, the reference myCat could point to Null, and it just sits there. References aren’t collected as garbage because later a different object could still be assigned to it.

Arrays themselves are always objects, and can be declared just like object references to hold primitives or other object references.

Here’s an example of how to create an array of cats:

1. Declare a Cat array variable (the brackets are what defines Cat as an array)

Cat[] pets;

Cat[] is the type of the array, and pets is the variable. ( this is where I get confused)…

2. Create a new Cat array with a length of 6, and assign it to the previously-declared Cat[] variable pets

pets = new Cat[6];

3. The objects are still missing so let’s create new Cat objects and assign them to the array elements.

pets[0] = new Cat();

pets[1] = new Cat();

pets[2] = new Cat();

So now pets[0, 1, 2] refer to a Cat() object, however, the other 3 pets do not refer to anything until we declare that, in fact, pets[3, 4, 5] = either a new cat object, or a different existing object, or null (a reference variable that is not referencing any object has a value of null).

Take for example two different ways of creating 10 contact objects:

Contact[] ca = new Contact[10];

while (x < 10) {

ca[x] = new Contact();

x = x + 1;

}

_________________________________

Contact refc;

while ( x < 10 ) {

refc = new Contact();

x = x + 1;

}

In this second method of creating 10 contact objects, only the last of the Contact objects that was created will be accessible. With each trip through the loop, an assignment of a new object to the one reference variable was made. All the other previously referenced objects were abandoned on the heap – unreachable. The second method of creating the array of 10 contact objects is pretty useless.


Android App Development with Eclipse, the Android SDK, and more Java

So my foray into Android App development has begun and I’m happy that I have eclipse up and running with the Android SDK. I have a virtual NexusOne up and running my first Hello World App. The only real snag I encountered was being unable to build an .apk and run my first few test apps because of the error: SDK does not have any Build Tools installed. I went to C:UsersJasonandroid-sdks and found that the Build Tools directory was empty (despite running the SDK manager and re-installing the Build-Tools component.) This was resolved by re-downloading the SDK, extracting the zipped files to C:Downloadsadt-bundle-windows-x86_64-20130522 and then manually copied the contents of the Build Tools folder from the unzipped location to my c:users directory.

HelloWorld

I’ve also progressed in my Java studies to become better at understanding and looking for what code will compile and which code will produce a compiler error. Also I’m becoming more comfortable with string arrays, getting java to find out how many words are in each list, generate random numbers that are constrained to a random number within the array, and building a string phrase using words within the arrays. For example:

String[] cats = {“Tricksie”, “Gunner”, “Bear”, “Apache”, “Esmeralda”};

int x = cats.length;

int rand1 = (int) (Math.random() * x);

String phrase = cats[rand1] ;

System.out.println(phrase + ” is a name for a cat.”);

– The first output could be: Bear is a name for a cat.

– The second output would probably be a different name and so on.

The logic of while and if methods can get tricky when creating an application that will output results when checking on conditions of your variables. For example,

class Test {

public static void main(String [] args) {

int x = 0;

int y = 0;

while ( x < 5 ) {

x = x + 1;

y = y + x;

System.out.print(x + “” + y +” “);

x = x + 1;

}

}

}

In this instance, the output would be:

11 34 59

If x starts out as a 0, then it passes the condition of being < 5 so it continues. x is added to 1 so it’s value = 0 + 1 = 1. It is told to print out it’s value as 1 and then add another 1 onto itself, and so on until it’s value is greater than 5, at which time the output ceases due to while condition no longer being true.

While, do-while, and for loops always has to pass a conditional test, or an expression that results in a boolean value; either true or false.