Exchange 2010 – Working with Public Folders – Part 12

In this post, we will look at Public Folders in Exchange 2010. More specifically:

  • We will review the purpose and use of Public Folders within your organization (and discuss the fact that they may no longer be used in some future version of Exchange).
  • We will go through the creation of a Public Folder database in the Exchange Management Console and see the properties that we can configure.
  • We will work with the Public Folder Management Console and the Outlook client to create and manage Public Folders.
  • We will review permission settings and delegating permissions for folders and sub-level folders.
In review, the purpose of Public Folders:
  • Public Folders are Nostalgic (out of date) – Public Folders were introduced with the first version of Exchange and have been used for many years as a means of collaborating with persons in your organization through a shared folder structure.
  • Users will see the Public Folder structure in their Outlook client and can view items that have been either posted or emailed to the folder (if it is mail-enabled) and they may have the ability to add content, create sub-folders and so-forth if they have permissions to do so.
  • Are Public Folders required in Exchange 2010?
  •      If you have Outlook 2007 and/or 2010 clients only, than the answer is no (it is completely optional if you want to).
  •      If you have Outlook 2003 clients, then the answer is yes. They use the Public Folder structure for Offline Address book distribution, free/busy lookups, organization form library, and security settings.
The Offline Address Book distribution in Exchange 2010 is now done with the BITS HTTP connection to the Exchange Client Access server. The Free/Busy look-ups are now done through the Availability Web Service. Security settings are done through Group Policy. Organizational Forms have been pushed aside in favor of InfoPath forms.
Starting with Exchange 2010, Public Folders are De-emphasized
  • Public Folders have become the dumping grounds for anything and everything your people want to share with each other. Public folders tend to sprawl out of control.
  • Public Folders are so late-1990’s. They aren’t designed for two very important 2010+ aspects of corporate life: Archiving data, and Document Sharing and Collaboration (check-in/check-out, versioning). Associates tend to try to hide their personal mail archives in Public Folders so that they are backed up.
  • As a result, the Microsoft Exchange Team has been making threats to pull Public Folder support from a future version of Exchange.
  • The idea is to encourage organizations toward SharePoint (although you are welcome to research and use some other collaboration solution).
  • While SharePoint has great features, any collaboration software has the potential to become the NEW dumping grounds for your organization.
How do I create the Public Folder database in Exchange 2010?
  • During the installation of the first Exchange 2010 Mailbox Server in your organization you see the question: “Do you have any client computers running Outlook 2003 and earlier or Entourage in your Organization?” If you answer “Yes” then the Public Folder database is automatically created.
  • You can also manually create a Public Folder database on any Mailbox Server in your organization and then determine if you want to replicate folders to that server.
How do I establish or create a High Availability structure for my Public Folders?
  • In Exchange 2010 there are no HA solutions you can use by default. The only way to ensure content is available is to create a new database and replicate content to that server.
Options for configuring Public Folder databases:
  • Maintenance Schedule
  • Replication Interval – specific to DB
  • Storage Limits
  • Deletion Settings
  • Age Limits
  • Public Folder Referral
Options for configuring individual Public Folders:
  • Replication (Both server choice and replication schedule)
  • Limits (Storage, Deleted Item, Age)
Path to managing the Public Folder in the Exchange Management Console (EMC):
MS Exchange -> MS Exchange On Premises -> Organization Configuration -> Mailbox -> Database Management Tab -> Right-click on Public Folder DB file and choose Properties.
Maintenance Schedules run from 1-5am by default. (ESE scanning check sum is an option as well. For smaller databases, you can get away with un-checking this option).
Circular Logging, again, is not having transaction logs building up. This is a space saver but not good when trying to recover from an emergency.
Replication Tab – replication of messages between PF databases.
Limits Tab – storage limits on the database. There is by default a maximum size of message of 10MB for each item placed in a Public Folder by default.
Public Folder Referral – Use Active Directory site costs. Essentially PFR comes into play with large organizations with multiple PF DBs, multiple Mail Box servers hosting PF DB’s. Certain PF’s may not be hosted at that same location. Site costs can be used to determine or manage PF locations.

You can configure  certain items on individual public folders like replication. Replication at the database level can be scheduled, or you can establish on the individual folder themselves.

Go to the Public Folder Console by going to the EMC -> Toolbox -> Public Folder Management Console:

Default Public Folders – include existing public folders created by an administrator. Try to maintain and organize Public Folders with a structure to maintain focus. One possibility is organizing by location. To add new folders, select New Public Folder… in the Action Pane. You can create sub-folders inside each Public Folder. You can delegate permissions on Public Folders to allow users the ability to create new sub-folders. Right-Click on a Public Folder, choose Properties. Under the Replication tab, you can add servers to replicate the content to and if you want High Availablity, you will select a different MailBox server and replicate the folder. You might replicate content to put them closer to actual user’s locations. You can use the default public folder replication schedule, or create your own. For limits, you can use the default quotas, or establish your own.

System Public Folders – we will cover these later.


Key Focus Points of Public Folders:

What are some of the key concepts of Public Folders?

  • Public Folder Trees
  •      Default Public Folders (IPM_Subtree – folders that users are typically aware of)
  •      System Public Folders (System PF structure known as the Non_IPM_Subtree – used by outlook for free/busy data, eforms registry and events root, for outlook clients that do not support 2010 or 2007 features (Availability service etc.) Legacy clients don’t know where to look for this, but can get their legacy data from these structures)
  • Replication
  •      Hierarchy – Properties of the folders, and organizational information, name of public folder, which server holds the replicas, and permissions are replicated with the heirarchy
  •      Content (Requires configured replication) – you decide which mailbox servers have copies of the content.
  • Referrals
  •      If a client looks for somethign in the Public Folder heirarchy, if they click on the folder, do they get it from their local Mailbox server? If it can’t find the data from their Mailbox, it will look for a replica in the same site. If it can’t find it there, it will look for the lowest cost site.
  • What are Mail-enabled Public Folders?
  •      They provide a bit more functionality to PFs
  •      Users can post to a PF through email.
Permissions: The Reality vs. The Potential
  • Exchange Administrators should consider delegating folder creation and management to others.
  • The easiest way to delegate is to assign persons to the Public Folder Management Group and let them worry about creating and managing Public Folders through Outlook
  • If you wanted to see the permissions or set the permissions on Public Folders, you cannot use the EMC/Public Folder Management Console. You must use the Exchange Management Shell.
  •      – Cmdlet used to add administrative permissions:  Add-PublicFolderAdministrativePermission
  •      – Cmdlet used to add client permissions: Add-PublicFolderClientPermission

In an Outlook 2010 client, if a user does not have permissions to create a sub-folder in a Public Folder, check the properties of the folder first -> Summary Tab.

To add a user to a Public Folder Management Group so that they can make changes/add folders to a Public Folder, you’ll need to open the Exchange Management Shell:

Edit – you can change permissions now through the Public Folders Management Console if Exchange 2010 SP1 is installed

[PS] c:windowssystem32>Add-RoleGroupMember -Identity “Public Folder Management” -Member User.Name 

After hitting Enter, nothing appears to happen, but when logged in as the user, and visiting the properties of a Public Folder in Outlook, you will see the additional properties/permissions available. And from here you can give additional permissions to other users.

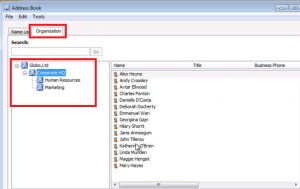
If a Public Folder is mail-enabled, in the Global Address List, you can change the address book to Public Folders, which will list all available Mail-Enabled Public Folders.

Permissions: Rights vs. Roles

  • When using Outlook to assign permissions to a Public Folder you assign Roles (like Editor, Author and so forth).
  • Those Roles have underlying Rights assigned to them. For example, a Reviewer (role) has the rights ReadItems and FolderVisible.
  • There are 10 different Rights that mix and match for each role:
  1. ReadItems
  2. CreateItems
  3. EditOwnedItems
  4. DeleteOwnedItems
  5. EditAllItems
  6. DeleteAllItems
  7. CreateSubFolders
  8. FolderOwner
  9. FolderContact
  10. FolderVisible
Each of these is a different set of permissions that combine to create a different role. A “none” role doesn’t allow any permissions and the user will not be able to even view items.
If you are the type that doesn’t want to delegate to users rights and roles, and want to adjust them on the EMShell, you can use the following commands:
[PS] c:windowssystem32>Get-PublicFolderClientPermission -identity “PublicFolderName”
Let’s say we want to give Jason.Coltrin a role:
[PS] c:windowssystem32>Add-PublicFolderClientPermission -identity “PublicFolderName” -user “jason.coltrin” -accessrights Editor
It can be more simple to use the Outlook client GUI, but using the above commands, you can make the changes in the Exchange Management Shell.

With Exchange SP1, you can change permissions (rights and roles) for public folders using the Public Folder Management Console -> Right-click on Default Public Folders -> Choose Properties -> Permissions Tab. 


A good majority of the content provided in my Blog’s Exchange series is derived from J. Peter Bruzzese’ excellent Train Signals Exchange Server 2010 Video Disk Series, as well as my own Exchange 2010 lab. Trainsignal.com is an invaluable source for accurate, easy to understand, IT information and training. http://www.trainsignal.com

Exchange 2010 – Understanding and Managing Databases – Part 11

In this post, we will discuss the following topics:

  • The concept of the Exchange Database including the Extensible Storage Engine or ESE
  • The way transaction logs and database files work together – storage architecture
  • How to create and mount databases
  • Some best practice concepts and implementing them with a newly created mailbox database
It’s important for you to visually realize that every email that goes to your Mailbox server must go into a database, and this creates challenges because of the huge variety of messages Exchange handles. From the tiny on-line emails to the monster MB emails with video attachments.
The I/O profile of a Mailbox server is not predictable (RANDOM). Read/write that occurs between memory and disk is substantial. At times there may be waves of messages, other times may be idle.
Exchange uses the Extensible Storage Engine (ESE) database engine (MS has mentioned moving this to SQL but that has been determined to be too much of an investment, so ESE remains in Exchange 2010). The ESE engine has received some enhancements to improve I/O by 70% (meaning, Exchange 2010 can read/write emails to disk 70% faster than 2007 using the same engine). These improvements included increasing the page size from 8kb to 32kb, storing header data in a single DB table, and compressing attachments. In turn, because of these optimizations, you actually have more options for using lower-end disks for your Exchange server.
Disk Types for Exchange:
  • Better IOPS performance mean flexibility in storage options:
  •      High-end storage (SANs or RAID arrays)
  •      Exchange 2010 uses reduced I/O and this allows for Lower cost SATA disks or Just a Bunch of Disks (JBOD) storage
  • One important point to keep in mind is that Microsoft removes Single Instance Storage with Exchange 2010
  •      The idea behind SIS is when a message is sent to a bunch of people (perhaps with a large file included) the original message is stored once.
  •      SIS is replaced by database compression technology and new tools to help administrators to purge mailboxes and reduce the overall size of the database
To visualize email flow consider the following:
The email comes in, the CPU/Memory sends it to the hard disk but not immediately into the database, because it might be busy. First it goes into transaction logs, which ensure the data is written into the database. Transaction logs don’t do anything, they are 1 MB in size and the amount of files/logs grows. But they are written into the “one monolithic database” file. The exchange store uses write-ahead Transaction Logs and CheckPoint files to help prevent data loss. These files record all changes that have been committed to the in-memory database. While checkpoint files record which data has been committed. If the DB is corrupted, and the transaction logs are safe, your DB will be up to date. Its recommended to keep TL and DB on separate disks. JRS files are used when the hard drive runs out of space and help to stop the queue DB cleanly. When the store runs out of hard disk space, the transport service will be stopped. At 1 GB it will run out of space and is BAD. Space cannot be reclaimed. *Make extra effort to ensure you do not run out of disk space!*
In the Exchange Management Console -> Mailbox server role -> Database Management tab, we can see the database file path and where the Transaction Logs are located.
In the Mailbox Database folder on the hard drive, in the transaction logs, when the placeholder E00 log is complete, it will be renamed.
When you create a new Mailbox, you can change the DB file locations. (PS command: new – mailboxdatabase Server…)
Exchange 2010 Database Best Practices:
  • Place transaction logs and database files on separate disks (off the system disk and/or the location where Exchange is installed – you can move the location of your DB)
  • Place transaction logs on a mirrored volume
  • Place database files on a RAID 5
  • Use the Exchange 2010 Mailbox Server Role Requirements Calculator to help you determine your storage needs. The latest version can be found here: http://blogs.technet.com/b/exchange/archive/2009/11/09/exchange-2010-mailbox-server-role-requirements-calculator.aspx
  • Note: Standard Edition supports 5 databases. Enterprise Edition supports 100 databases
For an existing DB, you can “Move Database Path” at any time and change the default locations for transaction logs and database file location.
EMC -> Organization Configuration -> Mailbox -> Database Management Tab -> Right-click on Database -> Properties ->
Maintenance Tab ->
Database Management Properties
  • Mount and Dismount the Database
  • Move Database and Log Paths
  • Background Database Maintenance (24×7 ESE scanning)
  • Circular Logging
  • Storage Limits
  • Deletion Settings
We will touch upon Journal Recipient later.
Here the Exchange Mailbox Database Maintenance Schedule can be adjusted or Customized.
Database maintenance performs the following maintenance tasks:
  1. Purging mailbox DB and PF DB indexes
  2. Maintaining Tombstones
  3. Cleans up deleted Items Dumpster
  4. Removes public folders that have exceeded expiration time
  5. Removes Deleted Public Folders which have exceeded the tombstone lifetime
  6. Cleans up conflicting Public Folder messages
  7. Updates server versions
  8. Checks schedule plus Free/Busy and offline folders
  9. Cleans up deleted mailboxes
  10. Checks message tables for orphaned messages
  11. Cleans up reliable event tables
By default, from 1am to 5 am, these tasks above are completed.
An online defragmentation process will be run to free up pages in the database at the end of every maintenance schedule. This is done to reduce the amount of I/O.
Legacy versions of Exchange would do a DB check-sum and look at every page to see if there was corruption at end of maintenance schedule.
However, ESE Scanning does the DB check sum process for corruption on the fly, outside of the maintenance schedule. Un-checking the option for ESE 24/7, the defrag will still take place at the end of the scheduled maintenance.
– Enable Circular Logging – saves disk space – allows exchange to overwrite transaction logs. If your database is corrupt, the transaction logs will restore the DB from the logs. It’s not recommended to use this option – but good if you want to save disk space (perhaps you can turn this on for specific databases)
Limits Tab:
Storage limits – mailbox and storage limits
By default, every day at 1am if the user hits these limits, they will be sent a notification that their mailbox has gotten so large that they will either be prohibited to send or send and receive.
Issue Warning at (kb):
Prohibit send at (kb):
Prohibit send and receive at (kb):
Deletion settings defaults:
Keep deleted items for (days): – deleted items do not count against user’s total mailbox size
Keep deleted mailboxes for (days)
Don’t permanently delete items until the database has been backed up (recommended to enable this option)
In summary, there is a lot to consider when managing an Exchange database. We talked about the concept of an Exchange Database, Transaction logs and database files, mounting/dismounting databases, best practices for configuring DB’s and logs, and finally, maintaining our databases with best practices.
A good majority of the content provided in my Blog’s Exchange series is derived from J. Peter Bruzzese’ excellent Train Signals Exchange Server 2010 Video Disk Series, as well as my own Exchange 2010 lab. Trainsignal.com is an invaluable source for accurate, easy to understand, IT information and training. http://www.trainsignal.com
Exchange 2010 – Understanding and Managing Databases – Part 11

In this post, we will discuss the following topics:

  • The concept of the Exchange Database including the Extensible Storage Engine or ESE
  • The way transaction logs and database files work together – storage architecture
  • How to create and mount databases
  • Some best practice concepts and implementing them with a newly created mailbox database
It’s important for you to visually realize that every email that goes to your Mailbox server must go into a database, and this creates challenges because of the huge variety of messages Exchange handles. From the tiny on-line emails to the monster MB emails with video attachments.
The I/O profile of a Mailbox server is not predictable (RANDOM). Read/write that occurs between memory and disk is substantial. At times there may be waves of messages, other times may be idle.
Exchange uses the Extensible Storage Engine (ESE) database engine (MS has mentioned moving this to SQL but that has been determined to be too much of an investment, so ESE remains in Exchange 2010). The ESE engine has received some enhancements to improve I/O by 70% (meaning, Exchange 2010 can read/write emails to disk 70% faster than 2007 using the same engine). These improvements included increasing the page size from 8kb to 32kb, storing header data in a single DB table, and compressing attachments. In turn, because of these optimizations, you actually have more options for using lower-end disks for your Exchange server.
Disk Types for Exchange:
  • Better IOPS performance mean flexibility in storage options:
  •      High-end storage (SANs or RAID arrays)
  •      Exchange 2010 uses reduced I/O and this allows for Lower cost SATA disks or Just a Bunch of Disks (JBOD) storage
  • One important point to keep in mind is that Microsoft removes Single Instance Storage with Exchange 2010
  •      The idea behind SIS is when a message is sent to a bunch of people (perhaps with a large file included) the original message is stored once.
  •      SIS is replaced by database compression technology and new tools to help administrators to purge mailboxes and reduce the overall size of the database
To visualize email flow consider the following:
The email comes in, the CPU/Memory sends it to the hard disk but not immediately into the database, because it might be busy. First it goes into transaction logs, which ensure the data is written into the database. Transaction logs don’t do anything, they are 1 MB in size and the amount of files/logs grows. But they are written into the “one monolithic database” file. The exchange store uses write-ahead Transaction Logs and CheckPoint files to help prevent data loss. These files record all changes that have been committed to the in-memory database. While checkpoint files record which data has been committed. If the DB is corrupted, and the transaction logs are safe, your DB will be up to date. Its recommended to keep TL and DB on separate disks. JRS files are used when the hard drive runs out of space and help to stop the queue DB cleanly. When the store runs out of hard disk space, the transport service will be stopped. At 1 GB it will run out of space and is BAD. Space cannot be reclaimed. *Make extra effort to ensure you do not run out of disk space!*
In the Exchange Management Console -> Mailbox server role -> Database Management tab, we can see the database file path and where the Transaction Logs are located.
In the Mailbox Database folder on the hard drive, in the transaction logs, when the placeholder E00 log is complete, it will be renamed.
When you create a new Mailbox, you can change the DB file locations. (PS command: new – mailboxdatabase Server…)
Exchange 2010 Database Best Practices:
  • Place transaction logs and database files on separate disks (off the system disk and/or the location where Exchange is installed – you can move the location of your DB)
  • Place transaction logs on a mirrored volume
  • Place database files on a RAID 5
  • Use the Exchange 2010 Mailbox Server Role Requirements Calculator to help you determine your storage needs. The latest version can be found here: http://blogs.technet.com/b/exchange/archive/2009/11/09/exchange-2010-mailbox-server-role-requirements-calculator.aspx
  • Note: Standard Edition supports 5 databases. Enterprise Edition supports 100 databases
For an existing DB, you can “Move Database Path” at any time and change the default locations for transaction logs and database file location.
EMC -> Organization Configuration -> Mailbox -> Database Management Tab -> Right-click on Database -> Properties ->
Maintenance Tab ->
Database Management Properties
  • Mount and Dismount the Database
  • Move Database and Log Paths
  • Background Database Maintenance (24×7 ESE scanning)
  • Circular Logging
  • Storage Limits
  • Deletion Settings
We will touch upon Journal Recipient later.
Here the Exchange Mailbox Database Maintenance Schedule can be adjusted or Customized.
Database maintenance performs the following maintenance tasks:
  1. Purging mailbox DB and PF DB indexes
  2. Maintaining Tombstones
  3. Cleans up deleted Items Dumpster
  4. Removes public folders that have exceeded expiration time
  5. Removes Deleted Public Folders which have exceeded the tombstone lifetime
  6. Cleans up conflicting Public Folder messages
  7. Updates server versions
  8. Checks schedule plus Free/Busy and offline folders
  9. Cleans up deleted mailboxes
  10. Checks message tables for orphaned messages
  11. Cleans up reliable event tables
By default, from 1am to 5 am, these tasks above are completed.
An online defragmentation process will be run to free up pages in the database at the end of every maintenance schedule. This is done to reduce the amount of I/O.
Legacy versions of Exchange would do a DB check-sum and look at every page to see if there was corruption at end of maintenance schedule.
However, ESE Scanning does the DB check sum process for corruption on the fly, outside of the maintenance schedule. Un-checking the option for ESE 24/7, the defrag will still take place at the end of the scheduled maintenance.
– Enable Circular Logging – saves disk space – allows exchange to overwrite transaction logs. If your database is corrupt, the transaction logs will restore the DB from the logs. It’s not recommended to use this option – but good if you want to save disk space (perhaps you can turn this on for specific databases)
Limits Tab:
Storage limits – mailbox and storage limits
By default, every day at 1am if the user hits these limits, they will be sent a notification that their mailbox has gotten so large that they will either be prohibited to send or send and receive.
Issue Warning at (kb):
Prohibit send at (kb):
Prohibit send and receive at (kb):
Deletion settings defaults:
Keep deleted items for (days): – deleted items do not count against user’s total mailbox size
Keep deleted mailboxes for (days)
Don’t permanently delete items until the database has been backed up (recommended to enable this option)
In summary, there is a lot to consider when managing an Exchange database. We talked about the concept of an Exchange Database, Transaction logs and database files, mounting/dismounting databases, best practices for configuring DB’s and logs, and finally, maintaining our databases with best practices.
A good majority of the content provided in my Blog’s Exchange series is derived from J. Peter Bruzzese’ excellent Train Signals Exchange Server 2010 Video Disk Series, as well as my own Exchange 2010 lab. Trainsignal.com is an invaluable source for accurate, easy to understand, IT information and training. http://www.trainsignal.com
Exchange 2010 – Mailbox Server Role Overview – Part 10

In this post we will review the overall purpose of the Mailbox role.

We will also review the management options that relate to the Mailbox role including:

  • Database Management
  • Messaging Records Management (MRM)
  • Address Lists
  • The Offline Address Book
  • Public Folders
Mailbox Server Role functions:
A server that runs the Mailbox Server role (“Mailbox server”) performs the following:
  • Hosts mailbox databases (which hold recipient mailboxes)
  • Hosts public folder databases
  • Handles email address policies
  • Generates Offline Address Books (OABs)
  • Generates Address Lists
  • Enables content indexing
  • Allows for messaging records management (MRM)
  • Allows for retention policies
As you can tell that the role is an important one and that High Availability and Site Resilience is a key concern and Exchange 2010 has been designed specifically to provide those features.
The mailbox server has quite a bit of connectivity to all the other server roles (except for the Edge Transport Server).
____________________________________
Configuration Aspects of the Mailbox Role
Organization Configuration
  • Database Management and Database Availabilty Groups
  • Messaging Records Management (MRM)
  •      Managed Default Folders
  •      Managed Custom Folders
  •      Managed Folder Mailbox Policies
  • Address Lists
  • Offline Address book
  • Sharing Policies
Server Configuration
  • Most of the configuration work is being done on the Organization Configuration side. In Exchange 2007, Database Management was under Server Config – related to storage groups. Very limited settings including MRM schedule and a view of Database Copies (if any exist).
MRM – policies to adjust for example, how long items stay in the deleted items folders in (all) user’s mailboxes. Sharing policies control how to share calendars with persons outside the organization.
Click image to enlarge

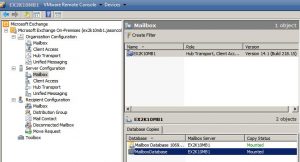
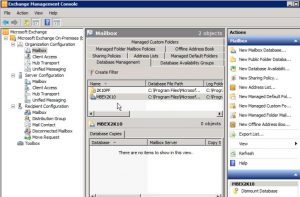
To manage the mailbox server, open the EMC, go to Organization Configuration -> Mailbox. You’ll notice that I have two databases. One is the Mailbox database and the other is the Public Folders database. You can right-click on the Mailbox Database and choose properties, where you will find General, Maintenace, Limits, and Client Settings Tabs.

Database availability groups tab will by default not contain objects as this tab is used for High Availability/Fail-over configuration.

The Managed Default Folders tab – lists out typical folders in a user’s mailbox. You can also create additional default folders. You may want to create two different Deleted Items folders.

Managed Custom Folders – place a folder in User’s Outlook – for example, Archive, you can create it, and place it in this tab.

Managed Folder Mailbox Policies – no policies by default, create a policy and then apply – we will go over this later.

Offline Address Book – default OAB

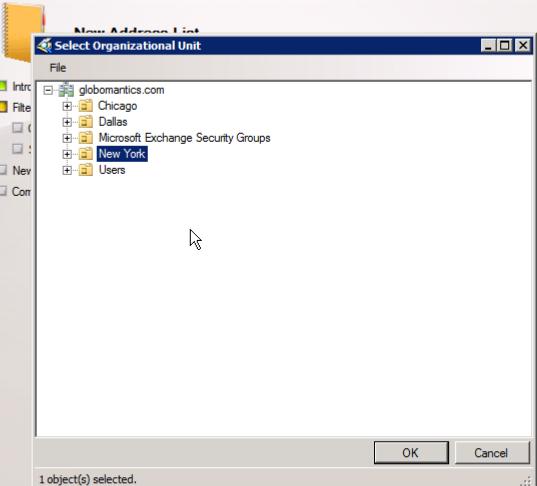
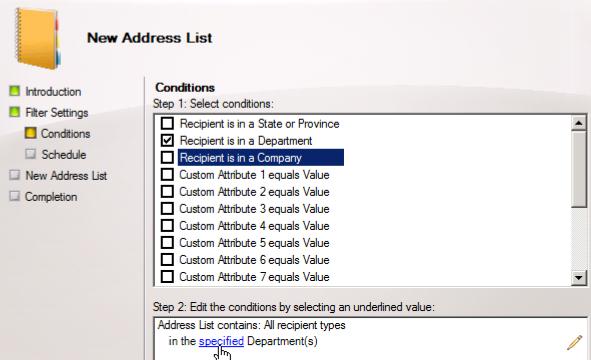
Address Lists – pre-configured Address Lists as well as the Default Global Address List. You may want to create lists for departments, sites, organizations.

Sharing Policies – Default Sharing Policy

_________________________

Server Configuration

Mailbox Role configuration

ServerConfigurationMailbox
Click Image to Enlarge

In the top pane, right click on the Mailbox and click on properties. Here you will find a General tab, a Systems Settings tab, and a Customer Feedback Options. For some unknown reason, Scheduled Managed Folder Assistant tab is not available on my installation as it is in others. This may be due to permissions.

By Right-clicking on the database copy, you can get the General Status of the Mailbox Database: the Content Index State, the Status (Mounted), the Copy queue length and Replay Queue Length. Under the Status tab you will find: Seeding, Messages, Latest available log time, Last inspected log time, Last copied log time, and Last replayed log time. Here you can also View Errors Messages.


A good majority of the content provided in my Blog’s Exchange series is derived from J. Peter Bruzzese’ excellent Train Signals Exchange Server 2010 Video Disk Series, as well as my own Exchange 2010 lab. Trainsignal.com is an invaluable source for accurate, easy to understand, IT information and training. http://www.trainsignal.com
Transitioning Exchange 2007 to Exchange 2010 – Part 9

This post has to do with transitioning from Exchange 2007 to 2010. Essentially you will be installing Exchange 2010 on the 2007 Exchange server, setup some co-existence if necessary, transfer the mailboxes, and then uninstall Exchange 2007.

* Upgrades – There is no “In-Place” upgrade from 2007 to 2010

– You can either deploy fresh, migrate, or transition.

*Migration

From Exchange 5.5 or 2000 to Exchange 2010 – when moving over to Exchange 2010 you will not be able to move over mailboxes or use transitioning coexistence. You might have to upgrade from 5.5 or 2000 to 2003, and then transition. Quest is a good transitioning tool from older versions to 2010. Lotus Domino has a transition path to 2007.

*Transition: involves introducing an Exchange Server(s) into the environment and moving over mailboxes and public folders

– Co-Existence: the state of your Exchange environment when different versions of Exchange are running together side-by-side within the same Exchange Organization

You can run exchange 2003, 2007, and 2010 all co-existing together. Slowly move the mailboxes and public folders over.

When migrating from a single 2007 server:

1. Ensure Exchange 2007 servers are running SP2

2. Deploy Exchange 2010 Servers in this order: Client Access Server, then Hub Transport Server, Unified Messaging, and then Mailbox server

3. Configure legacy DNS host name records* and implement new certificates for CAS

*Legacy DNS host name records: only necessary if you cannot transition quickly and need to provide remote OWA/Mobile usage.

4. Move over mailboxes and public folder data to Exchange 2010.

5. Tie up loose ends and uninstall Exchange 2007

Legacy Host Names and Certificates for CAS

  • If you plan for a period of co-existence with 2007, you will need to establish a legacy host name
  • The goal is to move your primary namespace, mail.companyname.com and autodiscover.companyname.com over to Exchange 2010
  • So for example, your mail.companyname.com domain continues but a new legacy.companyname.com is put in place for 2003/2007 users of OWA, ActiveSync, etc…
  • You will need to obtain a new certificate for Exchange and you should consider a Subject Alternative Name (SAN) certificate although wildcard certificates are also supported

Some DNS Record Types Review:

  • A Record: an address record that maps a host name to an IP address
  • NS Record: a name server record that maps a domain name to a list of DNS servers that are authoritative for that domain
  • MX Record: mail exchange record – maps a domain name to a list of mail exchange servers for that record
  • CNAME Record: gives the ability to provide an alias of one name to another
  • SRV Record: links a particular service to a specific server
  • SOA: Specifies the DNS server providing authoritative service for a particular domain

Users trying to log into an Exchange 2010 server, but have not had their mailbox transitioned yet, will be re-directed to the previous server if the legacy A record is listed in DNS.

Deployment Assistant: (upgrade means transistion) -this tool can be used from the website or downloaded.

The tool can be found here:

http://technet.microsoft.com/en-us/exdeploy2010/default.aspx#Index

Disjointed namespace: the FQDN of a server does not match the domain of which it is a member.

Transitioning Paths Vary

* Depending on your organization you may have the following variables in play for your transition to mold itself around:

– Exchange 2003 to 2010 (or mixed 2003/2007 to 2010)

– Public folders need to be transitioned

– Co-existence is necessary (requires legacy host name)

* Our example transition includes the following concerns:

-Public folders do, in fact, exist and need to be transitioned

-Co-existence is not necessary (we will perform the move in a minimal amount of time over a weekend of inactivity within the organization)

In a transition from Exchange 2007 to 2010 here are the following necessary items:

  1. Exchange 2007 is already running SP2
  2. The Server is 2008 and the forest functional level is already higher than the required 2003 forest functional level mode
  3. Exchange 2010 is already installed with CAS/HT/MB roles
Items to Complete:
  1. Move Offline Address Book (OAB) generation to Exchange 2010
  2. Move Exchange 2007 Mailboxes to 2010
  3. Move Public Folder data to Exchange 2010
  4. Ensure funtionality, test connectivity options, remove Exchange 2007

To check the domain functional level

  1. Go to Active Directory Computers and Users
  2. Right-click on the domain name, click “Raise Domain Functional Level”
  3. Look at Current Domain Functional Level


Moving the OAB generation from 2007 over to Exchange 2010

  1. Open Exchange Management Console
  2. Expand Organization Configuration node
  3. Select the Mailbox node
  4. Select Offline Address Book tab
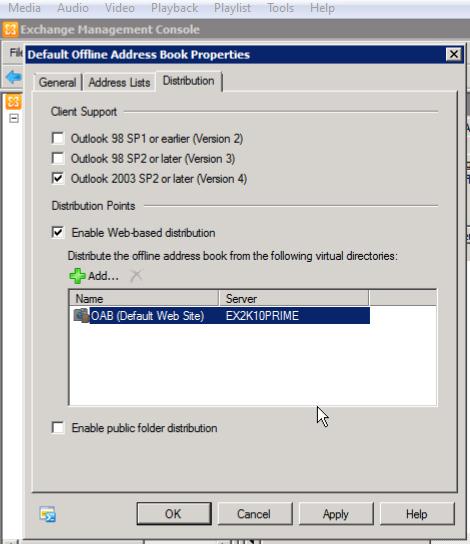
  5. Select the Default Offline Address book, ->Actions -> Properties -> Distribution tab
  6. Make sure Enable Web-based distribution is On (checked)
  7. Enable public folder distribution (On/checked) -> ok

Warning (ok)

In the actions pane click Move

Click Browse -> Select the new Exchange 2010 server -> Move

Completed (Warning) -> Finish

Generation server should now be your new 2010 server.

Online Mailbox Moves:

  • Previous transitions called for mailboxes to be offline for a period of time while they moved to the new server
  • Exchange 2010 eliminates this issue by allowing the mailbox to be moved while still online. Note: If transitioning from Exchange 2003 to 2010 you will still need to do an offline mailbox move
  • To the user, short of a restart of Outlook, they will not know a difference or notice any loss of service
  • Need to use the wizard or new powershell cmdlet New-MoveRequest

You need to start on the new Exchange 2010 server to move mailboxes from 2007 to 2010

Start Exchange Management Console

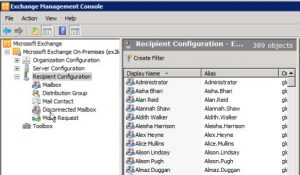
Go to Recipient Configuration node -> Mailbox

Add a column (Database) and place next to the display name

Select multiple users -> Actions -> New Local Move Request…

Target Mailbox Database (Browse) -> Select new 2010 server DB -> ok -> Next

Move options:

If corrupted messages are found:

  • Skip the mailbox (recommended)
  • Skip the corrupted messages
Next -> New -> Finish
Move Request -> If you look at the status it should say completed
Using the exchange management shell: (more flexibility and control)
get-help new-moverequest -examples
(3 examples)
System will perform check of mailbox for readiness
>New MoveRequest Identity ‘[email protected]’ -TargetDatabase “MBEX2K10”
To test
>get move-request
-shows which move requests have been completed
For example to move just mailboxes from one organizational unit into exchange 2010

> get user organizationalunit LegalDept | New MoveRequest -TargetDatabase “MBEX2K10”

Replicating Public Folder Structure:

Once we have replicas we can remove the original copy

Go to Toolbox – Public Folder Management Console – should connect back to your 2007 exchange server.

We first need an Exchange 2010 Public Folder database:
Organization Configuration under Mailbox

Database Management Tab -> Actions -> New Public Folder Database

Give it a name (2K10PF) -> Next -> New -> Finish.

Go back to PF management console -> Right click on folder and choose properties -> Replication tab -> Add -> Select new 2K10PF database -> OK

Change “Use public folder database replication schedule” to Run Every Hour.

Now we’ve asked the public folders to replicate over. One way to check if it’s working ok is right click on the root, and choose connect to server, select 2010 server, and find the replicated folders (update Heirarchy)

Now you can remove 2007 replicas. Make sure you have complete all public folders.

2007 Exchange Pre-Removal Tasks 

  • If you are confident that your Exchange 2010 server(s) are ready to work alone – don’t uninstall the Exchange 2007 server yet…
  • In the EMC Toolbox is the Exchange Best Practices Analyzer – use it!
  • Use the Exchange Remote Connectivity Analyzer Tool is another option
  • When your testing is complete and you feel comfortable — Uninstall Exchange 2007 from the Programs and Features item in the control panel

Decommissioning is simply removing the Programs and Features. It will go through the process of uninstalling the various roles (MB, CAS, etc)

We have ended the period of coexistence, and have transitioned over to 2010.


A good majority of the content provided in my Blog’s Exchange series is derived from J. Peter Bruzzese’ excellent Train Signals Exchange Server 2010 Video Disk Series, as well as my own Exchange 2010 lab. Trainsignal.com is an invaluable source for accurate, easy to understand, IT information and training. http://www.trainsignal.com
Exchange 2010: Exchange Management Console (EMC) – Part 8

A quick overview of the Exchange Management Console, or EMC; a very capable management console accessed via the OWA web interface.

We can access the EMC through Outlook Web App. On the Exchange Mailbox server itself, you can get to OWA through the address https://localhost/owa

Note: I encountered an issue here. When first logging into OWA I received the following error message: “Your mailbox appears to be unavailable. Try to access it again in 10 seconds. If you see this error again, contact your helpdesk.”

My first instinct when I receive a message like this is to check services. Yes, as I suspected, upon viewing my primary Exchange server services, the Microsoft Exchange Server Information Store Service was not started. I started the service manually, logged into OWA again, and found I could now completely log in and see my OWA inbox.

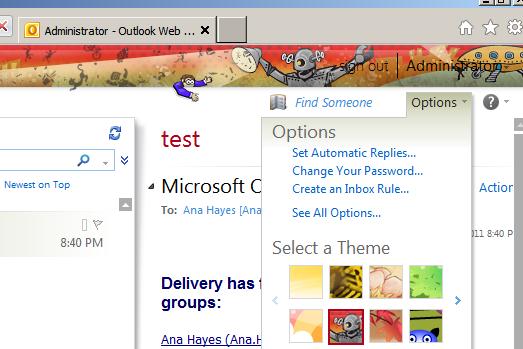
Once inside the administrator’s mailbox, you can manage the organization by clicking on the Options drop-down in the upper right-hand corner, and then on “See all options…”

ManageOptions
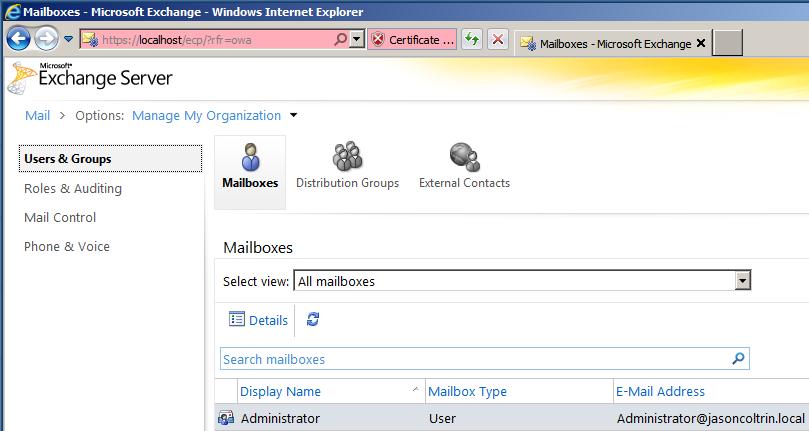
Now that you’ve clicked into all of the options, you will want to change the Mail > Options: “Manage Myself” drop-down to “My Organization”. You are now in the Exchange Management Console.EMC

Once inside the EMC you have the following Options:

  1. Users and Groups – contains Mailboxes, Distribution Groups, and External Contacts
  2. Roles and Auditing – contains Administrator Roles, User Roles, and Auditing. There are some nice Auditing controls available here including * Run a non-owner mailbox access report… * Run a litigation hold report… * Run an administrator role group report… * Export Mailbox Audit Logs… * Export the Administrator Audit Log…
  3. Mail Control – contains Rules, Journaling, and Delivery Reports
  4. Phone and Voice – contains ActiveSync Access (Quarantined Devices and Device Access Rules); and ActiveSync Device Policy
Take note that Multi Mailbox Search (which is under mail control in RTM). RVAC, even the admin is not able to see the Multi Mailbox Search; you have the add the administrator into the Discovery Management Role Group. Once added to that group, you will see MultiMailbox search in the Administrators EMC.


A good majority of the content provided in my Blog’s Exchange series is derived from J. Peter Bruzzese’ excellent Train Signals Exchange Server 2010 Video Disk Series, as well as my own Exchange 2010 lab. Trainsignal.com is an invaluable source for accurate, easy to understand, IT information and training. http://www.trainsignal.com
Exchange 2010 – The Exchange Management Console and Shell – Part 7

* There are 3 tools for managing Exchange. 1. The Exchange Management Console, 2. The Exchange Management Shell, and, 3. The Exchange Control Panel, which is accessed through Outlook Web App (OWA)

* We will first look at the use of the EMC and explore its various nodes, panes, and actions we can perform

* Then we’ll look at the purpose of PowerShell and the EMS, focusing on how commands are formed using cmdlets and how they are made more complex and useful through pipe-lining.

The EMC has 4 primary interface elements:

  1. Console Tree
  2. Result Pane
  3. Work Pane
  4. Action Pane
The EMC is based on MS MMC 3.0 and the GUI version used for Exchange.
Organization Configuration
Server Configuration
Recipient Configuration
Under Server Configuration, when you click on Mailbox, Client Access or Hub Transport, you’ll notice that there are two middle panes. A results pane and a work pane.
The Actions pane can be turned off by clicking Show/Hide the action pane button on the toolbar. When you turn it off, you can still perform functions by right-clicking on objects.
One thing to note in the Console Tree is that you have by default the “Microsoft Exchange on-Premises.” It is designed so that you can manage Exchange Servers in the cloud.
The Exchange Management Shell is a requirement for Exchange Administrators (and there are questions about it in exams). Learning PowerShell is not an option, it is a necessity.
The EMS is built upon PowerShell (PS)
  • PS is both a command-line tool and a scripting platform.
  • Exchange 2010 requires PowerShell v2.
  • PowerShell commands are built using cmdlets
  • Through PowerShell commands, you can manage EVERY aspect of Exchange, whereas the EMC you can manage ALMOST every aspect of Exchange
Local Shell and Remote Shell
  • The EMC allows you to make configuration changes to the Organization or to individual Servers. In Exchange 2007, you could only run the POwerShell compone3nts on the local machine.
  • With Exchange 2010 you can connect to a remote session on a remote Exchange 2010 system.
  • When you open the EMS it connects to the closest exchange session
  • you cannot connect remotely to an Edge Transport Server
  • Remote Sessions are created using the New-PSSession and Import-PSSession cmdlets
What are CMDLETS?
  • Simple verb-noun structure
  • Common verbs are : Get, Set, Remove, Test, Enable, Disable, Install, Uninstall, New and Move
  • Pipelines | help to string cmdlets together
  • Examples:
  • Get-Mailbox
  • Get-MailboxStatistics <Mailbox>
  • Get-Mailbox -OrganizationalUnit Sales
  • Get-Mailbox | Set-Mailbox -prohibitsendquota 500MB (this will take every mailbox in the organzation and set the prohibit send quota to 500MB – manually would take forever!
The Exchange Management Shell contains modules we need. You can import them into PowerShell, but the EMS already is loaded.
Try for example:
>get-excommand – quite a number of different cmdlets! To investigate how to use one of these commands?
>get-help test-systemhealth
This outputs
Name:
Synopsis:
Syntax: (might want to port out to txt and print)
Description:
Related Links:
Remarks: (Examples)
>Get-Service -> shows all the services running on our system
>Get-Mailbox ->  shows all the mailboxes on the server – names, where they reside, quota.
To narrow down to the sales org unit use:
>get-mailbox – OrganizationalUnit Sales
>Get-MailboxStatistics jason.coltrin
shows last login time, storage stats, etc
>get-mailbox -OrganizationalUnit Sales | Set-Mailbox -ProhibitSendQuota 500MB
To give a number of users mailbox with one line of code you can do the following:
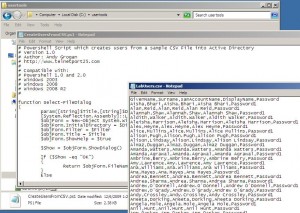
Andy Grogan created a script to create (fake) users on a domain. You can create several hundred users.
Go to UserTools, and you can see a .csv file which contains basic info for creating users. You can change these, and use your real names and create an entire domain of your users.
The script will create an Organizational Unit called “Exchange Users”
You can download the script here:
and here is a screenshot of the script and .csv files:
Click image to enlarge
Run the powershell script within powershell, and you should see the users scroll down the screen as they are created.
Now that the users have been created, go to your Mailbox server and go to Organization Configuration -> Mailbox -> “MailboxDatabase” is the database where we will be placing our new users. We will use the ExchangeUsers OU to help build mailboxes for our lab users.
Under Recipient Configuration, we do not yet have users listed. We do not have mailboxes for them.
Go to the EMS and type in the following command:
> get-user -OrganizationalUnit ExchangeUsers | where-object{$_.RecipientType -eq “User”} | Enable-Mailbox -Database “MailboxDatabase”
Now that your users have been given mailboxes, goto OWA at https://yourdomain/owa , log in as one of the users and test sending/receiving to the administrator.

Configuring SonicWall TZ210 and XP/Vista/7 client with RDP passthrough

Clients on your network may wish to work from home. While there are alternatives like GoToMyPC or LogMeIn, this is a free alternative. You will need spare public IP addresses that you can configure your domain’s DNS and your SonicWall to allow RDP traffic to clients on your LAN.

1. Ensure the client has RDP enabled. On the Windows PC, go to System Settings and then the Remote tab and make sure “any RDP client” is allowed access. Some of your clients may be using Macs and do not use Windows RDP clients. Also, it’s best to narrow down access to only particular user accounts (the user and administrator). Once RDP is enabled be sure to test connecting from a different client within your Local Area Network. If you can’t RDP into the client from within your LAN, you sure won’t be able to get to the machine remotely!

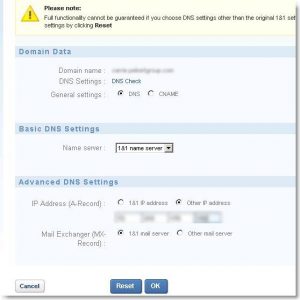
2. Go to your Domain Registrar and setup a sub domain for your user. In this example, I’m using my.1and1.com. Once logged in, click on “Domains”, then click on “New” and then “Subdomain”. Give the subdomain a friendly name. In this case I am using Julie.domainname.com. Once the subdomain has been added, place a checkmark next to the new subdomain, and then click on the DNS button dropdown and click Edit. Under Advanced DNS Settings -> IP Address (A-Record) : Change the radio button to “Other IP Addresses”. Enter in the Public IP address you want specified for the client. Make sure you record the IP address, because we will be using it again soon on the SonicWALL. As far as DNS replication is concerned, I’ve found that it takes place pretty quickly, if not 5 to 10 minutes for the new address to be resolved.

click image to enlarge


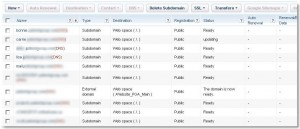
3. You should now see the entry along with the rest of your domain’s records. That should take care of the external DNS side of things.

Click Image to Enlarge


4. Now log into your SonicWALL and browse to Network -> Address Objects. Here we will create two new address objects. “Username_Computer Private”, and “Username_Computer Public”. Click on the Add… button.

— For Username_Computer Private use:

Name: Username_Computer Private

Zone Assignment: LAN

Type: Host

IP Address: (Internal IP Address 192.168…..)

— Click the Add… button again for Username_Computer Public:

Name: Username_Computer Private

Zone Assignment: WAN

Type: Host

IP Address: (External IP address you created in your Domain’s registrar)

5. Now that the Address Objects have been created, we can move on to Services. On the sonicwall, browse to Network -> Services.

Click on Add Group. In the Name field, type in “Username Computer Services”. Then find Terminal Services in the list on the left side of the screen, and add it to the right-hand pane and click OK. That’s it for this part.

6. Now we are going to add NAT policies for our Network. Browse to Network -> NAT Policies.

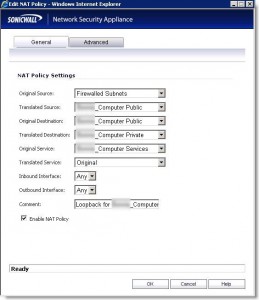
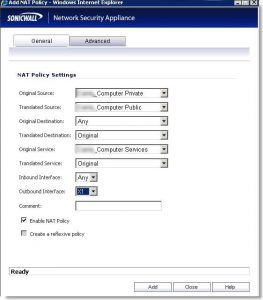
First we are going to want to add a Loopback policy which should look like the following:

click image to enlarge


Be sure to add a comment “Loopback for Username_Computer”

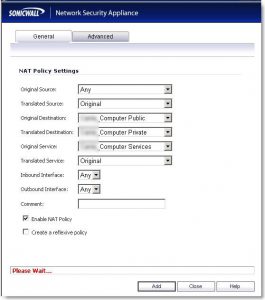
Next, we’ll add Private to Public Translation which will look like the following. Make sure your Outbound interface is your WAN interface, typically X1:

click image to enlarge


Next we’re going to do Public to Private Translation:

click image to enlarge


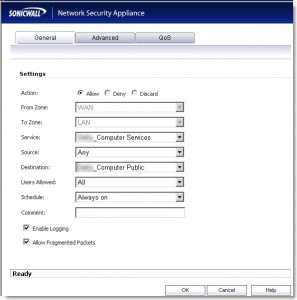
7. Lastly, we’re going to configure the firewall to allow traffic. Go to Firewall – Access Rules -> WAN to LAN which should have the following settings:

click image to enlarge


Action: Allow

From Zone: WAN

To Zone: LAN

Services: Username_Computer Services

Source: ANY

Destination: Username_Computer Public

Users allowed: All

Schedule: Always On


That should do it! You can now test by trying to RDP from any computer using the friendly subdomain name you setup with your domain’s registrar. If you are prompted for a username and password, your subdomain name and firewall are configured correctly.

Perhaps you may want to email your users the following instructions to assist them in connecting to their PC at work:

Greetings, you now have the ability to access your work PC from home. Before you try connecting for the first time, make sure you have the following:
1. A stable DSL, Cable, WiFi, Satellite, or 3G/4G internet connection (no dial-up).
2. A PC running at least: Windows XP with Service Pack 2 or Service Pack 3, Windows Vista, or Windows 7. To find the RDP client on a Windows PC, go to the Start button, then Programs, Accessories, Remote Desktop Connection.
3. A Mac with at least OSX and a Terminal Services (RDP) client. There are some free RDP clients like CoRD, or TSclientX that you can download and install on your Mac.
4. Up-to-date Anti-Virus protection.
If you’re going to access your work PC from your home PC, you will need to start up an RDP client on your home PC. Type in the friendly name for the PC at work for the “computer” name (give the user their friendly name somewhere in the email). For example, Scott would start an RDP session at home and use “Scott.DomainName.com” (without quotes) as the name of the computer he’s connecting into. When you’re prompted for your username and password, put in the domain name followed by a backslash and your username. In Scott’s case, the username is: DomainNameScottH. Then type in your password and click the Connect button. You may be prompted to login again. Simply login again using the same credentials you would normally use, as if you are sitting in front of your PC at work.
In our experience, there are some things to look out for when using Terminal Services:
1. You should only print to the printers connected to your PC at work. Trying to print to your printer at home may or may not work, and trying to do so may cause your session to hang or disconnect. If you have to print to your printer at home, you may want to email yourself the file. Also, trying to transfer files to and from your Home PC or Mac with your Work PC is slow and cumbersome. It’s best to leave work files on your PC at work.
2. Your session should stay active for long periods of time. If you are consistently losing your connection, you may need to speak to your ISP to see if there are interruptions in your service.
3. You can only RDP into your PC at work if it is powered up. PC’s at work that are set to sleep, hibernate, or shut down after a period of inactivity may not be accessible. If you plan on using your work PC from home, make sure it’s powered up and not set to automatically shutdown/sleep/hibernate.
“The Management”


Exchange 2010 SP1 Installation – Part 6

Exchange 2010 SP1

Exchange Team Points For Deployment Prepraration

The installation of SP1 can be very frustrating, despite it’s great features. There is always some side-IIS elements that were not installed, and they need to be installed before you can move forward. The hotfixes are the key. When you start with an OS, e.g. Server 2008 R2, make sure you first have all of the OS updates installed. Visit Windows Updates and make sure you install any that are available. Then you want to visit the Microsoft Exchange Team site and find all the hot fixes for your Exchange 2010 installation. Make sure all of those hot fixes are installed as well. Then, even though you can install roles and features with checkboxes, it’s better to use the import-modules servermanager commandlet with PowerShell and copy the text for installing roles and features.

Do a google search for “Install Exchange 2010 SP1” and go to the EHLO blog. http://blogs.technet.com/b/exchange/archive/2010/09/01/3410888.aspx

Go to the Upgrade order if you’re going to upgrade from 2007.

Use the Matrix of Updates Required chart. Use the chart and don’t just go with what the Exchange installer tells you. You don’t want to miss one; you may be shown that you finished completely, but end up having to go back to ADSI edit etc. So make sure you have the hotfixes based off the chart.

In my case, all of the updates in the matrix were not required by my system, and the SP1 install went well with my latest install. After the SP1 install, it’s a good idea to install the update roll-up #5 released by Microsoft here:

http://www.microsoft.com/download/en/details.aspx?id=22090

After the update roll-up has been installed, be sure to check Windows Update a few times to ensure you have the latest patches and updates.

After SP1 is installed, and the updates have been installed as well, open up the Exchange console, click on the Organization Configuration, and then Mailbox, and you should see two new Retention tabs:

ExchangeSP1
Click image to enlarge


A good majority of the content provided in my Blog’s Exchange series is derived from J. Peter Bruzzese’ excellent Train Signals Exchange Server 2010 Video Disk Series, as well as my own Exchange 2010 lab. Trainsignal.com is an invaluable source for accurate, easy to understand, IT information and training. http://www.trainsignal.com
Exchange 2010 Installation Part 5

Absolute Necessities for Exchange 2010

  • You need an Active Directory Domain in place
  • You need a solid DNS infrastructure
  • You can technically install Exchange 2010 on a server that is your Active Directory Server and your DNS server (case in point, Small Business Server)

Typical or Custom Installations:

Exchange 2010 can be deployed through either a Typical or a Custom Installation

1. Typical: will install the Hub Transport, Client Access and Mailbox Server roles

2. Custom: You can install one server type, or some, or all of the roles

  • If you install the Edge Transport (greys out other roles), you cannot install other roles. Can only exist on a DMZ
  • If you are installing one of the other roles, you can combine them together (you may install them on separate servers all together.)
  • You don’t need the Unified Messaging Server role in order for your organization to function. The same with the Edge Transport server, not required but is recommended by Microsoft to provide better protection for Exchange.

The installation itself is fairly typical, and if your prerequisites have been installed you should not encounter any errors.

After installation, if your Exchange server is not licensed, you will have approximately 120 days to activate or license the server.

Be sure to check for critical updates for your exchange server after installation. If you don’t see any updates for exchange in Windows Update, even after a reboot, you may need to start the Exchange Setup.exe Installer again, and click on “Step 5: Get critical updates for Microsoft Exchange”. This is the only way I could force Windows/Exchange to find new updates, for example Exchange Update Rollup 5 for Exchange Server 2010 KB2407113.


Exchange Updates
Click Image to Enlarge


Everything we need installed for a working Exchange environment has been accomplished.

When starting the Exchange 2010 Management Console, we are not simply opening it for this server, but for our Exchange Organziation. Whether on a single server, or a multitude of servers, the console will manage the entire Exchange Organization system.

For the Edge Transport Server

We will install Active Directory Lightweight Directory Services. Even though the Edge Transport Server is not a part of the AD (for our own safety) it still requires a directory to work with. We can install it via the GUI, or through the PowerShell.

For the Edge Transport server, we will use the code:

> import-module servermanager

> Add-WindowsFeature NET-Framework, RSAT-ADDS, ADLDS -Restart

When running the command you may receive the following result error:

PS C:UsersAdministrator> Add-WindowsFeature NET-Framwork,RSAT-ADDS,ADLDS -Restart
Add-WindowsFeature : ArgumentNotValid: Invalid role, role service, or feature: 'NET-Framwork'. The name was not found.
At line:1 char:19
+ Add-WindowsFeature <<<<  NET-Framwork,RSAT-ADDS,ADLDS -Restart
    + CategoryInfo          : InvalidData: (:) [Add-WindowsFeature], Exception
    + FullyQualifiedErrorId : NameDoesNotExist,Microsoft.Windows.ServerManager.Commands.AddWindowsFeatureCommand

Success Restart Needed Exit Code Feature Result
------- -------------- --------- --------------
False   No             Invali... {}

If you receive this error, it means that the prerequisite, .NET Framework 3.5.1 is required. See screenshot below. An easy way to install the prerequisite is to use the GUI role installation feature, which will prompt you to install the framework. Be sure to apply all critical updates and service packs to .NET prior completing the installation of Lightweight Directory Services; remember, this is your public-facing computer.

Click image to enlarge


Once .NET and the rest of the Edge Transport role is installed, you’ve rebooted, updated and have rebooted again, now would be a good time to backup the Edge Transport server with either a bare metal/VM system snapshot. Although snapshots are beneficial, an Edge Transport XML export/backup should be performed as well on a regular basis. I exported my first as Edge_BaselineXML.

A very useful article on backing up and restoring the Edge Transport Server can be found here: http://exchangeserverpro.com/exchange-2010-edge-transport-server-backup-and-recovery

Note: The Windows Backup feature is not installed by default on a newly installed Server2008 R2 installation. You can quickly install the backup feature at the powershell using the following two commands:

> import-module servermanager

> add-WindowsFeature backup

When logging into the Edge Server, and launching the Management Console, I encountered the following error:

[ERROR] Provisioning layer initialization failed: ‘Active Directory error 0x8007052E occurred while searching for domain controllers in domain

The problem was that I had logged into the local machine only and not the domain, and when trying to run the console, it was not logged in as a domain user. I logged off, logged back in as DOMAINAdministrator, and then found the Management Console to work correctly and identify my machine as an Edge Transport Server.

Another error I hit was the following:

The following error occurred when searching for On-Premises Exchange Server:

The term ‘C:Program FilesMicrosoftExchange Server V14BinConnectFunctions.ps1′ is not recongnized as the name of a cmdlet, function, script files, or operable program. Check the spelling of the name, or if a path was included, verify that the path is correct and try again. It was running the command’. ‘C:Program FilesMicrosoftExchange ServerV14BinConnectFunctions.ps1’

(Click here to retry)

By following the workaround here: http://blogs.technet.com/b/nawar/archive/2010/09/03/exchange-management-shell-ems-missing-after-applying-exchange-2010-sp1.aspx I was able to continue with the configuration and open up the Exchange Console. However, all roles were available, which is incorrect. We should only see the Edge Transport role. After re-installing only the Edge Transport Role through the Exchange Setup, I now have the Edge Transport Role up and running. The Exchange Management Console should show only the Edge Transport Role on the Edge Transport server itself.

Click Image to Enlarge


This makes it clear what we’re working on. We’re on an Edge Transport server and that is all we can work on.

At this point we now have the ability to send mail internally from one mailbox to another. We do not have the ability to send email to the internet or from the internet because we have not configured DNS, or our Send/Receive connectors. We will save these tasks for a different post.


A good majority of the content provided in my Blog’s Exchange series is derived from J. Peter Bruzzese’ excellent Train Signals Exchange Server 2010 Video Disk Series, as well as my own Exchange 2010 lab. Trainsignal.com is an invaluable source for accurate, easy to understand, IT information and training. http://www.trainsignal.com