This video shows you how to setup a user account for your kid/child without creating an email address. Windows 10 wants you to use an email address to create a user account. When you try to setup an account, it asks you to use an existing email and if not, it tries to force you to sign up for an outlook.com account. This video shows you how to bypass the Windows User account setup and use Computer Management to create a normal/local user account on Windows 10 Pro version for your kids.
Microsoft Bizspark – free business software for 3 years
If you’re thinking about which cloud service to use for a startup business, Microsoft just upped the ante with BizSpark.
Microsoft BizSpark https://www.microsoft.com/bizspark#start-two is really an amazing deal for business start-ups. If you wish you could get Microsoft software for free or for a huge discount check out their offer. BizSpark offers the following services and software for free for three years:
BizSpark gives startups 3 years of free stuff – software, services, tech support, and Azure cloud. Your startup qualifies if it is less than 5 years old, is privately held, and earns less than $1M annually. And at the end of your 3 years, you keep all the software you’ve downloaded – at no cost.
To expand on this service what you get with the Microsoft Bizspark details are the following:
Get up to $750 per month of FREE Azure cloud services for 3 years; that’s $150 per month each for up to 5 developers.
This potentially is a $27000 value!
Membership puts all Microsoft development and test software at your fingertips, including Azure, Windows, and Office 365 – for free. Plus, enjoy access to hundreds of free training classes, technical content, and 4 break-fix phone support incidents to help you on your journey.
It’s pretty amazing that BizSpark, in addition, also offers up to $120,000 worth of Azure credit.
Makes me want to go out and start a new business – hmm, maybe jasoncoltrin.com would qualify?
Moodle 2.4 – Recover uploaded course files from server even if corrupt
If for example, a new faculty member does not have the original files for an old moodle course, and the files uploaded to moodle the last semester are corrupt, you still can extract the files from a backup of the course with a tool I found here: DownloadAll
(DownloadAll.jar – cudos and thank you to OP Veronica Liesaputra !):
In order to extract all files from a course backup mbz file, please follow the guide below. Even if the files that were uploaded and are corrupt, and cannot be viewed/downloaded in moodle, you may be able to download the originals, repair the files, and then re-upload to moodle again:
-
-
Go into the course where files are located (may be in an old location, even though current/copied course is valid with same corrupt files)
-
-
-
Backup the course without user data. An mbz file will be generated. Copy this file to a Windows computer eg. c:\Users\jcoltrin\Desktop\moodlebackups\coursename.mbz
-
-
-
Copy the linked jar script to the same folder
-
-
Make sure 7zip is installed. Extract all the files in the mbz file to a directory with the same name just under the location of the mbz file. The script will not work unless you first extract all the files! For example, your folder structure will now look like this:
   Desktop\
     moodlebackups\
          DownloadAll.jar
          backup-moodle2-course-269-1509-bus302-va-20160114-1-28-nu.mbz
          backup-moodle2-course-269-1509-bus302-va-20160114-1-28-nu\
                   activities\
                   course\
                   files\
                         1b\
                              1b23cd2aaf9c0e8829407fc46c6b4b4c4f8d1a7c
                         3d\
                              3ddb69ac1035d0a51c4d1a3e767391d21f70c895
                   sections\
                   files.xml\
… This step may take a little bit of cut/paste as the mbz file has to be extracted twice with 7zip.
-
-
Run the DownloadAll.jar script with the command java -jar DownloadAll.jar (PS C:\Users\jcoltrin\Desktop\moodlebackups> java -jar DownloadAll.jar)
-
-
You’ll be prompted to enter the full path to the mbz file: “Enter the full path location to the Moodle’s backup (.mbz) file, e.g. C:/Users/Moodle/Backup/backup-moodle2-course-592-nu.mbz” – so in this case, I used: C:\Users\jcoltrin\Desktop\moodlebackups\backup-moodle2-course-269-1509-bus302-va-20160114-1028-nu.mbz
Output should return the names of the files that are recovered and start extracting (files even though errors occur):
       C:\Users\jcoltrin\Desktop\moodlebackups\backup-moodle2-course-269-1509-bus302-va-20160114-1028-nu created
       IOError :java.util.zip.ZipException: error in opening zip file
       Copy C:\Users\jcoltrin\Desktop\moodlebackups\backup-moodle2-course-269-1509-bus302-va-20160114-1028-nu\files\74\74ada129
       b720c6266753b54e5c5af614274bfcfe to C:\Users\jcoltrin\Desktop\moodlebackups\backup-moodle2-course-269-1509-bus302-va-201
       60114-1028-nu\Legal StructureLawsuits .pdf
       Copy C:\Users\jcoltrin\Desktop\moodlebackups\backup-moodle2-course-269-1509-bus302-va-20160114-1028-nu\files\6d\6db0919b
       e36df971bd7780defd8802ba119d4e80 to C:\Users\jcoltrin\Desktop\moodlebackups\backup-moodle2-course-269-1509-bus302-va-201
       60114-1028-nu\Sample-Negligence-Complaint.html
7. Once files have completed Extracting, gather the files and distribute as necessary.
8. In this case, many of the files that were corrupt in moodle had contained spaces in the filenames. I find that files uploaded to moodle work best with filenames that do not contain spaces or special characters. Also it’s smart to test opening each file in moodle first, to make sure repairs and download actions for each file work correctly.
Solved – Dell Optiplex 790 2nd HDD disk drive not found in Windows 10 Disk Management but BIOS sees the drive

I have a Dell Optiplex I’m putting together for an IP Camera security system. The security cameras use a lot of disk space, so I connected a 2nd Seagate 2TB drive to the black SATA port labeled SATA1. The BIOS sees the drive, but when I logged into Windows 10 and looked in Disk Management, the drive wasn’t found. If the new hard drive isn’t in Disk Management, but the BIOS does see the drive, there’s something wrong with either the BIOS / SATA / RAID configuration, or there’s something wrong with the drive itself. I attempted to Scan for Hardware Changes in the Device Manager – no luck. I also went into Disk Management -> Action -> Rescan Disks -> no luck.
Here is the SATA Port layout:
SATA 0 (Blue) – Primary HDD 500GB Seagate ST3500413AS
SATA 1 (Black) – Secondary HDD 2TB Seagate ST2000DM001-1CH164
SATA 2 (White) – CD / DVD
SATA 3 (White) – empty
I went to Dell’s support website, ran the System Detect (for some reason entering the Service Tag didn’t work) and then went to look at the available drivers. I was thinking of updating the BIOS from A09 to A18, but then noticed under Serial ATA there is a Seagate Firmware update named B765JC49.zip – unpacked is 2 folders, DOS and Windows, in the Windows folder is the file B7032100.exe – this is the file I installed. During the setup, the computer is restarted, and like most firmware utilities (I love these), you get a nice old-school 8-bit text interface with a resounding SUCCESS in big blue letters when it’s done.
So this was really all I did, and after flashing the Seagate Firmware, and logging into windows, immediately the drive was detected and prompted me to initialize and format the disk. So I did just that; initialized the drive as MBR, then changed the CD-ROM to drive letter E:, and formatted the new drive as NTFS on drive letter D: labelled as “Data”. Life is good again. Hopefully this post will be found by someone else having difficulty when their computer doesn’t see the new 2nd disk drive and save them a little time and frustration in the process.
Modern PHP development environment – Setup of Ansible, pycharm, sourcetree and workflow with bitbucket
When getting started with development with a cloud repository such as git, it may be a little daunting to decide how to get started. With some help from an associate, I put together a short simple guide to setup a development environment on OS X. I hope this information provides someone with a good start to development with bitbucket, version control, and PHP Development in conjunction with a cloud repository.
Bitbucket is similar to git, but allows free repos. We prefer to use bitbucket for a repository of code so that we can manage changes to our ubuntu servers and files. Bitbucket is the “Book of Truth” and will be the keeper of all files and things that are good. Ansible runs on a dedicated management ubuntu server and pushes out changes (playbooks) to either a single, a few, or all of our linux servers. Either way, with pull/push of data from our code repository, we can control what is deployed on our systems, an use our repo as our backup. If a server dies, we can setup a new system, and pull in the good data.
Setup
First, you need a bitbucket account and sign-on. Once signed on to https://bitbucket.org/brooksinstitute/ You should be able to create your first repo. You might want to create your own private repo for notes, configs etc. As mentioned earlier, bitbucket is where we keep our known-good source code, and changes to this should only be done from your own computer’s copy of the repo, and only changed with commits – more on this later.
sourcetree
Next on your local machine, download sourcetree https://www.sourcetreeapp.com/
Once downloaded and installed, tell sourcetree where your repos live at bitbucket (simple username/password login).
Next, SourceTree will ask you which remote repository you want to clone to your local machine. You want to clone the remote repos on bitbucket so that you can make changes to your local versions before you commit them back to bitbucket. If you work with a group of developers you will probably want someone to review your files before you commit. You should also “checkout” local copies within pycharm, if someone else will also be working on your local files.
pycharm
Now it’s time to install and configure pycharm Community Edition https://www.jetbrains.com/pycharm/ . Pycharm is a Development Environment (IDE) that provides code completion, nice pretty colors and integrates with VCS/Git to do versioning control of your local (cloned) repo. In Pycharm, you want to go to the File → Open menu, browse your local machine, and choose the root folder of the cloned repo of your choice. This will get you to the point where you can begin to edit files.
ansible
Ansible http://www.ansible.com/ is a management utility that helps you easily manage systems and deploy apps. Here is some introductory documentation http://docs.ansible.com/ansible/intro_getting_started.html. Ansible usually runs on a dedicated Admin server, and this is the server that issues commands or “playbooks”. Although your Admin server contains the ansible playbook files, we only want to make changes to the files linked to the bitbucket repo before we pull them into the Admin server and then execute the commands.
Vagrant
Vagrant https://www.vagrantup.com/ provides easy to configure, reproducible, and portable work environments built on top of industry-standard technology and controlled by a single consistent workflow to help maximize productivity. First download, install, and run VirtualBox https://www.virtualbox.org/wiki/Downloads , then open a terminal, and startup a vagrant “box” with the following:
   $ vagrant init hashicorp/precise32
   $ vagrant up
Vagrant will download and install the ‘precise32’ “box”. And now, in virtualbox you will see the new virtual machine. Then next from the command line you can issue the command ‘vagrant ssh’ which will open a shell to your new precise32 vm. You can use this vm to test your configurations and playbooks against before you roll them out to your production servers.
Workflow
When you’ve changed something in your local (cloned) repo, and you want to have that become the “truth” on bitbucket, do the following:
-
Open the file from your local repo in pycharm (double-click on the file icon in the menu tree)
-
Edit the file
-
When done editing, right-click on the file → Git → Commit file
-
Now you want to push this edited file up to bitbucket. Review the code, make comments and then push.
How to create and shrink partitions in Windows 10 – video
I’ve posted a new video here that demonstrates how to shrink an existing partition with Disk Management and then create a new partition with the empty space in Windows 10.
Sometimes you’d like to have a separate partition for data or scratch drives to keep your data safe when you run backups or re-install an operating system or software. Other times you create new partitions to install a different operating system and do a “Dual Boot” with the extra partition. Let me know if you’d like to see a video or a post about dual-booting Windows 10 and Linux/Debian/Ubuntu.
Suing for unwanted phone calls txts and faxes
I found a great AskMeAnything from a lawyer who sues TCPA violators here: TCPA Lawyer AMA
Here’s a snippit from the post:
About the TCPA
The TCPA was a law meant to protect people from unwanted telephone calls and faxes. It provides for an award of $500-$1500 per call. The rules are a little different depending on whether you’re getting calls on your cell phone, landline, VoIP, or if you’re getting junk faxes. See this quick cheatsheet. Basically:
Cell phones: Prerecorded voice and calls (and texts) made using an “automatic dialer” are illegal without consent. For non-telemarketing calls, the consent required can be oral or written, and simply giving your phone number = consent. For telemarketing, consent must be in writing. Political callers and charities are not exempt. This law also includes debt collectors, even for debt you owe, as well as repeated wrong number calls.
Landlines: Prerecorded telemarketing calls are illegal without express written consent.
VoIP: If you pay per minute or per call, treat like cell phones. If pay monthly for unlimited (or free), treat like landline.
Fax: Unsolicited fax advertisement? Illegal. Faxes also need a detailed opt out notice, even if solicited. If not there? Illegal.
CONSENT CAN BE REVOKED.
EDIT TO ADD I forgot the do not call list. If you receive two or more telemarketing calls in a 12-month period to your cell or landline and your cell or landline number is on the do not call list, that’s a separate violation, and potentially an additional $500-$1500 per call (meaning up to $3000 per call).
Of course, not all calls are worth suing about. Many “companies” that continue to call are scammers spoofing their caller ID that will be impossible to track down and recover from. It’s unfortunate. My short hand? Two of the following must be present to be worth investigating further:
the call must be from a live number (when you call it back it connects you with the company that called);
the caller or the person that answers at the number must identify the company;
a live company website.
With that said, happy to answer any questions you may have. I am a daily redditor…
Spammy phone calls from 281-806-5695, 725-696-3397, 650-722-1909
Apparently I am approved for a large loan for my business, although I don’t even own a business… block these numbers too: 281-806-5695 , 725-696-3397 from yesterday, and from the day before, 650-722-1909 . I wonder why I seem to be getting so many of these spam phone calls when there are heavy penalties for violating the “Do not call” list? Time to check the National Do Not Call registry again and re-register.
If you’re also getting annoying spam calls from these numbers please go to https://complaints.donotcall.gov/complaint/complaintcheck.aspx and file a complaint.
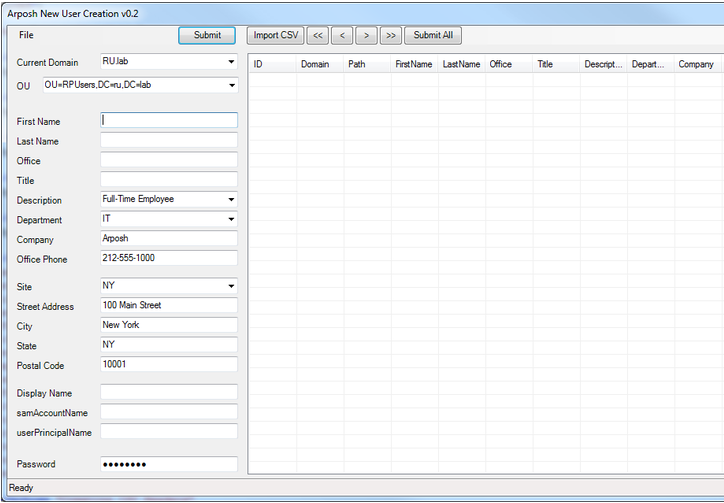
Adding users to Active Directory with a bulk import
One of the tasks a system administrator will probably have to tackle at one point in their careers, is to quickly add a large amount of users to Active Directory. Without too much difficulty or money, one can accomplish the feat using the following powershell script: Active Directory User Creation Tool: http://community.spiceworks.com/scripts/show/1917-active-directory-user-creation-tool
So a quick kudos to [email protected] and Jim Smith for making this tool available for free online.
By following the instructions on the download page, it’s a few hours work to get the xml file and the csv template to work together to bulk import the users into AD.
Download the script, change then name to a .ps1 file and then execute the script with powershell (right-click on the powershell icon and choose “Run as Administrator”.) Because this is an unsigned script, and in case you can’t recall, the command to run first is:
Set-ExecutionPolicy RemoteSigned
One thing to note is when building your csv file, all cells must be quoted. An easier way to do this, rather than struggling with Excel functions, is to use Libre Office.
Open your csv file with Libre Office, do a Save As -> csv -> check ‘use filter’ -> check ‘Quote all text cells’ -> finish save to a new location with a new filename. Then open the file in a text editor to make sure all cells are quoted.
In the XML file, the most difficult part to configure is the canonical name used to populate the OU you want with the users. In our case we used:
Domain=
subdomain.domain.domain.com
Path=
OU=ImportedUsers,DC=subdomain,DC=domain,DC=domain,DC=com
This will make more sense once you are configuring your XML file. Before you do a big bulk import, generate a template with the script/tool, fill out the essential fields with test accounts (first, last, username, password, etc.), then re-import the template, configure your XML file, and then submit the import. Then test your imports with just a few users at a time.
If you can’t find your test user accounts that you imported in Active Directory, you might need to right-click on the root in Active Directory Users and Computers (ADUC) and do a “Find…” then search for the test user accounts. They may have been added to the wrong OU. Again, this will take some tweaking, but at least if you can get the users into an OU, later you can select the users, right-click and choose Move… to put them in the correct OU container.
Once your test accounts are being imported correctly, go back, edit your bulk user lists according to the template specifications, and have at it.
Another issue that came up is that in our source file for our users, we only had the First Name, Last Name in the same cell. In order to split the names into two separte columns, we used the following tips:
Split full name to first and last name with Text to Column command – http://www.extendoffice.com/documents/excel/829-excel-split-first-last-name.html
For the First Name/Last name split, create a temporary column named General to the right of the Last name column
This project on spiceworks looks like it’s actively developed so it might be worth while to contact the developer if you run into any trouble or have a feature request.