Fix ubuntu when the OS will not boot – kernel panic – kernel panic not syncing vfs unable to mount root fs on unknown-block 0 0 – error /boot full remove old kernels from command line

To begin, it will probably take at least 30 minutes resolve this issue…

This fix solved my problem with the “vfs unable to mount root fs” error, but of course your results may vary. As always, first backup your system or do an export of the vm so you have a copy of the system as it existed before you started screwing around with it 😉

After running apt-get update / apt-get upgrade and then a reboot, you may receive the following error: kernel panic not syncing vfs unable to mount root fs on unknown-block 0 0 on ubuntu 16.04.

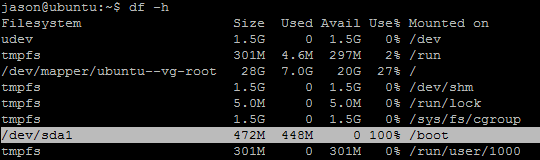
In many cases this  will be due to the /boot drive becoming 100% full because many updates have been made to the kernel. By default, ubuntu will retain the old kernels and add them to the list of available kernels you can boot into in the Grub2 boot loader menu. You can confirm that your drive is full by issueing the command:

df -h

The result will likely show the following:

In order to resolve this issue and boot successfully, while you’re looking at the error during boot, (you should already be at the console), and restart the vm or computer into the Grub2 menu then choose “Advanced options for ubuntu” view where you can see a list of old kernels you can boot into. Some report you can do this booting with the Shift key held down, or in the event it’s a virtual machine, you should be able to arrow-down in the Grub start screen and choose Advanced options for ubuntu on startup:
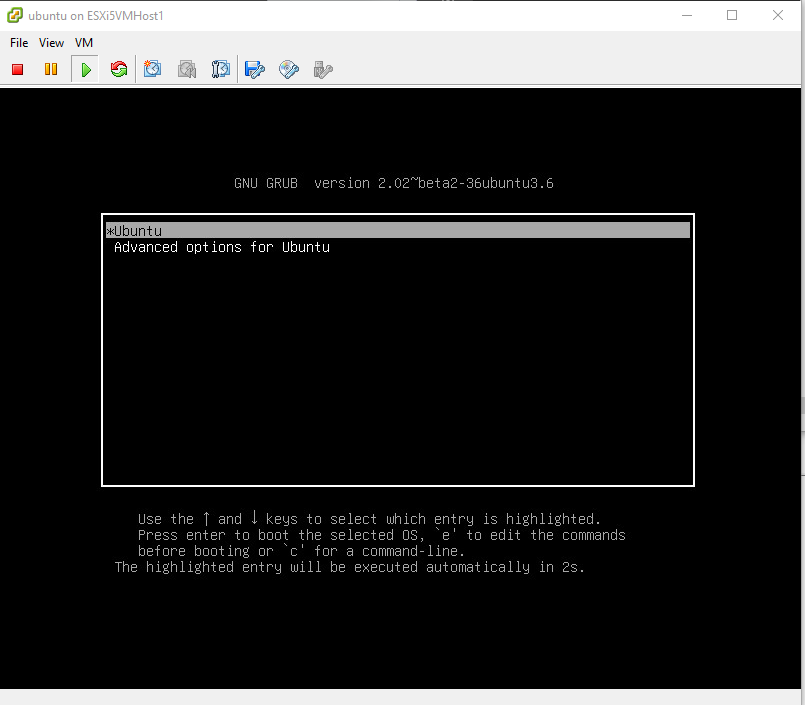
Grub2 boot menu.

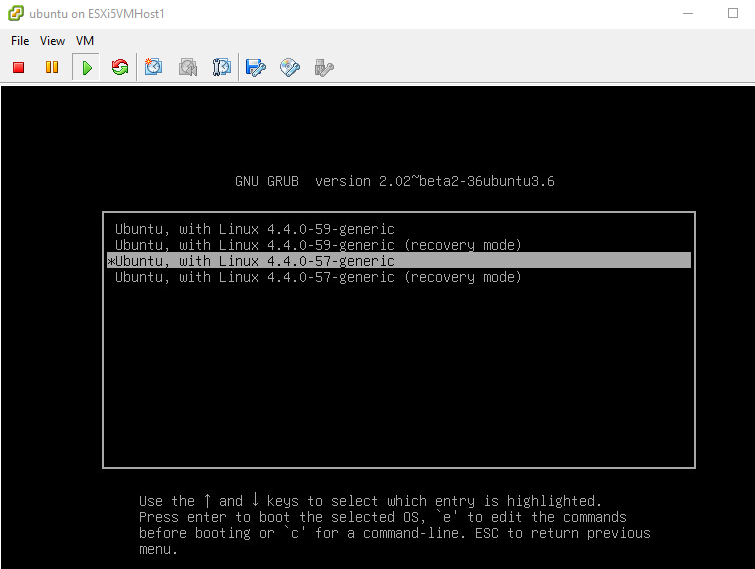
Once you go into the advanced boot menu you will likely see several kernels listed. Choose the next-oldest kernel from the top/highest version of kernels. In my case I booted into the version labeled Ubuntu, with Linux 4.4.0-57-generic (my boot menu screenshot below is clean, but you’ll likely see several kernels listed).

Cross your fingers and hope you get to your login prompt. From here I jumped on putty and connected from that client, as I prefer it over the console.

Next, login and follow the directions that I found here:

http://askubuntu.com/questions/2793/how-do-i-remove-old-kernel-versions-to-clean-up-the-boot-menu

To save you the search, here are the instructions I used to first list and then remove the old kernels:

Open terminal and check your current kernel:

uname -a

DO NOT REMOVE THIS KERNEL! Make a note of the version in notepad or something.

Next, type the command below to view/list all installed kernels on your system.

dpkg --list | grep linux-image

Find all the kernels that are lower than your current kernel version. When you know which kernel to remove, continue below to remove it. Run the commands below to remove the kernel you selected.

sudo apt-get purge linux-image-x.x.x.x-generic

Or:

sudo apt-get purge linux-image-extra-x.x.x-xx-generic

Finally, run the commands below to update grub2

sudo update-grub2

Reboot your system.

sudo reboot

As you can see from my terminal history, I had to remove a few:

589  uname -a
 590  dpkg --list | grep linux-image
 591  sudo apt-get purge linux-image-4.4.0-21-generic
 592  sudo apt-get purge linux-image-4.4.0-22-generic
 593  sudo apt-get purge linux-image-4.4.0-24-generic
 594  df -h
 595  sudo apt-get purge linux-image-4.4.0-24-generic
 596  sudo apt-get purge linux-image-4.4.0-28-generic
 597  sudo apt-get purge linux-image-4.4.0-31-generic
 598  sudo apt-get purge linux-image-4.4.0-34-generic
 599  sudo apt-get purge linux-image-4.4.0-36-generic
 600  sudo apt-get purge linux-image-4.4.0-38-generic
 601  df -h
 602  sudo apt-get purge linux-image-4.4.0-42-generic
 603  sudo apt-get purge linux-image-4.4.0-45-generic
 604  sudo apt-get purge linux-image-4.4.0-47-generic
 605  sudo apt-get purge linux-image-4.4.0-51-generic
 606  sudo apt-get purge linux-image-4.4.0-53-generic
 607  sudo update-grub2
 608  dpkg --list | grep linux-image
 609  df -h
 610  sudo apt-get purge linux-image-extra-4.4.0-21-generic
 611  sudo apt-get purge linux-image-extra-4.4.0-22-generic
 612  sudo apt-get purge linux-image-extra-4.4.0-24-generic
 613  sudo apt-get purge linux-image-extra-4.4.0-28-generic
 614  sudo apt-get purge linux-image-extra-4.4.0-31-generic
 615  sudo update-grub2
 616  df -h
 617  sudo reboot
 618  dpkg --list | grep linux-image
 619  uname -a
 620  sudo reboot

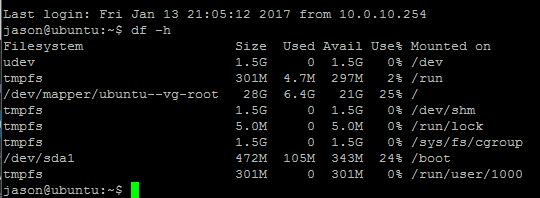
After the reboot, you can see my /boot partition returned to a manageable size:

I hope this post helps someone save some time and help them fix their ubuntu boot problems. Please leave a comment if this helped resolve your issue or if there is a smarter/faster way to fix this problem.

Google Cloud Platform Overview

The pace of global cloud computing is continuing to grow exponentially. While Amazon still holds the lion’s share of cloud services, Google’s Cloud Platform has been growing at the fastest pace. In this article, we’ll first examine what makes the Google Cloud Platform different; provide you with a list of its components, solutions, and features; and finish up by discussing pricing.

Cloud Services trends and opinion

According to a Synergy Research Group study: “In terms of year-over-year growth, Google enjoys the lead at 162 percent, while Azure has grown by an even 100 percent. AWS is in fourth with a 53 percent year-over-year (YoY) growth rate.…

Read the rest of the article here…

Google Cloud Platform overview

Excel slow when entering or putting text into cells old version issue solved

You might run into the problem or issue where it’s really slow when a user enters text into an Excel 2003 2010 2013 .xls or .xlsx cells for certain files. This input delay may be due to and advanced cell fill feature that you don’t really need. You might want to try the following fix:

  1. Open Excel
  2. Go to File -> Options -> Advanced
  3. Go the the “Enable AutoComplete for cell values”
  4. Under this setting uncheck “Automatically Flash Fill”
  5. Click OK

fix-slow-excel-input-delay

Hopefully this will resolve the 3 to 4 second delay when trying to type into excel cells and you can stop going crazy haha.

Adobe Acrobat Reader prints page tiny small backwards in the corner solved solution

If when you print a page from Adobe Acrobat or Reader and the page comes out very tiny as an image in the upper right corner / left corner, you may need to adjust your print settings.

Go to the File menu, the click Print or press CTRL + P on your keyboard. This will bring up your print dialog box. Here, for some (unknown) reason, the checkbox “Choose paper source by PDF page size” may have been checked.

This is likely the reason why the page prints tiny even though you have selected “Actual size” or “Print as an image”.

This took a little bit of trial and error and testing, but unchecking the option “Choose paper source by PDF page size” fixes the very small image of the print job and will again print normally.

How to Install ISC DHCP Server on Ubuntu 16.04

The Internet Systems Consortium (ISC) Dynamic Host Configuration Protocol (DHCP) server is free, open-source, and easy to install. Both enterprises and small networks have used ISC DHCP in production for many years.

In this guide, I’ll demonstrate how to locate your current DHCP server and then install and set up an ISC DHCP server. We’ll then move on to gaining control of your new DHCP server, best practices, monitoring the logs, and setting up static address reservations.

Read the rest of the article here:

Install ISC DHCP Server on Ubuntu 16.04

How to format a large external usb hard drive for use between both an OS X Mac and a Windows 10 PC

All versions of Windows since Windows Vista should be able to access a GUID drive. Because OS X is able to partition a GUID partition, we want to partition our large external hard drives with this compatible partition table. So, any modern computer since 2006 should be compatible. GUID doesn’t suffer from the restriction of a maximum partition size of 2TB, so if we have a hard drive larger than 2TB, we won’t be required to build multiple partitions with MBR.

Here’s a good quote for other important features regarding GUID (GPT stands for GUID Partition Table).

“On an MBR disk, the partitioning and boot data is stored in one place. If this data is overwritten or corrupted, you’re in trouble. In contrast, GPT stores multiple copies of this data across the disk, so it’s much more robust and can recover if the data is corrupted. GPT also stores cyclic redundancy check (CRC) values to check that its data is intact — if the data is corrupted, GPT can notice the problem and attempt to recover the damaged data from another location on the disk. MBR had no way of knowing if its data was corrupted — you’d only see there was a problem when the boot process failed or your drive’s partitions vanished.”

exFAT was released in 2006 as well, but Microsoft added backwards-compatibility to previous Windows versions from before Vista. The main benefit to it is that it doesn’t have the file size restrictions of FAT32, so individual files with exFAT can be larger than 4GB each. It probably isn’t super important for smaller files, but it could be a necessity for people working on larger files like videos or disk images.

Below is a step-by-step procedure for formatting a large External USB drive which can be used by both a Mac and a PC. This setup will utilize the newest, most fault-tolerant partition tables, and allows for the largest volume and file size capabilities. In my case I am formatting an 8TB Seagate Backup Plus+ USB 3.0 external HDD hard drive.

First, plug a new USB drive into a Mac:

  1. The Mac will automatically prompt if you want to use the drive as a Time Machine backup Disk – click “Don’t Use”
  2. Open Disk Utility
  3. On the left side of Disk Utility, under External, you should see your drive listed.
  4. Select the “highest-level” of the drive, not the partitions located underneath. In my case, Seagate Backup+ Desk Media.PC Mac External drive format (1)
  5. At the top of Disk Utility, click the “Erase” button.PC Mac External drive format (2)
  6. Name your disk, such as “JC-External”.
  7. Under “Format” drop-down menu, select “ExFAT”
  8. Under “Scheme” drop-down menu, select “GUID Partition Map”PC Mac External drive format (3)
  9. Click “Erase”
  10. Once the drive has been erased, again, Time Machine will prompt to use as a backup disk – select “Don’t Use”PC Mac External drive format (4)
  11. Click “Done”
  12. Your drive should now be listed under Devices in the Finder.PC Mac External drive format (5)
  13. Control-click or right-click on the device in the Finder, and click “Get Info”.  You can see that indeed it created an 8TB ExFAT Volume, but the Sharing and Permissions cannot be modified. Permissions can only be set if the drive is formatted with  “OS X Extended”. Also, notice that the Created/Modified dates may not be accurate, however, files and folders contained in the drive will display accurate modified dates/times.PC Mac External drive format (6)
  14. One thing to note, is after initially formatting the drive on a Mac, and then attaching the external drive to a Windows 10 PC, the drive may not immediately display with a drive letter by default in the Windows File Explorer. Go into Windows 10 Disk Management and find the drive listed in the discovered drives, but you may find that a drive letter is not associated with the volume.
  15. To fix this, in Disk Management, right-click on the large/unidentified new data volume and click “Change Drive Letter and Paths…”. Next, click the Add.. button, assign a drive letter (D:) and then OK. You should now find your external drive listed in Windows Explorer and see the files and folders you copied into it while it had been connected to your Mac.

OS X new domain migration – retaining user profile with terminal commands

If you’ve been tasked with the domain migration of a number of OS X El Capitan and Mavericks iMacs or MacBook Pro or Mac Air workstations, you may need to retain the user profiles. Normally, when unbinding, and then binding to a new domain, your user’s settings will be lost. You may be tempted to use Migration Assistant, but this usually requires copying the entire profile somewhere else which can take a long time and use a lot of disk space.

With this list of steps, you can use commands, scripting, and setting permissions and ownership of the user directories to perform the domain migration in-place.

Below is the sequence of commands and workflow step by step to migrate an OS X mac to a different domain. The key is to delete the sqlindex files, and prepare the user account for it’s new permissions. Please note the guide may not make sense at first while reading, but it will allow you to migrate your macs so that the users keep their same profile. Let me know if this guide helps you in your domain migration and if you find any better solutions.

Tasks Commands
1 Login as admin user and list users  Terminal -> ls -alh /Users/
2 move domain User folders to .old sudo mv /Users/johndoe /Users/johndoe.old
3 Unbind Machine  Preferences->Accounts->Login Options->Network account server -> Directory utility ->Active directory->Unbind
4 Delete sqlindex files found in ls /var/db/dslocal/nodes/Default/ sudo rm -f /var/db/dslocal/nodes/Default/sqlindex
sudo rm -f /var/db/dslocal/nodes/Default/sqlindex-shm
sudo rm -f /var/db/dslocal/nodes/Default/sqlindex-wal
5 reboot sudo reboot
6 Bind to new domain Preferences->Accounts->Login Options->Network account server -> Directory utility ->Active directory->Unbind
7 reboot
8 login as user
9 Logout and login as admin
10 move User folder .new After you have logged in as the user under the new domain you need to move the newly created User home folder to johndoe.new and move the .old User folder to /Users/johndoe with the command:
sudo mv /Users/johndoe /Users/johndoe.new
11 move .old to new username sudo mv /Users/johndoe.old /Users/johndoe
12 Change ownership of user home folder sudo chown -R johndoe:”Domain\Domain Users” /Users/johndoe
13 logout as admin
14 Reboot
15 login as that user (johndoe)
16 Click on “Create a new keychain” much easier in El Capitan and Yosemite If “Create new Keychain” fails then goto Keychain Access –> Preferences –> Reset Default Keychain

Windows 10 Best Free Video Screen Capture Open Broadcaster Software Install Tutorial

This video demonstrates how to use Open Broadcaster Software for capturing your desktop into a record-able video. OBS is free software that you can also use to record your gaming sessions to never miss that moment during your computer game. Here is a good post on Reddit.com describing how to set up OBS for capturing your game with a 20 second “buffer” so you can show your frags on youtube or convert them to a gif. But for now, below I put together a tutorial on how to setup OBS to record your desktop screen and audio to make videos like the one here:


Microsoft Bizspark – free business software for 3 years

If you’re thinking about which cloud service to use for a startup business, Microsoft just upped the ante with BizSpark.

Microsoft BizSpark https://www.microsoft.com/bizspark#start-two is really an amazing deal for business start-ups. If you wish you could get Microsoft software for free or for a huge discount check out their offer. BizSpark offers the following services and software for free for three years:

BizSpark gives startups 3 years of free stuff – software, services, tech support, and Azure cloud. Your startup qualifies if it is less than 5 years old, is privately held, and earns less than $1M annually. And at the end of your 3 years, you keep all the software you’ve downloaded – at no cost.

To expand on this service what you get with the Microsoft Bizspark details are the following:

Get up to $750 per month of FREE Azure cloud services for 3 years; that’s $150 per month each for up to 5 developers.

This potentially is a $27000 value!

Membership puts all Microsoft development and test software at your fingertips, including Azure, Windows, and Office 365 – for free. Plus, enjoy access to hundreds of free training classes, technical content, and 4 break-fix phone support incidents to help you on your journey.

It’s pretty amazing that BizSpark, in addition, also offers up to $120,000 worth of Azure credit.

Makes me want to go out and start a new business – hmm, maybe jasoncoltrin.com would qualify?

Moodle 2.4 – Recover uploaded course files from server even if corrupt

If for example, a new faculty member does not have the original files for an old moodle course, and the files uploaded to moodle the last semester are corrupt, you still can extract the files from a backup of the course with a tool I found here: DownloadAll

(DownloadAll.jar – cudos and thank you to OP Veronica Liesaputra !):

In order to extract all files from a course backup mbz file, please follow the guide below. Even if the files that were uploaded and are corrupt, and cannot be viewed/downloaded in moodle, you may be able to download the originals, repair the files, and then re-upload to moodle again:

    1. Go into the course where files are located (may be in an old location, even though current/copied course is valid with same corrupt files)
    1. Backup the course without user data. An mbz file will be generated. Copy this file to a Windows computer eg. c:\Users\jcoltrin\Desktop\moodlebackups\coursename.mbz
    1. Copy the linked jar script to the same folder
  1. Make sure 7zip is installed. Extract all the files in the mbz file to a directory with the same name just under the location of the mbz file. The script will not work unless you first extract all the files! For example, your folder structure will now look like this:
   Desktop\
     moodlebackups\
          DownloadAll.jar
          backup-moodle2-course-269-1509-bus302-va-20160114-1-28-nu.mbz
          backup-moodle2-course-269-1509-bus302-va-20160114-1-28-nu\
                   activities\
                   course\
                   files\
                         1b\
                              1b23cd2aaf9c0e8829407fc46c6b4b4c4f8d1a7c
                         3d\
                              3ddb69ac1035d0a51c4d1a3e767391d21f70c895
                   sections\
                   files.xml\

… This step may take a little bit of cut/paste as the mbz file has to be extracted twice with 7zip.

    1. Run the DownloadAll.jar script with the command java -jar DownloadAll.jar (PS C:\Users\jcoltrin\Desktop\moodlebackups> java -jar DownloadAll.jar)
  1. You’ll be prompted to enter the full path to the mbz file: “Enter the full path location to the Moodle’s backup (.mbz) file, e.g. C:/Users/Moodle/Backup/backup-moodle2-course-592-nu.mbz” – so in this case, I used: C:\Users\jcoltrin\Desktop\moodlebackups\backup-moodle2-course-269-1509-bus302-va-20160114-1028-nu.mbz

Output should return the names of the files that are recovered and start extracting (files even though errors occur):

       C:\Users\jcoltrin\Desktop\moodlebackups\backup-moodle2-course-269-1509-bus302-va-20160114-1028-nu created
       IOError :java.util.zip.ZipException: error in opening zip file
       Copy C:\Users\jcoltrin\Desktop\moodlebackups\backup-moodle2-course-269-1509-bus302-va-20160114-1028-nu\files\74\74ada129
       b720c6266753b54e5c5af614274bfcfe to C:\Users\jcoltrin\Desktop\moodlebackups\backup-moodle2-course-269-1509-bus302-va-201
       60114-1028-nu\Legal StructureLawsuits .pdf
       Copy C:\Users\jcoltrin\Desktop\moodlebackups\backup-moodle2-course-269-1509-bus302-va-20160114-1028-nu\files\6d\6db0919b
       e36df971bd7780defd8802ba119d4e80 to C:\Users\jcoltrin\Desktop\moodlebackups\backup-moodle2-course-269-1509-bus302-va-201
       60114-1028-nu\Sample-Negligence-Complaint.html

7. Once files have completed Extracting, gather the files and distribute as necessary.

8. In this case, many of the files that were corrupt in moodle had contained spaces in the filenames. I find that files uploaded to moodle work best with filenames that do not contain spaces or special characters. Also it’s smart to test opening each file in moodle first, to make sure repairs and download actions for each file work correctly.